SL93R - Range hood InAlto - Free user manual and instructions
Find the device manual for free SL93R InAlto in PDF.


| Product Type | Range Hood |
| Brand | InAlto |
| Model | SL93R |
| Width | 90 cm |
| Depth | 50 cm |
| Height | 30 - 40 cm (adjustable) |
| Weight | Approx. 15 kg |
| Power Supply | 220-240 V, 50/60 Hz |
| Maximum Airflow | Approx. 600 m³/h |
| Noise Level | < 65 dB(A) |
| Lighting | LED bulbs (2 x 3 W) |
| Number of Fan Speeds | 3 speeds + boost |
| Control Type | Electromechanical buttons |
| Filter Type | Aluminum grease filter (washable) |
| Duct Outlet Diameter | 150 mm |
| Installation Type | Wall-mounted, ducted or recirculating |
| Energy Class | A+ |
| Safety Features | Overheat protection, child lock |
| Maintenance | Clean grease filter monthly; replace carbon filter if recirculating |
| Spare Parts | Grease filter, carbon filter, LED bulbs |
Frequently Asked Questions - SL93R InAlto
User questions about SL93R InAlto
0 question about this device. Answer the ones you know or ask your own.
Ask a new question about this device
Download the instructions for your Range hood in PDF format for free! Find your manual SL93R - InAlto and take your electronic device back in hand. On this page are published all the documents necessary for the use of your device. SL93R by InAlto.
USER MANUAL SL93R InAlto
E info@residentiagroup.com.au
W residentiagroup.com.au
ACN 600 546 656
Residentia Group
PO Box 581
Stanhope Gardens
NSW Australia 2768
Dear Customer, Congratulations on purchasing your new rangehood.
The Residentia brand is proudly distributed within Australia by Residentia Group Pty Ltd.
Please refer to the warranty card at the rear of this manual for information regarding your product's parts and labour warranty, or visit us online at www.residentiagroup.com.au.
At Residentia Group, we are customer obsessed and our Support Team are there to ensure you get the most out of your appliance. Should you want to learn more about optional accessories (such as carbon filters) or most importantly taking care of your rangehood when cleaning, our Support Team are here to help.
You can use our online Support Centre at anytime by visiting http://support.residentiagroup.com.au, or you can contact us via phone by dialling 1300 11 HELP (4357).
It is important that you read through the following use and care manual thoroughly to familiarise yourself with the installation and operation requirements of your appliance to ensure optimum performance.
Again, thank you for choosing a Residentia appliance and we look forward to being of service to you.
Kind Regards,
The Residentia Team
General Safety
Read this manual thoroughly before first use, even if you are familiar with this type of product. The safety precautions enclosed herein reduce the risk of fire, electric shock and injury when correctly adhered to. Keep the manual in a safe place for future reference, along with the completed warranty card and purchase receipt. If applicable, pass these instructions on to the next owner of the appliance.
Always follow basic safety precautions and accident prevention measures when using an electrical appliance, including the following:
Important installation advice
WARNING: All electrical work associated with the installation of this rangehood must be carried out by a licensed electrician.
WARNING: This rangehood must be installed by a suitably qualified person in strict accordance with all instructions in this manual.
Cables: Do not allow electrical fittings or cables to come into contact with areas on the associated equipment (cooktop or stove) that get hot.
Air discharge: The exhaust air must not be discharged into a flue which is used for exhausting fumes from appliances burning gas or other fuels.
External air evacuation: Make sure to follow your local laws that apply to external air evacuation when installing and using the rangehood.
Electrical safety and cord handling
Voltage and frequency: Before plugging the unit into an appropriate electrical outlet, make sure your outlet voltage and circuit frequency correspond to the voltage stated on the appliance rating label.
Power cord: Check the cord regularly for damage. Do not use the appliance if the cord, or any other part of the appliance, has been damaged.
Damaged cord: A damaged cord must be replaced by the manufacturer or a similarly qualified person in order to avoid a hazard.
Disconnect: Before cleaning the rangehood, make sure to switch it off and unplug it from the electrical supply. Do not disconnect the appliance with wet hands. Grip by the plug, do not pull by the cord when disconnecting.
Usage conditions and restrictions
Domestic use only: This rangehood is designed for indoor domestic use only. It can be built into a standard kitchen cabinet or housing unit following the installation instructions in this manual.
Intended purpose: Only use this rangehood for its intended purpose, in its intended environment and as described in this manual. Any other use may cause fire, electric shock or injury.
Use common sense: These instructions are not intended to cover every possible condition and situation. As with any electrical household appliance, common sense and caution are therefore always recommended when installing, operating and maintaining the equipment.
General Safety Cont.
Usage restriction: This rangehood is not intended for use by persons (including children) with reduced physical, sensory or mental capabilities, or lack of experience and knowledge, unless they have been given supervision or instruction concerning use of the appliance by a person responsible for their safety.
Children: Supervise young children to ensure they do not play with the appliance. Close supervision is necessary when any appliance is used by or near children.
No timer: The appliance is not intended to be operated by means of an external timer or separate remote control system.
CAUTION: Take care when the rangehood is operating simultaneously with an open fireplace or burner that depend on air from the environment and are supplied by other than electrical energy, as the rangehood removes air from the environment which a burner or fireplace needs for combustion.
Ventilation: The rangehood removes air from the environment during use. Always provide adequate ventilation for safe operation of the rangehood. This is particularly important when the rangehood is used at the same time as flued heaters burning gas or other fuels.
CAUTION: No open flame cooking: Do not use an open flame for cooking underneath this rangehood. Open flames can damage the filters and present a fire hazard.
Unattended: Do not leave the rangehood unattended during use.
After use: Make sure to switch off the rangehood after use and before cleaning.
CAUTION: Do not touch the light bulbs after the appliance has been used as they may be hot. Let them cool down before cleaning and maintenance.
WARNING: Fire Risk! Clean your rangehood regularly as instructed in this manual. There is a fire risk if cleaning is not carried out in accordance with the instructions.
Cleaning: Do not use steam cleaning equipment for cleaning any part of the rangehood.
Filters: Do not check the status of the filters while the rangehood is in use.
Damage: Do not use the rangehood if any part, including the supply cord, has been damaged, is faulty or does not work properly. Only have it repaired by an authorised service centre. Incorrect repair could expose you to the risk of electric shock, fire or injury. Prolonged use of the unit in such conditions could cause fire or electrocution. In case of damage, contact our after sales support line for advice.
Liability: We assume no liability for any eventual damages caused by incorrect installation, misuse of the product or noncompliance with these instructions.
Product Overview
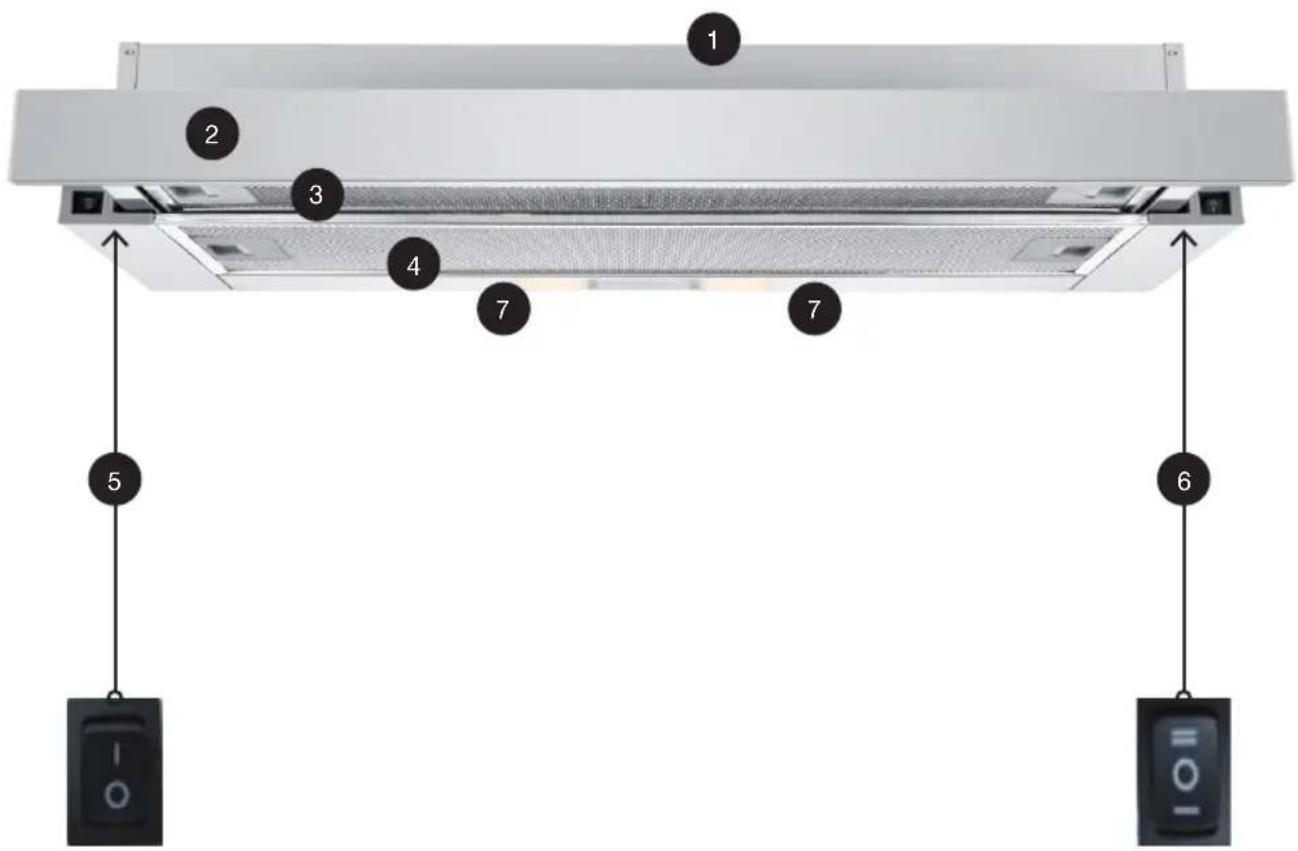
Key to Product Overview
1 Rangehood housing
2 Slide-out Front Fascia Rail
3 Inner Aluminium Grease Filter
4 Outer Aluminium Grease Filter
5 On/Off Switch
6 Fan Speed Switch
7 Light
Installation
Installation Kit
The installation kit contains the following parts:
| Part ID Description Illustration Qty | |||
| 1 Rangehood | 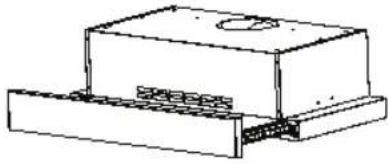 | 1 | |
| 2 | Rear-underside support mounting bracket | 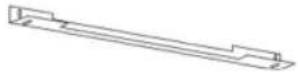 | 1 |
| 3 40mm Height Front Fascia Rail | 1 | ||
| 4 | Charcoal Filters—Already installed | 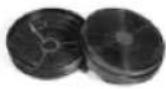 | 1 set(2 pcs) |
| 5 Screws (ST4 x 30mm) 6 | 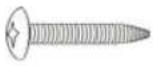 | ||
| 6 Screws (ST4 x 8mm) | 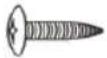 | 2 | |
| 7 Wall Plugs (8mm) | 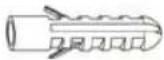 | 6 | |
| 8 Flat Washers | 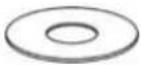 | 6 | |
| 9 | Front Vent Cover—If external ducting selected |  | 1 |
| 10 Flu Outlet Adapter | 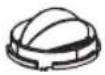 | 1 | |
Installation Cont.
Unpacking
- This product has been packaged to protect it against transportation damage. Unpack the appliance and remove all packaging materials from around the rangehood. Keep all packaging materials until you have made sure your new rangehood is undamaged and in good working order. The carton is recyclable. Whenever possible, reuse the carton and recycle it when disposing of the packaging materials.
- Plastic wrapping can be a suffocation hazard for babies and young children, so ensure all packaging materials are out of their reach, and dispose of them safely.
Important installation advice
WARNING!
- All electrical work associated with the installation of this rangehood must be carried out by a licensed electrician.
- This rangehood must be correctly installed by a suitably qualified person in strict accordance with all applicable rules and regulations and following the instructions in this manual.
- Do not try to install the rangehood yourself; doing so will expose you to danger and void the warranty. Improper installation, adjustment, alteration or service can cause injury or damage. We decline any responsibility for injury or damage, to persons or property, as a result of improper installation.
Before Installation:
Before Installation, please decide the extraction mode with the adjuster on the motor (Fig. 1).
Rangehood standard configuration
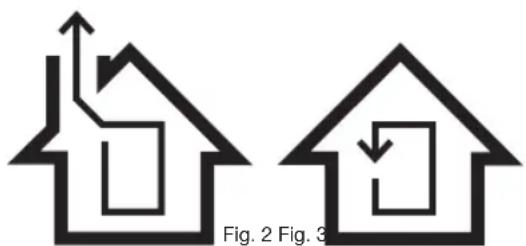
This product has been supplied with “recirculation mode” as the default setting. The rangehood is suitable for both recirculation (Fig 3.) and external ducting (Fig. 2) modes
natural_image
Two house diagrams with arrows indicating airflow or movement, labeled Fig. 2 and Fig. 3 (no text or symbols on diagrams)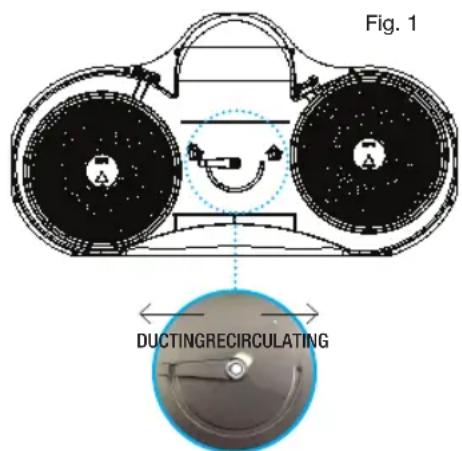
External Outdoor Ducting Mode
- Recommended wherever possible for optimal performance
If you have chosen to operate your rangehood in “External Outdoor Ducting Mode” you will need to follow the steps below:
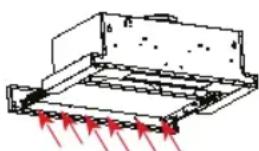
- Unscrew the 80mm fascia rail which is already installed on the rangehood (Fig. 4)
- Using the same screws, attach the 40mm fascia rail (part ID 3, Installation Kit) supplied in the box
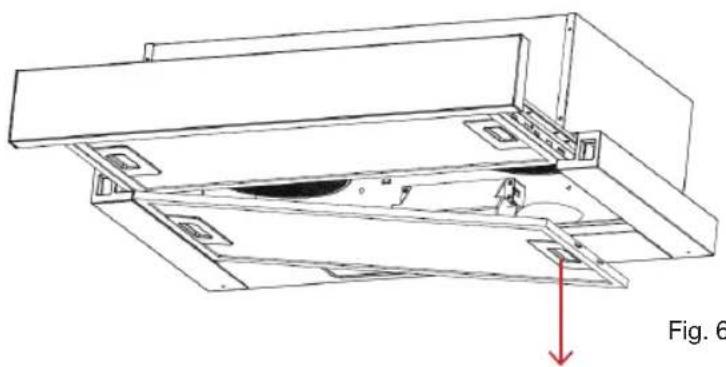
- Remove the aluminium grease filters (Fig 6. on page 10) from the underside of the rangehood. Turn the switch in the centre of the motor housing to "External Outside Ducting" position (Fig. 1)
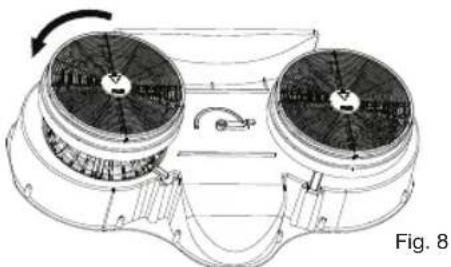
- Remove the charcoal filters by twisting anti-clockwise (Fig. 8 on page 11). The charcoal filters are not required for “external outdoor ducting mode”
- Clip in the plastic Front Vent Cover (part ID 9, installation kit) over the vent holes on the front of the rangehood.
- Using the screws provided, install the Flu Outlet Adaptor (Part ID 10, Installation kit) to the top of the rangehood
- Install the ducting pipe (not supplied) to the outlet on the top of the rangehood and vent to external air. It is recommended that the ducting pipe is 120mm in diameter.
natural_image
Diagram of a mechanical device with red arrows indicating force or movement (no text or symbols)Fig. 4
Installation Cont.
White Plastic Cover
- When choosing the outdoor exhausting mode, you can cover the front outlet (part ID 9) with the white plastic cover. (fig. 5).
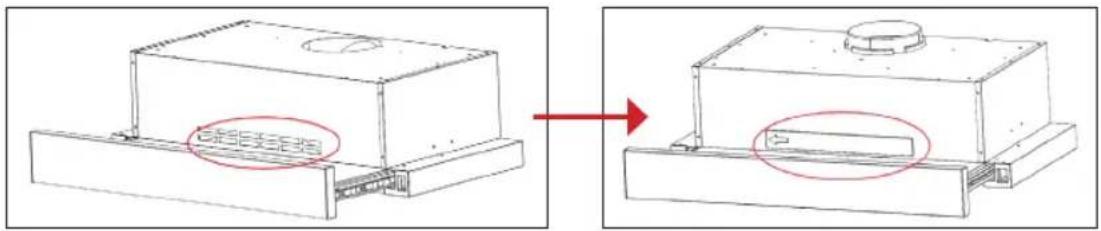
Fig. 5
Recirculation Mode
This mode is the default setting. The rangehood will operate with carbon filters and vent the air back into the kitchen.
To ensure that the mode is correct, remove the grease filters (see Fig. 6) and check that the switch is in "Recirculation mode" position (Fig. 1).
natural_image
Technical line drawing of a mechanical assembly with no visible text or symbolsCharcoal filters
- If you intend to use the rangehood with the air recirculating back into the kitchen, it is important that you use the charcoal filters that are already installed to prevent the odours generated through cooking from being vented back into the kitchen.
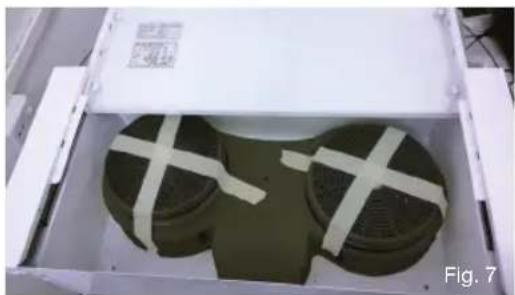
- Before installing the rangehood into the cabinet, please remember to remove the adhesive transit support tape on the carbon filters first (Fig. 7).
natural_image
White box containing two circular film strips with white tape, no visible text or symbols on the strips or background.Installation Cont.
Removing and Installing Charcoal filters
To remove the charcoal filters you will first need to remove the grease filters (see Fig. 6), now twist anti-clockwise and pull down as shown in Fig. 8.
natural_image
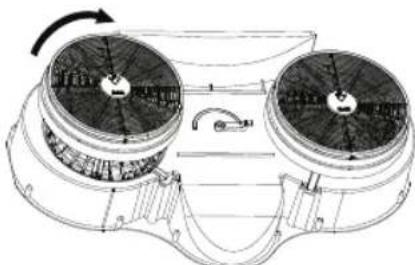
Technical line drawing of a fan or compressor unit with two fans and a central hub, showing internal components and airflow direction (no text or symbols)To install new charcoal filters you will need to first remove the grease filters (Fig. 9), now align the charcoal filters with the centre of the motors, twist clockwise (Fig. 9) and push upwards until they lock into place.
natural_image
Technical line drawing of a dual fan or fan assembly with rotating components (no text or symbols)Fig. 9
Installation height:
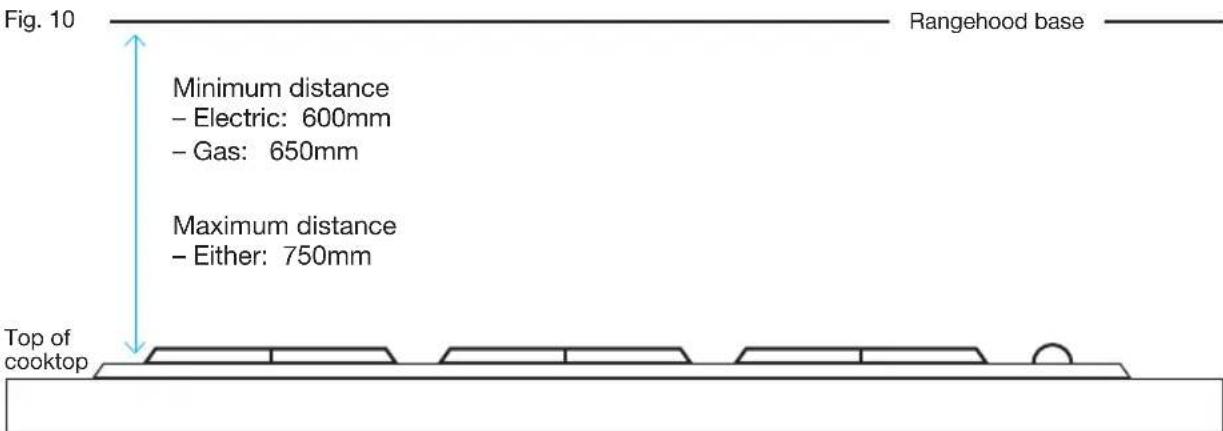
For optimum performance, it is recommended that the rangehood be installed at a height of between 650-750mm from the cooking surface. See Fig. 10 for detailed AS/NZS minimum distance requirements.
Rear-mounting to the wall
- Using a spirit level, mark a horizontal line on the wall where the rangehood base will be, observing all necessary clearances (Fig. 10). Check the required clearances in your cooktop/stove manual and, should they be greater than those specified in Fig. 10, make sure to observe them.
Installation Cont.
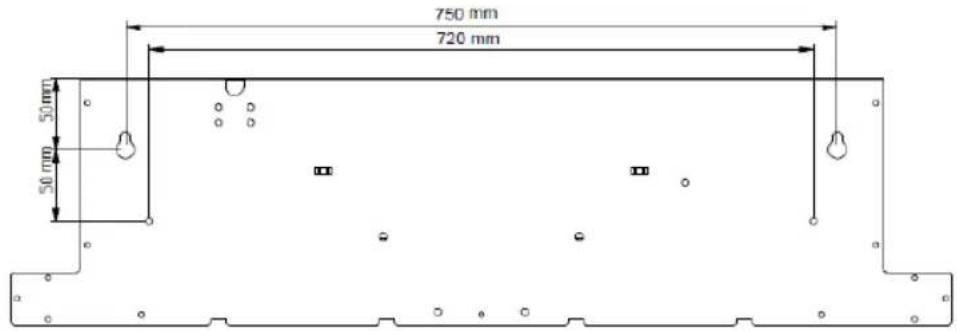
- Drill 4 holes of ∅8mm on the wall, as illustrated below (Fig. 11).
- Hammer the wall plugs into the holes, then insert two ST4x30mm screws into the lower wall plugs. Tighten the screws, but leave a 2mm gap so that you can hang the rangehood on the screws in the keyhole slots.
- Hang the hood to the wall screws, and make sure the hood is in balance and positioned correctly.
• Take away the Aluminum Filters, mark and drill another 2 holes of ∅8mm on the wall. (Safety Screw Holes) - Take back the hood and hammer the wall plugs, hang the hood again and fix the hood with two ST4x30mm screws.
WARNING: Failure to install the screws or fixing device in accordance with these instructions may result in electrical hazards!
Fig. 11
Top-mounting in a cabinet
- Determine where in the top cabinet you want to install the rangehood, then drill 4 holes of ∅4mm at the bottom of the hanging board of your cabinet (Fig. 12).
Fig. 12
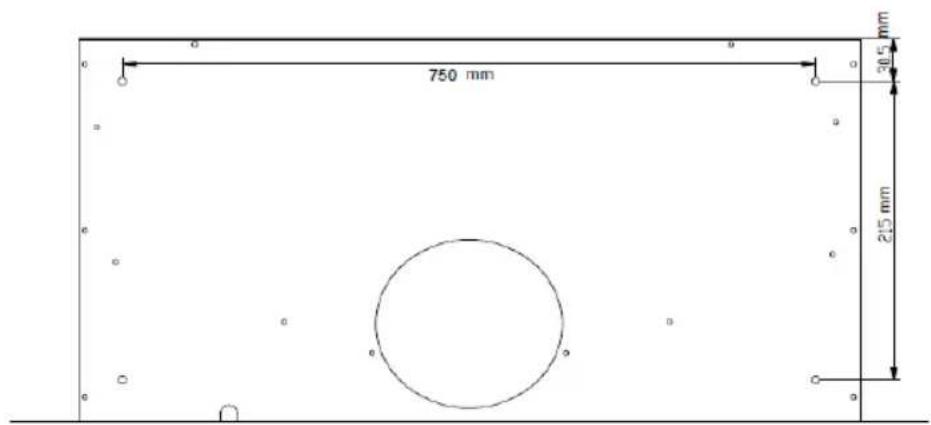
Installation Cont.
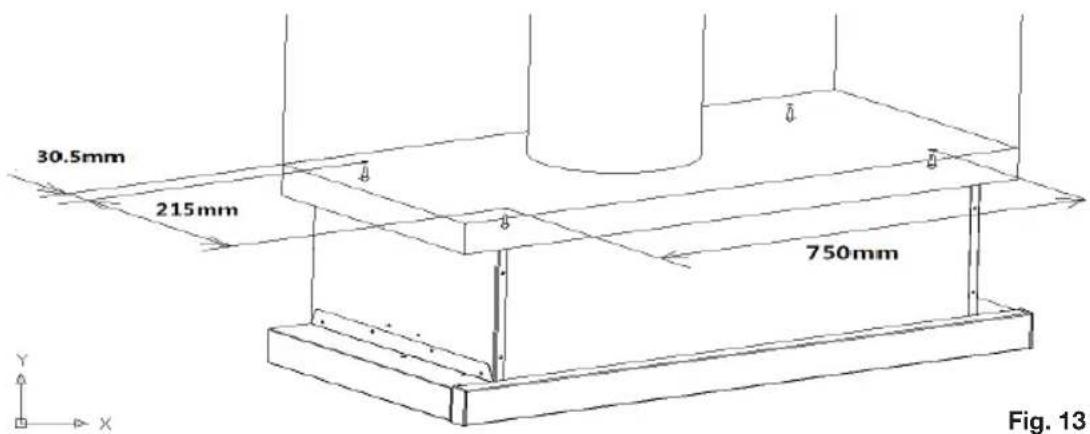
- Install the rangehood onto the bottom of the cupboard and secure it in place with four ST4x30mm screws (Fig 13).
- If there is a space between the wall and the rear of the rangehood, install the rear-underside support mounting bracket (Part ID 2, Installation kit) using the two ST4x8mm screws.
WARNING: Failure to install the screws or fixing device in accordance with these instructions may result in electrical hazards!
Instructions
NOTE: After the rangehood has been properly installed, insert the power plug into an appropriate electrical outlet and let the unit run for a few minutes prior to using it while cooking.
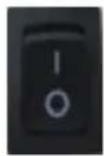
This switch is to turn the rangehood either on or off.
I Turns the rangehood ON
O Turns the rangehood OFF
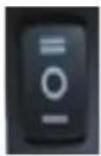
This button toggles between fan speed high, fan speed low and off setting
= Turns on the fan motors to high speed for maximum extraction
o Turns off the fan motors for no extraction, the fan motors are off
- Turns on the fan motors to low speed minimum extraction
NOTE:
- The rangehood will only operate once the slide-out rail is pulled outwards towards the kitchen.
- Close the front panel and the rangehood will stop working.
- The next time the front panel is pulled back out, the rangehood will start working at the previously set level.
FAQs
Troubleshooting guide
If you experience problems with your rangehood, or it appears not to be operating correctly, check in the list below for answers to frequently asked questions. If none of the solutions offered help you solve your problem, please contact our after sales support line for advice.
Do not attempt to repair the appliance yourself!
| Problem Possible Cause Solution | ||
| The extractor fan ceases to function. | There is no electrical current in the network. | Check with other appliances that your electricity supply is in working order. |
| There is insufficient suction power. | Wrong suction speed has been selected, or the air outlet is blocked. | Select suction speed “II” if speed “I” was selected. |
| The charcoal filter needs to be replaced. The charcoal filter needs to be replaced if food smells start to become noticeable within your kitchen. | ||
| If the rangehood is installed to vent outside, check that the ducting and outlets are free of blockages. | ||
| Make sure your kitchen is adequately vented to allow the entry of fresh air. | ||
| The rangehood has switched off during operation. | The safety cut-out device has been tripped. | Turn off the rangehood and wait for the device to reset. |
| If the rangehood has been installed below the height levels indicated in the “Installation” section, the motor will cut out frequently, which may damage the rangehood. | ||
| The bulbs do not light up. The bulbs | are loose, or burnt out. | Tighten the bulbs, or replace them, if necessary. |
Other Useful Information
Cleaning and maintenance
CAUTION!
- Before cleaning the rangehood or carrying out maintenance, make sure the operation and light switches are set to the "0" position and the rangehood is disconnected from the power supply.
- It is important to clean the filters regularly as oil and food residues can become a fire hazard.
- Never use a steam cleaner to clean any part of the rangehood.
Cleaning the rangehood exterior
Wipe the exterior surface of the rangehood regularly using a soft cloth moistened with a household solvent such as methylated spirits, or with a sponge dampened with water and a little non-abrasive liquid detergent.
Cleaning the grease filters
The aluminium mesh filters must be cleaned regularly in order to prevent a fire hazard. Regular cleaning also ensures better efficiency, as grease and grime can impede the airflow. We recommend cleaning them at least every two months.
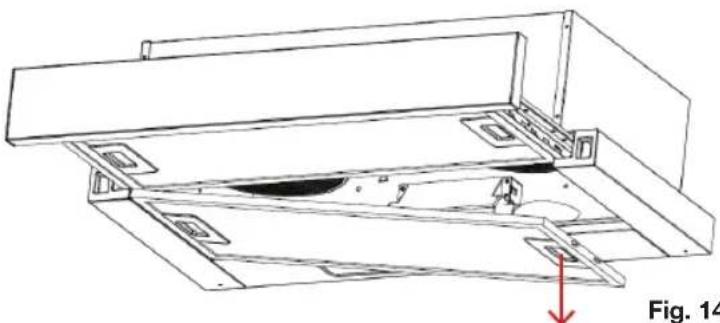
- Push in the plastic opening latch and take the filters out of their frames (Fig. 14).
natural_image
Technical line drawing of a mechanical assembly with no visible text or symbols- Wash the filters thoroughly in warm, soapy water, leaving them to soak for best results. Rinse with warm water and leave to dry.
NOTE: The aluminum panels may slightly change colour after several washes. This is not a fault and no cause for concern. It does not affect performance and does not warrant replacement of these parts.
Charcoal filters
If you are using the rangehood with the air recirculating back into the room, the charcoal filters which were supplied with the rangehood would have already been installed.
A charcoal filter absorbs cooking odours and must be changed regularly. How often you need to change the filters depends on your usage. We recommend changing them every three to six months. An activated charcoal filter cannot be washed or recycled; it must be replaced with a new one.
To obtain replacement filters, contact our after sales support line and arrange for purchase (see page 18 for details).
NOTE: The suction power will be lowered with charcoal filters installed.
To remove and/or install new filters, please see page 11.
Other Useful Information Cont.
Replacing a light bulb
If the light bulb needs replacing, proceed as follows:
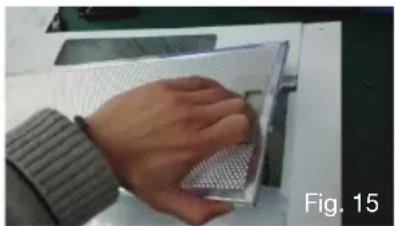
- Slide out the front panel for easier access and remove the two aluminium mesh filters (Fig. 15).
- Carefully turn the bulb in anticlockwise direction and remove (Fig. 16).
- Replace the bulb with one of the same type and wattage (E14, 28W), as illustrated below (Fig. 17).
natural_image
Close-up of a hand using a transparent plastic device to press or install a grid-patterned object (no visible text or symbols)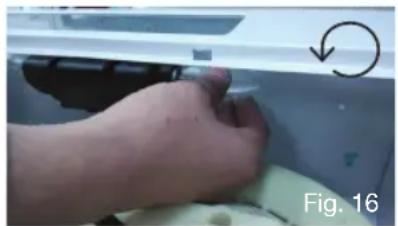
natural_image
Close-up of a hand pressing down on a mechanical component, labeled Fig. 16 (no text or symbols on the object itself)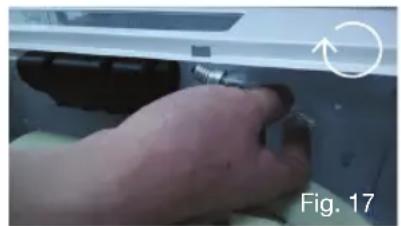
natural_image
Close-up of a hand pressing a button on a device component, labeled Fig. 17 (no readable text or symbols)Spare parts
Our after sales support centre stocks a wide range of spare parts for the SL63R Rangehood. To purchase a part, call the centre on 1300 11 43 57 or email us at support@residentiagroup.com.au
| Blower | Charcoal filter | Connection box and bar |
| Ducting | Switch | Slider |
| Lamp and lamp holder | Motor | Outlet |
| Reflector | Filter (aluminium mesh, inner and outer) | |
Specifications
| Rated voltage / frequency 220-240VAC 50/60Hz | |
| Dimensions (H×W×D) 176mm ×899mm × 278mm | |
| Extended depth 278-472mm | |
| Height of front panel 40mm/80mm | |
| Weight 10.5kg | |
| Motor power 2 × 100W | |
| Lamp power 2 × 28W | |
| Total input power 256W | |
| Housing Painted white with stainless steel trim | |
| Filters 2 Aluminium mesh filters | |
| Accessories supplied 1 Set of charcoal filters |
This product complies with AS/NZS 60335.2.31:2004+A1:2006
+A2:2007+A3:2009+A4:2010 for electrical safety, and with EN 55014-1:2006+A1:2009+A2:2011 for electromagnetic compatibility.
Responsible disposal
At the end of their working life, do not throw any of these appliances out with your household rubbish. Electrical and electronic products contain substances that can have a detrimental effect on the environment and human health if disposed of inappropriately. Observe any local regulations regarding the disposal of electrical consumer goods and dispose of it appropriately for recycling. Contact your local authorities for advice on recycling facilities in your area.
Purchase Details\
For your records, please record details of your
purchase below and staple your receipt to the page.
Store details
Store name
Address
Telephone
Purchase date
Product details
Model no.
Serial no.*
Warranty\
Warranty terms and conditions Cooking appliances (rangehoods)
This document sets out the terms and conditions of the product warranties for Residentia Group Appliances. It is an important document. Please keep it with your proof of purchase documents in a safe place for future reference should you require service for your Appliance.
1. In this warranty
(a) ‘acceptable quality’ as referred to in clause 10 of this warranty has the same meaning referred to in the ACL;
(b) 'ACL' means Trade Practices Amendment (Australian Consumer Law) Act (No.2) 2010;
(c) ‘Appliance’ means any Residentia Group product purchased by you accompanied by this document;
(d) 'ASR' means Residentia Group authorised service representative;
(e) 'Residentia Group' means Residentia Group Pty Ltd of Studio 5, 1/32 Wangaratta Street Richmond VIC 3121, ACN 600 546 656 in respect of Appliances purchased in Australia;
(f) 'major failure' as referred to in clause 10 of this warranty has the same meaning referred to in the ACL and includes a situation when an Appliance cannot be repaired or it is uneconomic for Residentia Group, at its discretion, to repair an Appliance during the Warranty Period;
(g) 'Warranty Period' means:
(i) where the Appliance is used for personal, domestic or household use (i.e. normal single family use) as set out in the instruction manual, the Appliance is warranted against manufacturing defects for 24 months, following the date of original purchase of the Appliance;
(h) 'you' means the purchaser of the Appliance not having purchased the Appliance for resale, and 'your' has a corresponding meaning.
-
This warranty only applies to Appliances purchased and used in Australia and is in addition to (and does not exclude, restrict, or modify in any way) any non-excludable statutory warranties in Australia.
-
During the Warranty Period Residentia Group or its ASR will, at no extra charge if your Appliance is readily accessible for service, without special equipment and subject to these terms and conditions, repair or replace any parts which it considers to be defective. Residentia Group or its ASR may use remanufactured parts to repair your Appliance. You agree that any replaced Appliances or parts become the property of Residentia Group. This warranty does not apply to light globes, batteries, filters or similar perishable parts.
-
Parts and Appliances not supplied by Residential Group are not covered by this warranty.
-
You will bear the cost of transportation, travel and delivery of the Appliance to and from Residentia Group or its ASR. If you reside outside of the service area, you will bear the cost of:
(a) travel of an authorised representative;
(b) transportation and delivery of the Appliance to and from Residentia Group or its ASR, in all instances, unless the Appliance is transported by Residentia Group or its ASR, the Appliance is transported at the owner's cost and risk while in transit to and from Residentia Group or its ASR.
-
Proof of purchase is required before you can make a claim under this warranty.
-
You may not make a claim under this warranty unless the defect claimed is due to faulty or defective parts or workmanship. Residentia Group is not liable in the following situations (which are not exhaustive):
(a) the Appliance is damaged by: (i) accident
(ii) misuse or abuse, including failure to properly maintain or service
(iii) normal wear and tear
(iv) power surges, electrical storm damage or incorrect power supply
(v) incomplete or improper installation
(vi) incorrect, improper or inappropriate operation
(vii) insect or vermin infestation
(viii) failure to comply with any additional instructions supplied with the Appliance;
(b) the Appliance is modified without authority from Residentia Group in writing;
(c) the Appliance's serial number or warranty seal has been removed or defaced;
(d) the Appliance was serviced or repaired by anyone other than Residentia Group, an authorised repairer or ASR.
- This warranty, the contract to which it relates and the relationship between you and Residentia Group are governed by the law applicable where the Appliance was purchased.
- To the extent permitted by law, Residentia Group excludes all warranties and liabilities (other than as contained in this document) including liability for any loss or damage whether direct or indirect arising from your purchase, use or non use of the Appliance.
- For Appliances and services provided by Residentia Group in Australia, the Appliances come with a guarantee by Residentia Group that cannot be excluded under the Australian Consumer Law. You are entitled to a replacement or refund for a major failure and for compensation for any other reasonably foreseeable loss or damage. You are also entitled to have the Appliance repaired or replaced if the Appliance fails to be of acceptable quality and the failure does not amount to a major failure. The benefits to you given by this warranty are in addition to your other rights and remedies under a law in relation to the Appliances or services to which the warranty relates.
- At all times during the Warranty Period, Residential Group shall, at its discretion, determine whether repair, replacement or refund will apply if an Appliance has a valid warranty claim applicable to it.
- To enquire about claiming under this warranty, please follow these steps:
(a) carefully check the operating instructions, user manual and the terms of this warranty;
(b) have the model and serial number of the Appliance available;
(c) have the proof of purchase (e.g. an invoice) available;
(d) telephone the numbers shown below.
- You accept that if you make a warranty claim, Residentia Group and its ASR may exchange information in relation to you to enable Residentia Group to meet its obligations under this warranty.
IMPORTANT
Before calling for service, please ensure that the steps in point 12 have been followed.
Telephone contacts
▶ Service: Please call 1300 11 HELP (4357)
▶ Spare Parts: Please call 1300 11 SPARE (7727)
The Australian Consumer Law requires the inclusion of the following statement with this warranty: Our goods come with guarantees that cannot be excluded under the Australian Consumer Law. You are entitled to a replacement or refund for a major failure and for compensation for any other reasonably foreseeable loss or damage. You are also entitled to have the goods repaired or replaced if the goods fail to be of acceptable quality and the failure does not amount to a major failure.
Residentia
- General Safety
- Important installation advice
- Electrical safety and cord handling
- Usage conditions and restrictions
- General Safety Cont.
- Product Overview
- Key to Product Overview
- Installation
- Installation Kit
- Installation Cont.
- Unpacking
- WARNING!
- Before Installation:
- Rangehood standard configuration
- External Outdoor Ducting Mode
- - Recommended wherever possible for optimal performance
- White Plastic Cover
- Recirculation Mode
- Charcoal filters
- Removing and Installing Charcoal filters
- Installation height:
- Rear-mounting to the wall
- Top-mounting in a cabinet
- Instructions
- NOTE:
- FAQs
- Troubleshooting guide
- Other Useful Information
- Cleaning and maintenance
- CAUTION!
- Cleaning the rangehood exterior
- Cleaning the grease filters
- Other Useful Information Cont.
- Replacing a light bulb
- Spare parts
- Responsible disposal
- Purchase Details\
- Store details
- Product details
- Warranty\
- Warranty terms and conditions Cooking appliances (rangehoods)
- In this warranty
- IMPORTANT
- Residentia
Brand : InAlto
Model : SL93R
Category : Range hood