
UHD-VWP-1X4 - Processor BZBGear - Free user manual and instructions
Find the device manual for free UHD-VWP-1X4 BZBGear in PDF.


| Product Type | Video Wall Processor |
| Model | UHD-VWP-1X4 |
| Brand | BZBGear |
| Input Interface | 1x HDMI 2.0 |
| Output Interface | 4x HDMI 2.0 |
| Max Resolution | 3840x2160 @ 60Hz (4K UHD) |
| Supported Video Modes | Single, Split, Stretch, PIP |
| Power Supply | DC 12V / 1A |
| Power Consumption | < 12W |
| Dimensions (L x W x H) | 250 x 150 x 30 mm |
| Weight | 500 g |
| Operating Temperature | 0°C ~ 40°C |
| Housing Material | Metal |
| Mounting | Desktop or wall mount |
| Cooling | Passive (no fan) |
| Control Method | IR remote, RS232, front panel buttons |
| Firmware Update | Via USB |
| Compliance | CE, FCC, RoHS |
| Included Accessories | Power adapter, IR remote, RS232 cable, user manual |
Frequently Asked Questions - UHD-VWP-1X4 BZBGear
User questions about UHD-VWP-1X4 BZBGear
0 question about this device. Answer the ones you know or ask your own.
Ask a new question about this device
Download the instructions for your Processor in PDF format for free! Find your manual UHD-VWP-1X4 - BZBGear and take your electronic device back in hand. On this page are published all the documents necessary for the use of your device. UHD-VWP-1X4 by BZBGear.
USER MANUAL UHD-VWP-1X4 BZBGear

Safety and Notice
The BG-UHD-VWP-1X4 4K 1x4 Video Wall Processor has been tested for conformance to safety regulations and requirements, and has been certified for international use. However, like all electronic equipment, the BG-UHD-VWP-1X4 should be used with care. Please read and follow the safety instructions to protect yourself from possible injury and to minimize the risk of damage to the unit.
- Follow all instructions and warnings marked on this unit.
- Do not attempt to service this unit yourself, except where explained in this manual.
- Provide proper ventilation and air circulation and do not use near water.
- Keep objects that might damage the device and assure that the placement of this unit is on a stable surface.
- Use only the power adapter and power cords and connection cables designed for this unit.
- Do not use liquid or aerosol cleaners to clean this unit. Always unplug the power to the device before cleaning.

ESD CAUTION
TABLE OF CONTENTS
INTRODUCTION....1
FEATURES....1
PACKAGE CONTENTS.... 1
SPECIFICATIONS 2
HARDWARE INSTALLATION 3
CONNECTION DIAGRAM....3
PANEL DESCRIPTIONS 4
SUPPORTED RESOLUTION 5
The BG-UHD-VWP-1X4 4K 1x4 Video Wall Processor is a powerful, cost effective, and fully real time data/video processor for multiple flat panel displays or projectors. Virtually any setups for the display layout can be possible by the control software. The BG-UHD-VWP-1X4 allows user to input HDMI/DisplayPort up to 4K2K@60Hz 4:4:4. And the embedded scaler converts signals from HDMI/DisplayPort source to match the native resolution of monitors, flat panel displays, projectors as well as user-selectable output settings up to WUXGA (1920x1200). The BG-UHD-VWP-1X4 sends the resulting processed video thru HDMI interface to the connected monitors/projectors based on the setup display layout. The layout can be readily modified to fit your applications in digital signage, broadcasting, education and surveillance systems and optimize visual effects.
FEATURES
● Four HDMI outputs from 640x480 to 1920x1200
● Supports HDMI and DisplayPort input from 640x480 to 4K2K@60 (YUV 4:4:4), interlaced or progressive
- HDCP compliant
● DisplayPort 1.2a & HDMI 2.0a compliant
- Image parameters and layouts are automatically saved in flash memory of the device and can be recalled for later use
● Several image parameters and layouts can be saved in computers and can be loaded for later use
● Firmware upgradable for new features and technology enhancements
- The video wall processor can control by USB, push button, Ethernet, IR remote control and cloud control*
- Resize, position, zoom for each HDMI output video
- User-selectable output settings, up to 1920x1200
● Supports remote control to switch 1x1, 2x2, 1x3 rotate, and 1x4 rotate mode
● Supports independent input rotation at the resolution up to 1080p
- 4K2K60 (YUV 4:4:4) can be divided and displayed onto four 1080p60 TV (2x2 layout only)
● Supports individual propagation delay on each display to have the best visual perception

*Cloud support is thru an encrypted communication to provide the best private protection when using BG-UHD-VWP-1X4
PACKAGE CONTENTS
● 1x BG-UHD-VWP-1X4
- 1x User Manual
- 1x 1U rack-mounting ear set
- 1x 12V power supply
● 1x Installation software CD
● 1x IR Remote control (15 keys)
SPECIFICATIONS
| Model Name | BG-UHD-VWP-1X4 | |
| Technical | ||
| Role of usage | Video Wall Processor | |
| HDGP compliance | Yes | |
| Video bandwidth | Input - Single link 600MHz [18Gbps]Output -Single-link 225MHz [6.75Gbps] | |
| Video support | Input - 4K2K@60 (4:2:2 8bits) / 4K2K@60 (4:4:4 8bits)Output - 1920x1080@60 / 1920x1200@60 | |
| Video Format Support | HDMI / DisplayPort | |
| Audio support | Yes | |
| ESD protection | Human body model — ±15kV [air-gap discharge] & ±8kV [contact discharge] | |
| Input | 1x HDMI + 1x DisplayPort + 1x USB + 1xRJ45 | |
| Output | 4x HDMI + 1x Stereo | |
| Control | IR remote control / Ethernet / USB (virtual) / Front Panel / Cloud Control | |
| Input TMDS signal | 1.2 volts [peak-to-peak] | |
| HDMI connector | Type A [19-pin female] | |
| Mini-USB connector | I type A | |
| RJ-45 connector | WE/SS 8P8C | |
| Mechanical | ||
| Enclosure | Metal case | |
| Dimensions(L x W x H) | Model | 290 x 180 x 44mm [11.4" x 7" x 1.7"] |
| Package | 376 x 240 x 112mm [1'2" x 9.4" x 4.4"] | |
| Carton | 590 x 510 x405 mm [1'9" x 1'7" x 1'3"] | |
| Weight | Model | 1427g [3.2lbs] |
| Package | 2077g [4.6lbs] | |
| Fixedness | 1U rack-mount with ears and Wall hanging holes | |
| Power supply | 12V DC | |
| Power Consumption | 12W | |
| Operation temperature | 0~40°C [32~104°F] | |
| Storage temperature | -20~60°C [-4~140°F] | |
| Relative humidity | 20~90% RH [no condensation] | |
HARDWARE INSTALLATION
BG-UHD-VWP-1X4 as master
- Connect the sources to HDMI / DisplayPort Input of the BG-UHD-VWP-1X4.
- Connect all displays to HDMI Outputs of the BG-UHD-VWP-1X4.
- Connect the +12V DC power supply to the BG-UHD-VWP-1X4
CONNECTION DIAGRAM

HDMI
CAT5/5e/6

OR


REAR


Front Panel

1. LED indicator:
PWR – Power indicator LED
LOCK – When device status is locked, it will shine
4K – If source resolution is 4K, the LED indicator will shine
Source – When source from HDMI, the LED indicator will shine
Source from DisplayPort, the LED indicator will blink
- IR SENSOR: IR sensor for receiving the IR commands from IR remote
3. Control buttons:
Button 1 (Source) – Source setting (HDMI or DisplayPort)
Button 2 (LOCK) – Press button for 3 seconds will enable/disable device locked
Button 3 (2x2) – Fast switch to 1x1 and 2x2
Button 4 (+90°) – Fast switch to 3x1 90° and 4x1 90°
Button 5 (-90°) – Fast switch to 3x1 -90° and 4x1 -90°
Button 6 (Preset 1)
Button 7 (Preset 2)
Rear Panel

- Power Switch: Power ON/OFF switch
- +12V DC: 12V DC power jack
- Dip Switch: For firmware update (Default mode: on)
- USB virtual COM
- Ethernet: Ethernet control port
- Stereo audio output - L
- Stereo audio output - R
- HDMI INPUT
- DisplayPort INPUT
- Output 1-4: HDMI outputs
SUPPORTED RESOLUTION
| Input resolution | Output resolution |
| 720x480@60Hz | 640x480@60Hz |
| 720x576@50Hz | 720x480@60Hz |
| 1280x720@60Hz | 720x576@60Hz |
| 1920x1080@30Hz | 800x600@60Hz |
| 1920x1080@60Hz | 1024x768@60Hz |
| 4K2K@30Hz | 1280x720@60Hz |
| 4K2K@60Hz (4:2:2 8bits) | 1280x768@60Hz |
| 4K2K@60Hz (4:4:4 8bits) | 1280x960@60Hz |
| 1280x1024@60Hz | |
| 1366x768@60Hz | |
| 1440x900@60Hz | |
| 1680x1050@60Hz | |
| 1920x1080@60Hz | |
| 1920x1200@60Hz | |
| 1600x1200@60Hz |
OPERATION APPROACH
Method A: IR Remote Control
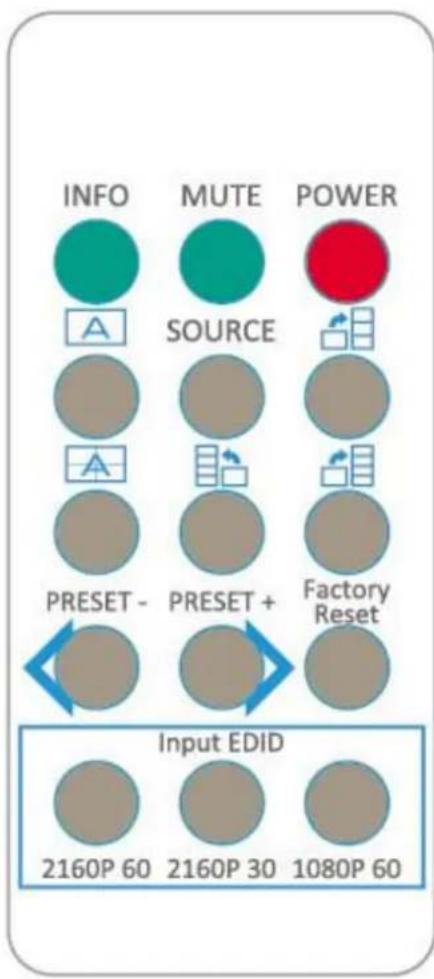
| Button | Function |
| INFO | Display device status (IN/OUT Resolution, EDID, Layout) |
| MUTE | Turn off the stereo audio output |
| POWER | Power ON/OFF the video wall processor |
| Fast switch to VW1x1 (Full Screen) | |
| SOURCE | Source setting (HDMI or DisplayPort) |
| Fast switch to VW3x1 (+90°) | |
| Fast switch to VW2x2 | |
| Fast switch to VW4x1 (-90°) | |
| Fast switch to VW4x1 (+90°) | |
| PRESET- | Previous custom layout |
| PRESET+ | Next custom layout |
| Factory Reset | Factory default reset |
| 2160p 60 | Default EDID 2160p 60 |
| 2160p 30 | Default EDID 2160p 30 |
| 1080p 60 | Default EDID 1080p 60 |





System Requirement and Precautions
- Whenever power off BG-UHD-VWP-1X4, please stay unpowered at least 5 to 10 seconds to allow power capacitors to discharge.
- The BG-UHD-VWP-1X4 provides software control program which runs under Microsoft Windows 7, 8.1, 10 through the interface of USB virtual com control.
- Before you click on the icon of the software, make sure you have secured the connection between your computer USB port and the BG-UHD-VWP-1X4.
Start the software control program
Executing the control software, the following dialog will pop up. It has two ways to control the BG-UHD-VWP-1X4 device (under Microsoft Windows 7, please run as administrator).
- USB Connection: Use USB to connect the port on device and computer. Select correct virtual COM port and click the OK button.
- Ethernet Connection: Enter the device IP address and click the OK button.

After the software control setting is accomplished, it will enter directly to the control interface.
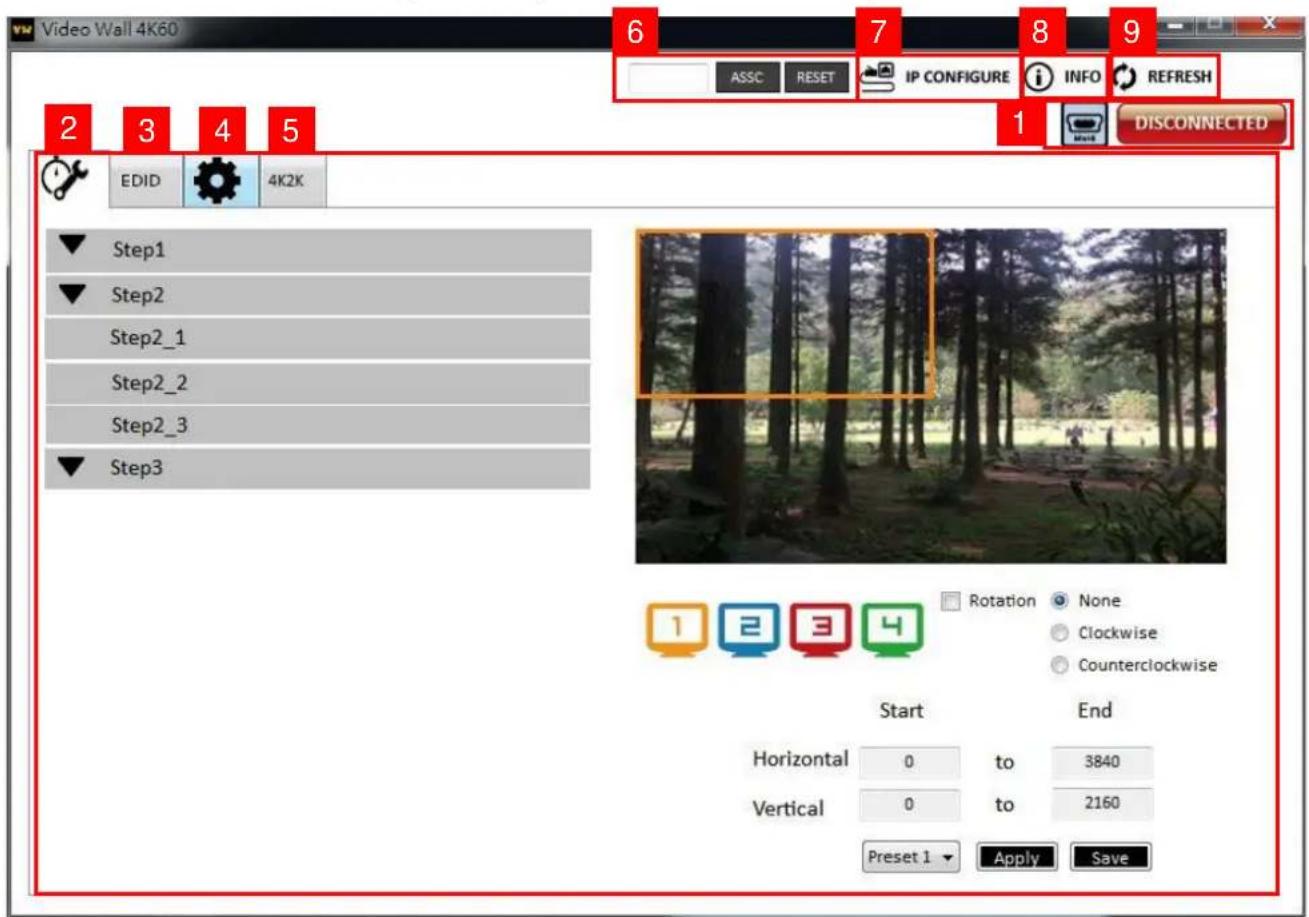
Control Interface
1. Connection Status:
Show the connect information and status. If you use USB control Mode to connect device, the graph

For IP control, the graph of Ethernet is

2. Quick Selection: *Quick Selection function is not available when the input resolution is 4K2K@60Hz
In this part, you can set up the screen resolution, screen coordinate and split screen. Firstly, you should select the TV picture and you can set up the corresponding function. The different colors of frame represent the different output TVs. The information of coordinate shows the position of output TV. We also provides 8 preset spaces to save the frequently used scenarios into the device.


Rotation
None
Clockwise
Counterclockwise
Start
Horizontal

to

Vertical

to

Preset 1


Rotation: *only at input is 1080p resolution
Use the software for independent rotation for each input. You can select clockwise or counterclockwise to rotate the screen.
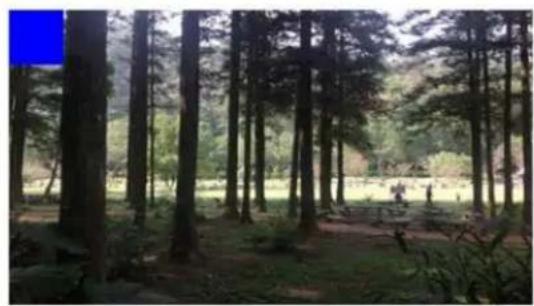


Rotation
None
Clockwise
Counterclockwise
H Start:

Width:

preview
Apply
V Start:

Height:

Apply
Preset 1
Apply
Save
Output Selection and Resolution:
(1) Step 1: check input resolution and choose output resolution
Set the output resolution. You can choose the design display icon to select the output port and setup resolution. When setting the different resolution, the coordinate of output will also be changed. In this part, you also can select input source (HDMI or DisplayPort) or lock/unlock the device.
*Note that when you select the Synchronize function, all windows need to set up in the same resolution, otherwise the output will be abnormal.
*If you lock the device, only factory reset function can work.

(2) Step 2: output setting
In here, it has three modes can set up the output TV resolution, position, size and split screen. The details of different mode are described in step 2-1, 2-2 and 2-3.
*Note that when you want to change another mode, you need to back to the step 2 to change.
Quick Selection
From file
Custom define
(3) Step 2-1: quick selection
Step2_1
Quick Selection




Rotation
None
○Clockwise
○ Counterclockwise


Preset 1
Apply
Save
If you choose the Quick Selection mode in step 2, this window will automatically pop up. In this mode, you can select default screen split and rotate screen (rotate screen only at 1080p resolution).
3x1: This mode will divide the screen into 3 parts and rotate the figure. The remaining part shows the full screen.
➢ 4x1: The mode will divide the screen into 4 parts and rotate the figure.
When select the 3x1 or 4x1 mode, the picture in the right part of control interface will show a red circle. You can slide this white circle to resize the output screen. In addition, you also can input the number to adjust the coordinate.

4k2k60 (YUV 4:4:4) only can be displayed as an 2x2 layout (1080p60 for each output)
(4) Step 2-2: configuration from file
You can load and read configuration from the existing file on your PC/laptop.
Step2_2
Load From File
Apply
(5) Step 2-3: custom define

In Custom define mode, you can define how to cut in both directions and the part you want to show on output TV. If you want to understand or estimate which part you may select, you can
select the Grid button to show grid on the graph. After the setting, please click the

button. Besides, you also can click the button to save the configuration for future usage. You can adjust the output position by setting coordinates.
(6) Step 3: adjust image

➢ Zoom In/Out: You can change pixel size from the edge of image by clicking and
button (the edge of image has four directions). After adjusting the image, the rest of this image will be auto-scaled to fulfill the screen.
Horizontal shift/ Vertical shift: You can arbitrarily move the image on each screen in horizontal direction or vertical direction. Move one pixel at a time.

3. EDID (Extended Display Identification Data)

(1) Learn EDID from the default
Select Default EDID (1-5 default EDID).

➢ Click button to learn default EDID.
(2) Learn EDID from Display
Select the Output.
➢ Click button to learn display EDID.
(3) Learn EDID from File
➢ Click button to select the EDID file and write it into input.
(4) View EDID content
➢ Select the EDID input source (Input, Output or From File).
➢ Click button to read the EDID description and analysis.
➢ Click button to save the EDID as a file in the connected computer.
4. Advanced Setting

(1) Machine Name
You can set up your machine name in here. Please take a closer look at the length of string (Max Length: 8).
(2) Change Graph
You can change the default graph (splash screen) on this machine.
Load Graph Click button to select the graph.
After loading the graph step, please click √ button to write this graph into device.
(3) Factory Reset
➢ Click button to do factory default reset.
This default reset process will take about 5 seconds.

➢ After pop-up a dialog indicates complete, please restart this machine.

5. 4K2K Setting
When input is 4K2K@60Hz Resolution, the output display will be forced to 2x2 layout (other layout cannot set) and only can set up the output position. We also provide 8 preset spaces to save the frequently used scenarios into the device.

6. Cloud setting-Association Code
Clicking ASSC button to get an "association code". The device can use this code to pair with cloud server. After a successful pairing, you can reset cloud.
*Please pair device to cloud within 2 minutes when you get an association code.
7. IP Configure
You also can use the Ethernet to control software program. First, you should click the

IP CONFIGURE
button to setup network set. Next, you can read the Ethernet setting from device and manually set to device or click the DHCP button to automatically get the IP address. After the step of IP configuration, please restart the machine.


8. Info
Read the software and firmware version.

9. Refresh
This function not only can refresh the information of setting but also can reconnect this device. You can click button to update the control connection. A "ReConnectForm" window will pop up for you to select the approach to connect this device.

Method C: Firmware Update through mini-USB Port
- Please ensure the file of new firmware file is in the root directory of USB Flash Drive. The file name should be firmware.bin.
- Use mini-USB to female USB type A cable to connect the USB interface of device and USB Flash Drive.
- Switch dip switch on F/W mode.
- Power cycle the device and it will automatically start the FW update process (The process will take about 10 seconds).
Method D: Cloud Control (IntriCloud) through Ethernet Port
Create Account
The first time to use the IntrCloud service, please create a new account.
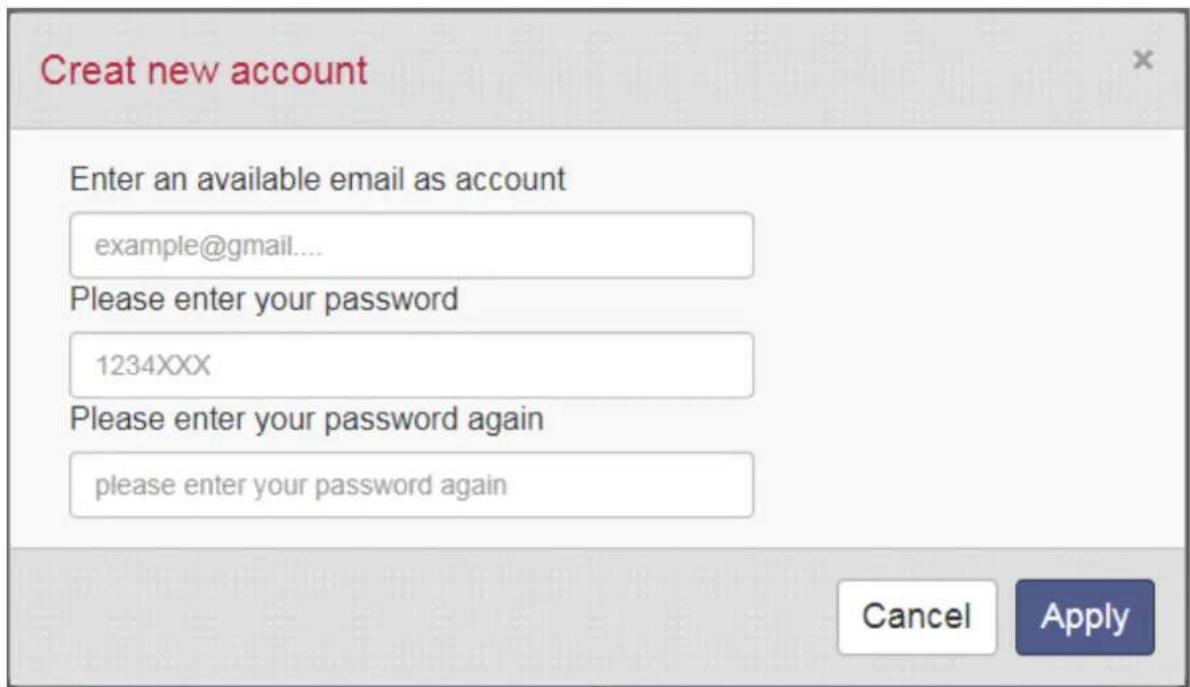
- Access IntrCloud (http://www.intri.cloud) and click "Create new account".

- The Registration page will pop up and please fill in your email and password information to create your private account.
Add Device to Intricloud
- Firstly, please make sure the device is connected to the Ethernet. Then please executing the software with device to get the association code (Note: the status of software is connected).

- Access IntrCloud (http://www.intri.cloud), and then log in your account on the right top corner. Click Add device to add the device which you just got its association code.
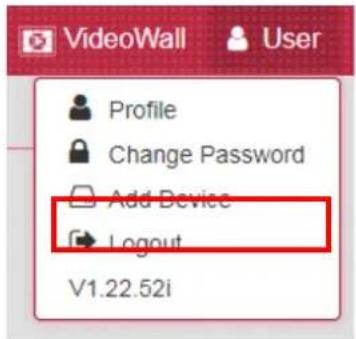
- Enter the Installer Email for online support in the future, and the Association Code for pairing with your device.

- After adding the device, the list of devices related to your account will show on the right top corner. You can click the button to switch device for control.

EDID LEARNING
The EDID learning function is only necessary whenever you encounter any display on the HDMI output port that cannot play audio and video properly. Because the HDMI sources and displays may have various level of capability in playing audio and video, the general principle is that the source will output the lowest standards in terms of audio format and video resolutions to be commonly acceptable among all HDMI displays. In this case, a 720p stereo HDMI signal output would be probably the safest choice. Nevertheless, the user can force the matrix to learn the EDID of the lowest capable HDMI display among others to make sure all displays are capable to play the HDMI signals normally.
The method on doing EDID learning please refer to the software operation section.
There are five embedded default EDIDs as below,
- Full-HD(1080p@60)-24bit 2D & 2ch
- HD(1080i 720p@60)-24bit 2D & 2ch
- 4K2K@60-24bit 2D & 2ch
- 4K2K@30-3D-PCM2CH
- 4K2K@60-420-3D-PCM2CH(2ch)
The SELLER warrants the BG-UHD-VWP-1X4 4K 1x4 Video Wall Processor is free from defects in the material and workmanship for 1 year from the date of purchase from the SELLER or an authorized dealer. Should this product fail to be in good working order within 1 year warranty period, The SELLER, at its option, repair or replace the unit, provided that the unit has not been subjected to accident, disaster, abuse or any unauthorized modifications including static discharge and power surge. This warranty is offered by the SELLER for its BUYER with direct transaction only. This warranty is void if the warranty seal on the metal housing is broken.
Unit that fails under conditions other than those covered will be repaired at the current price of parts and labor in effect at the time of repair. Such repairs are warranted for 90 days from the day of reshipment to the BUYER. If the unit is delivered by mail, customers agree to insure the unit or assume the risk of loss or damage in transit. Under no circumstances will a unit be accepted without a return authorization number.
The warranty is in lieu of all other warranties expressed or implied, including without limitations, any other implied warranty or fitness or merchantability for any particular purpose, all of which are expressly disclaimed.
Proof of sale may be required in order to claim warranty. Customers outside Taiwan are responsible for shipping charges to and from the SELLER. Cables and power adapters are limited to a 30 day warranty and must be free from any markings, scratches, and neatly coiled.
The content of this manual has been carefully checked and is believed to be accurate. However, The SELLER assumes no responsibility for any inaccuracies that may be contained in this manual. The SELLER will NOT be liable for direct, indirect, incidental, special, or consequential damages resulting from any defect or omission in this manual, even if advised of the possibility of such damages. Also, the technical information contained herein regarding the BG-UHD-VWP-1X4 features and specifications is subject to change without further notice.
SECOND YEAR ASSURANCE
BZB Gear wants to assure you peace of mind. We're so confident in the quality of our products that along with the manufacturer's one-year limited warranty, we are offering free second-year warranty coverage upon registration*.
Taking advantage of this program is simple, just follow the steps below:
- Register your product within 90 days of purchase by visiting BZBGear.com/warranty.
- Complete the registration form. Provide all necessary proof of purchase details, including serial number and a copy of your sales receipt.
For questions, please call 1.888.660.2962 or email support@bzbgear.com.
For complete warranty information, please visit BZBGear.com/warranty or scan the QR code below.

*Terms and conditions apply. Registration is required.
MISSION STATEMENT
BZB Gear manifests from the competitive nature of the audiovisual industry to innovate while keeping the customer in mind. AV solutions can cost a pretty penny, and new technology only adds to it. We believe everyone deserves to see, hear, and feel the advancements made in today's AV world without having to break the bank. BZB Gear is the solution for small to medium-sized applications requiring the latest professional products in AV.
We live in a DIY era where resources are abundant on the internet. With that in mind, our team offers system design consultation and expert tech support seven days a week for the products in our BZB Gear catalog. You'll notice comparably lower prices with BZB Gear solutions, but the quality of the products is on par with the top brands in the industry. The unparalleled support from our team is our way of showing we care for every one of our customers. Whether you're an integrator, home theater enthusiast, or a do-it-yourselfer, BZB Gear offers the solutions to allow you to focus on your project and not your budget.
- SAFETY AND NOTICE
- TABLE OF CONTENTS
- FEATURES
- PACKAGE CONTENTS
- SPECIFICATIONS
- HARDWARE INSTALLATION
- BG-UHD-VWP-1X4 AS MASTER
- CONNECTION DIAGRAM
- FRONT PANEL
- LED INDICATOR
- CONTROL BUTTONS
- REAR PANEL
- OPERATION APPROACH
- SYSTEM REQUIREMENT AND PRECAUTIONS
- START THE SOFTWARE CONTROL PROGRAM
- CONTROL INTERFACE
- CONNECTION STATUS
- QUICK SELECTION: *QUICK SELECTION FUNCTION IS NOT AVAILABLE WHEN THE INPUT RESOLUTION IS 4K2K@60HZ
- ROTATION: *ONLY AT INPUT IS 1080P RESOLUTION
- STEP 2-1: QUICK SELECTION
- STEP2_1
- QUICK SELECTION
- STEP 2-2: CONFIGURATION FROM FILE
- STEP2_2
- EDID (EXTENDED DISPLAY IDENTIFICATION DATA)
- ADVANCED SETTING
- MACHINE NAME
- CHANGE GRAPH
- FACTORY RESET
- 4K2K SETTING
- CLOUD SETTING-ASSOCIATION CODE
- IP CONFIGURE
- INFO
- REFRESH
- METHOD C: FIRMWARE UPDATE THROUGH MINI-USB PORT
- METHOD D: CLOUD CONTROL (INTRICLOUD) THROUGH ETHERNET PORT
- CREATE ACCOUNT
- ADD DEVICE TO INTRICLOUD
- EDID LEARNING
- SECOND YEAR ASSURANCE
- MISSION STATEMENT
Brand : BZBGear
Model : UHD-VWP-1X4
Category : Processor