
DABLS1BT - Radio JUNG - Free user manual and instructions
Find the device manual for free DABLS1BT JUNG in PDF.


| Product Type | DAB+ / FM Digital Radio with Bluetooth |
| Brand | JUNG |
| Model | DABLS1BT |
| Radio Bands | DAB+ (Band III, 174–240 MHz), FM (87.5–108 MHz) |
| Bluetooth | Yes, Version 4.2, range up to 10 m |
| Display | LCD with backlight, station and info display |
| Audio Output | Stereo speakers, 2 x 3W RMS |
| Power Supply | AC 100–240V, 50/60Hz (adapter included); USB 5V DC (alternative) |
| Dimensions (approx.) | 200 x 120 x 80 mm (W x H x D) |
| Weight (approx.) | 0.5 kg |
| Connectivity | 3.5 mm headphone jack, AUX input |
| Additional Features | Alarm clock, sleep timer, 20 preset stations (DAB+ & FM), auto-scan |
| Maintenance | Wipe with soft dry cloth; do not use solvents or water |
| Safety | Use only supplied power adapter; keep away from moisture and heat sources |
| Spare Parts & Repairability | Contact JUNG support for replacement parts; no user-serviceable components |
| Package Contents | Radio, AC adapter, user manual |
Frequently Asked Questions - DABLS1BT JUNG
User questions about DABLS1BT JUNG
0 question about this device. Answer the ones you know or ask your own.
Ask a new question about this device
Download the instructions for your Radio in PDF format for free! Find your manual DABLS1BT - JUNG and take your electronic device back in hand. On this page are published all the documents necessary for the use of your device. DABLS1BT by JUNG.
USER MANUAL DABLS1BT JUNG
Operating instructions
1 Safety instructions

Electrical equipment may only be fitted and connected by electrically skilled persons.
Serious injuries, fire or property damage possible. Read and observe instructions fully.
Danger of electric shock. Before working on the device, disconnect the mains voltage and switch off the circuit breakers.
These instructions are a component part of the product and must remain with the end customer.
2 Correct use
- DAB reception in the frequency range 174 MHz to 240 MHz (VHF band III and channel 13)
- FM reception in the frequency range 87.5 MHz to 108 MHz (VHF band II)
- Installation in flush box according to DIN 49073 (recommendation: deep box)
3 Product characteristics
- Digital radio with display and sensor buttons
- Real glass front panel
- Stereo reception
- Connection terminals for two loudspeakers
- Stereo/mono switch-over
- Simple operation
- Integrated antenna for DAB+ and FM
- High reception quality
- Automatic station scan
- Storage of 8 favourites DAB+ and 8 favourites FM (will be retained after voltage failure)
- Switch-on with last station
- Switch-on with last volume
- Switch-on with last operation mode (DAB+ or FM)
- Display of station information, time and current settings
- Current time via RDS and DAB+
- Brightness level of display can be adjusted
- Night mode
- Alarm function
- Sleep mode
- Switching on/off via extension unit
- Line-out output (AUX) to connect external amplifiers
- Optional external cable antenna ref.-no.: RAD-ANT
Only version with Bluetooth
- Playback and control of music on mobile devices via Bluetooth
- Storage of 8 Bluetooth audio sources
- Bluetooth device name can be changed
4 Structure of the device
- Power supply
- Frame
- Display
4.〈〉next/previous channel/title
\~ \~ loud/quiet, brighter/darker - Button On/Off
- Confirm/apply button
- Button ☐ Selection DAB+, FM, Bluetooth, Alarm, Settings, Return without saving
- Favourites button
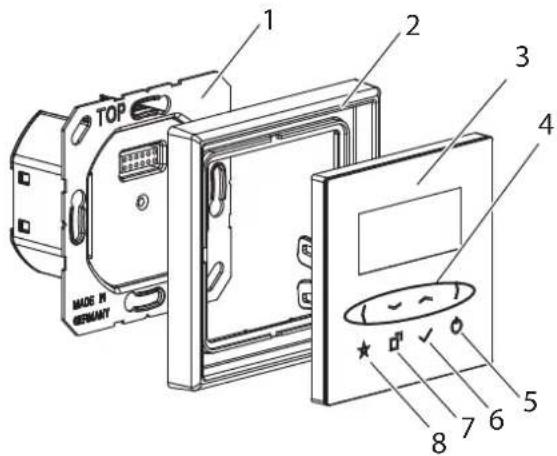
Fig. 1: Structure of the device
5 Operation
Switch on/off
- Press ⏻ button Radio switches on/off
Menu
- Press □ button.
- Select functions with ( ) buttons: DAB RADIO, FM RADIO, BLUETOOTH, ALARM, SETTINGS
- Selection with √ button.
- SETTINGS submenu: SLEEP, TIME, DISPLAY, BT-NAME
- Selection with button.
DAB RADIO/FM RADIO
During commissioning, all reachable channels are saved. The next/previous channel is selected using the ( ) buttons.
The choice between DAB RADIO and FM RADIO is made using the menu ☐.
Saving favourites
During commissioning, the 8 strongest channels are saved as favourites.
The favourites can be customised individually.
- Selecting channels
- Press ★ button longer.
- Select favourite 1-8 using button ( )
- Press √ button.
Channel is saved on the selected favourite.
Retrieving favourites
- Press ☆ button briefly.
- Select favourite 1-8 using button ( ).
The respective channel is displayed and played. - Confirm channel using √ button
Channel search
- Press > button for 3 seconds
Display shows "New Scan" - Confirm scan using √ button
Night mode
In night mode the display can be hidden if the radio is switched off. After pressing any button, the display becomes visible for approx. 10 seconds.
Requirement: For activating the night mode the radio has to be switched off.
- Select the lowest brightness level using √ button.
- Press again to de/activate night mode.
SLEEP
The radio switches off after a predetermined time. The OFF setting deactivates the function.
- Hold down ⏻ button for 3 seconds.
- Set (OFF, 15 min, 30 min) using ⟨ ⟩ buttons
- Confirm √ button
Setting time
The time is transferred from favourite 1 via DAB+ or FM. If the time is not transferred via DAB+ or FM, it must be set manually.
- Press □ button.
- Select SETTINGS and then TIME using > button.
- Confirm √ button
- Set time using (\~ \~) buttons.
- Confirm √ button
Alarm time/alarm function
The last radio channel is selected as alarm sound. The volume increases gently.
Setting alarm time:
Requirement: The radio is switched off.
- Press □ button for approx. 4 sec
- Setting alarm time using (\~ \~) buttons
- Press √ button
Alarm time is set.
Alarm function is active
Switching alarm function on/off:
Requirement: The radio is switched off.
- Press □ button for approx. 2 sec. ALARM ON or ALARM OFF is displayed briefly. Activated alarm time appears in the upper right-hand corner of the display.
Connecting Bluetooth
(Only version with Bluetooth)
External audio devices can be connected via Bluetooth.
Requirement: There is no active Bluetooth connection to other devices.
- Invoke menu screen using □ button and select BLUETOOTH.
- Confirm √ button
The radio is now visible.
The connection can be established via the Bluetooth audio device.
Known devices are connected automatically.
Clearing Bluetooth Connections
(Only Version with Bluetooth)
All connections are cleared.
- Invoke menu screen using □ button and select BLUETOOTH
- Press ★button for 3 seconds "UNPAIR" display screen
- Confirm √ button All connections are cleared.
Selecting known Bluetooth sources
(Only version with Bluetooth)
- Invoke menu screen using □ button and select BLUETOOTH
- Press ★button briefly Known sources are displayed.
- Displaying devices using ( ) button
- Select device using √ button.
Switching hotel mode on/off
The SETTINGS menu item (Settings) is not displayed in hotel mode.
The maximum volume is limited, channel search and favourite assignment are disabled.
Requirement: The radio is switched off.
- Press ⏻ and (buttons simultaneously for approx. 8 seconds.
A progress bar is displayed after approx. 4 seconds.
The hotel mode is switched after approx. 8 sec. - Release both buttons. Hotel mode is switched on/off.
Default setting, reset
All settings are reset.
- Press ☆ and > buttons simultaneously for approx. 8 seconds.
A progress bar is displayed after approx. 4 seconds.
The radio is reset to the as-delivered state after approx. 8 sec.
- Release both buttons.
All settings are reset.
Channels for DAB+ and FM are rescanned.
6 Information for electrically skilled persons
Installation and electrical connection

Danger!
Risk of death by electric shock.
Disconnect device from power supply. Cover live parts.
Installation location
The reception quality depends on the installation location. Reception faults in mains (e.g. by the use of LED lighting) are possible.
- Check radio reception of DAB+ and FM by short commissioning before final installation.
Connecting and installing power supply
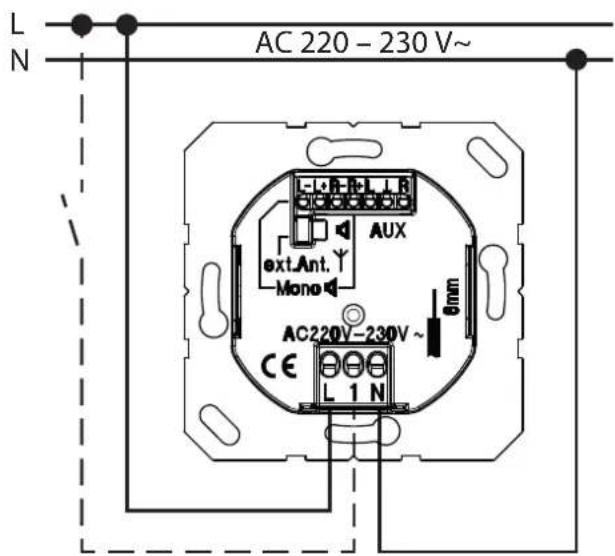
Fig. 2: Connection of insert with optional extension unit
i The radio, for example, can be switched on together with the room lighting via the extension unit input.
i The radio and extension unit must be operated on the same phase.
Connecting a loudspeaker (stereo mode)
Two loudspeakers must be connected for stereo mode.
i All cables with low voltage must be laid in an additional insulating tube within the device box. This guarantees safe isolation from the mains voltage.
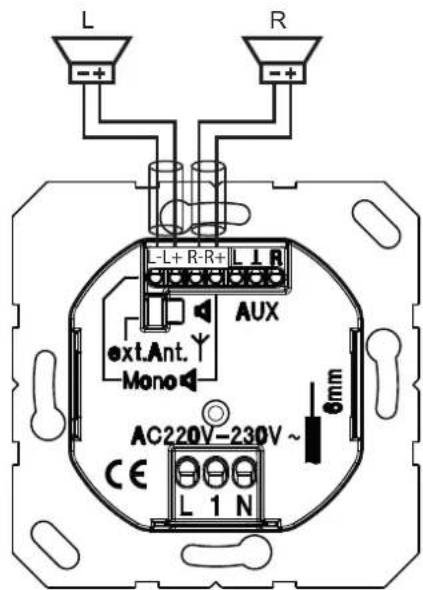
Fig. 3: Connection of 2 loudspeakers
Connecting a loudspeaker (mono mode)
One loudspeaker must be connected for mono mode.
[i] All cables with low voltage must be laid in an additional insulating tube within the device box. This guarantees safe isolation from the mains voltage.
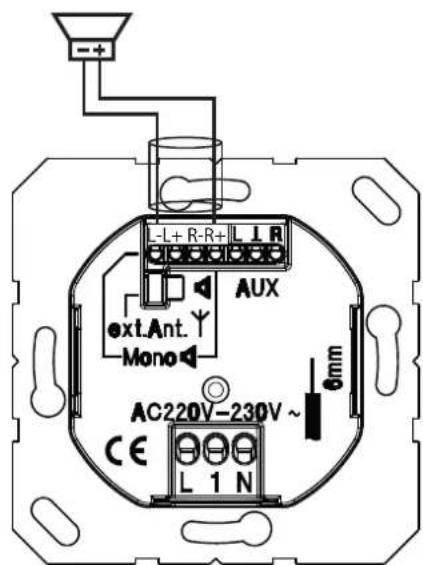
Fig. 4: Connection of 1 loudspeaker
Connecting AUX output
Output to the connection from active boxes and headphones.
All cables with low voltage must be laid in an additional insulating tube within the device box. This guarantees safe isolation from the mains voltage.
Connecting cable aerial
It is only necessary to connect the external cable aerial Art.-No.: RAD-ANT in the case of poor reception.
i The connection from other aerials, e.g. roof aerials or community aerials, is not permitted.
- Remove jumper (9)
- Insert the aerial (10) at the lower connection
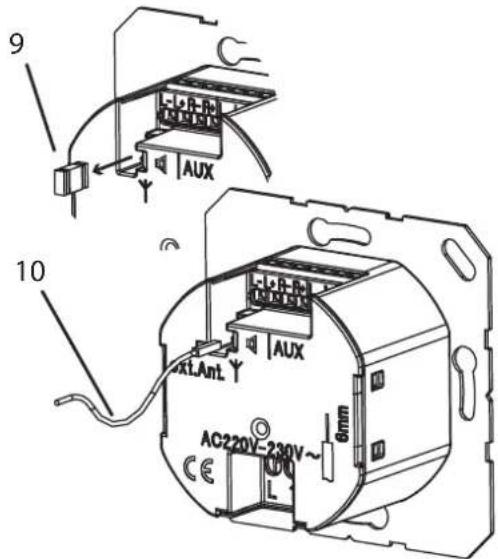
Fig. 5: Aerial connection
7 Commissioning
The radio scans and saves all receivable channels for DAB+ and FM. The 8 strongest channels are saved as favourite.
The time is applied automatically during reception of favourite 1. The time can also be set via the menu.
8 Technical data
Rated voltage AC 220 ... 230 V\~
Mains frequency 50/60 Hz
Connection Screw terminals
Cable cross-section 1 x 2.5 mm² or 1 x 1.5 mm²
Power draw
Standby < 1 W
Operation < 5.5 W
Temperature range 0 ... 50 °C
Humidity 15 ... 90 % (no dew)
DAB frequency range 174 ... 240 MHz
VHF frequency range 87.5 ... 108 MHz
Bluetooth
Frequency range 2.402 ... 2.48 GHz
Transmission power Class 2 < 4 dBm
Transmitter range type 10 m
Protection rating IP20
Connecting cable loudspeaker
Twin cable H03VH-H, 2x0.75
Alternative JY-(St)- Y 2x2x0.6
Length max. 5 m
Loudspeaker LSM...
Rated load capacity 2.5 W
Impedance 4 Ω
Frequency range 120 ... 15000 Hz (-10 dB)
9 Accessories
Cable aerial Art.-No.: RAD-ANT
10 Warranty
Warranty is offered according to the statutory provisions via specialist dealers.
- Operating instructions
- Safety instructions
- Correct use
- Product characteristics
- Only version with Bluetooth
- Structure of the device
- Operation
- Switch on/off
- Menu
- DAB RADIO/FM RADIO
- Saving favourites
- Retrieving favourites
- Channel search
- Night mode
- SLEEP
- Setting time
- Alarm time/alarm function
- Setting alarm time:
- Switching alarm function on/off:
- Connecting Bluetooth
- (Only version with Bluetooth)
- Clearing Bluetooth Connections
- Selecting known Bluetooth sources
- Switching hotel mode on/off
- Default setting, reset
- Information for electrically skilled persons
- Installation location
- Connecting and installing power supply
- Connecting a loudspeaker (stereo mode)
- Connecting a loudspeaker (mono mode)
- Connecting AUX output
- Connecting cable aerial
- Commissioning
- Technical data
- Accessories
- Warranty
Brand : JUNG
Model : DABLS1BT
Category : Radio