EL100C-20 - Uncategorized EtherWAN - Free user manual and instructions
Find the device manual for free EL100C-20 EtherWAN in PDF.


| Product Type | Industrial Managed Ethernet Switch |
| Number of Ports | 20 |
| Port Type | 10/100/1000Base-T (copper) or SFP options |
| Dimensions (W x D x H) | 440 x 200 x 44 mm (19-inch rackmount) |
| Weight | Approximately 3.0 kg |
| Power Supply | AC 100-240V, 50/60Hz, or DC option |
| Power Consumption | Max 30W |
| Operating Temperature | -40 to 75°C (industrial grade) |
| Humidity | 5% to 95% non-condensing |
| Mounting | Rackmount, wall-mountable with optional brackets |
| Management | Web GUI, SNMP v1/v2/v3, CLI, Telnet |
| Layer 2 Features | VLAN, STP, RSTP, MSTP, IGMP snooping, Link Aggregation |
| QoS | 8 priority queues, strict priority, WRR |
| Security | 802.1X, ACL, port security, SSH, SSL |
| Redundancy | ERPS, STP/RSTP/MSTP, dual power inputs (optional) |
| Diagnostics | LED indicators for power, link, activity, error |
| Maintenance | Clean with dry cloth; avoid liquids; check LEDs periodically |
| Safety | Connect to grounded power outlet; install in well-ventilated area |
| Spare Parts | Power supply unit, fan module, rackmount brackets |
| Repairability | Modular design; contact EtherWAN support for spare parts |
Frequently Asked Questions - EL100C-20 EtherWAN
User questions about EL100C-20 EtherWAN
0 question about this device. Answer the ones you know or ask your own.
Ask a new question about this device
Download the instructions for your Uncategorized in PDF format for free! Find your manual EL100C-20 - EtherWAN and take your electronic device back in hand. On this page are published all the documents necessary for the use of your device. EL100C-20 by EtherWAN.
USER MANUAL EL100C-20 EtherWAN
natural_image
Abstract blue brushstroke design resembling stylized letters or strokes (no text or symbols)EtherWAN
natural_image
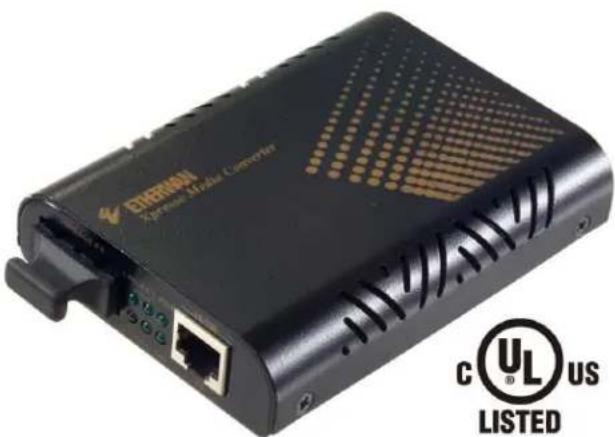
Exterior view of a black Ethernet Media Converter with visible ports and network (no text or symbols on device body)EL100 / EL200 Series
10/100BASE-TX to 100BASE-FX Media Converter
10/100BASE-TX to 100BASE-BX WDM Media Converter
User's Guide
All Rights Reserved
Dissemination or reproduction of this document, or its contents, is not authorized except where expressly permitted. Violators are liable for damages. All rights reserved, for the purposes of patent application or trademark registration.
Disclaimer of Liability
The information contained in this document is subject to change without notice. EtherWAN is not liable for any errors or omissions contained herein or for resulting damage in connection with the information provided in this manual.
Warranty
For details on the EtherWAN warranty replacement policy, please visit our web site at:
www.etherwan.com
Products Supported by this Manual:
EL100, EL200
Preface
Audience
This guide is designed for the person who installs, configures, deploys, and maintains the Ethernet network. This document assumes the reader has moderate hardware, computer, and Internet skills.
Document Revision Level
This section provides a history of the revision changes to this document.
| Revision | Document Version | Date | Description |
| A | Version 1 | 02/04/2021 | First version in this format |
Safety and Warnings
This guide uses the following symbols to draw your attention to certain information.
| Symbol | Meaning | Description |
 | Note | Notes emphasize or supplement important points of the main text. |
| ### | Tip | Tips provide helpful information, guidelines, or suggestions for performing tasks more effectively. |
| ### | Warning | Warnings indicate that failure to take a specified action could result in damage to the device, or could result in serious bodily injury. |
| ### | Electric Shock Hazard | This symbol warns users of electric shock hazard. Failure to take appropriate precautions such as not opening or touching hazardous areas of the equipment could result in injury or death. |
Contents
Preface....iii
Safety and Warnings....iii
Contents iv
Introduction......5
Unpacking 6
Select Installation Location....6
Connect Power....8
Ports and Port Settings....8
LED Indicators....9
DIP Switches....10
Link Fault Pass Through (LFPT)....10
CLASS 1 LASER PRODUCT....10
Specifications....11
Manufacturer's Information....12
Introduction
EL100 / EL200 Media Converter
10/100BASE-TX to 100BASE-FX Media Converter
10/100BASE-TX to 100BASE-BX WDM Media Converter
The EL100 / EL200 Series provide media conversion between 10/100BASE-T(X) and 100BASE-FX Fiber. Easy plug-and-play design facilitates network infrastructure construction. Through DIP switch selection, Link-Fault-Pass-Through (LFPT) function can be activated or disabled.
The EL100 series is designed for SC or ST fiber connection applications, while the EL200 series is designed for WDM fiber connection. These commercial grade media converters support the EtherWAN EMC1600 chassis system for easy group installation.
Unpacking
Open the carton and unpack the items. Your package should include an EL100 or EL200 media converter, and this Quick Install Guide. If items are missing or damaged, notify your EtherWAN representative.
Select Installation Location
Place the equipment where it will not be subjected to extreme temperatures, humidity, or electromagnetic interference. Specifically, the site you select should meet the following requirements:
- The ambient temperature should be between 32 and 113 degrees Fahrenheit (0 to 45 degrees Celsius).
- The relative humidity should be less than 95 percent, non-condensing.
- Surrounding electrical devices should not exceed the electromagnetic field (RFC) standards for IEC 801-3, Level 2 (3V/M) field strength.
- Make sure that the equipment receives adequate ventilation. Do not block the ventilation holes on each side of the equipment.
- The power outlet should be within 1.8 meters of the product.
Chassis Installation
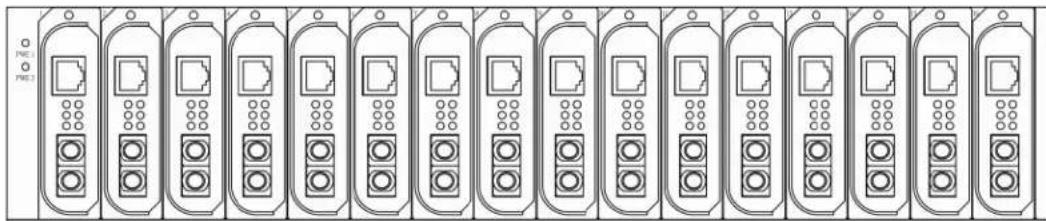
The converter can be installed into any of the expansion slots in a compatible chassis.
• Install the converter onto a carrier supplied with the chassis.
- Unscrew the carrier from the desired expansion slot on the chassis.
• Fit the converter onto the carrier, and insert the carrier to the guide rails of the expansion slot.
- Tighten the retaining screws to fix the carrier in the chassis.
natural_image
Front view of a row of identical electronic device enclosures with indicator lights (no text or symbols visible)
NOTE: Never insert any converter into the chassis directly without using the supplied carriers.
The carriers allow secure and consistent placement of the converters into the chassis' backplane without causing any damage.
Connect Power
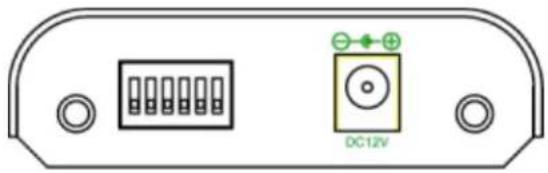
This Converter is a plug-and-play device. Connect the supplied AC to DC power adaptor to the receptacle on the rear panel of the converter, and then attach the plug into a standard AC outlet.
If installing into a chassis, then no additional power connection is required.
natural_image
Front view of a device rear panel with ports and a DC12V indicator (no text or symbols beyond label)Ports and Port Settings
The EL100 provides one TX port and one FX/BX port. For the FX/BX port, it provides options of: Multi-mode fiber using SC, ST, VF-45, MT-RJ or LC connector or Single-mode fiber using SC or ST connector.
The TX port uses RJ-45 connector and auto senses the speed of 10/100Mbps. The EL200 provides a WDM-A/B fiber port.
Port settings are made by means of a DIP (Dual Inline Package) switch at the rear panel of the module.
LED Indicators
| LED | State | Indication |
| PWR | Steady | Power on |
| Off | Power off | |
| 100 (Mbps) | Steady | Connection at 100Mbps |
| Off | Connection at 10Mbps | |
| LNK/ACT | Steady | Valid network connection established |
| Flashing | Transmitting or receiving data | |
| Off | Neither valid network connection established nor transmitting/receiving data | |
| FDX/COL | Steady | Connection in full-duplex mode |
| Flashing | Collision occurred | |
| Off | Connection in half-duplex mode |
DIP Switches
There are six pins on the DIP switch for port settings. Refer to the table below for more details.
| DIPSwitchNo. | Down | Up |
| 1 | Enable LFPT (link-fault-pass-through) | Disable LFPT (link-fault-pass-through) |
| 2 | Enable auto negotiation for TX port | Enable forced mode for TX port |
| 3 | TX port forced to 100Mbps | TX port forced to 10Mbps |
| 4 | TX port forced to full duplex mode | TX port forced to half duplex mode |
| 5 | FX port forced to full duplex mode | FX port forced to half duplex mode |
| 6 | Store-and-forward mode | Converter mode |
The default settings for all six dip switches are "Down".
Disconnect the converter from the power source before changing any of the DIP switch settings.
NOTE: In order for converter mode to work, both TX and FX must be set to the same speed. Otherwise, the device will automatically switch to store-and-forward mode.
Link Fault Pass Through (LFPT)
LFPT (Link Fault Pass Through) is a feature that will pass a link fault through the device at each segment. If either of the copper TX links fail, the media converter will pass the fail state on throughout the link, taking down the middle fiber as well as the copper link on the opposite end. This prevents the connected switches from sending packets that would end up lost. LFTP is designed for use with media converters arranged in pairs, and both devices must support LFPT.
CLASS 1 LASER PRODUCT
Each laser product complies with US FDA regulations of 21 CFR 1040.10 and 1040.11 or complies with those regulations except for deviations pursuant to Laser Notice No. 56 dated May 8, 2019.
Specifications
| Applicable standards | IEEE 802.3 10Base-TIEEE 802.3u 100Base-TX & 100Base-FX |
| Fixed ports | EL100 : 1 TX port, 1 FX portEL200 : 1 TX port, 1 BX port |
| 10Base-T speed | 10/20Mbps for half/full-duplex |
| 100Base-TX speed | 100/200Mbps for half/full-duplex |
| 100Base-FX/BX speed | 200Mbps for full-duplex |
| Switching Method | Store-and-Forward mode or converter mode |
| Forwarding rate | 14,880/148,810pps for 10/100Mbps |
| LED Indicators | Per Unit- (2 LEDs): Power; 100(Mbps) |
| Per Port- (2 LEDs): LNK/ACT; FDX/COL | |
| Dimensions | 80.3 × 109.2 × 23.8mm (W x D x H)(3.16" × 4.30" × 0.94") |
| Weight | 150g (0.33lb.) |
| Power | External power adaptor 0.16A @ 12VDC |
| Power Consumption | 1.92W Max. |
| Operating Temperature | 0 ~ 45°C (32 ~ 113°F) |
| Storage Temperature | -10 ~ 70°C (14 ~ 158°F) |
| Humidity | 5 ~ 95%, non-condensing |
| Safety | UL/CUL/CB 62368-1 Ed.2 |
| Emissions | CE/FCC/VCCI |
Manufacturer's Information
EtherWAN System, Inc.
www.etherwan.com
USA Office
2301 E. Winston Road
Anaheim, CA 92806
TEL: +1-714-779-3800
Email: info@etherwan.com
Pacific Rim Office
33F, No. 93, Sec. 1, Xintai 5th Rd., Xizhi Dist.
New Taipei City, 221 Taiwan
TEL: +886 -2- 6629-8986
EtherWAN has made a good faith effort to ensure the accuracy of the information in this document and disclaims the implied warranties of merchantability and fitness for a particular purpose, and makes no express warranties, except as may be stated in its written agreement with and for its customers.
EtherWAN shall not be held liable to anyone for any indirect, special or consequential damages due to omissions or errors. The information and specifications in this document are subject to change without notice.
Copyright 2021. All Rights Reserved.
All trademarks and registered trademarks are the property of their respective owners
EL100 / 200 Media Converter
February 2, 2021
- EtherWAN
- EL100 / EL200 Series
- All Rights Reserved
- Disclaimer of Liability
- Warranty
- Preface
- Audience
- Document Revision Level
- Safety and Warnings
- Contents
- Preface....iii
- Contents iv
- Introduction......5
- Introduction
- Unpacking
- Select Installation Location
- Chassis Installation
- Connect Power
- Ports and Port Settings
- DIP Switches
- Link Fault Pass Through (LFPT)
- CLASS 1 LASER PRODUCT
- Manufacturer's Information
- EtherWAN System, Inc.
- www.etherwan.com
- USA Office
- Pacific Rim Office
Brand : EtherWAN
Model : EL100C-20
Category : Uncategorized