
MRMP3RD - Fault MORPHY RICHARDS - Free user manual and instructions
Find the device manual for free MRMP3RD MORPHY RICHARDS in PDF.


| Product Type | Digital Multifunction Cooking Pot |
| Model | MRMP3RD |
| Color | Red |
| Rated Voltage | 220-240V ~ 50-60Hz |
| Rated Power | 1350-1600W |
| Max Capacity (Deep Pan) | 3 L |
| External Dimensions (W x D x H) | 450 x 283 x 225 mm |
| Net Weight | 4.95 kg |
| Cooking Functions | Cook, Grill, Steam, Stew, Preset |
| Control | Touch buttons and dials for time, power, and temperature |
| Cook Time Range | 1 min to 2 hours (Cook); 1 min to 60 min (Grill/Steam); 1 min to 3 hours (Stew) |
| Cook Power Range | 200W to 1600W in 200W increments |
| Grill Temperature Range | 140°C to 220°C in 5°C increments |
| Preset Time Range | Up to 12 hours (only with Steam or Stew) |
| Included Accessories | Deep pan, griddle pan, steam tray, lid with handle |
| Non-Stick Coating | Yes (do not use metal utensils) |
| Cleaning | Hand wash only; not dishwasher safe; do not submerge base |
| Safety Features | Automatic shut-off, cool-touch base, overheat protection |
| Warranty | Refer to warranty card in box |
Frequently Asked Questions - MRMP3RD MORPHY RICHARDS
User questions about MRMP3RD MORPHY RICHARDS
0 question about this device. Answer the ones you know or ask your own.
Ask a new question about this device
Download the instructions for your Fault in PDF format for free! Find your manual MRMP3RD - MORPHY RICHARDS and take your electronic device back in hand. On this page are published all the documents necessary for the use of your device. MRMP3RD by MORPHY RICHARDS.
USER MANUAL MRMP3RD MORPHY RICHARDS
smart ideas for your home
Digital Multifunction Cooking Pot
INSTRUCTION MANUAL
Read these instructions carefully before using this appliance for the first time
STORE THESE INSTRUCTIONS CAREFULLY

For product hints and tips plus more join us at
www.morphyrichards.com.au

facebook.com/MorphyRichardsAUS instagram.com/morphyrichardsau
SPECIFICATIONS
| Model: MRMP3GN MRMP3RD | ||
| Colour: Green Red | ||
| Rated Voltage: 220-240V~50-60Hz | ||
| Rated Power: 1350-1600W | ||
| Max Capacity: 3L (Deep Pan) | ||
| External Dimensions (W x D x H): 450 x 283 x 225mm | ||
| Net Weight: 4.95kg | ||
NAMES OF PARTS AND ACCESSORIES

WARNING
To reduce the risk of fire, electric shock, injury to persons or damage to property, follow basic precautions including the following:
- If the power cord is damaged, it must be replaced by the manufacturer or its service agent or a similarly qualified person in order to avoid a hazard.
- Keep the appliance and its cord out of reach of children.
- WARNING: Misuse of appliance could cause personal injury.
- WARNING: Avoid spillage on connector. This product incorporates a heating element which is subject to residual heat after use. Refer to the cleaning section for more information.
- This appliance is not intended to be operated by means of an external timer or a separate remote-control system.
- This appliance is not intended for use by persons with reduced physical, sensory or mental capabilities or lack of experience and knowledge unless they have been given supervision or instruction concerning use of the appliance by a person responsible for their safety.
- Children should be supervised to ensure that they do not play with this appliance.
- In the absence of supervision, the cleaning and maintenance work should not be done by a child.
-
Use of accessories not recommended or sold by the original manufacturer may cause risks of fire, electric shock or personal injury.
-
This appliance must be used in accordance with the instructions and must not be used for other purposes.
- This appliance is intended to be used in household and similar applications such as:
- staff kitchen areas in shops, offices and other working environments;
- farm houses;
- by clients in hotels, motels and other residential type environments;
- bed and breakfast type environments.
Location
- For indoor use only. Do not use outdoors or near water.
- Do not place directly under kitchen wall cupboards when in use, as it produces large amounts of steam. Avoid reaching over the steamer when in use.
- Cooking appliances should be positioned in a stable situation.
Power cord
- The power cord should reach from the socket to the base unit without straining the connections.
- Remove the plug from the socket, grasp the plug and pull out the power cord, do not pull on the cord.
- Do not let the cord hang over the edge of the table or counter and keep it away from any hot surfaces.
- Do not let the cord run across an open space e.g. between a low socket and table.
- WARNING: This appliance is NOT to be used with extension leads and/or power boards.
Personal safety
- The temperature of accessible surfaces may be high when the appliance is operating.
- Do not touch hot surfaces. Use oven gloves or a cloth when removing the lid or handling hot containers as hot steam will escape.
- WARNING: To protect against fire, electric shock and personal injury, do not immerse cord, plugs, or appliance in water or other liquid.
- WARNING: Extreme caution must be used when moving the appliance when containing hot food, water, or other hot liquids.
- Unplug from the socket when not in use, before putting on or taking off attachments, and before cleaning.
- Do not operate any appliance with a damaged lead or plug, or after an appliance has malfunctioned, or has been dropped or damaged in any way.
- Do not fill above the maximum level. If the appliance is overfilled, boiling water may be ejected which can scald.
Other safety considerations
- To open, lift the lid off towards yourself but tilted away from you.
- Do not use any of the appliance parts in a microwave or on any cooking/heated surfaces.
- Do not place on or near a hot gas or electric burner, or in a heated oven.
- When steaming, make sure the water does not fall below the minimum level.
Treating scalds
- Run cold water over the affected area immediately. Do not stop to remove clothing, get medical help quickly.
Electrical requirements
- Check that the voltage on the rating plate of your appliance corresponds with your house electricity supply which must be A.C.
- WARNING: This appliance must be earthed.
- WARNING: This appliance is NOT to be used with extension leads and/or power boards.
READ CAREFULLY AND KEEP FOR FUTURE REFERENCE

TIME DIAL - The operating times can be adjusted by rotating the dial to the left or right. For the relevant functions below:
• COOK - Rotate clockwise increases 10 minute increments & anti-clockwise decreases 1 minute increments (Max 2 hours).
- GRILL - Rotate clockwise increases 5 minute increments & anti-clockwise decreases 1 minute increments (Max 60 mins).
- STEAM - Rotate clockwise increases 5 minute increments & anti-clockwise decreases 1 minute increments (Max 60 mins).
- STEW - Rotate clockwise increases 10 minute increments & anti-clockwise decreases 1 minute increments (Max 3 hours).
- PRESET - The Preset function operates ONLY with the STEAM or STEW function. Rotate clockwise increases 30 minute increments & anti-clockwise decreases 5 minute increments.
MENU BUTTON - Press to select the desired cooking function from COOK, GRILL, STEAM or STEW.
START/STOP BUTTON - After selecting a cooking function in the MENU and choosing a heating power or temperature setting with the COOK/GRILL dial:
- Press START/STOP once briefly to start or pause cooking.
- Hold START/STOP button down for 2 seconds to stop cooking and return to standby.

PRESET BUTTON - The Preset button operates a countdown program where the user can choose when the element starts heating. It operates ONLY with the STEAM or STEW function.
- STEAM - After selecting STEAM from the MENU button, rotate the TIME dial to the desired cooking duration (15 to 60 minutes). After setting the cooking time, press the PRESET button and rotate the TIME dial to adjust when to start the heating process (maximum preset time is 12 hours). Press the START/STOP button to enter the PRESET mode and the PRESET time starts to countdown. Note: The PRESET time includes the selected cooking duration time.
- STEW - After selecting STEW from the MENU button, rotate the TIME dial to the desired cooking duration (1.5 to 3 hours). After setting the cooking time, press the PRESET button and rotate the TIME dial to adjust when to start the heating process (maximum preset time 12 hours). Press the START/STOP button to enter the PRESET mode and the PRESET time starts to countdown. Note: The PRESET time includes the selected cooking duration time.

COOK/GRILL DIAL - Depending on the function selected, the operating power or temperature can be adjusted by rotating the dial to the left or right. For the relevant functions below:
- COOK - Press the MENU button to select COOK and rotate the COOK/GRILL dial clockwise to increase the heating wattage from 200W to a maximum of 1600W or rotate anti-clockwise to decrease the wattage. Each rotation increases or decreases in 200W increments. The COOK indicator light will flash while changing the power.
- GRILL - Press the MENU button to select GRILL and rotate the COOK/GRILL dial clockwise to increase the heating temperature from 140°C to a maximum of 220°C or rotate anti-clockwise to decrease the temperature. Each rotation increases or decreases in 5°C increments. The GRILL indicator will flash while changing the temperature.
BEFORE FIRST USE
Before using this product for the first time, please:
- Wash the Deep Pan, Griddle Pan and Steam Tray accessories in warm soapy water and dry before use.
- Before placing any accessory onto the element, make sure there is no water between the accessory base and the heating element (see below diagrams).

natural_image
Line drawing of a cylindrical tank with two side handles (no text or symbols)
natural_image
Line drawing of a rectangular kitchen grater with two handles and a central opening (no text or symbols)
natural_image
Technical line drawing of a two-wheeled toaster oven with side panels and handlebars (no text or symbols)- Ensure any accessory placed on the element is fitted correctly and stable.
- When heating for the first time expect a small amount of smoke. This is normal and will not last for long.
COOKING TEMPERATURES
| Heat Power Heat Temperature Examples | ||
| 200-600W - | Reheating food | |
| 800-1200W 140-180°C Pancakes, Rice, | Vegetables | |
| 1400-1600W 190-220°C Grilling Meat, | Steaming, Hot Pots | |
The Deep Pan accessory is great for soups, curries, stews, slow cooking and anything that requires the lid on and a larger capacity pan.
- Plug the power cord into the base and place the Deep Pan (4) onto the heating element.
- The display lights on the control panel flash and the appliance enters the function selection mode and prepares for preheating. If the unit goes into standby after inactivity, press any button to restart the unit.
- Press MENU and select either COOK, GRILL or STEW functions to preheat. Rotate the TIME dial to set the desired cooking time from the default time and then rotate the COOK/GRILL dial to set the power or temperature (depending on the function selected).
Note: The default cooking times for the COOK function is 2 hours, GRILL is 30 minutes and STEW is 1 hour and 30 minutes.
- Press the START/STOP button and the heating element begins to warm up and the Deep Pan will heat to the set power or temperature.
- After cooking, carefully remove the Lid (2), using the Lid Handle (1). Press the START/STOP button to stop the heating process. Alternatively, the heating process will stop when the cooking time elapses.
PREHEAT FUNCTION
The Preset button operates an optional countdown program where the user can choose when the element starts heating. It operates ONLY with the STEAM or STEW function.
- Press MENU and select STEW. Rotate the TIME dial to the desired cooking duration (1.5 to 3 hours).
- After setting the cooking time, press the PRESET button. Rotate the TIME dial to adjust when to start the heating process (maximum preset time is 12 hours).
- Press the START/STOP button to enter the PRESET mode and the PRESET time starts to countdown.
Note: The PRESET time includes the selected cooking duration time.
DEEP PAN
Note: At any time, the heating process can be paused or stopped. A short press of the START/STOP button pauses the cooking process. After 30 seconds the appliance will revert back to the start menu. Holding the START/STOP button for longer than 2 seconds stops the unit from heating and it will revert back to the start menu. Alternatively, the heating process will stop when the cooking time elapses.
- WARNING: During the preheating process the Base and Deep Pan (4) will become hot.
- WARNING: Ensure the power cord is firmly connected to the Base and does not touch the accessory plates.
- DO NOT use metal spatulas, knives or other hard objects in order to avoid damaging the non-stick coating.
• DO NOT use the Lid (2) when preheating.
The Griddle Pan accessory is great for cooking meat, frying, and anything that requires a high heat.
- Plug the power cord into the base and place the Griddle Pan (6) onto the heating element.
- The display lights on the control panel flash and the appliance enters the function selection mode and prepares for preheating. If the unit goes into standby after inactivity, press any button to restart the unit.
- Press MENU and select either COOK or GRILL functions to preheat. Rotate the TIME dial to set the desired cooking time from the default time and then rotate the COOK/GRILL dial to set the power or temperature (depending on the function selected).
Note: The default cooking time for the GRILL function is 30 minutes.
- Press the START/STOP button and the heating element begins to heat and the Griddle Pan will heat to the set power or temperature.
Note: At any time, the heating process can be paused or stopped. A short press of the START/STOP button pauses the cooking process. After 30 seconds the appliance will revert back to the start menu. Holding the START/STOP button for longer than 2 seconds stops the unit from heating and it will revert back to the start menu. Alternatively, the heating process will stop when the cooking time elapses.
- WARNING: During the preheating process the Base and Griddle Pan (6) will become hot.
- WARNING: Ensure the power cord is firmly connected to the Base and does not touch the accessory plates.
• DO NOT use metal spatulas, knives or other hard objects in order to avoid damaging the non-stick coating. - DO NOT use the Lid (2) when preheating or when cooking with the Griddle Pan.
The Steam Tray accessory is great for vegetables, dumplings, fish or any food that benefits from the gentle and healthy method of cooking with steam.
- Plug the power cord into the base and place the Deep Pan (4) onto the heating element.
- Fill the Deep Pan (4) up with water to the Max line (lower mark for Steam).
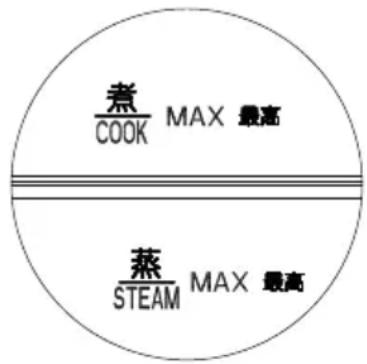
- Place the Steam Tray (3) securely into the Deep Pan (4).
- Place ingredients onto the Steam Tray (3) and place the Lid (2) on the Deep Pan (4).
- The display lights on the control panel flash and the appliance enters the function selection mode and prepares for preheating. If the unit goes into standby after inactivity, press any button to restart the unit.
- Press MENU and select the STEAM function to preheat. Rotate the TIME dial to set the desired cooking time from the default time and then rotate the COOK/GRILL dial to set the power or temperature (depending on the function selected).
Note: The default cooking time for the STEAM function is 30 minutes.
-
Press the START/STOP button and the heating element begins to warm up and the Deep Pan will heat to the set power or temperature.
-
After cooking, carefully remove the Lid (2), using the Lid Handle (1). Press the START/STOP button to stop the heating process. Alternatively, the heating process will stop when the cooking time elapses.
PREHEAT FUNCTION
The Preset button operates an optional countdown program where the user can choose when the element starts heating. It operates ONLY with the STEAM or STEW function.
- Press MENU and select STEW.
- Rotate the TIME dial to the desired cooking duration (15 to 60 minutes).
- After setting the cooking time, press the PRESET button.
- Rotate the TIME dial to adjust when to start the heating process (maximum preset time is 12 hours).
- Press the START/STOP button to enter the PRESET mode and the PRESET time starts to countdown.
Note: The PRESET time includes the selected cooking duration time.
Note: At any time, the heating process can be paused or stopped. A short press of the START/STOP button pauses the cooking process. After 30 seconds the appliance will revert back to the start menu. Holding the START/STOP button for longer than 2 seconds stops the unit from heating and it will revert back to the start menu. Alternatively, the heating process will stop when the cooking time elapses.
- WARNING: During the preheating process the Base, Steam Tray (3) and Deep Pan (4) will become hot.
- WARNING: Ensure the power cord is firmly connected to the Base and does not touch the accessory plates.
• DO NOT use metal spatulas, knives or other hard objects in order to avoid damaging the non-stick coating.
• DO NOT use the Lid (2) when preheating.
CLEANING
WARNING: NOT Dishwasher safe
- NOTE: Ensure the appliance is turned off, unplugged from the socket and all accessories are cool before cleaning.
- Wash the Deep Pan, Griddle Pan and Steam Tray and Lid in warm soapy water after use. Dry with a soft cloth.
- Do NOT submerge the base in water.
- Do NOT use metal scouring pads or abrasive cleaners.
MAINTENANCE
If the unit fails to operate efficiently, is broken or other problems arise, unplug and do not operate.
Ask for advice by calling your local after sales service agent or the Customer Care Centre on 1300 556 816 (AU) / 0800 666 2824 (NZ).
WARRANTY
Please refer to the warranty card in the box for warranty information. For any troubleshooting advice, please contact the relative Customer Care Centre below.
Glen Dimplex Australia Pty Ltd Glen Dimplex New Zealand Ltd 8 Lakeview Drive, 38 Harris Road, East Tamaki, Scoresby 3179, Victoria Auckland 2013
Australia New Zealand Ph: 1300 556 816 Ph: 0800 666 2824
For inspirational recipes for your Multifunction Cooking Pot, visit our website
www.morphyrichards.com.au
NOTES

Recycling: Do not dispose of electrical appliances as unsorted municipal waste. Use separate collection facilities. Contact your local government for information regarding the collection systems available. If electrical appliances are disposed of in landfills or dumps, hazardous substances can leak into the ground water, polluting the food chain and damaging health and wellbeing.
Polystyrene Disposal: The websites listed below can assist in the responsible disposal of EPS (Expanded Polystyrene) packaging products.
Australia: https://recyclingnearyou.com.au/polystyrene/ and/or http://epsa.org.au/
morphy richards
Glen Dimplex Australia Pty Ltd 8 Lakeview Drive
Scoresby VIC 3179
Phone: 1300 556 816
Email: sales@glendimplex.com.au
Web: www.morphyrichards.com.au
© Glen Dimplex Australia. All rights reserved. Material contained in this publication may not be reproduced in whole or in part, without prior permission in writing of Glen Dimplex Australia.
- Digital Multifunction Cooking Pot
- INSTRUCTION MANUAL
- STORE THESE INSTRUCTIONS CAREFULLY
- SPECIFICATIONS
- NAMES OF PARTS AND ACCESSORIES
- WARNING
- Location
- Power cord
- Personal safety
- Other safety considerations
- Treating scalds
- Electrical requirements
- BEFORE FIRST USE
- PREHEAT FUNCTION
- DEEP PAN
- CLEANING
- WARNING: NOT Dishwasher safe
- MAINTENANCE
- WARRANTY
- NOTES
- morphy richards
Brand : MORPHY RICHARDS
Model : MRMP3RD
Category : Fault