LZH-124 - Water pump Sunnydaze Decor - Free user manual and instructions
Find the device manual for free LZH-124 Sunnydaze Decor in PDF.

User questions about LZH-124 Sunnydaze Decor
0 question about this device. Answer the ones you know or ask your own.
Ask a new question about this device
Download the instructions for your Water pump in PDF format for free! Find your manual LZH-124 - Sunnydaze Decor and take your electronic device back in hand. On this page are published all the documents necessary for the use of your device. LZH-124 by Sunnydaze Decor.
USER MANUAL LZH-124 Sunnydaze Decor
40" Curved Plinth Pineapple Water Fountain(LZH-124)
SAFETY PRECAUTIONS
This fountain is intended for outdoor use only.
Place your fountain in a location where any water spills or splashing will not reach any other electrical equipment or cause damage.
Choose an appropriate location before installing the fountain. DO NOT lift or push/drag the water basin to relocate the fountain when it's filled with water. Empty the water basin before lifting.
Excessive weight or pressure on any of the fountain sections may cause it to tip or fall over.
Keep pets and children away from any of the fountain sections.
Some splashing may occur. To avoid injury from electrical shock, observe basic safety precautions and comply with the following instructions:
The pump on your fountain has no user serviceable parts. Only an authorized service representative should service the pump. Do not open the sealed pump housing as this may result in electrical shock. Refer to enclosed pump maintenance guide for cleaning.
-
Install the fountain pump correctly before operating it.
-
DO NOT allow the pump to run dry.
-
An adult should supervise children when they are around the pump.
-
Use the proper power source as indicated on the pump label.
-
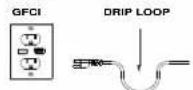
Equip the electrical power for the pump with a ground fault circuit interrupter (GFCI).
-
If the entire fountain falls into the water accidentally, turn off the circuit breaker immediately.
-
If any leakage occurs around the pump housing, turn off the circuit breaker immediately and have the pump serviced by a registered technician.
-
Do not operate the fountain if the pump has been dropped or has a damaged power cord or plug.
-
If the plug or your wall receptacle gets wet due to water dripping down the power cord or for any other reason, do not remove the plug from the wall outlet until the circuit breaker is turned off
NOTE: Allow the pump power cord to hang at a lower level than the wall outlet to form a "drip loop
”. This will help prevent water from dripping down the power cord and getting into the wall outlet.
- Always unplug the fountain pump and any other independent electrical accessories
(e.g. lights) from the outlet when not in use and before cleaning or replacing parts.
-
Disconnect the power cord from the outlet by holding the plug, not by pulling on the power cord.
-
Periodically change the water. Clean the fountain water basin, the pump's outlet nozzle and the water tube for dirt and debris with a damp cloth if necessary.
-
Do not expose the pump to direct sunlight or to low temperatures for any period of time.
-
Keep the power cord away from high temperatures or heat sources.
-
Use only a UL-approved extension cord of the correct rating to avoid overheating
TROUBLESHOOTING
- If your FOUNTAIN PUMP fails to operate please check the following:
a) Make sure the pump is plugged into the socket properly.
b) Check the water level in the fountain. Running the pump without sufficient water can damage the pump.
c) Check the setting of the flow control on the pump. Check the pump outlet nozzle and the water tube for dirt and debris. Clean if necessary.
d) Make sure the pump is connected to the water tube tightly. Check the fountain tubing for kinks and obstructions
e) The pump may be "air locked". Plug and unplug the pump several times to clear any air that may have been trapped.
- If the water does not flow out of the fountain, it may be caused by kinked or loose water tubes, make sure water tubes are connected properly.
ASSEMBLY PICTURES

Fig7 Fig 8 Fig 9
ASSEMBLY INSTRUCTIONS
Step 1: Place the base pedestal and the large basin on a level surface. route the pump's power cord downwards through the resin tube in large basin. Lay the pump in the bottom of the large basin. And then route the pump's power cord through the base pedestal, the cord exits through the slot in the bottom of base pedestal., Lastly align the large basin with base pedestal, insert the large basin and twist clockwise to lock in place securely. (pls refer to the fig. 1,2,3)
Step 2: Place the center pedestal and the small basin on a level surface. align the small basin with center pedestal, make sure matching the slot under the center pedestal to the blocks on the small basin, insert the small basin and twist clockwise to lock in place securely. (pls refer to the fig.4,5)
Step 3: Route the water tube of the fountain topper downwards through the middle hole of the small basin, then align the fountain topper with the small basin. Make sure matching the slot under the fountain topper to the blocks on small basin. Insert the fountain topper and twist clockwise to lock in place securely, (pls refer to the fig.6,7)
Step 4: Route the water tube of the assembled topper downwards through the assembled large basin. through the door of Center Pedestal, Connect the water tube to the outlet nozzle of pump. Make sure the connection is tight. insert the assembled topper and twice clockwise to lock in place securely. (pls refer to the fig.8,9)
Step 5: Put the board located at the door of the Center Pedestal.
Step 6: Fill the large basin and small basin with water. Make sure the pump is completely submerged in water.
Step 7: Plug the pump power cord to the wall outlet to run the fountain.

Be careful not to spill water onto the plug of the pump. DO NOT allow the pump to run dry!