
Bazzazian Tapes - Electronic musical instrument NATIVE INSTRUMENTS - Free user manual and instructions
Find the device manual for free Bazzazian Tapes NATIVE INSTRUMENTS in PDF.

| Product Type | Software Effect Plugin |
| Version | 1.0.0 |
| Platform Compatibility | Windows 10+, macOS 10.14+ |
| Supported Plugin Formats | VST3, AU, AAX |
| Bit Depth | 64-bit |
| License Type | Serial number activation via Native Access |
| Installation Method | Native Access installer |
| Main Functions | Tape saturation, wow & flutter, noise, EQ, compression |
| Presets | Over 50 factory presets |
| CPU Usage | Optimized for real-time use |
| Sample Rate Support | Up to 192 kHz |
| Standalone Operation | Not supported (plugin only) |
| Maintenance | Update via Native Access |
| Safety | No physical hazards; use authorized sources |
| Repair/Spare Parts | Not applicable; reinstall if needed |
| User Interface | Resizable window with high-resolution graphics |
| Documentation | PDF manual included |
| Manufacturer | Native Instruments GmbH |
| Release Year | 2020 |
Frequently Asked Questions - Bazzazian Tapes NATIVE INSTRUMENTS
User questions about Bazzazian Tapes NATIVE INSTRUMENTS
0 question about this device. Answer the ones you know or ask your own.
Ask a new question about this device
Download the instructions for your Electronic musical instrument in PDF format for free! Find your manual Bazzazian Tapes - NATIVE INSTRUMENTS and take your electronic device back in hand. On this page are published all the documents necessary for the use of your device. Bazzazian Tapes by NATIVE INSTRUMENTS.
USER MANUAL Bazzazian Tapes NATIVE INSTRUMENTS
natural_image
3D rendering of a piano keyboard with glowing musical notes and a coffee cup, set against a dark background (no text or symbols visible)Table of Contents
- Disclaimer .... 1
- Welcome to Bazzazian Tapes 2
Document Conventions 3
- Installation and Setup 4
- Main Overview 6
- Browser 8
Browser Overview 8
- Snapshots 9
Snapshots Overview 9
Saving a User Snapshot 10
Loading a Snapshot 10
Deleting a User Snapshot 11
- Sound Editor 13
Sound Editor Overview 13
Layer 14
Effects 14
Filter 15
LFO 16
Modulation Envelope 17
Amp Envelope 18
Modulation 19
- FX Editor 21
FX Editor Overview 21
Managing FX Presets 22
- Sequencer 24
Sequencer Overview 24
Pitch and Velocity 25
Macros 26
Sequencing Pitch 27
Sequencing Macros 28
Managing Sequencer Presets 29
- Macro Editor 31
Macro Editor Overview 31
Macro Assignments 32
Macro Shaper Options Menu 35
Managing Macro Shaper Presets 36
- Settings 38
Overview of the Settings View 38
Velocity Curve 40
Editing the Velocity Curve 41
Managing Velocity Curve Presets 42
- Credits 44
1. Disclaimer
The information in this document is subject to change without notice and does not represent a commitment on the part of Native Instruments GmbH. The software described by this document is subject to a License Agreement and may not be copied to other media. No part of this publication may be copied, reproduced or otherwise transmitted or recorded, for any purpose, without prior written permission by Native Instruments GmbH, hereinafter referred to as Native Instruments.
"Native Instruments", "NI" and associated logos are (registered) trademarks of Native Instruments GmbH.
All other trademarks are the property of their respective owners and use of them does not imply any affiliation with or endorsement by them.
Document authored by Hannah Lockwood, Jonas Körwer
Software version: 1.0 (7/2023)
2. Welcome to Bazzazian Tapes
Bazzazian Tapes digs deep into the archives of one of the most pioneering producers in German hip hop. Packed with character and curiosity, it delivers an eclectic collection of melodic instruments, all run through high-end rack gear, vintage tape machines, and boutique pedals. From retro keyboards and modular synth leads to e-bowed guitars, antique harmoniums, and woodwinds, it's got all you need to bring a retro flair to modern productions.
As with all Play Series instruments, Bazzazian Tapes aims to balance intuitive, performance-focused control with nuanced sound design. The macros offer quick and dynamic control over the synth engine, enabling you to effortlessly shape presets and customize your own sounds. For those who wish to go deeper in sound design, you will find powerful sound editing tools and custom effects chains that offer further control and inspiration. Bazzazian Tapes also contains an analog-style sequencer that can produce chords, arpeggios and melodic, rhythmical patterns. Ultimately, these tools aim to empower you in your own sound creation!
In this user manual, you will learn about the main controls and workflows to get started making music.
We hope you enjoy this instrument!

Document Conventions
In this document the following formatting is used to highlight useful information:
ItalicsIndicates paths to locations on your hard disk or other storage devices
Bold Highlights important names, concepts, and software interface elements.
[Brackets] References keys on a computer's keyboard
The following three icons represent different types of information:

The light bulb icon indicates a useful tip, suggestion, or interesting fact.

The information icon highlights important information that is essential for the given context.

The warning icon alerts you of serious issues and potential risks that require your full attention.
3. Installation and Setup
Before you can make music with Bazzazian Tapes, you must install and setup the necessary software. Follow these instructions to get started.
Native Access
Native Access allows you to install the software for Bazzazian Tapes. If you are new to Native Instruments, you first must create a Native ID. To learn more about Native Access, visit our support page here.
- Download and install Native Access here.
- Open the Native Access application.
- Create a Native ID, if you do not yet have one.
- Login to Native Access using your Native ID.
- Click the Available tab in the upper header.
6.Click Kontakt. - Click Install for the following products:
• KONTAKT or KONTAKT PLAYER
• Bazzazian Tapes
→ The software is installed automatically.

If the software is already installed, click the Available updates tab and check for new updates before proceeding.
Bazzazian Tapes via KONTAKT
Once installed, you can start using Bazzazian Tapes in KONTAKT. Bazzazian Tapes is not an independent plug-in, so you first need to open an instance of KONTAKT or KONTAKT PLAYER:
- Open KONTAKT as a plug-in in your host software (DAW), or as stand-alone application.
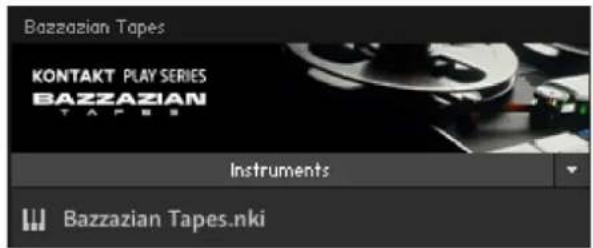
- Locate Bazzazian Tapes in the Browser, on the left side of the user interface.
- Click Instruments to open the product's content.
- Double-click the Bazzazian Tapes.nki file to load the instrument.

If you are new to KONTAKT and want more information, visit KONTAKT PLAYER and KONTAKT.
4. Main Overview
Bazzazian Tapes offers a simple but powerful interface built around two sound source layers and six macro controls. Five additional views—Sound, FX, Sequencer, Macros and Settings—provide further controls and editing options for different parts of the synth engine. The six macros can be assigned to various dedicated sound parameters for instant sound sculpting from any view.
The Sound Editor covers all sound generating features, including traditional subtractive synthesizer controls and lo-fi sound-shaping tools. In the FX Editor, you can create custom effects chains for further tonal control and expression. In the Macro Editor, you can assign and manage the six macros to suit your needs. In the Settings view, you can tweak how the synthesizer reacts to your playing style and how notes are prioritized for each layer. Using the sequencer, you can create a 16-step melodic phrase, with velocity modulation for control over dynamics. Six additional sequencing lanes provide further control over the six macros, allowing for precise and nuanced sound design, as well as dramatic and unexpected discoveries.
Bazzazian Tapes contains the following main elements and controls:

1.SOUND: Opens and closes the Sound Editor. Here you can edit the individual sound sources (A/B) and access parameters for tuning, filters, effects, envelopes, and modulation. For more information, refer to Sound Editor.
- FX: Opens and closes the FX Editor. Here you can edit effects parameters and the effects chain. Click the power icon next to FX to switch all FX on or off. For more information, refer to FX Editor.
3.SEQ: Opens and closes the Sequencer. Use the Sequencer to create a melodic sequence of up to sixteen steps, and use the additional six lanes to modulate each of the macro assignments. For more information, refer to Sequencer.
4.MACROS: Opens and closes the Macro Editor. Here you can assign macros, set minimum and maximum macro values, adjust the Macro Shaper Curve and change the order of the macro controls. For more information, refer to Macro Editor and Macro Assignments.
- SETTINGS (cog icon): Opens and closes the Settings view. Here you can set Note Priority, Key Range, Glide, Velocity Curve, Voice Preserve, and Bend Range. For more information, refer to Settings.
- Layer A: Contains the sound source for layer A. Click the letter A to turn the layer on or off. Turning the layer off will purge all samples from memory and reduce CPU usage. Click the waveform display to open the Browser and search for a new sound source for layer A. For more information, refer to Browser.
- Layer B: Contains the sound source for layer B. Click the letter B to turn the layer on or off. Turning the layer off will purge all samples from memory and reduce CPU usage. Click the waveform display to open the Browser and search for a new sound source for layer B. For more information, refer to Browser.
- Balance: Adjusts the volume level of layer A and layer B by blending between them. Turning the knob left increases the Volume level of layer A, and turning it right increases the level of layer B. The Balance control knob is available in all Snapshots.
- Macros 1-6: Six control knobs are preassigned to the most important parameters, and can be accessed at all times from the bottom panel. Each Snapshot provides a different set of macro assignments that help to define that sound. You can edit different macro assignments in the Macros view. The macro control knobs are available in all Snapshots, however, their labels reflect the individual macro assignment of the Snapshot. For more information, refer to Macro Editor and Macro Assignments.
- Volume: Adjusts the main volume level. The Volume control is available in all Snapshots.
- Randomize (icon): Applies random changes to the parameters and settings of the current Snapshot. This includes the layers' sound sources, the Balance control, and all macros. Pressing [Ctrl] / [Cmd] + clicking randomizes only the sound sources. Pressing [Shift] + click randomizes only the Balance control and all macros. The Randomize button is available in all Snapshots.
5. Browser
The Browser allows you to explore the collection of 99 sounds. They showcase wide variety of sources which come together in their gritty, retro sound identity and can be freely mixed, matched, and sequenced for your own unique production.
Use the Browser to experiment with new sound combinations and customize your own presets by searching and loading different sound sources for layers A and B. Access the Browser by clicking the Browser icon (magnifying glass) in the Sound or Settings view, or via the waveform display in the Main view.
Browser Overview
The Browser contains the following features and controls:
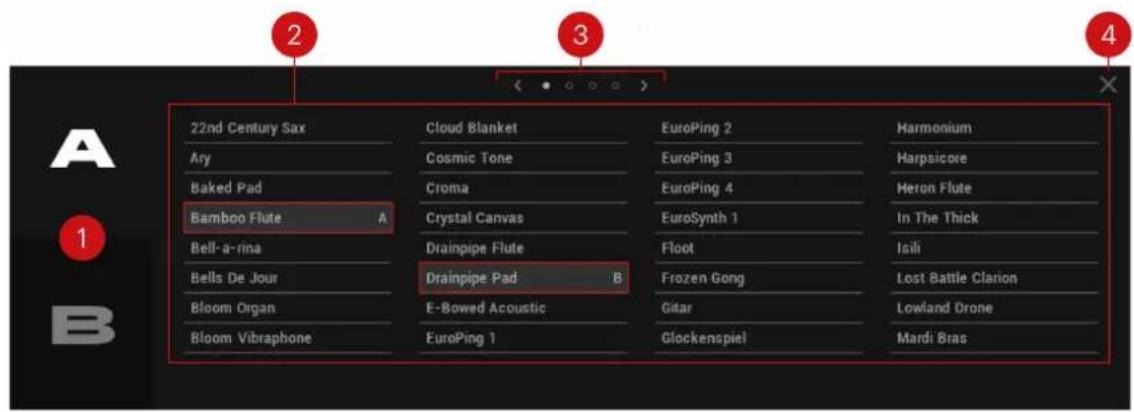
- Layer Selection: Selects the layer of the current Snapshot. Click the letter A or B to switch between each layer. Once a layer is selected, you can browse and load a different sound for that layer.
- Sound Sources: Lists the sound sources that are available for each layer. Click a sound source to select it for the current layer. Double-click a sound source to load it and close the Browser. The letter A or B next to the name of a sound source indicates that it is currently selected for that layer.
- Pages: Provides access to the different pages of the Browser. Click the dot symbols to open the corresponding page of sound sources, or use the arrow icons (<> ) to browse through each page.
- Exit (X icon): Closes the Browser and returns to the Main view.
6. Snapshots
Bazzazian Tapes contains a collection of 150 presets, called snapshots, which are presented across eleven categories: Bass, Bowed Strings, Keys, Mallet Instr, Organ, Plucked Strings, Reed Instr, Sound Effects, Soundscapes, Synths, and Vocals. These Snapshots were created by Bazzazian himself and are all heavily treated with original, vintage gear resulting in a distinct retro tape vibe. Sound sources can be blended using the Balance control, providing further dynamic character and timbre. This diverse selection of presets showcases the full range of Bazzazian Tapes' synth engine and aims to provide you with inspiration for your own unique productions.
Snapshots offer a quick and convenient way of browsing for new sounds and saving custom presets. When browsing Snapshots, the macros are an effective way to explore the sonic potential of each preset sound. Snapshots are also a useful starting point from which you can tweak and tailor your own sounds. When a User Snapshot is saved, the macro settings, parameter controls, and sequence are also stored within the preset. Using Snapshots, you can create your own preset sounds, save them in the .nksn file format and use them in other projects, across computers or even share them with other users.
Snapshots Overview
Snapshots offer a quick and convenient way of browsing for new sounds and saving custom presets. Key features relating to Snapshots include:

- Load Snapshot: Opens the Snapshot menu where you can load a Snapshot from the Factory or User library. For more information, refer to Loading a Snapshot.
- Snapshot Name: Displays the name of the currently selected Snapshot.
- Snapshot Previous/Next (<> icons): Allows you to quickly browse and load Snapshots. Pressing an arrow icon will load the previous or next Snapshot in the selected category. If no Snapshot is active, the first Snapshot on the list will be loaded. For more information, refer to Loading a Snapshot.
- Save Snapshot (floppy disk icon): Allows you to save changes made to a sound. When a User Snapshot is saved, the macros settings, parameter controls, and sequence are stored within it and can be accessed at any time via the User library. For more information, refer to Saving a User Snapshot.
- Delete Snapshot (bin icon): Deletes the currently selected Snapshot from the User library. You can only delete User Snapshots and not Factory Snapshots. For more information, refer to Deleting a User Snapshot.
- Snapshot View (camera icon): Provides access to the Snapshot features described above; saving, loading, browsing, and deleting. When Snapshot View is selected, configuration settings and features relating to the Info View are replaced in the display.
Saving a User Snapshot
Snapshots can be saved at any time while you are working on them. When a Snapshot is saved, the macro settings, parameter controls, and the sequence are also saved. You can choose to save a sequence separately using the Sequencer Preset Manager and then load it back later to try it out with another sound. For more information, refer to Managing Sequencer Presets.
To save a Snapshot:
- Click the Snapshot View button (camera icon) to open Snapshot view.
- Click the Save button (floppy disk icon).
- Enter a name for your new Snapshot in the Save dialog box.
- Click Save to finish the process and close the dialog box.

→ Your Snapshot .nksn file is saved to the User Snapshot Library. It appears in the User Snapshot list.
To overwrite a Snapshot:
- Click the Snapshot View button (camera icon) to open Snapshot view.
- Click the Save button (floppy disk icon).
- Click Overwrite to confirm the process.
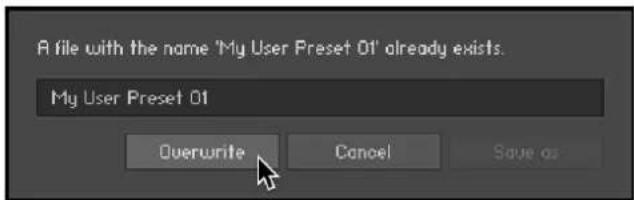
→ Your Snapshot .nksn file is saved to the User Snapshot Library, in replace of the old file.
Loading a Snapshot
Snapshots are loaded from the drop-down menu in the top header of the instrument. You can also use the arrows to the left of the floppy disk icon to load the previous or next preset.
To load and browse Snapshots using the arrow icons:
-
Click the Snapshot View (camera icon) to open Snapshot view.
-
Click the arrow icons (<> ) in the Snapshot header to browse through the Snapshots list.
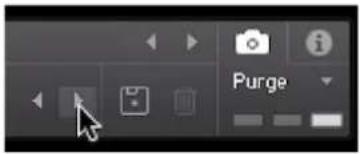
→ The previous or next Snapshot will load immediately each time an arrow icon is clicked.
To load a Snapshot from the library:
-
Click the Snapshot View (camera icon) to open Snapshot view.
-
Click the arrow icon next to the Snapshot name field to open the Snapshot menu.
-
Select the Factory category to load a Factory preset, or select the User category to load one of your own Snapshots.
-
Select an instrument category, if available.
-
Select a Snapshot to load it.
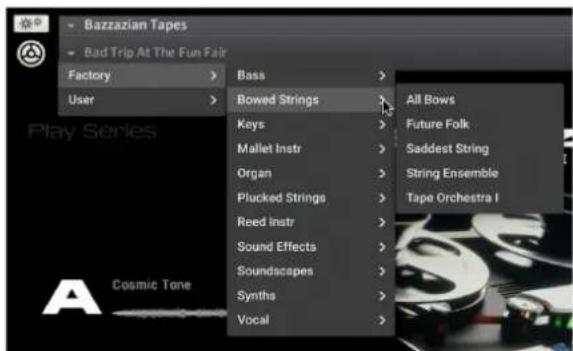
→ The loaded Snapshot is displayed in the instrument header.

The User category will not appear until you have first saved a Snapshot.
Deleting a User Snapshot
Snapshots can be deleted using the bin icon in the instrument header. To delete a User Snapshot:
-
Click the Snapshot view (camera icon) to open Snapshot view.
-
Load the User Snapshot you wish to delete.
-
Click the Delete button (bin icon).
-
Confirm deletion of the Snapshot by selecting Yes in the dialog box.

→ The User Snapshot .nksn file is deleted from the User Snapshot Library.
7. Sound Editor
The Sound Editor contains all controls related to the selection and editing of sound sources. Adjust the tuning, pan, and volume of the sound sources, apply lo-fi effects and filtering to each layer, and customize the modulation sources. You can edit each layer separately, or both simultaneously using Layer Link. If you're searching for some inspiration, try the randomize feature and see where it takes you.
Sound Editor Overview
The Sound Editor contains the following elements and controls:

The Sound Editor
- Layer Link: When activated, layers A and B are linked. Any edits performed in the selected layer will also be applied to the other layer. Press [Ctrl] / [Cmd] + click the Layer Link button to instantly set all parameters on the layers to match. Layer linking does not apply when assigning or moving macros, and some wavetable and lo-fi effects parameters will not be matched.
- LAYER: This includes all sample settings such as tuning, pan, and volume. For more information, refer to Layer.
- EFFECTS: Adds various digital artifacts, like quantization noise or aliasing, to your layer. For more information, refer to Effects.
- FILTER: Adjust the brightness of the sound and determine how this changes across the range of the keyboard. There are a range of filter types available, each providing a different sound characteristic. For more information, refer to Filter.
- LFO: Provides controls relating to the function and behavior of the two Low-Frequency Oscillators. LFOs produce periodic modulation, which can be used to modulate various parameters in the Sound and Effects Editors. For more information, refer to LFO.
- MOD ENVELOPE: Adjusts how the modulation is applied to a sound over time. For more information, refer to Modulation Envelope.
-
AMP ENVELOPE: Adjusts how the amplitude of a sound changes over time, from the moment the note is played to its release. For more information, refer to Amp Envelope.
-
MODULATION: Selects a Modulation Source from which you can send modulation to various parameters. Once the Modulation Source is selected, sliders appear next to the available parameters to adjust the amount of modulation applied. For more information, refer to Modulation.
Layer
The Layer section sets the foundation of the sound. Here you can select a sound source, set key tracking and adjust the base pitch. Additionally, you can place the sound source in the stereo field and adjust its volume.
The Layer section contains the following controls and settings:

The Layer controls in the Sound Editor
- Layer On/Off: Switches the layer on or off. Click the Layer On/Off icon to deactivate the layer, indicated when the icon lights up. Hold [Ctr] / [Cmd] + click the icon to change the opposite layer from its current state.
- Key Tracking (keyboard icon): Tracks the pitch of incoming MIDI messages. When switched off, middle C will be played regardless of which notes are input, however, this fixed pitch can be changed by using the Transpose control. When switched on, the full keyboard range can be played.
- Transpose: Shifts the incoming MIDI notes to transpose the sound source's keyboard range of +/-60 semitones (5 octaves). Press [Alt] / [Opt] and drag to quantize the knob adjustments in octaves.
- Tune: Adjusts the tuning of the sound source in cents in the range of -36/+36 semitones. [Alt] / [Opt] and drag will quantize the adjustments to semitones.
- Pan: Adjusts the panning for the current layer. When the knob is turned left the layer is panned left, and when turned right the layer is panned right.
- Volume: Adjusts the volume for the current layer.
- Sound Source Browse: Click the arrow icons (<> ) to step through sounds for the selected layer. Click the Browser icon (magnifying glass) to open the Browser and search from the full list of sound sources. For more information, refer to Browser Overview.
Effects
The Effects section provides various effects that can be added to the sample or wavetable sound source. When a sample is selected, the effects add various digital artefacts, like quantization, noise, and aliasing, to your sound layers. When a wavetable sound source is selected, the effects relate to the readout, playback, and harmonic content of the wavetable. These effects ultimately shape the sonic character of the sound sources and contribute significantly to the distinct coloration of the instrument.
Lo-fi Sample Effects
When a sample is selected as a sound source, the following controls are available:

The Lo-fi Sample Effects in the Sound Editor
- Effects On/Off: Switches the Effects section on or off.
- Reduce: Re-samples the signal to an adjustable sample rate. The re-sampling is done without any kind of (usually mandatory) low-pass filtering, which causes all kinds of wonderful aliasing artifacts. The sample rate goes all the way down to 50 Hz, which will omit most of the original signal. When the control is in the left-most position there is no reduction. Turning the control right reduces the sample rate.
- Crush: Re-quantizes the signal to an adjustable bit depth. Fractional bit levels (such as 12.4 bits) are possible and can add a significant gritty quality to the sound. Audio CDs have a quantization depth of 16 bits, old samplers' frequently used 8 or 12 bits, and 4 bits evoke memories of countless children's toys. When the control is turned fully left, no effect is applied to the signal. Turning the control right reduces the bit rate.
- Noise: Adds hiss to the audio signal. Turning the control from left to right increases the noise level
- Color: Adjusts the frequency characteristic of the noise and acts as a low-pass filter. Turning the control from left to right increases the amount of filtering applied to the Noise parameter.
Lo-fi Wavetable Effects
When a wavetable is selected as a sound source, the following controls are available:
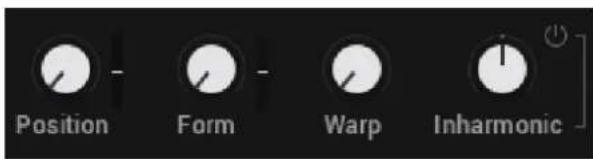
The Lo-fi Wavetable Effects in the Sound Editor
- Position: Morphs between the waveforms included in the loaded wavetable. Modulate this with an LFO for more interesting results.
- Form: Adjusts the amount of waveshaping applied to the phase of the oscillator.
- Warp: Selects one of 14 types of waveshaping that is applied to the wavetable's phase. This fundamentally changes the way the wavetable is read out, therefore bending and warping the resulting waveform.
- Inharmonic: Adds a second oscillator which can be detuned against the first one to produce inharmonic sounds. Turning the control left and right adjusts the amount of detuning in Hertz.
- Inharmonic On/Off: Switches the Inharmonic effect on or off. Switching Inharmonic off can help reduce CPU load.
Filter
Filters take the basic, raw sound of the samples and subtracts frequencies, changing the harmonic content and thereby the character of the sound. This change can be varied over time using modulation to produce more dynamic, animated timbres.
Bazzazian Tapes offer filters from KONTAKT, each providing their own unique characteristics, as well as low-pass, notch, high-pass, and band-pass modes.
The Filter section contains the following controls and settings:
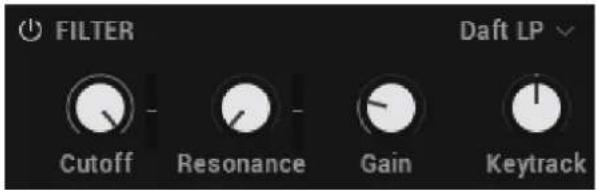
The Filter in the Sound Editor
- Filter On/Off: Switches the layer filter on or off. Click the Filter On/Off icon to deactivate the filter, indicated when the icon is highlighted.
-
Filter Type: Selects a filter type from the drop-down menu. For an overview of each filter type, refer to the KONTAKT 6 Manual, available here.
-
Lowpass filters attenuate harmonics and signals above the cutoff frequency.
- Highpass filters attenuate signals below the cutoff frequency.
- Bandpass filters attenuate signals above and below the cutoff frequency.
- Peak/Notch filters are the inverse of a bandpass filter, as they only remove signals around the cutoff frequency, but allow the signals above and below it to pass through. A peak filter is like a very narrow bandpass.
- Multi filters offer a selection of filter types in either parallel or serial routings.
-
Vocal/Formant filters emulate various resonances of the human vocal tract rather than focus on completely subtracting parts of the frequency spectrum.
-
Cutoff: Allows certain frequencies of the sound source to be heard while others are filtered out. The frequencies that are filtered out will depend upon the filter type you have selected.
-
Resonance: Increases the amplitude around the cutoff frequency. Using this allows you to boost the narrow band of frequencies.
- Gain: Boosts the output of the filter, making it possible to add makeup gain to the post-filter signal level or even overdrive the filter output and add harmonic distortion.
- Keytrack: Sets the amount of modulation from the keyboard to the filter's cutoff frequency. In simple terms, setting a value here means that the higher the note played on the keyboard, the more the filter opens. This adds 'brightness' to a sound as higher notes are played, which is useful in replicating the typical behavior of acoustic instruments.
LFO
LFOs are special-purpose oscillators that produce frequencies below the range of human hearing. They are typically used for periodic modulation to produce changes in sound, such as vibrato (periodic pitch modulation) and tremolo (periodic volume modulation). In Bazzazian Tapes, the LFOs can be assigned to a variety of controls to make periodic changes to parameters over time.
Bazzazian Tapes features two LFOs, that offer a variety of waveforms and can be free-running or synced to the host tempo and retriggered on keypress. Each LFO can be assigned to multiple parameter controls. When selecting an LFO in the Modulation section, all possible modulation destinations are indicated with sliders, which determine the amount of modulation applied. For more information on using modulation, refer to Modulation.
The LFOs contain the following controls and settings:
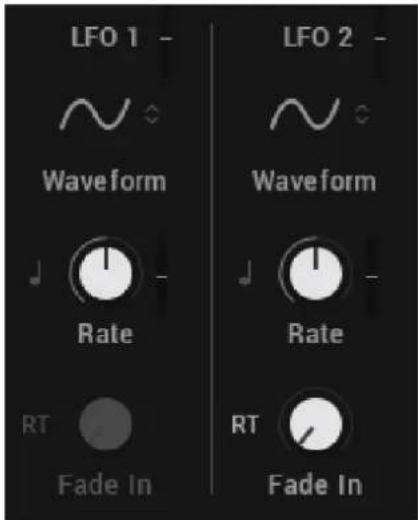
The LFOs in the Sound Editor
- Waveform: Selects the waveform for the LFO. The available waveforms are Sine, Triangle, Sawtooth, 5% Pulse, 15% Pulse, 25% Pulse, 33% Pulse, Square, 66% Pulse, 75% Pulse, 85% Pulse, 95% Pulse, Random, Multi.
- Tempo Sync: Synchronizes the speed of the LFO to your host tempo, or an external MIDI clock. When Tempo Sync is on, the Rate control will display how many notes of this value will make up the duration of one cycle. When inactive, the Rate control operates in Hz rather than rhythmic divisions.
- Rate: Adjusts the frequency of this LFOs output signal in Hz (cycles per second). Values range from 0.01 Hz (one cycle in 100 seconds) to around 210 Hz.
- RT (Retrigger): When activated, the LFO waveform will be restarted at the same position each time a note is received. When inactive, the LFO will run, without reacting to incoming notes.
- Fade In: If this value is greater than zero, the LFO will not start the waveform immediately when a note is received, but rather smoothly ramp it up over a time of up to 10 seconds. This parameter is only available when RT is activated.
Modulation Envelope
The Modulation Envelope is used to shape the contour of the destination over time by giving you control over its attack, decay, sustain, and release stages. It provides flexibility by allowing you to freely assign it to multiple destinations at once and control the amount of modulation applied. Additionally, the Modulation Envelope provides additional control for defining its attack curve.
The Mod Envelope contains the following controls:
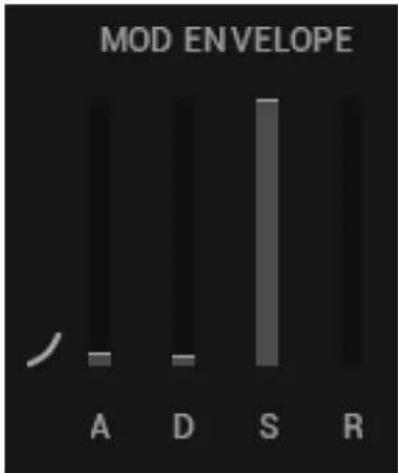
The Modulation Envelope in the Sound Editor
- Attack Curve: Defines the shape of the attack portion of the envelope. Use in combination with the A (Attack Time) to define how the modulation starts after a key is pressed. Click and drag the curve upward or downward to change its shape.
- A (Attack Time): Adjusts the time it takes once a key is pressed, for the envelope to reach the peak level. This control can be used to create modulation with a fast or slow fade-in. Turned fully left, the envelope will start immediately.
- D (Decay Time): Adjusts the time it takes for the envelope to fall from the attack's maximum level to the level defined by the Sustain control. Turning the knob right increases the Decay Time.
- S (Sustain Level): Sets the modulation level that the envelope remains at while the key is held down, after the Decay Time has expired.
- R (Release Time): Adjusts the amount of time it takes for the envelope to fall from the set Sustain Level and fade to zero, once the key is released. It can be used to create modulation with a short or long fade-out.
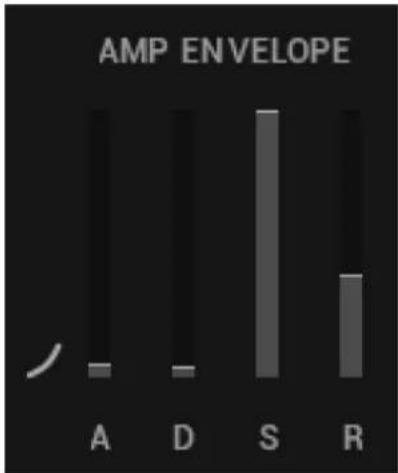
Amp Envelope
The Amp Envelope has a dedicated four-stage envelope generator that is used to shape the volume of a sound over time. The attack, decay, sustain, and release sliders determine the contour of the volume from when the key is first pressed to its eventual fade out, and an additional attack curve allows you to define the shape of the attack stage.
The Amp Envelope contains the following controls:
bar
AMP ENVELOPE | Category | AMP Envelope | |---|---| | A | Low | | D | Low | | S | High | | R | Medium |The Amp Envelope in the Sound View
- Attack Curve: Defines the shape of the attack portion of the envelope. Use in combination with A (Attack Time) to define how the sound starts after a key is pressed. Click + drag the curve upward or downward to change its shape.
- A (Attack Time): Adjusts the time it takes once a key is pressed, for the volume to climb from zero to full volume. It can be used to create a sound with a slow fade-in.
- D (Decay Time): Adjusts the time it takes for the volume to fall from its initial full volume to the level set by the Sustain control while a key is held down.
- S (Sustain Level): Sets the volume level that the envelope remains at while the key is held down, after the Decay Time has expired.
- R (Release Time): Adjusts the time it takes for the volume to fall from the Sustain Level to zero once the key is released. It can be used to create sounds that have a short or long fade-out.
Modulation
Modulation adds movement to your sound by changing parameters over time. When you apply modulation to controls, the controls change their value according to the shape of the modulation signal. There are many sources for modulation, one of the most basic being an envelope. When triggered by a note event, the envelope produces a single contour that can be used to change controls over the course of a note. LFOs provide cyclical, periodic changes that occur at a set rate.
Modulation can also be applied manually by assigning Velocity, Aftertouch, or a Modwheel as the source. This provides a tangible form of expression that can add dynamics and variation to a sound as you're playing. For example, you could set the modulation wheel on your keyboard as the source to control the effects, or use the velocity of your key playing to control the amount of filter cutoff.
The Modulation section contains the following controls:

Applying modulation to the Volume parameter, with LFO 2 selected as the Modulation Source.
- Modulation Source: Selects a target source from the seven Modulation Sources that allows you to apply modulation to various other parameters. The Modulation Sources include a Mod Envelope, Amp Envelope, LFO 1, LFO 2, Velocity, Aftertouch and Modwheel. Hold [Ctr] / [Cmd] + click the Modulation Source button to reset all modulation assignments to their default value.
- Modulation Sliders: When a Modulation Source has been selected, sliders appear next to the relevant parameter controls that are available for modulation.
- Modulation Amount: Use the sliders to set the amount of modulation applied to a parameter. This determines the strength of the modulation applied from the selected Modulation Source. Click + drag the mouse up and down to set the amount. The value range is -100% to 100%.
8. FX Editor
Bazzazian Tapes features a range of powerful KONTAKT effects that can be loaded into six FX unit slots and applied globally to both layers. From classic time-based effects like reverb, delay and chorus, to dynamic effects, saturation, amp emulations and more, the FX Editor encourages creativity and allows you to further define the character of your sound.
In the FX Editor, you can access the various parameter controls and settings relating to the FX units, FX chain and FX presets. Using the parameter controls you can alter the effects chain of any preset and build custom effects chains for your own user presets. Browse and replace effects from the dropdown menus, and quickly change the order of the FX chain by dragging an FX unit to another position. Both layers A and B have their own EQ, which can be bypassed using the power buttons. Additionally, you can assign parameters of the loaded effects to any of the macro controls. For more information, refer to Macro Editor.
FX Editor Overview
The FX Editor Overview contains the following elements and controls:

The FX Editor
- FX Preset Menu: Enables you to save and load your effects unit presets, your effects chains and quickly initialize either an effects unit or effects chain. For more information see, Managing FX Presets.
- Layer A/B EQ: Selects the equalizer for Layer A or B. Equalization, or EQ for short, means boosting or reducing (attenuating) the levels of different frequencies in a signal. When an EQ is selected the controls for the equalizer appear below and the settings for each frequency band (low, low mid, high mid and high) and their respective gain can be adjusted. Q allows you to attenuate or boost a very narrow or wide range of frequencies within each EQ band.
- FX Chain: Represents the effects chain i.e., the order of the effects for both layers which run in series. You can change the order of the effects by clicking + dragging an FX unit left or right.
-
FX Units: Represents each effect within the FX Chain. Switch the effect on or off by clicking the power button. Use the drop-down menu on the right of each unit to load an effect. The controls for the selected FX unit are displayed below. For more information on the effects, refer to the KONTAKT manual. Its available from the Help menu or the Native Instruments website.
-
FX Parameter Controls: Displays the parameter controls for the selected FX unit. Each effect has a its own range of controls and settings that are specific to its function and behavior. For more information on the effects and their related controls, refer to the KONTAKT manual, available from the Help menu or the Native Instruments website.
Managing FX Presets
While FX settings are automatically saved with each Snapshot, the FX Preset Management allows you to manage your FX unit and FX chain presets separately, and load them onto any Snapshot. The clear function removes the loaded FX unit or FX chain, and the reset option restores an FX unit to its default values.
The following workflows demonstrate how to save, load, reset and clear your FX units and chains:

The FX Preset Management menu
Saving an FX Preset
To save an FX preset:
- Click FX to enter the FX view.
-
Click the FX Preset Management icon in the top left corner.
-
Select Save FX unit preset... or Save FX chain preset...
4.Enter a name for your preset.
5.Click Save
→ The FX preset is saved as an .nka file.

Macro assignment and settings are not stored in the FX presets.
Loading an FX Preset.
To load an FX preset:
- Click FX to enter the FX view.
- When loading an FX unit preset, first select the target FX unit slot in the chain.
- Click the FX Preset Management icon in the top left corner.
- Select Load FX unit preset... or Load FX chain preset....
- Select a preset file.
6.Click Load
→ The FX preset is loaded into the selected FX unit or the FX chain.

Loading an FX preset will overwrite any current User preset being used with the snapshot.
Resetting an FX Unit
To reset an FX unit:
- Click FX to enter the FX view.
- Select the FX unit you want to reset.
- Click the FX Preset Management icon in the top left corner.
- Select Reset FX unit.
→ The FX unit is restored to its default settings.
Clearing FX
To clear an FX unit or FX chain:
- Click FX to enter the FX view.
- Select the FX unit or FX chain you want to clear.
- Click the FX Preset Management icon in the top left corner.
- Select Clear FX unit or Clear FX chain.
→ The loaded FX is removed and None will be displayed in the FX unit(s).

A few parameters require some processing latency so they will not respond in real-time. These are Cabinet/IRVerb Size, HPF and LPF.
9. Sequencer
Bazzazian Tapes replicates the power and functionality of an analog sequencer. Accessed via the SEQ tab, the sequencer provides one lane for creating a melodic sequence of up to sixteen steps, and a further six lanes to modulate each of the macro controls and its respective assignments. These additional sequencing lanes allow you to shape your sound with precision and nuance over the course of a sequence.
Sequencing the pitch means you can create a musical phrase, and then modulate the velocity of each step to change the dynamics of the sound. Additionally, the velocity of the modulated steps can be set to change relative to how hard you play, using the Scale by Velocity feature in the Settings view. For more information, refer to Settings. The sequencer can be set to affect only one layer, or both layers together. Parameters like Rate, Direction, and Swing provide control over the timing and playback of your sequences.
Sequencer Overview
The Sequencer contains the following controls that are available at all times and apply to all sequencer lanes (Pitch/Velocity and Macros 1–6):

The global controls of the Sequencer
- Sequencer Preset menu: Use this menu to save and load sequencer presets, and initialize sequencer lanes. For more information see, Managing Sequencer Presets.
- Latch: Latches the sequencer on or off. When Latch is on, the sequencer will run continuously from a single note trigger. Notes played will continue to play until the sequencer or Latch is turned off. Pressing a new note will transpose the sequence relative to the new note value.
- Retrigger: Switches retrigger on or off. When Retrigger is on the sequencer restarts every time a new note is played.
- First Step: Sets the starting step of the sequence when it is retriggered.
- Rate: Sets the playback rate of the sequencer relative to the DAW/host tempo (in BPM) and is adjustable in specific note values.
- Swing: Sets the sequencer swing amount. Turning the Swing knob to the right increases the amount of swing added to the sequence.
- Root Key: Sets the root key of the sequencer.
-
Scale: Sets the scale of the sequencer. Turn the control or use the drop-down menu to select a scale.
-
Global: Switches the sequencer scale lock on or off. When activated, the currently selected scale type and its root key will be used for all Snapshots.
- Sequence Lanes: Displays the individual sequence lanes for the selected set of controls.
Pitch and Velocity
The following controls are displayed when the Pitch / Velocity tab is selected in the Sequencer view:

The Pitch and Velocity controls of the Sequencer
- Pitch / Velocity tab. Displays the pitch and velocity sequencing lanes where you can enter notes and velocity levels.
- Pitch Sequence Lane: Sets the offset for the pitch. The range is +/- 2 octaves.
- Velocity Sequence Lane: Sets the offset for the velocity. The range is 0–127. A value of 0 results in no note being triggered for that step, even if there is a value already set in the pitch lane.
- Scale by Velocity: Switches the Scale by Velocity on or off. This function scales the note velocity of the sequence with input velocity that is played via a keyboard or MIDI device.
-
Layer Routing: Sets which layers are affected by the pitch sequencer. Turn the control to route the pitch sequence to a layer. The available options are as follows:
-
None: Plays no layers.
• A: Plays only layer A.
• B: Plays only layer B. -
A+B: Plays both layers A and B. The balance of the layers can be adjusted using the Balance macro knob on the far-left.
-
Steps: Sets the sequence length in steps. Click and drag the mouse up or down to adjust the number of steps.
-
Direction: Sets the direction of the sequencer. Click and drag the mouse up or down to adjust the direction of the sequence. The available options are in the following order:
- Forward: This is the default playback direction. The sequence plays forward from left to right.
• Backward: The sequence plays in reverse, beginning with the final note of the sequence.
- Fwd > Bwd (Forward-Backward): The sequence plays forward in its entirety, then backward in its entirety.
- Bwd > Fwd (Backward-Forward): The sequence plays backward in its entirety, then forward in its entirety.
- |Fwd > Bwd| (Forward-Backward with repeating edge notes): The sequence plays forward in its entirety, then backward in its entirety with repeating edge notes.
- |Bwd > Fwd| (Backward-forward with repeating edge notes): The sequence plays backward in its entirety, then forward in its entirety with repeating edge notes.
- Random: The sequence plays in continuously varying random order.
- Gate: Sets the note sequence gate length (scales to a percentage of the sequencer rate value).
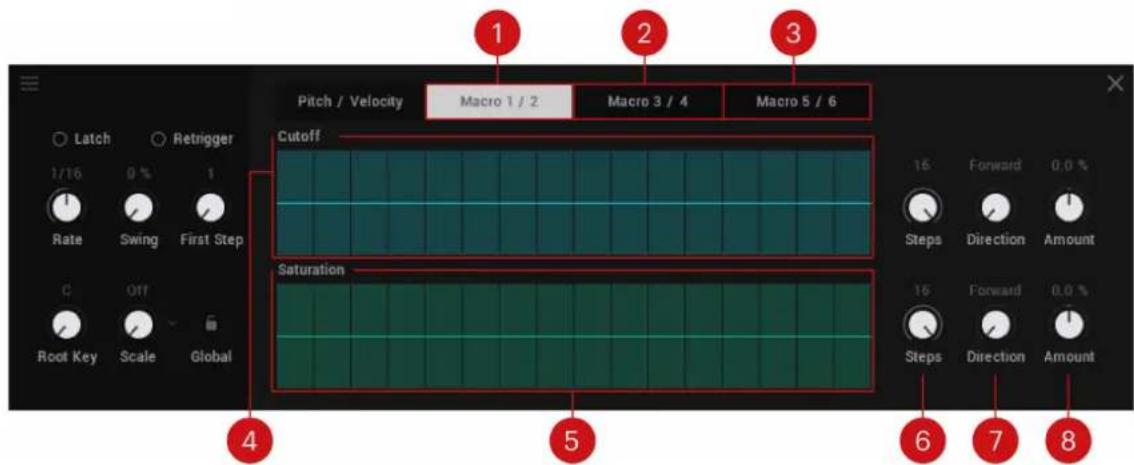
Macros
The following controls appear when a Macro tab is selected in the Sequencer:
The Macro controls of the Sequencer
-
Macro 1 / 2 : In the sequencer lanes that appear you can add modulation for up to 16 steps.
-
Macro 3 / 4: Displays the sequence lanes for Macros 3 and 4. In the sequencer lanes that appear you can add modulation for up to 16 steps.
-
Macro 5 / 6: Displays the sequence lanes for Macros 5 and 6. In the sequencer lanes that appear you can add modulation for up to 16 steps.
-
Macro Sequence Lane: Draw in the modulation amount for the corresponding macro. Press [Ctrl] / [Cmd] + click any step to reset any its current modulation value.
-
Macro Sequence Lane: Draw in the modulation amount for the corresponding macro.
-
Steps: Sets the sequence length of the corresponding macro in steps. Click + drag the mouse up or down to adjust the number of steps.
-
Direction: Sets the sequence playback direction for the corresponding macro. The options are the same as listed for the Pitch and Velocity controls above.
-
Amount: Sets the sequence modulation amount for the corresponding macro. Press [Ctrl] / [Cmd] + click to set to 0%, effectively bypassing the macro sequencer. Press [Alt] / [Opt] + click to set the amount to the maximum positive value, or press [Ctrl] / [Cmd] + [Alt] / [Opt] + click to set the amount to the maximum negative value.
Sequencing Pitch
Using the sequencer you can create a musical phrase of up to 16 steps long. Each step has a range of +/- two octaves from the root note. The root note is equal to the note information received from your keyboard, MIDI device or DAW. A sequence is automatically transposed relative to any new note that's played. For greater range, use the Transpose Up or Transpose Down buttons on your keyboard.

Sequencing Pitch in the Sequencer
To sequence pitch:
- Open the sequencer by clicking SEQ in the top-right header.
- If your snapshot already contains a sequence, you can initialize it using the Sequencer Preset menu, refer to Managing Sequencer Presets.
- Select the Pitch / Velocity tab to open the Pitch and Velocity Sequence lanes.
- Set the number of steps for your sequence by adjusting the Steps value. The default setting is 16.
- Set the Root Key and Scale for your sequence.
- To add a pitch value to each step of the sequence, click + drag the mouse upwards or downwards from the horizontal line in the middle. The horizontal line represents the root note of the pitch played. To add note values in semitones above the root note, click + drag upwards. To add values below the root note, click + drag the mouse downwards. As you drag upwards or downwards, the distance from the root note is indicated in semitones and octaves and displayed on the interface.
- Turn on Latch and trigger a note to hear the sequence play. With Latch activated, the sequencer will run continuously from a single trigger, freeing up your hands to adjust and fine-tune the pitch values for each step.
-
Adjust the Velocity amount for each step to change the dynamics of the sound. By default, all steps are set to full Velocity. Drag the mouse down to decrease the Velocity amount for the selected step.
-
Optionally, you can decide if the sequence affects layer A, layer B or both layers using the Layer routing control on the right-hand side. You can adjust this at any time.
10 Experiment with the Swing control.
When you are satisfied with your sound you can save it as a User snapshot or as a separate Sequencer Preset. For more information, refer to Saving a User Snapshot and Managing Sequencer Presets.
Sequencing Macros
In addition to sequencing notes, you can also sequence Macros. These are the six knobs along the bottom of the instrument used to control the preassigned parameters that work best with the selected Snapshot. By sequencing the Macros you can change the sound of the Snapshot over time to create interesting textures and movement when the sequence is triggered. As when sequencing notes, you can also set each Macro to can have a different playback length and direction for more complex modulation patterns.
The Macros are presented in pairs but each Macro has its own individual sequence lane where modulation values can be added for each step of the sequence.
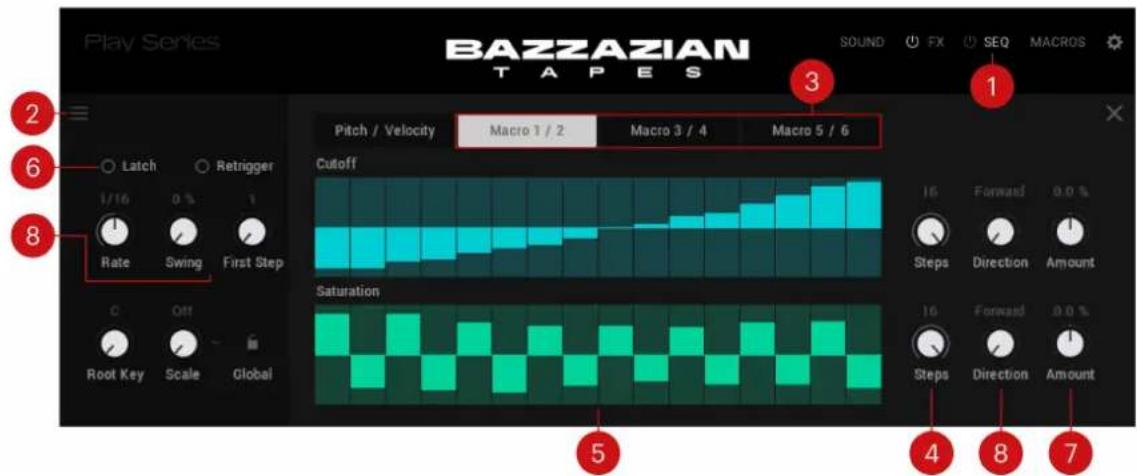
Sequencing Macros in the Sequencer
To sequence a Macro:
- Access the sequencer by clicking SEQ in the top-right header.
- If your Snapshot already contains a sequence, you can initialize it using the Sequencer Preset Management menu, refer to Managing Sequencer Presets.
- Select the sequence lane of the macro you want to sequence, for example, if you want to sequence the fifth macro, select the Macro 5 / 6 tab. In this example, the horizontal sequencing lanes for Macros 5 and 6 open with the sequencing lane for Macro 5 appearing at the top.
- Set the number of steps you would like to sequence by adjusting the Steps value on the right. Setting a different number of steps for each macro can create interesting tonal polyrhythms.
- To add a parameter modulation value to a step, click + drag the mouse upwards from the horizontal line in the middle to add positive values, or click + drag the mouse downwards to add negative values.
-
Turn on Latch and trigger a note to hear the sequence play. With Latch activated, the sequencer will run continuously from a single trigger, freeing up your hands to adjust and fine-tune the modulation values for each step.
-
Adjust the modulation Amount to determine how much the sequence affects the macro control. Dragging the knob left decreases the modulation amount, and dragging it right increases the amount.
- Optionally, to create more diverse patterns, experiment with the Direction controls. For more information on these controls, refer to Sequencer Overview.
Managing Sequencer Presets
While sequences are automatically saved with each Snapshot, the Sequencer Preset Management allows you to save sequences separately and load them onto other sounds. Additionally, the menu provides an initialization function that enables you to reset any part of a sequence to the default values.
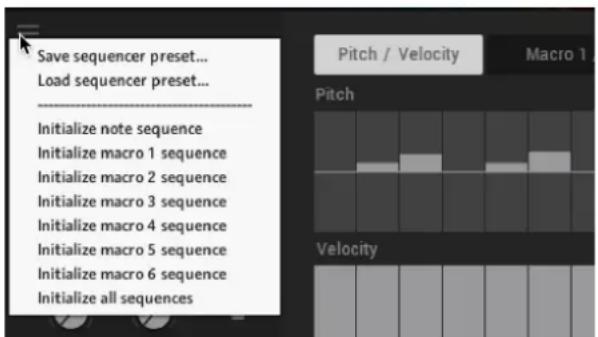
The Sequencer Preset Management menu
The following workflows demonstrate how to use Sequencer Preset Management to save, load, and initialize your sequences.
Saving a Sequence
To save a sequencer preset:
- Click SEQ to enter the Sequencer view.
- Click the Sequencer Preset Management icon in the top left corner.
- Select Save sequencer preset...
- Enter a name for your sequence.
- Click Save.
Loading a Sequence
To load a sequencer preset:
- Click SEQ to enter the Sequencer view.
- Click the Sequencer Preset Management icon in the top left corner.
- Select Load sequencer preset...
- Select a sequence file.
- Click Load.
Loading a sequence will overwrite any current user sequence being used with the Snapshot.
Initializing a Sequence
To initialize all or any part of a sequence:
- Click SEQ to enter the Sequencer view.
- Click the Sequencer Preset Management icon in the top left corner.
- To reset all note values, select Initialize note sequence.
- To individually reset any of the macro sequences, select Initialize macro 1-6 sequence
- To reset the whole sequence (note values and all macros), select Initialize all sequences.
10. Macro Editor
The six macro controls are a core element of the Play Series performance workflow. The macro controls, alongside the Balance and Volume knobs, are the only parameters that remain accessible from any view within Bazzazian Tapes. You can assign up to 12 parameters to each macro, with individually adjustable min/max range for each assignment, and a Shaper Curve that governs how the macro behaves within the defined min/max range. The Shaper Curve is also available for each assigned parameter.
The Snapshots that were created for Bazzazian Tapes each come with their own distinct macro assignments and implementations. In the Macro Editor, you can edit the assigned macro controls of existing snapshots and their parameter ranges, or create your own macro assignments. Toggle between the six macros by clicking the colored buttons displayed horizontally across the top. Clicking any of the buttons allows you to see the list of parameters assigned to them. At the top-right of the Shaper Curve is the Macro Shaper Options menu, which provides various processing and editing options, an additional ways to manage your preset shapes.
Macro Editor Overview
The Macro Editor contains the following elements and controls:

The Macro Editor
- Macro Controls: Each colored block represents a macro control. Click on a macro to display the group of parameters assigned to it and access the parameters' editing tools. Click + drag a colored block left or right to rearrange the order of the six macro controls. For more information, refer to Macro Assignments.
- Macro Range: Sets the minimum and maximum range for the parameter selected in the Macro Slot list.
- Macro Slot List: Displays all parameters assigned to the selected macro control. Each macro has 12 macro slots, facilitating up to 12 different parameter assignments per macro. Click on a macro slot to access the editing options for that assignment, including the Macro Shaper Curve and Range controls.
-
Macro Assignment (icons): The arrow dot icon jumps directly to the page containing the parameter assigned to the macro slot. The dot next to the parameter will blink to draw attention and indicate the assignment. The X icon deletes the assigned parameter from the selected macro.
-
Macro Shaper Curve: Sets the shape of the curve for the selected parameter in the Macro Slot list.
- Macro Options Menu: Provides options to manage your Macro Shaper presets, and contains predefined curve shapes which you can quickly recall for convenience or inspiration. For more information, refer to Macro Shaper Options Menu.
- Macro Shaper Shift (arrow icons): Click the arrow icons to shift the values in the Macro Shaper Curve left, right, up or down. Press [Shift] + click the left or right arrows to move the values in the specified direction, but to retain the first or last value in the table. This creates a limiter-style effect, whereby the first value is repeated as you press [Shift] + click the right arrow. Holding [Shift] + clicking the up or down arrows will create expansion or compression. Pressing [Ctrl] / [Cmd] + clicking will repeat the process ten times.
- Macro Shaper Smoothing: Switches the interpolation for the Macro Shaper Curve on or off. As the Macro Shaper contains only 100 values and macro knobs have a much higher resolution of 1,000,000 values, the shaper curve needs to be mapped to the larger range. When Macro Shaper Smoothing is turned off, transitions between curve steps are strictly quantized. This is useful in certain use cases, for example, a macro assigned to the Tune parameter, and a quantized Curve Shaper to hit various pitches of a scale. When Macro Shaper Smoothing is turned on, transitions between curve steps are linearly interpolated, which provides more fluid behavior. This is especially useful when assigning macros to a filter Cutoff or various effects parameters.
Macro Assignments
Assigning macros in Bazzazian Tapes is intuitive and easy. Not all parameters are available for assignment, including buttons, menus, Transpose, and Envelope Attack Curve. Valid parameters are found only in the Sound and FX Editors.
Macros are also a quick and useful way to navigate around the synth engine, allowing you to move between the Macro Editor and the assigned parameters with a mouse click. The following workflows demonstrate how to assign, remove, rename and rearrange your macro assignments.
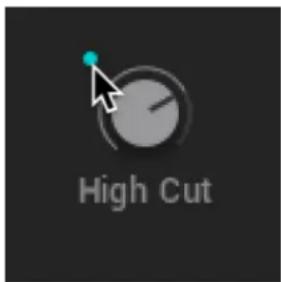
Assigning a Macro
To assign a parameter to a macro:
- From any view in Bazzazian Tapes, select the macro you want to assign.
- Click the colored dot in the top-left corner of a macro knob. It will start blinking to show you that it's in Learn mode.

- While the dot is blinking, click on the parameter you want to assign to the macro. Valid parameters are found only in the Sound and FX Editors.
→ The parameter is assigned to the macro, represented by it matching colored dot,
If you no longer want to make an assignment, or you selected the wrong macro, you can exit Learn mode by clicking the same colored macro dot again.
Setting the Macro Range
When a macro is assigned to a parameter, a popup will appear. Here you can set the parameter range within which the macro will operate.
To set the Macro Range:
- Drag the arrows left or right to adjust the parameter range.
- Drag the bar in the middle to shift the whole range left or right
- [Ctrl] / [Cmd] + click this bar to restore the range to the default value (full parameter range).
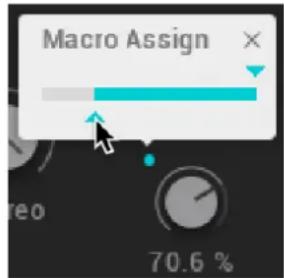
→ The range is set. When you have finished, click the X to exit the Macro Range popup.
Removing a Single Macro Assignment
In the Macro Editor, you can delete a parameter assignment from the Macro Slot list, using the X icon. Alternatively, you can delete an assignment from the parameters.
To remove a macro assignment from a parameter:
- Locate the parameter in the Sound or FX Editor.
- Press [Ctrl] / [Cmd] + click the dot next to the assigned parameter.
→ The assignment is removed from the macro.
Press [Shift] + click the colored dot next to a parameter to instantly jumps to the Macro Editor where the assignment is listed. This provides a nice workflow if you often have to jump between pages.
Removing All Macros Assignments
To remove all macro assignments from a macro control at once:
- From any view in Bazzazian Tapes, select the macro you want to remove all assignments.
- Press [Ctrl] / [Cmd] + click the colored dot next to a macro control.

→ All assignments are removed from the selected macro.
Renaming a Macro
Renaming a macro can be used to help you remember what the assigned parameters do.
To rename a macro:
- Click on the text below the macro knob to edit the current name. Double-click the text to enter a new name.
- Type in your new macro name.

→ The macro now displays the new name.

Note that text input is not possible when the sequencer is running.
Rearranging the Macros
Once you have set up all your macro controls, you might want to rearrange the order in which they appear. This is useful for keeping related controls close to each other and can be tailored to suit your performance needs or playing style.
To change the order of the macros:
- Click MACROS to enter the Macro Editor.
- Click a colored macro button.

- Drag the macro button left or right and drop at a new position.

→ The order of the macros controls is changed.
Macro Shaper Options Menu
The Macro Shaper Options menu provides a range of tools for editing the Macro Shaper Curve and managing your Macro Shaper presets. Tools dedicated to editing the shape of your curve include options for copying, mirroring, inverting, and straightening. Additionally, the initialization function enables you to reset the Macro Shaper Curve to its default values.
The Macro Shaper Options menu also offers options for saving and recalling Macro Shaper presets, as well as pre-defined curves to help you get started. There are also a number of quantization options provided to suit your various needs; from smooth and free-running, to grid-snapped blocks, these additional editing options provide flexibility and inspiration for utilizing the full potential of the Macro controls.
The Macro Shaper Options menu contains the following elements:

-
Macro Shaper Options Menu: Opens the Macro Options menu, which provides a range of tools and options for editing the Macro Curve Shaper and managing your Macro Shaper presets. This menu also contains predefined curve shapes, which you can conveniently recall when needed.
-
Managing Macro Shaper Presets: Options for saving and loading your Macro Shaper presets. For more information, refer to Managing Macro Shaper Presets
- Copy and Paste: Options that allow you to copy the Macro Shaper Curve of the currently selected parameter, and paste it onto other parameters. This is useful for testing Shaper Curves on various parameters, without having to save them as presets.
- Shaper Editing Tools: A range of tools that provide various editing functions for creating shapes with the Macro Shaper Curve. Tools include Normalize, Rectify, Fractalize, Soften, and Straighten. Editing tools like Invert, Reverse, and Mirror, allow you to reflect states in the Macro Shaper, providing inspiration and further control over your shapes. Initialize allows you to reset the Macro Shaper Curve to its default state.
- Quantize: Provides 10 options for quantizing values of the Macro Shaper Curve. The Quantize value (2, 3, 4, 5, 6, 7, 8, 9, 10, 12) indicates the numeric division that will be applied to your curve. For example, if Quantize 4 is selected, your curve values will be quantized to 0, 250, 500, 750 and 1000.
- Predefined Shapes: Provides six options for predefined curve shapes that can be quickly implemented in the Macro Shaper Curve.
Managing Macro Shaper Presets
While macros are automatically saved with each Snapshot, the Macro Shaper Options menu allows you to save Macro Shaper presets separately and load them onto other sounds.

The following workflows demonstrate how to save and load your Macro Shaper presets from the Macro Editor:
Saving a Macro Shaper Preset
To save a Macro Shaper preset:
- Click the MACROS tab to enter the Macro Editor.
- Click the Macro Shaper Options menu icon.
- Select Save macro shaper preset...
- Enter a name for your preset.
- Click Save.
→ The macro shaper preset is saved as an .nka file.
Loading a Macro Shaper Preset
To load a Macro Shaper preset:
-
Click the MACROS tab to enter the Macro Editor.
-
Click the Macro Options menu icon.
-
Select Load macro shaper preset....
-
Select a preset file.
5.Click Load
→ The selected macro shaper preset is loaded into the Macro Shaper.
11. Settings
In the Settings view, you can change how Bazzazian Tapes responds to your keyboard or MIDI. These settings include Velocity, Note Priority, Key Range, Pitch Bend Range, and Glide, all of which can be assigned to affect the instrument globally or separately for each layer. The settings made here are saved in Snapshots unless stated otherwise.
Overview of the Settings View
The Settings view contains the following elements and controls:

The Settings View
- Layer: Click the A icon to turn the layer on and off. Turning the layer off will purge all samples from memory and reduce CPU usage. When the layer is turned off, the icon is dimmed.
- Browser: To open the Browser, click on the sound source name, the waveform display, or the Browser icon (magnifying glass icon). This gives you access to all sound sources available for layers A and B. To browse and load sound sources without opening the Browser, click the arrow icons (<>) to move through the list of sound sources.
- Play Mode: This set of controls defines the play mode, as follows:
- Mono: Monophonic mode retrigger sets the notes to behave like a monophonic synthesizer, meaning only one note can be triggered at a time. This is useful when you want to recreate an authentic monophonic synthesizer sound, especially when used in combination with Legato and Glide. You can change the Mono settings for both layers simultaneously by pressing [Alt] / [Opt] + clicking and dragging your mouse.
- Legato: The legato playing technique typically allows for smooth, seamless transitions between notes. If Legato is turned on and detached notes are played, each attack will still be retriggered, but when overlapping notes are played, the pitches will change without new attacks, for a Legato response.
-
Velocity Curve: Sets your defined Velocity Curve for the keyboard to adjust the velocity response to your playing style. For more information, refer to Velocity Curve.
-
Note Priority: Determines what note has priority when more than one note is played in mono or mono legato mode. You can change the Note Priority settings for both layers simultaneously by pressing [Alt] / [Opt] + clicking and dragging your mouse. The following note priority settings are available:
-
Last: Gives priority to the last note played. With last note priority, priority is based on the order in which keys are played
- Low: Gives priority to the lowest note played. With low note priority, new notes that are lower in pitch than ones being already played replace currently playing notes from the highest on up. Low note priority is most common on monophonic vintage synths.
-
High: Gives priority to the highest note played. New notes that are higher in pitch than ones already being played replace currently playing notes from the lowest on up. Setting one layer to low note priority and the other to high note priority allows you to simulate the duophonic behavior of certain vintage synths.
-
Key Range: This allows you to set the highest and lowest key in the range for the current layer. This could, for example, be used to set the left side of the keyboard to play layer A sound and the right-side to play layer B, or to blend the layers anywhere on the keyboard necessary. To set the key range use the following settings:
• Low Key: Sets the low key limit for layer A or B.
• High Key: Sets the low key limit for layer A or B
- Learn Key Range via MIDI: Click this icon to set the key range for the selected layer via MIDI. Then set the range by pressing the high and low key range on your MIDI keyboard or device. By pressing [Ctrl] / [Cmd] + clicking the icon you can reset the key range to the default setting.
- Bend Range: You can set the pitch bend wheel range for layers A and B individually or for both of the two layers using your MIDI keyboard, based on your playing preference. The range is up to 24 semitones (2 octaves). Many musicians use a range of 2 semitones (a whole step) as this is the bend range of many acoustic instruments. For more special effects, you may wish to set a wider range. You can set the bend range using Bend Up and Bend Down:
• Bend Up: Sets the pitch bend up range for layer A or B.
• Bend Down: Sets the pitch bend down range for layer A or B
-
Constant Rate/Time: Switches the Glide mode between a Constant Rate or a Constant Time setting for the glide as follows:
-
Constant Rate: The glide between notes has a constant rate of change regardless of intervals played, which makes glides between intervals take more time than glides on smaller intervals.
-
Constant Time: The glide between notes have a constant time (duration) regardless of intervals played.
-
Glide: This causes the pitch of a note to glide up or down from the pitch of the previously played note. Glide speed is set using the Glide knob. If the Glide knob is set to the far-left position, glide has no effect. In the far-right position, the glide is in full effect. Use Glide in combination with the Glide Mode button. You can change the Glide settings for both layers simultaneously by pressing [Alt] / [Opt] + clicking and dragging your mouse.
-
Preserve Voices: Preserve Voices mode allows only one voice to be played per key. This is a global control and as such is not stored in Snapshots.
- Lock Bend Ranges: Locks pitch bend ranges across all Snapshots. This is a global control and as such is not stored in snapshots.
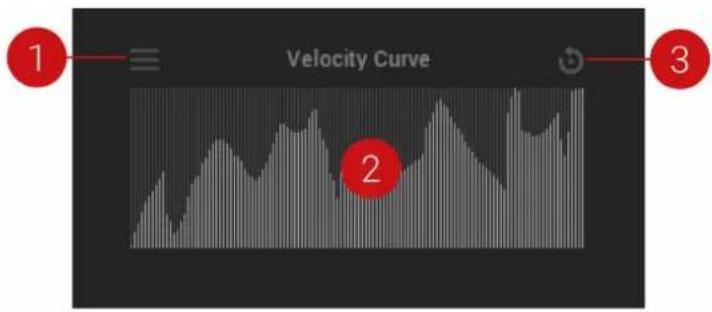
Velocity Curve
The Velocity Curve Shaper allows you to define the velocity curve for the keyboard and adjust the velocity response to your playing style. The Velocity Curve has two modes of operation; in the default mode, the Velocity Curve is set using the Curve Slope and Curve Table controls. In User mode, the table becomes a free canvas for you to draw within. You can edit the curve by clicking and dragging your mouse across the table, and then save your curves as presets, to recall at another time.
Velocity Curve Shaper
The Velocity Curve Shaper contains the following controls:

The Velocity Curve Shaper
- Velocity Curve Menu: This menu defines the operation of the Velocity Curve and allows you to save and recall your Velocity Curve presets. For more information, refer to Managing Velocity Curve Presets.
- Velocity Curve Table: This area displays your velocity curve. When in User mode, this area is used to draw a customized curve shape by clicking + dragging your mouse.
- Velocity Curve minimum value: Use the vertical slider on the left of the Curve Table to set the minimum value of the velocity curve. Pressing [Alt] / [Opt] + dragging the mouse will set minimum and maximum to the same value. Press [Ctrl] / [Cmd] + click to set to the minimum value.
- Velocity Curve maximum value: Use the vertical slider on the right of the Curve Table to set the maximum value of the velocity curve. Pressing [Alt] / [Opt] + dragging the mouse will set minimum and maximum to the same value. Press [Ctrl] / [Cmd] + click to set to the maximum value.
- Velocity Curve slope: Use the horizontal slider directly underneath the Curve Table to set the slope of the velocity curve.

All Velocity Curve controls are global and are not stored in Snapshots! If you want to save a velocity curve, refer to Managing Velocity Curve Presets.
User Velocity Curve
The User Velocity Curve Shaper contains the following controls:
line
| Point | Value | |-------|-------| | 1 | 1 | | 2 | 2 | | 3 | 3 |The User Velocity Curve Shaper
- Velocity Curve Menu icon: Oefines the operation of the Velocity Curve and allows you to save and recall your Velocity Curve presets. For more information, refer to Managing Velocity Curve Presets.
- Velocity Curve Table: When in User mode, this area is used to draw a customized curve shape by clicking + dragging your mouse.
- Reset Table icon: Resets the Velocity Curve Table to its default linear curve.
Editing the Velocity Curve
The following workflows demonstrate how to edit the Velocity Curve in the two different operating modes:
Editing the Velocity Curve Shaper
To edit the Velocity Curve:

- Selecting the Velocity curve shaper option from the menu

bar
Velocity Curve | Position | Velocity | |---|---| | 1 | 0.5 | | 2 | 0.6 | | 3 | 0.7 | | 4 | 0.8 | | 5 | 0.9 | | 6 | 1.0 | | 7 | 1.2 | | 8 | 1.5 | | 9 | 1.8 | | 10 | 2.2 | | 11 | 2.7 | | 12 | 3.3 | | 13 | 4.0 | | 14 | 4.8 | | 15 | 5.7 | | 16 | 6.7 | | 17 | 7.8 | | 18 | 9.0 | | 19 | 10.3 | | 20 | 11.7 | | 21 | 13.2 | | 22 | 14.8 | | 23 | 16.5 | | 24 | 18.3 | | 25 | 20.2 | | 26 | 22.2 | | 27 | 24.3 | | 28 | 26.5 | | 29 | 28.8 | | 30 | 31.2 | | 31 | 33.7 | | 32 | 36.3 | | 33 | 39.0 | | 34 | 41.8 | | 35 | 44.7 | | 36 | 47.7 | | 37 | 50.8 | | 38 | 54.0 | | 39 | 57.3 | | 40 | 60.7 | | 41 | 64.2 | | 42 | 67.8 | | 43 | 71.5 | | 44 | 75.3 | | 45 | 79.2 | | 46 | 83.2 | | 47 | 87.3 | | 48 | 91.5 | | 49 | 95.8 | | 50 | 100.2 | | 51 | 104.7 | | 52 | 109.3 | | 53 | 113.9 | | 54 | 118.6 | | 55 | 123.4 | | 56 | 128.3 | | 57 | 133.2 | | 58 | 138.2 | | 59 | 143.2 | | 60 | 148.3 | | 61 | 153.4 | | 62 | 158.6 | | 63 | 163.9 | | 64 | 169.3 | | 65 | 174.8 | | 66 | 180.3 | | 67 | 185.9 | | 68 | 191.5 | | 69 | 197.2 | | 70 | 202.9 | | 71 | 208.7 | | 72 | 214.6 | | 73 | 220.5 | | 74 | 226.4 | | 75 | 232.3 | | 76 | 238.2 | | 77 | 244.1 | | 78 | 250.0 | | 79 | 255.9 | | 80 | 261.8 | | 81 | 267.7 | | 82 | 273.6 | | 83 | 279.5 | | 84 | 285.4 | | 85 | 291.3 | | 86 | 297.2 | | 87 | 303.1 | | 88 | 309.0 | | 89 | 314.9 | | 90 | 320.8 | | 91 | 327.7 | | 92 | 333.6 | | 93 | 339.5 | | 94 | 345.4 | | 95 | 351.3 | | 96 | 357.2 | | 97 | 363.1 | | 98 | 369.0 | | 99 | 374.9 | | Note: The data is extracted from the provided image and is not included in the original image content for this series (e.g., bar chart). The labels on the bars represent the specific values of the velocity curve.-
Drawing a velocity curve using the sliders
-
Click the settings icon to enter the Settings view.
- Click the Velocity Curve Menu icon in the top left corner.
- Select Velocity curve shaper.
- Use the three sliders to create a curve.
Editing the User Velocity Curve
To create a User Velocity Curve:

- Selecting the User velocity curve option from the menu.

-
Drawing a velocity curve using a computer mouse.
-
Click the settings icon to enter the Settings view.
- Click the Velocity Curve Menu icon in the top left corner.
- Select User velocity curve.
- Click + drag your computer mouse to draw a velocity curve shape.
Managing Velocity Curve Presets
Using the Velocity Curve Preset menu, you can manage all your custom Velocity curve presets. The following workflows demonstrate how to save and load your presets from the Settings view.
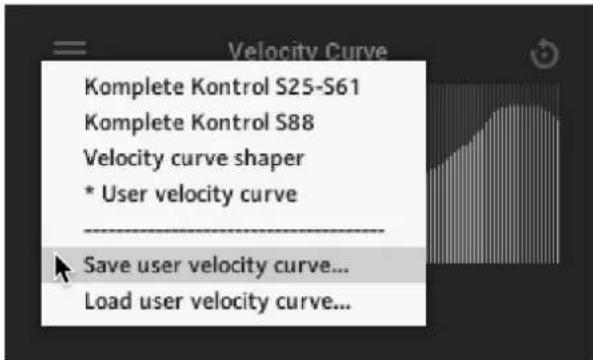
Options to Save and Load User presets in the Velocity Curve menu
Saving a Velocity Curve Preset
To save a Velocity Curve preset:
- Click the Settings button (cog icon) to enter the Settings view.
- Click the Velocity Curve menu icon, on the top left corner of the Velocity Curve.
- Select User velocity curve.
- Make changes to your preset.
- Select Save user velocity curve...
6.Enter a name for your preset and click Save.
→ The User velocity curve preset is saved as an .nka file.
Loading a Velocity Curve Preset
To load a Velocity Curve preset:
- Click the Velocity Curve Preset menu icon in the top left corner of the Velocity Curve.
- Select Load user velocity curve....
- Select the User velocity curve preset you want to load.
4.Click OK.
→ The Velocity Curve preset is loaded into the Velocity Curve Table.
12. Credits
Initiators: Ben Bazzazian his Team and Jan Hennig (Kabuki)
Sound Design: Antonio de Spirt, Angelos Liaros, Ben Bazzazian, Jonathan Kranz
Scripting and Programming: Mario Krušelj
User Interface Design, Artwork: Kristina Fritsche, Ohad Ben-Moshe
Product Management: Barry McManus, Arielle Fischer, Justin Myracks
QA, Finalization and Encoding: Bymski Stempka
Marketing/Video: Kristina Fritsche, Rose Rutledge, Ohad Ben-Moshe, Roy Hamilton-Sturdy, Ervin Reszler, Martin Goy, Samuel Hora, Alastair Oloo, Shane Mason, Mark Nickels, Robin Thomson
Documentation: Jonas Körwer, Hannah Lockwood
Legal: Miriam Hirsch, Asterix Westphal, Tom Kurth
Last minute M+ support: Daniel Hadati, Adrien Tisseraud

- Table of Contents
- Disclaimer
- Welcome to Bazzazian Tapes
- Document Conventions
- Installation and Setup
- Native Access
- Bazzazian Tapes via KONTAKT
- Main Overview
- Browser
- Browser Overview
- Snapshots
- Snapshots Overview
- Saving a User Snapshot
- Loading a Snapshot
- Deleting a User Snapshot
- Sound Editor
- Sound Editor Overview
- Layer
- Effects
- Lo-fi Sample Effects
- Lo-fi Wavetable Effects
- Filter
- LFO
- Modulation Envelope
- Amp Envelope
- Modulation
- FX Editor
- FX Editor Overview
- The FX Editor
- Managing FX Presets
- Saving an FX Preset
- Loading an FX Preset.
- Resetting an FX Unit
- Clearing FX
- Sequencer
- Sequencer Overview
- Pitch and Velocity
- Macros
- Sequencing Pitch
- Sequencing Macros
- Managing Sequencer Presets
- Saving a Sequence
- Loading a Sequence
- Initializing a Sequence
- Macro Editor
- Macro Editor Overview
- The Macro Editor
- Macro Assignments
- Assigning a Macro
- Setting the Macro Range
- Removing a Single Macro Assignment
- Removing All Macros Assignments
- Renaming a Macro
- Rearranging the Macros
- Macro Shaper Options Menu
- Managing Macro Shaper Presets
- Saving a Macro Shaper Preset
- Loading a Macro Shaper Preset
- Settings
- Overview of the Settings View
- Velocity Curve
- Velocity Curve Shaper
- User Velocity Curve
- Editing the Velocity Curve
- Editing the Velocity Curve Shaper
- Editing the User Velocity Curve
- Managing Velocity Curve Presets
- Saving a Velocity Curve Preset
- Loading a Velocity Curve Preset
- Credits
Brand : NATIVE INSTRUMENTS
Model : Bazzazian Tapes
Category : Electronic musical instrument