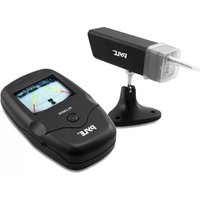
PLCMH6 - Rear Camera Pyle - Free user manual and instructions
Find the device manual for free PLCMH6 Pyle in PDF.


| Product Type | Rear View Camera |
| Brand | Pyle |
| Model | PLCMH6 |
| Video Resolution | 720 x 480 pixels |
| Viewing Angle | 170° |
| Waterproof Rating | IP68 |
| Power Supply | 12V DC |
| Cable Length | 5 meters |
| Image Sensor | CMOS |
| Night Vision | Infrared LEDs (effective up to 5m) |
| Display Compatibility | Composite Video (RCA) input |
| Mounting Type | Surface mount / License plate frame |
| Dimensions (Camera) | 2.5 x 1.5 x 1.2 inches |
| Weight (Camera) | 0.3 lbs |
| Color | Black |
| Material | Aluminum alloy housing |
| Operating Temperature | -20°C to 60°C |
| Video Output | CVBS, 1.0Vp-p, 75 Ohm |
| Horizontal Resolution | 420 TV lines |
| Min. Illumination | 0.1 Lux |
| Power Consumption | <2W |
| Parking Guide Lines | Built-in adjustable guide lines |
| Warranty | 1 year limited |
Frequently Asked Questions - PLCMH6 Pyle
User questions about PLCMH6 Pyle
0 question about this device. Answer the ones you know or ask your own.
Ask a new question about this device
Download the instructions for your Rear Camera in PDF format for free! Find your manual PLCMH6 - Pyle and take your electronic device back in hand. On this page are published all the documents necessary for the use of your device. PLCMH6 by Pyle.
USER MANUAL PLCMH6 Pyle
natural_image
Exterior view of a PYLE® electronic device with a mounted sensor and its analog multimeter (PLCMH5) shown on the right side (no text or symbols on the device itself)PLCMH6
Wireless Rearview Backup Trailer / Hitch Camera, Waterproof Night Vision Vehicle Cam & Monitor System
Introduction
Thank you for purchasing the wireless camera and monitor hitch kit. The camera features an image sensor and a transmitting module to capture the image and transmit picture wirelessly. The receiver features a receiving module to receive and display the camera image on a color LCD - liquid crystal display. System works at 2.4GHz frequency band, which could be legally used worldwide without permission. Refer to the troubleshooting guide at the end of this manual for help. Contact a professional technician or our technical support staff for additional support. Please retain proof of purchase receipt for warranty verification. Any attempted disassembly of the product will void the warranty and may cause damage or personal injury. Do not return defective products, or products no longer under warranty.
Note
This product may cause interferences with other wireless equipment that operates at the 2.4GHz wireless band. Please turn off, or do not operate the product, near a similar frequency using wireless device to eliminate the interference possibility. The wireless system will emit an electromagnetic wave, just like other wireless products. The transmitting strength is less than other wireless products. The 2.4GHz wireless camera meets wireless frequency security standards and recommended indexes. Make sure NOT to use this product to violate an individual's privacy, also do not use near medical equipment.
Important
- Do not shake or strike the product;
- Keep it dry and dustless and avoid exposing it to direct sunlight;
- Avoid putting the product in places where the constantly changed temperature or humidity occurs;
- Keep product away from heat sources such as electric heater;
- Do not use the camera near caustic chemicals;
- Do not use this camera near water, for example, near a bath tub, wash bowl, kitchen sink or laundry tub, in a wet basement or near a swimming pool and the like;
- Do not use the camera in the places which are enclosed by metal. The surrounding metal like lifter, cabin, may shield the electromagnetic wave, and result in failure of signal reception;
- Please obey the local government's environment protection policy;
- Please turn off the power when left unused;
- Do not disassemble or repair the camera or receiver; doing so might cause damages to the product, and also VOID THE WARRANTY.
Package Contents
The unit comes with all pieces necessary for typical setup & installation.
Using the System
- Before using, make sure the camera is fully charged. Press the Power ON/OFF button to power on your camera.
- Mount the Magnetic Camera on your tailgate, then adjust it to a suitable angle.
- Then view the camera on your LCD display. Ensure your display is charged or connected via power cable.

natural_image
Collection of electronic devices including a digital display, cable, and earplugs (no visible text or symbols)Package Contents: 2.4Ghz wireless camera, weatherproof camera cover, wireless receiver, rechargeable battery, charging cable, wall power adapter, connection cables
Camera

Camera Indicator Lights
| CAMERA LED INDICATOR | STATUS |
| Red | Charging when Powered off |
| Off | Power off (disconnect with cigarette lighter)/Finish Charging |
| Green | Power on |
| Yellow | Charging when Power on |
Charging the Camera and Receiver
- Load a Li-battery to the battery compartment with its polarities matched.
- Connect the camera/receiver with auto cigarette lighter by the "Y" shaped charging cable. Your camera and receiver are being charged. A full charge will take about 2.5 hours for camera and for receiver respectively.
- The camera can work during charging. Press the Power ON/OFF button to power on (or turn off) the camera, then you can use it.
- The receiver can also work during charging. Press and hold the Power ON/OFF button for about three seconds to turn on/off the receiver. When the receiver is powered on, LCD displays reverse the image by default. Pressing POWER ON/OFF button momentarily can switch between reverse and non reverse image.
Charging Notes & Battery
A full charge will take about 2.5 hours, which can power the receiver for about 4 hours continuously. You are recommended to have the battery fully charged before its first installation to optimize its life. Do not burn or disassemble the Li-battery. Do not short-circuit the battery as it may cause fire or electric shock.
Display

Display LED Indicators
| RECEIVER LED INDICATOR | STATUS |
| Red | Charging when Powered off |
| Off | Power off (disconnect with cigarette lighter)/Finish Charging |
| Green | Power on, working at reverse image |
| Yellow | Charging when Power on, working at reverse image |
| Green Flashing | Working at non reverse image |
| Yellow Flashing | Charging and working at non reverse image |
Troubleshooting
| Problem | Reason / Solution |
| No image | Check whether the camera/receiver is connected to power supply and powered on. |
| Snowflakes on image | Check the distance & connection cables. |
| Ghost image | 1. Interfered with other devices; 2. Check the distance & blocks. |
Brand : Pyle
Model : PLCMH6
Category : Rear Camera