GSR-HY01 - Uncategorized VAIS Technology - Free user manual and instructions
Find the device manual for free GSR-HY01 VAIS Technology in PDF.


| Brand | VAIS Technology |
| Model | GSR-HY01 |
| Product Type | Electronic accessory / interface module |
| Dimensions (approx.) | 100 x 60 x 20 mm |
| Weight (approx.) | 50 g |
| Power Supply | USB powered (5V DC, 500 mA) |
| Operating Temperature | 0°C to 40°C |
| Storage Temperature | -20°C to 60°C |
| Connectivity | USB 2.0 Type-A, 3.5 mm audio jack |
| Compatible Systems | Windows 7/8/10, macOS 10.10+, Linux |
| Main Functions | Audio interface, data transfer, signal conversion |
| Indicators | LED power/status indicator |
| Enclosure Material | ABS plastic |
| Certifications | CE, FCC, RoHS |
| Cleaning Instructions | Wipe with a dry, soft cloth. Do not use solvents. |
| Storage Conditions | Dry place, away from direct sunlight |
| Safety Precautions | Avoid bending cables; do not expose to liquids. |
| Spare Parts Availability | Replacement cables and adapters available from VAIS Technology. |
| Warranty | 1 year limited warranty |
Frequently Asked Questions - GSR-HY01 VAIS Technology
User questions about GSR-HY01 VAIS Technology
0 question about this device. Answer the ones you know or ask your own.
Ask a new question about this device
Download the instructions for your Uncategorized in PDF format for free! Find your manual GSR-HY01 - VAIS Technology and take your electronic device back in hand. On this page are published all the documents necessary for the use of your device. GSR-HY01 by VAIS Technology.
USER MANUAL GSR-HY01 VAIS Technology
(SXV300 SiriusXM Tuner required)

GSR-PK01-MAN
UNIVERSAL

What's Included
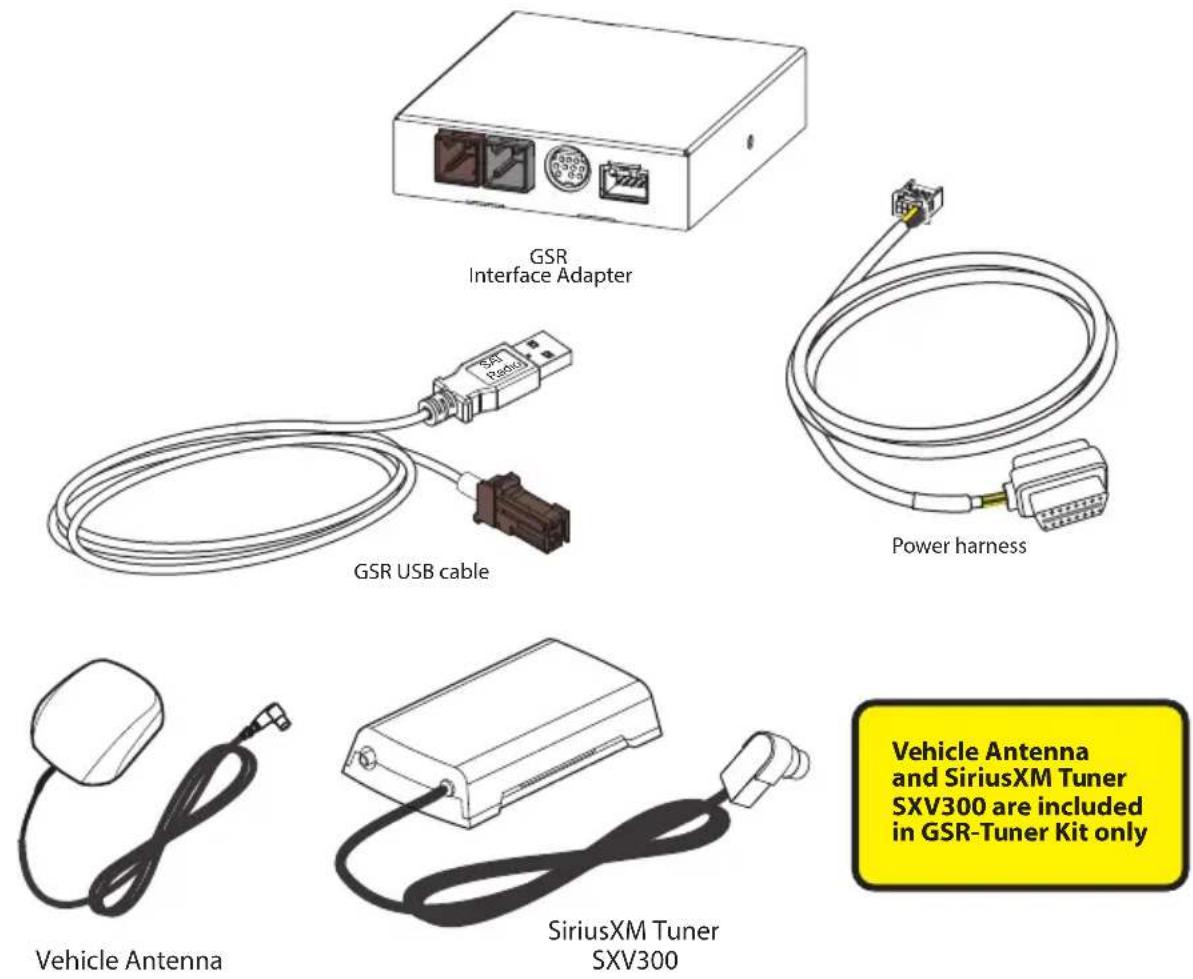
Vehicle Antenna and SiriusXM Tuner SXV300 are included in GSR-Tuner Kit only
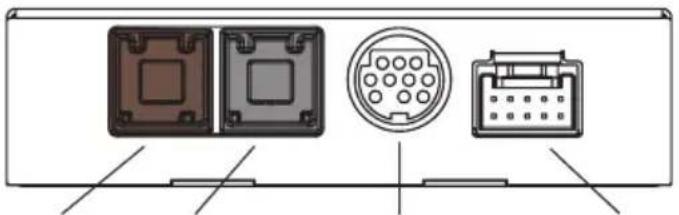
GSR Connectors and Ports
natural_image
Diagram of four electronic component connectors (no text or symbols)Brown USB interface connector
Not Used
Interface connector for SiriusXM SXV300 Tuner
Power connector

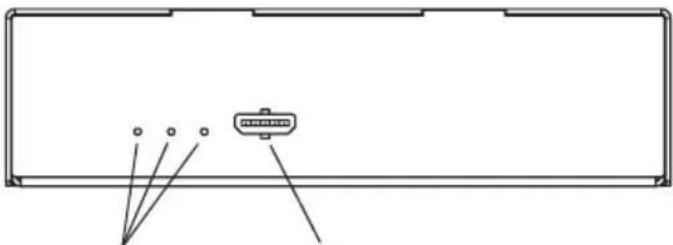
(Generation 2)
natural_image
Pure electrical connector diagram without any text, numbers, or symbolsMicro USB connector (used for firmware update)
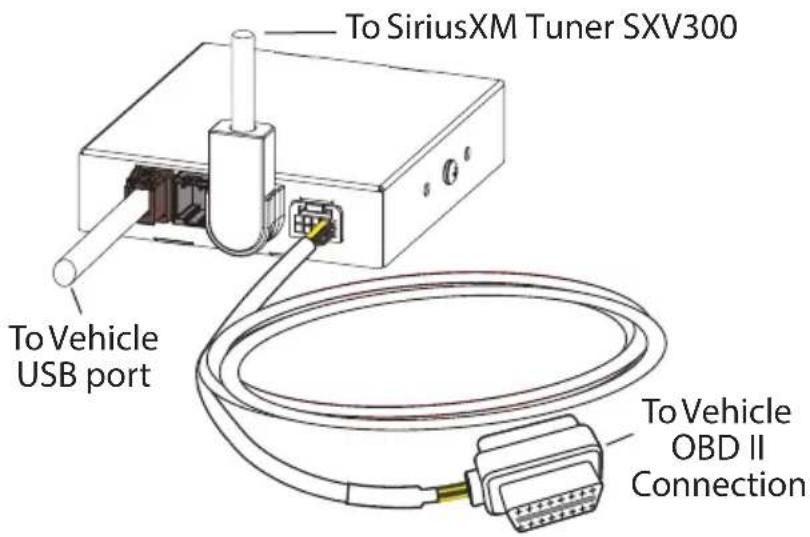
Connecting GSR
natural_image
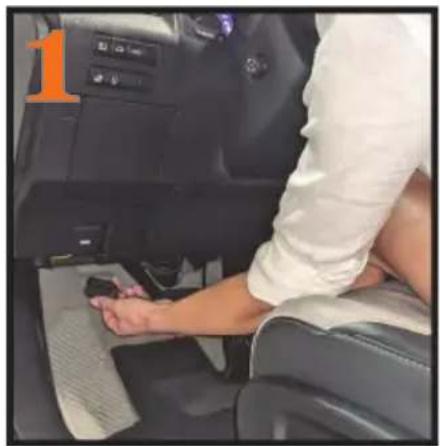
Interior view of a car showing a person's arm seated at the seat of the dashboard, with no visible text or symbols.Connect OBD II Connector
Connect the ODB II connector to the OBD II connection in the vehicle for power

natural_image
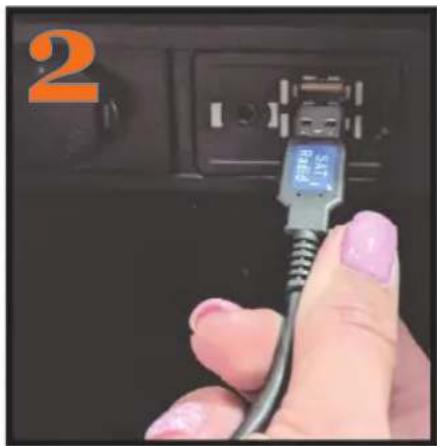
Close-up of a hand holding a USB cable inserted into a device panel (no visible text or symbols)Connect GSR to Factory USB Port
Our adapter plugs into the factory USB data port to feed SiriusXM data into the factory radio
natural_image
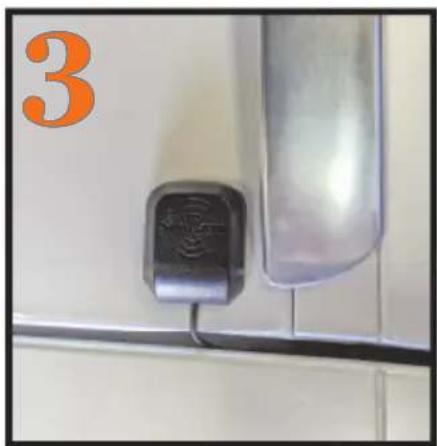
Close-up of a wall-mounted electronic device with a sensor or signal unit attached, no visible text or symbols.Install Antenna on the Roof
For the best Satellite Radio reception, install antenna on the highest point of the vehicle, and must be mounted outside the vehicle

natural_image
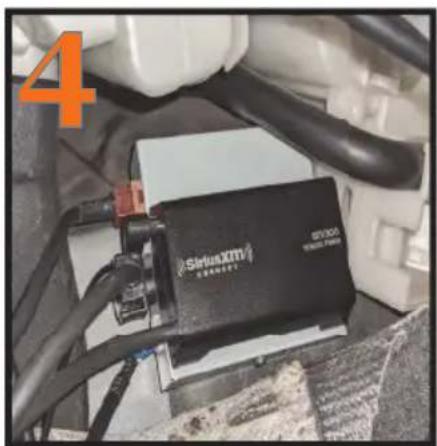
Close-up of a black SiriusXM powertrain battery mounted on a vehicle chassis, with visible wiring and components (no readable text or symbols)Mount Everything Behind the Panels
Mount the GSR and the SiriusXM Vehicle Tuner behind the dash and secure in place
Optional: Connecting GSR Power Without OBD II Connector

Always use the OBD II connection for power when possible. If you cannot use the ODB II connection, here is an optional method for connecting the GSR Power Harness.

natural_image
Illustration of a pair of pliers connected to a connector (no text or symbols)Cut off the OBD II Connector

ALL WIRES IN THE POWER HARNESS MUST BE CONNECTED
Yellow Wires CONSTANT BATTERY POWER +12V connect BOTH to constant battery power

DO NOT CONNECT TO ACCESSORY POWER
Black Wires
connect BOTH to car chassis ground
General Information
● Illustrations in this Owners Manual are for reference only. Your radio and the screens displayed will vary by car manufacturer and radio.

- Some functions of your radio may not be available while the vehicle is in motion. When present, steering wheel controls are always available.
● ● For questions about your SiriusXM subscription contact SiriusXM at 1-866-635-2349.
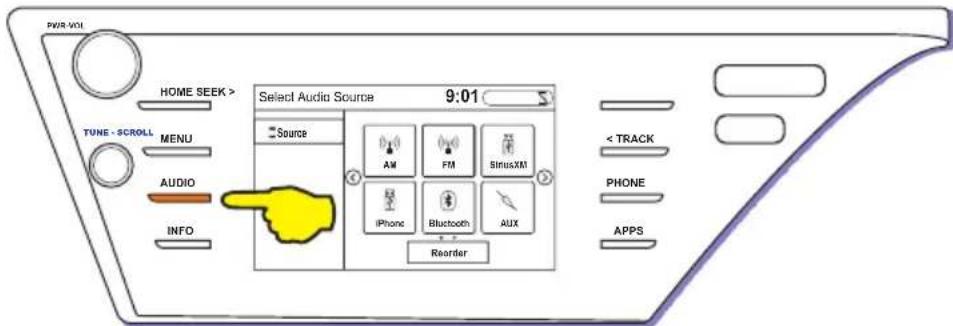
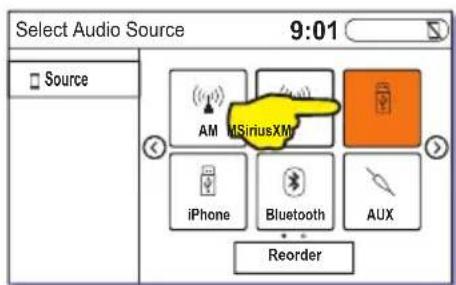
Select SiriusXM as the Audio Source
A
Select Audio or Media or Source:

B
Select SiriusXM or SXM or iPod or USB:

Browse and Select SiriusXM Channels
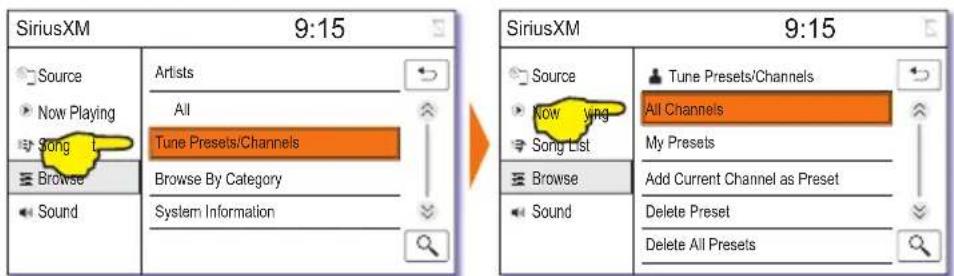
To browse a list of the SiriusXM channels and select a channel to listen to, follow steps A through D.
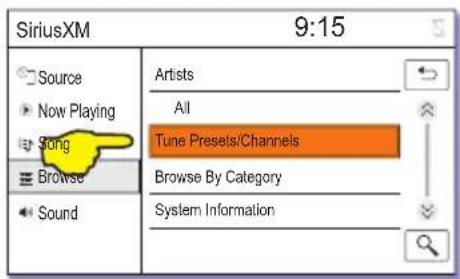
(Select Browse or List or Menu and then select Artists)
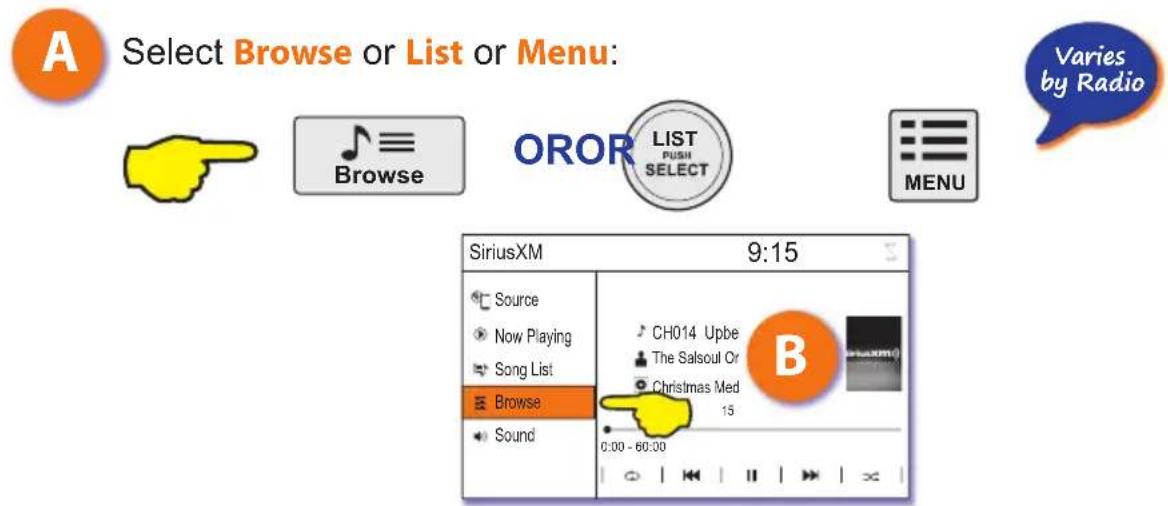
B Select Artists:
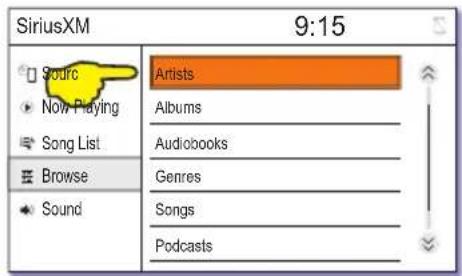
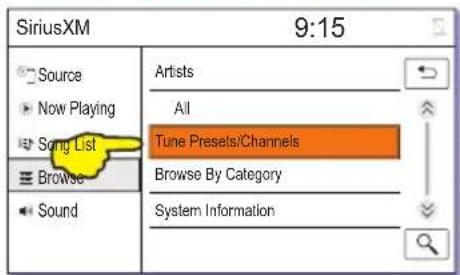
C Select Tune Presets/Channels, select All Channels, and select a channel:

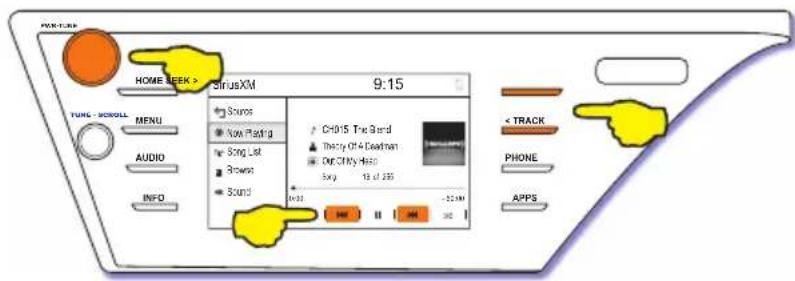
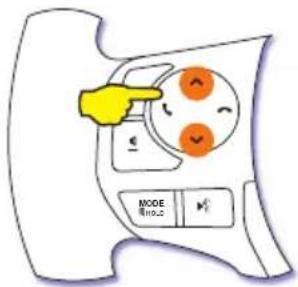
Use Track Seek or Tune to tune previous/next channel:



Presets
Add a Preset

Select Browse or List or Menu:

OROR


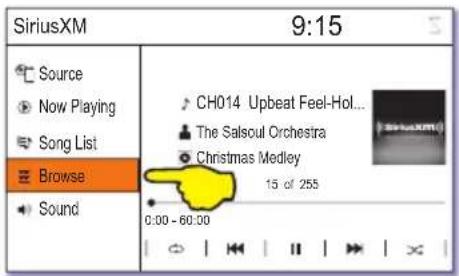

Select Artists:
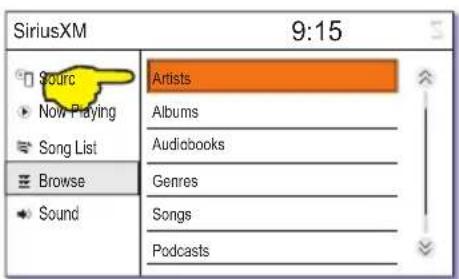

Select Tune Presets/Channels:

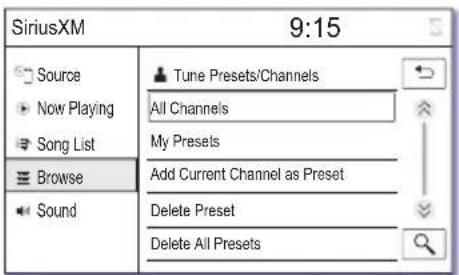

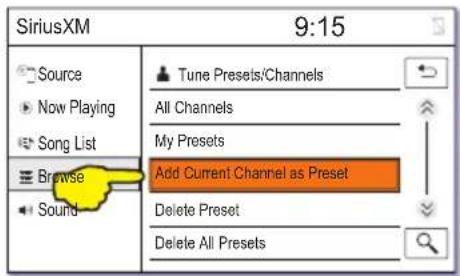
Select Add Current Channel as Preset, and select the channel:

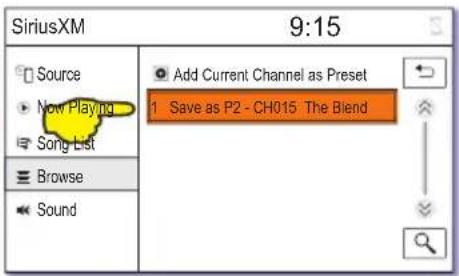
Tune a Preset

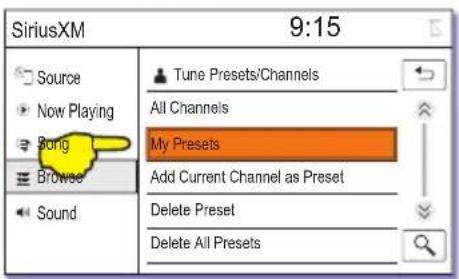
To select a specific Preset:

Select Tune Presets/Channels, and select My Presets:


Select a preset:
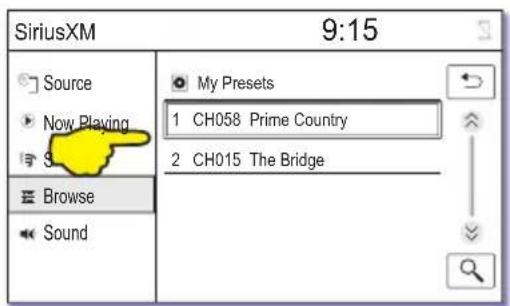
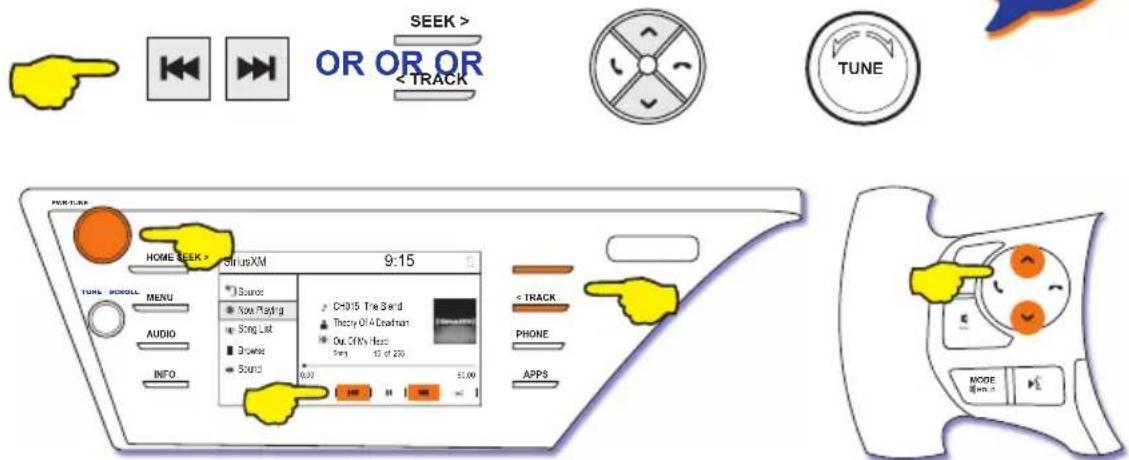
To quickly tune the previous or next Preset:
Long press Track Seek to tune previous/next preset:

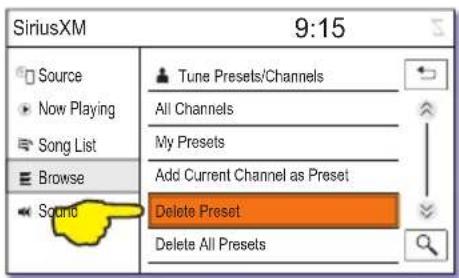
Delete a Preset
Select Delete Preset, and select the preset to be deleted:
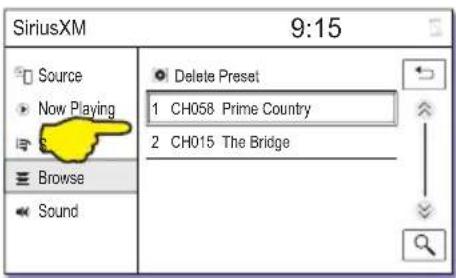
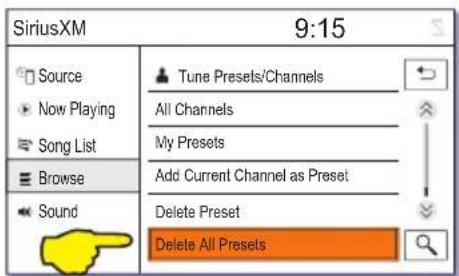
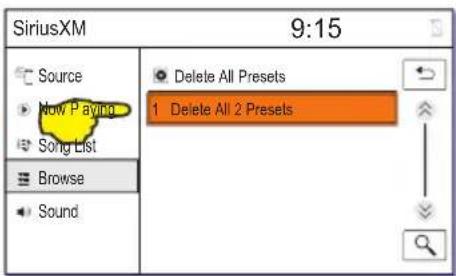
Delete All Presets
Select Delete All Presets, and select Delete All [x] Presets:
Browse SiriusXM Categories
A
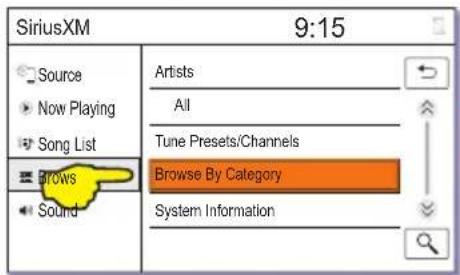
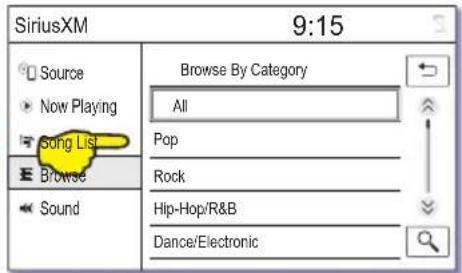
Follow A and B on page 6 (select Browse or List or Menu and then select Artists).
B
Select Browse By Category and select a category:
System Information
A
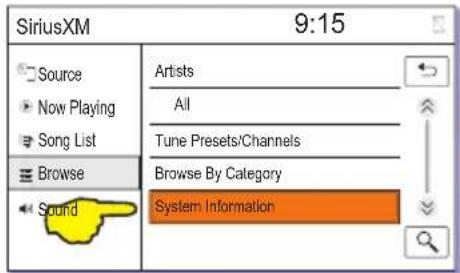
Follow A and B on page 6 (select Browse or List or Menu and then select Artists).
B
Select System Information to show the SiriusXM Radio ID and the System FW (Firmware):
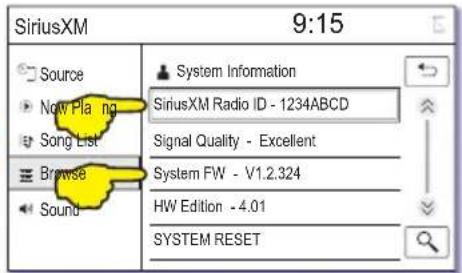
Troubleshooting
| Problem Solution | |
| My presets are gone after I turn the car off | GSR requires constant 12V power connection. If the GSR doesn’t keep presets after the car is turned off, this means GSR was connected to Accessory power source |
| SiriusXM doesn’t appear as the source | Verify the power connection by checking the power harness connection or by verifying the lights at LEDs on the GSR moduleVerify the USB connection between the GSR and vehicle’s USB port |
| Check Antenna message | Verify the antenna connection to the tuner |
| No Signal message Make | sure the SiriusXM antenna has a clear view of the southern sky |
| Check Tuner message Ver | ify the tuner connection to the GSR module or replace the tuner |

WARNING
DO NOT DISASSEMBLE OR ALTER
Doing so may result in an accident, fire or electric shock
Do not block the airbag
Do not mount product or any added audio and/or video equipment where it can obstruct the operation of any safety devices such as the airbag.
Distraction warning
Do not let product or any added audio and/or video equipment distract you while you are driving.
BEFORE WIRING, DISCONNECT THE CABLE FROM THE NEGATIVE BATTERY TERMINAL
Before starting any installation work, you must wait 90 seconds after turning the ignition switch to the LOCK position and disconnecting the negative (-) terminal from the battery. The supplemental restraint system (airbag) is equipped with a backup power source. If installation work is started less 90 seconds after disconnection of the negative (-) battery terminal, the SRS may deploy. When the negative (-) terminal cable is disconnected from the battery the clock and audio systems memory will be erased. Before starting installation work make a record of the clock and audio systems memory settings. When installation is complete, reset the clock and audio systems to their previous settings. Check power tilt, power telescopic steering column, front power seats, power mirrors, and power shoulder belt anchorage are equipped with a memory function. When installation is complete, it is necessary to readjust the features to their previous settings Never use a backup power supply (such as another battery) during installation work to avoid losing these memory settings.

CAUTION
DO NOT SPLICE INTO ELECTRICAL CABLES
Never cut away cable insulation to supply power to other equipment. Doing so will exceed the current carrying capacity of the wire and result in fire or electric shock.
DO NOT ALLOW CABLES TO BECOME ENTANGLED IN SURROUNDING OBJECTS
Cables or wiring that obstruct or get caught on places such as the steering wheel, shift lever, brake pedals, etc. can be extremely hazardous.
DO NOT INSTALL IN LOCATIONS WITH HIGH MOISTURE OR DUST
Moisture or dust may result in product failure.
HAVE THE WIRING AND INSTALLATION DONE BY EXPERTS
The wiring and installation of this product requires special technical skills and experience.
USE ONLY SPECIFIED ACCESSORY PARTS
Use of other than specified parts may damage product internally.
FOLLOW THE OPERATIONAL AND INSTALLATION MANUALS.
YOU SHOULD READ AND FAMILIARIZE YOURSELF THOROUGHLY WITH THE FOLLOWING INFORMATION PRIOR TO INSTALLING AND USING THIS UNIT. IN ADDITION, YOU MUST CAREFULLY READ AND FOLLOW THE INSTALLATION SCHEMATICS/INSTRUCTIONS FOR THE PRODUCT AND THE VEHICLE IN WHICH IT IS BEING INSTALLED. FAILURE TO FOLLOW INSTALLATION INSTRUCTIONS MAY DAMAGE THE PRODUCT AND THE VEHICLE, WILL VOID THE PRODUCT WARRANTY, AND MAY VOID THE VEHICLE WARRANTY
CHECK YOUR LOCAL LAWS
Some States/Provinces or other governmental jurisdictions (such as cities) may have laws that prohibit the operation of a video screen within the sight of the Driver. If you have purchased such a product, you should use the product only in locations where it is legal to do so, and if you do use the product, set up the screen so it is only visible to passengers.
TROUBLESHOOTING
Should this product fail to operate properly, please contact your Dealer or our Customer Service Department at info@vaistech.com.

About SiriusXM Satellite Radio Operation
The unit may refuse to change the channel if your reception is going ON and OFF.
Please wait until your reception stabilizes in order for the unit to allow you to change the channel easily. Due to bad reception in some areas, SiriusXM Satellite Radio may not work and/or not able to display text.
Warranty is available for download: https://www.vaistech.com/download/15244/
To request a paper warranty copy please contact us:
VAIS Technology
Warranty Department
8811 American Way
Unit 125
Englewood, CO 80112
720-733-2348
sales@vaistech.com
- UNIVERSAL
- Connecting GSR
- Optional: Connecting GSR Power Without OBD II Connector
- General Information
- Select SiriusXM as the Audio Source
- A
- B
- Browse and Select SiriusXM Channels
- Presets
- Add a Preset
- Tune a Preset
- To select a specific Preset:
- To quickly tune the previous or next Preset:
- Delete a Preset
- Delete All Presets
- Browse SiriusXM Categories
- System Information
- Troubleshooting
- WARNING
- DO NOT DISASSEMBLE OR ALTER
- Do not block the airbag
- Distraction warning
- BEFORE WIRING, DISCONNECT THE CABLE FROM THE NEGATIVE BATTERY TERMINAL
- CAUTION
- DO NOT SPLICE INTO ELECTRICAL CABLES
- DO NOT ALLOW CABLES TO BECOME ENTANGLED IN SURROUNDING OBJECTS
- DO NOT INSTALL IN LOCATIONS WITH HIGH MOISTURE OR DUST
- HAVE THE WIRING AND INSTALLATION DONE BY EXPERTS
- USE ONLY SPECIFIED ACCESSORY PARTS
- FOLLOW THE OPERATIONAL AND INSTALLATION MANUALS.
- CHECK YOUR LOCAL LAWS
- About SiriusXM Satellite Radio Operation
Brand : VAIS Technology
Model : GSR-HY01
Category : Uncategorized