
LED-2253MC - Television DENVER - Free user manual and instructions
Find the device manual for free LED-2253MC DENVER in PDF.

| Product Type | LED TV |
| Screen Size | 22.5 inches (approx.) |
| Resolution | 1366 x 768 (HD) |
| Dimensions (with stand) | 510 x 320 x 150 mm |
| Weight | 3.0 kg |
| Power Supply | 100-240V, 50/60Hz |
| Energy Class | A+ |
| Tuner | DVB-T/T2/C |
| Inputs | HDMI, USB, VGA, AV |
| Audio Output | 2 x 3W speakers |
| Teletext | Yes |
| Sleep Timer | Yes |
| Child Lock | Yes |
| Wall Mount Compatible | Yes (VESA 100x100) |
| Cleaning Instructions | Wipe with a soft, dry cloth; do not use harsh chemicals. |
| Safety | Do not expose to moisture; unplug during storms. |
| Spare Parts Availability | Contact Denver service center. |
| Manual Included | Yes (PDF available for download) |
Frequently Asked Questions - LED-2253MC DENVER
User questions about LED-2253MC DENVER
0 question about this device. Answer the ones you know or ask your own.
Ask a new question about this device
Download the instructions for your Television in PDF format for free! Find your manual LED-2253MC - DENVER and take your electronic device back in hand. On this page are published all the documents necessary for the use of your device. LED-2253MC by DENVER.
USER MANUAL LED-2253MC DENVER
natural_image
Line drawing of a flat-screen monitor with a circular base and stand (no text or symbols)Instruction Manual
Caution
Caution 1
Safety Information 2
Product Introduction 3
Front View 3
Rear View 3
Connections 4
5-6 Remote Control
Basic Operation 7
OSD Menu 8-16
-
Video menu 8
-
Audio menu 9
-
TV menu 10-12
-
Setup menu 13
-
Time menu 14
-
Others menu 15-16
Simple Troubleshooting 17
Caution
The lightening flash with arrowhead symbol, within an equilateral triangle is intended to alert the user to the presence of un-insulated “dangerous voltage” within the products enclosure that may be of sufficient magnitude to constitute a risk of electric shock to the persons.

The exclamation point within an equilateral triangle is intend to alert the user to the presence of important operating and maintenance (servicing) instructions in the literature accompanying the appliance.

Correct disposal of this Product
(Waste Electrical & Electronic Equipment (WEEE)
Your product is designed and manufactured with high quality materials and components which can be recycled and reused.
This symbol means that electrical and electronic equipment, at their end-of-life should be disposed of separately from your household waste.
Please dispose of this equipment at your local community waste collection/recycling centre.
In the USA there are separate collection systems for used electrical and electronic products. Please help us to conserve the environment we live in!

This unit complies with European safety and electrical interference directives.
Safety Information
To ensure reliable and safe operation of this equipment, please read carefully all the instructions in this user guide, especially the safety information below.
Electrical safety
- The TV set should only be connected to a mains supply which matches that stated on the label on the mains adaptor.
- To prevent overload, don't share the same mains supply socket with too many other items of equipment.
- Do not place any connecting wires where they may be stepped on or tripped over.
- Do not place heavy items on the leads, which may damage them.
- Hold the Mains plug, not the wires, when removing from a socket.
- During a thunderstorm or while leaving the TV for long periods, disconnect the aerial (if outdoor) and mains adaptor from the supply.
- Do not allow water or moisture to enter the TV or mains adaptor. Do NOT use in wet or moist areas such as Bathrooms, steamy kitchens or near swimming pools.
- Pull the plug out immediately, and seek professional help if:
- the mains plug or cable is damaged.
- liquid is spilt onto the set, or if it is accidentally exposed to water or moisture.
- anything accidentally penetrates the ventilation slots.
- the set does not work normally.
- Do NOT remove the safety covers. There are no user serviceable parts inside. You may invalidate the warranty. Qualified personnel only are permitted to service this apparatus.
- To avoid battery leakage, remove exhausted batteries from the remote control handset, or when not using for along period.
- Do NOT break open or throw exhausted batteries on a fire.
Physical safety
- Do NOT block ventilation slots in the back cover. You may place the TV in a cabinet, but ensure at least 5cm (2") clearance all around the unit.
- Do NOT tap or shake the TV screen, you may damage the internal circuitry. Take good care of the remote control, do not drop it or allow it to come into contact with liquids.
- To clean the TV use a soft dry cloth. Do NOT use solvents or petrol based fluids. For stubborn stains, you may use a damp soft cloth with diluted detergent.
Product Introduction
Introduction
1. Front View
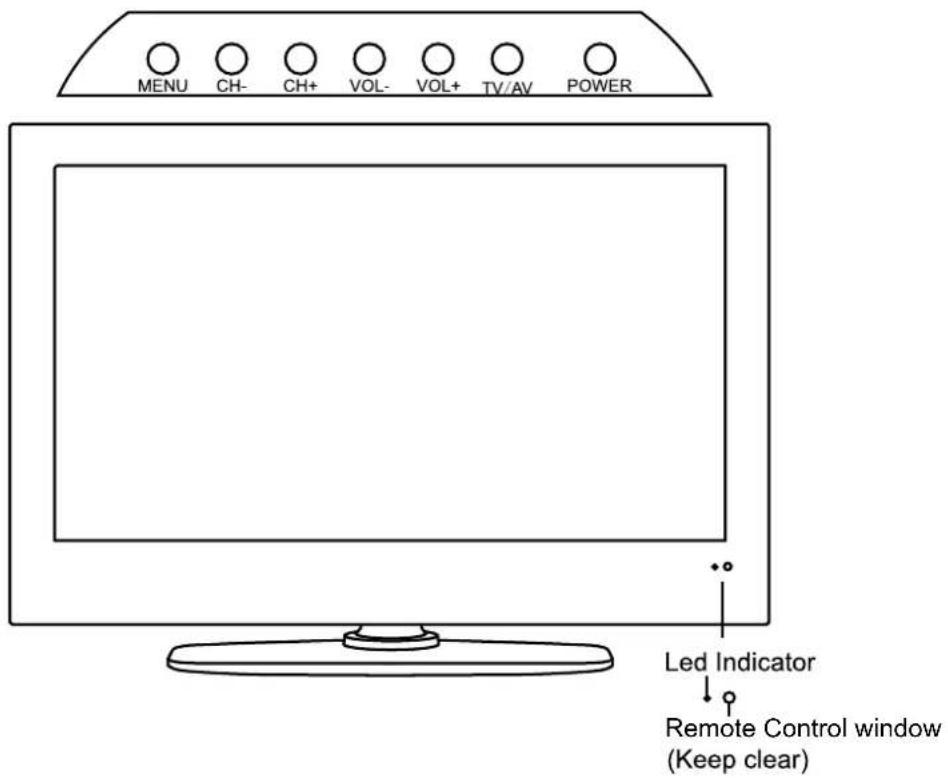
- (IR) Infrared Receiver: Receives IR signals from the remote control. (Power on/Standby)LED Indicator: Press POWER to turn on and off.
Indicator on(Red)
Standby mode
Indicator on(Null)
Power on mode
The effective receiving range for the signal is 5-8 metres from the front of the remote control window, and 30^ to the left or right side and 20^ above or below the remote control window.
- The functions of the buttons are described as bellows:
MENU: Press to display the OSD menu, press again to exit the menu.
CH+/-: Press to scan through channels.
VOL+/-: Press to adjust the volume.
TV/AV: Press to display the input source menu.
POWER: Turn on/standby the TV set.
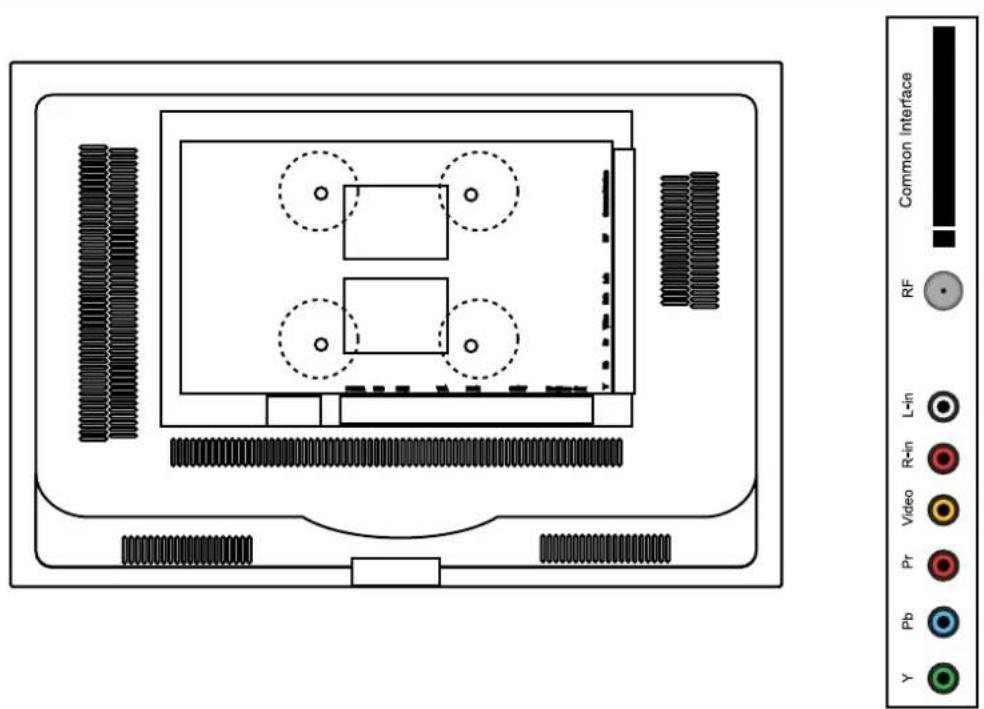
Connections

POWER: Connect to the mains adaptor.
USB -For upgrade: For software upgrade only.
HDMI: Connect it to the HDMI of DVD or other equipment.
VGA: For PC display. Connect it to the D-Sub 15 pins analog output connector of the PC.
PC-IN: Connect it to the audio output terminal of PC.
SCART: Connect them to the SCART video output terminal of DVD.(used in component source)
Headphone: Connect it to your headphone or other audio equipment.
Coax: Digital coaxial output.
Common Interface: CI slot.
RF: Connect antenna or cable 75 Ohm coaxial to receive TV signal.
R/L in: Connect them to the audio output terminal of DVD.(shared with YPbPr)
VIDEO: Connect it to video output terminal of DVD.
YPbPr: Connect them to the YPbPr video output terminal of DVD.(used in component source)
Remote Control
The remote control is using Infra-Red(IR). Point it towards the front of the LCD TV. The remote control may not work correctly if it is operated out of range or out of angle.
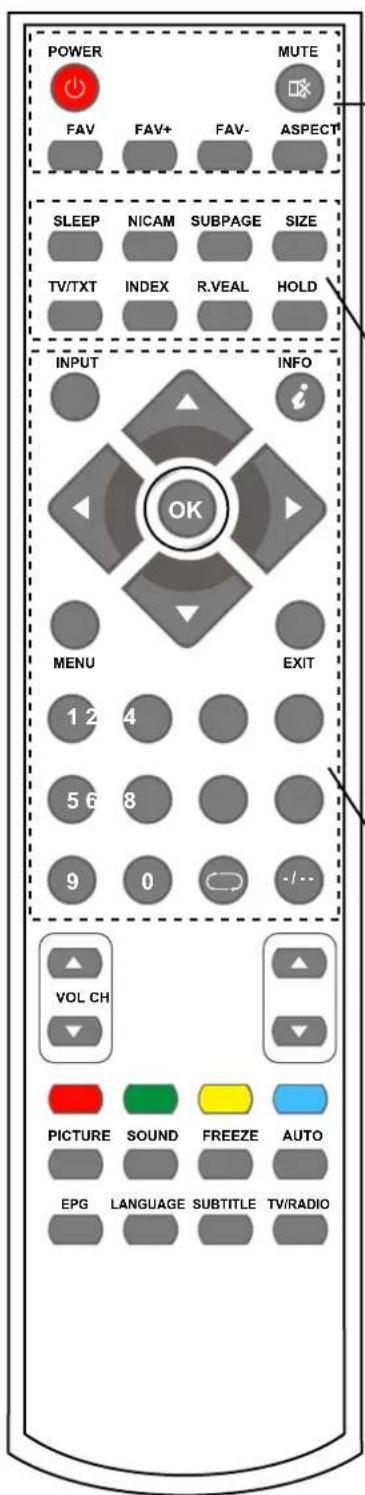
POWER: Turn the TV on/standby.
MUTE: Press to mute the sound, press again or press VOL+ to unmute.
FAV: Display the favourite program list.
FAV+: Add the program to the favourite program list.
FAV-: Remove the program from the favourite program list.
ASPECT: Press to change the display mode of the screen.
SLEEP: Standby timer.
NICAM: NICAM/A2.
SUBPAGE: For example to go directly to subpage 4: press SUBPAGE, then 0,0,0,4; press SUBPAGE again to cancel subpage mode.
SIZE: Press to see top half of page double size, Press again to see the bottom half og page double size, Press again for normal size.
TV/TXT: Turn off/on the Teletext display.
INDEX: Go to index.
R.VEAL: Reveal any hidden text, for example-quiz answer.
HOLD: Hold or carry on the current subpage.
INPUT: Press to display the input source menu.
INFO: Display brief information concerning the current channel you are view.
Cursor left/right/up/down: Cursor buttons used in menus.
OK: CONFIRM BUTTON for menu.
MENU: System setup menu.
EXIT: Exit the OSD menu.
0-9,-/--: Choose channel directly.
: Return to the previous channel viewed.
Remote Control
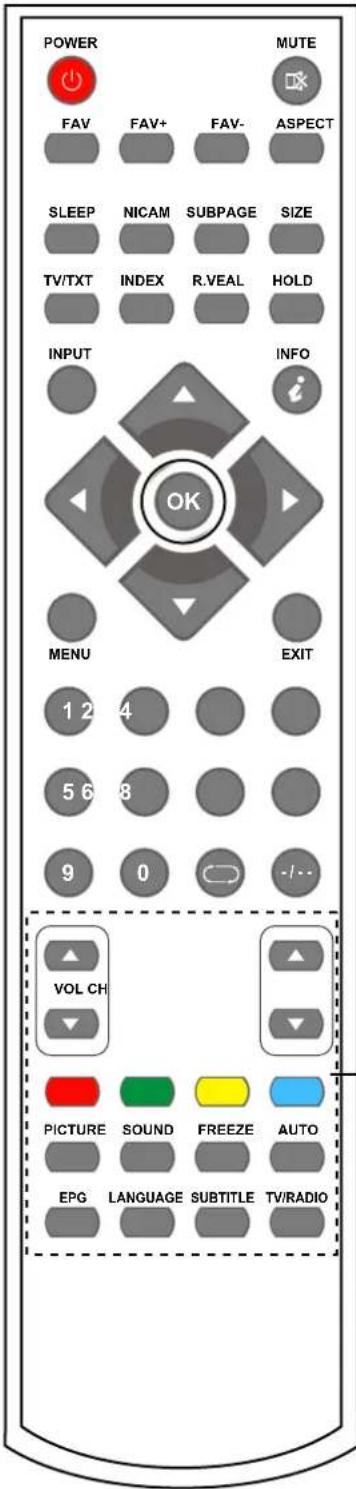
VOL+/-: Adjust the volume.
CH+/-: Scan through channels.
Colour buttons: short cuts-follow the coloured links in the text.
PICTURE: Select the picture mode.
SOUND: Select the sound mode.
FREEZE: Catch the picture of the current program.
AUTO: Auto adjust in the PC mode.
EPG: To show the Electronic Program Guide during no-menu state only in DTV mode.
LANGUAGE: Select the language for the TV in DTV mode.
SUBTITLE: Turn on/off the subtitle display in DTV mode.
TV/RADIO: Change the state between DTV and RADIO in DTV mode.
Basic Operation
Power on/off
- Connect to the power supply with a power code and an adaptor.
- -To turn on the TV
Press POWER button on the TV or remote control.
-To turn off the TV
Press POWER button on the TV or remote control.
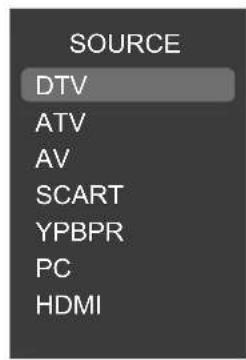
Input Source select
Press INPUT/TV/AV button on the TV set or remote control to display the input source menu, and use CH+/- button on the TV set or ∧/∨ button on remote control to select the input source, press OK button on the remote control to enter.
Note: Before you select the input source, make sure the connections are prepared.
Signs on the screen

Mute No signal

Basic OSD Menu operation
Press MENU button to display the OSD menu as below:
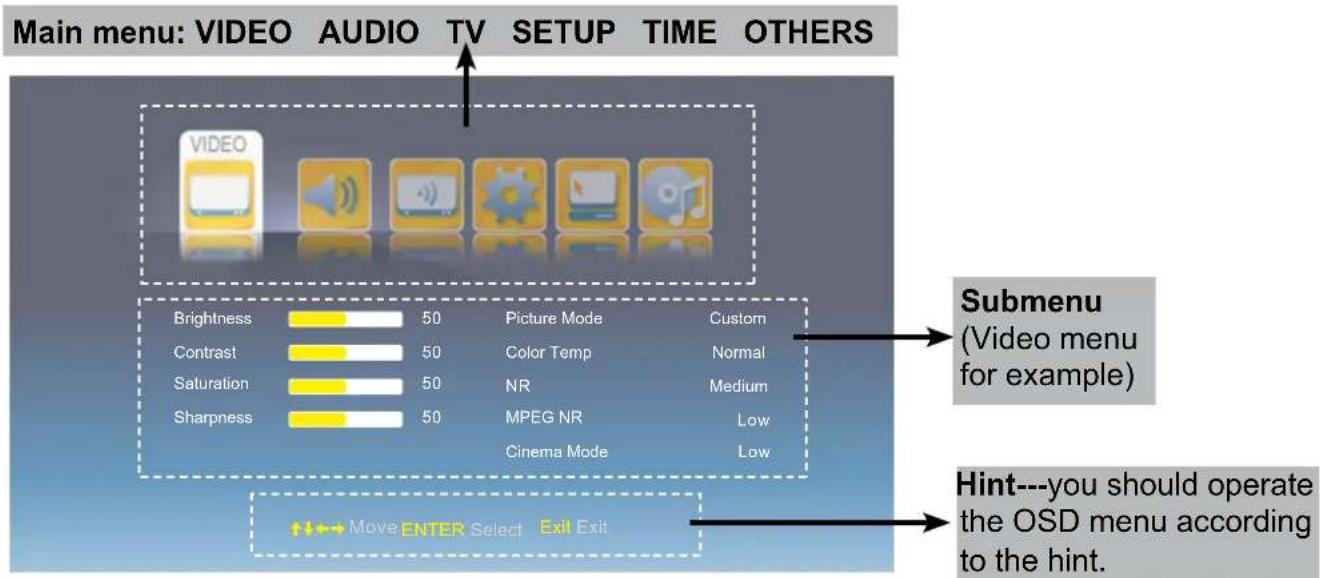
Use < / > button to select the main menu, and press \button to enter the submenu. In the submenu, use / M < > button to select the function item, press OK button to enter the adjust/setup menu.
* (Press MENU button to return to the upper menu.)
* (Press EXIT button to exit the menu display.)
Note1: Only when you input the suitable signal, the relevant items can be activated Note2: Please operating the OSD menu according to hint on the bottom of the banner.
OSD Menu
1. Video menu
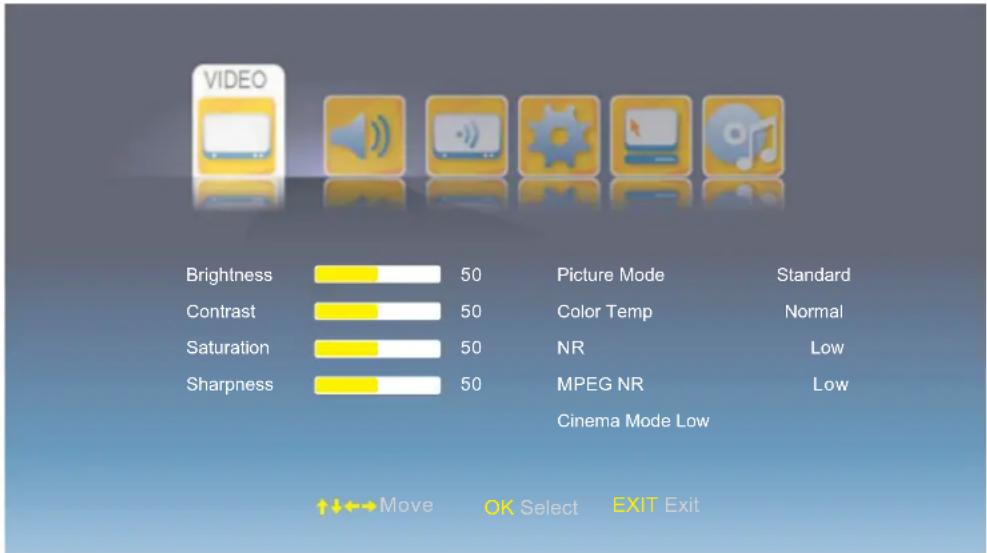
Description

Adjust menu (Brightness menu for example)
Adjust menu: Press < / > button to adjust, and press / button to switchover between Brightness, Contrast, Saturation, Sharpness.
Brightness: Adjust image black level.
Contrast: Adjust image contrast.
Saturation: Adjust image saturation.
Sharpness: Adjust the sharpness(Gray and invalid in VGA/PC mode).

Select menu (Picture mode menu for example)
Select menu: Press ∧/∨ button to select, and press OK button to confirm.
Picture Mode: Select your desired picture mode from Custom, Standard, Mild, Vivid.
You may select the picture mode directly by pressing the PICTURE button on the remote control.
Colour Temp: Select an optimum color temperature mode to suit your eyes for viewing from Cold, Normal, Warm)
NR: If the broadcast signal received is weak, you can select the NR option to reduce the video noise level between Off, Low, Medium and High.
MPEG NR: Select MPEG NR mode from Off, Low, Medium and High.
OSD Menu
2. Audio menu
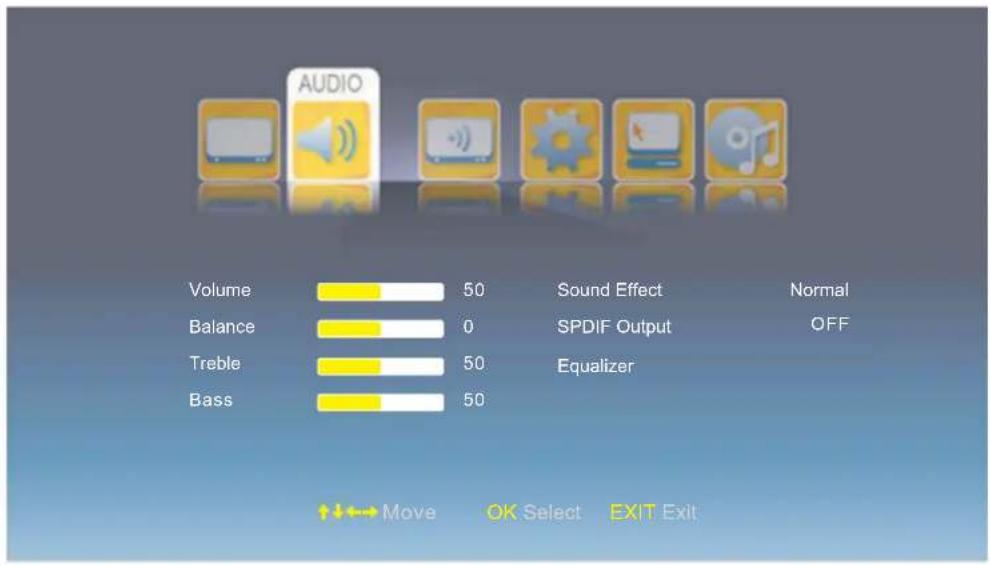
Description
Volume: Adjust volume.
Balance: Adjust the audio output between left and right speakers.
Treble: Adjust the level of the higherpitched sounds.
Bass: Adjust the level of the lower-pitched sounds.
Sound Effect: Select the sound effect from BBE, SRS, Normal.
SPIDE Output: Select the Spide Output mode from Off, PCM, RAW.
Equalizer: Enter the Equalizer menu to adjust.
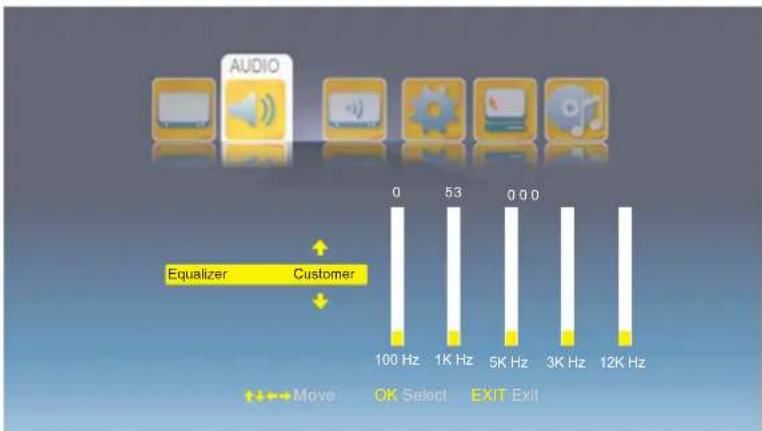
Select the Equalizer mode from Rock, Country, Jazz, Classical, Blue, Default and Customer. Note: You could adjust by yourself when you select "Customer" mode.
OSD Menu
3. TV menu(In ATV/DTV mode)
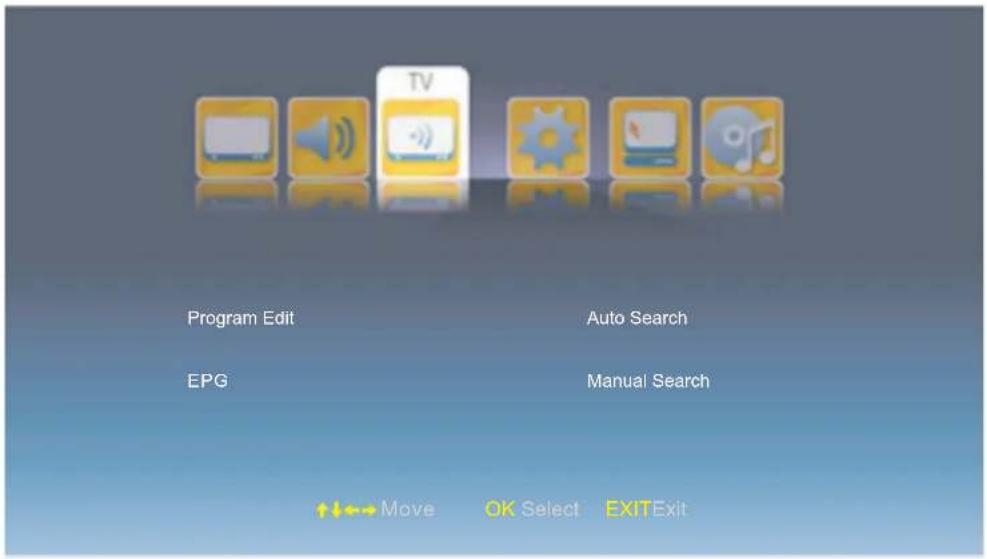
Description
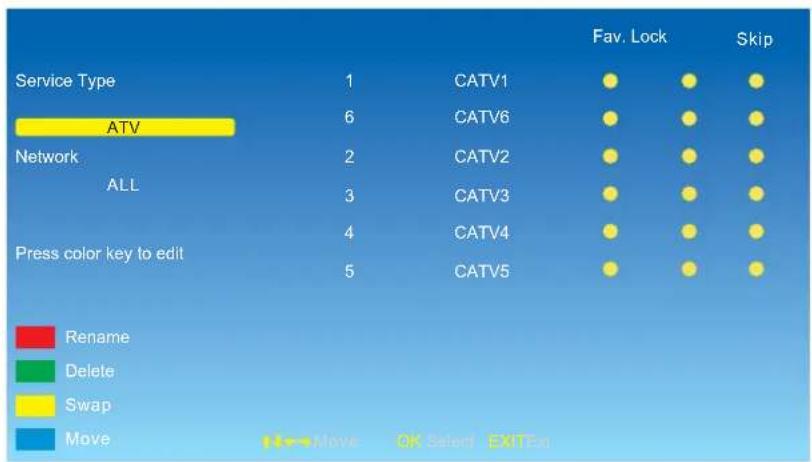
Program Edit: Enter the Program Edit menu as below:
bar
| Service Type | 1 | CATV1 | Fav. Lock | Skip | | :--- | :--- | :--- | :--- | :--- | | ATV | 6 | CATV6 | ● | ● | | Network | 2 | CATV2 | ● | ● | | ALL | 3 | CATV3 | ● | ● | | Press color key to edit | 4 | CATV4 | ● | ● | | | 5 | CATV5 | ● | ● | Rename Delete Swap Move OK Select ExitExService Type: Select the Service Type you want.
Network: Select the Network mode you want from All, Rowridge, Crystal Palace, Digita Finland, Winter Hill.
Operation on the Program Edit menu:
After you select the Service Type and Network modes, you will see the program's information displays on the right side of the screen.
Rename: Select the program you want to rename by ∧/∨ button, and press RED button on the remote control to start renaming the program, you should select the position by< / > button and select the character you like on the position by ∧/∨ button. Press OK button to confirm.
Delete: Delete the program you select by GREEN button.
Swap: Select the program you want to swap, and press YELLOW button, then select the other program you want it to be swapped and press OK button to swap.
Move: Select the program you want to move, and press BLUE button, then select the position you want the program to be moved to and press OK button to move.
OSD Menu
Fav.: Press OK button to add the program to the favorite channel list, and press OK button to cancel.
Lock: Press OK button to lock the channel, and you have to enter the code to view the program. (Note: you should set the code in Parent control menu of OTHERS menu).
Press OK button to cancel.
Skip: Press OK button to skip the channel, and the channel will be skipped when you scan the channels by CH+/- buttons, and press OK button to cancel.
EPG(Gray and invalid in ATV mode): To display the Electronic Program Guide in DTV mode.
Auto Search: Press OK button to enter the Auto Search select menu.
(*Needs 10 minutes for each search.)
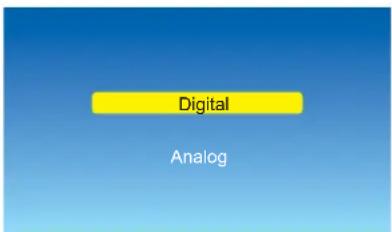

Select the Digital/Analog, and press OK button to start autoscan.
Note: 1. When auto searching, it will store the channel it found.
- You could press MENU/EXIT button to cancel the auto searching, or it will stop when all the frequency has been searched.
- You should select Aerial/Cable to start autoscan in Digital mode.

bar
| Category | Value (%) | |---|---| | Found Channels | 6 | | ATV | 430.23MHz | Press Key MENU or EXIT to stop searchingAnalog autoscan menu

bar
| Channel | Percentage (%) | | :--- | :--- | | Found Channels | 6 | | DVB-T | 75 | Press Key MENU or EXIT to stop searchingDigital-Aerial autoscan menu
| Network ID | 41111 | Demodulation | Auto |
| Frequency | 362MHz | Service Type | All Services |
| Symbol Rate | Auto | Scan Type | Quick Scan |
| Start | |||
| ↑↓←→Move | OK Select EXITExit |
Digital-Cable autoscan menu
Select the options for the cable autoscan, select "Start", and press OK button to start atuoscan.

bar
| Metric | Value | | ---------------- | --------- | | DVB-C | 362.00MHz | | Found Channels | 6 | | Percentage | 8% | | QAM | 128QAM |OSD Menu
Manual Search(in ATV mode): Press OK button to enter the Manual menu.
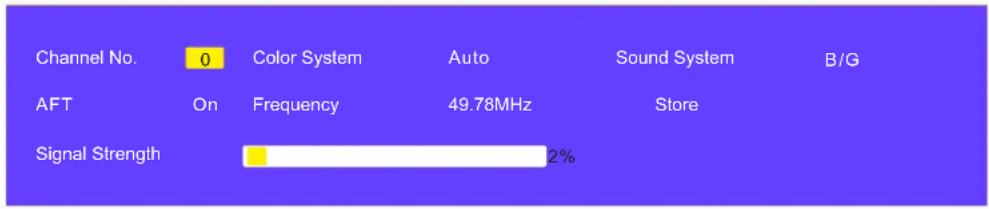
Note: Press < / > button to select.
Channel No.: Select the channel you want to manual search.
Color System: Select the Color System for the channel.
Sound System: Select the Sound System for the channel.
AFT: Due to weak signals or a wrong antenna configuration, some of the channels may not be turned to the best reception condition. AFT function allows you to fine tune channel selected.
Frequency: Press ∨/∧ button to search the signal.
Store: Press OK button to store the settings.
OSD Menu
- SETUP menu
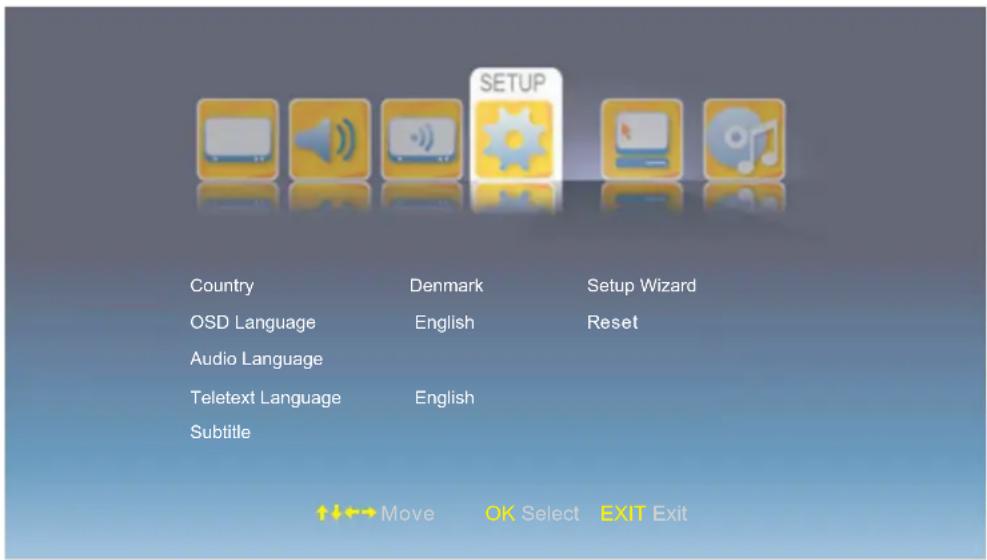
Description
Country: Select the Country in ATV/DTV mode.
OSD Language: Select the OSD language.
Audio Language: Enter the submenu and select the audio languages for the programs in DTV mode.
Teletext Language: Select th Teletext language in ATV/DTV mode.
Subtitle: Enter the submenu and set the subtitle settings for the programs in DTV mode.
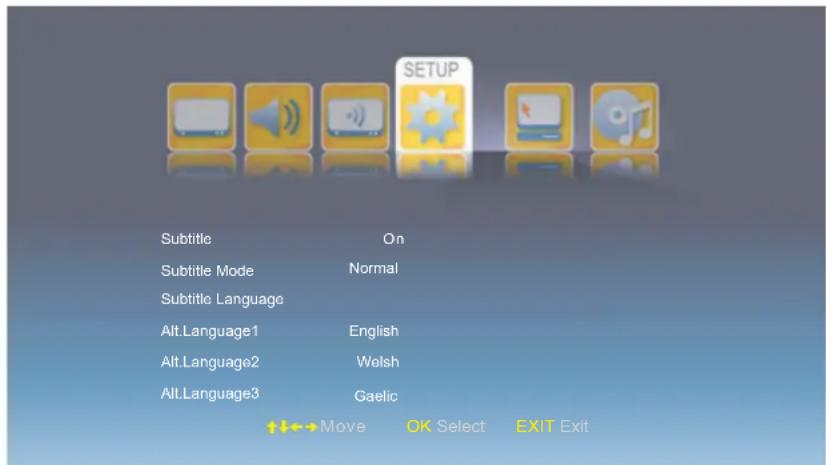
Subtitle: Turn on/off the subtitle display.
Subtitle Mode: Select the the subtitle display mode from Normal or Hard of Hearing.
Subtitle Language: Select the subtitle languages for the programs.
Setup Wizard: Turn on/off the setup wizard.
Customer Reset: Reset all the settings above.
OSD Menu
5. Time menu
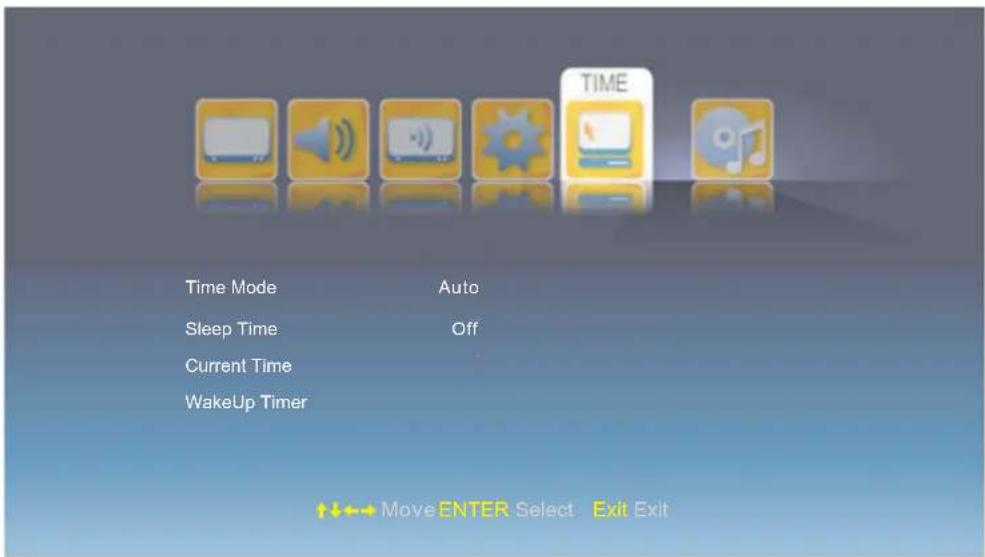
Description
Time Mode: Select Time mode from Auto or Maunal.
Note: You should select Manual mode when you want to setting the Current Time below.
Sleep Time: Set the sleep time for the TV.
Current Time: Press OK button to enter the submenu and set the current time yourself.
WakeUp Timer: Press OK button to enter the submenu and set the wakeup timer for the TV.
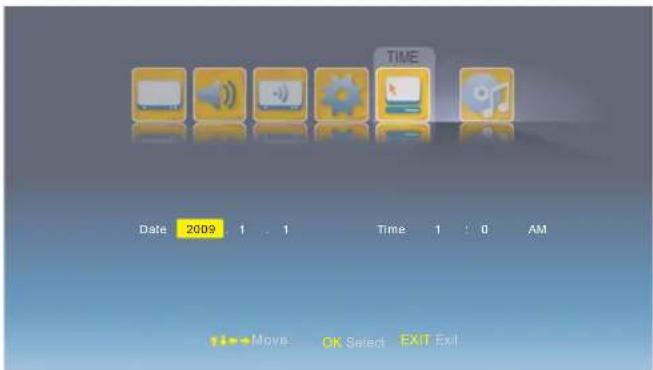
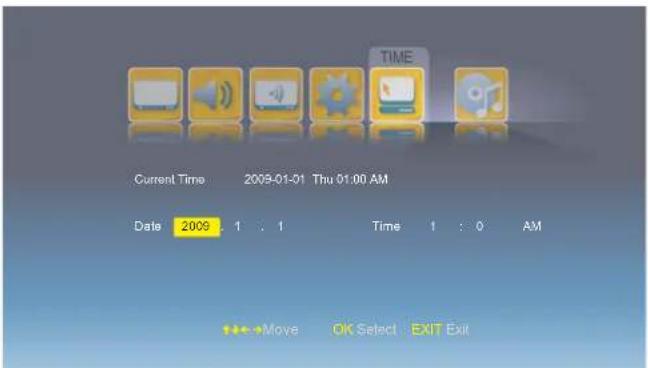
Operation for Time: Press < / > to select the position you want to edit, and press ∧/∨ button to select.
OSD Menu
6. OTHERS menu
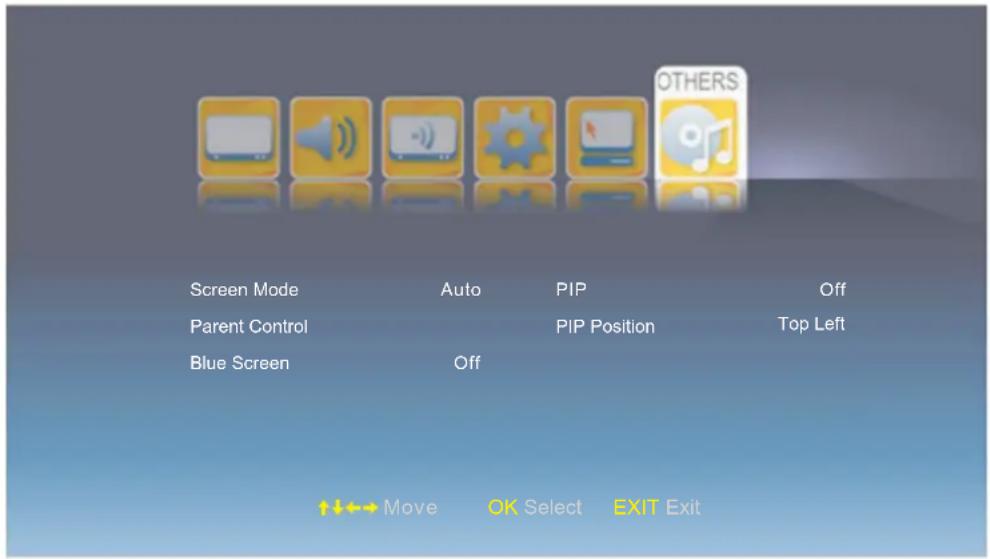
Description
Screen Mode: Select the screen mode for the TV from auto, 16:9Wide, 16:9 Zoom, 16:9 Subtitle, 4:3.
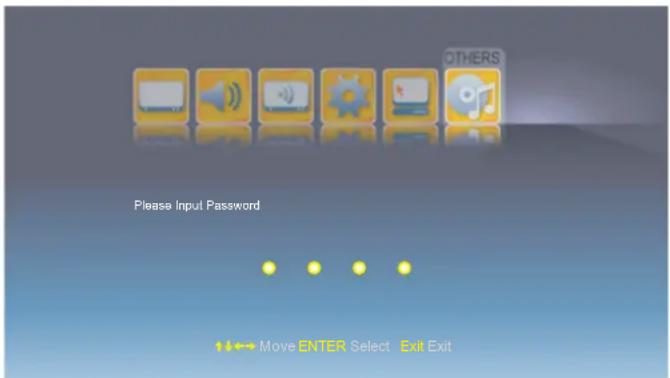
Parent Control: Press OK button and enter the code by the number buttons to enter Parent Control menu(the original password is 8888).
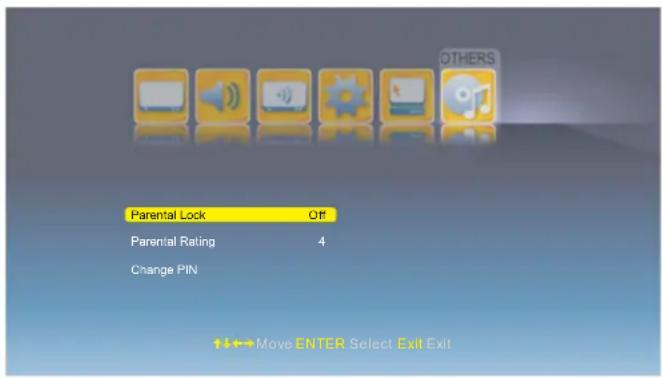
Parental Lock: Turn on/off the Parental Lock function.
Parental Rating: Select the Parental Rating from 3 to 18.
Change PIN: Press OK button to enter the submenu and change the PIN code.
Note; You should enter the old code, then enter the new code twice to change the code.
Blue Screen: Turn on/off the blue screen function.
The background will be blue screen when there's no signal.
PIP Function
PIP: Select the input source for the PIP window.
PIP Position: Select the PIP Position on the screen.
OSD Menu
7. PC menu(In PC mode)
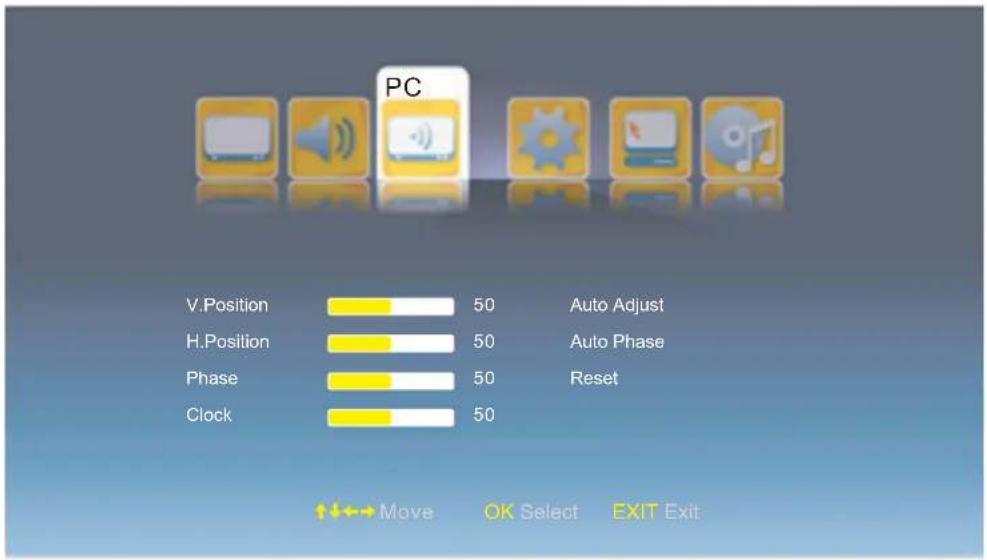
Description
V.Position: Adjust the vertical position of the picture.
H.Position: Adjust the horizontal position of the picture.
Phase: Adjust the phase of the picture.
Clock: Adjust the clock of the picture.
Auto Adjust: Auto adjust the PC/VGA settings.
Auto Phase: Auto adjust the phase of the picture.
Reset: Reset the PC/VGA settings to factory default.
Simple Troubleshooting
If the display fails or performance dramatically deteriorates check the Display in accordance with the following instructions. Remember to check the peripherals to point the source of the failure.
If the display still fails to perform as expected, connect your helpline for assistance.
No power
- Check all connections to the TV.
- Press either the power button or the Standby button on the Remote control.
No picture or sound
- Ensure that the TV is plugged in and the power is on.
- Ensure that the aerial is connected.
- Try a different programme.
Poor picture quality
- Check the aerial connections.
- Check that the channel is tuned in properly.
- Adjust the picture settings: brightness, colour, sharpness, contrast, hue.
- Make sure that the TV is not located close to electrical appliances that may emit radio frequency interference.
No colour
- Adjust the colour setting.
- Check that the programme is broadcast in colour.
- Check that the cannel is tuned properly.
TV does not respond to remote control
- Check that there are no obstructions between the remote control and the unit.
- Check that the remote control is within range of the unit.
- Check that the batteries in the remote control and not weak or exhausted.
This LCD TV is for household use and registered as harmless on electromagnetic waves.
Therefor, you can use it in every location as well as residential areas.
Electric and electronic equipment and included batteries contains materials, components and substances that can be hazardous to your health and the environment, if the waste material (discarded electric and electronic equipment and batteries) is not handled correctly.
Electric and electronic equipment and batteries is marked with the crossed out trash can symbol, seen below. This symbol signifies that electric and electronic equipment and batteries should not be disposed of with other household waste, but should be disposed of separately.
As the end user it is important that you submit your used batteries to the appropriate and designated facility. In this manner you make sure that the batteries are recycled in accordance with legislature and will not harm the environment.
All cities have established collection points, where electric and electronic equipment and batteries can either be submitted free of charge at recycling stations and other collection sites, or be collected from the households. Additional information is available at the technical department of your city.

natural_image
Symbol of a trash bin crossed out by two crossed lines, with no text or labels present.ALL RIGHTS RESERVED
COPY RIGHT DENVER ELECTRONICS A/S

www.denver-electronics.com


- Caution
- Correct disposal of this Product
- Safety Information
- Electrical safety
- Physical safety
- Product Introduction
- Introduction
- Front View
- Connections
- Remote Control
- Basic Operation
- Power on/off
- Input Source select
- Signs on the screen
- Basic OSD Menu operation
- OSD Menu
- Video menu
- Description
- Audio menu
- TV menu(In ATV/DTV mode)
- Operation on the Program Edit menu:
- Time menu
- OTHERS menu
- PIP Function
- PC menu(In PC mode)
- Simple Troubleshooting
- No power
- No picture or sound
- Poor picture quality
- No colour
- TV does not respond to remote control
Brand : DENVER
Model : LED-2253MC
Category : Television