
DP-C306 - Photocopier PANASONIC - Free user manual and instructions
Find the device manual for free DP-C306 PANASONIC in PDF.


| Product Type | Color Multifunction Copier/Printer/Scanner |
| Model | DP-C306 |
| Brand | Panasonic |
| Maximum Print Speed | Up to 30 pages per minute (color and B/W) |
| Print Resolution | 600 x 600 dpi |
| Copy Resolution | 600 x 600 dpi |
| Scan Resolution | 600 x 600 dpi (optical) |
| Maximum Paper Size | A3 (11.7 x 16.5 inches) |
| Paper Input Capacity | Standard 500-sheet cassette + 100-sheet bypass tray; optional additional cassettes |
| Duplex Printing | Automatic duplex (standard) |
| Finishing Options | Staple, sort, group, offset (with optional finisher) |
| Dimensions (W x D x H) | Approx. 599 x 704 x 800 mm (23.6 x 27.7 x 31.5 inches) |
| Weight | Approx. 90 kg (198 lbs) |
| Power Requirements | 220-240 V, 50/60 Hz |
| Power Consumption | Max 1.5 kW; Sleep mode < 10 W |
| Warm-up Time | Less than 30 seconds |
| First Copy Time | Color: approx. 9.5 seconds; B/W: approx. 6.5 seconds |
| Toner Cartridge | Individual toner cartridges for Cyan, Magenta, Yellow, Black |
| Drum Unit | Separate drum unit for each color (approx. 60,000 pages life) |
| Maintenance | Clean the glass platen and document feeder regularly; replace toner and drum as indicated |
| Safety Precautions | Use only specified power source; avoid obstructing vents; do not open covers while printing |
| Spare Parts Availability | Toner, drum, fuser unit, transfer belt, paper feed rollers are replaceable |
| Repairability | Designed for professional service; user-replaceable consumables only |
| Network Connectivity | Ethernet 10/100/1000 base-T; optional wireless |
| Supported Operating Systems | Windows, Mac, Linux (via PCL/PS drivers) |
Frequently Asked Questions - DP-C306 PANASONIC
User questions about DP-C306 PANASONIC
0 question about this device. Answer the ones you know or ask your own.
Ask a new question about this device
Download the instructions for your Photocopier in PDF format for free! Find your manual DP-C306 - PANASONIC and take your electronic device back in hand. On this page are published all the documents necessary for the use of your device. DP-C306 by PANASONIC.
USER MANUAL DP-C306 PANASONIC
natural_image
White electronic printer with paper feed and control panel, no visible text or symbols on the device itself.Panasonic®
Operating Instructions
(For Facsimile and Internet Fax)
Digital Colour Imaging Systems
Model No. DP-C406 / C306 / C266
Operating Instructions
The following Operating Instruction manuals are included with this machine. Please refer to the appropriate manual and keep all manuals for future reference. If you lose the manual, contact the authorised Panasonic dealer.

natural_image
Illustration of a mechanical component with layered structure and wiring (no text or symbols)Accessories

Quick Reference Guide
Describes the basic procedures for each function, and introduces various settings for Copy function.

Operating Instructions (For Basic)
Describes the overview of this machine.
For a detailed explanation of functions, please refer to the Operating Instruction manuals included on two CD-ROMs as illustrated below.

Operating Instructions CD
Contains manuals with detailed information for Administrator Setup, User Setup, Copy, Facsimile/Internet Fax, Scan/Email, Print functions, Function Parameters, User Authentication, and Maintenance.

Document Management System CD
Contains the Panasonic Document Management System Application software, and manuals for the Panasonic Document Management System Application software.
Operating Instructions CD
Setup Guide For Administrator
Describes how to set up the machine.
Setup Guide For User
Describes how to install the printer driver and application software to client PC.

Copy Function
Describes how to make a Colour Copy with creative features.

Facsimile and Internet Fax Function
(The Facsimile function is available when the optional G3 Fax Communication Board is installed.)
Describes how to send/receive a Facsimile/Internet Fax, and describes the course of action to take when a trouble message appears, etc.


Scan and Email Function
Describes how to scan and how to send Email through the machine.

Print Function
Describes how to print using the Control Panel of the machine.
Function Parameters
Describes how to change the default settings of each function using the Control Panel of the machine.
User Authentication
Describes how to enable and use the User Authentication function.
Maintenance Guide
Describes how to maintain the machine, and the course of action to take when a problem message appears.
Document Management System CD
Application Software
Describes how to use the application software.
Ex: Printer Driver, Fax Driver, Quick Image Navigator, Device Monitor/Device Explorer, Network Configuration and Address Book Editor
Conventions
Icons
The following icons are used in this manual.
| Icon Description | |
| ATTENTION | Indicates important information that must be read in detail. |
| NOTE | Indicates reference information. |
Notation
The following notations are used in this manual.
| Notation Description | |
| For Keys and Buttons | Hard buttons on the Control Panel are depicted as **** key, and soft buttons on the Touch Panel Display are depicted as “xxx”.Ex:Press the Start key and select “More Menus”. |
Table of Contents
Chapter 1 Getting To Know Your Machine
Menu Map.... 10
Chapter 2 Basic Fax Transmission
Placing Originals.... 14
How to Place Originals.... 14
Fax Transmission Procedure.... 18
Entering a Destination 20
Manual Dialling.... 20
Using the Address Book.... 22
Searching for a Destination......“Search” 24
Redialling .... "Redial" 27
Preventing Accidental Transmission to Multiple Destinations......“Multi Station” 28
Confirming the Destination.... "Destinations:###" 29
Transmission with Destination Monitoring .... "Monitor" 31
Talking to the Remote Party Before Transmission.... 32
Setting Original Quality......“Quality Adj.” 33
Setting the Original Size .... "Original Size" 36
Transmitting 2-Sided Originals ......“2-Sided Original” 38
Verification Stamp "Verification Stamp" 40
Transmitting a Document Stored in Memory......“Memory” 42
Job Build and SADF "Job Build and SADF" 44
Direct Transmission......“Direct” 46
Verifying Communication Status .... "Comm. Status" 48
Rotated Transmission.... 49
Batch Transmission.... 50
Getting an Outside Line Using PIN Code Access 51
Using Program Keys...."Program/Group" 52
Cancelling a Communication.... 53
To Cancel Memory Transmission: 53
To Cancel Direct Transmission: 54
Dial Prefix ...... "122 Dial Prefix" 55
Chapter 3 Convenient Fax Features
Time Controlled Communication (Deferred) 57
Deferred Transmission...."Transmit" 57
Deferred Polling......“Polling” 59
Polling 61
Polling...."Polling" 61
Storing Documents to be Polled......“Polled” 63
Using a Mailbox (Confidential Communication)......“Mail Box” 65
What is Confidential Communication? 65
Confidential Transmission......“Transmit” 66
Confidential Polling......“Polling” 68
Storing Documents for Confidential Polling......“Polled” 69
Printing a Received Confidential Document...... "Print File" 70
Deleting a Confidential Document......“Delete File” 72
Sub-Address Communication.... 73
What is Sub-Addressing? 73
Sub-Addressed Transmission Using Address Book......“Sub Address Transmit” 74
Sub-Addressed Transmission Using Manual Dialling...... "Sub-Address" 76
Password Communication.... 78
What is Password Communication?......78
Password Transmission .... "Password XMT" 79
Setting Password-Protected Transmission......“43 Password-Transit” 81
Printing Communication Journal......“Comm. Journal” 83
Transmitting a Document with a Cover Sheet......“Cover Sheet” 85
Chapter 4 Fax Reception
Receiving Documents.... 87
Automatic Reception 87
Manual Reception.... 88
Print Reduction and Duplex Recording.... 89
Print Reduction 89
Duplex Recording.... 90
Substitute Memory Reception.... 91
Convenient Reception Features 92
Selective Reception.... 92
Fax Forwarding.... 93
Password-Reception 94
Junk Fax Filter 95
Receive to Memory......“Receive to Memory” 96
What is Memory Reception? 96
Programming Memory Reception....97
Chapter 5 Internet Fax
What is Internet Fax? 100
What is Internet Fax? 100
Using the Internet Fax Feature 101
What Internet Fax Can Do.... 102
Sending Email 102
Receiving Email 103
Inbound Routing.... 103
Relay Transmission.... 104
Message Delivery Notice (MDN).... 105
Direct Internet Fax Transmission (Using Direct SMTP) 106
Tips for Internet Fax 107
Preparing to Use Internet Fax 109
Program Network Parameters.... 109
Sending an Email Procedure...... "Email" 111
Entering an Email Address.... 113
Using the Onscreen Keyboard 113
Using the Address Book.... 115
Searching for Destinations .... "Search" 117
Using Cc, Bcc and From.... 120
Setting Cc and Bcc.... 121
Setting From Field 122
Setting Subject 123
Confirming the Destination.... 124
Setting a File Type and a File Name......“File Type and Name” 125
Emailing an A3-Sized Document......“Ledger Email XMT” 127
Setting Message Delivery Notice (MDN)......“Delivery Notice” 129
When Email Transmission Fails 131
Using a Completion Notice......“Completion Notice” 132
Receiving an Email.... 134
Configuring to Receive Email 134
Receiving Email Automatically 134
Receiving Email Manually .... "Get Email" 135
Receiving Email with the Program Key "Program/Group" 136
Receiving an Email on a Computer 137
Receiving Email on Your Computer 137
Opening Email.... 138
Inbound Routing 139
What is Inbound Routing? 139
Routing Setup Flow 140
Settings for Inbound Routing.... 141
Programming the Address Book for Inbound Routing.... 142
Using the Relay Feature.... 144
What is the Relay Feature? 144
Setting up a Relayed Transmission Network.... 146
Example of a Relayed Transmission Network.... 147
Sample Entries in Address Book 148
Function Parameters for Relay Stations.... 150
Settings for Initial Sending Station.... 151
Adding End Receiving Stations for Relayed Transmission 152
Relayed Transmission from Internet Fax...... "Lan Relay XMT" 154
Relayed Transmission from PC 156
Requesting a Relayed Transmission from a Computer.... 157
Convenient Application Software.... 158
Result of Relayed Transmission.... 159
Useful Terms to Remember.... 161
DHCP (Dynamic Host Configuration Protocol).... 161
SMTP Authentication.... 161
Chapter 6 Handling Communication Reservation Files
Editing a Communication Reservation File...... "File List" 162
Displaying a Communication Reservation File List 162
Reading the Reservation Report 164
Editing Communication Reservations......“Change Time/Stn” 165
Deleting a Communication Reservation File ......"Delete File" 167
Printing a Communication Reservation File .... "Print File" 169
Adding Documents to a Communication Reservation File .... "Add Document" 171
Resending an Incomplete Document ...."Retry Incomp. File" 173
Chapter 7 Program Destinations/Program Keys
Address Book 175
What is Address Book? 175
Items Allowed for Entry in the Address Book 175
Adding a Fax Number into the Address Book ......“01 Add Telephone Number” 176
Adding an Email Address to Address Book......“02 Add Email Address” 179
Editing Address Book......“03 Modify Station” 182
Deleting a Destination from Address Book......“04 Delete Station” 183
Printing the Address Book List .... "00 Print Address Book List" 184
Program Keys 185
What is Program Key? 185
Programmable Items.... 185
Setting for Program Dialling ....“02 Program Dial” 186
Setting for Group Dialling ....“01 Group Dial” 188
Editing a Group Dialling ....“03 Modify Group Dial” 190
Deleting the Program Key Setting......“04 Delete Program/GRP” 192
Printing the Program List......“00 Print Program List” 193
Programming Email Manual Reception on Program Keys......"05 Manual POP RCV" 194
Chapter 8 Reading Reports/Lists
Transaction Journal.... 196
Printing Transaction Journal .... "Journal" 196
Viewing Communication Results on Touch Panel Display......“Journal” 198
Reading Transaction Journal 199
Communication Journal.... 202
Address Book List.... 205
Printing Address Book List .... "Address Book List" 205
Reading Address Book List.... 206
Program List 207
Printing Program List......“Program List” 207
Reading Program List 208
Fax Parameter List 209
Printing Fax Parameter List......“Fax Parameter List” 209
Reading Fax Parameter List 210
Individual XMT Journal 211
Printing Individual XMT Journal ...... “IND. XMT Journal” 211
Reading Individual XMT Journal 212
Chapter 9 Solving Problems
Tips for Solving Problems.... 214
Information Codes 216
Power Failure 221
Checking the Telephone Line.... 222
Chapter 10 Appendix
Replacing the Verification Stamp 223
Specifications 225
Glossary 226
Index 227
Menu Map
The main screen and menu for Fax features are as follows.
Address Book Screen

Basic Menu Screen
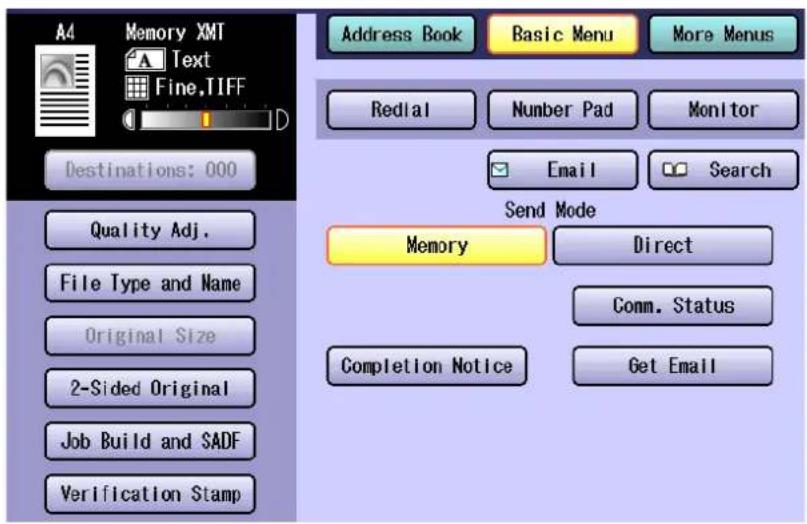
• Quality Adj. (Setting Original Quality: see page 33)
- File Type and Name (Setting a File Type and a File Name: see page 125)
- Original Size (Setting the Original Size: see page 36)
• 2-Sided Original (Transmitting 2-Sided Originals: see page 38)
• Job Build and SADF (Job Build and SADF: see page 44)
• Verification Stamp (Verification Stamp: see page 40)
• Memory (Transmitting a Document Stored in Memory: see page 42)
- Direct (Direct Transmission: see page 46)
- Comm. Status (Verifying Communication Status: see page 48)
• Completion Notice (Using a Completion Notice: see page 132)
• Get Email (Receiving an Email: see page 134)
More Menus > Advanced Comm. Screen
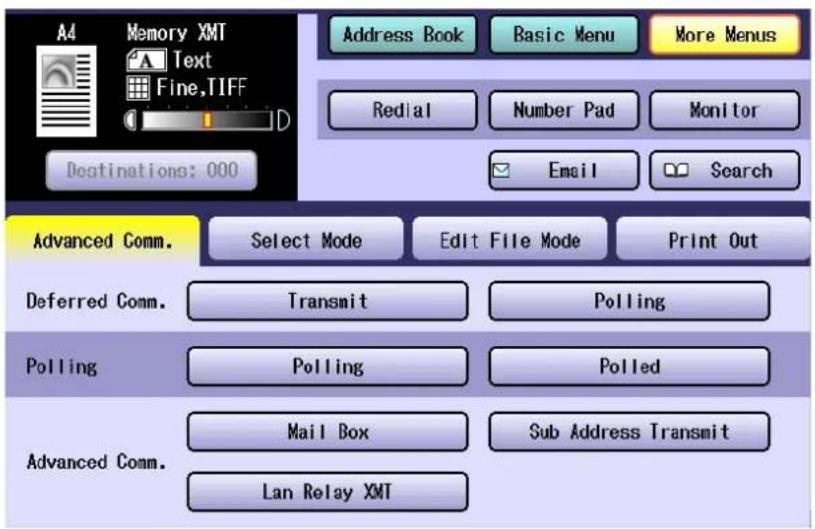
- Deferred Comm.
- Transmit (Deferred Transmission: see page 57)
- Polling (Deferred Polling: see page 59)
- Polling
- Polling (Polling: see page 61)
- Polled (Storing Documents to be Polled: see page 63)
- Advanced Comm.
- Mail Box (Using a Mailbox (Confidential Communication): see page 65)
- Sub Address Transmit (Sub-Address Communication: see page 73)
- Lan Relay XMT (Relayed Transmission from Internet Fax: see page 154)
More Menus > Select Mode Screen

- Password XMT (Password Transmission: see page 79)
• Comm. Journal (Printing Communication Journal: see page 83) - Cover Sheet (Transmitting a Document with a Cover Sheet: see page 85)
- Receive to Memory (Receive to Memory: see page 96)
• A3 Email XMT (Emailing an A3-Sized Document: see page 127) - Delivery Notice (Setting Message Delivery Notice (MDN): see page 129)
More Menus > Edit File Mode Screen

- File List (Displaying a Communication Reservation File List: see page 162)
- Change Time/Stn (Editing Communication Reservations: see page 165)
-
Delete File (Deleting a Communication Reservation File: see page 167)
-
Print File (Printing a Communication Reservation File: see page 169)
- Add Document (Adding Documents to a Communication Reservation File: see page 171)
- Retry Incomp. File (Resending an Incomplete Document: see page 173)
More Menus > Print Out Screen

• Journal (Transaction Journal: see page 196)
- Address Book List (Address Book List: see page 205)
- Program List (Program List: see page 207)
- Fax Parameter List (Fax Parameter List: see page 209)
- IND. XMT Journal (Individual XMT Journal: see page 211)
Placing Originals
How to Place Originals
On the ADF

Original Guides
Adjust the Original Guides to the original's width.
Notice for ADF
Do not use the following type / flawed originals.
- Drawing papers, Transparencies, Labeling paper, Heavy weight papers, Thin Art papers, Film, Thermal papers.
- Papers which are curled, ripped, creased, folded, punched, glued, stapled, or self-adhesive.
- Originals of assorted (mixed) width size.
- Pressure sensitive or carbon backed papers.
- Paper which is still wet with colour ink or white-out.
On the Platen Glass
Notice for Platen Glass
Align the original to the top left corner mark (↓).
- If the original is not positioned properly, a portion of the original may not be scanned.
- For originals smaller than A5 size, position the original within the A5 area and select A5.
Original Orientation
Ex: A5

A5 A5R

For Portrait Orientation Original Guides

For Landscape Orientation
Original Guides

Scanning a thick booklet
• After scanning a thick booklet, open the ADF and verify that the ADF Hinge was returned to original position in order to prevent the rear of the ADF from being raised.

CAUTION
- When copying with the ADF open, do not look directly at the exposure lamp. Direct eye exposure can cause eye fatigue or eye injury.
- When scanning a thick original, do not use excessive force to press it against the Platen Glass. The Glass may break and cause injuries.
■ Sending Non-Standard Size Originals
When transmitting non-standard size original(s), the machine may perform Rotate transmission automatically and not transmit the portion of the original that exceeds the standard size ("P" portion).
NOTE
- Rotation XMT is not carried out in Monitor Dial transmission.

Scanning Direction
Rotation XMT


The portion labelled "P" that exceeds the standard original size is not sent.
NOTE
- When an oversized original is sent to another machine, it may be reduced in accordance with the other party's recording paper size.
EX:

flowchart
graph LR
    A["◀"] --> B["◀"]
A3 size A4 size
Scanning Area
Ex:
Original Width:
216 mm

Original Size
From the ADF

From the Platen Glass

For Auto Reset
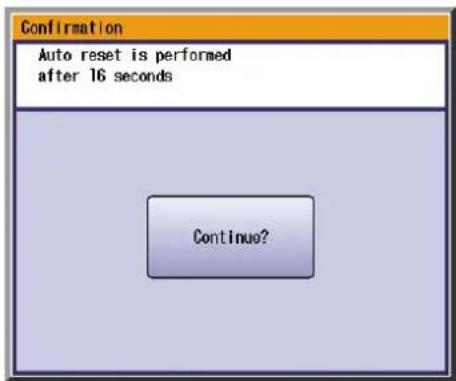
When the pop-up screen is displayed while setting the address or facsimile mode, select "Continue?" on the Touch Panel Display, or press the Stop key on the Control Panel.
NOTE
The initial setting for Auto Reset Time is 1 minute.
If you do not touch any key for 1 minute, the Touch Panel Display will be back to the initial screen of the active function automatically. 20 seconds before resetting, the "Continue?" screen is displayed to extend the auto reset time for another 1 minute.
If you wish to change Auto Reset Time, consult with your Key Operator.
Fax Transmission Procedure
You can send originals via a telephone line by simply entering the fax number using the Keypad or the Address Book.
The basic procedure of transmitting a fax on this machine is as follows.
NOTE
● The Facsimile function is available only when the optional G3 Fax Communication Board is installed.
1 Place original(s).

● Refer to Placing Originals (See page 14).
- If the available memory is not sufficient, Memory transmission may not be possible. If this happens, use Direct transmission instead. Refer to Direct Transmission (See page 46).
2 Press the Fax key to open the Fax screen.

☐ Select "Basic Menu" if additional settings are required.

- Setting Original Quality (see page 33)
- Setting the Original Size (see page 36)
● Transmitting 2-Sided Originals (see page 38)
• Job Build and SADF (see page 44)
Verification Stamp (see page 40)
• Transmitting a Document Stored in Memory (see page 42)
• Direct Transmission (see page 46) - Verifying Communication Status (see page 48)
☐ Select "More Menus" if additional settings are required.

• Deferred Transmission (see page 57)
3 Enter the fax number using the Keypad, or select a destination.
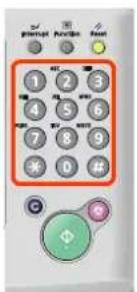
or
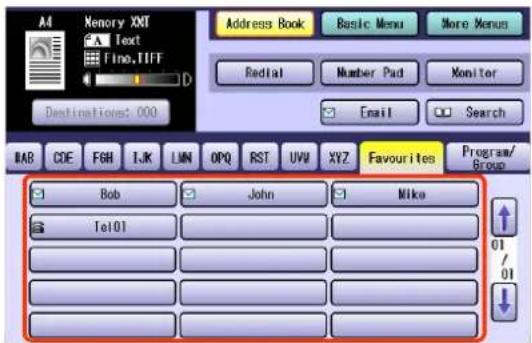
● Refer to Entering a Destination (see page 20).
The Address Book is available only when destinations are registered (See page 176).
4 Press the Start key.

The original(s) are stored into memory with a file number. Then starts dialling the telephone number.
NOTE
- The scanned data is sent in black and white (Grey Scale).
- For instructions on how to cancel a transmission, refer to Cancelling a Communication (see page 53).
- When sending from the Platen Glass, place the next original and follow the instructions displayed on the Touch Panel Display.
A communication journal is printed if the transmission fails (Ex: Remote station is busy). - Press the Reset key to return the machine to the initial screen of the current active mode.
- If the line is busy, the number is automatically redialed. The call waiting message appears on the display while auto-dialling.
• To print the transaction journal, refer to Transaction Journal (See page 196).
Entering a Destination
Stations can be entered by using the following methods or a combination of these:
- Manual Dialling
Enter the telephone number directly. (See below)
• Using the Address Book
Use the pre-programmed Address Book.
- Use a Key Name (see page 22)
- Select from "Favourites" (see page 22)
- Use Group Dialling (see page 23)
• Searching for a Destination
Search the Address Book or the Global directory service (LDAP).
- Search through the Address Book (Local Search) (see page 24)
- Search through the LDAP Server (LDAP Search) (see page 25)
(This feature is available in certain countries only.)
- Redialling
Use the last dialled remote station. (See page 27)
Manual Dialling
To enter a destination telephone number, follow the steps below.
NOTE
- This function is not available when the Function Parameter "136 Restrict Direct Dial" (Fax/Email Settings >Fax Parameters) is set to "Valid".
1 Follow the step 1 and 2 on page 18.
2 Enter the fax number using the Keypad.

The Number Pad screen opens automatically.
- Telephone number field is limited to 36 digits in length.
- For transmission to additional destinations, enter their fax numbers, and then select "Set" after each destination. When you finish entering the last destination's fax number, select "OK". (Do not select "Set" at this time.)
- When the Function Parameter "137 Re-enter Direct Dial" (Fax/Email Settings > Fax Parameters) is set to "Valid", enter the fax number twice for manual dialling. For more details, refer to Fax/Email Settings in the Operating Instructions (For Function Parameters) of provided CD-ROM.
- To confirm the destinations, select "Destinations: ###" on the upper left corner of the screen.
- If you make a mistake, select "Clear" to delete entries one digit at a time.
- Fax number entry is also possible from the "Number Pad" in the Address Book screen, instead of the Control Panel Keypad.
☐ Number Pad Screen

| Redial/Pause | Inserts a pause each time it is selected. The pause is represented by a “-” symbol. |
| Flash | Used to access some features of your PBX. |
| Sub-Address | Select when entering a sub-address number.The sub-address is represented by an “s” symbol. |
| Set | Select when entering additional destinations.NOTEDo not select “Set” for a single destination. |
| Clear | Select “Clear” to delete an erroneous entry, one digit at a time. |
□ Using "Redial/Pause"
- If you are using a PBX, enter the external access number first, and then select "Redial/Pause" before entering the fax number.
Ex: Enter 9 for the outside access number, select "Redial/Pause", and then enter the fax number.
9-5551234 Pause symbol
□ Using\*”
- This feature is available in certain countries only.
A “/” symbol appears when the dialling method is changed from “Pulse” to “Tone”. - The standard setting for "06 Dialling Method" is "Tone".
Ex: After entering 9, select “*to switch to tone dialling.

□ Using "Sub-Address"
- Select "Sub-Address" to enter a sub-address destination after the fax number. Refer to Sub-Addressed Transmission Using Manual Dialling (see page 76).
Ex: After entering 4, select "Sub-Address", and then enter the Sub-address.
5551234s1234 T Sub-address symbol
3 Press the Start key.
The original(s) are stored into memory with a file number. Then starts dialling the telephone number.
Using the Address Book
Use a Key Name
If a destination is registered in the Address Book, it can be selected by using a Key Name.
ATTENTION
- The fax numbers must be pre-programmed into the Address Book. Refer to Adding a Fax Number into the Address Book (see page 176).
1 Follow the step 1 and 2 on page 18.
2 Select the Key Name tab.
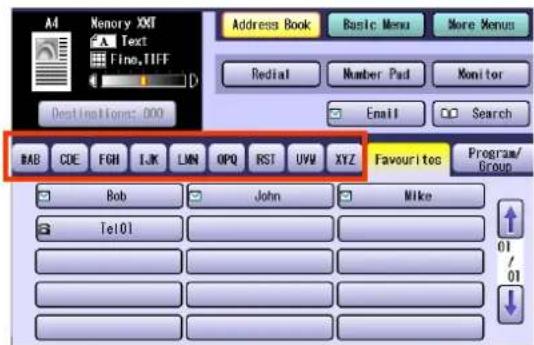
3 Select the desired destination.

- To cancel a choice, select the same destination again.
- To enter additional destinations, repeat steps 2 and 3.
- To confirm the destinations, select "Destinations:###" on the upper left corner of the screen.
4 Press the Start key.
The original(s) are stored into memory with a file number. Then starts dialling the telephone number.
■ Select from "Favourites"
If a destination is registered as a Favourite in the Address Book, it can be selected using the "Favourites" tab.
ATTENTION
The fax numbers must be pre-programmed into the Address Book. Refer to Adding an Email Address to Address Book (see page 179).
1 Follow the step 1 and 2 on page 18.
2 Select "Favourites" to display the Favourites screen.

3 Select the desired destination.

- To cancel a choice, select the same destination again.
- For transmission to additional destinations, press the relevant keys.
- To confirm the destinations, select "Destinations:###" on the upper left corner of the screen.
4 Press the Start key.
The original(s) are stored into memory with a file number. Then starts dialling the telephone number.
■ Use Group Dialling
For transmission to multiple destinations using group dialling, follow the steps below.
ATTENTION
- The group dialling button must be pre-programmed. Refer to Setting for Group Dialling (see page 188).
1 Follow the step 1 and 2 on page 18.
2 Select "Program/Group".
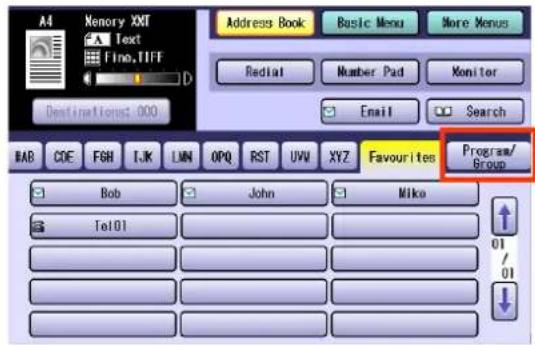
3 Select the button for the desired destination group.

- To cancel a choice, select the same destination again.
- To confirm the destinations, select "Destinations:###" on the upper left corner of the screen.
4 Press the Start key.
The original(s) are stored into memory with a file number. Then starts dialling the telephone number.
Searching for a Destination
■ Search through the Address Book (Local Search)
Select "Search" to look through the Address Book for the desired destination by the entry name.
NOTE
- Select "Global" to search fax numbers or Email addresses in the LDAP server (See page 25).
- This feature is available in certain countries only.
1 Follow the step 1 and 2 on page 18.
2 Select "Search".

3 Enter the first few letters of the Key Name you are searching for.
The search result appears.

- For instructions on using the onscreen Keyboard, refer to Using the Keyboard in the Operating Instructions (For Function Parameters) of provided CD-ROM.
4 Select a destination, and then select "OK".

- Select or to scroll the search results. - Multiple destinations cannot be selected at a time.
5 Press the Start key.
The original(s) are stored into memory with a file number. Then starts dialling the telephone number.
■ Search through the LDAP Server (LDAP Search)
LDAP search is a feature that searches through the Address Book of an LDAP server on the network for fax numbers or Email addresses.
Select "Global" on the displayed screen to use the LDAP Search feature.
Contact your network administrator to check whether the LDAP Search feature is available in your particular environment.
NOTE
- An LDAP server must be configured before using the LDAP search function. For more details, refer to Fax/Email Settings in the Operating Instructions (For Function Parameters) of provided CD-ROM.
1 Follow the step 1 and 2 on page 18.
2 Select "Search".

3 Select "Global".
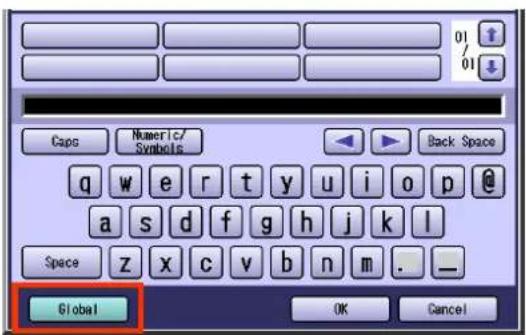
4 Enter a search letter, and then select "Search".
The search result appears.

- You can search for station names, Email addresses, and fax numbers.
- For instructions on using the onscreen Keyboard, refer to Using the Keyboard in the Operating Instructions (For Function Parameters) of provided CD-ROM.
- A message appears if there are more than 100 matches.
Select "Yes, I want to restart my computer now." to search by a more detailed keyword. Select "No, not this time" to continue the search.
- Select "Local" to exit the LDAP search screen.
- A message appears if an error occurs while searching.
5 Select "Fax Number" to display a list of destinations.

6 Select a destination, and then select "OK".
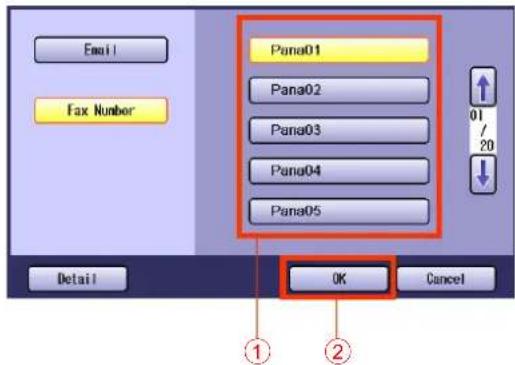
- Only one destination can be selected.
- You can change the entry screen by selecting "Email" or "Fax Number".
- Select or to scroll the search results.
- Select "Detail" to open the more detailed information screen.
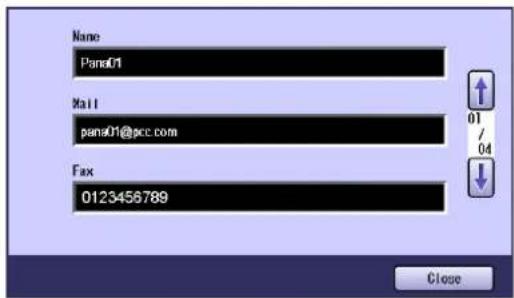
Select "Close" to exit the detailed information screen.
- To cancel a search operation, select "Cancel".
- To add the found destination to the Address Book, select "Add to Local" on the LDAP search screen, enter an entry name, and then select "OK". (If you are using a PBX, you need to register a telephone number with the dial prefix.)

7 Select "OK", and then press the Start key.
Redialling
To redial the most recently dialled number, follow the steps below.
NOTE
- The "Redial" button cannot be used when the Function Parameter "136 Restrict Direct Dial" (Fax/Email Settings > Fax Parameters) is set to "Valid".
1 Follow the step 1 and 2 on page 18.
2 Select "Redial".

3 Confirm that this is the fax number that you want to send to, and then select "OK".

- When the Function Parameter "137 Re-enter Direct Dial" (Fax/Email Settings > Fax Parameters) is set to "Valid", a message appears on the Number Pad screen prompting to re-enter the fax number for confirmation.
4 Press the Start key.
The original(s) are stored into memory with a file number. Then starts dialling the telephone number.
Preventing Accidental Transmission to Multiple Destinations
This function can prevent accidental transmission of documents to multiple destinations. It is useful when sending documents to a single destination.
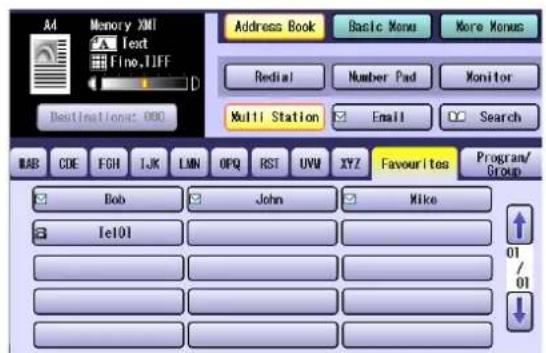
Setting the Function Parameter "117 Multi Station (HOME)" (Fax/Email Settings > Fax Parameters) to "Off" or "Invalid" can prevent accidental transmission of documents to multiple destinations.
When "117 Multi Station (HOME)" is set to "Off", the "Multi Station" button is displayed on the Touch Panel Display.

NOTE
- For instructions on how to set the Function Parameter "117 Multi Station (HOME)" to "Off" or "Invalid", refer to Fax/Email Settings in the Operating Instructions (For Function Parameters) of provided CD-ROM.
- An error message appears if you select multiple destinations when the "Multi Station" button is displayed in blue or the Function Parameter "117 Multi Station (HOME)" is set to "Invalid".
■ Temporarily Enabling Transmission to Multiple Destinations
Even when the Function Parameter "117 Multi Station (HOME)" (Fax/Email Settings > Fax Parameters) is set to "Off", the transmission to multiple destinations can be enabled temporarily.
1 Select "Multi Station".

The "Multi Station" button changes to yellow, and the document can be sent to multiple destinations.
Confirming the Destination
■ Confirming the Destination
You can confirm the entered destinations.
1 Select "Destinations:###". (###: Number of selected addresses)

2 Select the desired field button, and confirm destinations.
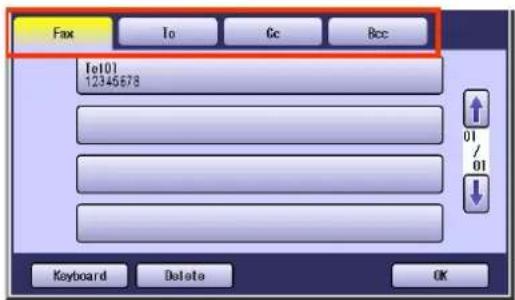
- To add a destination, select "OK", and then select the desired destination.
- To delete a destination, select a destination, and then select "Delete" and "Yes".
- Only Email addresses entered directly as a destination can be edited using the onscreen Keyboard.
3 Select "OK".
■ When Confirmation of the Destinations is Always Required
When the Function Parameter "125 Confirm Stations" (Fax/Email Settings > Fax Parameters) is set, a message prompting the confirmation of destinations appears if the Start key is pressed before the destinations are confirmed.
NOTE
- For instructions on how to set the Function Parameter "125 Confirm Stations", refer to Fax/Email Settings in the Operating Instructions (For Function Parameters) of provided CD-ROM.
1 When the message appears, select "Close".

2 Select "Destinations:###". (###: Number of selected addresses)

3 Select the desired field button, and confirm destinations.
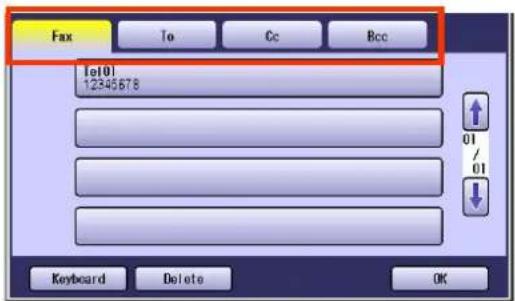
- To add a destination, select "OK", and then select the desired destination. Select "Destinations:###" to confirm the destinations again.
- To delete a destination, select a destination, and then select "Delete" and "Yes".
4 Select "OK", and then press the Start key.
- The original(s) are stored into memory with a file number. Then the Fax transmission starts.
Transmission with Destination Monitoring
Select "Monitor" on the Touch Panel Display to obtain a dial tone. This feature is called "On-hook dialling". To monitor the status of a remote station, follow the steps below.
NOTE
- This function is not available when the Function Parameter "137 Re-enter Direct Dial" (Fax/Email Settings > Fax Parameters) is set to "Valid".
1 Place original(s).
- If the Platen Glass is used, only one page can be transmitted at a time.
● Refer to Placing Originals (See page 14).
2 Press the Fax key.
3 Select "Monitor".

The Monitor screen appears, and you will hear a dialling tone through the monitor speaker.
4 Enter the fax number of the destination.
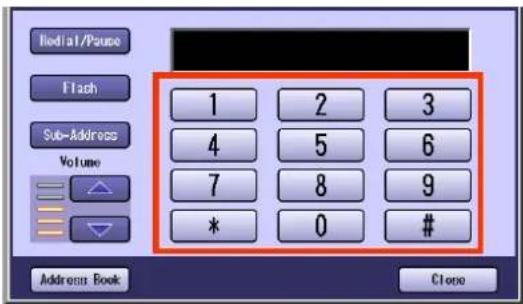
- When the Function Parameter "136 Restrict Direct Dial" is set to "Valid", manual input of fax numbers is not available. Select a destination from the "Address Book".
| Raises the monitor volume. | |
| Lowers the monitor volume. | |
| Redial/Pause | Select once to recall the last dialled fax number. Select twice to insert a pause (dialling interval). |
5 When you hear a beep, press the Start key.
- For instructions on how to cancel a transmission, refer to Cancelling a Communication (see page 53).
- Press the Reset key to return the machine to the initial screen of the current active mode.
Talking to the Remote Party Before Transmission
If an external telephone is connected to your machine, you can send a fax after talking to the remote party on the phone. Follow the steps below.
1 Place original(s).
- If the Platen Glass is used, only one page can be transmitted at a time.
● Refer to Placing Originals (see page 14).
2 Press the Fax key.
3 Lift the handset of the external telephone.
4 Dial the telephone number.
5 Talk to the remote party, and then tell the other party to get ready for receiving fax.
6 When a beep is heard, press the Start key, and then place the handset back on the cradle.
Transmission starts.
- For instructions on how to cancel a transmission, refer to Cancelling a Communication (see page 53).
Setting Original Quality
Original Type
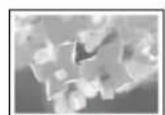
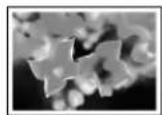
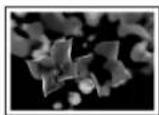
Original type can be specified to suit your needs. You can select from text-only original, photo-only original, or original in which text and photos are mixed.
Select "Text/Photo" when text and photos are mixed on a single page or are mixed on multiple pages to be sent.
Text Photo Text/Photo


natural_image
Microscopic view of crystalline structures with no visible text or symbols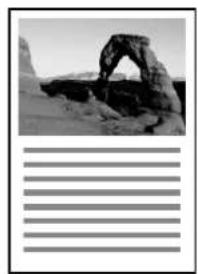
natural_image
Black-and-white photo of a rock arch formation on rocky terrain, with horizontal lines below (no text or symbols)Density
Adjust the density according to your requirements.
Lighter Darker


Resolution
Adjust the resolution according to your requirements.
Ordinary original

Std Fine Fine, S-Fine, or 600dpi
Original containing small characters or graphics

Original containing detailed drawings or text

natural_image
Simple floor plan diagram with rooms and a grid background (no text or labels)NOTE
- The standard setting can be changed by setting the Function Parameters "03 Original (HOME)", "01 Density (HOME)", and "02 Resolution (HOME)" (Fax/Email Settings > Fax Parameters).
For instructions on how to change the setting, refer to Fax/Email Settings in the Operating Instructions (For Function Parameters) of provided CD-ROM.
1 Place original(s).
● Refer to Placing Originals (see page 14).
2 Press the Fax key.
3 Select "Basic Menu".
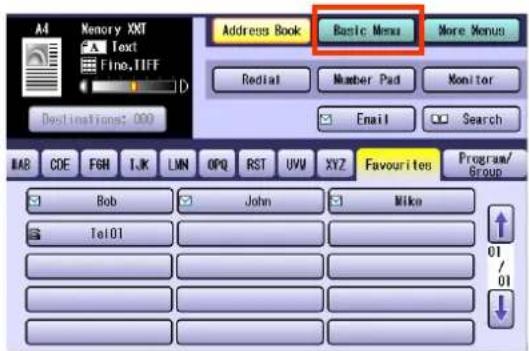
4 Select "Quality Adj.".

5 Adjust the original quality, and then select "OK".

Original Type
| Text | Select for text-only originals. |
| Text/Photo | Select for originals in which text and photos are mixed. |
| Photo | Select for photo-only originals. |
- If a photo original is scanned in the "Text" mode, the scanned image can be indistinguishable in the halftone area.
- When "Text/Photo" or "Photo" is selected, you cannot select the "Std" Resolution setting.
□ Density
| Lighter | Each time it is selected, the density level is decreased, brightening the printed colour. |
| Darker | Each time it is selected, the density level is increased, darkening the printed colour. |
Resolution
 |
- The finer an original to be scanned, the more information needs to be transmitted, thus, requiring a longer communication time.
- If "S-Fine" or "600dpi" is selected, and the receiving station does not support these resolutions, originals will be transmitted with resolution of the receiver's capability.
6 Select "Address Book", and then select a destination.
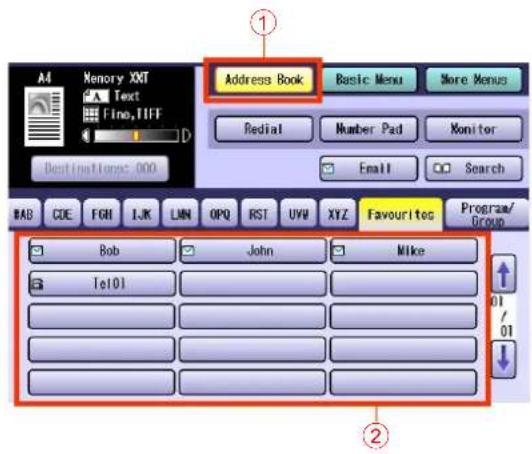
● Refer to Entering a Destination (see page 20).
7 Press the Start key.
The original(s) are stored into memory with a file number. Then starts dialling the telephone number.
Setting the Original Size
The original's size is usually detected automatically when an original is placed on the Platen Glass. If the size is not detected automatically, or you would like to change the detected size, you can set the Original Size manually by following the procedure below.
Original size is not detected automatically.

Original size is not detected correctly.

NOTE
This feature is not available when the original is loaded on the ADF.
1 Place an original on the Platen Glass.

● Refer to Placing Originals (see page 14).
2 Press the Fax key.
3 Select "Basic Menu".

4 Select "Original Size".

5 Select the Original Size, and then select "OK".
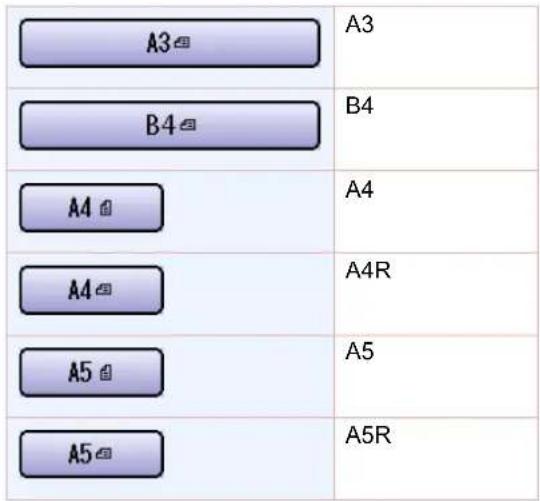
6 Set "Quality Adj." as required.
● Refer to Setting Original Quality (See page 33).
7 Select "Address Book", and then select a destination.

● Refer to Entering a Destination (See page 20).
8 Press the Start key.
The original(s) are stored into memory with a file number.
NOTE
- The Confirmation screen appears each time an original is scanned.
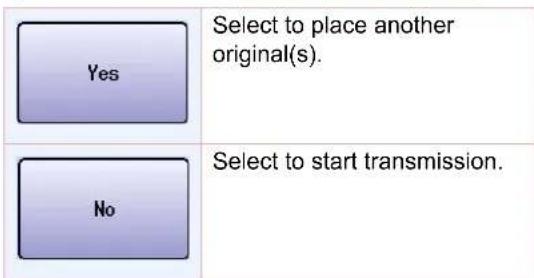
- When the last original is scanned, select "No" to start transmission.

Transmitting 2-Sided Originals
2-sided originals loaded in the ADF are scanned automatically with a specified binding edge position, and transmitted.
Two binding edge selections are available:
- Long Edge: 2-sided scanning is aligned to the long edge of the original.
- Short Edge: 2-sided scanning is aligned to the short edge of the original.
natural_image
Four-panel illustration showing a blank document with paper cutouts, no text or symbols presentNOTE
This feature works only when originals are loaded in the ADF.
The Verification Stamp feature does not work when 2-Sided scanning is selected.
1 Place original(s) on the ADF.

● Refer to Placing Originals (see page 14).
2 Press the Fax key.
3 Select "Basic Menu".

4 Select "2-Sided Original".

5 Select a binding position, and then select "OK".
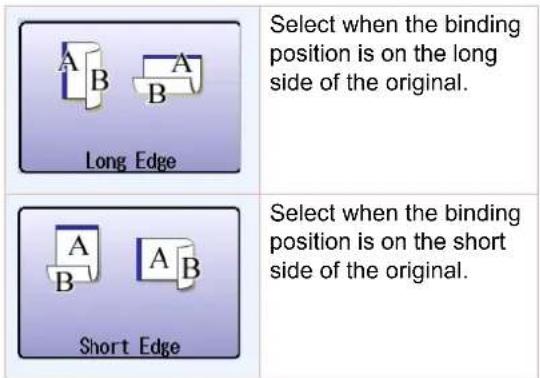
6 Set "Quality Adj." as required.
● Refer to Setting Original Quality (see page 33).
7 Select "Address Book", and then select a destination.

● Refer to Entering a Destination (see page 20).
8 Press the Start key.
The original(s) are stored into memory with a file number. Then starts dialling the telephone number.
Verification Stamp
This function confirms successful transmission or storage into the memory by stamping at the bottom of each successfully transmitted original(s) with a small "x" mark.
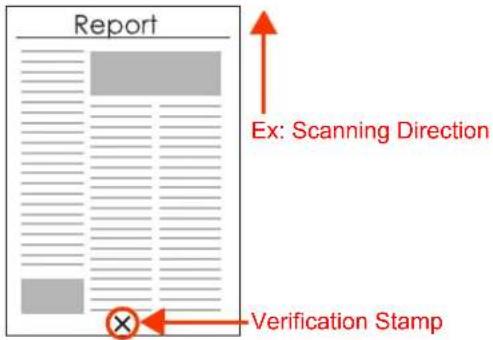
NOTE
The scanned document(s) are stamped after feeding through the ADF.
- The standard setting of the Verification Stamp is "Off". The stamp setting can be changed with the Function Parameter "04 Stamp (HOME)" (Fax/Email Settings > Fax Parameters). For instructions on how to change the standard setting, refer to Fax/Email Settings in the Operating Instructions (For Function Parameters) of provided CD-ROM.
- The machine can be configured not to stamp the documents stored in the memory by changing the setting of the Function Parameter "28 Stamp at Memory XMT" (Fax/Email Settings > Fax Parameters). For instructions on how to configure the verification stamp, refer to Fax/Email Settings in the Operating Instructions (For Function Parameters) of provided CD-ROM.
● The Verification Stamp function is available when scanning documents with the ADF.
ATTENTION
- Because the verification stamp cannot be deleted, be careful not to use the verification stamp when transmitting important document(s).
1 Place original(s) on the ADF.
● Refer to Placing Originals (see page 14).
2 Press the Fax key.
3 Select "Basic Menu".

4 Select "Verification Stamp".

5 Set "Quality Adj." as required.
● Refer to Setting Original Quality (see page 33).
6 Select "Address Book", and then select a destination.

● Refer to Entering a Destination (see page 20).
7 Press the Start key.
The original(s) are stored into memory with a file number. Then starts dialling the telephone number.
- The setting of the "Verification Stamp" is returned to Off after the transmission is completed.
Transmitting a Document Stored in Memory
Documents can be quickly scanned and stored in the memory before transmission.
This feature allows you to send the documents to multiple destinations without having to scan the same documents over again. It also allows you to retrieve your original(s) immediately without having to wait for the Fax transmission to complete.
In addition to the Memory transmission, the machine supports the Direct transmission feature. In Direct transmission, a document is transmitted without storing it into the memory.
Memory Transmission Quick Memory Transmission
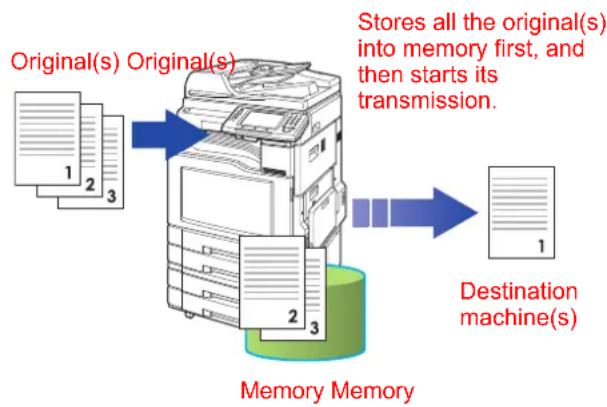
flowchart
graph TD
    A["Original(s) Original(s)"] --> B["Memory Memory"]
    B --> C["Stores all the original(s) into memory first, and then starts its transmission."]
    C --> D["Destination machine(s)"]
    style A fill:#f9f,stroke:#333
    style B fill:#ccf,stroke:#333
    style C fill:#cff,stroke:#333
    style D fill:#ffc,stroke:#333
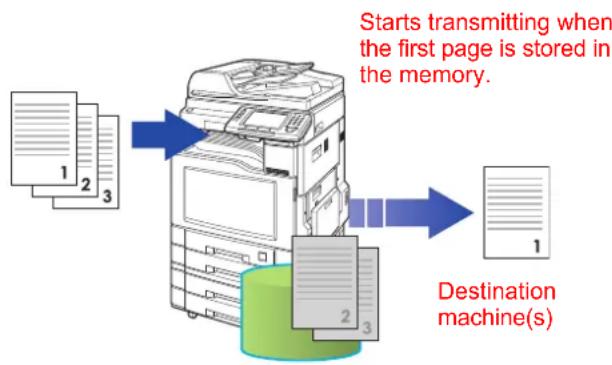
flowchart
graph LR
    A["Starts transmitting when the first page is stored in the memory."] --> B["Destination machine(s)"]
    B --> C["File 1"]
    B --> D["File 2"]
    B --> E["File 3"]
NOTE
- If the memory overflows while original(s) are being scanned for transmission to a single destination, the machine will operate in the following manner:
☐ If the Quick Memory Transmission feature is set to "Valid" in Function Parameters The document is transmitted up to the portion that was stored into the memory.
☐ If the Quick Memory Transmission feature is set to "Invalid" in Function Parameters
The document is transmitted up to the portion that was stored in the memory, and then switches to Direct transmission and transmits the remaining original(s) in the ADF during the same phone call.
- If the memory overflows while original(s) are being scanned for transmission to multiple destinations, a message appears asking whether to transmit the successfully stored documents in memory or to cancel the transmission. Select "Yes" to start transmitting, or "No" to cancel. If no action is taken within 10 seconds, the machine will start transmitting the stored documents.
- The transmission of a document terminates if memory overflows when the first page is transmitted.
- The standard setting of Memory transmission is "On" and it can be changed with the Function Parameter "05 Memory (HOME)" (Fax/Email Settings > Fax Parameters). For instructions on how to change the standard setting, refer to Fax/Email Settings in the Operating Instructions (For Function Parameters) of provided CD-ROM.
- The Function Parameter "82 Quick Memory XMT" (Fax/Email Settings > Fax Parameters) can be configured to start transmitting a document when the first page is stored. This transmission mode is called "Quick Memory Transmission". The standard setting of Quick Memory transmission is "Valid". For instructions on how to change the standard setting, refer to Fax/Email Settings in the Operating Instructions (For Function Parameters) of provided CD-ROM.
- Your machine is preset to transmit all documents from memory.
To send documents using Memory transmission, follow the steps below. (This is an example when the Direct transmission is set as default in the Function Parameters.)
1 Place original(s).
● Refer to Placing Originals (see page 14).
2 Press the Fax key.
3 Select "Basic Menu".

4 Select "Memory".

5 Set "Quality Adj." as required.
- Refer to Setting Original Quality (see page 33).
6 Select "Address Book", and then select a destination.

● Refer to Entering a Destination (see page 20).
7 Press the Start key.
The original(s) are stored into memory with a file number. Then starts dialling the telephone number.
- For instructions on how to cancel a transmission, refer to Cancelling a Communication (see page 53).
Job Build and SADF
The Job Build and SADF setting enables to scan sets of originals that exceed the maximum capacity of ADF. Special originals (thin paper, etc.) can be fed from the ADF for Memory transmission.
This function is available when "Job Build and SADF" is selected in the "Basic Menu".
NOTE
- The standard setting of "133 Job Build and SADF Mode" is set to "No". For instructions on how to change the standard setting, refer to Fax/Email Settings in the Operating Instructions (For Function Parameters) of provided CD-ROM.
- This function is available when the Function Parameter "05 Memory (HOME)" (Fax/Email Settings > Fax Parameters) is set to "On".
- The Function Parameter "82 Quick Memory XMT" (Fax/Email Settings > Fax Parameters) is not available for this function.
- Up to 255 pages can be stored. When the number of pages exceeds 255, the memory overfull message will be displayed. Select "Yes" to start transmitting, or "No" to cancel. If no action is taken within 5 seconds, the machine will start transmitting the stored originals.
1 Place original(s).

● Refer to Placing Originals (see page 14).
2 Press the Fax key.
3 Select "Basic Menu".

4 Select "Job Build and SADF".

5 Set "Quality Adj." as required.
● Refer to Setting Original Quality (see page 33).
6 Select "Address Book", and then select a destination.

● Refer to Entering a Destination (see page 20).
7 Press the Start key.
The original(s) are stored into memory with a file number.
- For instructions on how to cancel a transmission, refer to Cancelling a Communication (see page 53).
8 If you have another original(s), place the next original(s) within 5 seconds after the last original is scanned.

- If you do not place the next original(s) within 5 seconds, the message "Another Original?" will be displayed.

Direct Transmission
Documents can be transmitted immediately on scanning without storing into memory. Direct transmission is more convenient in situations as shown below.
- When you want to send the documents right away.
- When you want to send a large amount of documents.

flowchart
graph LR
    A["Original(s)\n1\n2\n3"] --> B["Printer"]
    B --> C["To a single destination\nBlue arrow"]
    B --> D["Memory\nX symbol"]
NOTE
- Direct transmission cannot be used to send documents to multiple destinations.
● Memory transmission may switch automatically to Direct transmission when memory overflow occurs during document scanning.
● Memory transmission is the standard setting on the machine, however, it can be changed to Direct transmission by setting the Function Parameter "05 Memory (HOME)" (Fax/Email Settings > Fax Parameters). For instructions on how to change the standard setting, refer to Fax/Email Settings in the Operating Instructions (For Function Parameters) of provided CD-ROM.
1 Place original(s).
● Refer to Placing Originals (see page 14).
2 Press the Fax key.
3 Select "Basic Menu".

4 Select "Direct".

5 Set "Quality Adj." as required.
● Refer to Setting Original Quality (see page 33).
6 Select "Address Book", and then select a destination.

● Refer to Entering a Destination (see page 20).
7 Press the Start key.
Transmission starts immediately upon scanning.
- For instructions on how to cancel a transmission, refer to To Cancel Direct Transmission: (see page 54).
Verifying Communication Status
To verify the communication status, follow the steps below.
1 Press the Fax key.
2 Select "Basic Menu".

3 Select "Comm. Status" while the call session is in progress.
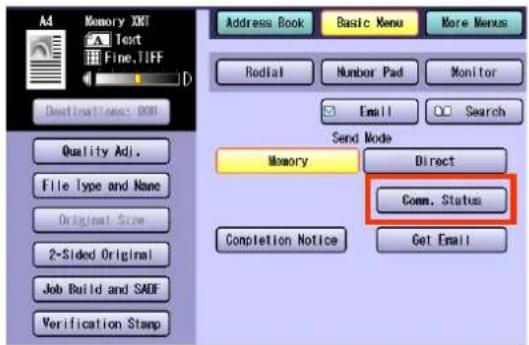
4 Verify the communication status.

5 When the verification is completed, select "OK".

Rotated Transmission
If an A4/Letter-sized document is loaded in the portrait position, it could be interpreted as an A3/Ledger size on the receiving station. To avoid this misinterpretation, the machine is configured to support Rotated transmission.
Set the Function Parameter "78 Rotation XMT" (Fax/Email Settings > Fax Parameters) to "Valid". This allows an A4/Letter-size document to be rotated by 90 degrees automatically when they are loaded in the portrait position, so that it is transmitted in the same orientation as it would have been loaded in the landscape position.
NOTE
- The standard setting of "78 Rotation XMT" is set to "Valid". For instructions on how to change the standard setting, refer to Fax/Email Settings in the Operating Instructions (For Function Parameters) of provided CD-ROM.
● The Rotated Transmission feature only works with Memory transmissions, but not with Direct transmissions.
■ Rotation XMT set to "Valid"
Sender
Set as Portrait

flowchart
graph TD
    A["Scanning Width"] --> B["Report"]
    B --> C["A4"]
    D["Scanning Direction"] --> E["Rotated 90 degrees"]
    F["Scanning Direction"] --> G["Receiver"]
    style A fill:#f9f,stroke:#333
    style D fill:#f9f,stroke:#333
    style F fill:#f9f,stroke:#333
    style B fill:#ccf,stroke:#333
    style E fill:#ccf,stroke:#333
    style G fill:#ccf,stroke:#333
Set as Landscape
■ Rotation XMT set to "Invalid"
Sender
Set as Portrait


Receiver

Print size reduced to 70%
Prints on A4 size

Prints on A3 size
Batch Transmission
The Batch Transmission feature is useful in controlling the reduction of transmission time and telephone costs. In a Batch transmission job, the machine sorts documents bound for the same destination(s), and collectively handles them as one reserved document (file) to be transmitted in a single call.
There are two types of Batch transmissions available:
• Real Time Batch Transmission:
During the Memory transmission, your machine searches the memory for reserved files (up to 4 files) to transmit to the same destination, and automatically batches, and then transmits them in a single call.
- The machine cannot batch files that are waiting for redialling or currently being sent, but will batch files that are pending to be dialled.
- Delayed Batch Transmission:
This feature requires the scheduling of the time for the Batch transmission into a Program key in advance. All transmission(s) using this Program key are batched and transmitted at the registered time.
Ex: Real Time Batch Transmission
To NY
To LA
To London

flowchart
graph TD
    A["User"] --> B["Printer"]
    B --> C["User"]
    D["To LA"] --> E["To London"]
    F["Time"] --> G["NY"]
    G --> H["LA"]
    H --> I["London"]
Getting an Outside Line Using PIN Code Access
If your PBX requires a PIN (Personal Identification Number) code to access an external line, your machine can be set to prompt the user to enter the PIN code before dialling.
This function is available when the Function Parameter "39 PIN Code Access" (Fax/Email Settings > Fax Parameters) is set to "Suffix" or "Prefix".
When "39 PIN Code Access" is set to "Prefix", the dialling procedure is as follows. (Available for some countries only.)
NOTE
- This feature is available in certain countries only.
- This feature is not available when dialling from a connected external telephone.
- The standard setting of "39 PIN Code Access" is set to "None". For instructions on how to change the standard setting, refer to Fax/Email Settings in the Operating Instructions (For Function Parameters) of provided CD-ROM.
1 Place original(s).
● Refer to Placing Originals (see page 14).
2 Press the Fax key.
3 Set "Quality Adj." as required.
● Refer to Setting Original Quality (see page 33).
4 Select "Address Book", and then select a destination.

● Refer to Entering a Destination (see page 20).
5 Press the Start key.
6 Enter a PIN code, and then select "OK". (Up to 36 digits)
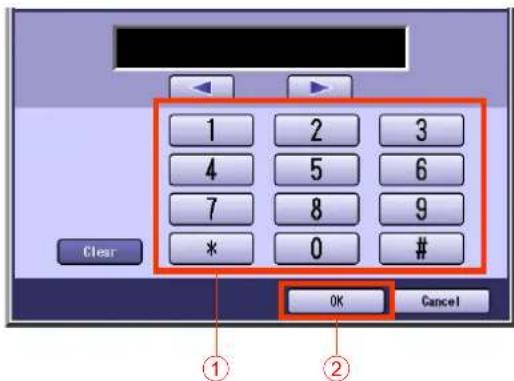
The original(s) are stored into memory with a file number. Then starts dialling the telephone number.
Using Program Keys
If frequently used communication tasks are pre-programmed onto a respective program dialling button, the programmed operating sequence can be recalled by simply selecting the assigned button.
Program dialling not only simplifies repetitive and complex operational sequences but also prevents operator errors.
To use a Program key, follow the steps below.
NOTE
To use this feature, the operating sequence must be programmed onto the button in advance. Refer to Setting for Program Dialling (see page 186).
- To check what operation was pre-programmed onto a program button, confirm by printing the program list. Refer to Printing the Program List (see page 193).
1 Place original(s).
● Refer to Placing Originals (see page 14).
2 Press the Fax key.
3 Select "Program/Group".

4 Select the Program key.

5 Press the Start key.
Communication starts, or original(s) are stored into memory.
Cancelling a Communication
To cancel a communication, follow the steps below.
To Cancel Memory Transmission:
1 Press the Fax key.
2 Press the Stop key while the communication is in progress.
3 Select "Yes" to stop a communication.

4 Select "Yes" to print a communication journal, or "No" if a communication journal is not desired.

To Cancel Direct Transmission:
1 Press the Stop key while the communication is in progress.
2 Select "Yes" to stop a communication.

3 Remove the document.
Dial Prefix
Your machine has the following functions to utilize your existing fax phone numbers database:
- LDAP database search for fax phone numbers (Directory Search)
- Import an existing fax phone number list in CSV file format (Network Address Book Editor software) The phone numbers in the database are usually 10-digit numbers (It differs in each countries' specifications) that are not in the format of phone numbers actually dialled through a PBX.
Ex: (In the case of 10-digit number in the database.)
• A fax phone number in the database is shown as 212 555 1234
- A long distance fax phone number format that is dialled via a PBX, is as 9+1+212 555 1234
The Dial Prefix function allows you to program a Dial Prefix including a PBX Dial-out Prefix (Ex: "9") and the Long Distance Call Code (=1). The pre-programmed Dial Prefix will be automatically dialled only when the fax phone number is a 10-digit number, allowing you to utilize the existing database without modifying it.
To enable this function, enter the Dial Prefix number in "122 Dial Prefix". For more details, refer to Fax/Email Settings in the Operating Instructions (For Function Parameters) of provided CD-ROM.
NOTE
- Only numbers (0 to 9) will be counted for 10 digits. Any other characters or symbols (such as “-”) will be ignored.
- This function is not available when using Monitor dialling or Off-hook dialling with either the optional handset or an external telephone set.

flowchart
graph TD
    A["Server"] --> B["212 111 1234\n312 222 4321\n213 333 9876\n"]
    B --> C{If the number to dial is a 10-digit number\n(See Note)\nEx: 212 111 1234}
    C --> D["Dials with the dial prefix number appended\n9-1 + 212 111 1234\n(Automatically appended)"]
    C --> E{If the number to dial is NOT a 10-digit number\nEx: 9-222 9876 (8 digits)\n9-1 312 333 4567 (12 digits)}
    E --> F["Sends the document(s)\nDials without the dial prefix number\n9-222 9876\n9-1 312 333 4567"]
    G["Dial prefix = 9-1\n("-" represents a pause)"] --> H["Address Book Dialling\nManual Number Dialling\nLDAP Search Dialling"]
1 Press the Function key to open the Function Parameters screen.
2 Select "Fax/Email Settings".
3 Select "04 Key Operator Mode".

4 Enter the Key Operator password, and then select "OK".

- If you make a mistake, press the Clear key or select "Back Space" to delete.
5 Select "01 Fax Parameters".

6 Select "120-159".
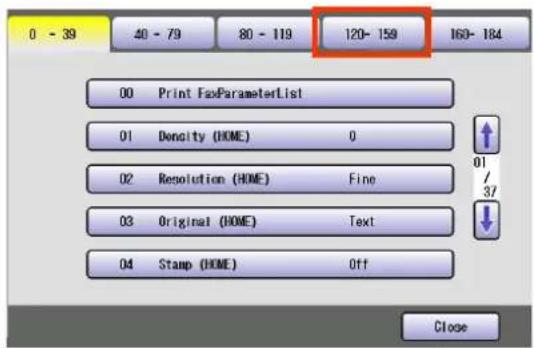
- You can also proceed to step 8 by entering 122 with the Keypad and pressing the Start key.
7 Select "122 Dial Prefix".
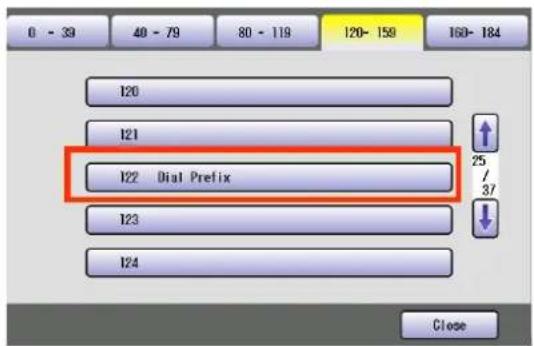
8 Enter the Dial Prefix Number (4 digits), and then select "OK".

- If you make a mistake, select "Clear" to delete.
- Press the Reset key to return the machine to the initial screen of the current active mode.
Time Controlled Communication (Deferred)
Deferred Transmission
The time must be pre-programmed in advance to send document(s) to a single or multiple destinations at a deferred time within the next 24 hours.
The document is scanned and stored in memory as a reserved document until the pre-programmed time lapses. The transmission starts at the pre-programmed time.
11:0021:00
flowchart
graph TD
    A["Document 1"] --> B["Server"]
    C["Document 2"] --> B
    D["Document 3"] --> B
    B --> E["Server"]
    style A fill:#f9f,stroke:#333
    style C fill:#f9f,stroke:#333
    style D fill:#f9f,stroke:#333
    style B fill:#ccf,stroke:#333
    style E fill:#ccf,stroke:#333
Programmed to transmit at 21:00 Transmitted
NOTE
- Up to 50 built-in timers can be set for deferred communication.
1 Place original(s).
● Refer to Placing Originals (see page 14).
2 Press the Fax key.
3 Select "More Menus".

4 Select "Transmit".

5 Set the deferred time, and then select "OK".

- Set the time in the 24-hour format.
Ex: 21:00
- If you make a mistake, select "Clear" to delete entries one digit at a time.
6 Set "Quality Adj." as required.
● Refer to Setting Original Quality (see page 33).
7 Select a destination.
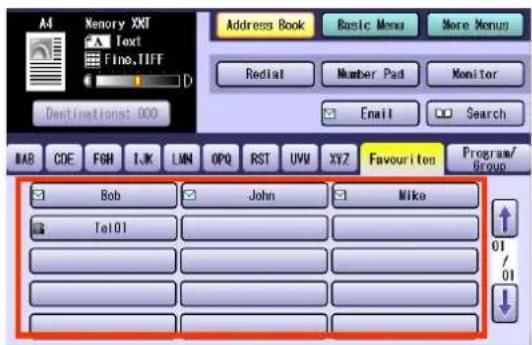
● Refer to Entering a Destination (see page 20).
8 Press the Start key.
Document(s) are stored into memory.
- The programmed deferred communication time can be modified.
For instructions on how to modify the communication time, refer to Editing Communication Reservations (see page 165).
- It you need to delete a reserved communication file, or to cancel a time-controlled communication, refer to Deleting a Communication Reservation File (see page 167).
A communication journal is printed if the transmission fails for any reason.
(Ex: Remote station was busy.)
Refer to Printing a Communication
Reservation File (see page 169) and Communication Journal (see page 202).
- Press the Reset key to return the machine to the initial screen of the current active mode.
Deferred Polling
If Polling is requested with a deferred time, it will start polling at the pre-programmed time.

flowchart
graph LR
    A["Pre-programm Communication Time 18:00"] --> B["Receiver Sender"]
    B --> C["Document(s)"]
    C --> D["Request to Poll"]
    D --> E["Memory"]
NOTE
- Up to 50 built-in timers can be set for deferred communication.
- Polling might not function with all fax machines. We suggest you attempt a trial polling before you actually poll important documents.
- If a password is not set in the polled station, you may poll the other station even though your machine has a password.
- For instructions on how to use polling without a pre-programmed time, refer to Polling (see page 61).
1 Press the Fax key.
2 Select "More Menus".

3 Select "Polling" in "Deferred Comm."

4 Enter a communication time, and then select "OK".

- Enter the time in the 24-hour format.
Ex: 18:00
- If you make a mistake, select "Clear" to delete entries one digit at a time.
5 If a password is required, enter the password, and then select "OK".

- If you have set the polling password in the Function Parameter "26 Polling Password" (Fax/Email Settings > Fax Parameters), the password will appear on the display. You can still change the password temporarily by overwriting it with a new one.
6 Select a destination.

- Refer to Entering a Destination (see page 20).
7 Press the Start key.
Polling starts when the pre-programmed time is reached.
- The programmed deferred communication time can be modified. For instructions on how to modify the communication time, refer to Editing Communication Reservations (see page 165).
- If you need to delete a reserved communication file, or cancel a time-controlled communication, refer to Deleting a Communication Reservation File (see page 167).
Polling
Polling
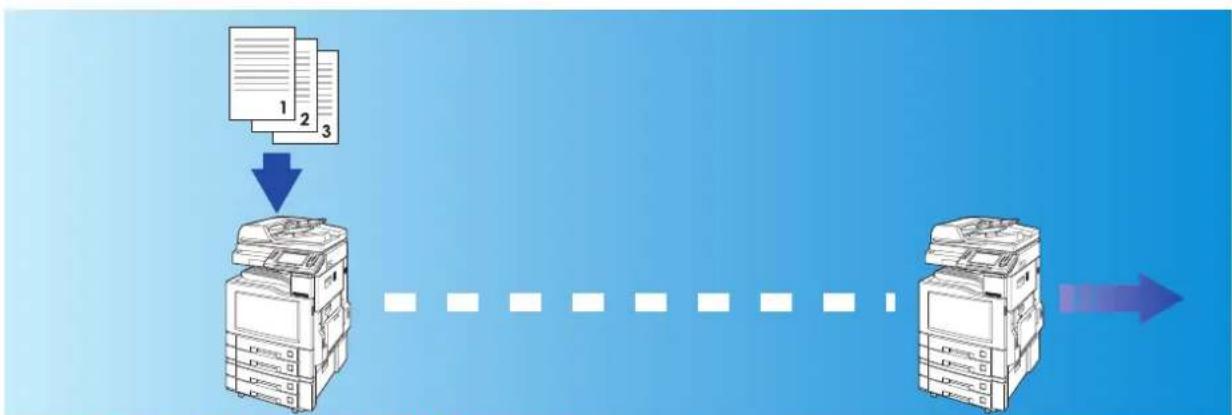
Polling is a process of calling the other station(s) for document retrieval. The other station must know in advance that you will call, and must prepare document(s) by storing them into the memory. To ensure security, establish a polling password that is shared by the other station ahead of time.
The receiving station initiates the call, therefore, it pays for the communication charges.

flowchart
graph LR
    A["1 2 3"] --> B["Receiver Sender"]
    B --> C["Document(s)"]
    C --> D["Request to Poll"]
    D --> E["Memory"]
NOTE
- For instructions on how to use deferred polling, refer to Deferred Polling (see page 59).
- Polling might not function with all fax machines. We suggest you attempt a trial polling before you actually poll important documents.
- If a password is not set in the polled station, you may poll the other station even though your machine has a password.
1 Press the Fax key.
2 Select "More Menus".

3 Select "Polling" in "Polling".

4 If a password is required, enter the password, and then select "OK".

- If you have set the polling password in the Function Parameter "26 Polling Password" (Fax/Email Settings > Fax Parameters), the password will appear on the display. You can still change the password temporarily by overwriting it with a new one.
5 Select a destination.

● Refer to Entering a Destination (see page 20).
6 Press the Start key.
Polling starts.
Storing Documents to be Polled
Being Polled is the process of automatically transmitting document(s) upon receiving the polling request from the receiving station.
You must prepare your machine by storing document(s) into memory ahead of time.
To ensure security, set the polling password that is shared with the receiving station.
The receiving station initiates the call, therefore, it pays for the communication charges.

flowchart
graph LR
    A["Store document(s) into memory."] --> B["Sender (Waiting for Polling request)"]
    B --> C["Memory"]
NOTE
- Polling might not function with all fax machines. We suggest you attempt a trial polling before you actually poll important documents.
- If a password is not set in the polled station, you may poll the other station even though your machine has a password.
1 Place original(s).
● Refer to Placing Originals (see page 14).
2 Press the Fax key.
3 Select "More Menus".

4 Select "Polled" in "Polling".

5
If a password is required, enter the password, and then select "OK".
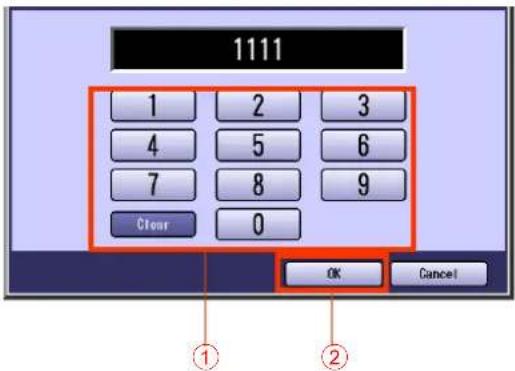
The scanned document is stored in the memory as a polled file ready for transmission upon receiving a polling request.
- You can still send or receive documents even when the machine is setup to be polled.
- To delete a polled file, refer to Deleting a Communication Reservation File (see page 167).
- Only one polled file can be stored in memory. If you need to add document(s) into the same polled file, refer to Adding Documents to a Communication Reservation File (see page 171).
- If you have set the polling password in the Function Parameter "26 Polling Password" (Fax/Email Settings > Fax Parameters), the password will appear on the display. You can still change the password temporarily by overwriting it with a new one.
- After being polled, the documents stored in the memory will be erased automatically. To retain the documents in memory so that they can be polled repeatedly, change the setting of the Function Parameter "27 Polled File Save" (Fax/Email settings > Fax Parameters) to "Valid".
Using a Mailbox (Confidential Communication)
What is Confidential Communication?
The confidential mailbox allows communication with other compatible models using a 8 to 16-digit confidential code. The Confidential Mailbox feature receives document(s) with a confidential code in the memory. These documents can only be printed by the person who has the correct confidential code.
- A confidential reception report is printed whenever confidential documents are received on the machine.
- 49 mailboxes are available on the machine.
- Mailbox passwords are 8 to 16 digits.
This section explains how to transmit, poll, store, delete, and print confidential documents.
Confidential Polling and Confidential Polled transmission can be performed using mailboxes. For instructions on how to use these, refer to Confidential Polling (see page 68) and Storing Documents for Confidential Polling (see page 69).
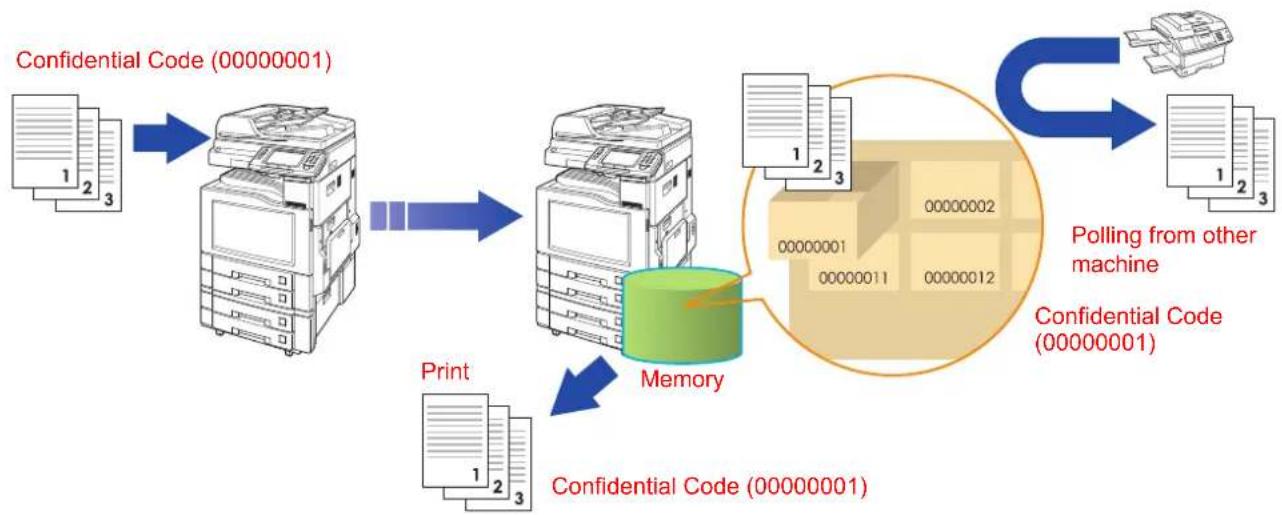
flowchart
graph TD
    A["Print"] --> B["Memory"]
    B --> C["Confidential Code (00000001)"]
    C --> D["Confidential Code (00000002)"]
    D --> E["Polling from other machine"]
    E --> F["Confidential Code (00000001)"]
    F --> G["Output"]
    style B fill:#99ccff,stroke:#333
    style C fill:#f9f9f9,stroke:#333
    style D fill:#ffcccc,stroke:#333
    style E fill:#ffcccc,stroke:#333
    style F fill:#ffcccc,stroke:#333
    style G fill:#ffcccc,stroke:#333
ATTENTION
- This feature works only if the remote station is any one of the following compatible Panasonic models.
DP-180 DP-190 DP-1820E DP-1820P DP-2330 DP-3030 DP-3530 DP-4530
DP-6030 DP-8020P DP-8020E DP-8035 DP-8045 DP-8060 DP-C213 DP-C262
DP-C263 DP-C264 DP-C265 DP-C266 DP-C305 DP-C306 DP-C322 DP-C405
DP-C323 DP-C354 DP-C406
DX-800
UF-5100 UF-5300 UF-6100 UF-6300 UF-9000
NOTE
- Confidential reception requires establishing the password (8 to 16 digits) between the sender and the receiver before reception.
Confidential Transmission
To transmit a confidential document, follow the steps below.
NOTE
- You must have a mailbox password (8 to 16 digits) setup and shared with the receiving machine.
1 Place original(s).
● Refer to Placing Originals (see page 14).
2 Press the Fax key.
3 Select "More Menus".
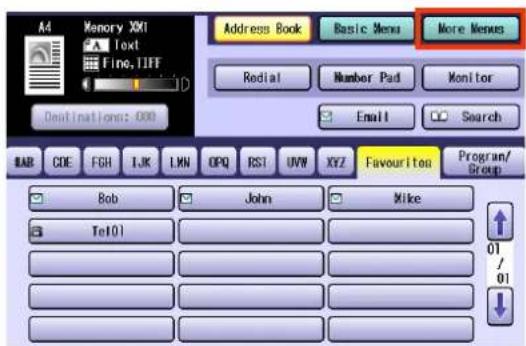
4 Select "Mail Box".

5 Select "Transmit".
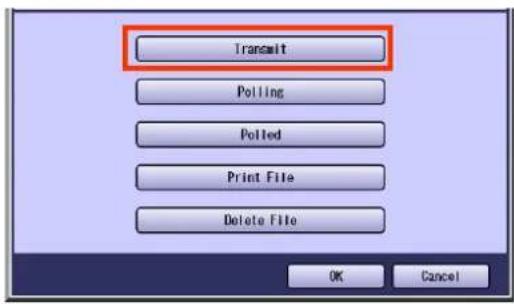
6 Enter the mailbox password (8 to 16 digits), and then select "OK".

- If you make a mistake, select "Clear" to delete entries one digit at a time.
7 Set "Quality Adj." as required.
- Refer to Setting Original Quality (see page 33).
8 Select a destination.
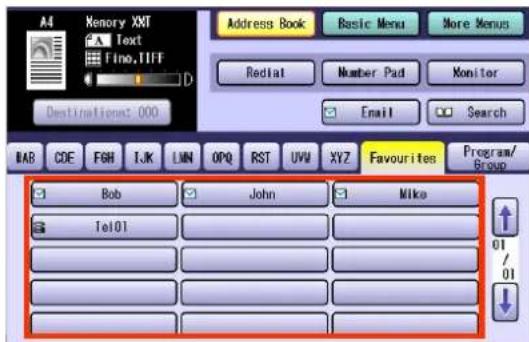
● Refer to Entering a Destination (see page 20).
- Select an address, except the address registered for Relayed transmission.
9 Press the Start key.
The original(s) are stored into memory with a file number. Then starts dialling the telephone number.
Confidential Polling
1 Press the Fax key.
2 Select "More Menus".

3 Select "Mail Box".

4 Select "Polling".

5 Enter the mailbox password (8 to 16 digits), and then select "OK".

- If you make a mistake, select "Clear" to delete entries one digit at a time.
6 Select a destination.

● Refer to Entering a Destination (see page 20).
- Select an address, except the address registered for Relayed transmission.
7 Press the Start key.
Confidential mailbox polling starts.
- For instructions on how to cancel confidential mailbox polling, refer to Cancelling a Communication (see page 53).
Storing Documents for Confidential Polling
1 Place original(s).
● Refer to Placing Originals (see page 14).
2 Press the Fax key.
3 Select "More Menus".
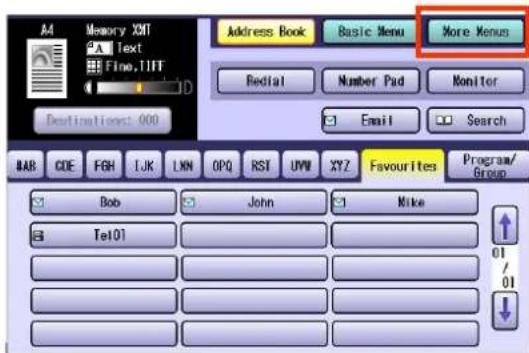
4 Select "Mail Box".
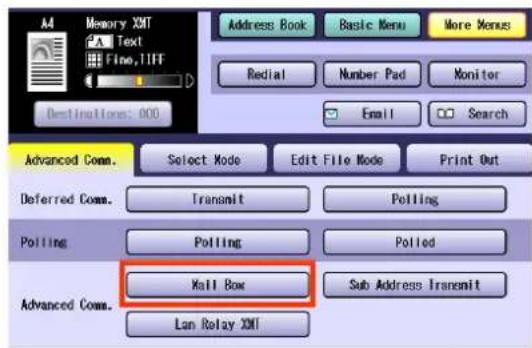
5 Select "Polled".

6 Enter the mailbox password (8 to 16 digits), and then select "OK".
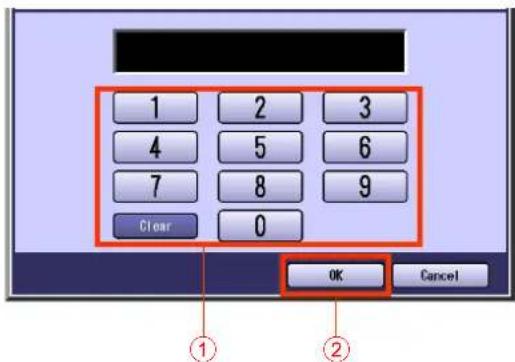
The documents are stored in the mailbox, and will be transmitted upon receiving the confidential polling request.
- For instructions on how to delete a confidential document polled for transmission, refer to Deleting a Confidential Document (see page 72).
- If you make a mistake, select "Clear" to delete entries one digit at a time.
Printing a Received Confidential Document
When confidential documents are received, a confidential reception report is printed. This section explains how to read a confidential reception report and print the received confidential documents.
NOTE
● After a received confidential document is printed, it is deleted from the mailbox.
- If the machine receives documents having the same password, they are stored into the same mailbox.
- 49 mailboxes are available.
■ Confidential Reception Report

| No. Item Explanation | |
| (1) Date/Time The date and time at which the confidential reception report is printed | |
| (2) File No. The number automatically assigned to a confidential document in the order of its reception (001 to 999) | |
| (3) Sender ID Transmitting station's ID | |
| (4) Page(s) Total number of pages of the confidential document | |
| (5) Receive Time Time The date and time at which the confidential document was received | |
| (6) Logo Logo (up to 25 characters) | |
| (7) Character ID Character ID (up to 16 characters) | |
| (8) Numeric ID Numeric ID (up to 20 digits) | |
■ Printing a Received Confidential Document
To print a received confidential document, follow the steps below.
NOTE
● After a received confidential document is printed, it is deleted from the mailbox.
1 Press the Fax key.
2 Select "More Menus".

3 Select "Mail Box".

4 Select "Print File".
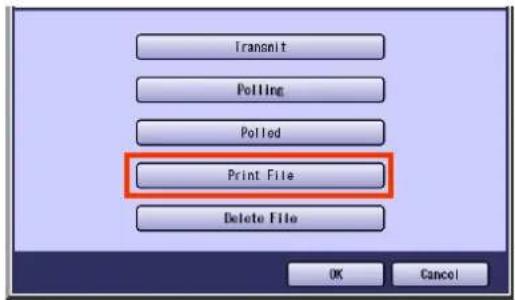
5 Enter the mailbox password (8 to 16 digits), and then select "OK".

The document is printed and deleted from the mailbox.
- If you make a mistake, select "Clear" to delete entries one digit at a time.
- To delete confidential documents from a mailbox, refer to Deleting a Confidential Document (see page 72).
Deleting a Confidential Document
To delete a confidential document in a mailbox, follow the steps below.
1 Press the Fax key.
2 Select "More Menus".

3 Select "Mail Box".
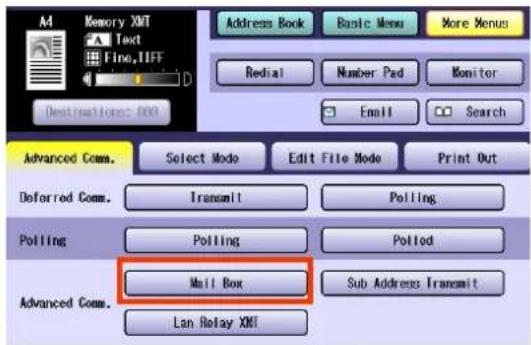
4 Select "Delete File".

5 Enter the mailbox password (8 to 16 digits), and then select "OK".

Documents in the mailbox are deleted.
- If you make a mistake, select "Clear" to delete entries one digit at a time.
Sub-Address Communication
The Sub-addressing function allows further routing, forwarding, or relaying of document(s) to the desired destinations when used in combination with Internet Fax.
What is Sub-Addressing?
Sub-addressing is a T.30 communications protocol recommended by ITU-T.
- A centre machine supporting the Memory feature is required on the fax network to implement sub-addressed communications. For more details, contact your local authorised Panasonic dealer.
- In a sub-addressed communication, the sub-addressing information must be checked between the sender and the receiver beforehand (sub-address is limited up to 20 digits).
- On this machine, select "Sub Address Transmit" from the "More Menus" to initiate sub-addressed communication.
- Sub-addressing allows documents received by the centre machine to be forwarded to computers on the network, Internet fax, or other fax stations. Refer to Inbound Routing (see page 139).
NOTE
- ITU-T: International Telecommunication Union-Telecommunication Standardization Sector
T.30: Telecommunications standard
■ Example of a Network Using Sub-Addressing

flowchart
graph TD
    A["Sender 1"] --> B["Telephone number 2013331234"]
    B --> C["Sub-Address 2222"]
    D["Sender 2"] --> E["Telephone number 2013331234"]
    E --> F["Sub-Address 0001"]
    G["Centre Machine"] --> H["Tel: 2013331234"]
    H --> I["A"]
    H --> J["B"]
    H --> K["C"]
    H --> L["C"]
    H --> M["C"]
    H --> N["C"]
    H --> O["C"]
    H --> P["C"]
    H --> Q["C"]
    H --> R["C"]
    H --> S["C"]
    H --> T["C"]
    H --> U["C"]
    H --> V["C"]
    H --> W["C"]
    H --> X["C"]
    H --> Y["C"]
    H --> Z["C"]
    H --> AA["C"]
    H --> AB["C"]
    H --> AC["C"]
    H --> AD["C"]
    H --> AE["C"]
    H --> AF["C"]
    H --> AG["C"]
    H --> AH["C"]
    H --> AI["C"]
    H --> AJ["C"]
    H --> AK["C"]
    H --> AL["C"]
    H --> AM["C"]
    H --> AN["C"]
    H --> AO["C"]
    H --> AP["C"]
    H --> AQ["C"]
    H --> AR["C"]
    H --> AS["C"]
    H --> AT["C"]
    H --> AU["C"]
    H --> AV["C"]
    H --> AW["C"]
    H --> AX["C"]
    H --> AY["C"]
    H --> AZ["C"]
    H --> BA["C"]
    H --> BB["C"]
    H --> BC["C"]
    H --> BD["C"]
    H --> BE["C"]
    H --> BF["C"]
    H --> BG["C"]
    H --> BH["C"]
    H --> BI["C"]
    H --> BJ["C"]
    H --> BK["C"]
    H --> BL["C"]
    H --> BM["C"]
    H --> BN["C"]
    H --> BO["C"]
    H --> BP["C"]
    H --> BQ["C"]
    H --> BR["C"]
    H --> BS["C"]
    H --> BT["C"]
    H --> BU["C"]
    H --> BV["C"]
Sub-Addressed Transmission Using Address Book
To transmit a document by sub-addressing, follow the steps below.
NOTE
- This feature cannot be used when dialling from the external telephone. Refer to Talking to the Remote Party Before Transmission (see page 32).
1 Place original(s).
● Refer to Placing Originals (see page 14).
2 Press the Fax key.
3 Select "More Menus".
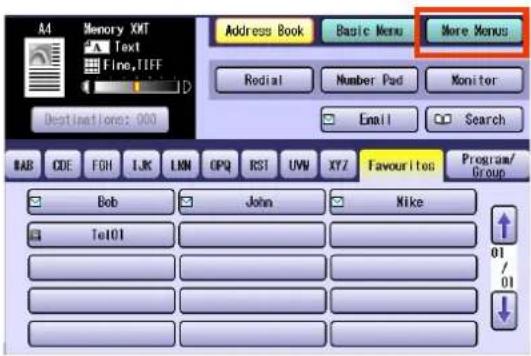
4 Select "Sub Address Transmit".

5 Enter a sub-address, and then select "OK".
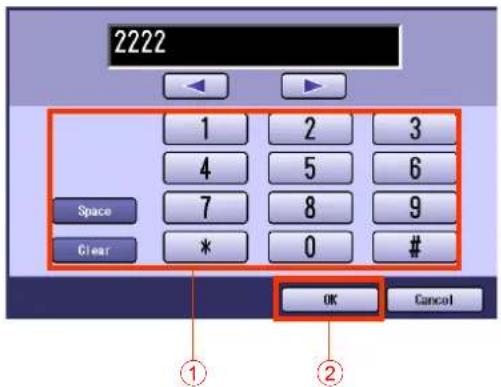
The sub-address can be up to 20 digits.
- If you make a mistake, select "Clear" to delete entries one digit at a time.
6 Enter the password, and then select "OK".

- The password can be up to 20 digits in length.
- If you make a mistake, select "Clear" to delete entries one digit at a time.
7 Set "Quality Adj." as required.
● Refer to Setting Original Quality (see page 33).
8 Select a destination.

● Refer to Entering a Destination (see page 20).
- Select an address, except the address registered for Relayed transmission.
9 Press the Start key.
Sub-addressed transmission starts.
Sub-Addressed Transmission Using Manual Dialling
To enter a sub-address directly from the Keypad, follow the steps below.
NOTE
- This function is not available when the Function Parameter "136 Restrict Direct Dial" (Fax/Email Settings > Fax Parameters) is set to "Valid".
- This feature does not work when dialling from the external telephone. Refer to Talking to the Remote Party Before Transmission (see page 32).
- If you use sub-addressed transmission frequently, the sub-address can be pre-programmed into the Address Book to facilitate future communications. For additional details, refer to Adding a Fax Number into the Address Book (see page 176).
1 Place original(s).
● Refer to Placing Originals (see page 14).
2 Press the Fax key.
3 Set "Quality Adj." as required.
- Refer to Setting Original Quality (see page 33).
4 Enter the fax number using the Keypad.

● The Number Pad screen opens automatically.
- If you make a mistake, press the Clear key to delete entries one digit at a time.
- When the Function Parameter "137 Re-enter Direct Dial" (Fax/Email Settings > Fax Parameters) is set to "Valid", enter the fax number twice for manual dialling. For more details, refer to Fax/Email Settings in the Operating Instructions (For Function Parameters) of provided CD-ROM.
5 Select "Sub-Address".

The letter "s" appears on the display.
6 Enter a sub-address.

- The telephone number and sub-address field can be up to 36 digits in length. However, the sub-address itself is limited to 20 digits.
- If you need to enter a sub-address containing a blank space (Ex: 123 456), input the sub-address from "Advanced Comm." > "Sub Address Transmit" (See page 74).
- If you make a mistake, select "Clear" to delete entries one digit at a time.
7 Press the Start key.
Sub-addressed transmission starts.
Password Communication
What is Password Communication?
Password communications, including Password transmission and Password reception prevents your machine from sending a fax to a wrong station or receiving a fax from an unauthorised station. You can set Password transmission and Password reception independently, or both together.
To use Password transmission, you must set a 4-digit transmission password in advance. The password must be shared with the other compatible Panasonic machine(s). If the transmission password in your machine does not match the transmission password in other compatible Panasonic machine(s), the transmission will fail.
The standard setting of the Function Parameter "43 Password-Transmit" (Fax/Email Settings > Fax Parameters) is set to "Off". To utilize Password transmission, change the standard setting to "On". For instructions on how to change the standard setting, refer to Setting Password-Protected Transmission (see page 81).
Ex: Password Transmission
Sender Receiver

flowchart
graph LR
    A["Printer Unit 1"] --> B["Document"]
    B --> C["Printer Unit 2"]
    B --> D["Printer Unit 3"]
Transmission Password: 1234 Transmission Password: 1234
ATTENTION
● This feature works only if the remote station is any one of the following Panasonic models.
DP-180 DP-190 DP-1820E DP-1820P DP-2330 DP-3030 DP-3530 DP-4530
DP-6030 DP-8020P DP-8020E DP-8035 DP-8045 DP-8060 DP-C213 DP-C262
DP-C263 DP-C264 DP-C265 DP-C266 DP-C305 DP-C306 DP-C322 DP-C323
DP-C354 DP-C405 DP-C406
DX-800
UF-5100 UF-5300 UF-6100 UF-6300 UF-9000
Password Transmission
To utilize the Password-protected Transmission feature, follow the steps below.
ATTENTION
- You must set the password (4 digits) in the Function Parameter "43 Password-Transmit" (Fax/Email Settings > Fax Parameters) in advance.
1 Place original(s).
● Refer to Placing Originals (see page 14).
2 Press the Fax key.
3 Select "More Menus".
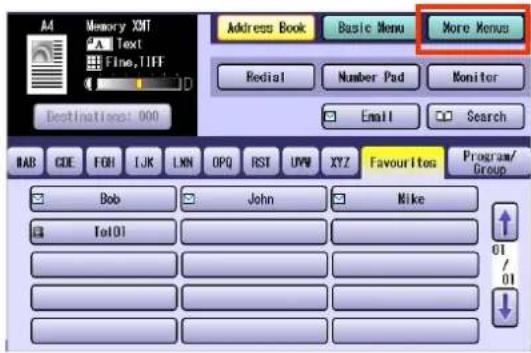
4 Select "Select Mode".

5 Select "Password XMT".

6 Select "On", and then select "OK".


7 Set "Quality Adj." as required.
● Refer to Setting Original Quality (see page 33).
8 Select a destination.

● Refer to Entering a Destination (see page 20).
- Select an address, except the address registered for Relayed transmission.
9 Press the Start key.
Password-protected transmission starts.
- The transmission fails if the password of both units does not match.
Setting Password-Protected Transmission
To always utilize Password-protected transmissions, follow the steps below.
NOTE
- You must program a password (4 digits) in advance.
1 Press the Function key to open the Function Parameters screen.
2 Select "Fax/Email Settings".
3 Select "04 Key Operator Mode".

4 Enter the Key Operator password, and then select "OK".
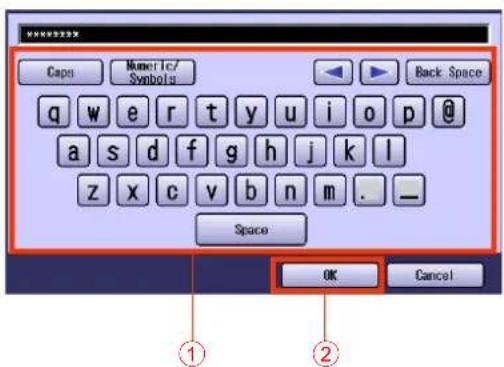
- If you make a mistake, press the Clear key or select "Back Space" to delete.
5 Select "01 Fax Parameters".
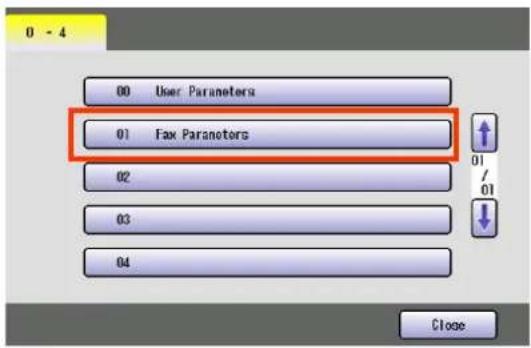
6 Select "40-79".

- You can also proceed to step 8 by entering 43 with the Keypad and pressing the Start key.
7 Select "43 Password-Transmit".

8 Enter the password (4 digits), and then select "OK".

- If you make a mistake, select "Clear" to delete.
9 Select "On" or "Off", and select "OK".

- You can change the setting temporarily in "Password XMT" of "More Menus" for each transmission (See page 79).
- Press the Reset key to return the machine to the initial screen of the current active mode.
Printing Communication Journal
The communication journal can be printed at the end of each transmission communication.
- If “Comm. Journal” is set to “On” in “More Menus”, a communication journal is printed at the end of each transmission communication.
- For instructions on how to read the communication journal, refer to Communication Journal (see page 202).
![**************** - Comm. Journal-**************** Date dd-MMM-yyyy ** Time 15:00 ***************** Mode = Memory Transmission Start = dd-MMM 14:50 End = dd-MMM 15:00 File No.= 050 STN Comm. Key Name Station Name/Email Address/Telephone No. Pages Duration No. 001 OK [SERVICE] SERVICE DEPT 001/001 00:01:30 002 OK [SALES DEPT] SERVICE DEPT 001/001 00:01:25 003 407 [ACCOUNTING] SERVICE DEPT 000/001 00:01:45 004 Busy 021 111 1234 000/001 00:00:00 - PANASONIC - **************** DP-XXXX ***************** - HEAD OFFICE - ******** - 201 555 1212 - ***************** THE SLEREXE COMPANY LIMITED SAPORS LANE .BOOLE .DORSET .BH 25 8 ER TELEPHONE BOOLE (945 13) 51617 .TELEX 123456 Our Ref. 350/PJC/EAC 18th January, 1972. Dr. P.N.Cundall, Mining Surveys Ltd., Holroyd Road trions of print density cause the photocell to generate an analogous electrical video signal. this signal is used to modulate a carrier, which is transmitted to remote destination over a radio or cable communications link. At the remote terminal, demodulation reconstructs the video signal, white is used to modulate the density of print produced by a printing device. This device is scanning in a raster scan synchronised with that at the transmitting terminal. As a result, a facsimile copy of the subject document is produced. Probably you have used for this facility in your organisation. Yours sincerely, Phil. P.J. CROSS Group Leader - facsimile Research](/content/2026/05/1123304/images/8ada54c0a744b2b39b2b3897c47c58204d47475ef2bb7ea88bdd3c64b167c040.jpg)
NOTE
- Your machine is preset to print the communication journal only when transmission has failed. Refer to Fax/Email Settings in the Operating Instructions (For Function Parameters) of provided CD-ROM.
● The document image for the Direct transmissions is not printed in the communication journal.
1 Place original(s).
● Refer to Placing Originals (see page 14).
2 Press the Fax key.
3 Select "More Menus".
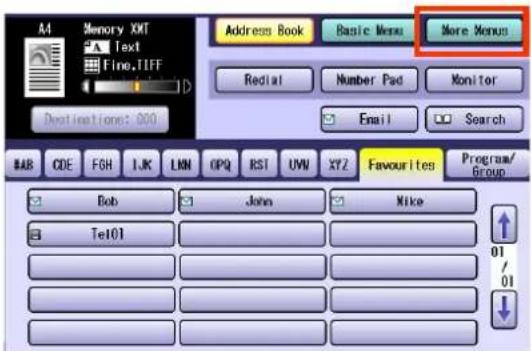
4 Select "Select Mode".

5 Select "Comm. Journal".
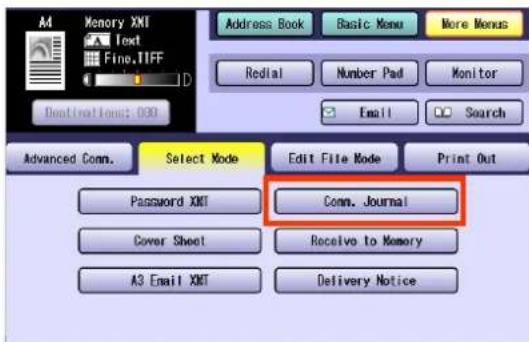
6 Select "On", "Off", or "Inc Only", and then select "OK".

| On | Select to print a communication journal after each transmission. |
| Off | Select not to print a communication journal. |
| Inc Only | Select to print a communication journal only when transmission has failed. |
7 Set "Quality Adj." as required.
● Refer to Setting Original Quality (see page 33).
8 Select a destination.
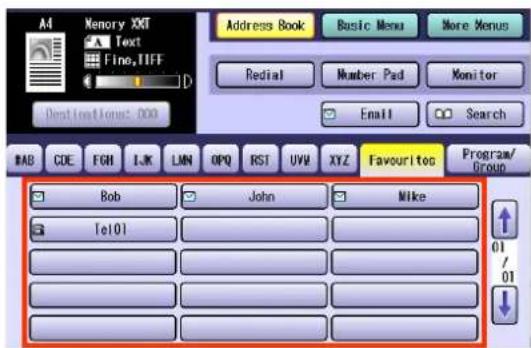
● Refer to Entering a Destination (see page 20).
9 Press the Start key.
Transmitting a Document with a Cover Sheet
Documents can be transmitted with a cover sheet stating the date and time of the transmission, destination station name, and total number of pages.
□ Sample Fax Cover Sheet
![***** Facsimile Cover Sheet ***** dd-MMM-yyyy 15:00 Message To: [ — — — — — ] [ — — — — — ] Message From: [ — — — — — ] [ — — — — — ] PANASONIC 201 555 1212 01 Page(s) Following This Cover Page Text Area 60 characters for 1 line (Up to 10 lines)](/content/2026/05/1123304/images/99abea48b7ff138eefc31cbd2bcef359e23071f736712e5358cf28cd0ac77293.jpg)
NOTE
- The cover sheet is excluded from the total page count in the transaction journal.
● The cover sheet can be printed with texts programmed by users. (Up to 10 lines are available.) - 60 characters can be programmed for 1 line, and up to 600 characters can be printed on the cover sheet.
- Characters are written from left to right. (The dotted lines will not be printed.)
- The standard setting of a cover sheet can be changed with the Function Parameter "56 Cover Sheet (HOME)" (Fax/Email Settings > Fax Parameters). To modify the standard setting, refer to Fax/Email Settings in the Operating Instructions (For Function Parameters) of provided CD-ROM.
1 Place original(s).
● Refer to Placing Originals (see page 14).
2 Press the Fax key.
3 Select "More Menus".

4 Select "Select Mode".
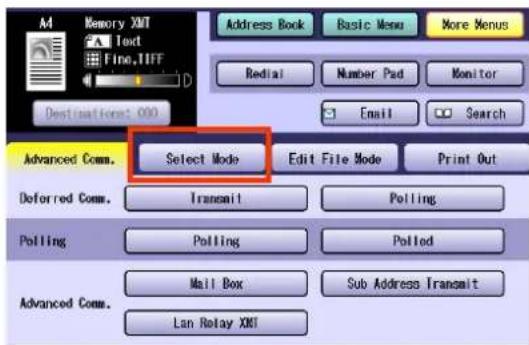
5 Select "Cover Sheet".

6 Select "On", and then select "OK".

| On | Select to attach a cover sheet. |
| Off | Select not to attach a cover sheet. |
7 Set "Quality Adj." as required.
● Refer to Setting Original Quality (see page 33).
8 Select a destination.
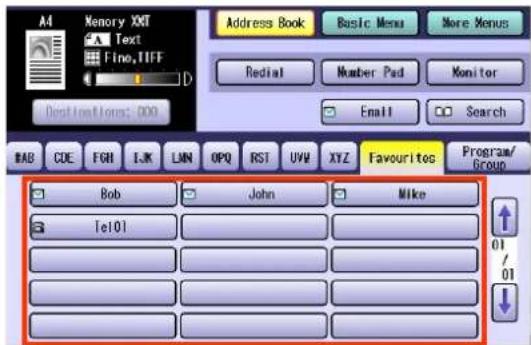
● Refer to Entering a Destination (see page 20).
9 Press the Start key.
The transmission of the document with a cover sheet starts.
Receiving Documents
There are two ways to receive fax calls on this machine.
■ Automatic Reception
The machine receives documents automatically. The machine answers all incoming calls (including voice calls).
■ Manual Reception
When your telephone rings, lift the handset of the external telephone. If you hear a beep from the phone, it means someone wants to initiate a fax call. Or, if the caller answers and says he/she wants to initiate a fax call, press the Start key and then hang up the handset. Refer to Manual Reception (see page 88).
Automatic Reception
This mode is recommended when the telephone line is used only for fax.
- Set the Function Parameter "17 Receive Mode" (Fax/Email Settings > Fax Parameters) to "Auto".
- When an incoming call is received, the machine starts receiving documents automatically.
Manual Reception
When your machine is set to this mode, it will not receive documents automatically. After you answered the call, you can receive a fax.
- Set the Function Parameter "17 Receive Mode" (Fax/Email Settings > Fax Parameters) to "Manual".
1 When your telephone rings, lift the external telephone handset.
2 If a document is loaded on the ADF, remove it.
3 When you hear a beep, press the Start key.
4 Hang up the phone.
- If you hang up the phone before pressing the Start key, the telephone connection will be terminated.
Print Reduction and Duplex Recording
Print Reduction
This machine can use Letter, Legal, A4, B4 or A3 size plain paper for recording. Sometimes, oversized documents sent to you by the other parties cannot be printed within a single page. If this happens, the document will be divided into separate pages.
This machine is equipped with the Print Reduction function to solve this problem. You may select the most appropriate setting described below.
■ When Print Reduction is Set to "Auto"
If the Function Parameter “24 Print Reduction” (Fax/Email Settings > Fax Parameters) is set to “Auto”, it prints incoming documents reduced in size from 70 to 100% (in increments of 1%) to fit them within the preset paper size according to the length.
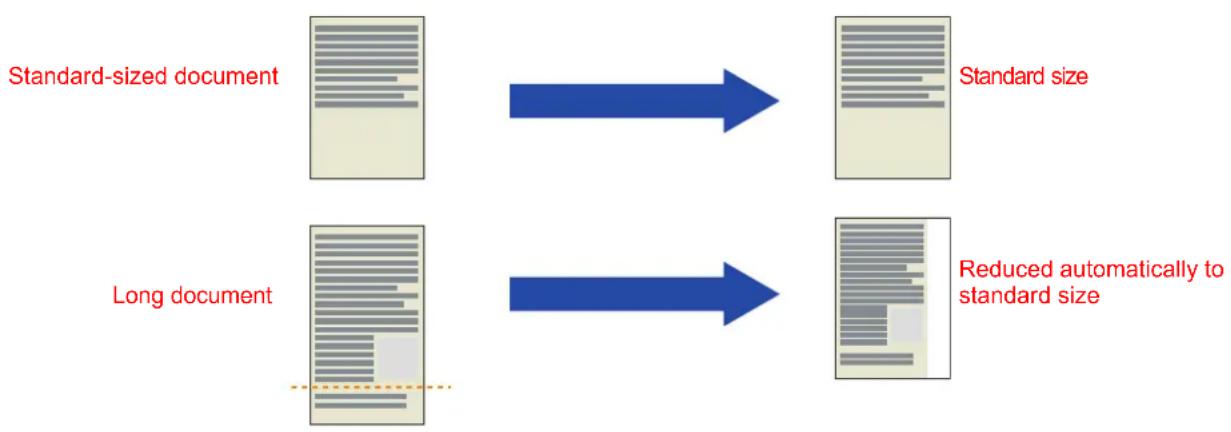
flowchart
graph LR
    A["Standard-sized document"] --> B["Standard size"]
    C["Long document"] --> D["Reduced automatically to standard size"]
NOTE
- The standard setting of "24 Print Reduction" is set to "Auto". For instructions on how to change the standard setting, refer to Fax/Email Settings in the Operating Instructions (For Function Parameters) of provided CD-ROM.
- When the machine receives a long document (longer than the paper size by 39% or more), it prints the document in multiple pages with the 10mm of the bottom margin of the first page overlapping the 10mm top margin of the next page.
■ When Print Reduction is Set to "Fixed"
With the Function Parameter “24 Print Reduction” (Fax/Email Settings > Fax Parameters) set to “Fixed”, the machine prints all incoming documents reduced at the reduction ratio pre-programmed in the Function Parameter “25 Reduction Ratio” (Fax/Email Settings > Fax Parameters). The fixed reduction ratio can be programmed between 70 and 100% (in increments of 1%).
Standard-sized document



Reduced at a specified reduction ratio
Long document


Reduced at a specified reduction ratio
NOTE
- The standard setting of "25 Reduction Ratio" is set to "100" (%).
For instructions on how to change the standard setting, refer to Fax/Email Settings in the Operating Instructions (For Function Parameters) of provided CD-ROM.
Duplex Recording
When the Function Parameter "95 Duplex Print" (Fax/Email Settings > Fax Parameters) is set to "Valid", the received multi documents are printed on both sides of paper.
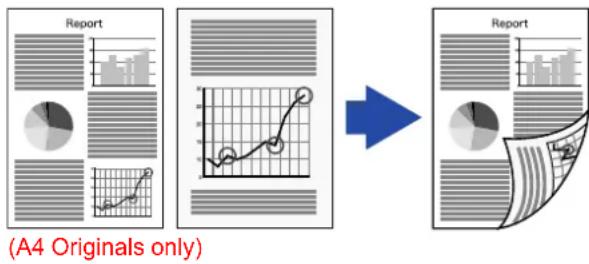
flowchart
graph LR
    A["Report"] --> B["Graph: Line graph"]
    B --> C["Report"]
    style A fill:#f9f,stroke:#333
    style C fill:#bbf,stroke:#333
    note bottom-left (A4 Originals only)
NOTE
- The standard setting of "95 Duplex Print" is set to "Invalid".
For instructions on how to change the standard setting, refer to Fax/Email Settings in the Operating Instructions (For Function Parameters) of provided CD-ROM.
Substitute Memory Reception
When your machine cannot print an incoming document for some reasons, such as when it runs out of paper/toner, or paper has jammed, the received document is saved in memory automatically. This feature is called “Substitute Memory Reception”.
When a received document is saved in memory as substitute memory reception, the message "Message in Memory" appears on the Touch Panel Display.
The saved documents will be printed automatically when you replenish the paper and toner and/or clear the jammed paper.
If a document has been saved in memory due to substitute memory reception

NOTE
- The available memory size is limited. Replenish the paper and toner and/or clear the jammed paper before the memory becomes full.
- The standard setting of the Function Parameter “22 Substitute RCV” (Fax/Email Settings > Fax Parameters) is set to “Valid”.
For instructions on how to change the standard setting, refer to Fax/Email Settings in the Operating Instructions (For Function Parameters) of provided CD-ROM.
Convenient Reception Features
This machine supports certain convenient-to-use reception features. Program these features as required.
Selective Reception
Your machine has the Selective Reception function which can prevent receiving unnecessary documents (junk fax and direct mail, etc.).
Before receiving the document, the last 4 digits of the ID number received from the sending machine will be compared with the last 4 digits of the telephone number programmed in the Address Book of each station. When a match is found, your machine will start receiving the document. If a match is not found, your machine will cancel the reception.
Receiver Sender A (ID No: xxxx1234)
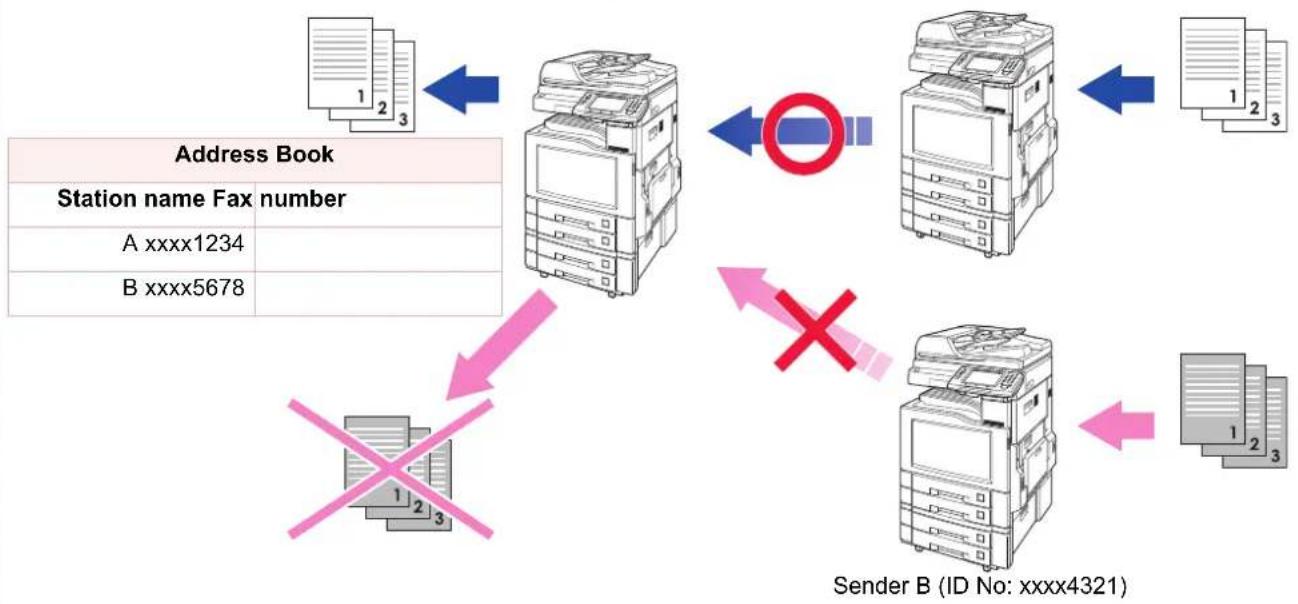
flowchart
graph TD
    A["Address Book"] -->|1 2 3| B["Station 1"]
    B --> C["Station 2"]
    C --> D["Station 3"]
    D --> E["Sender B ID No: xxx4321"]
    E --> F["Sender B"]
    style A fill:#f9f,stroke:#333
    style B fill:#ccf,stroke:#333
    style C fill:#cfc,stroke:#333
    style D fill:#fcc,stroke:#333
    style E fill:#ffc,stroke:#333
    style F fill:#cff,stroke:#333
NOTE
- The standard setting of the Function Parameter "46 Select Receive" (Fax/Email Settings > Fax Parameters) is set to "Invalid". For instructions on how to enable the Selective Reception feature, refer to Fax/Email Settings in the Operating Instructions (For Function Parameters) of provided CD-ROM.
- This feature requires the registration of all possible sending stations in the Address Book. Refer to Adding a Fax Number into the Address Book (see page 176).
- Selective reception will not work if the fax number is not set in the sender's numeric ID, or the sender's numeric ID is not programmed at all. You need to advice to include the fax number (fax telephone number) in the numeric ID to the sender who you want to receive faxes from.
- The remote machines to which you send faxes may also have the Selective Reception feature pre-programmed.
Fax Forwarding
This feature allows all incoming faxes to be forwarded to the station registered in the Address Book. It is convenient when you want to receive fax calls at a location away from your office (such as your home) at night or during holidays.

flowchart
graph TD
    A["Input File 1-3"] --> B["Printer"]
    C["Input File A-B-C"] --> B
    B --> D["Forward Receiver"]
    D --> E["Sender A"]
    D --> F["Sender B"]
    E --> G["Output Files 1-3"]
    F --> H["Output Files A-B-C"]
NOTE
- The standard setting of the Function Parameter "54 Fax Forward" (Fax/Email Settings > Fax Parameters) is set to "Invalid". For instructions on how to enable the Fax Forward feature, refer to Fax/Email Settings in the Operating Instructions (For Function Parameters) of provided CD-ROM.
- When the Fax Forward feature is set, the station programmed in the Address Book is restricted from editing. To change a programmed destination, follow the steps below.
1) Set the Function Parameter "54 Fax Forward" (Fax/Email Settings > Fax Parameters) to "Invalid".
2) Change the station entered in the Address Book or pre-programmed in the program dialling.
3) Reset the Function Parameter "54 Fax Forward" (Fax/Email Settings > Fax Parameters) to "Valid".
- When Fax forwarding fails, for example, calling a busy station, the received document will be printed and is deleted from the memory.
● Fax forwarding will be disabled if the machine has 5% or less of memory remaining.
Password-Reception
Password reception will prevent receiving fax from unauthorised stations.
To use the Password Reception function, you must set a 4 digits receiving password in advance. The password must be shared with the other compatible Panasonic machine(s). If the password in your machine does not match the receiving password in the other compatible Panasonic machine(s), the reception will fail.
Password reception can be enabled by programming the Function Parameter "44 Password-Receive" (Fax/Email Settings > Fax Parameters). Refer to Fax/Email Settings in the Operating Instructions (For Function Parameters) of provided CD-ROM.
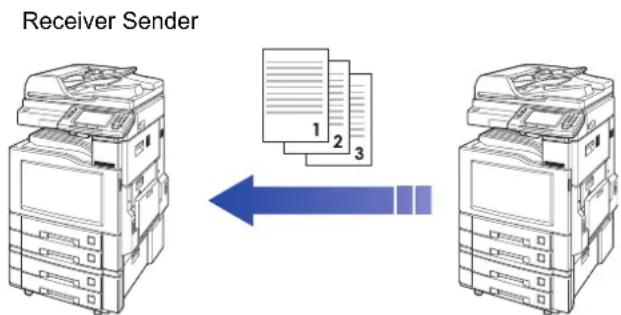
flowchart
graph LR
    A["Receiver Sender"] --> B["Document 1"]
    A --> C["Document 2"]
    A --> D["Document 3"]
Reception Password: 1234 Reception Password: 1234
ATTENTION
- This feature works only if the remote station is any one of the following compatible Panasonic models.
DP-180 DP-190 DP-1820E DP-1820P DP-2330 DP-3030 DP-3530 DP-4530
DP-6030 DP-8020P DP-8020E DP-8035 DP-8045 DP-8060 DP-C213 DP-C262
DP-C263 DP-C264 DP-C265 DP-C266 DP-C305 DP-C306 DP-C322 DP-C323
DP-C354 DP-C405 DP-C406
DX-800
UF-5100 UF-5300 UF-6100 UF-6300 UF-9000
NOTE
- The standard setting of the Function Parameter "44 Password-Receive" (Fax/Email Settings > Fax Parameters) is set to "Off". For instructions on how to enable the Password Reception feature, refer to Fax/Email Settings in the Operating Instructions (For Function Parameters) of provided CD-ROM.
Junk Fax Filter
This machine can filter incoming faxes to prevent receiving unnecessary documents (junk fax, etc.). Before receiving the document, the sender's numeric ID (fax number) will be compared to the numbers registered as junk fax numbers in the receiving station. If the fax number is found in the registry, the machine will cancel the reception.
Sender A (ID No: 123456789)Receiver
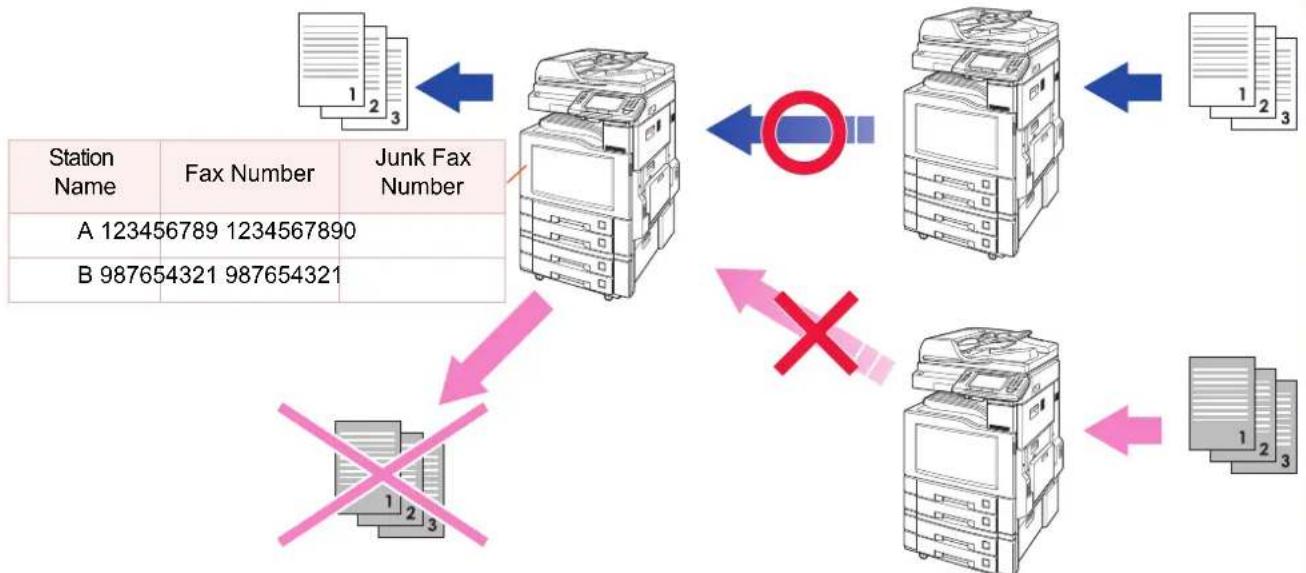
flowchart
graph TD
    A["Station Name"] --> B["Fax Number"]
    B --> C["Junk Fax Number"]
    C --> D["Printer 1"]
    C --> E["Printer 2"]
    C --> F["Printer 3"]
    D --> G["Printer 1"]
    E --> H["Printer 2"]
    F --> I["Printer 3"]
    J["A 123456789 1234567890"] --> K["Printer 1"]
    L["B 987654321 987654321"] --> M["Printer 1"]
    N["×"] --> O["Printer 2"]
    P["×"] --> Q["Printer 3"]
- The standard setting of the Function Parameter "135 Junk Fax Filter (00 Junk Fax Filter)" (Fax/Email Settings > Fax Parameters) is set to "Invalid". For instructions on how to enable the Junk Fax Filter feature, refer to Fax/Email Settings in the Operating Instructions (For Function Parameters) of provided CD-ROM.
- This feature requires the registration of junk fax numbers. For more information, refer to Fax/Email Settings in the Operating Instructions (For Function Parameters) of provided CD-ROM.
- This machine receives documents from senders whose fax number is not registered in the numeric ID if "135 Junk Fax Filter (01 Receive without ID No.)" is set to "Valid". For more information, refer to Fax/Email Settings in the Operating Instructions (For Function Parameters) of provided CD-ROM.
- The sender's numeric ID and received time can be printed on the faxes. For more information, refer to Fax/Email Settings in the Operating Instructions (For Function Parameters) of provided CD-ROM.
● The remote machines you send faxes to may also have set the Junk Fax Filter function.
Receive to Memory
What is Memory Reception?
Memory reception allows all incoming documents to be stored in memory, instead of printing them onto the output tray.
- If the Memory Reception feature has been set in Function Parameters, the message “Receive to Memory” appears on the Touch Panel Display.
- Documents received in memory are printed when the pre-programmed password is entered. The received documents are deleted from memory when the printing completes.
This section explains how to program memory reception, and print documents received into the memory.
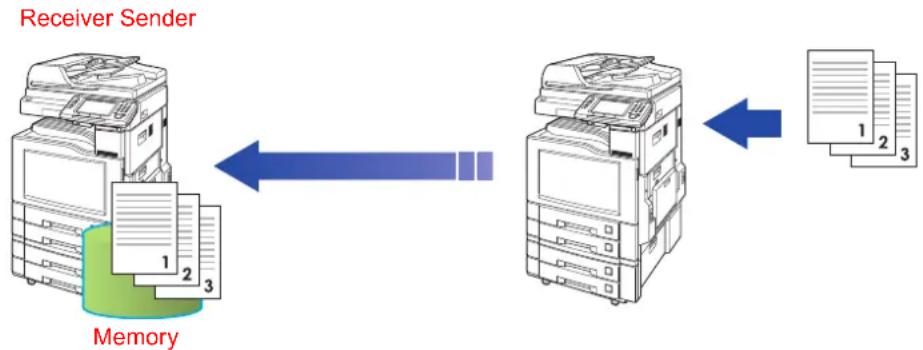
flowchart
graph LR
    A["Receiver Sender"] --> B["Printer 1"]
    A --> C["Printer 2"]
    A --> D["Printer 3"]
    B --> E["Memory"]
    C --> E
    D --> E
    E --> F["Document Files 1, 2, 3"]
NOTE
- The standard setting of "Receive to Memory" is set to "Off" in "More Menus".
- You can set the password in Function Parameters (Fax/Email Settings > Fax Parameters).
- When memory becomes full, the memory reception is aborted and the communication is cancelled. Pages already received in memory can be printed.
- Once memory is full, incoming documents can no longer be received into memory.
- If "Receive to Memory" has been set to "On", the memory reception password cannot be changed in Function Parameters. To change the password, follow the steps below.
1) Set "Receive to Memory" to "Off" in "More Menus".
2) Change the password of the Function Parameter "37 Receive to Memory" (Fax/Email Settings > Fax Parameters).
3) Set "Receive to Memory" to "On" in "More Menus".
Programming Memory Reception
To enable memory reception, follow the steps below.
1 Press the Fax key.
2 Select "More Menus".

3 Select "Select Mode".
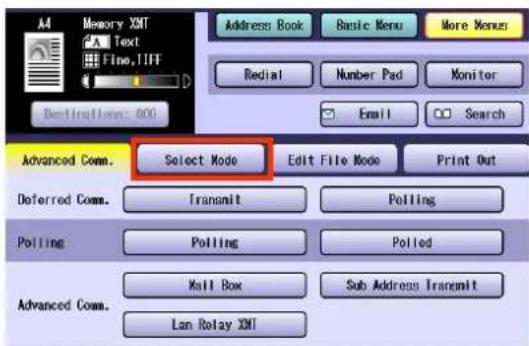
4 Select "Receive to Memory".

5 Select "On", and then "OK".
Memory reception is programmed.

| On | Select to enable memory reception. |
| Off | Select to cancel memory reception. |
| Select to print a document received in memory. |
Printing a Document Received in Memory
When a document is received in memory, a message is displayed.
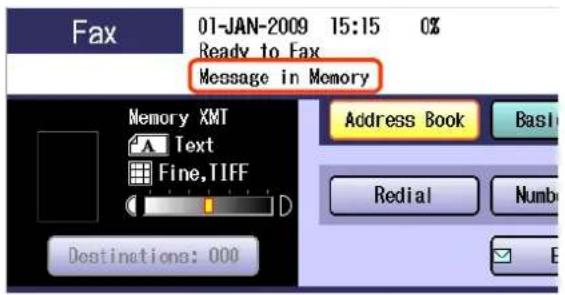
To print a document received in memory, follow the steps below.
1 Press the Fax key.
2 Select "More Menus".

3 Select "Select Mode".

4 Select "Receive to Memory".

5 Select "Print", and then "OK".

Select to enable memory reception.
Select to disable memory reception.

Select to print a document received in memory.
6 If a password is pre-programmed, enter the password (8 digits), and then select "OK".

- This screen appears when the password is set in the Function Parameter "37 Receive to Memory" (Fax/Email Settings > Fax Parameters).
- The entered password is masked with “*”.
- If you make a mistake, select "Clear" to delete entries one digit at a time.
What is Internet Fax?
What is Internet Fax?
It is a feature whereby scanned documents are transmitted to Internet Fax or to computers as Email. Internet Fax communicates via an Intranet or the Internet without using the telephone line.
This machine can be connected to 10Base-T/100Base-TX/1000Base-T Ethernet LAN (local area network).
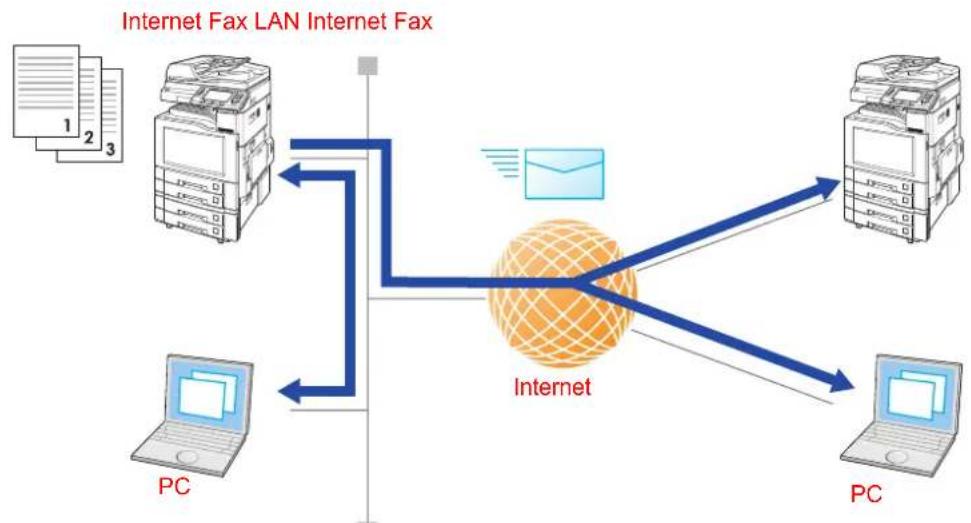
flowchart
graph TD
    A["PC"] -->|Data Flow| B["Internet"]
    C["Printers 1-3"] -->|Data Flow| B
    D["Computer"] -->|Data Flow| B
    E["Desktop"] -->|Data Flow| B
    F["Server"] -->|Data Flow| B
    B --> G["Email"]
    B --> H["PC"]
    style B fill:#f9f,stroke:#333
Sending Email
Scanned documents can be transmitted to an Internet Fax or a remote computer as files attached to an Email.
NOTE
• Refer to Sending Email (see page 102).
- Scanned documents are transmitted as attached files in the TIFF or PDF format.
The PDF format can be used only for transmitting documents from an Internet Fax to computers.
● The remote PC must support MIME to receive file attachment in the TIFF or PDF format.
■ Receiving Email
When an Email is received from an Internet Fax or a computer, the Email message is printed automatically with the image of the attached file.
NOTE
● Refer to Receiving Email (see page 103).
Routing
You can forward fax documents or Email to an Internet Fax or to networked computers.
NOTE
- Refer to Inbound Routing (see page 103).
■ Transmitting to a Fax via a Relay Station (Relay Transmission)
Email can be transmitted as normal fax documents via a relay station. Email can also be broadcasted.
NOTE
● Refer to Relay Transmission (see page 104).
Using the Internet Fax Feature
To use the Internet Fax feature, a network cable must be connected to the machine, and the network environment must be properly configured in Function Parameters.
For setup instructions, refer to Preparing to Use Internet Fax (see page 109).
What Internet Fax Can Do
This section introduces the functions of the Internet Fax feature.
The Internet Fax feature not only sends and receives Email but also forwards fax documents via a telephone line and broadcasts them via a relay station.
Sending Email
A scanned document can be transmitted to an Internet Fax or a remote computer as an Email file attachment. Attached files must be in either of the following formats:
- Internet Fax: TIFF format (TIFF-F)
- Computer: Select either TIFF (TIFF-F) format or PDF format.

flowchart
graph TD
    A["LAN"] --> B["PC"]
    A --> C["Internet Fax"]
    B --> D["TIFF (TIFF-F) or PDF format"]
    C --> E["TIFF (TIFF-F) format"]
NOTE
- For more details on sending Email, refer to Sending an Email Procedure (see page 111).
Receiving Email
When this machine receives Email from an Internet Fax or a computer, it starts printing the Email automatically. If the Email has an attached file in a format that is not supported by the machine, an error message is printed to alert you that the machine cannot print the Email.

flowchart
graph TD
    A["PC"] --> B["LAN"]
    C["Internet Fax"] --> B
    D["Device"] --> B
    B --> E["Server"]
    style A fill:#f9f,stroke:#333
    style C fill:#f9f,stroke:#333
    style D fill:#ccf,stroke:#333
    style B fill:#cff,stroke:#333
    style E fill:#ffc,stroke:#333
NOTE
- For instructions on how to receive Email, refer to Receiving an Email (see page 134).
Inbound Routing
A document received from a G3 fax station via a telephone line can be forwarded to a remote computer on the network, an Internet Fax, or G3 fax. The forwarding destination can be specified by sub-addressing, or the numeric ID of a fax station.

flowchart
graph TD
    A["G3 Fax"] -->|Telephone line| B["Internet Fax"]
    B -->|Email| C["Internet Fax"]
    B -->|Forwards to G3 Fax| D["G3 Fax"]
    C --> E["PC"]
    D --> E
    F["LAN"] --> C
NOTE
- For more details about routing, refer to Inbound Routing (see page 139).
Relay Transmission
The Internet Relayed Transmission feature can save your time and transmission costs if you need to send the same documents to multiple G3 fax machines. This is especially true if the transmissions are long distance.
You can send documents to any G3 fax machine by using the Internet via a LAN from your machine to another relay station. You can also send an Email with attached TIFF-F file(s) to any G3 fax machine from your PC using your current Email application through a relay station.
To convert applications, such as spread sheet, into a TIFF-F format file, however, requires you to first download the software (TIFF converter) from the web site listed below.
http://panasonic.net/pcc/support/office_products.html
Ex: Internet Relay Transmission

flowchart
graph LR
    PC["PC"] --> Server["Server"]
    Server --> Internet["Internet"]
    Internet --> G3Fax1["G3 Fax"]
    Internet --> G3Fax2["G3 Fax"]
    Internet --> G3Fax3["G3 Fax"]
    G3Fax1 --> TransfersG3Fax["Transfers to G3 Fax"]
    G3Fax2 --> TransfersG3Fax["Transfers to G3 Fax"]
    G3Fax3 --> TransfersG3Fax["Transfers to G3 Fax"]
    Internet --> Internet
    Internet --> G3Fax4["G3 Fax"]
    Internet --> G3Fax5["G3 Fax"]
    Internet --> G3Fax6["G3 Fax"]
    Internet --> G3Fax7["G3 Fax"]
    Internet --> G3Fax8["G3 Fax"]
    Internet --> G3Fax9["G3 Fax"]
    Internet --> G3Fax10["G3 Fax"]
    Internet --> G3Fax11["G3 Fax"]
    Internet --> G3Fax12["G3 Fax"]
    Internet --> G3Fax13["G3 Fax"]
    Internet --> G3Fax14["G3 Fax"]
    Internet --> G3Fax15["G3 Fax"]
    Internet --> G3Fax16["G3 Fax"]
    Internet --> G3Fax17["G3 Fax"]
    Internet --> G3Fax18["G3 Fax"]
    Internet --> G3Fax19["G3 Fax"]
    Internet --> G3Fax20["G3 Fax"]
    Internet --> G3Fax21["G3 Fax"]
    Internet --> G3Fax22["G3 Fax"]
    Internet --> G3Fax23["G3 Fax"]
    Internet --> G3Fax24["G3 Fax"]
    Internet --> G3Fax25["G3 Fax"]
    Internet --> G3Fax26["G3 Fax"]
    Internet --> G3Fax27["G3 Fax"]
    Internet --> G3Fax28["G3 Fax"]
    Internet --> G3Fax29["G3 Fax"]
    Internet --> G3Fax30["G3 Fax"]
    Internet --> G3Fax31["G3 Fax"]
    Internet --> G3Fax32["G3 Fax"]
    Internet --> G3Fax33["G3 Fax"]
    Internet --> G3Fax34["G3 Fax"]
    Internet --> G3Fax35["G3 Fax"]
    Internet --> G3Fax36["G3 Fax"]
    Internet --> G3Fax37["G3 Fax"]
    Internet --> G3Fax38["G3 Fax"]
    Internet --> G3Fax39["G3 Fax"]
    Internet --> G3Fax40["G3 Fax"]
ATTENTION
- When requesting Relay transmission from a computer, it is necessary to transmit the file in the TIFF-F format.
- The application software is available from the download site. Refer to Convenient Application Software (see page 158).
NOTE
- For more details on the Relay Transmission feature, refer to Using the Relay Feature (see page 144).
Message Delivery Notice (MDN)
If the sender (Internet Fax) desires a processing confirmation, it must request a Message Delivery Notice when sending the message to a device supporting the notification function.
Several Email applications such as Eudora ^® and Outlook ^® Express support and are able to respond to the delivery confirmation notification sent from the Internet Fax, as well as sending a request for notification to the Internet Fax by Email applications that support the Message Disposition Notifications function.
■ If the Receiving Station is an Internet Fax Station
A Message Delivery Notice (MDN) with communication capability notice is returned to the sender.
■ If the Receiving Station is a Computer
An MDN response Email message is transmitted to the sender.
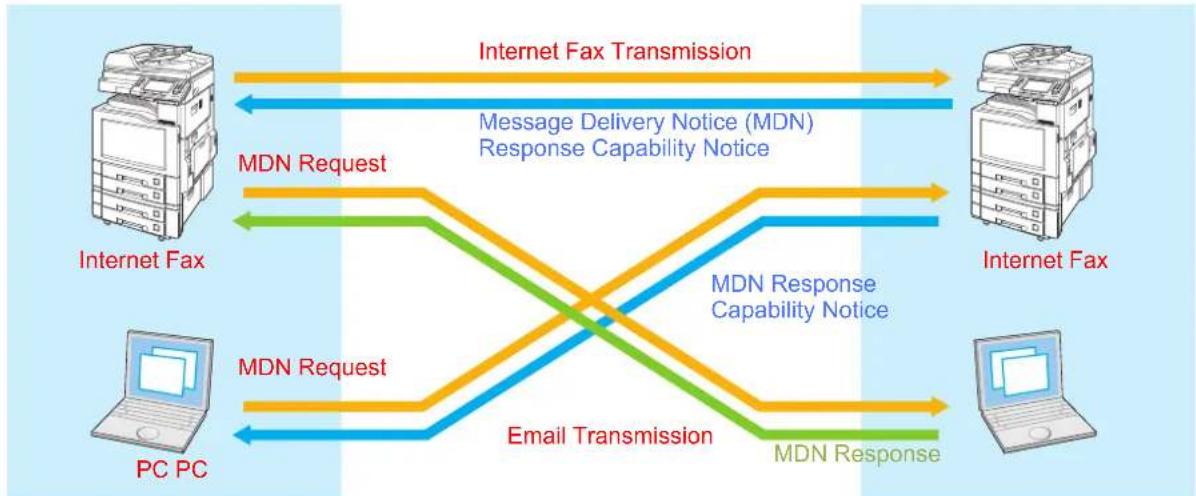
flowchart
graph LR
    A["Internet Fax"] -->|Message Delivery Notice (MDN) Response Capability Notice| B["Internet Fax"]
    B -->|Message Delivery Notice (MDN) Response Capability Notice| C["Internet Fax"]
    C -->|Message Delivery Notice (MDN) Response Capability Notice| D["Internet Fax"]
    D -->|Message Delivery Notice (MDN) Response Capability Notice| E["Internet Fax"]
    E -->|Message Delivery Notice (MDN) Response Capability Notice| F["Internet Fax"]
    F -->|Message Delivery Notice (MDN) Response Capability Notice| G["Internet Fax"]
    G -->|Message Delivery Notice (MDN) Response Capability Notice| H["Internet Fax"]
    H -->|Message Delivery Notice (MDN) Response Capability Notice| I["Internet Fax"]
    I -->|Message Delivery Notice (MDN) Response Capability Notice| J["Internet Fax"]
    J -->|Message Delivery Notice (MDN) Response Capability Notice| K["Internet Fax"]
    K -->|Message Delivery Notice (MDN) Response Capability Notice| L["Internet Fax"]
    L -->|Message Delivery Notice (MDN) Response Capability Notice| M["Internet Fax"]
    M -->|Message Delivery Notice (MDN) Response Capability Notice| N["Internet Fax"]
    N -->|Message Delivery Notice (MDN) Response Capability Notice| O["Internet Fax"]
    O -->|Message Delivery Notice (MDN) Response Capability Notice| P["Internet Fax"]
    P -->|Message Delivery Notice (MDN) Response Capability Notice| Q["Internet Fax"]
    Q -->|Message Delivery Notice (MDN) Response Capability Notice| R["Internet Fax"]
    R -->|Message Delivery Notice (MDN) Response Capability Notice| S["Internet Fax"]
    S -->|Message Delivery Notice (MDN) Response Capability Notice| T["Internet Fax"]
    T -->|Message Delivery Notice (MDN) Response Capability Notice| U["Internet Fax"]
    U -->|Message Delivery Notice (MDN) Response Capability Notice| V["Internet Fax"]
    V -->|Message Delivery Notice (MDN) Response Capability Notice| W["Internet Fax"]
    W -->|Message Delivery Notice (MDN) Response Capability Notice| X["Internet Fax"]
    X -->|Message Delivery Notice (MDN) Response Capability Notice| Y["Internet Fax"]
    Y -->|Message Delivery Notice (MDN) Response Capability Notice| Z["Internet Fax"]
    Z -->|Message Delivery Notice (MDN) Response Capability Notice| AA["Internet Fax"]
    AA -->|Message Delivery Notice (MDN) Response Capability Notice| AB["Internet Fax"]
    AB -->|Message Delivery Notice (MDN) Response Capability Notice| AC["Internet Fax"]
    AC -->|Message Delivery Notice (MDN) Response Capability Notice| AD["Internet Fax"]
    AD -->|Message Delivery Notice (MDN) Response Capability Notice| AE["Internet Fax"]
    AE -->|Message Delivery Notice (MDN) Response Capability Notice| AF["Internet Fax"]
    AF -->|Message Delivery Notice (MDN) Response Capability Notice| AG["Internet Fax"]
    AG -->|Message Delivery Notice (MDN) Response Capability Notice| AH["Internet Fax"]
    AH -->|Message Delivery Notice (MDN) Response Capability Notice| AI["Internet Fax"]
    AI -->|Message Delivery Notice (MDN) Response Capability Notice| AJ["Internet Fax"]
    AJ -->|Message Delivery Notice (MDN) Response Capability Notice| AK["Internet Fax"]
    AK -->|Message Delivery Notice (MDN) Response Capability Notice| AL["Internet Fax"]
    AL -->|Message Delivery Notice (MDN) Response Capability Notice| AM["Internet Fax"]
    AM -->|Message Delivery Notice (MDN) Response Capability Notice| AN["Internet Fax"]
    AN -->|Message Delivery Notice (MDN) Response Capability Notice| AO["Internet Fax"]
    AO -->|Message Delivery Notice (MDN) Response Capability Notice| AP["Internet Fax"]
    AP -->|Message Delivery Notice (MDN) Response Capability Notice| AQ["Internet Fax"]
    AQ -->|Message Delivery Notice (MDN) Response Capability Notice| AR["Internet Fax"]
    AR -->|Message Delivery Notice (MDN) Response Capability Notice| AS["Internet Fax"]
    AS -->|Message Delivery Notice (MDN) Response Capability Notice| AT["Internet Fax"]
    AT -->|Message Delivery Notice (MDN) Response Capability Notice| AU["Internet Fax"]
    AU -->|Message Delivery Notice (MDN) Response Capability Notice| AV["Internet Fax"]
    AV -->|Message Delivery Notice (MDN) Response Capability Notice| AW["Internet Fax"]
    AW -->|Message Delivery Notice (MDN) Response Capability Notice| AX["Internet Fax"]
    AX -->|Message Delivery Notice (MDN) Response Capability Notice| AY["Internet Fax"]
    AY -->|Message Delivery Notice (MDN) Response Capability Notice| AZ["Internet Fax"]
    AZ -->|Message Delivery Notice (MDN) Response Capability Notice| BA["Internet Fax"]
    BA -->|Message Delivery Notice (MDN) Response Capability Notice| BB["Internet Fax"]
    BB -->|Message Delivery Notice (MDN) Response Capability Notice| BC["Internet Fax"]
    BC -->|Message Delivery Notice (MDN) Response Capability Notice| DA["Internet Fax"]
    DA -->|Message Delivery Notice (MDN) Response Capability Notice| AE["Internet Fax"]
    AE -->|Message Delivery Notice (MDN) Response Capability Notice| AF["Internet Fax"]
    AF -->|Message Delivery Notice (MDN) Response Capability Notice| AG["Internet Fax"]
    AG -->|Message Delivery Notice (MDN) Response Capability Notice| AH["Internet Fax"]
    AH -->|Message Delivery Notice (MDN) Response Capability Notice| AI["Internet Fax"]
    AJ["PC PC"] --> AC
    AC --> AD
Eudora, Outlook Express, etc. Eudora, Outlook Express, etc.

MDN Request from the Originator

MDN Response with Capability Notice from the Recipient

MDN Response from the Recipient
NOTE
● This feature can be used when the receiving station supports the Message Delivery Notice (MDN) feature.
● To enable this feature, refer to Setting Message Delivery Notice (MDN) (see page 129).
Direct Internet Fax Transmission (Using Direct SMTP)
Email is normally distributed by an SMTP mail server using Simple Mail Transfer Protocol (SMTP).
In common cases, only Internet Email and Web service are permitted into the corporate intranet, and corporate network administrators are extremely unwilling to open the firewall for other incoming services, since each opened path represents additional potential security threats.
The Direct Internet Fax feature enables documents to be directly exchanged between Internet Fax stations without the intervention of an SMTP mail server. This will reduce workload of SMTP mail server.
Use of this feature requires that IP Addresses always have to be kept unique. Certain information, such as the domain name of this machine, also needs to be properly pre-programmed in the DNS server.
To use the Direct Internet Fax feature, set the Function Parameter "172 Direct IFax XMT" (Fax/Email Settings > Fax Parameters) to "Valid".
NOTE
- For more details on the network configuration, contact your network administrator.
- More detailed information, please refer to the following site. http://panasonic.net/pcc/support/office_products.html
(Business Fax -- Download -- Software / Documentation for Internet Fax -- How to use Direct Internet Fax(IFAX) Transmission)

flowchart
graph TD
    A["Internet Fax"] -->|Direct SMTP| B["SMTP Server"]
    C["Internet Fax"] -->|Direct SMTP| B["SMTP Server"]
    D["Internet Fax"] -->|Direct SMTP| B["SMTP Server"]
    style A fill:#f9f,stroke:#333
    style C fill:#f9f,stroke:#333
    style D fill:#f9f,stroke:#333
Tips for Internet Fax
Your machine uses the same communication protocols as Email: the Simple Mail Transfer Protocol (SMTP).
The differences from a standard G3 fax communication using the Public Switched Telephone Network (PSTN) are as follows.
■ Differences between Internet Fax and Fax Stations on the Telephone Line
Fax stations connected to the telephone line transmit data over a telephone line at their own expenses.
Internet Fax, on the other hand, breaks down image data into packets, and transmits them from a LAN to the Internet or an Intranet without using a telephone line, thus the telephone bills on long distance calls can be saved.
■ When Email Transmission Fails
- Your machine does not directly connect to the final destination, but rather connects to a mail server via LAN. Therefore, if a document cannot be correctly transmitted due to an error, the error mail may be returned from the mail server to your machine.
- Error mail may take a long time to return (20 to 30 minutes normally) depending on the location of the remote stations, the degree of line congestion on the Internet, or the network configuration and so on.
- Depending on the mail server, it is possible that erroneous mail is not returned at all. Therefore, when transmitting important or time sensitive documents, it is recommended that you follow up with a telephone call to confirm reception.
- Documents may not be transmitted to a remote station correctly if the remote station's mailer does not support MIME. Error mail may be returned depending on the type of the remote mail server.
- Documents consisting of multiple pages or including a large amount of image data may not be transmitted.
NOTE
- If the Function Parameter "172 Direct IFax XMT" (Fax/Email Settings > Fax Parameters) has been set to "Valid", documents are directly transmitted to Email addresses pre-programmed in the Address Book.
- This machine supports the Message Delivery Notice (MDN) feature. Program this feature when you want to make sure whether the Email you sent has reached the receiving station successfully. For more details, refer to Message Delivery Notice (MDN) (see page 105).
■ Telephone Calls Cannot Be Made via LAN
- Your machine can only make a phone call using a regular telephone line (if an external telephone is connected to your machine).
- Fax communication cannot be performed using Voice Over IP network communication.
Dual Port Communication
Your machine has dual port capability allowing simultaneous G3 fax communication over a telephone line (PSTN) and LAN Communication.
■ Transmission Resolution
In view of PC transmission, the standard setting of the resolution is set to "Fine". If required, this setting can be changed to "Std" (See page 33).
■ Receiving Internet Email Messages
- Your machine can receive text Email from a PC, and print ANSI characters. It will print a “■” symbol if an unrecognized character is received.
-
Received Email font and character size are fixed, and cannot be changed.
-
Text Email will be printed at about 72 lines per page. It is recommended that you use A4/Letter size recording paper.
- Documents cannot be transmitted correctly if the destination mail server does not support the MIME protocol. Erroneous mail may not be returned depending on the mail server.
■ Sending a Document to a PC via LAN
When transmitting a document to an Email address, the following instructions are sent as text message in addition to the TIFF-F formatted image file.
Image data in the TIFF-F format has been attached to this Email. You can download the TIFF-F Image Viewer from the following URL addresses.
http://panasonic.net/pcc/support/office_products.html
NOTE
- If the document(s) are sent in the PDF format, the following message is shown instead. "Image data in PDF format has been attached to this email."
Relay Transmission
To prevent unauthorised stations from getting access to your relay station for Internet Relayed transmission, you must set up your network security. Enter the relay station name, which is concealed from the final destinations, and a manager's Email address for notification of all Internet Relayed transmissions.
Transmitted File Type Setting
PDF can be selected for file type attachment from "File Type and Name" in "Basic Menu".
The PDF format can be chosen when sending scanned documents as an Email to a remote computer. If a document is transmitted to an Internet Fax in the PDF format, the receiving Internet Fax station cannot print the attached file, resulting in an error.
Preparing to Use Internet Fax
To use the Internet Fax feature, your machine needs to be set up properly on your network. Please contact your network administrator for actual network setup.
Copy the Important Information form found in the Operating Instructions (For Administrator Setup), and ask your network administrator to complete the information on the form.
Program Network Parameters
The following network parameters need to be programmed on your machine by referring to the Operating Instructions (For Administrator Setup) of provided CD-ROM, and important information received from your network administrator.
Network Parameters
- TCP/IP Address of your machine
- TCP/IP Subnet Mask of your machine
- TCP/IP Address of the Default Gateway
- Host Name
- TCP/IP Address of the DNS Server (if not available, see Note)
- Email Address of your machine (see Note)
- Name or IP Address of the Default SMTP Mail Server
- SMTP Authentication Name (when the authentication with the SMTP server is required)
- SMTP Authentication Password (when the authentication with the SMTP server is required)
To program the above items, refer to Fax/Email Settings in the Operating Instructions (For Function Parameters) of provided CD-ROM as well.
NOTE
- The Email address format can be same as your regular Email address. If your Email address is popuser001@panasonic.com, your machine's Email address can be Internet_Fax@panasonic.com.
- By default the machine requires the IP Address of the DNS server and prompts you to enter the SMTP server name.
- Sending Email (This machine -> Other Internet Fax machine or PC)
This machine -> Other Internet Fax machine or PC
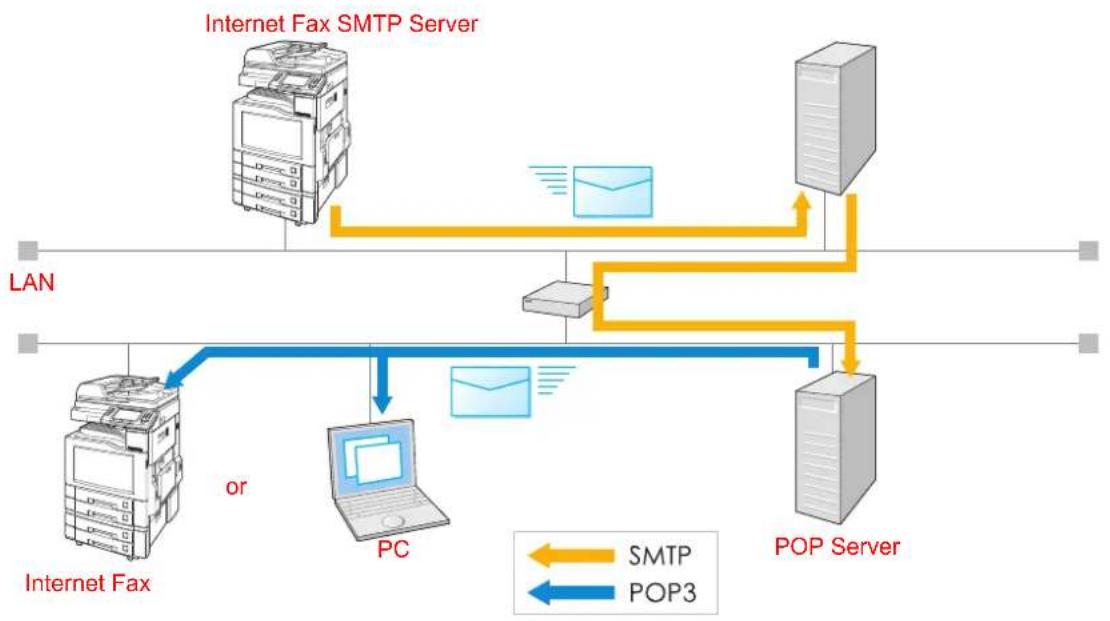
flowchart
graph TD
    A["Internet Fax SMTP Server"] -->|SMTP| B["LAN"]
    A -->|SMTP| C["POP Server"]
    D["Internet Fax"] -->|or| E["PC"]
    E -->|POP3| C
    B -->|SMTP| C
    style A fill:#f9f,stroke:#333
    style D fill:#f9f,stroke:#333
    style B fill:#ccf,stroke:#333
    style C fill:#ccf,stroke:#333
Sending an Email Procedure
The basic operation to send scanned originals as an Email is as follows.
NOTE
- Check that the other party has Internet Fax capability before using this function.
- Email addresses and Fax stations can be mixed while entering the destinations.
Email would be transmitted to an Email address destination, while normal fax documents would be transmitted to a fax destination.
1 Place original(s).

Face up. Up to 100 sheets (80 g/m ^2 / A4)
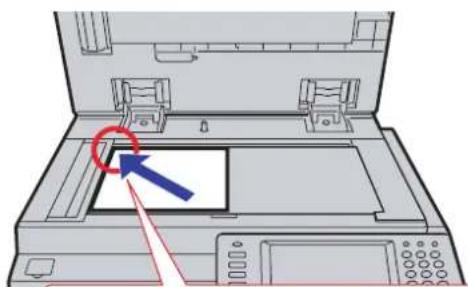
natural_image
Diagram of an open laptop with a highlighted screen and arrow pointing to the screen (no text or symbols present)Face down. Align with top left corner. Close ADF.
● Refer to Placing Originals (see page 14).
2 Press the Fax key to open the Fax screen.
☐ Select "Basic Menu" if additional settings are required.

- Setting Original Quality (see page 33)
- Setting a File Type and a File Name (see page 125)
The PDF format can be used only for transmitting Email to remote computers. Send Email in the TIFF format to an Internet Fax.
- Setting Message Delivery Notice (MDN) (see page 129)
☐ Select "More Menus" if additional settings are required.
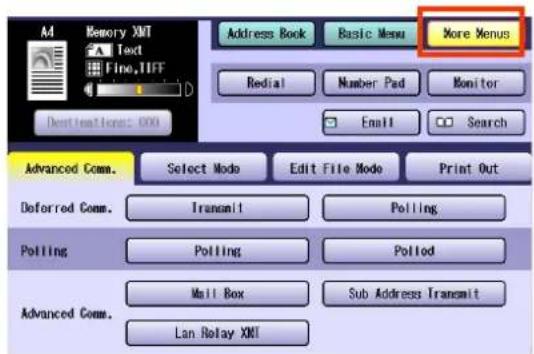
• Deferred Transmission (see page 57)
- Emailing an A3-Sized Document (see page 127)
- Relayed Transmission from Internet Fax (see page 154)
3 Select "Email".

4 Enter an Email address by selecting "Keyboard", or select a pre-programmed Email address.
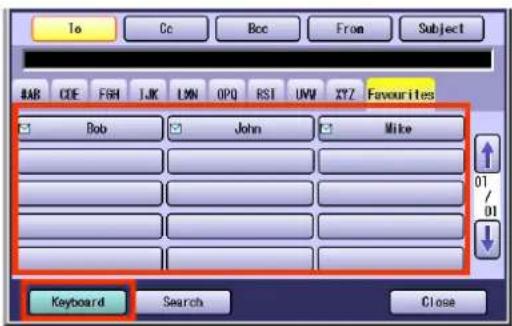
● Refer to Entering an Email Address (see page 113)
The Address Book is available only when destinations are registered (See page 176).
● Refer to Using Cc, Bcc and From (see page 120)
5 Press the Start key.

The original(s) are stored into memory with a file number. Then the Email transmission starts.
NOTE
- The scanned data is sent in black and white (Grey Scale).
- If the transmission fails, an error mail is delivered from the mail server and printed on this machine. The error mail including an error message and an image of the first page of the transmitted document is received.
Refer to When Email Transmission Fails (see page 131).
- For instructions on how to cancel a transmission, refer to Cancelling a Communication (see page 53).
- When sending from the Platen Glass, place the next original, and follow the instructions described on the Touch Panel Display.
- Press the Reset key to return the machine to the initial screen of the current active mode.
• To print the transaction journal, refer to Transaction Journal (See page 196).
Entering an Email Address
Email addresses can be entered by any of the following methods:
• Using the Onscreen Keyboard
Enter the Email address directly. (See below)
• Using the Address Book
Use the pre-programmed Address Book.
- Use a Key Name (see page 115)
- Select from "Favourites" (see page 115)
- Use Group Dialling (see page 116)
- Searching for a Destination
Search the Address Book or Global Directory Service (LDAP).
- Search through the Address Book (Local Search) (see page 117)
(Search by the first letter of a Station Name)
- Search through the LDAP Server (LDAP Search) (see page 118)
Using the Onscreen Keyboard
To enter an Email address directly from the onscreen Keyboard, follow the steps below.
NOTE
- This function is not available when the Function Parameter "136 Restrict Direct Dial" (Fax/Email Settings > Fax Parameters) is set to "Valid".
1 Follow the step 1 and 2 on page 111.
2 Select "Email".
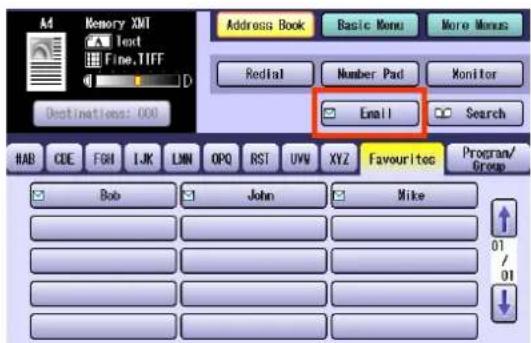
3 On the Email screen, select "Keyboard".

4 Enter an Email address, and then select "OK".

● Each Email address can be up to 60 characters long.
- For instructions on using the onscreen Keyboard, refer to Using the Keyboard in the Operating Instructions (For Function Parameters) of provided CD-ROM.
- To set multiple Email addresses, repeat steps 3 and 4.
- If you make a mistake, select "Back Space" to delete one digit at a time, or move the cursor to the beginning of the field, and then press the Clear key to delete the entire entry.
- When the Function Parameter "137 Re-enter Direct Dial" (Fax/Email Settings > Fax Parameters) is set to "Valid", enter the email address twice. For more details, refer to Fax/Email Settings in the Operating Instructions (For Function Parameters) of provided CD-ROM.
There are three ways to enter Email addresses:
☐ Enter an Email Address Directly
Enter an entire Email address from the
onscreen Keyboard.
☐ Use the Default Domain
When you enter an Email address, you can use the Default Domain if the Default Domain is pre-programmed in the machine beforehand.
①Enter the part of the Email address to the left of @, and then select "OK".
The default domain is automatically added to the Email address when the Email is sent.
Ex: Input characters: abc Sending Email Address: abc@panasonic.com
□ Use the Domain List
When you enter an Email address, you can use the Domain List if you have pre-programmed the domain name you wish to enter.
①Enter the Email address up to @, and then select "Domain List".
②Select a domain name from the pre-programmed domain list.
Ex: Input character string: abc@Selected from the domain list: abc@panasonic.com
5 Press the Start key.
The original(s) are stored into memory with a file number. Then the Email transmission starts.
Using the Address Book
Use a Key Name
If an Email address is pre-programmed in the Address Book, it can be selected by using a Key Name.
NOTE
To use the Address Book, it is necessary to have Email addresses added to the Address Book in Function Parameters. Refer to Adding an Email Address to Address Book (see page 179).
1 Follow the step 1 and 2 on page 111.
2 Select a Key Name tab.
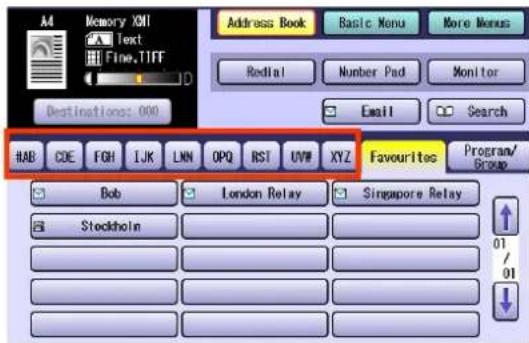
3 Select the Email address you want to send to.

- Select the same destination to cancel a choice.
- To enter additional Email addresses, repeat steps 2 and 3.
4 Press the Start key.
The original(s) are stored into memory with a file number. Then the Email transmission starts.
■ Select from "Favourites"
If an Email address is pre-programmed in the "Favourites", it can be selected from "Favourites".
NOTE
- To use the Address Book, it is necessary to have Email addresses added to the Address Book in Function Parameters. Refer to Adding an Email Address to Address Book (see page 179).
- If there are any Email addresses added in the "Favourites", the Address Book opens the "Favourites" tab first.
1 Follow the step 1 and 2 on page 111.
2 Select "Favourites".

3 Select the Email address you want to send to.
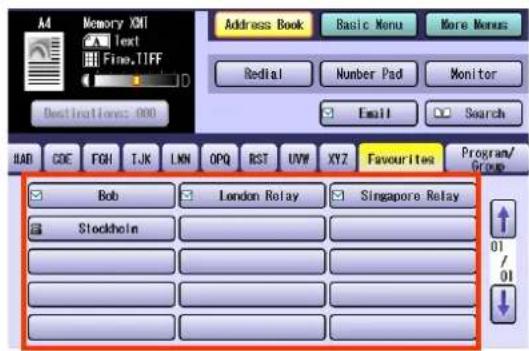
- Select the same destination to cancel a choice.
- To add more Email addresses, select other addresses.
4 Press the Start key.
The original(s) are stored into memory with a file number. Then the Email transmission starts.
■ Use Group Dialling
For transmission to multiple destinations with group dialling, follow the steps below.
NOTE
- To use a Group button, group dialling needs to be programmed in Function Parameters. Refer to Setting for Group Dialling (see page 188).
1 Follow the step 1 and 2 on page 111.
2 Select "Program/Group".

3 Select the Group you want to send to.

- Select the same destination again to cancel a choice.
4 Press the Start key.
The original(s) are stored into memory with a file number. Then the Email transmission starts.
Searching for Destinations
■ Search through the Address Book (Local Search)
The Email address of a remote station programmed in the Address Book can be searched by its entry name.
1 Follow the step 1 and 2 on page 111.
2 Select "Search".

3 Enter the character string you want to search for.
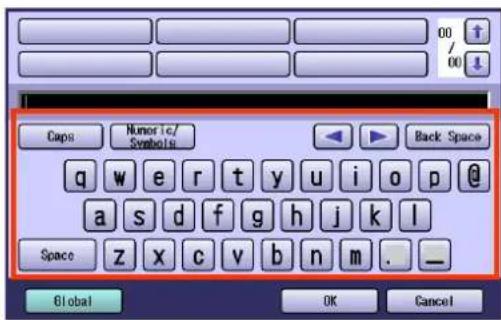
- For instructions on using the onscreen Keyboard, refer to Using the Keyboard in the Operating Instructions (For Function Parameters) of provided CD-ROM.
The Email addresses that match the character string are displayed.
4 Select the destination to which you want to send to, and then select "OK".

- Select or to scroll through the search results.
5 Press the Start key.
The original(s) are stored into memory with a file number. Then the Email transmission starts.
■ Search through the LDAP Server (LDAP Search)
LDAP search is a feature that searches through the Address Book on an LDAP server on a network for fax numbers or Email addresses.
To find out whether the LDAP Search feature works in your particular environment, contact your network administrator.
NOTE
- An LDAP server must be configured before using the LDAP search function. For more details, refer to Fax/Email Settings in the Operating Instructions (For Function Parameters) of provided CD-ROM.
1 Follow the step 1 and 2 on page 111.
2 Select "Search".

3 Select "Global".
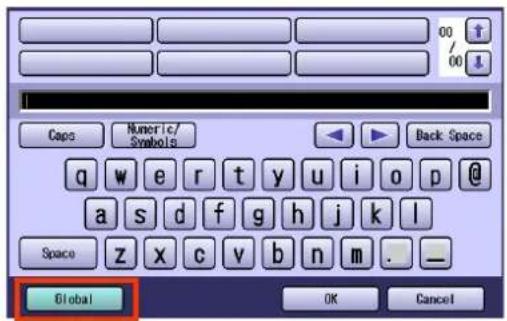
4 Enter a name or characters to search, and then select "Search".

The search result appears.
- Email addresses and fax numbers can be searched.
- Select "Local" to return to the Address Book search screen.
- A message appears if there are more than 100 matches.
Select "Yes" to search by a more detailed keyword.
Select "No" to continue the search. - A message appears if an error occurs while searching.
5 Select "Email".
6 Select a destination, and then select "OK".

- Only one Email address can be selected at a time.
- You can switch between the Email Addresses and Fax Number list by selecting "Email" or "Fax Number" on the screen.
- Select or to scroll through the search results.
- Select "Detail" to open the more detailed information screen. Select "Close" to exit the detailed information screen.

- To cancel a search, select "Cancel".
- To add the found Email address into the Address Book, select "Add to Local" on the LDAP search screen. Enter the entry name, and then select "OK".

7 Press the Start key.
The original(s) are stored into memory with a file number. Then the Email transmission starts.
Using Cc, Bcc and From
When creating an Email, you have the option of setting Cc and Bcc as its destinations, and entering a subject.
If the use of From has been enabled in Function Parameters, the machine can transmit an Email with Email addresses entered in From other than its own Email address.
NOTE
Cc: Carbon Copy
Bcc: Blind Carbon Copy
- If the Message Delivery Notice feature is set to "On", all Emails are sent as To even if they are pre-programmed as Cc/Bcc. For more details on the Message Delivery Notice feature, refer to Setting Message Delivery Notice (MDN) (see page 129).
Example of the receiving station

Setting Cc and Bcc
To set Cc and Bcc as Email destinations, follow the steps below.
1 On the Email screen, select "Cc" or "Bcc". (See pages 111 and 120)

2 Select an Email address, and then select "Close".

- For instructions on how to set an Email address, refer to Entering an Email Address (see page 113).
3 Press the Start key.
The original(s) are stored into memory with a file number. Then the Email transmission starts.
Setting From Field
The From field preset in the machine can be changed by selecting "From" on the Email screen. To set the From field, follow the steps below.
NOTE
- If "145 Sender Selection" is set to "Valid", you can preset up to 25 sender names. You can select from the sender list when sending an Email. However, if you select "From" on the Email screen, the sender list will not be displayed.
For more details on this setting, refer to Fax/Email Settings in the Operating Instructions (For Function Parameters) of provided CD-ROM.
1 On the Email screen, select "From". (See pages 111 and 120)
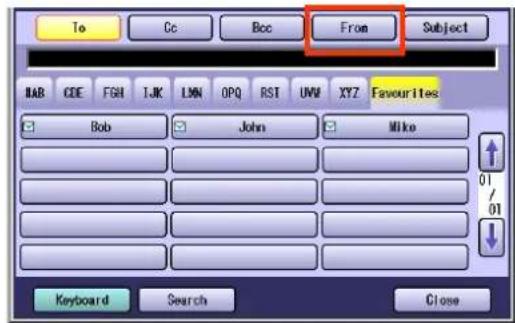
2 Enter a sender name, or select a sender Email address, and then select "Close".

3 Press the Start key.
The original(s) are stored into memory with a file number. Then the Email transmission starts.
- When "145 Sender Selection" is set to "Valid", and if you do not select "From", the Sender Selection list will be displayed after pressing the Start key. Select a Sender, and then select "OK".
Setting Subject
Every time you send an Email, you can enter its subject manually. To enter a subject, follow the steps below.
NOTE
- The default subject is preset if the Function Parameter "21 Default Subject" (Fax/Email Settings > User Parameters) has been set. For programming instructions, refer to Fax/Email Settings in the Operating Instructions (For Function Parameters) of provided CD-ROM.
1 On the Email screen, select "Subject". (See pages 111 and 120)
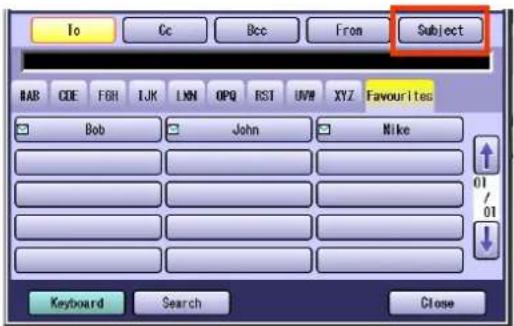
2 Enter a subject, and then select "OK".

- The subject field is up to 40 characters in length.
- For instructions on using the onscreen Keyboard, refer to Using the keyboard in the Operating Instructions (For Function Parameters) of provided CD-ROM.
- If you make a mistake, select "Back Space" to delete one character at a time, or move the cursor to the beginning of the field, and then press the Clear key to delete the entire entry.
3 Press the Start key.
The original(s) are stored into memory with a file number. Then the Email transmission starts.
Confirming the Destination
You can confirm the entered destinations.
1 Select "Destinations:###".
(###: Number of selected addresses)
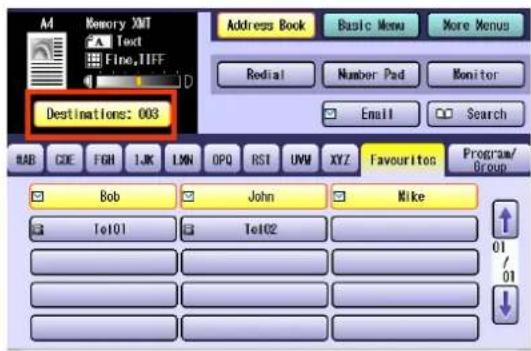
2 Select the desired field button, and confirm destinations.

- To delete a destination, select a destination, and then select "Delete" and "Yes".
3 Select "OK".
Setting a File Type and a File Name
Documents can be scanned into the PDF or TIFF format, and renamed as well.
NOTE
- Internet Fax does not support the PDF format. If a document is transmitted to an Internet Fax in the PDF format, the Internet Fax at the receiving station cannot print the images, resulting in an error.
- The file is automatically named "Image.tif" unless you rename the attached file.
1 Place original(s).
● Refer to Placing Originals (see page 14).
2 Press the Fax key.
3 Select "Basic Menu".

4 Select "File Type and Name".
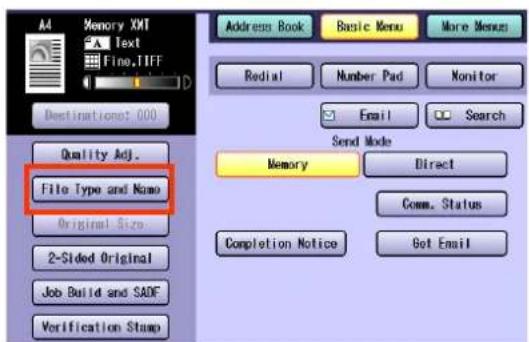
5 Select a file type.

| TIFF Select to transmit in the TIFF format. |
| PDF Select to transmit in the PDF format (monochrome). Can be used only if the receiving station is a computer. |
6 To rename the file, select "Custom".

| Image Select to transmit by using the standard name, "Image.tif" or "Image.pdf". |
| Custom Select to rename the file. |
7 Enter a filename, and then select "OK".

- The filename can be up to 20 characters long.
- For instructions on using the onscreen Keyboard, refer to Using the Keyboard in the Operating Instructions (For Function Parameters) of provided CD-ROM.
- If you make a mistake, select "Back Space" to delete one character at a time, or move the cursor to the beginning of the field, and then select the Clear key to delete the entire entry.
8 Select "Address Book", and then set an Email address.
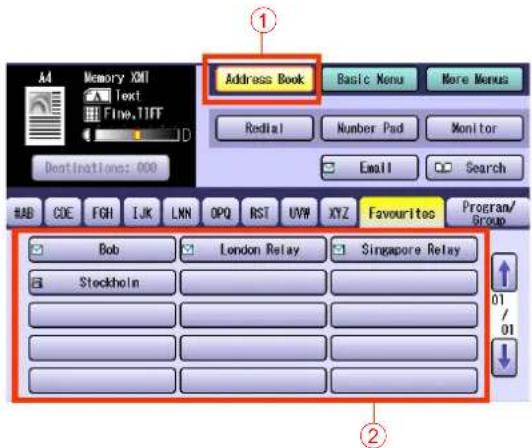
● Refer to Entering an Email Address (see page 113).
9 Press the Start key.
The original(s) are stored into memory with a file number. Then the Email transmission starts.
Emailing an A3-Sized Document
Receiving stations may not receive large documents depending on the recording capability (paper size).
If you want to transmit a document larger than A4, such as an A3 size, by using the Internet Fax feature, check the paper size capability of the receiving station before transmission. If the receiving station is capable of receiving an A3-sized document, you can send the document without reducing the size.
z When "A3 Email XMT" is not set to "On", the document will be reduced according to the setting of the Function Parameter "141 LAN XMT Reduce" (Fax/Email Settings > Fax Parameters). For more details on document size reduction, refer to the table below.
z For information about programming the Function Parameter "141 LAN XMT Reduce", refer to Fax/Email Settings in the Operating Instructions (For Function Parameters) of provided CD-ROM.
Document Sizes and Transmitted/Received Document Sizes
When a document larger than A4, such as an A3 size, is transmitted by Internet Fax, it is reduced in size as described in the table below. Whether the document is reduced or not depends on the setting of "A3 Email XMT" in "More Menus".
| Document Size | Transmitted/Received Document Size | ||
| “A3 Email XMT” has been set to “On”. | “A3 Email XMT” has been set to “Off”. | ||
| The Function Parameter “141 LAN XMT Reduce” has been set to “Invalid”. | The Function Parameter “141 LAN XMT Reduce” has been set to “Valid”. | ||
| A3 A3 B4 A4 | |||
| B4 B4 B4 A4 | |||
| A4 A4 A4 A4 | |||
1 Place original(s).
z Refer to Placing Originals (see page 14).
2 Press the Fax key.
3 Select "More Menus".
4 Select "Select Mode".

5 Select "A3 Email XMT".

6 Select "On", and then select "OK".
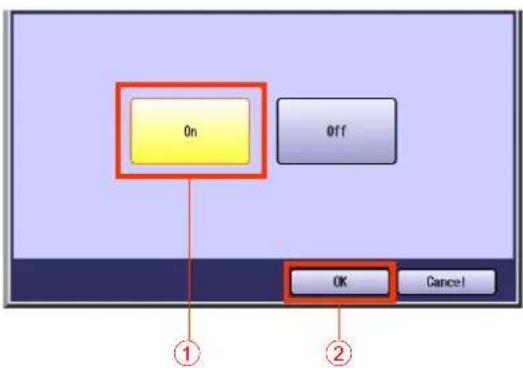
| 0n | The document is transmitted at the same ratio scale as it has been scanned. |
| 0ff | The document is transmitted, reduced in size according to the setting of the Function Parameter “141 LAN XMT Reduce” (Fax/Email Settings > Fax Parameters). |
7 Select "Address Book", and then set an Email address.
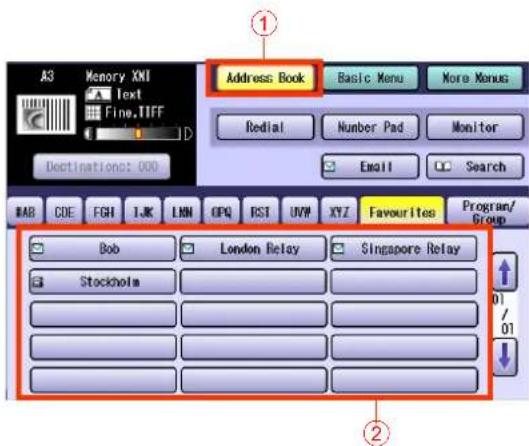
● Refer to Entering an Email Address (see page 113).
8 Press the Start key.
The original(s) are stored into memory with a file number. Then the Email transmission starts.
Setting Message Delivery Notice (MDN)
To enable Message Delivery Notice feature, follow the procedure below.
NOTE
- The standard setting of the Function Parameter "173 Delivery Notice" (Fax/Email Settings > Fax Parameters) can be changed. For instructions on how to change the standard setting, refer to Fax/Email Settings in the Operating Instructions (For Function Parameters) of provided CD-ROM.
1 Place original(s).
● Refer to Placing Originals (see page 14).
2 Press the Fax key.
3 Select "More Menus".

4 Select "Select Mode".
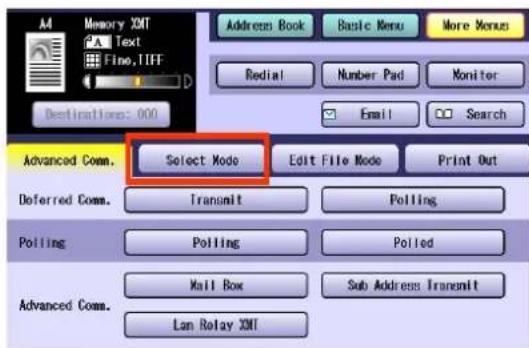
5 Select "Delivery Notice".

6 Select "On", and then select "OK".

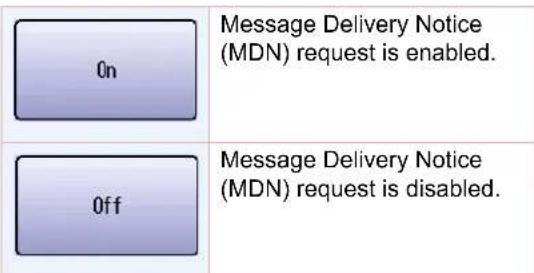
©
When Email Transmission Fails
If the Email fails to reach its destination, an error mail is returned from the mail server, and is printed on the machine. The error mail includes an error message, and the image of the first page of the transmitted document to alert the sender the conditions of the failure.
Failure Report Sample (Unknown User)
![Received: from localhost (localhost) by ifeifl.rdmg.mgcs.mei.co.jp (8.6.12/3.4W3) with internal id OAA24381; FRI, 09 JAN 2009 14:52:57 +0900 Date: FRI, 09 JAN 2009 14:52:57 +0900 From: Mail Delivery Subsystem Subject: Returned mail: User unknown Message-Id: <200011120552.OAA243B1@ifeifl.rdmg.mgcs.mei.co.jp> To: The original message was received at FRI, 09 JAN 2009 14:52:54 +0900 from nwpc31.rdmg.mgcs.mei.co.jp [172.21.22.51] ---- The following addresses had delivery problems ---- (unrecoverable error) ---- Transcript of session follows ---- .... while talking to nwr39.rdmg.mgcs.mei.co.jp.: >>> RCPT To: << 550 ... User unknown 550 ... User unknown ---- Original message follows ---- Return-Path: fax@nwpc31.rdmg.mgcs.mei.co.jp Received: from nwpc31.rdmg.mgcs.mei.co.jp (Internet PAX) (nwpc31.rdmg.mgcs.mei.co.jp [172.21 .22.51]) by ifeifl.rdmg.mgcs.mei.co.jp (8.6.12/3.4W3) with SMTP id OAA24380 for ; FRI, 09 JAN 2009 14:52:54 +0900 Message-ID: <200011120552.OAA24380@ifeifl.rdmg.mgcs.mei.co.jp> Mime-Version: 1.0 Content-Type: image/tiff Content-Transfer-Encoding: base64 Content-Disposition: attachment; filename="image.tif" Content-Description: image.tif X-Mailer: Internet FAX, MGCS Date: FRI, 09 JAN 2009 14:49:00 +0900 From: iFAX Subject: IMAGE from Internet FAX To: error@nwr39.rdmg.mgcs.mei.cp.jp 5 09-JAN-2009 14:49 iFAX P.01/01 THE SLEREXE COMPANY LIMITED SAPORS LANE - DOOLE - DORSET - BH25 &ER TELEPHONE DOOLE (94513) 51617 - TELEX 123456 Our Ref. 350/PJC/EAC 18th January, 1972.](/content/2026/05/1123304/images/10fb6c58b3849016bc105564a4f1dcfc7e09ffbe625ba37b5a1a806da9f75b80.jpg)
Using a Completion Notice
The Completion Notice feature notifies your computer when Email or Fax transmission is completed.
ATTENTION
- Before using this function, install the Panasonic Document Management System and Printer Driver, and then set up each software.
- Refer to Completion Notice Function in the Operating Instructions (For User Setup) of provided CD-ROM.
1 Place original(s).
● Refer to Placing Originals (see page 14).
2 Press the Fax key.
3 Select "Basic Menu".

4 Select "Completion Notice".
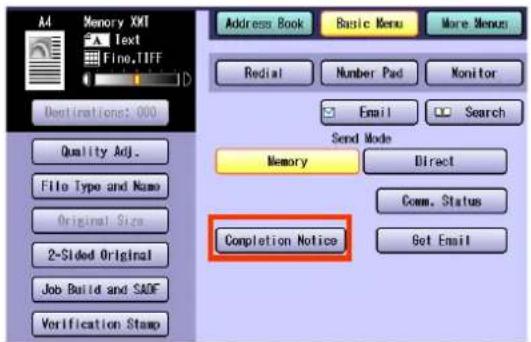
5 Select a computer to be informed, and then select "OK".
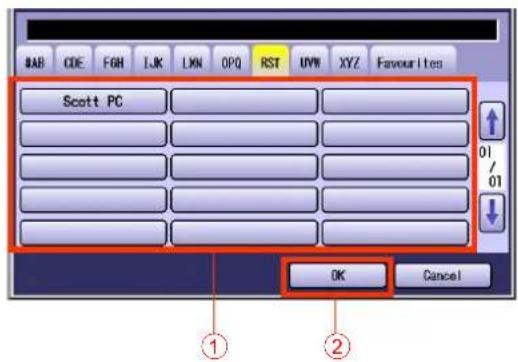
6 Select "Email".
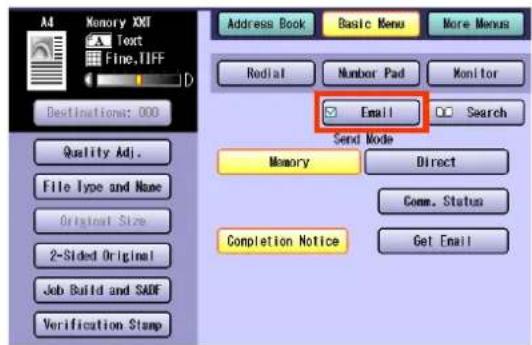
7 Set an Email address.
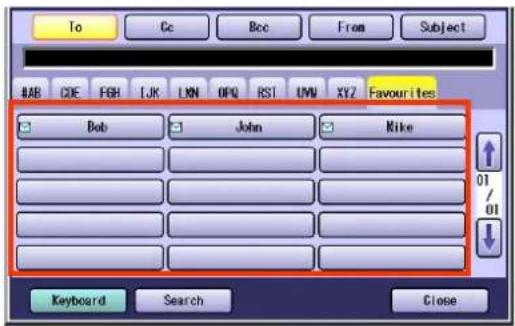
● Refer to Entering an Email Address (see page 113).
8 Press the Start key.
The original(s) are stored into memory with a file number. Then the Email transmission starts.
When the Email is sent, completion notice is also sent to the computer.
Receiving an Email
If the machine connects to a network as a POP client, it can receive Email either automatically or manually. The Email reception method from a POP server varies depending on the POP settings programmed in Function Parameters.
Configuring to Receive Email
Program the following parameters in Function Parameters (Fax/Email Settings > Fax Parameters) to receive Email:
| Item Name Setting | |
| “146 POP Timer” | Set the time interval for checking the Email on POP server.· Set an interval between 0 and 60 minutes.· An interval setting of 0 minutes would not retrieve Email automatically. |
| “147 Auto POP Receive” | Set whether to retrieve Emails automatically from the POP server.· When set to “Valid”, Emails on the POP server are retrieved and printed automatically.· When set to “Invalid” with “146 POP Timer” set to a number other than 0, only the number of the incoming Email messages on the POP server appears on the display. |
| “148 Del POP Receive Mail” | Set whether to delete the Email from the server after it has been retrieved. |
| “149 Del POP Error Mail” | Set whether to delete Email from the server when the attached file is in a format that cannot be printed. |
NOTE
- For instructions on how to configure the POP server, refer to Fax/Email Settings in the Operating Instructions (For Function Parameters) of provided CD-ROM.
- With POP manual reception pre-programmed on a Program key, POP Email can be retrieved by a user name other than the one pre-programmed as local station information.
Receiving Email Automatically
With "147 Auto POP Receive" set to "Valid", and POP acquisition interval set between 1 and 60 minutes in Function Parameters (Fax/Email Settings > Fax Parameters), queries are transmitted to the POP server periodically to check for new Emails.
If there is an Email on the POP server when a query is transmitted, it is retrieved and printed automatically.
Receiving Email Manually
With the Function Parameter "147 Auto POP Receive" (Fax/Email Settings > Fax Parameters) set to "Invalid", Email is received manually.
NOTE
- With POP acquisition interval set between 1 and 60 minutes, queries are transmitted to the POP server periodically to check for new Emails, and the number of the incoming Email messages on the server appears on the display.
1 Press the Fax key.
2 Check for incoming mail(s).

3 Select "Basic Menu".
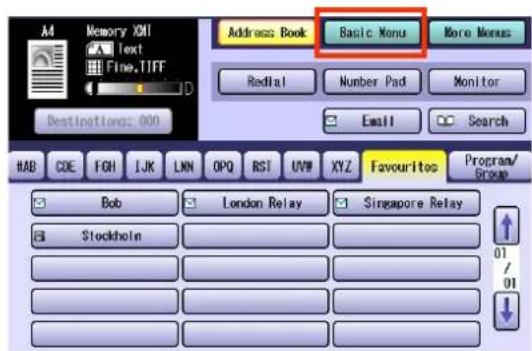
4 Select "Get Email".
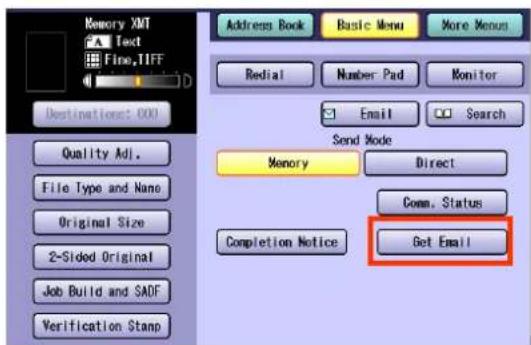
The retrieved Email is printed.
Receiving Email with the Program Key
This function allows others to share your machine to retrieve their Emails from the POP server by preprogramming their POP user names and POP passwords into the Program keys. They will be able to retrieve Emails by simply pressing the corresponding Program key.
NOTE
- If security is of a great concern, and it is necessary to prevent unauthorised personnel from retrieving your Email from the POP server, leave the POP password field blank when programming the Program key. By leaving it blank, the machine will prompt you to enter the POP password when the Program key is pressed to retrieve Emails.
- For instructions on how to program POP reception on a Program key, refer to Programming Email Manual Reception on Program Keys (see page 194).
1 Press the Fax key.
2 Select "Program/Group".

3 Select the Program key on which POP reception is pre-programmed.
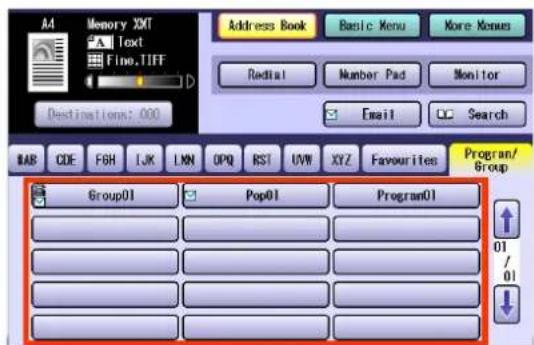
When the POP Account name entry prompt window opens, enter the POP Account name, and then enter the password.
The Email is retrieved and printed.
Receiving an Email on a Computer
This section explains how to receive Emails transmitted from the machine to a computer, and also explains the Emails forwarded from the machine to a computer.
Receiving Email on Your Computer
A sample screen shot of a mailer that has received Email from an Internet Fax is shown below.
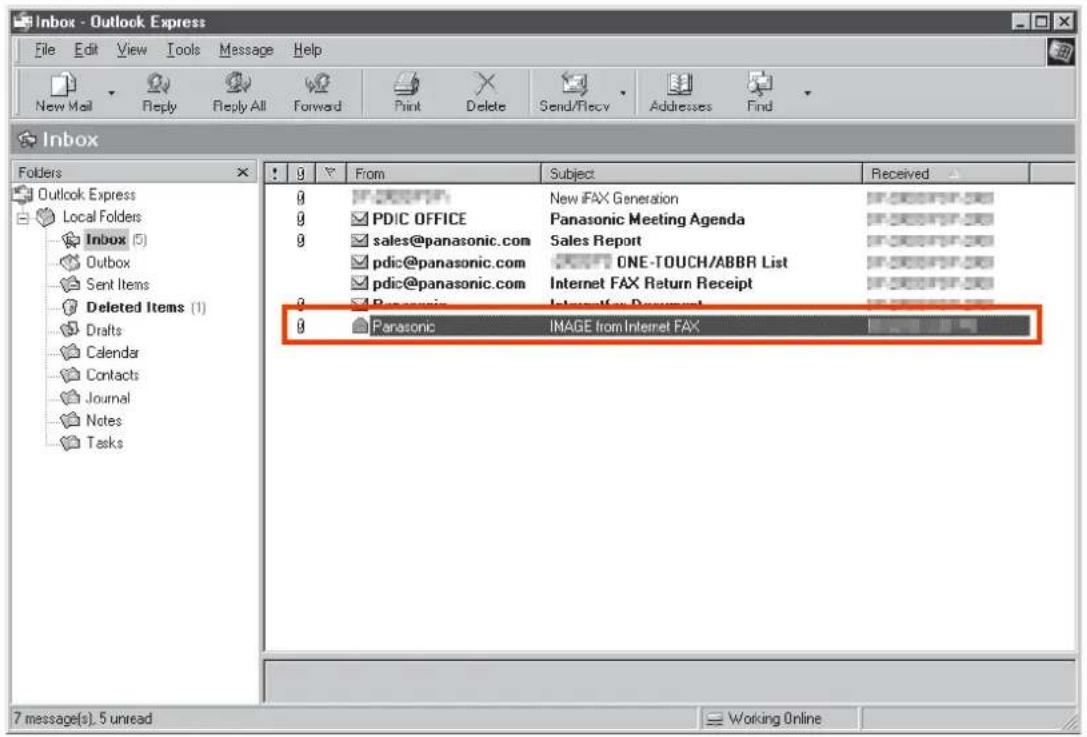
For your reference, the above example is from Outlook® Express Inbox running under Microsoft® Windows®.
If you are using a different Email application software, please refer to your application's user manual.
NOTE
- For more details on how to view Email on your computer, refer to the user manual for your mailer or viewer.
- In the screen shot above, the Email transmitted from Internet Fax has the subject "IMAGE from Internet Fax". Email title can be modified if required.
Opening Email
When you open an Email received from Internet Fax, the screen as shown below is displayed.

NOTE
- For your reference, the above example is from Windows Messaging running under Microsoft Windows.
- To run the viewer, please refer to your application's user manual. The attached file is composed of TIFF-F (Tagged Image File Format with Modified Hoffman coded image). TIFF viewers come in many flavours, a majority of TIFF viewers will open and view this file, however, some viewers may not support this format.
- You can download the TIFF-F Image Viewer into your PC from the following URL address. http://panasonic.net/pcc/support/office_products.html
License agreement of Panasonic's TIFF-F Image Viewer application You must carefully read the license agreement before installing the TIFF-F Viewer application on your PC. If you do not agree to all the terms of this agreement, do not use the software and destroy all of the copies thereof. You must assume full responsibility for selection of the software, and its operation/non-operation and results obtained therefrom. - If you receive an Email (Internet Fax) with a PDF file attached, the following text message is shown in the Email body. "Image data in PDF format has been attached to this email."
Inbound Routing
What is Inbound Routing?
Using the Inbound Routing feature, your machine can route documents received from a G3 fax machine to Email address(es) or Internet Fax machine(s) connected to a LAN as an Email, as well as to other G3 fax machine(s) over the telephone line.
NOTE
- For more details on the types of fax that work with routing, contact your local authorised Panasonic dealer.
- If no sub-address is specified, your machine tries to match the originating fax machine's numeric ID (TSI) with the TSI routing within its auto dialler, and will route the documents to the corresponding stations Email address(es) and/or telephone number(s).

flowchart
graph TD
    A["G3 Fax"] -->|Telephone line| B["Internet Fax"]
    B -->|Email| C["PC"]
    B -->|LAN| D["Internet Fax"]
    B -->|Transfer to G3 Fax| E["G3 Fax"]
Routing Setup Flow
Before the Inbound Routing feature can be used, the Function Parameters and Address Book programming is required.
- Configure your machine for Internet Fax (See page 109)
- Set required parameters to “Valid” in Function Parameters
| To use sub-addressing | Set the Function Parameter “152 Sub-Addr Routing” (Fax/Email Settings > Fax Parameters) to “Valid”. |
| To use a numeric ID | Set the Function Parameter “153 TSI Routing” (Fax/Email Settings > Fax Parameters) to “Valid”. |
NOTE
● Refer to Settings for Inbound Routing (see page 141).
Program the transferring station in the Address Book
Program Internet Fax or a remote computer as a transferring destination.
(Program the Email address of the transferring destination in the Address Book.)
Program a G3 fax station as a transferring destination.
(Program the fax number of the transferring destination in the Address Book.)
NOTE
● Refer to Programming the Address Book for Inbound Routing (see page 142).
Settings for Inbound Routing
To use the Inbound Routing feature, program the following parameters to meet the type of routing in Function Parameters (Fax/Email Settings > Fax Parameters):
| Routing Type Explanation Function Parameters | ||
| Routing by sub-addressing | Set this parameter to perform an ITU-T sub-address query within its auto dialler, and to route the received document(s) to corresponding station's Email address(es) or telephone number(s). | Set “152 Sub-Addr Routing” to “Valid”. |
| Routing by the numeric ID of a sending fax station | Set this parameter to perform a numeric ID (TSI frame information) query within its auto dialler, and to route the received document(s) to the corresponding station's Email address(es) or telephone number(s). | Set “153 TSI Routing” to “Valid”. |
| To set the From field Use this | parameter to select the type of Email header to be included in the “From” field of each routed faxes.Originator (Origi):The originating fax machine's TSI will appear in the “From” field of the routed Email.Relay Station (Rly Stn):The routing station's Email address will appear in the “From” field of the routed Email. | Program “154 Route Header FMT”. |
| To program printout of received documents | Select whether to print all documents received on this machine (“Always”), or print them only if inbound routing fails (“Inc Only”). | Program “155 Print Routed Doc”. |
NOTE
- For more operational details, refer to Fax/Email Settings in the Operating Instructions (For Function Parameters) of provided CD-ROM.
Programming the Address Book for Inbound Routing
To use the Inbound Routing feature, program the transferring destination in the Address Book.
NOTE
- For instructions on how to register the Address Book, refer to Address Book (see page 175).
1 Press the Function key.
2 Select "Fax/Email Settings".

3 Select "00 Address Book".

4 Select "02 Add Email Address".

5 Enter an Email Address, and then select "OK".

- For instructions on how to enter Email addresses, refer to Entering an Email Address (see page 113).
- Enter an Email address up to 60 characters.
6 Enter a station name, and then select "OK".
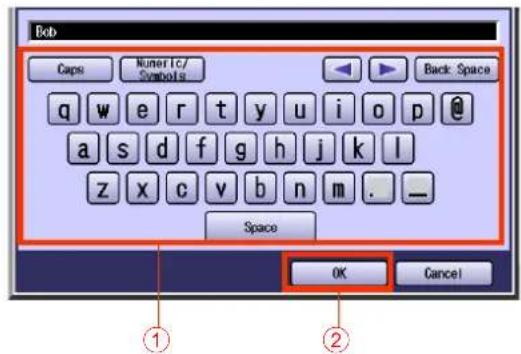
- Enter a station name up to 15 characters.
- For instructions on using the onscreen Keyboard, refer to Using the Keyboard in the Operating Instructions (For Function Parameters) of provided CD-ROM.
7 Enter a Key Name, and then select "OK".

● Key Names are used to select the destinations on the Touch Panel Display.
- For instructions on using the onscreen Keyboard, refer to Using the Keyboard in the Operating Instructions (For Function Parameters) of provided CD-ROM.
8 Select "IFax", and then select "OK".

- To display the Email address in the Address Book of both Email/Scan and Fax modes, select "PC".
9 Select whether to add the Email address to "Favourites".

| Yes | Select to display the station in "Favourites". |
| No | Select not to display the station in "Favourites". |
10 To enable sub-addressed routing, enter a sub-address, and then select "OK".

This screen appears when the Function Parameter "152 Sub-Addr Routing" (Fax/Email Settings > Fax Parameters) has been set to "Valid".
11 To enable routing by a numeric ID, enter a numeric ID, and then select "OK".

The Email address is added to the Address Book.
This screen appears when the Function Parameter "153 TSI Routing" (Fax/Email Settings > Fax Parameters) has been set to "Valid".
- Press the Reset key to return the machine to the initial screen of the current active mode.
Using the Relay Feature
What is the Relay Feature?
From your PC or machine, you can send documents to the End Receiving Station(s) via an Internet Relay Station.
After the relay station completes its transmission to the End Receiving Station, your PC or machine receives a Communication Journal from the relay station. This Communication Journal confirms whether the Internet or Intranet Relayed transmission was successful.
■ Example 1: Internet Relay Network

flowchart
graph LR
    subgraph New York
        A["Internet Fax"] -->|Email| B["Internet"]
        C["PC"] -->|Email| B
        B --> D["Internet Relay Station"]
    end

    subgraph London
        E["Internet Fax"] -->|Local Telephone Call| F["Stockholm"]
        G["Internet Fax"] -->|Local Telephone Call| H["Berlin"]
        I["Internet Fax"] -->|Local Telephone Call| J["Rome"]
        K["Internet Fax"] -->|Local Telephone Call| L["End Receiving Station(s)"]
    end

    A -->|Initial Sending Station(s)| C
    C -->|Comm. Journal| B
    E -->|Local Telephone Call| F
    G -->|Local Telephone Call| H
    J -->|Local Telephone Call| L
Initial Sending Station(s)
Sends Email to a relay station (Internet Fax supporting the Relay feature) using the Internet Fax feature to request a Relayed transmission.
NOTE
- The LAN Relayed transmissions request can be made easier by having the relay station pre-programmed in the Address Book.
TIFF image files can be attached to Email when it is transmitted from a computer. - For more details on the Relayed Transmission Report (Communication Journal) and the Fax Relay log, refer to Result of Relayed Transmission (see page 159).
Internet Relay Station
Sends Email received from the initial sending station to an end receiving station (a fax station connected to the telephone line: Ex: Stockholm/Berlin/Rome) as a fax document. If multiple end receiving stations are specified, the Email is broadcasted to them.
Each time a relay station completes a transmission, it transmits a Relayed Transmission Report (Communication Journal) to the initial sending station to designate its Relayed transmission request, and emails a Fax Relay log to the administrator's computer at the relay station.
End Receiving Station(s)
On receiving a fax document from the relay station, the mail header and mail text will be printed on the first page, and the file attachment (TIFF) on the next, and subsequent pages.
Example 2: Intranet Relaying Network

flowchart
graph LR
    A["PC"] -->|LAN| B["Mail Server"]
    C["PC"] -->|LAN| B
    B --> D["Intranet Relay Station"]
    D --> E["G3 Fax"]
    D --> F["G3 Fax"]
    D --> G["G3 Fax"]
Computer (PC)
Sends Emails to Intranet Relay Station via mail server.
NOTE
- For operating instructions on how to request Relayed transmission from a computer, refer to Relayed Transmission from PC (see page 156).
Mail Server
Forwards Email to the Intranet Relay Station.
Setting up a Relayed Transmission Network
This section explains how to set up a relayed broadcasting network.
■ What is the Hardware Configuration?
A relay network needs the following kinds of equipment:
- Internet Fax or computer (Initial Sending Station)
- Internet Fax supporting the Relayed Transmission feature (Relay Station)
• G3 fax station connected to the telephone line (End Receiving Station)
■ What is the Communication Charge?
- Email is transmitted from the initial sending station to the relay station via Internet, saving both the time and charges on long-distance calls.
- A telephone charge accrues on the Fax transmission from the relay station to the end receiving station.
How can I confirm the completion of a transmission?
- When the relay station completes a transmission to the receiving station, it transmits a Relayed Transmission Report (Communication Journal) to the initial sending station to report the completion of a Fax transmission.
- The relay station also emails a Fax Relay log to the administrator's computer at the relay station.
How to Program?
- Program required network parameters in your machine. (See page 109)
- To use the Relayed Transmission feature, program the required function parameters in Function Parameters for Relay Stations (See page 150) and Settings for Initial Sending Station (See page 151). A sample network is shown on the next page.
- Add relay station and end receiving station to Address Book by referring Sample Entries in Address Book (See page 148) and Adding End Receiving Stations for Relayed Transmission (See page 152). To set up Relayed transmission network properly, consult authorised Panasonic dealer.
Example of a Relayed Transmission Network
An example of a Relayed transmission network using relay stations at two locations is shown below.
- This network has an initial sending station (New York) connected to relay stations (London and Singapore).
- Documents are transmitted from the relay stations (London/Singapore) to end receiving stations (Stockholm, Rome, Tokyo, Hong Kong, Sydney and others) via the telephone lines.
• This network uses relay stations at two locations.
- A single Relayed transmission request made from the initial sending station (New York) allows a document to be transmitted to the end receiving stations (Stockholm, Rome, Tokyo, Hong Kong, Sydney and others) via the relay stations (London, Singapore).

Sample Entries in Address Book
Table 1: Initial Sending Station (New York)
• Telephone number ; 212 111 1234
- Email address (SMTP) ; ifax@newyork.panasonic.com
- Host name ; newyork
- Relay XMT password ; usa-rly
| Station Name | Email Address/Telephone Number | Relay Station Address |
| London ifax@london.panasonic.co.uk | ____ | |
| Stockholm 46 8 111 1234 “London Relay” | ||
| Singapore ifax@singapore.panasonic.co.sg | ____ | |
| Tokyo 81 33 111 1234 | “Singapore Relay” | |
| London Relay | uk-rly@london.panasonic.co.uk | ____ |
| Singapore Relay | sg-rly@singapore.panasonic.co.sg | ____ |
| Rome | 39 6 111 1234 “London Relay” | |
| Hong Kong | 852 23123456 | “Singapore Relay” |
| Sydney 61 2 111 1234 “Singapore Relay” | ||
Table 2: Relay Station (London)
• Telephone number ; 71 111 1234
- Email address (SMTP) ; ifax@london.panasonic.co.uk
- Host name ; london
- Relay XMT password ; uk-rly
| Station Name | Email Address/Telephone Number | Relay Station Address |
| New York | ifax@newyork.panasonic.com | —— |
| Stockholm 46 8 111 1234 “London Relay” | ||
| Singapore ifax@singapore.panasonic.co.sg | —— | |
| Tokyo 81 33 111 1234 | “Singapore Relay” | |
| Singapore Relay | sg-rly@singapore.panasonic.co.sg | —— |
| Rome | 39 6 111 1234 “London Relay” | |
| Hong Kong | 852 23123456 | “Singapore Relay” |
| Sydney 61 2 111 1234 “Singapore Relay” | ||
| London Relay | uk-rly@london.panasonic.co.uk | —— |
Table 3: Relay Station (Singapore)
• Telephone number ; 65 111 1234
- Email address (SMTP) ; ifax@singapore.panasonic.co.sg
- Host name ; singapore
- Relay XMT password ; sg-rly
| Station Name | Email Address/Telephone Number | Relay Station Address |
| London ifax@london.panasonic.co.uk | ____ | |
| Stockholm 46 8 111 1234 “London Relay” | ||
| New York ifax@newyork.panasonic.com | ____ | |
| Tokyo 81 33 111 1234 | “Singapore Relay” | |
| London Relay | uk-rly@london.panasonic.co.uk | ____ |
| Rome 39 6 111 1234 “London Relay” | ||
| Hong Kong | 852 23123456 | “Singapore Relay” |
| Sydney 61 2 111 1234 “Singapore Relay” | ||
| Singapore Relay | sg-rly@singapore.panasonic.co.sg | ____ |
Function Parameters for Relay Stations
Program the following parameters to use this machine as a relay station in Function Parameters:
| Item Required Function Parameters Explanation | ||
| 1 Fax Parameters“142 Relay XMT” | Selecting whether the machine will accept and perform G3 Relayed transmission.·InvalidMachine will not accept a Relay XMT request.·ValidMachine will accept a Relay XMT request. | |
| 2 Fax Parameters“143 Relay XMT Report” | Selecting how the Communication Journal for Relayed transmission is sent to the originator.·OffDoes not send.·AlwaysThe Communication Journal is always sent after a Relay communication is completed or has failed.·Inc OnlyThe Communication Journal is sent if the Relay communication to the destination has failed. | |
| 3 Fax Parameters“36 Relay XMT Password” | Enter a Relay XMT Password (up to 10 characters) to be used for the protection against unauthorised (outside) stations from accessing your machine to relay messages to a G3 fax machine via PSTN. This password should be given out to authorised people only.As the relay password is transmitted in the header of Email, it should be differentiated from the Email address used by Email or Internet Fax. A relay password pre-programmed in this way would be easy to identify when Internet Fax is received. | |
| 4 Fax Parameters“45 Relay Domain (01)” to “54 Relay Domain (10)” | Register up to 10 Domain Names (up to 30 characters) that your machine will accept Relayed transmission.Requests to relay a message to another G3 fax machine via PSTN.Ex: Registered Domain Names(01): panasonic.co.jp(02): abc.iFax.com(03): panasonic.comNOTETo increase network security by protecting from third party access to the relay station, enter a relay-permitted domain name and an administrator's Email address for every relay station.If the whole domain name is left blank, Internet Fax will receive Relayed transmission requests from all the domain names. | |
| 5 Fax Parameters“37 Manager's Email Addr” | Register the department manager's Email address for supervising, and cost control purposes. Once registered, the machine will send an Email notification to the Email address for each Relayed XMT Request received from a remote station. The following information is sent.(From: The Email address of the originating station)(To: The telephone number of the destination G3 fax machine) | |
NOTE
- For more details on the Function Parameters, refer to Fax/Email Settings in the Operating Instructions (For Function Parameters) of provided CD-ROM.
Settings for Initial Sending Station
To use the machine as an initial sending station, program the following parameters in Function Parameters:
| Item Required Function Parameters Explanation | ||
| 1 Fax Parameters“140 LAN RLY XMT Request” | Select “Valid” to use this machine as an initial sending station.·InvalidSelect to disable Relayed transmission.·ValidSelect to enable Relayed transmission. | |
Adding End Receiving Stations for Relayed Transmission
You can add end receiving stations to the Address Book by the following procedure.
NOTE
- If broadcasting to multiple end receiving stations is required, use group dialling (See page 188).
- The Function Parameter "140 LAN RLY XMT Request" (Fax/Email Settings > Fax Parameters) must have been set to "Valid" to have a LAN Relayed transmission request pre-programmed in the Address Book. For more operational details, refer to Fax/Email Settings in the Operating Instructions (For Function Parameters) of provided CD-ROM.
- For instructions on registration in the Address Book, refer to Address Book (see page 175).
- You cannot use the address registered for Relayed transmission for Confidential communication, Sub-address communication, and Password transmission. Register an address without a relayed station (See page 176).
1 Press the Function key.
2 Select "Fax/Email Settings".

3 Select "00 Address Book".

4 Select "01 Add Telephone Number".
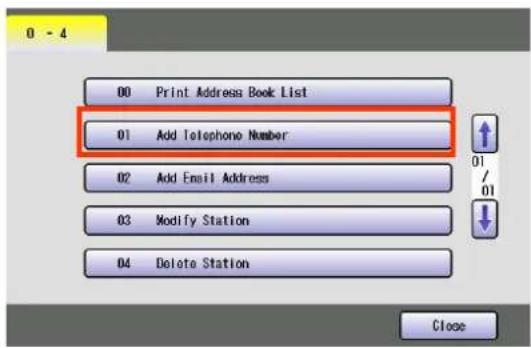
5 Enter a fax number, and then select "OK".

- Select "Clear" to delete the fax number one digit at a time.
- For instructions on how to enter fax numbers, refer to Manual Dialling (see page 20).
6 Enter a station name, and then select "OK".

- Enter a station name up to 15 characters.
- For instructions on using the onscreen Keyboard, refer to Using the Keyboard in the Operating Instructions (For Function Parameters) of provided CD-ROM.
7 Enter a Key Name, and then select "OK".

● Key Names are displayed on the Touch Panel Display to select destinations.
- For instructions on using the onscreen Keyboard, refer to Using the Keyboard in the Operating Instructions (For Function Parameters) of provided CD-ROM.
8 Select whether to add a station to "Favourites".

| Yes | Select to display the station in "Favourites". |
| No | Select not to display the station in "Favourites". |
9 Select a relay station or enter the Email address of a relay station, and then select "OK".
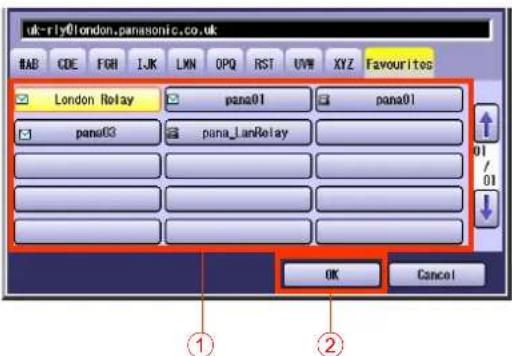
- This screen appears when the Function Parameter "140 LAN RLY XMT Request" (Fax/Email Settings > Fax Parameters) has been set to "Valid". - Only one destination can be programmed as a relay station. - Before you select a relay station, you must pre-program an Email address in "36 Relay XMT Password" as the user name as follows;
"Relay XMT Password "@" the host and domain names registered with the DNS server"
Ex: sg-rly@singapore.panasonic.co.sg
- Press the Reset key to return the machine to the initial screen of the current active mode.
Relayed Transmission from Internet Fax
Documents can be transmitted to fax stations on the telephone line via Internet Fax relay stations.
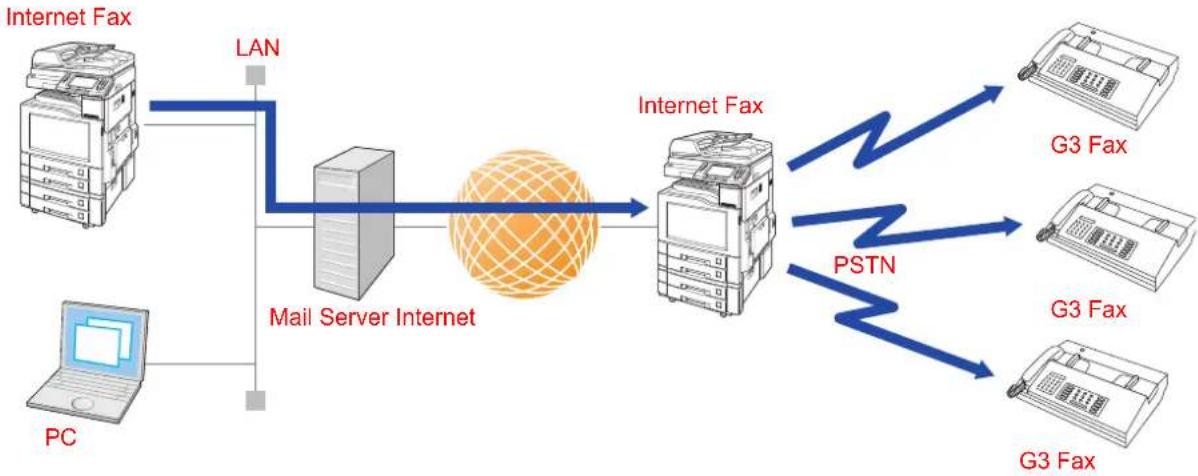
flowchart
graph LR
    PC["PC"] -->|LAN| LAN["LAN"]
    LAN -->|Mail Server Internet| Cloud["Cloud Grid"]
    Cloud --> InternetFax["Internet Fax"]
    InternetFax --> PSTN["PSTN"]
    PSTN --> G3Fax["G3 Fax"]
    G3Fax --> G3Fax1["G3 Fax"]
    G3Fax1 --> G3Fax2["G3 Fax"]
NOTE
- This function is available when the Function Parameter "140 LAN RLY XMT Request" (Fax/Email Settings > Fax Parameters) is set to "Valid".
1 Place original(s).
● Refer to Placing Originals (see page 14).
2 Press the Fax key.
3 Select "More Menus".

4 Select "Lan Relay XMT".
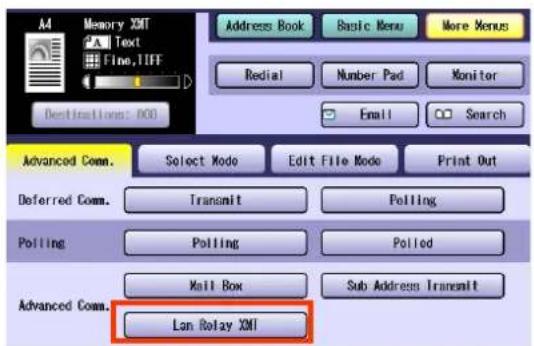
5 Select a relay station or enter the Email address of the relay station.

- Only one destination can be programmed as a relay station.
- For instructions on how to enter destinations, refer to Entering an Email Address (see page 113).
6 Press the Start key.
7 Select an end receiving station to which the relay station relays.

- For instructions on how to enter destinations, refer to Entering a Destination (see page 20).
● Multiple stations can be programmed as end receiving stations.
8 Press the Start key.
Email is sent to the relay station with the fax number of the end receiving station.
When the relay station completes the transmission to the end receiving station, a communication journal is delivered.
- If the transmission fails, an error response is delivered from the mail server and printed on this machine.
The error response contains an error message and a copy of the first page of the document to alert you of the transmission failure.
For more details, refer to When Email Transmission Fails (see page 131).
NOTE
- Relayed transmission requests can be pre-programmed in the Address Book beforehand to ease later operational complexities. Refer to Adding End Receiving Stations for Relayed Transmission (see page 152).
Relayed Transmission from PC
Using your Email application, you can send any document(s) from your PC as a TIFF-F attachment to one or multiple G3 fax machines automatically through the Internet Relay Station.
End Receiving Station
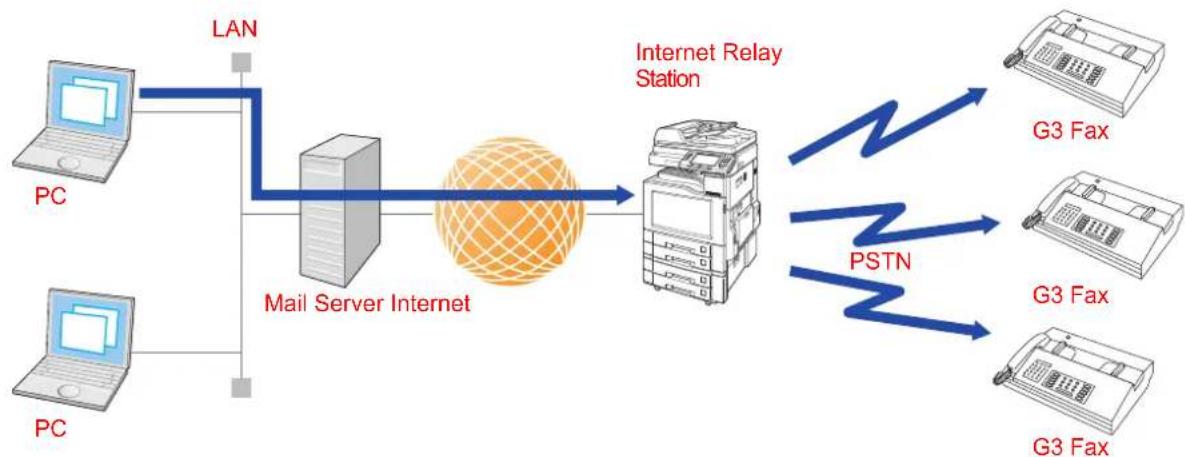
flowchart
graph LR
    A["PC"] -->|LAN| B["Mail Server Internet"]
    C["PC"] -->|LAN| B
    B --> D["Internet Relay Station"]
    D --> E["G3 Fax"]
    D --> F["G3 Fax"]
    D --> G["G3 Fax"]
    D --> H["PSTN"]
The Internet Relay Station (your machine) must be properly setup with all the required parameters.
Requesting a Relayed Transmission from a Computer
Requesting a Relayed transmission, fill the field in your mailer that corresponds to the destination (To) in the following manner:
Sample entry:
sg-rly#8133111234@singapore.panasonic.co.sg
| Entry Example Explanation | |
| sg-rly Enter the Relay XMT Password. (It must match the Relay XMT Password pre-programmed in the relay station.) | |
| #8133111234 Enter the telephone number of the fax station. | In addition to the telephone number, Address Book information may be entered between # and @.If a pause is required for dialling an outside line from an extension by using a PBX (exchange) or similar equipment, enter a hyphen (-) before the fax number. |
| After @ The host and domain names registered with the DNS server. | |
NOTE
- When Relayed transmission completes, a communication journal is emailed to the initial sending station, and a Fax Relay log is emailed to the administrator's computer that is pre-programmed in "30 Manager's Email Addr" of the relay station.
Convenient Application Software
TIFF Converter
The TIFF converter is an application that converts files created in another application to the Internet Fax-ready TIFF format.
Files created by Microsoft word or Excel ^® (*.doc and *.xls) cannot be transmitted by Internet Fax as Email attachments in their original form.
To transmit files created by Microsoft word or Excel from a computer to Internet Fax, it is necessary to have them converted to the Internet Fax-ready TIFF format using the TIFF converter.
NOTE
- Normally, select 200 dpi as a resolution for the conversion. When you are sending a detailed graphic documents to a Panasonic Internet Fax, you can specify 600 dpi resolution for better clarity.
TIFF Converter Mail Linking Program
A TIFF Converter Mail Linking Program is an add-in program for the TIFF converter that links the Email client for MAPI to the TIFF converter for the Internet Fax.
Before sending a printed image as Email from the application to the Internet Fax, you have to convert the file into the format that the Internet Fax is allowed to receive, and print as an Email using the TIFF file creation function. You also have to send that file to the Internet Fax as an attached document.
TIFF Converter Mail Linking Program allows you to automatically create TIFF files by pressing one button from the TIFF converter for the Internet Fax.
You can download the Panasonic's TIFF converter and TIFF Converter Mail Linking Program, and their respective user's guide from the following URL. Click IFAXVIW (TIFF Viewer), and download the required software.
http://panasonic.net/pcc/support/office_products.html
Result of Relayed Transmission
When the Relayed Transmission feature is used, two reports as described below are transmitted from the relay station to the initial sending station, and administrator's computer confirming the results of a Relayed transmission.
■ Relayed Transmission Report (communication journal)
When a relay station completes a Relayed transmission, it transmits a Relayed Transmission Report (Communication Journal) to the initial sending station to report the relay result.
The Relayed Transmission Report (Communication Journal) is transmitted when the Function Parameter "143 Relay XMT Report" has been set to "Always" or "Inc Only".
| ********** - Comm. Journal - ********** Date dd-MMM-yyyy ***** Time 15:00 ********** | |||||
| (1) | (2) | (3) | |||
| Mode = Relayed Transmission Start=dd-MMM 15:00 End=dd-MMM 15:00 | |||||
| File No.= 050 (4) | |||||
| (5) | (6) | (7) | (8) | (9) (10) | |
| STN No. | Comm. | Key Name | Station Name/Email Address/Telephone No. | Pages | Duration |
| 001 | R-OK | [STOCKHOLM] | STOCKHOLM | 001/001 | 00:00:15 |
| 002 | R-OK | [ROME] | ROME | 001/001 | 00:00:15 |
| - PANASONIC - | |||||
| *******DP-xxxxx********** - HEAD OFFICE - ***** - 201 555 1212 - ********** | |||||
| No. Item Explanation | |
| (1) Indication of communication mode | Indication of communication mode |
| (2) Start time of communication Start time of communication | |
| (3) End time of communication End time of communication | |
| (4) File number 001 to 999 (When the communication is stored into the memory, a file number is assigned for each communication.) | |
| (5) Station number Sequential number of the stations | |
| (6) Communication result Communication result “R-OK” indicates that the Relayed XMT Request was successful.“3-digit Info Code” indicates that the communication has failed. | |
| (7) Key name The display will appear different, depending on your PC settings. | |
| (8) Recorded name in the Address Book, direct dialling number, or Email address | Recorded name in the Address Book, direct dialling number, or Email address |
| (9) Number of pages transmitted or received | The 3-digit number is the number of pages successfully transmitted or received.When the documents are stored into the memory, two 3-digit numbers will appear.The first 3-digit number represents the number of pages successfully transmitted.The second 3-digit number represents the total number of pages that were attempted to be transmitted. |
| (10) Duration of Communication Duration of Communication. | |
Fax Relay Log Email
Each time a relay station completes a transmission, it emails a Fax Relay log to the administrator's computer that is pre-programmed in "37 Manager's Email Addr".
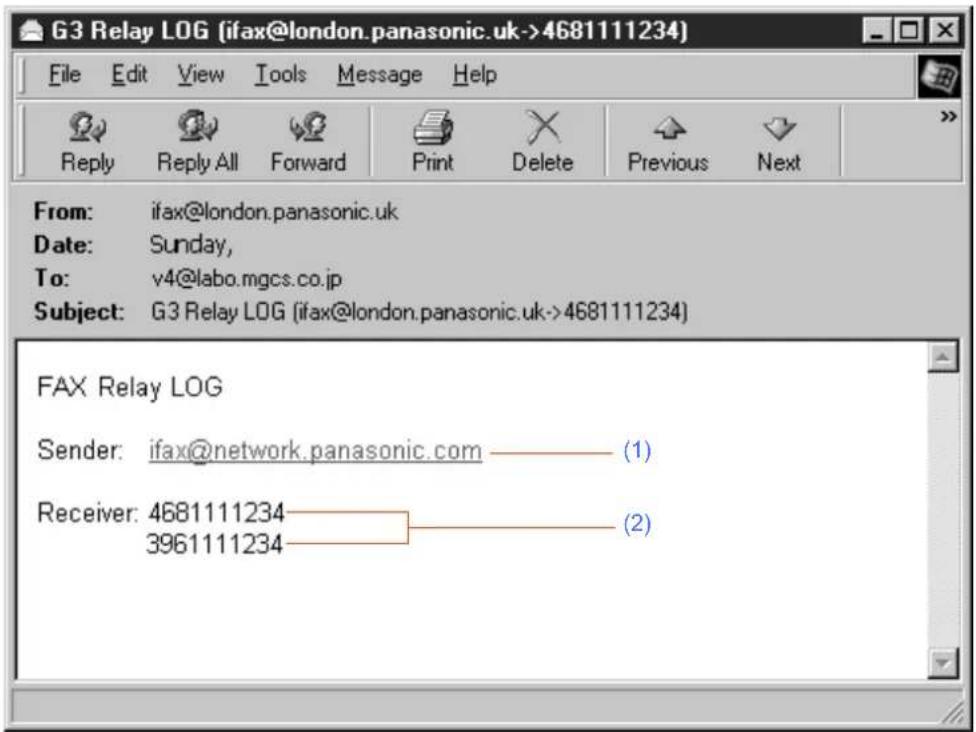
| No. Explanation |
| (1) Email address of the sender's Internet Fax or PC |
| (2) Fax telephone number of the end receiving station |
Useful Terms to Remember
DHCP (Dynamic Host Configuration Protocol)
DHCP is a protocol for dynamically assigning IP Addresses to Internet Fax and client PCs. With DHCP, an Internet Fax can automatically acquire a unique IP Address each time it connects to a network making IP Address management an easier task for network administrators. When an Internet Fax logs on to the network, the DHCP server selects an IP Address from a master list, and assigns it to the system.
If you wish to enable the Direct Internet Fax transmission on your Internet Fax, a static (reserved by a network administrator) IP Address and configurations must be used instead of the DHCP operation. Contact authorised Panasonic dealer. (See page 106)
SMTP Authentication
Since the Internet debuted as an electronic infrastructure of global dimensions, the communications equipment market has been growing at a phenomenal rate. Yet, technologies help enhance Internet security are yet to come. There are some reasons.
- Internet mail is a multi-hop (multi-protocol, multi-device) structure, so transmission line-based security is typically difficult to implement.
- No exclusive technologies recommended by the Internet Fax standards are available.
- Encryption-based authentication systems are presently available as standard solutions that drive system enhancement and integrity. Such an authentication entry has been embedded in an authentication feature, such as SASL (Simple Authentication and Security Layer).
Many Internet service providers (ISPs) support authentication methods in one form or another. The authentication options provided by this machine are as follows:
- SMTP Authentication Extension Service (SMTP AUTH) - while sending
When users log on, they are authenticated by their user name and password, thereby preventing unauthorised users from sending or relaying faxes. - APOP authentication service (APOP) - while receiving
A scheme of password encryption used for receiving Email. - POP before SMTP
To allow prior access to a POP3 server specified before the start of transmission to grant the permission to use the SMTP server.
Editing a Communication Reservation File
Your machine has a document image memory which enables you to reserve Memory transmission, Memory Deferred transmission, Memory Polling and so on.
After reserving the communications in memory, you may need to change the settings of the communication(s) while it is still in memory. This section describes how to use the file editing features.
Displaying a Communication Reservation File List
To display a communication reservation file list, follow the steps below.
1 Press the Fax key.
2 Select "More Menus".

3 Select "Edit File Mode".

4 Select "File List".

5 Select or to display the communication reservation file.
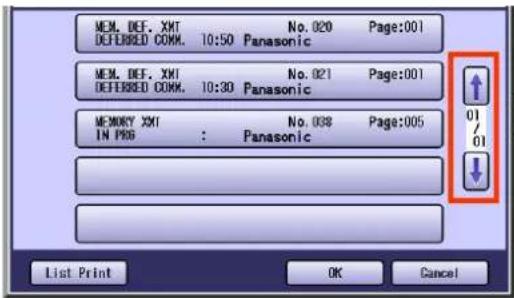
6 To print the communication reservation report, select "List Print".

7 When the verification has completed, select "OK".

- Press the Reset key to return the machine to the initial screen of the current active mode.
Reading the Reservation Report
Items covered in the reservation report are as follows.
![*************************** -File List- ******************************* Date dd-MMM-yyyy ***** Time 09:11 *************************** (1) (2) (3) (4) (5) (6) File Comm. Type Created Time Start Time Page(s) Destination(s) No. 020 Mem. Def. XMT dd-MMM 19:54 10:50 001 [pana03 ] 021 Mem. Def. XMT dd-MMM 19:56 10:30 001 [pana01 ] [pana03 ] *038 Memory XMT dd-MMM 09:02 005 [pana_Lanrelay ] - PANASONIC - ***** DP-xxxx ******************************* - HEAD OFFICE - ***** - 201 555 1212 - **************************](/content/2026/05/1123304/images/962b26c1aeed872328c7ec7e5462248a06838bd69564ccddade942089a63d713.jpg)
| No. Item Explanation | |
| (1) File Number If the file is now being executed, an “*” is indicated on the left of the file number. | |
| (2) Communication Type Communication type (for example, Polled transmission, Polling reception, and Memory transmission) | |
| (3) Created date/time Date/time that these files were stored | |
| (4) Start time If the file is a time-controlled communication, the start time is printed in this column. If the file is an incomplete file, “Incomp” is printed in this column. | |
| (5) Page(s) The number of stored page(s) | |
| (6) Destination(s) Key name(s)/Manual dialling location(s) | |
Editing Communication Reservations
To change the start time and/or stations in a communication file, follow the steps below.
NOTE
● Communication reservations for the documents being transmitted cannot be modified.
1 Press the Fax key.
2 Select "More Menus".
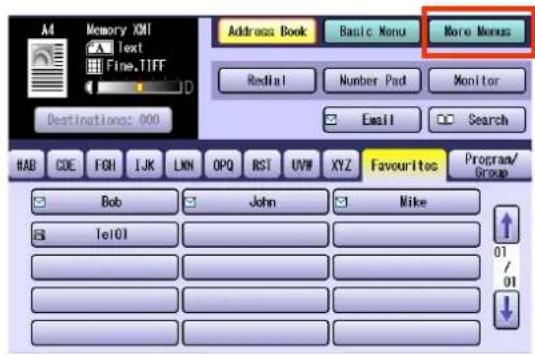
3 Select "Edit File Mode".
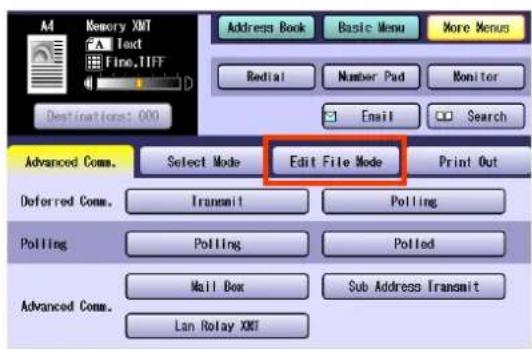
4 Select "Change Time/Stn".
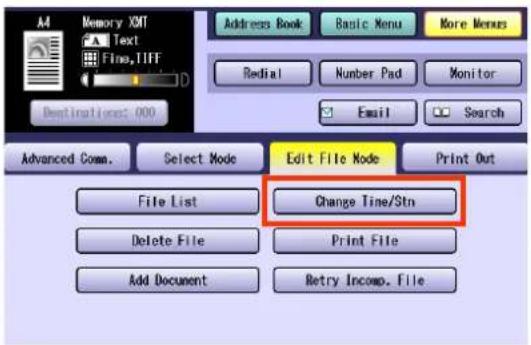
5 Select for to display the communication reservation fileto be edited.
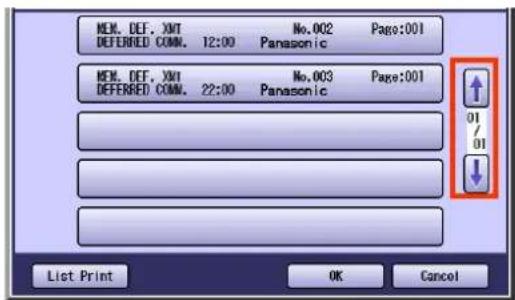
6 Select a communication reservation file, and then select "OK".
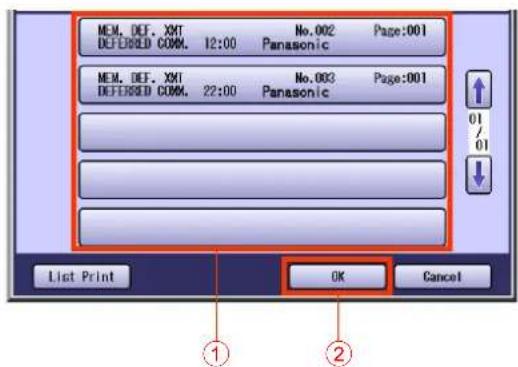
7 Edit the communication time, and then select "OK".

- To leave the communication time unchanged, select "OK".
- If you make a mistake, select "Clear" to delete entries one digit at a time.
8 Edit the destination.

- To delete a destination(s), select "Delete", and then go to step 10.
- To add destination(s), select "Add", and then go to step 9.
9 Select the destination, and then select "OK".

10 When the change completes, select "OK".
- Press the Reset key to return the machine to the initial screen of the current active mode.
Deleting a Communication Reservation File
To delete a file in memory, follow the steps below.
NOTE
- Your machine cannot delete the file while it is being sent.
1 Press the Fax key.
2 Select "More Menus".

3 Select "Edit File Mode".

4 Select "Delete File".

5 Select ↑ or ↓ display a communication reservation file to be deleted.

6 Select a communication reservation file, and then select "OK".

- Select "All Files" to select all communication reservation files.
- To cancel the deletion, select "Cancel".
7 Select "Yes".

- To cancel the deletion, select "No".
- Press the Reset key to return the machine to the initial screen of the current active mode.
Printing a Communication Reservation File
Communication reservation files stored in memory can be printed.
NOTE
- Your machine cannot print the document while it is being sent.
1 Press the Fax key.
2 Select "More Menus".
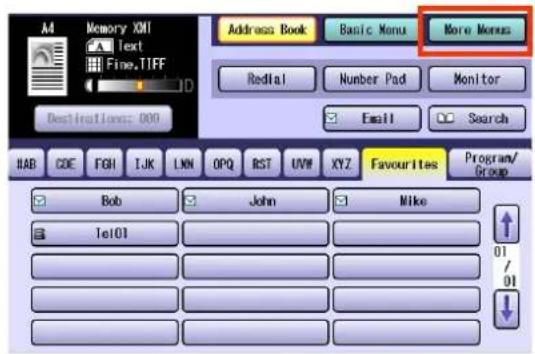
3 Select "Edit File Mode".

4 Select "Print File".
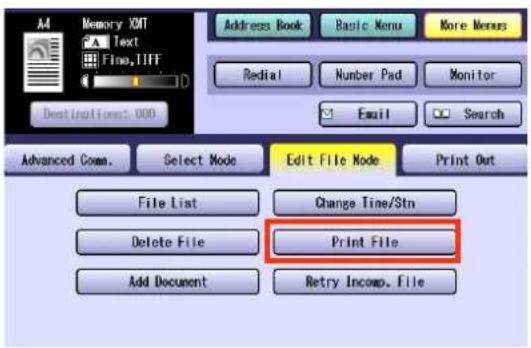
5 Select ▶ or ▶ display the communication reservation file you want to print.

6
Select a communication reservation file to be printed, and then select "OK".
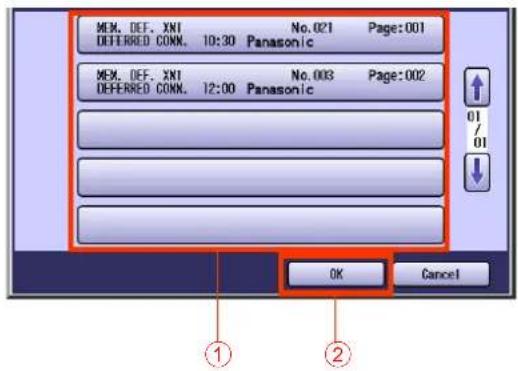
- To cancel the print, select "Cancel".
- Selected communication reservation file is printed.
- Press the Reset key to return the machine to the initial screen of the current active mode.
Adding Documents to a Communication Reservation File
Documents can be added to a communication reservation file stored in memory.
NOTE
- Your machine cannot add the document into the file while it is being sent, waiting to redial, or trying to send the incomplete file.
1 Place the additional document.
● Refer to Placing Originals (see page 14).
2 Press the Fax key.
3 Select "More Menus".

4 Select "Edit File Mode".

5 Select "Add Document".

6 Select for to display the communication reservation file to which you want to add documents.

7 Select a communication reservation file to which pages are added, and then select "OK".

- To cancel the page addition, select "Cancel".
8 Your machine stores the documents.
Resending an Incomplete Document
With the Function Parameter "31 Incomplete File Save" (Fax/Email Settings > Fax Parameters) set to "Valid", documents that could not be transmitted due to a communication error (such as the remote station busy or not responding) can be stored in memory as incomplete files.
This section explains how to resend incomplete files stored in memory.
NOTE
- The standard setting of "31 Incomplete File Save" is set to "Invalid". For instructions on how to modify the standard setting, refer to Fax/Email Settings in the Operating Instructions (For Function Parameters) of provided CD-ROM.
- If the Function Parameter "31 Incomplete File Save" (Fax/Email Settings > Fax Parameters) is set to "Valid", all incomplete files remain in the memory each time a communication error occurs. To avoid memory overflow, retry to send the incomplete file from time to time.
1 Press the Fax key.
2 Select "More Menus".
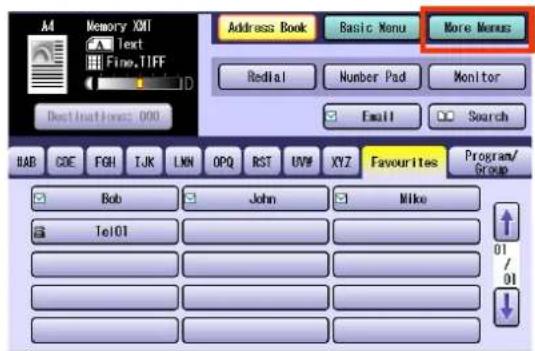
3 Select "Edit File Mode".
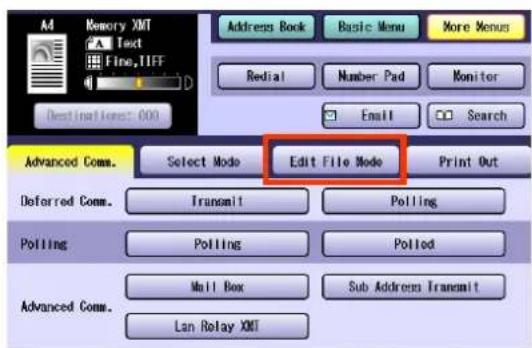
4 Select "Retry Incomp. File".
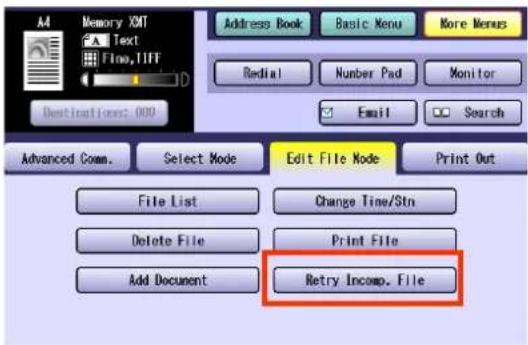
5 Select for to find the incomplete file that you want to resend.

- To send all incomplete files, select "Select All".
6 Select the incomplete file that you want to resend, and then select "OK".
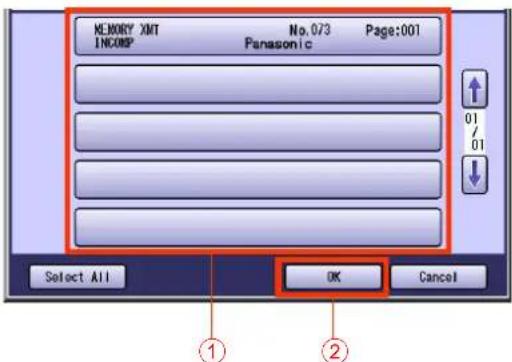
The communication error file is resent.
- To cancel the resend, select "Cancel".
Address Book
What is Address Book?
With the fax numbers or Email addresses of remote stations programmed in the Address Book, the stations can be selected with a single operation on their button appearing on the Touch Panel Display.

NOTE
- For instructions on how to set fax numbers or Email addresses using the Address Book, refer to Entering a Destination (see page 20) and Entering an Email Address (see page 113).
Items Allowed for Entry in the Address Book
| No. | Item Explanation | ||
| 1 | Fax number Set a fax number in the Address Book. Up to 36 characters | ||
| 2 | Email address Set an Email address in the Address Book. Up to 60 characters | ||
| 3 | Station name Remote station name. Up to 15 characters | ||
| 4 | Key Name Set a Key Name to display on the Touch Panel Display for selecting destination.Up to 15 characters | ||
| 5 | Favourites | Select to show a programmed destination in “Favourites”. | |
| 6 | Relay Station Set the Email address of a relay station. Displays if the feature has been | ||
| 7 | Sub-address Program sub-address for Inbound Routing. | programmed in FunctionParameters (Fax/Email Settings). | |
| 8 | TSI | Program ID number for Inbound Routing. | |
Adding a Fax Number into the Address Book
To add a fax number to the Address Book, follow the steps below.
NOTE
- Up to 1000 addresses can be registered.
- For instructions on how to edit the station in the Address Book, refer to Editing Address Book (see page 182).
- For instructions on how to delete the station from the Address Book, refer to Deleting a Destination from Address Book (see page 183).
1 Press the Function key.
2 Select "Fax/Email Settings".

3 Select "00 Address Book".

4 Select "01 Add Telephone Number".

5 Enter a fax number, and then select "OK".

- Enter a fax number up to 36 digits including pauses and spaces.
- If you need a special access number to access an outside line, enter the number first, and then select "Pause" to enter a pause (represented by a "-" before entering the full number.
Ex: 9 Pause 5551234 -> 9-5551234
- If you want to change from the Pulse dialling to Tone dialling, select “*” (represented by a “/”). The “/” symbol is displayed after “-” when the dialling mode is set to Tone. Ex: 9 Pause 5551234 -> 9-/5551234
- Select "Clear" to delete the fax number one digit at a time.
- For more information on how to enter fax numbers, refer to Manual Dialling (see page 20).
6 Enter a station name, and then select "OK".

- Enter a station name up to 15 characters.
- If you make a mistake, press the Clear key or select "Back Space" to delete.
- For instructions on using the onscreen Keyboard, refer to Using the keyboard in the Operating Instructions (For Function Parameters) of provided CD-ROM.
7 Enter Key Name, and then select "OK".

- Enter a Key Name up to 15 characters.
● Key Names are used to select destinations on the Touch Panel Display. - For instructions on using the onscreen Keyboard, refer to Using the Keyboard in the Operating Instructions (For Function Parameters) of provided CD-ROM.
8 Select whether to add the station to "Favourites".
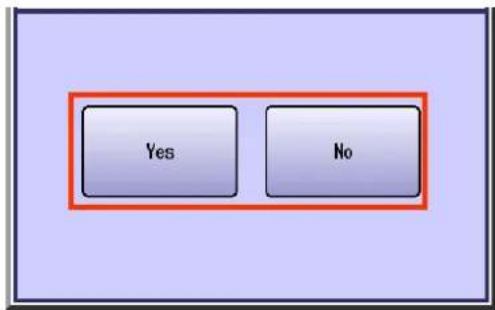
| Yes | Select to display the station in "Favourites". |
| No | Select not to display the station in "Favourites". |
9 To enable Relay Transmission, enter the Email address of a relay station, and then select "OK".

This screen appears when the Function Parameter "140 LAN RLY XMT Request" (Fax/Email Settings > Fax Parameters) has been set to "Valid".
10 To enable sub-addressed routing, enter a sub-address, and then select "OK".

This screen appears when the Function Parameter "152 Sub-Addr Routing" (Fax/Email Settings > Fax Parameters) has been set to "Valid".
11 To enable routing by the sender's numeric ID, enter the numeric ID, and then select "OK".

This screen appears when the Function Parameter "153 TSI Routing" (Fax/Email Settings > Fax Parameters) has been set to "Valid".
- To register another fax number, repeat steps 5 to 11.
- Press the Reset key to return the machine to the initial screen of the current active mode.
Adding an Email Address to Address Book
To add an Email address to the Address Book, follow the steps below.
NOTE
- Up to 1000 addresses can be registered.
- For instructions on how to edit the station in the Address Book, refer to Editing Address Book (see page 182).
- For instructions on how to delete the station from the Address Book, refer to Deleting a Destination from Address Book (see page 183).
1 Press the Function key.
2 Select "Fax/Email Settings".

3 Select "00 Address Book".

4 Select "02 Add Email Address".

5 Enter an Email Address, and then select "OK".
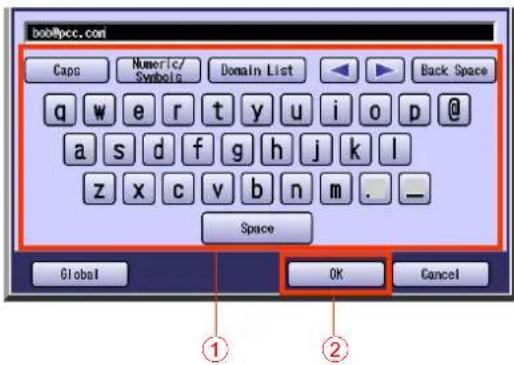
- Enter an Email address up to 60 characters.
- If you make a mistake, press the Clear key or select "Back Space" to delete.
- For instructions on how to enter Email addresses, refer to Entering an Email Address (see page 113).
- For instructions on using the onscreen Keyboard, refer to Using the Keyboard in the Operating Instructions (For Function Parameters) of provided CD-ROM.
6 Enter a station name, and then select "OK".
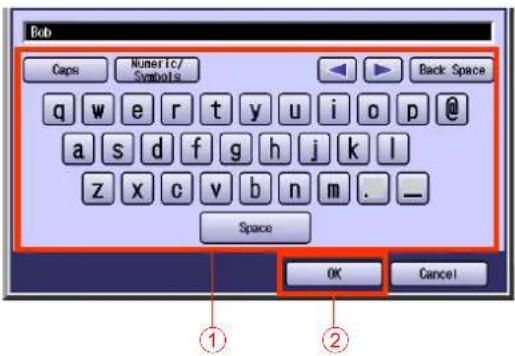
- Enter a station name up to 15 characters.
- If you make a mistake, press the Clear key or select "Back Space" to delete.
- For instructions on using the onscreen Keyboard, refer to Using the Keyboard in the Operating Instructions (For Function Parameters) of provided CD-ROM.
7 Enter a Key Name, and then select "OK".

- Enter a Key Name up to 15 characters.
● Key Names are used to select destinations on the Touch Panel Display. - For instructions on using the onscreen Keyboard, refer to Using the Keyboard in the Operating Instructions (For Function Parameters) of provided CD-ROM.
8 Select "IFax", and then select "OK".

- To display the Email address in the Address Book of both Email/Scan and Fax modes, select "PC".
9 Select whether to add the station to "Favourites".


Select to display the station in "Favourites".

Select not to display the station in "Favourites".
10 To enable sub-addressed routing, enter a sub-address, and then select "OK".

- This screen appears when the Function Parameter "152 Sub-Addr Routing" (Fax/Email Settings > Fax Parameters) has been set to "Valid".
11 To enable routing by the sender's numeric ID, enter the numeric ID, and then select "OK".
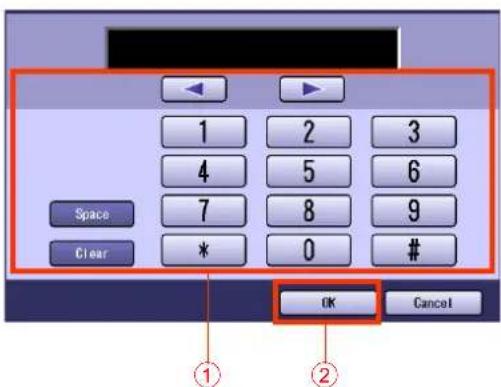
This screen appears when the Function Parameter "153 TSI Routing" (Fax/Email Settings > Fax Parameters) has been set to "Valid".
- To register another Email address, repeat steps 5 to 11.
- Press the Reset key to return the machine to the initial screen of the current active mode.
Editing Address Book
To edit the station in the Address Book, follow the steps below.
1 Press the Function key.
2 Select "Fax/Email Settings".

3 Select "00 Address Book".
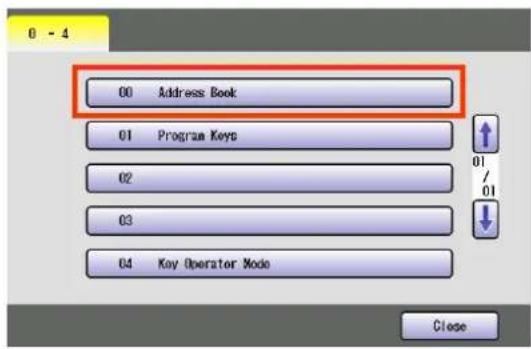
4 Select "03 Modify Station".
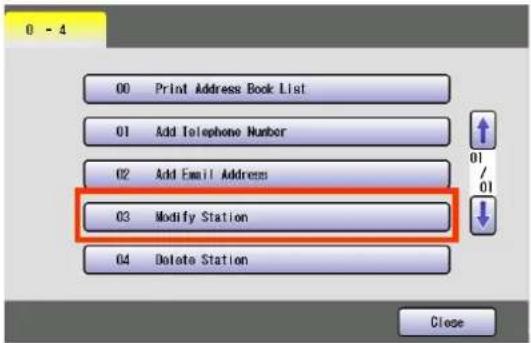
5 Select the station you want to edit, and then select "OK".
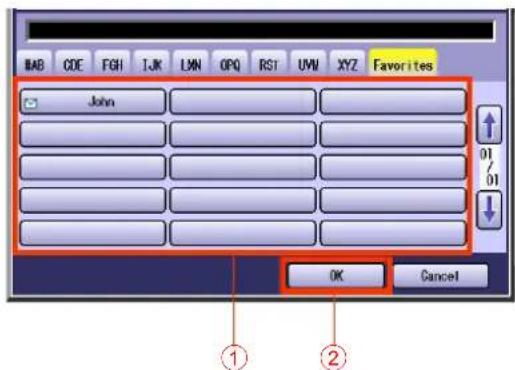
- Select the same button again to cancel the choice.
6 Edit the station.
For more information, refer to Adding a Fax Number into the Address Book (see page 176) and Adding an Email Address to Address Book (see page 179).
- Press the Reset key to return the machine to the initial screen of the current active mode.
Deleting a Destination from Address Book
To delete a remote station from the Address Book, follow the steps below.
1 Press the Function key.
2 Select "Fax/Email Settings".
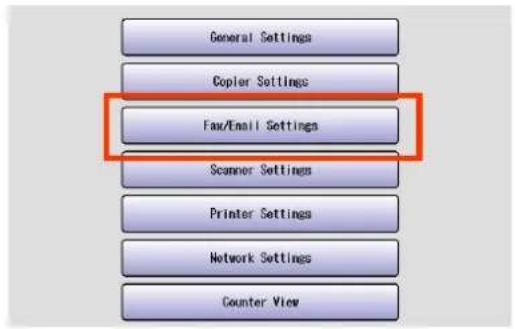
3 Select "00 Address Book".

4 Select "04 Delete Station".
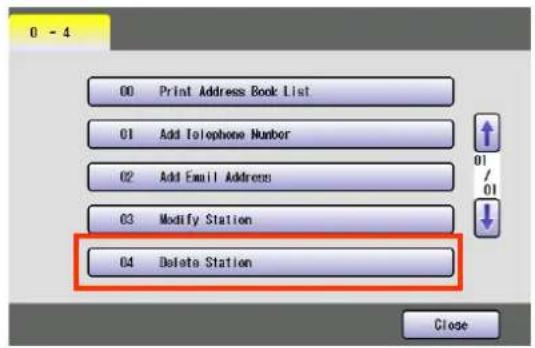
5 Select the station you want to delete from the Address Book, and then select "OK".

- Only one station can be selected at a time.
- Select the same button again to cancel the choice.
6 Select "Yes".


- Press the Reset key to return the machine to the initial screen of the current active mode.
Printing the Address Book List
To print the Address Book list, follow the steps below.
NOTE
● The Address Book list can also be printed by selecting "Print Out" in "More Menus" (See page 205).
- For more details about items in the Address Book list, refer to Reading Address Book List (see page 206).
1 Press the Function key.
2 Select "Fax/Email Settings".

3 Select "00 Address Book".

4 Select "00 Print Address Book List".
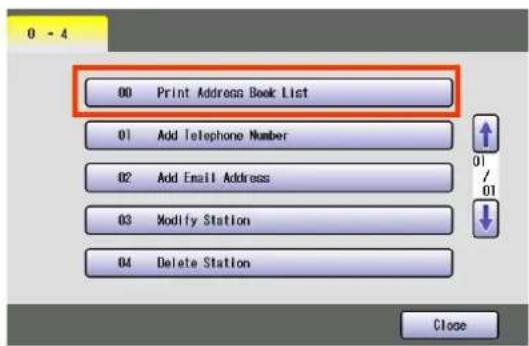
5 Select "Start", and then select "OK".
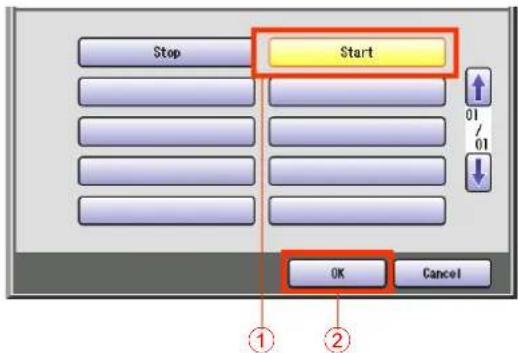
The Address Book list is printed.
- Press the Reset key to return the machine to the initial screen of the current active mode.
Program Keys
What is Program Key?
There are three ways to use the Program key:
■ Using for Program Dialling
You can set communication sequences or destinations which you often use.
■ Using for Group Dialling
Multiple destinations can be selected from the Address Book, and pre-programmed on a single Program key for group dialling.
■ Using as Email Reception Key
This function allows others to share your machine to retrieve their Emails from the POP server by pre-programming their POP user names and POP passwords into the Program keys. They will be able to retrieve their Emails by simply pressing the corresponding Program key.

NOTE
- For instructions on how to use Program keys, refer to Using Program Keys (see page 52).
Programmable Items
The following items can be programmed on a Program key:
| No. Item Explanation | |
| 1 Key name Name of a program | |
| 2 Communication feature Program communication features and destinations on program dialling. | |
Setting for Program Dialling
To program a communication feature on a Program key, follow the steps below.
NOTE
- For instructions on how to edit pre-programmed station, refer to Editing Address Book (see page 182).
- For instructions on how to delete pre-programmed station, refer to Deleting a Destination from Address Book (see page 183).
- For instructions on how to print the program list, refer to Printing the Program List (see page 193).
1 Press the Function key.
2 Select "Fax/Email Settings".

3 Select "01 Program Keys".

4 Select "02 Program Dial".

5 Enter a program dial name, and then select "OK".
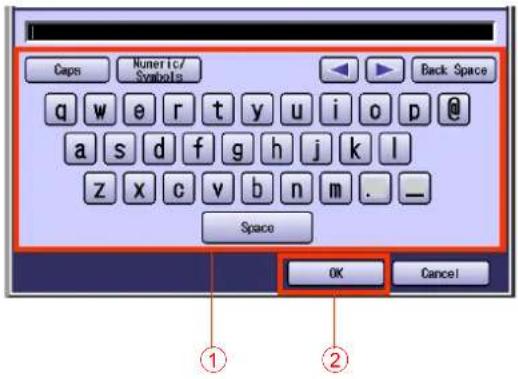
- Enter a name up to 15 characters.
- For instructions on using the onscreen Keyboard, refer to Using the Keyboard in the Operating Instructions (For Function Parameters) of provided CD-ROM.
6 Enter a Key Name, and then select "OK".

7 Program each desired feature.
• Deferred Communication
Transmit (See page 57)
Polling (See page 59)
- Polling (See page 61)
• Advanced Communication
MailBox (See page 65)
Sub-Address Transmit (See page 73)
Lan Relay XMT (See page 154)

8 Press the Start key.
The program dial is programmed.
- Press the Reset key to return the machine to the initial screen of the current active mode.
Setting for Group Dialling
To program multiple destinations on a Program key, follow the steps below.
NOTE
- For instructions on how to edit pre-programmed station, refer to Editing Address Book (see page 182).
- For instructions on how to delete pre-programmed station, refer to Deleting a Destination from Address Book (see page 183).
- For instructions on how to print the program list, refer to Printing the Program List (see page 193).
- To program multiple destinations, each destination must be programmed in advance.
1 Press the Function key.
2 Select "Fax/Email Settings".

3 Select "01 Program Keys".

4 Select "01 Group Dial".

5 Enter a group dial name, and then select "OK".

- Enter a name up to 15 characters.
- For instructions on using the onscreen Keyboard, refer to Using the Keyboard in the Operating Instructions (For Function Parameters) of provided CD-ROM.
6 Enter a Key Name, and then select "OK".

7 Select the destinations to be programmed, and then select "OK".
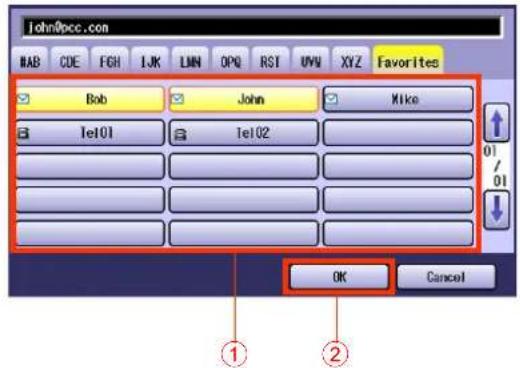
The group dialling is programmed.
- Press the Reset key to return the machine to the initial screen of the current active mode.
Editing a Group Dialling
To edit a group dialling, follow the steps below.
1 Press the Function key.
2 Select "Fax/Email Settings".

3 Select "01 Program Keys".

4 Select "03 Modify Group Dial".

5 Select the Group Dial button you want to edit, and then select "OK".
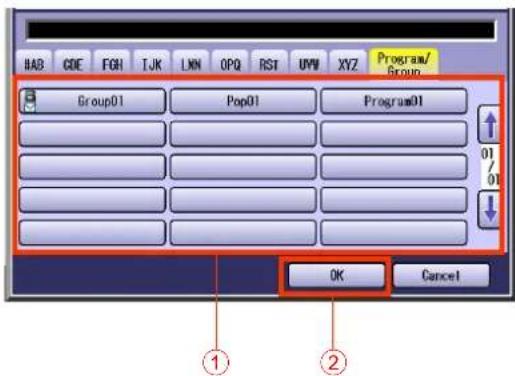
- Select the same button again to cancel the choice.
6 To rename a group dial name, enter a new name, and then select "OK".
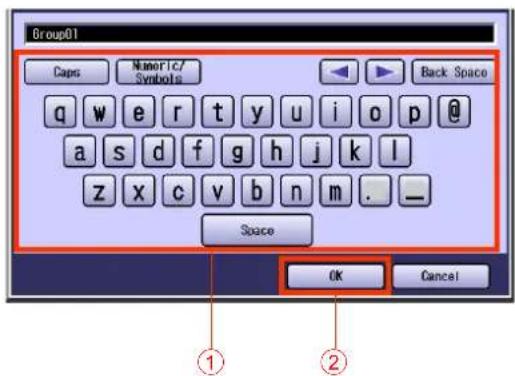
7 To rename a group dial key name, enter a new name, and then select "OK".

8 Select the destination to be programmed, and then select "OK".

- Press the Reset key to return the machine to the initial screen of the current active mode.
Deleting the Program Key Setting
To delete a program dialling or group dialling destination, follow the steps below.
1 Press the Function key.
2 Select "Fax/Email Settings".

3 Select "01 Program Keys".

4 Select "04 Delete Program/GRP".

5 Select a Program key, and then select "OK".

- Select the same button again to cancel the choice.
6 Select "Yes".

- Press the Reset key to return the machine to the initial screen of the current active mode.
Printing the Program List
To print the program list, follow the steps below.
NOTE
- The program list can also be printed by selecting "Print Out" in "More Menus" (See page 207).
- For more details about the items in the program list, refer to Reading Program List (see page 208).
- To program multiple destinations, each destination must be programmed in advance.
1 Press the Function key.
2 Select "Fax/Email Settings".

3 Select "01 Program Keys".

4 Select "00 Print Program List".

5 Select "Start", and then select "OK".

The program list is printed.
- Press the Reset key to return the machine to the initial screen of the current active mode.
Programming Email Manual Reception on Program Keys
When this machine is connected to a POP server, POP Account name and password other than the machine's one can be programmed for a Program key to receive Emails.
To enter an Email address and a password, follow the steps below.
NOTE
- If you leave a password blank in step 8, a password prompt window will appear upon POP reception. In order to strengthen the security, you are advised to leave a password blank.
- For instructions on how to print the program list, refer to Printing the Program List (see page 193).
- To program multiple destinations, each destination must be programmed in advance.
1 Press the Function key.
2 Select "Fax/Email Settings".
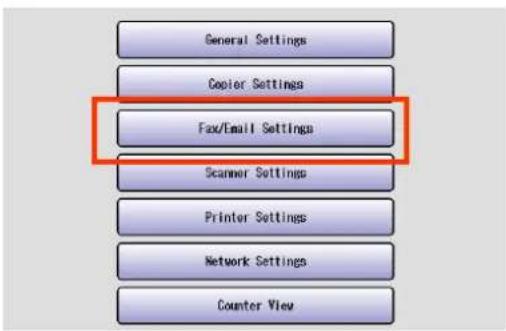
3 Select "01 Program Keys".
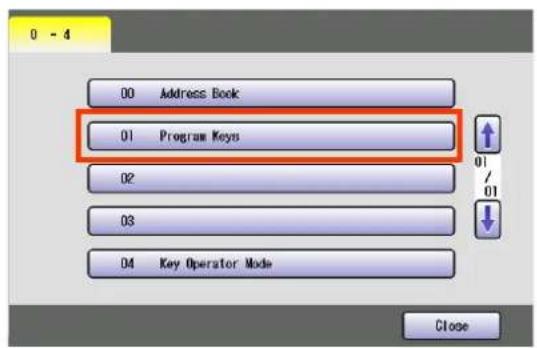
4 Select "5-9".

5 Select "05 Manual POP RCV".

6 Enter a POP Account name, and then select "OK".
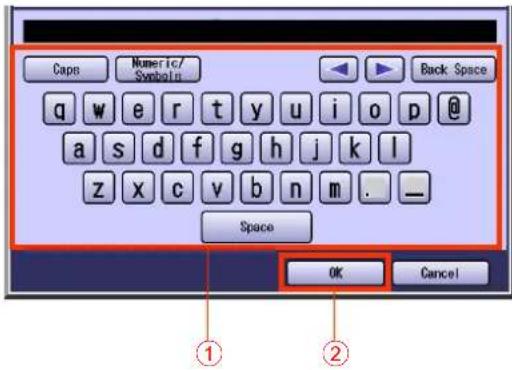
7 Enter a Key Name (program button name), and then select "OK".

8 Enter the password, and then select "OK".

9 Select "Invalid" or "Valid", and then select "OK".

| Invalid Select to leave Email on the POP server after it has been received. |
| Valid Select to delete Email from the POP server after it has been received. |
The POP Reception feature is programmed.
- Press the Reset key to return the machine to the initial screen of the current active mode.
Transaction Journal
The "Journal" is a record of the last 200 transactions (a transaction is recorded each time you send or receive a document). It is printed automatically after every 200 transactions, or you can print or view it manually by using the following procedure.
- Regardless of the setting of the Function Parameter "13 Auto Print JRNL" (Fax/Email Settings > Fax Parameters), a transaction journal can be printed by selecting "Journal" from "More Menus".
- Select "XMT Only (View)" or "All (View)" in "Journal" from "More Menus" to verify the transaction result on the Touch Panel Display.
This section explains how to print manually, view and read the transaction journal on the Touch Panel Display.
NOTE
- The standard setting of "13 Auto Print JRNL" is "Valid". For instructions on how to modify the Journal setting, refer to Fax/Email Settings in the Operating Instructions (For Function Parameters) of provided CD-ROM.
Printing Transaction Journal
To print the transaction journal, follow the steps below.
1 Press the Fax key.
2 Select "More Menus".

3 Select "Print Out".
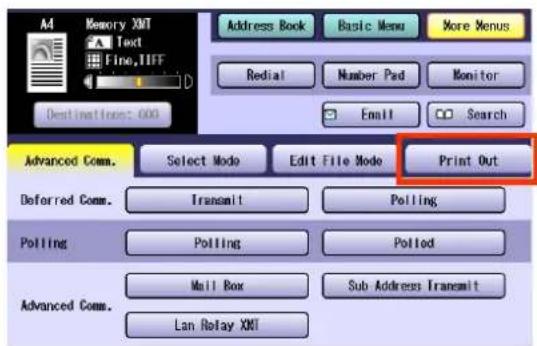
4 Select "Journal".
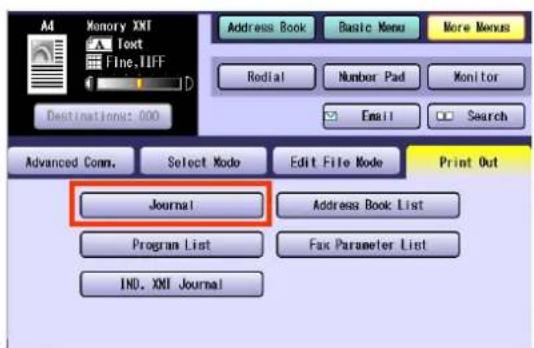
5 Select "List Print".
The transaction journal will be printed.

- Press the Reset key to return the machine to the initial screen of the current active mode.
Viewing Communication Results on Touch Panel Display
To view the communication results on the Touch Panel Display, follow the steps below.
1 Press the Fax key.
2 Select "More Menus".
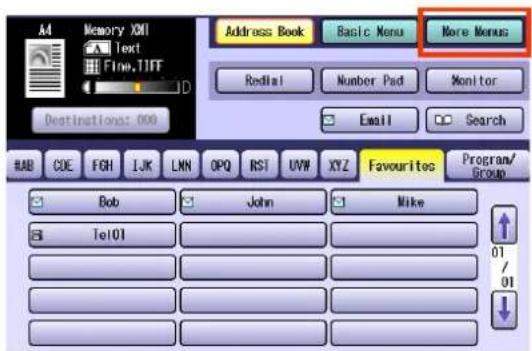
3 Select "Print Out".

4 Select "Journal".

5 Select "XMT Only (View)" or "All(View)".
Communication results will be displayed.

| XMT Only (View) Select to view only the transmission result. |
| All (View) Select to view both the transmission and reception results. |
6 When the verification completes, select "OK".

- Press the Reset key to return the machine to the initial screen of the current active mode.
Reading Transaction Journal
Items in the transaction journal are listed below.

| No. Item Explanation | |
| (1) Printout date The date at which the Transaction Journal printed | |
| (2) Printout time Printout time | |
| (3) Journal number Journal number | |
| (4) Communication result | “OK”indicates that the communication was successful.“Busy”indicates that the communication has failed because of busy line.“Stop”indicates that theStopkey was pressed during communication.“JUNK”indicates that the communication was cancelled.“P-OK”indicates that memory overflow occurred while storing the documents into the memory for transmission but successfully stored document(s) was sent.“R-OK”indicates that the Relayed XMT was successful.“B-OK”indicates that the Batch transmission was successful.“M-OK”indicates that the Memory reception/Substitute reception was successful.“-”indicates LAN transmission.“3-digit Info Code”indicates that the communication has failed.Refer toInformation Codes(see page 216). |
| (5) Pages Number of pages transmitted or received. The 3-digit number is the number of pages successfully transmitted or received.When the documents are stored into the memory, two 3-digit numbers will appear. The first 3-digit number represents the number of pages successfully transmitted. The second 3-digit number represents the total number of pages that were attempted to be transmitted.Asterisk “*” indicates that the quality of some received copies was poor. | |
| (6) File number 001 to 999 (When the communication is stored into the memory, a file number is assigned for each communication.) | |
| (7) Duration of communication Duration of communication | |
| (8) Type of communication | “XMT”means Transmission.“RCV”means Reception.“POL”means Polling.“PLD”means Polled.“FWD”means Fax Forward. |
| No. Item | Explanation |
| (9) Remote station identification | NameRecorded name in the Address Book or remote station's character ID.numberDialled telephone number. (PIN code will not be shown)NumberRemote station's ID number.Email address |
| (10) Communication date Communication date | |
| (11) Communication Start time Communication start time | |
| (12) Diagnostic For service personnel only | |
| (13) Own LOGO Up to 25 characters | |
| (14) Own ID number Up to 20 digits | |
| (15) Own character ID Up to 16 characters | |
Communication Journal
This is a report that is printed at the end of each transaction to keep a record of the communication result.
- A communication journal is printed when the Function Parameter “12 Comm. Journal (HOME)” (Fax/Email Settings > Fax Parameters) has been set to “Always” or “Inc Only”.
- If set to "Always"
A communication journal will be printed when a transaction completes or fails.
- If set to "Inc Only"
A communication journal will be printed only when a transaction has failed, for example, due to a communication error.
- Even when the communication journal is set to "Off" in "More Menus" > "Select Mode", you may also configure the machine to print a communication journal individually. For more operational details, refer to Printing Transaction Journal (see page 196).
- If a Memory transmission has failed, for example, due to a communication error, an image of the first page of the document transmitted is covered in the communication journal, but not for Direct transmissions.
This section explains how to read the communication journal.
NOTE
- The standard setting of the Function Parameter “12 Comm. Journal (HOME)” (Fax/Email Settings > Fax Parameters) is “Inc Only”. For instructions on how to enable the Communication Journal feature, refer to Fax/Email Settings in the Operating Instructions (For Function Parameters) of provided CD-ROM.
Items that are covered in the communication journal are listed below.
![********** -Comm. Journal- ********** Date dd-MMM-yyyy ** Time 15:00 ********** (1) Mode= Memory Transmission (2) Start = dd-MMM 14:30 (3) End = dd-MMM 15:00 File No.= 050 (4) (5) (6) (7) (8) STN Comm. Key Name Station Name/Email Address/Telephone No. Pages (10) No. 001 OK [SERVICE ] SERVICE DEPT 001/001 00:01:30 002 OK [SALES DEPT ] SERVICE DEPT 001/001 00:01:25 003 407 [ACCOUNTING ] SERVICE DEPT 000/001 00:01:45 004 Busy 021 111 1234 000/001 00:00:00 - PANASONIC - **********DP-XXXX ********** - HEAD OFFICE - ********* - 201 555 1212 - ********** THE SLEREXE COMPANY LIMITED SAPORS LANE . BOOLE . DORSET . BH 25 8 ER TELEPHONE BOOLE (945 13) 51617 . TELEX 123456 Our Ref. 350/PJC/EAC 18th January, 1972. Dr. P.N.Cundall, Mining Surveys Ltd., Holrcyo Road Dr. P.N.Cundall, Mining Surveys Ltd., Holrcyo Road Tions of print density cause the photocell to generate an analogous electrical video signal. this signal is used to modulate a carrier, which is transmitted to remote destination over a radio or cable communications link. At the remote terminal, demodulation reconstructs the video signal, white is used to modulate the density of print produced by a printing device. This device is scanning in a faster scan synchronised with that at the transmitting terminal. As a result, a facsimile copy of the subject document is produced. Probably you have used for this facility in your organisation. Yours sincerely, Phil. P.J. CROSS Group Leader - facsimile Research](/content/2026/05/1123304/images/4d46a73b95f44b05113e3e67efa8da719010de89cdf2b1e620a3f8b4ee1f6909.jpg)
| No. Item Explanation | |
| (1) Indication of communication mode | Indication of communication mode |
| (2) Start time of communication Start time of communication | |
| (3) End time of communication End time of communication | |
| (4) File number 001 to 999 (When the communication is stored into the memory, a file number is assigned for each communication.) | |
| (5) Station number Sequential number of the stations | |
| (6) Communication result | “OK”indicates that the communication was successful.“Busy”indicates that the communication has failed because of busy line.“Stop”indicates that theStopkey was pressed during communication.“P-OK”indicates that memory overflow occurred while storing the documents into the memory for transmission but successfully stored document(s) was sent.“R - OK”indicates that the Relayed XMT was successful.“B-OK”indicates that the Batch transmission was successful.“M-OK”indicates that the Memory reception/Substitute reception was successful.“-”indicates LAN transmission.“3-digit Info Code”indicates that the communication has failed.Refer toInformation Codes(see page 216).In this case, the machine will print the attached report with the first page of your document as shown on the previous page. |
| (7) Key name or mark mark indicates dialling by direct number dialling. | |
| (8) Recorded name in the Address Book, direct dialling number, or Email address | Recorded name in the Address Book, direct dialling number, or Email address |
| (9) Number of pages transmitted or received | The 3-digit number is the number of pages successfully transmitted or received.When the documents are stored into the memory, two 3-digit numbers will appear. The first 3-digit number represents the number of pages successfully transmitted. The second 3-digit number represents the total number of pages that were attempted to be transmitted. |
| (10) Duration of communication Duration of Communication | |
Address Book List
This section explains how to print and read the Address Book list.
Printing Address Book List
To print the Address Book list, follow the steps below.
NOTE
- The Address Book list can also be printed by programming "Fax/Email Settings > Fax Parameters" in Function Parameters.
1 Press the Fax key.
2 Select "More Menus".

3 Select "Print Out".

4 Select "Address Book List".
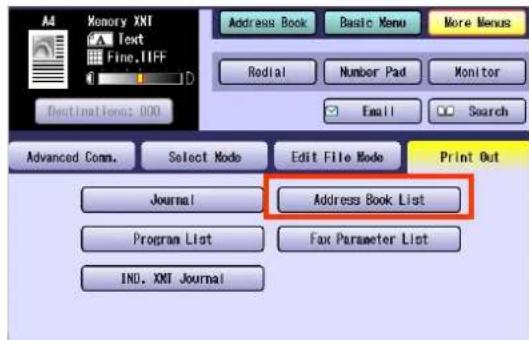
The Address Book list will be printed.
- Press the Reset key to return the machine to the initial screen of the current active mode.
Reading Address Book List
Items in the Address Book list are listed below.
![********** -Address Book List- ************ Date dd-MMM-yyyy ***** Time 15:00 ********** (1) (2) (3) (4) Key Name Station Name Email Address / Telephone No. Routing Sub-Addr (6) Routing TSI (7) Relay Addr (8) [B] [Bob Jones ] Bob Jones Jonesb@abcdefg.com 123456 201 555 1212 [J] [John Smith ] John Smith 201 555 3156 1234 +1 201 123 4567 [RELAY1] [John Smith ] John Smith 201 555 3156 1212 212 555 1234 [RELAY2] [P] [Panafax1 ] Panafax1 Panafax1@Panasonic.com.co.jp 4827 +81 03 5251 1234 [Panafax2 ] Panafax1 Panafax2@Panasonic.com.co.jp 1773 +81 0467 5251 1234 No. of Stations = 05 (5) -PANASONIC ****** DP-XXX*************** -HEAD OFFICE - ***** - 201 555 1212- *********](/content/2026/05/1123304/images/1993001f90e2a828e47ed81c0ae9487e6d1863dbafdd4b35e2cfd6ef0efba711.jpg)
| No. Item Explanation | |
| (1) The first letter of station name recorded in your machine The first letter of station name recorded in your machine | |
| (2) Key name recorded in the machine Up to 15 characters | |
| (3) Station name recorded in the machine Up to 15 characters | |
| (4) Email address recorded in the machine Telephone number recorded in the machine | Up to 60 characters (Email address) Up to 36 digits (Telephone number) |
| (5) Number of recorded Address Book stations Telephone number/Email address programmed in the Address Book | |
| (6) Routing Sub-address Up to 20 digits | |
| (7) Routing TSI Up to 20 digits | |
| (8) Relay address Relay address | |
Program List
This section explains how to print and read the program list.
Printing Program List
To print the program list, follow the steps below.
NOTE
- The program list can also be printed by programming "Fax/Email Settings > Fax Parameters" in the Function Parameters.
1 Press the Fax key.
2 Select "More Menus".

3 Select "Print Out".

4 Select "Program List".

The program list will be printed.
- Press the Reset key to return the machine to the initial screen of the current active mode.
Reading Program List
Items in the program list are listed below.
| ********** -Program List- ********** Date dd-MMM-yyyy ***** Time 15:00 ********** | |||||
| (1) Key Name | (2) Program Name | (3) Type | Timer | (4) Destination(s) | |
| [TEST] | TEST | Group | ---- | [PANAFAX] | [SALE DEPT] |
| [ACCOUNT] | ACCOUNT | POP | ---- | Delete Email | Invalid (5) |
| [ACC] | ACC | POP | ---- | Delete Email | Valid |
| [PROG.B] | PROG.B | Group | ---- | [PANAFAX] | [PANASONIC] |
| -PANASONIC | |||||
| ********** DP-XXXX********** -HEAD OFFICE | -***** - | 201 555 12121********** | |||
| No. Item Explanation | ||
| (1) Key name Key name | ||
| (2) Program name Up to 15 characters | ||
| (3) | Type of communication | “Group” indicates that the Program key is programmed as a group key.“POP” indicates that the Program key is programmed as an Email Manual Reception key. |
| (4) Destinations Destinations programmed in the Program key | ||
| (5) | Deletion of received Email | “Valid” means that the received Email will be deleted.“Invalid” means that the received Email will be retained. |
Fax Parameter List
This section explains how to print and read the Fax Parameter list.
Printing Fax Parameter List
To print the Fax Parameter list, follow the steps below.
NOTE
- The fax parameter list can also be printed by programming "00 Print FaxParameterList" (Fax/Email Setting > Fax Parameters) in the Function Parameters.
1 Press the Fax key.
2 Select "More Menus".
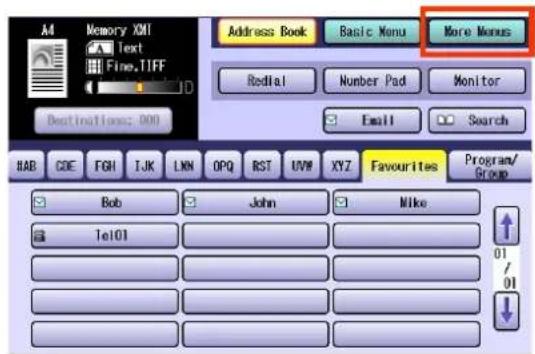
3 Select "Print Out".

4 Select "Fax Parameter List".

The Fax Parameter list will be printed.
- Press the Reset key to return the machine to the initial screen of the current active mode.
Reading Fax Parameter List
Items in the Fax Parameter list are listed below.

| No. Item Explanation | |
| (1) Parameter number Parameter number | |
| (2) Description “(HOME)” means home position setting. | |
| (3) Selection Selection | |
| (4) Current setting “----” indicates the code or | password is not set. When the code or password is set, it is shown by asterisk(*). |
| (5) Standard setting Factory preset standard setting | |
| (6) Changed setting “*” indicates that the factory preset setting has been changed. | |
Individual XMT Journal
This section explains how to print and read the individual XMT journal.
The individual XMT journal is useful when saving sent jobs or checking the detailed communication information. Only the latest sent result is printed.
Printing Individual XMT Journal
To print the individual XMT journal, follow the steps below.
1 Press the Fax key.
2 Select "More Menus".

3 Select "Print Out".
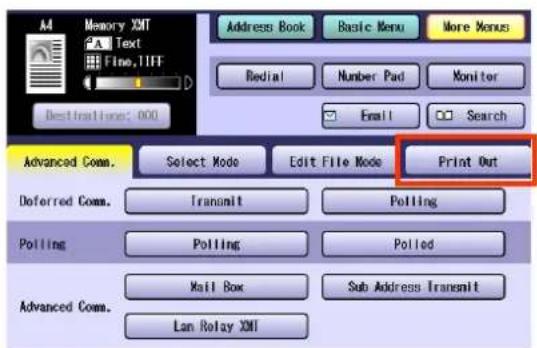
4 Select "IND. XMT Journal".

The individual XMT journal will be printed.
- Press the Reset key to return the machine to the initial screen of the current active mode.
Reading Individual XMT Journal
Items in the individual XMT journal are listed below.

| No. Item Explanation | |
| (1) Date/Time The date and time when the individual XMT journal is printed | |
| (2) Journal No. Journal number | |
| (3) Communication result | “ OK” indicates that the communication was successful.“ Busy” indicates that the communication has failed because of busy line.“ Stop” indicates that theStopkey was pressed during communication.“ P-OK” indicates that memory overflow occurred while storing the documents into the memory for transmission but successfully stored document(s) was sent.“ R-OK” indicates that the Relayed XMT was successful.“ B-OK” indicates that the Batch transmission was successful.“ M-OK” indicates that the Memory reception/Substitute reception was successful.“- -” indicates LAN transmission.“ 3-digit Info Code” indicates that the communication has failed.Refer toInformation Codes(see page 216).In this case, the machine will print the attached report with the first page of your document as shown on the previous page. |
| (4) Number of pages transmitted or received | The 3-digit number is the number of pages successfully transmitted or received.When the documents are stored into the memory, two 3-digit numbers will appear. The first 3-digit number represents the number of pages successfully transmitted. The second 3-digit number represents the total number of pages that were attempted to be transmitted. |
| (5) Duration Duration of the communication | |
| (6) File No. File number | |
| (7) Mode Communication mode | |
| (8) Destination Email address or fax number of the remote station | |
| (9) Received ID Received ID of the fax | |
| (10) Resolution Resolution that the fax was transmitted | |
Tips for Solving Problems
If you encounter the problems, please check following items.
| Problem Symptom Action Refer to | |||
| While sending A document does not feed, or multiple pages are fed at the same time. | ·Check that the document does not have staples or clips attached to it and that it is not smeared or broken.·Check if the document is loaded properly. | —— | |
| Does not stamp. Verify the settings of the Function Parameters “04Stamp (HOME)” (Fax/Email Settings > Fax Parameters) and “28 Stamp at Memory XMT”. | Operating Instructions (For Function Parameters) | ||
| The verification stamp image appears too light. | Replace the verification stamp. Replacing the | VerificationStamp (see page 223) | |
| Vertical lines appear in a transmitted document. | Make a copy on this machine and check the image quality. If the copy is OK, notify the receiving station at fault.If there are any problems with the copy, clean the document scanning surface area. | —— | |
| Document is transmitted as blank paper. | ·Check if the document is loaded properly.·Make a copy on this machine and check image quality. If the copy is OK, notify the receiving station at fault.If there are any problems with the copy, clean the document scanning surface area. | —— | |
| Document is misfeeding. 1.Remove the jammed document according to the error code displayed on the Touch Panel Display.2.The machine cannot send overlong document. Confirm the document length according to the guidelines shown below.·Document length exceeds 2 meters in “Std” and “Fine” mode.·Document length exceeds 1.38 meters in “S-Fine” and “600dpi” mode. | Operating Instructions (For Maintenance) | ||
| While receiving Paper out An error massage will appear on the display if the machine has run out of the paper while receiving a document. Load paper. | —— | ||
| Paper jam If paper jam occurs, an error code is displayed.Remove the jammed paper. | Operating Instructions (For Maintenance) | ||
| Paper does not feed. | Check if the Paper Tray is loaded with paper. Load paper as directed by relevant instructions. | ||
| Paper is not exited at the end of a print job. | Check if the paper has jammed in the machine. | ||
| The Automatic Print Reduction feature does not work. | Check the setting of the Function Parameter “24 Print Reduction” (Fax/Email Settings > Fax Parameters). | ||
| Communicating No dial tone heard • Check the telephone line connection. | • Check the telephone line. | Checking the Telephone Line (see page 222) | |
Information Codes
In the event of communication failures, information codes appear in the transmission result or transaction journal.
When an information code is displayed, take necessary action as recommended in the table below. For definitions of the information code not found here, refer to the User (U)/Jam (J)/Machine (E) Error Codes in the Operating Instructions (For Maintenance) of provided CD-ROM.
| Info. Code Problem Action Refer to | ||
| 030 Document is misfeeding. Reload the document properly.Remove the document jam.Adjust the Original Guides. | —— | |
| 031 Document is too long or jammed.Document length exceeds 2 meters in "Std" and "Fine" mode only.The length limitation for "Super Fine" and "600dpi" mode is subject to the available memory size. | Reload the document properly.Remove the document jam.*1 | Operating Instructions (For Maintenance) |
| 061 ADF Cover is open. Close the ADF Cover.40 | —— | |
| 212 Communication error occurred. | Check with the other party. | —— |
| 400 During initial handshake,receiving station did not respond or a communication error occurred. | Check with the other party.Reload the document and send again. | —— |
| 401 Remote station required a receiving password to receive the document. Remote station does not have Confidential Mailbox. | Check the remote station. | —— |
| 402 During initial handshake,communication error occurred. | Reload the document and send again. | —— |
| 403 No polling capability at the remote side. | Ask remote side to set to be polled. | —— |
| 404/405 During initial handshake,communication error occurred. | Reload the document and send again. | —— |
| 406 Transmission password does not match.Receiving password does not match.Received from an unauthorised station in the Selective Reception mode. | Check the password or telephone number in Address Book. | Editing Address Book (see page 182) |
| 407 No confirmation from the receiving station for the previous page sent. | Wait a few minutes and send again. | —— |
| 408 Remote side confirmation of previous page is illegible. | Wait a few minutes and send again. | —— |
| Info. Code | Problem | Action | Refer to |
| 410 Communication cancelled by the transmitting side. | Check with the other party. | —— | |
| 411 Polling password does not match. | Check the polling password. Operating | Instructions (For Function Parameters) | |
| 412 No data from the transmitting side | Check with the other party. | —— | |
| 414 Polling password does not match. | Check the polling password. Operating | Instructions (For Function Parameters) | |
| 415 Polling transmission error Check the polling password. Operating | Instructions (For Function Parameters) | ||
| 416/417 Received data has too many errors. | Check with the other party. | —— | |
| 420/421 Machine goes to the receiving mode, but receives no command from the transmitting side. | Remote side misdial.Check with the other party. | —— | |
| 422/427 Interface is incompatible. Check with the other party. | —— | ||
| 430/434 Communication error occurred while receiving. | Check with the other party. | —— | |
| 436/490 Received data has too many errors. | Check with the other party. | —— | |
| 438 Received data from the sender whose numeric ID has been registered as a junk fax number. | —— | —— | |
| 456 Unit received a confidential document or was requested to be polled of a confidential document under any of following conditions.1.Not enough space in memory to receive the confidential document.2.Confidential Mailbox is full.3.While printing received document.Unit was requested to relay a document. | Print a confidential document.Wait until the unit finishes printing. | Printing a Received Confidential Document (see page 70) | |
| 459 Communication error occurred. | Check with the other party. | —— | |
| 494 Communication error occurred while receiving. | Check with the other party. | —— | |
| 495 Telephone line disconnected. Check with the other party. | —— | ||
| 501/502/503/504 | Communication error occurred using the internal V.34 modem. | Check with the other party. | —— |
| 505 Received the polling request when documents have not been stored for being polled. | Check with the other party. | —— | |
| 540/541/542/543 | Communication error occurred while transmitting. | Reload the document and send again.Check with the other party. | —— |
| 550 Telephone line disconnected. Check with the other party. | —— | ||
| 554/555 Communication error occurred while receiving. | Check with the other party. | —— | |
| 580 Sub-address transmission to a unit that has no Sub-address function. | Check the remote station. | —— | |
| 581 Sub-address Password transmission to a unit that has no Password Sub-address function. | Check the remote station. | —— | |
| 623 No document is loaded in the ADF. | Resend the documents. | —— | |
| 630 Redial was not successful due to a busy line. | Reload the document and send again. | —— | |
| 634 Redial was not successful due to no response from the called station or wrong number dialled.If a dial tone is not detected, the machine does not transmit. | Check the telephone number, and send again.Change the setting of the Function Parameter “68 Dial Tone Check” (Fax/Email Settings > Fax Parameters) to “Off”. | Operating Instructions (For Function Parameters) | |
| NOTEIf busy tone was not detected, the machine will only redial once. | |||
| 638 Power failure occurred during the communication. | Check the power cord and plug. | —— | |
| 700 During dialling, the Stop key was pressed. | Reload the document and send again. | —— | |
| 711 Incorrect LDAP settings Check the LDAP server name, LDAP log-in name, LDAP password, and LDAP search base. | Operating Instructions (For Function Parameters) | ||
| 712 Incorrect Email address Check the registered Email address.Check the IP Address of the SMTP server with the network administrator. | Operating Instructions (For Administrator Setup) | ||
| 714 Cannot log on to the LAN. An unexpected LAN problem occurred. Check the 10 Base-T/100 Base-TX/1000 Base-T cable connection. Contact the network administrator. | Operating Instructions (For Administrator Setup) | ||
| 715 TCP/IP connection timed out. Check the Internet Fax parameter settings.Verify the IP Address, Default Gateway IP Address, and SMTP server IP Address. | Operating Instructions (For Administrator Setup) | ||
| 716 Cannot log on to the designated SMTP server. | Check the SMTP server IP Address setting.Contact the network administrator. | Operating Instructions (For Administrator Setup) | |
| 717 Incomplete SMTP Protocol transmission. SMTP server's hard disk may be full. | SMTP server is defective.Contact the network administrator. | —— | |
| 719 Received data via LAN is in a format that is not supported. | Ask the originator to re-send with a supported file attachment format:In the TIFF-F formatImage data conforming to recording paper size | —— | |
| 720 Cannot connect to the POP server (incorrect POP server IP Address). POP server is down. | Check the POP server IP Address.Contact the network administrator. | Operating Instructions (For Administrator Setup) | |
| 721 Cannot connect to the POP server (user name or password error). | Check the POP user name and password, or the APOP settings.Contact the network administrator. | Operating Instructions (For Administrator Setup) | |
| 722 Failed to obtain IP Address from the DHCP server. | Check the 10Base-T/100Base-TX/1000Base-T cable connection.Confirm that the Internet Parameter, and the DHCP server are correctly configured before turning on, or turning off the power.Contact the network administrator. | Operating Instructions (For Administrator Setup) | |
| 725 DNS server connection timed out. DNS server is down. | Check the DNS server IP Address.Contact the network administrator. | Operating Instructions (For Administrator Setup) | |
| 726 Received an error response from the DNS server. | Check the POP server name.Check the SMTP server name. | Operating Instructions (For Administrator Setup) | |
| 727 Communication error occurred while communicating with remote station. | Check the remote station. | —— | |
| 728 Communication error occurred with the SMTP Direct transmission. | Check the remote station. | —— | |
| 729 Failed to authenticate (SMTP Authentication) when connecting with the SMTP server. | Check the SMTP authentication user name and password.Contact the network administrator. | Operating Instructions (For Function Parameters) | |
| 730 Cannot retrieve the Journal or program the Internet Parameters and the Auto Dialler remotely via Email from a PC. | Check that the Fax Parameter “158 PC Remote Update” is set to “Valid”. | Operating Instructions (For Function Parameters) | |
| 731 The dialler buffer for manual dialling was full (70 stations) when the Relay transmission request was received. | Request the originator to re-send the Relay transmission request after the reserved communication is finished. | —— | |
| 734 Internet Fax communications and POP reception functions are disabled. | Contact the device administrator. | —— | |
| 800/814/816/825 | Unit was requested to relay a document or Confidential Communication but has no capability. | Check with the other party. | —— |
| 815 Mailbox is full. Delete confidential documents. Deleting a | Confidential Document (see page 72) | ||
| 826 The received sub-address is not pre-programmed in the Address Book. | Check entries in the Address Book.Check the entry of the sub-address of the remote station. | Address Book(see page 175) | |
| 850 The Relay transmission was cancelled at a relay station because the Relay XMT passwords did not match. | Check the password. Operating | Instructions (For Function Parameters) | |
| 870 Memory overflow occurred while storing documents into memory for transmission. | Transmit documents without storing into memory.Add SD Memory Card in the machine. | Direct Transmission(see page 46) | |
*1
| 600dpi(Max. Length) | Super Fine(Max. Length) | |||
| 2-Sided (Long Edge) | 2-Sided (Short Edge)1-Sided | 2-Sided (Long Edge) | 2-Sided (Short Edge)1-Sided | |
| A3 486 mm 1387 mm 730 mm 1387 mm | ||||
| B4 577 mm 866 mm | ||||
| A4 684 mm 1027 mm | ||||
Power Failure
Power Failure
The fax display remains off for the duration of a power failure, and you cannot send or receive documents.
| Problem Condition | ||||
| FAX When a power failure occurs | Send a fax. The fax transmission is aborted. Resend when power recovers. | |||
| Receive a fax. The fax reception is aborted. Ask the remote party to resend when power recovers. | ||||
| While a power failure persists | Send a fax. You cannot send a fax. | |||
| Receive a fax. You cannot receive a fax. | ||||
| When power recovers Send a fax. The fax transmission is start again when power recovers, if there is transmission data in memory. | ||||
| When External Telephone is connected | • When a power failure occurs • While a power failure persists | • You are talking to a remote party. • Make phone calls. Receiving phone calls. | Please confirm the specification of your external telephone. | |
NOTE
- If a power failure occurs while scanning a document, the scan is cancelled. Rescan the document when power recovers. If a power failure occurs while sending a document from memory, the fax or document will be resent immediately upon recovery.
- The notice above only applies when the machine is connected to the Public Telephone Network. Please check the specification of PBX, if it is connected to it.
Checking the Telephone Line
If you do not hear a dial tone when "Monitor" is selected after pressing the Fax key, or the incoming call does not ring on your machine (no automatic receive), check the telephone line by following the procedure below.
1 Unplug the Telephone Line Cable from the telephone jack that was supplied by the telephone company.
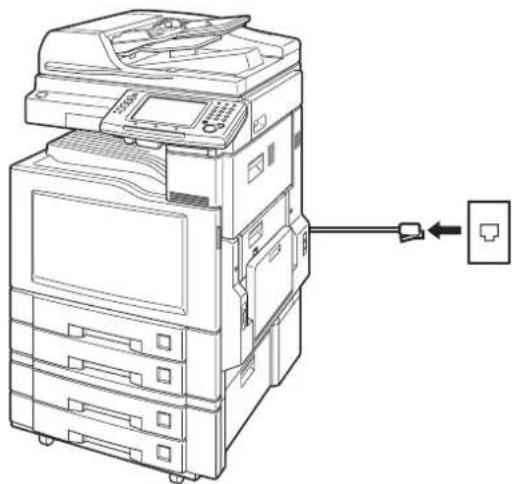
natural_image
Line drawing of a multi-level electronic device with an external connector (no text or symbols)2 Plug a different regular telephone into the same telephone jack.

natural_image
Line drawing of a telephone handset connected to a device via cable (no text or symbols)3 Check for a dial tone through the handset. If there is still no dial tone, report it to your local telephone company. or Call from another telephone to this number. If the telephone does not ring, report it to your local telephone company.

natural_image
Line drawing of a telephone handset connected to a power outlet (no text or symbols)Replacing the Verification Stamp
To replace the verification stamp, follow the steps below.
NOTE
• DZHT000027 (for USA and Canada)
• DZHT000004 (for other countries)
1 Open the ADF Cover.

natural_image
Line drawing of a car rearview cab with a black arrow indicating the direction (no text or symbols)2 Open the Inner Cover while holding the green-labelled tab.
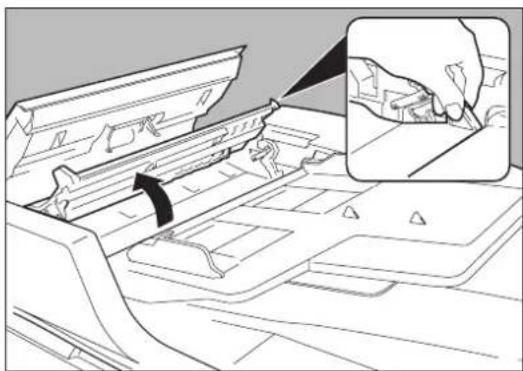
natural_image
Technical line drawing of a mechanical assembly with an inset showing a hand holding a tool (no text or symbols present)3 Lift up the ADF Tray.

natural_image
Technical line drawing of a mechanical component with an arrow indicating a directional movement (no text or symbols present)4 Open the Exit Guide while holding the green-labelled tab.

natural_image
Technical diagram showing a mechanical assembly with an inset close-up of a hand holding a tool (no text or symbols present)5 Remove by pulling the Stamp Assembly upward.
6 Remove the Stamp. Replace the stamp with a new one, or refill the stamp with a few drops of the specified ink onto the back of the stamp.

7 Reinstall the Stamp Assembly.
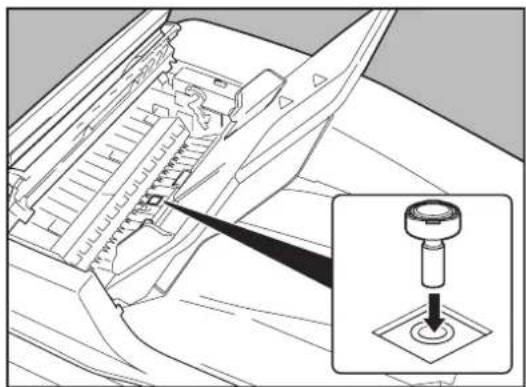
natural_image
Technical line drawing of a mechanical assembly with an inset showing a disassembled component (no text or symbols present)Specifications
Email / Internet Fax
| Standard Compliance: | 10 Base-T Ethernet (IEEE 802.3), 100 Base-TX Fast Ethernet (IEEE 802.3u), 1000 Base-T Gigabit Ethernet (IEEE 802.3ab) |
| Connector Interfaces: 10/100/1000 Base-TX port: RJ-45 | |
| Compatibility: IETF RFC3965, ITU-T T.37 | |
| Communication Protocol: TCP/IP, SMTP, POP3, MIME | |
| File Format: TIFF [IETF RFC3949 Profile S, F, J]PDF (Transmission only) | |
| Email Receiving Width: Max. A3 | |
G3 Facsimile (Option)
| Compatibility: ITU-T Group 3 | |
| Coding Scheme: JBIG, MH, MR, MMR (Conforms to ITU-T Recommendations) | |
| Modem Type: ITU-T V.34, V.17, V.29, and V.27 ter | |
| Modem Speed: 33600-2400 bps | |
| Document Size: A5 - A3 | Max :Platen Glass : A3ADF : A3Min :Platen Glass : No MinimumADF : A5 |
| Scanning Method: Sheet Feeding with CCD type image sensor | |
| Effective Scanning Width: 292 mm | |
| Scanner Resolution: | Horizontal:8 pels/mm (203 pels/inch) : Standard and Fine Resolution16 pels/mm (406 pels/inch) : 400 dpi as Super Fine Resolution600 dpi : 600 dpi as Super Fine ResolutionVertical:3.85 lines/mm (98 lines/inch) : Standard Resolution7.7 lines/mm (196 lines/inch) : Fine Resolution15.4 lines/mm (391 lines/inch) : 400 dpi as Super Fine Resolution600 dpi : 600 dpi as Super Fine Resolution |
| Address Book Memory Capacity: | 1000 stationsNOTEz Each station can register up to 36 digits for each telephone number (including pauses and spaces) and up to 15 characters for each station name. |
| Image Memory Capacity: | Standard : 3 MB |
| Ringer Equivalence: | 0.2 B |
The specifications are subject to change without notice. Panasonic Communications Co., Ltd. reserves the right to make improvements in the product design without reservation and without notice.
Glossary
| DHCP | Dynamic Host Configuration Protocol - a standard method for assigning IP addresses automatically to the devices on a TCP/IP network. As a new device connects, the DHCP server assigns an IP address from a list of available addresses. The device retains this IP address for the duration of the session - once the device disconnects the IP address becomes available for use again. |
| Fax Communication Board | In a multi-functional device, this is a Fax capability built onto a printed circuit board which can send and receive facsimiles. The multi-functional device is normally able to scan a document and transmit it over a phone line to another fax machine. Also, it can receive faxes from other machines and print them out. |
| G3 (Group 3) | Refers to the standards and transmission capabilities of the current generation of facsimile machines. |
| Internet FAX | The Internet fax uses the Internet to send faxes. The transmission and reception take place via store-and-forward mode on the Internet using Internet email. In store-andforward mode the facsimile protocol stops at the gateway to the Internet and is reestablished at the gateway leaving the Internet. |
| LAN (Local Area Network) | A Local Area Network is a computer network system and printer limited to an immediate area, such as an Office, Factory, and University used to integrate and exchange data. |
| Modem | A device that converts signals from your fax machine into signals that can be transmitted over telephone lines. |
| Protocol | A standard process, a set of rules and conditions that perform a particular function. A word which is very common in PC and Internet Terminology.Ex: FTP (File Transmission Protocol), IP Address (Internet Protocol Address), TCP/IP (Transmission Control Protocol/Internet Protocol), POP (Post Office Protocol) |
| SMTP (Simple Mail Transfer Protocol) | An accepted standard used extensively on the Internet for transferring E-mail messages between computers. The standard defines exactly how the message will be sent, any controls, format of the message etc. |
| TCP/IP | TCP/IP stands for Transmission Control Protocol/Internet Protocol and is quite simply a standard set of protocols that govern the basic workings of the Internet that was implemented in 1982.The TCP part is all about ensuring that data is transmitted correctly between 2 computers. If any errors occur these are detected and the data is retransmitted. The data transmitted is split up into small portions called Data packets. The IP part of TCP/IP is how these data packets are moved from one point to another. Each computer on the Internet has a unique IP address and the data packets are moved from the source to the destination through many different computers and this is controlled via TCP/IP. This protocol is used on the Internet and also by computers which are part of a LAN. |
Index
Numerics
2-Sided Original ....39
A
A3 Email XMT 128
A3-Sized Document 127
Add Document 171
Add Email Address 142, 179
Add Telephone Number 152, 176
Address Book 10, 175
Address Book List 205
ADF 14
Advanced Comm. 11
Automatic Reception 87
B
Basic Menu ....11
Batch Transmission ....50
Bcc 120, 121
Binding Position 39
C
Cc 120, 121
Change Time/Stn 165
Comm. Journal 84
Comm. Status ....48
Communication Journal 83, 202
Communication Reservation File 162
Communication Status 48
Completion Notice 132
Confidential Communication 65
Confidential Document 70, 72
Confidential Polling 68
Confidential Reception Report ....70
Confidential Transmission 66
Cover Sheet 86
D
Deferred Polling ....59
Deferred Transmission 57
Delete File 72,167
Delete Program/GRP 192
Delete Station 183
Delivery Notice 129
Density 33
Destinations:### 29,124
DHCP 161
Dial Prefix 55, 56
Direct 47
Direct Internet Fax Transmission 106
Direct SMTP 106
Direct Transmission 46, 54
Duplex Recording 90
E
Edit File Mode ......12
Email 10, 111, 134
Email Address 113, 179
F
Failure Report 131
Favourites 22,115
Fax Forwarding 93
Fax Key 18
Fax Parameter List 209
Fax Parameters 56
Fax Relay Log Email 160
Fax Transmission 18
Fax/Email Settings 56
File List 162
File Type and Name 125
From 120, 122
Function Key 56
G
Get Email 135
Global 25
Group Dial 188
|
Inbound Routing 103, 139
Incomplete Document 173
IND. XMT Journal 211
Information Codes 216
Internet Fax 100, 102, 107, 109
J
Job Build and SADF 44
Journal 196
Junk Fax Filter 95
K
Key Name 22,115
Key Operator Mode 56
Keypad 19
L
Lan Relay XMT 154
LDAP Search 25,118
Local Search 24,117
M
Mailbox 65
Manual Dialling 20,76
Manual POP RCV 194
Manual Reception 88
MDN 105, 129
Memory 43
Memory Reception 96
Memory Transmission 42, 53
Modify Group Dial 190
Modify Station 182
Monitor 31
More Menus 11
Multi Station 28
N
Network Parameters 109
Non-Standard Size Originals 16
Number Pad 10,21
0
Onscreen Keyboard 113
Original Quality 33
Original Size 36
Original Type 33
P
Password Communication 78
Password XMT 79
Password-Protected Transmission 81
Password-Reception 94
Password-Transmit 82
PIN Code Access 51
Platen Glass 15
Polled 63, 69
Polling 59,61
Print Address Book List 184
Print File 71, 169
Print Out 13
Print Program List 193
Print Reduction 89
Program Dial 186
Program Key 52, 185
Program List 207
Program/Group 52
Q
Quality Adj. 34
Quick Memory Transmission 42
R
Receive to Memory 96, 97
Redial 27
Relay Feature 144
Relay Stations 150
Relayed Transmission 154, 156, 159
Resolution 33
Retry Incomp. File 173
Rotated Transmission 49
S
Scanning Area 16
Search 10, 24, 25, 117, 118
Select Mode 12
Selective Reception 92
SMTP Authentication 161
Start Key 19
Sub Address Transmit 74
Sub-Addressing 73
Subject 123
Substitute Memory Reception 91
T
TIFF Converter 158
TIFF Converter Mail Linking Program 158
Transaction Journal 196
Transmit 57,66
V
Verification Stamp 40,223
Memo
The following trademarks and registered trademarks are used throughout this manual:
Microsoft, Windows, Windows Server, Windows Vista, Excel, PowerPoint, Outlook & Windows logo are either registered trademarks or trademarks of Microsoft Corporation in the USA and other countries.
Microsoft product screen shot(s) reprinted with permission from Microsoft Corporation.
Adobe, Acrobat Reader & Adobe logo are either registered trademarks or trademarks of Adobe Systems Incorporated.
Itanium is a trademark of Intel Corporation and its subsidiaries.
Eudora is a registered trademark of QUALCOMM Incorporated.
PCL is a registered trademark of Hewlett-Packard Company.
PEERLESSPage ^™ is a trademark of the PEERLESS Systems Corporation; and,
PEERLESSPrint® and Memory Reduction Technology® are registered trademarks of PEERLESS Systems Corporation; and, COPYRIGHT © 2002 PEERLESS Systems Corporation
Universal Font Scaling Technology (UFST) and all typefaces have been licensed from Monotype Imaging Inc.
Monotype ^® is a registered trademark of Monotype Imaging Inc. registered in the U.S. Patent and Trademark Office and may be registered in other jurisdictions.
ColorSet ^™ is a registered trademark of Monotype Imaging Inc. registered in the U.S. Patent and Trademark Office and may be registered in other jurisdictions. ColorSet ^™ Profile Tool Kit, Profile Studio and Profile Optimizer are trademarks of Monotype Imaging Inc. and may be registered in certain jurisdictions.
Copyright © 2005 Monotype Imaging Inc. All rights reserved.
Captaris and RightFax are trademarks of Captaris, Inc.
Novell and NetWare are registered trademarks of Novell, Inc. in the United States and other countries.
libtiff is a software written by Sam Leffler while working for Silicon Graphics.
Copyright © 1988-1997 Sam Leffler
Copyright © 1991-1997 Silicon Graphics, Inc.
zlib is a library written by Jean-loup Gailly and Mark Adler.
Copyright © 1995-2005 Jean-loup Gailly and Mark Adler
libjpeg is a library maintained by the Independent JPEG Group.
Copyright © 1991-1998, Thomas G. Lane
All other trademarks identified herein are the property of their respective owners.
In these Operating Instructions, some ^TM and ^ marks are omitted from the main text.
For Service, Call:
For Customer Support:
Panasonic Communications Co., Ltd.
Fukuoka, Japan
http://panasonic.net
- Panasonic®
- Operating Instructions
- (For Facsimile and Internet Fax)
- Digital Colour Imaging Systems
- Quick Reference Guide
- Operating Instructions (For Basic)
- Operating Instructions CD
- Document Management System CD
- Setup Guide For Administrator
- Setup Guide For User
- Copy Function
- Facsimile and Internet Fax Function
- Scan and Email Function
- Print Function
- Function Parameters
- User Authentication
- Maintenance Guide
- Application Software
- Conventions
- Icons
- Notation
- Table of Contents
- Chapter 1 Getting To Know Your Machine
- Chapter 2 Basic Fax Transmission
- Chapter 3 Convenient Fax Features
- Chapter 4 Fax Reception
- Chapter 5 Internet Fax
- Chapter 6 Handling Communication Reservation Files
- Chapter 7 Program Destinations/Program Keys
- Chapter 8 Reading Reports/Lists
- Chapter 9 Solving Problems
- Chapter 10 Appendix
- Menu Map
- Placing Originals
- How to Place Originals
- On the ADF
- Notice for ADF
- Do not use the following type / flawed originals.
- On the Platen Glass
- Notice for Platen Glass
- Original Orientation
- Scanning a thick booklet
- CAUTION
- ■ Sending Non-Standard Size Originals
- NOTE
- Scanning Area
- Original Size
- For Auto Reset
- Fax Transmission Procedure
- Place original(s).
- Press the Fax key to open the Fax screen.
- ☐ Select "Basic Menu" if additional settings are required.
- Entering a Destination
- Manual Dialling
- ☐ Number Pad Screen
- □ Using "Redial/Pause"
- □ Using\*”
- □ Using "Sub-Address"
- Press the Start key.
- Using the Address Book
- Use a Key Name
- ATTENTION
- Press the Start key.
- ■ Select from "Favourites"
- ■ Use Group Dialling
- Searching for a Destination
- ■ Search through the Address Book (Local Search)
- ■ Search through the LDAP Server (LDAP Search)
- Redialling
- Preventing Accidental Transmission to Multiple Destinations
- ■ Temporarily Enabling Transmission to Multiple Destinations
- Select "Multi Station".
- Confirming the Destination
- ■ Confirming the Destination
- ■ When Confirmation of the Destinations is Always Required
- Select the desired field button, and confirm destinations.
- Select "OK", and then press the Start key.
- Transmission with Destination Monitoring
- Press the Fax key.
- Select "Monitor".
- Enter the fax number of the destination.
- When you hear a beep, press the Start key.
- Talking to the Remote Party Before Transmission
- Setting Original Quality
- Original Type
- Density
- Resolution
- Setting the Original Size
- Select "Original Size".
- Select the Original Size, and then select "OK".
- Set "Quality Adj." as required.
- Select "Address Book", and then select a destination.
- Press the Start key.
- Transmitting 2-Sided Originals
- Select "2-Sided Original".
- Select a binding position, and then select "OK".
- Verification Stamp
- Select "Verification Stamp".
- Set "Quality Adj." as required.
- Select "Address Book", and then select a destination.
- Press the Start key.
- Transmitting a Document Stored in Memory
- Job Build and SADF
- Select "Job Build and SADF".
- If you have another original(s), place the next original(s) within 5 seconds after the last original is scanned.
- Direct Transmission
- Select "Direct".
- Verifying Communication Status
- Rotated Transmission
- ■ Rotation XMT set to "Valid"
- ■ Rotation XMT set to "Invalid"
- Batch Transmission
- Getting an Outside Line Using PIN Code Access
- Using Program Keys
- Cancelling a Communication
- To Cancel Direct Transmission:
- Dial Prefix
- Time Controlled Communication (Deferred)
- Deferred Transmission
- Deferred Polling
- Polling
- Storing Documents to be Polled
- 5
- Using a Mailbox (Confidential Communication)
- What is Confidential Communication?
- Confidential Transmission
- Select a destination.
- Press the Start key.
- Confidential Polling
- Storing Documents for Confidential Polling
- Printing a Received Confidential Document
- ■ Confidential Reception Report
- ■ Printing a Received Confidential Document
- Deleting a Confidential Document
- Sub-Address Communication
- What is Sub-Addressing?
- ■ Example of a Network Using Sub-Addressing
- Sub-Addressed Transmission Using Address Book
- Set "Quality Adj." as required.
- Sub-Addressed Transmission Using Manual Dialling
- Enter a sub-address.
- Password Communication
- What is Password Communication?
- Password Transmission
- Setting Password-Protected Transmission
- Select "43 Password-Transmit".
- Enter the password (4 digits), and then select "OK".
- Select "On" or "Off", and select "OK".
- Printing Communication Journal
- Transmitting a Document with a Cover Sheet
- □ Sample Fax Cover Sheet
- Receiving Documents
- ■ Automatic Reception
- ■ Manual Reception
- Automatic Reception
- Manual Reception
- Print Reduction and Duplex Recording
- Print Reduction
- ■ When Print Reduction is Set to "Auto"
- ■ When Print Reduction is Set to "Fixed"
- Duplex Recording
- Substitute Memory Reception
- Convenient Reception Features
- Selective Reception
- Fax Forwarding
- Password-Reception
- Junk Fax Filter
- Receive to Memory
- What is Memory Reception?
- Programming Memory Reception
- Printing a Document Received in Memory
- Select "Print", and then "OK".
- If a password is pre-programmed, enter the password (8 digits), and then select "OK".
- What is Internet Fax?
- Sending Email
- ■ Receiving Email
- Routing
- ■ Transmitting to a Fax via a Relay Station (Relay Transmission)
- Using the Internet Fax Feature
- What Internet Fax Can Do
- Receiving Email
- Inbound Routing
- Relay Transmission
- Message Delivery Notice (MDN)
- ■ If the Receiving Station is an Internet Fax Station
- ■ If the Receiving Station is a Computer
- Direct Internet Fax Transmission (Using Direct SMTP)
- Tips for Internet Fax
- ■ Differences between Internet Fax and Fax Stations on the Telephone Line
- ■ When Email Transmission Fails
- ■ Telephone Calls Cannot Be Made via LAN
- Dual Port Communication
- ■ Transmission Resolution
- ■ Receiving Internet Email Messages
- ■ Sending a Document to a PC via LAN
- Transmitted File Type Setting
- Preparing to Use Internet Fax
- Program Network Parameters
- Network Parameters
- - Sending Email (This machine -> Other Internet Fax machine or PC)
- Sending an Email Procedure
- Entering an Email Address
- Using the Onscreen Keyboard
- Enter an Email address, and then select "OK".
- □ Use the Domain List
- Press the Start key.
- Searching for Destinations
- Using Cc, Bcc and From
- Setting Cc and Bcc
- Setting From Field
- On the Email screen, select "From". (See pages 111 and 120)
- Enter a sender name, or select a sender Email address, and then select "Close".
- Setting Subject
- On the Email screen, select "Subject". (See pages 111 and 120)
- Enter a subject, and then select "OK".
- Select "Destinations:###".
- Select the desired field button, and confirm destinations.
- Select "OK".
- Setting a File Type and a File Name
- Enter a filename, and then select "OK".
- Select "Address Book", and then set an Email address.
- Emailing an A3-Sized Document
- Document Sizes and Transmitted/Received Document Sizes
- Select "Select Mode".
- Select "A3 Email XMT".
- Select "On", and then select "OK".
- Select "Address Book", and then set an Email address.
- Setting Message Delivery Notice (MDN)
- When Email Transmission Fails
- Using a Completion Notice
- Set an Email address.
- Receiving an Email
- Configuring to Receive Email
- Receiving Email Automatically
- Receiving Email Manually
- Receiving Email with the Program Key
- Receiving an Email on a Computer
- Receiving Email on Your Computer
- Opening Email
- What is Inbound Routing?
- Routing Setup Flow
- Settings for Inbound Routing
- Programming the Address Book for Inbound Routing
- Enter a Key Name, and then select "OK".
- Select "IFax", and then select "OK".
- Select whether to add the Email address to "Favourites".
- To enable sub-addressed routing, enter a sub-address, and then select "OK".
- To enable routing by a numeric ID, enter a numeric ID, and then select "OK".
- Using the Relay Feature
- What is the Relay Feature?
- Initial Sending Station(s)
- Internet Relay Station
- End Receiving Station(s)
- Example 2: Intranet Relaying Network
- Computer (PC)
- Mail Server
- Setting up a Relayed Transmission Network
- ■ What is the Hardware Configuration?
- ■ What is the Communication Charge?
- How can I confirm the completion of a transmission?
- How to Program?
- Example of a Relayed Transmission Network
- Sample Entries in Address Book
- Table 1: Initial Sending Station (New York)
- Table 2: Relay Station (London)
- Table 3: Relay Station (Singapore)
- Function Parameters for Relay Stations
- Settings for Initial Sending Station
- Adding End Receiving Stations for Relayed Transmission
- Relayed Transmission from Internet Fax
- Select a relay station or enter the Email address of the relay station.
- Press the Start key.
- Select an end receiving station to which the relay station relays.
- Relayed Transmission from PC
- Requesting a Relayed Transmission from a Computer
- Convenient Application Software
- TIFF Converter
- TIFF Converter Mail Linking Program
- Result of Relayed Transmission
- ■ Relayed Transmission Report (communication journal)
- Fax Relay Log Email
- Useful Terms to Remember
- DHCP (Dynamic Host Configuration Protocol)
- SMTP Authentication
- Editing a Communication Reservation File
- Displaying a Communication Reservation File List
- Reading the Reservation Report
- Editing Communication Reservations
- Deleting a Communication Reservation File
- Printing a Communication Reservation File
- Adding Documents to a Communication Reservation File
- Resending an Incomplete Document
- Address Book
- What is Address Book?
- Items Allowed for Entry in the Address Book
- Adding a Fax Number into the Address Book
- Adding an Email Address to Address Book
- Editing Address Book
- Deleting a Destination from Address Book
- Printing the Address Book List
- Program Keys
- What is Program Key?
- Programmable Items
- Setting for Program Dialling
- Program each desired feature.
- Setting for Group Dialling
- Select the destinations to be programmed, and then select "OK".
- Editing a Group Dialling
- Deleting the Program Key Setting
- Printing the Program List
- Programming Email Manual Reception on Program Keys
- Transaction Journal
- Printing Transaction Journal
- Select "List Print".
- Viewing Communication Results on Touch Panel Display
- Reading Transaction Journal
- Communication Journal
- Address Book List
- Printing Address Book List
- Reading Address Book List
- Program List
- Printing Program List
- Reading Program List
- Fax Parameter List
- Printing Fax Parameter List
- Reading Fax Parameter List
- Individual XMT Journal
- Printing Individual XMT Journal
- Reading Individual XMT Journal
- Tips for Solving Problems
- Information Codes
- Power Failure
- Checking the Telephone Line
- Replacing the Verification Stamp
- Reinstall the Stamp Assembly.
- Specifications
- Index
- Numerics
- A
- B
- C
- D
- E
- F
- G
- |
- J
- K
- L
- M
- N
- 0
- P
- Q
- R
- S
- T
- V
Brand : PANASONIC
Model : DP-C306
Category : Photocopier