
RANCDM514 - Radio JUNG - Free user manual and instructions
Find the device manual for free RANCDM514 JUNG in PDF.


| Product Type | Radio for flush mounting |
| Power Supply | AC 230 V ~, 50/60 Hz |
| Frequency Range | 87.5 MHz - 108 MHz (VHF) |
| Reception | Stereo, automatic mono/stereo switching |
| Integrated Speaker | Yes, with base reflex tube for optimized acoustics |
| Additional Speaker Connection | Right stereo channel, max cable length 10 m |
| Memory Channels | 4 favorite channels, non-volatile storage |
| Sleep Timer | Approx. 30 minutes |
| LED Indicators | Blue (operation/flashing sleep), Red (favorite channel) |
| Volume Control | + and - buttons |
| Channel Search | Automatic (scans and saves 4 strongest) or manual |
| Switching On/Off | Via brief button press; also via extension connection or potential-free contact |
| Installation | Two concealed appliance boxes (DIN EN 49073), vertical or horizontal |
| Protection Class | IP20 |
| Ambient Temperature | 0 °C to +50 °C |
| Relative Humidity | 15% to 90% (non-condensing) |
| Connections | Screw terminals: 1 x 2.5 mm² or 2 x 1.5 mm² |
| Aerial | Integrated VHF aerial |
| Safety | Installation and wiring only by electrically skilled persons; disconnect power before work |
| Warranty | Statutory provisions; send device postage paid to service center |
Frequently Asked Questions - RANCDM514 JUNG
User questions about RANCDM514 JUNG
0 question about this device. Answer the ones you know or ask your own.
Ask a new question about this device
Download the instructions for your Radio in PDF format for free! Find your manual RANCDM514 - JUNG and take your electronic device back in hand. On this page are published all the documents necessary for the use of your device. RANCDM514 by JUNG.
USER MANUAL RANCDM514 JUNG
Caution! Electrical devices may only be installed and fitted by electrically skilled persons.
Non-compliance with the installation information could cause damage to the device, fire or other hazards.
Danger of electric shock. Before working on the device, disconnect the power or load and switch off the circuit breakers.
Danger of electric shock. Loudspeaker connections and power supply may not be wired in one socket.
These instructions are a component part of the product and must remain with the end customer.
Structure of the device
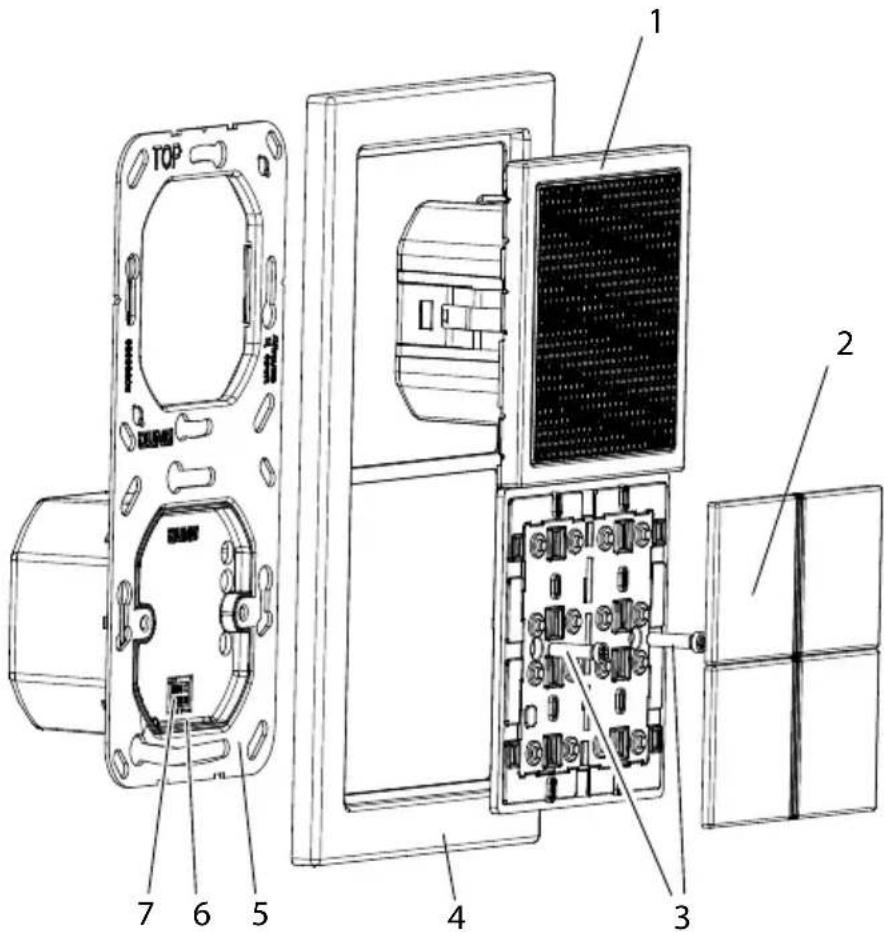
Figure 1: Structure of the radio device
- Radio
- Button set
- Plastic screws
- Frames
- Supporting ring with power supply
- Lever
- Power supply interface
Function
Correct use
- Installation in two concealed appliance boxes according to DIN EN 49073 (recommendation: deep boxes).
• VHF reception in the frequency range 87.5 MHz to 108 MHz
Product characteristics
- Stereo reception
- Connection terminal for additional external loudspeaker (right stereo channel)
• Automatic recognition of the second loudspeaker
• Automatic switching from mono to stereo operation when there is sufficient signal strength and a second loudspeaker is connected - Simple operation with additional feedback LED
- Blue LED lit up: operational display
- Blue LED flashing: Sleep mode active
- Red LED lit up: favourite channel
• High-quality sound and large loudspeaker dynamics
- Optimised acoustics through the use of a base reflex tube
- Integrated VHF aerial
• High reception quality
• Automatic and manual channel search
- Non-volatile storage of 4 favourite channels (saved channels remain stored when power supply fails)
- Switch on with most recent channel and saved volume
- Sleep mode (switch-off after approx. 30 minutes)
- Switching on/off possible via extension connection together with the room lighting
- Switching on/off via potential-free contact A/B (e.g. switch or timer switch with potential-free contact).
Operation
Switching radio on/off
- Press button briefly
Device switches on/off.
The blue LED lights/switches off
i The most recently set channel will be called up with the most recently set volume.
Sleep mode:
The radio is switched on.
- Press and hold button (approx. 3 seconds).
The long press will be acknowledged with a sound.
The blue LED flashes.
The radio switches off after approx. 30 minutes.
Automatic channel search
- Press and hold the button's full surface (approx. 3 seconds).
The long press will be acknowledged with a sound.
The entire frequency range will be scanned and the four strongest channels saved (automatic memory assignment).
i Memory will be overwritten.
Manual channel search
Searching for channels in ascending/descending frequency.
- Press button briefly.
The next channel will be selected.
Saving/overwriting favourite channel
The desired channel frequency is selected.
- Press and hold (approx. 3 seconds) 1, 2 of desired memory button
The saving will be acknowledged with a sound.
The channel frequency is saved.
i If the memory slot is already assigned, it will be overwritten with the frequency of the new channel.
Deselecting favourite channel
- Briefly press 1, 2 o3 memory button
The associated red LED flashes
The stored channel will be received.
Volume+
The button sets the volume
- Press + button louder
- Press - button quieter
Information for electrically skilled persons
Installation and electrical connection

DANGER!
Touching live parts can result in an electric shock.
An electric shock can be fatal.
Before working on the device, disconnect the power and cover live parts in the area.
Installing and connecting radio
Installation in two concealed appliance boxes according to DIN EN 49073.
In the LS series the installation can also be performed x2 and x3 in surface caps.
The installation can be performed either vertically or horizontally.
Vertical installation: loudspeaker on top (Fig. 2) left
Horizontal installation: loudspeaker on left (Fig. 2) right
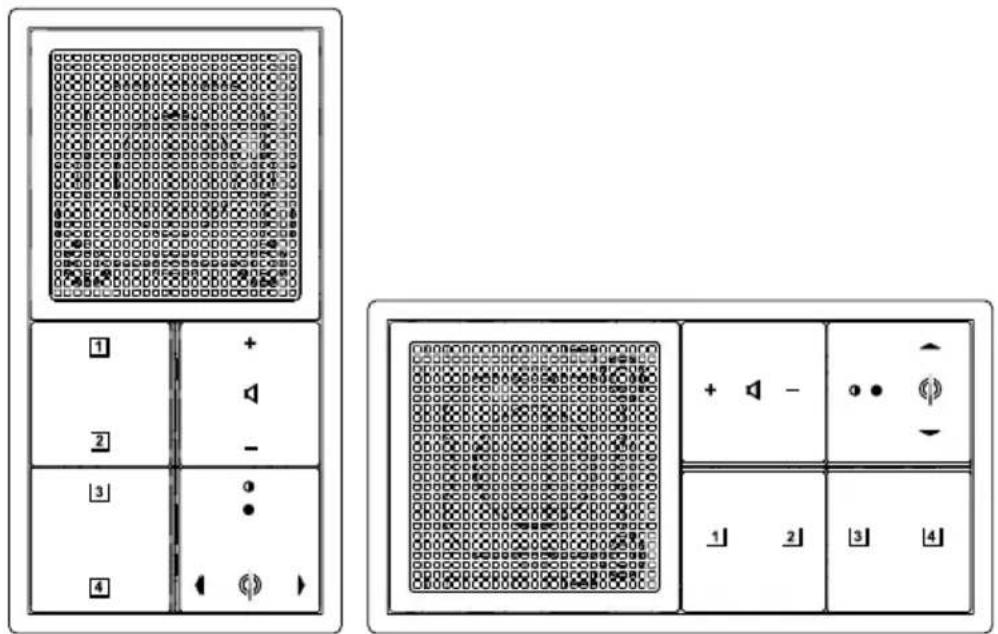
Figure 2: Vertical and horizontal installation
i For series A, CD and FD lever (6) position A, for series LS position B (Fig. 1).
Additional loudspeaker
Series A and CD: An additional loudspeaker must be fitted in a separate frame. LS series: An additional loudspeaker can be fitted in the same frame or a separate one.
The cable length may not exceed 10 m.
i Longer cables lead to sound glitches and interference.
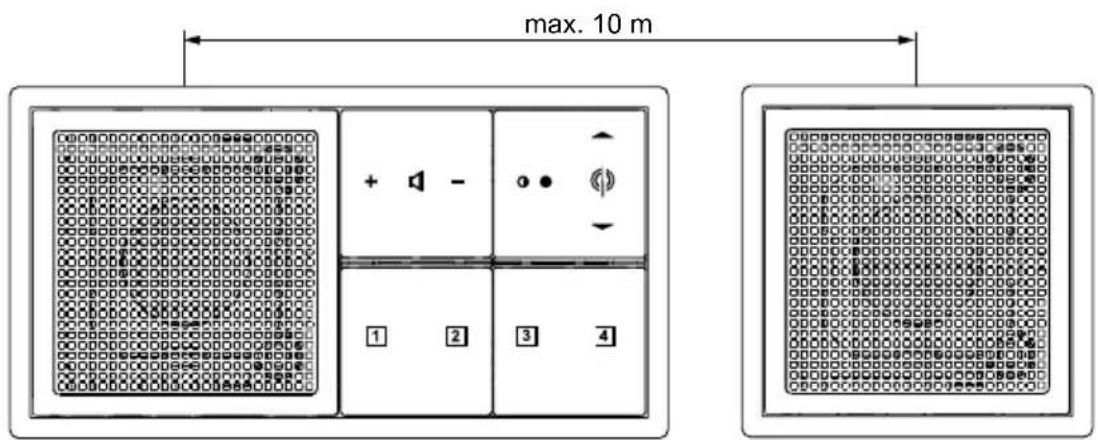
Figure 3: Additional loudspeaker fitted
• Power supply connection according to the circuit diagram (Fig. 4).
- Connection – and + on the radio (Fig. 5) to connect an additional loudspeaker on the right for stereo operation. Use the cable enclosed (l = 1.5 m).
- Connection A and B on radio (Fig. 5) for connection to a potential-free contact (e.g. switch or timer switch with potential-free contact).
- Attach the radio with the frame to the insert. Ensure contact with the power supply.
- Fasten radio to the supporting ring (3) with the enclosed plastic screws. Only tighten the plastic screws lightly.
- Snap on covers (2).
i The aerial is integrated.

DANGER!
When connecting the loudspeakers or potential-free contact and power supply wires to a shared device socket, the loudspeakers or potential-free contact cables may come into contact with mains voltage.
The safety of the entire radio installation will be endangered.
People can also receive an electrical shock at devices that have been disconnected.
Lay the loudspeaker or line out cables in separated device sockets in the additional insulation sleeves.
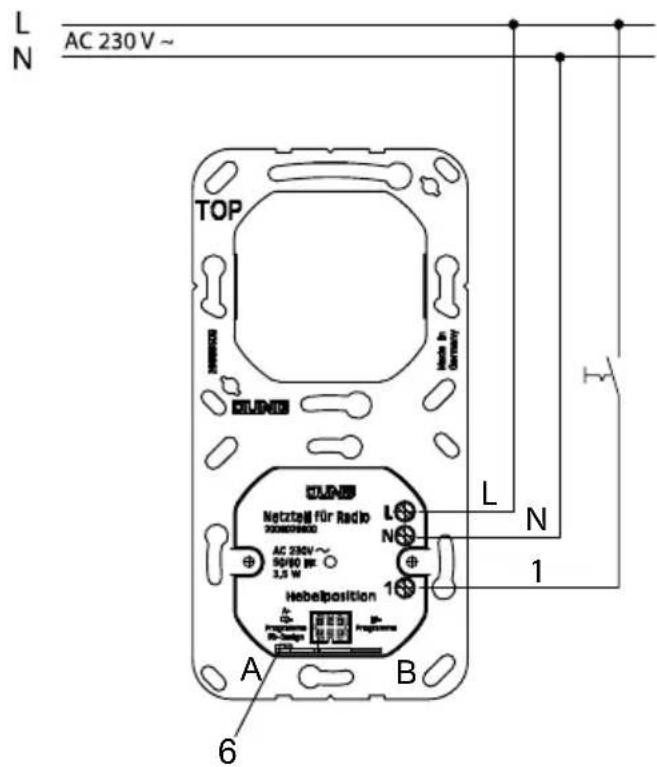
Figure 4: Power supply connection
L,N AC 230 V\~ connection
1 extension connection
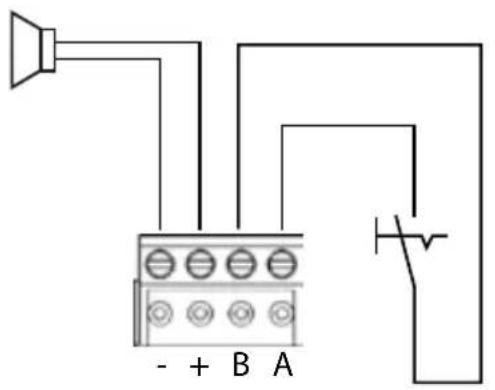
Figure 5: Connection of an external loudspeaker and potential-free contact
-/+ External right loudspeaker connection
A/B potential-free loudspeaker contact connection
Start-up
An automatic channel search takes place on the first start-up.
The entire frequency range will be scanned and the four strongest channels saved in memory slots 1 to 4.
Appendix
Technical data
Rated voltage: AC 230 V \~
Frequency: 50/60 Hz
Ambient temperature: approx. 0 ... + 50 °C
Relative humidity: ....approx. 15 % ... 90 %, no dew
Frequency range: 87.50 MHz ... 108.00 MHz
Protection class: IP 20
Separate loudspeaker connection cable ....Twin loudspeaker cable
H03VH-H, 2 x 0.75
Alternative: JY (st) Y 2x2x0.6 mm
Max. length: 10 m
Connection: ....Screw terminals 1 x 2.5 mm² or 2 x 1.5 mm²
Warranty
We reserve the right to modify technical and formal characteristics of the product insofar as this supports technical progress.
Our products are under guarantee within the scope of the statutory provisions.
Please send the device, postage paid, to our central Customer Service Centre, with a description of the error.
ALBRECHT JUNG GMBH & CO. KG
Service Centre
Kupferstr. 17-19
44532 Lünen
Germany
Telephone: +49 (0) 2355 80 60
Fax: +49 (0) 23 55.80 61 89
kundencenter@jung.de
The CE mark is a free trade symbol intended solely for the authorities, and does not carry any guarantee of properties.
ALBRECHT JUNG GMBH & CO. KG
Volmestrasse 1
58579 Schalksmühle
Germany
Telephone: +49 (0) 2355 806-0
- Structure of the device
- Function
- Correct use
- Product characteristics
- Operation
- Switching radio on/off
- Sleep mode:
- Automatic channel search
- Manual channel search
- Saving/overwriting favourite channel
- Deselecting favourite channel
- Volume+
- Information for electrically skilled persons
- Installation and electrical connection
- DANGER!
- Installing and connecting radio
- Additional loudspeaker
- Start-up
- Appendix
- Technical data
- Warranty
- ALBRECHT JUNG GMBH & CO. KG
Brand : JUNG
Model : RANCDM514
Category : Radio