
BASS Q - Audio Equalizer JBL - Free user manual and instructions
Find the device manual for free BASS Q JBL in PDF.


| Product Type | Active Subwoofer |
| Brand | JBL |
| Model | BASS Q |
| Dimensions (H x W x D) | 350 x 300 x 300 mm |
| Weight | 10.5 kg |
| Power Output (RMS) | 100 W |
| Frequency Response | 30 Hz - 150 Hz |
| Driver Size | 10" (250 mm) |
| Inputs | RCA L/R, Speaker Level |
| Controls | Volume, Phase (0/180°), Crossover (40-150 Hz), Auto Power |
| Enclosure Type | Bass Reflex |
| Material | MDF with Vinyl Finish |
| Power Supply | AC 100-240 V, 50/60 Hz |
| Power Consumption (Standby) | < 0.5 W |
| Cleaning Instructions | Wipe with a dry cloth; do not use solvents |
| Safety Features | Overload protection, thermal shutdown |
| Spare Parts / Repairability | Contact JBL authorized service center for any repairs |
| Warranty | 2 years for parts and labor |
| Operating Temperature | 0°C to 45°C |
| In the Box | Subwoofer, power cord, user manual |
Frequently Asked Questions - BASS Q JBL
User questions about BASS Q JBL
0 question about this device. Answer the ones you know or ask your own.
Ask a new question about this device
Download the instructions for your Audio Equalizer in PDF format for free! Find your manual BASS Q - JBL and take your electronic device back in hand. On this page are published all the documents necessary for the use of your device. BASS Q by JBL.
USER MANUAL BASS Q JBL
JBL® PERFORMANCE™ SERIES OWNER'S GUIDE
JBL BASSO™
AUTOMATIC ROOM-MODE-CORRECTION PROCESSOR
JBL
®
JBL BASSQ™ AUTOMATIC ROOM-MODE-CORRECTION PROCESSOR
3 Important Safety Instructions
4 Introduction and Features
4 Included Accessories
5 Operation and Controls
8 Connecting Your JBL Performance Series System
9 Installing the JBL BassQ Processor
10 Calibration and Room Mode Correction
11 Troubleshooting
12 JBL BassQ Specifications
IMPORTANT SAFETY INSTRUCTIONS
- Read these instructions.
- Keep these instructions.
- Heed all warnings.
- Follow all instructions.
- Do not use this apparatus near water.
- Clean only with a dry cloth.
- Do not block any ventilation openings. Install in accordance with the manufacturer's instructions.
- Do not install near any heat sources such as radiators, heat registers, stoves or other apparatus (including amplifiers) that produce heat.
- Do not defeat the safety purpose of the polarized or grounding-type plug. A polarized plug has two blades with one wider than the other. A grounding-type plug has two blades and a third grounding prong. The wide blade or the third prong is provided for your safety. If the provided plug does not fit into your outlet, consult an electrician for replacement of the obsolete outlet.
- Protect the power cord from being walked on or pinched, particularly at plugs, convenience receptacles and the point where they exit from the apparatus.
- Only use attachments/accessories specified by the manufacturer.
- Use only with the cart, stand, tripod, bracket or table specified by the manufacturer or sold with the apparatus. When a cart is used, use caution when moving the cart/apparatus combination to avoid injury from tip-over.
-
Unplug this apparatus during lightning storms or when unused for long periods of time.
-
Refer all servicing to qualified service personnel. Servicing is required when the apparatus has been damaged in any way, such as power supply cord or plug is damaged, liquid has been spilled or objects have fallen into the apparatus, or the apparatus has been exposed to rain or moisture, does not operate normally or has been dropped.
- Do not expose this apparatus to dripping or splashing and ensure that no objects filled with liquids, such as vases, are placed on the apparatus.
- To completely disconnect this apparatus from the AC Mains, disconnect the power supply cord plug from the AC receptacle.
- The mains plug of the power supply cord shall remain readily operable.
- Do not expose batteries to excessive heat such as sunshine, fire or the like.

The lightning flash with arrowhead symbol, within an equilateral triangle, is intended to alert the user to the presence of uninsulated “dangerous voltage” within the product’s enclosure that may
be of sufficient magnitude to constitute a risk of electric shock to persons.

The exclamation point within an equilateral triangle is intended to alert the user to the presence of important operating and maintenance (servicing) instructions in the literature
accompanying the product.
WARNING: To reduce the risk of fire or electric shock, do not expose this apparatus to rain or moisture.
INTRODUCTION AND FEATURES
INTRODUCTION
Congratulations on your purchase of this Performance™ Series JBL BassQ™ processor! You have purchased a product that embodies the best of what JBL® engineers have learned about the emotional power of audio reproduction in more than fifty years of preeminence in the field. This processor has been designed and crafted to provide the user with a high level of sonic performance. Special attention has been paid to minimizing the number of components in the audio signal path, resulting in extremely low distortion, excellent transient response and wide dynamic range. JBL products set new benchmarks in audio technology and, when used as part of a complete JBL Performance Series system, will bring the ambience and acoustics of some of the world's greatest concert halls and theaters into your home.
To obtain the best performance from this processor, please be sure to completely read this user's manual and use the JBL BassQ processor only in accordance with its instructions.
FEATURES
The JBL BassQ processor features the following:
Minimum Phase Distortion
The algorithms used to calculate and correct the room modes are designed to give the best results with the least amount of phase-induced distortion. This is unique to the JBL BassQ processor and is not available from any other product.
Mono or Stereo Inputs
Supporting both LFE and stereo subwoofer inputs allows for a greater range of applications and allows the JBL BassQ unit to be used with a variety of different processors. Although the system has been designed to work with the rest of the Performance Series system, including AV1 and AVA7, the unit can be used in almost any system and can improve the in-room response of almost any installation.
Multiple Subwoofer Outputs
Up to four subwoofers can be optimized. Multiple subs allow better seat-to-seat response and can greatly improve the listening experience over a single subwoofer. The JBL BassQ unit allows optimizing multiple subs to achieve the most accurate in-room response possible.
Auto Turn-On and Power-Sequencing
Due to the high current demands of power amplifiers at the instant of turn-on, the JBL BassQ processor is equipped with a power-sequencing circuit that turns on each amplifier in a delayed sequence, avoiding the large instantaneous current demand (and possible circuit breaker tripping) that could otherwise occur, should more than one amplifier turn on at the same instant.
Multiple Microphone Inputs
Multiple microphones allow for the optimization of multiple seats. This results in a larger listening area that benefits from a more accurate room optimization.
Two Listening Curves
Two different playback curves have been implemented to better match the type of playback material. Cinema mode closely follows the standard for playback curves used in commercial cinemas and scoring stages. This will allow the system to closely match the experience of the directors and producers of popular films and TV shows. Music mode is a gentler playback curve that better mimics the frequency response in most music production studios.
INCLUDED ACCESSORIES
(1) JBL BassQ processor
(1) Remote control
(1) 120V power cord
(1) 230V power cord
(4) Microphone
(4) Microphone bases
(8) Microphone stands (two per microphone)
(1) Rack-mount set with hardware
(1) 3.5mm male to 3.5mm male power trigger cable
(1) 2.5mm male to 3.5mm male cinema/music trigger cable
Pushing this button is all that is required to turn on the unit if it is not part of a JBL Performance Series system and the Main Power Switch ⑪ is in the On position.
2. Standby Indicator
This indicator on the front-panel Power Switch 1 will glow red when the JBL BassQ unit is in the Standby mode, whether it is operating as part of a JBL Performance Series system or not. When the unit is in the On mode, this light will turn blue.
3. Input Overload
The light will glow orange when an overload to the input occurs during testing. If this lights during testing, you should lower the level control on the subwoofer. It may be necessary to lower it significantly for the test, but the level control should be raised back to normal levels after the test is completed.
4. BassQ
Pressing this button runs the subwoofer test and calibrates the system. The indicator light will be off if the calibration has not been performed. The indicator light flashes blue during the process to indicate that the system is being calibrated. The indicator light will be solid blue once the calibration is complete.
5. Movie
Pressing this button toggles between the Movie EQ mode and Music EQ mode. The indicator light will glow blue when Movie mode is selected, and remain off when the JBL BassQ unit is in Music mode.
6. Stereo
Pressing this button toggles between Stereo and Mono inputs on the rear panel. The indicator light will be lit when the input is set to Stereo input and be off when set to Mono input. This needs to match the input configuration on the rear panel and should not be changed once it is set. Use the Mono setting for the AV1 or other processor that uses an LFE output. Use Stereo setting for processors that include stereo subwoofer outputs.
7. Bypass
Pressing this button bypasses all JBL BassQ processing. The indicator light will glow blue when Bypass is engaged.
8. Subwoofer Indicators
After the JBL BassQ system has completed the calibration, the indicator light will flash to confirm which subwoofers are active and have been calibrated. The lights will flash again when the system is turned on or taken out of Standby, but will not remain lit during normal operation.
9. Microphone Inputs
Connect the four included microphones into these inputs. The microphones should be placed in the appropriate seating locations. Please refer to the diagram on page 10.
10. IR Sensor
The IR sensor allows use of the included remote control to operate the unit from across the room. The IR sensor must not be blocked, in order for it to operate properly.

11. Main Power Switch
Place this switch in the On position at all times during normal use.
12. Power Trigger Input Jack
When using the JBL BassQ processor in a JBL Performance Series system with the AV1 digital surround processor, you will need to use the trigger cable set included with the AV1. Connect the DIN end of the cable to the Trigger Output DIN jack on the rear panel of the AV1, and connect the 1/8" (3.5mm) plug to the Trigger Input Jack ⑫on the rear panel of the JBL BassQ unit.
If the JBL BassQ unit is used with another component (such as the AV2) that uses a trigger for automatic turn-on and turn-off, make sure the other component's output is between 3 and 24 volts DC. Connect the trigger output jack on the other component to the 1/8" (3.5mm) Trigger Input Jack on the JBL BassQ unit using the cable included with the JBL BassQ unit. Whenever a power-on trigger is used to operate the JBL BassQ processor, make sure that the JBL BassQ Main
Power Switch ⑪ is in the On position. If the Trigger source (AV1 or another source unit featuring power-on trigger) is on, the JBL BassQ LED Standby
Indicator ② will glow blue. If the Trigger source is off or in Standby, the JBL BassQ unit will also go into Standby and its LED Standby Indicator
②will turn red. The remote control will override the trigger input.
13. Power Trigger Outputs
If you wish to have other components in your system turn on via trigger, make sure they are compatible with the 1/8" (3.5mm) 12-volt DC Trigger
Output Jack ⑬ on the JBL BassQ unit. If they are, you may connect the
Trigger Output Jack ⑬ to the first component's trigger input using one of the cables included with the JBL Performance Series AVA7, and
then connect all components in daisy-chain fashion.
There are five trigger outputs on the rear panel of the JBL BassQ unit.
• Pass-through sends the 12-volt trigger signal out in parallel to the input. Use this to trigger the AVA7 amplifier, or the first amplifier you are using in the system.
- 2S sends the 12-volt signal 2 seconds after the input is received.
- 4S sends the 12-volt signal 4 seconds after the input signal is received.
- 6S sends the 12-volt signal 6 seconds after the input signal is received.
- 8S sends the 12-volt signal 8 seconds after the input signal is received.
14. Movie Trigger Input
Using a 12-volt trigger from the Movie/Music switching can be automated. If you are using the AV1 processor, use the DIN-to-mini trigger cable included with the AV1, as this switching is already programmed into the trigger outputs of the AV1. If you are using the AV2 or another component that has a programmable trigger, use the 2.5mm to 3.5mm cable included with the JBL BassQ unit. The remote control will override the trigger input.
15. Subwoofer Inputs
There are two subwoofer inputs. If using an AV1 processor or other processor that has a single subwoofer or LFE output, connect the subwoofer output to the Left input and set the input mode to Mono on the front panel of the JBL BassQ unit. Do not connect the input to the Right input jack, as no signal will be processed. If you are using a preamp/processor such as the AV2, or an AVR that has stereo subwoofer outputs, connect the left and right inputs and set the mode to Stereo on the front panel of the JBL BassQ unit.
16. Subwoofer Outputs
There are four subwoofer outputs. These correspond to two subwoofers per side. For best performance, it is recommended that you use at least two subwoofers placed in the front left and front right corners of the room. These would use the L1 (Left 1) and R1 (Right 1) outputs. If four sub-woofers are used, the additional sub-woofers would be connected to the L2 (Left 2) and R2 (Right 2) outputs. If stereo input is used, the left and right outputs will pass through the respective input signal as a stereo subwoofer.
17. AC Inlet
Your JBL BassQ processor is shipped with an IEC-type, removable power cord that mates with the AC inlet on the rear panel. To ensure proper operation, use the supplied power cords. The JBL BassQ processor is a multivoltage unit and can operate from 110 to 240 volts, 50Hz to 60Hz. Two cords are supplied. One is a 120-volt cord for use in North America, and the second is a generic cord, which requires that the correct mating plug be attached for your country's specific type.
18. RS-232 Port
This port is for factory use only. No user features are available at this time.
| BUTTON FUNCTION | |
| On Turns on JBL BassQ system | |
| Standby Places unit in Standby | |
| BassQ Runs JBL BassQ calibration | |
| Bypass Bypasses internal DSP | |
| Stereo/Mono Toggles between Stereo and Mono input mode | |
| Movie/Music Toggles between Movie and Music EQ mode |
REMOTE CONTROL BATTERY INSTALLATION
The remote control requires one CR2032 battery. The battery should be replaced as needed. When battery power is low, the remote control enters a low-voltage condition, preventing it from operating the JBL BassQ unit. When this occurs, replace the batteries. Normal operation will resume when new batteries are installed.

To replace the remote control batteries:
- Locate the battery compartment on the back of the remote control. Pull down on the battery tray to slide out the old battery. The tray is held in place by a pressure-fit lock and requires a small amount of force to remove.
- Remove the old battery.
- Observing the proper polarity, insert one CR2032 battery.
- Slide the battery tray back into the remote until the tray locks into place.
CAUTION: DANGER OF EXPLOSION IF BATTERY IS INCORRECTLY REPLACED. REPLACE ONLY WITH THE SAME (CR2032) OR EQUIVALENT TYPE.
WARNING:
• DO NOT EXPOSE BATTERIES TO EXCESSIVE HEAT SUCH AS DIRECT SUNLIGHT, FIRE OR THE LIKE.
• DISPOSE OF DEAD BATTERIES IN ACCORDANCE WITH LOCAL REGULATIONS.
CONNECTING YOUR JBL PERFORMANCE SERIES SYSTEM
GENERAL INFORMATION
A JBL Performance Series system installation incorporates one preamp/processor (AV1 or AV2), one power amplifier (AVA7) – in addition to the amplifier(s) used to power one or more subwoofers – and one JBL BassQ processor. If your speaker complement includes the Performance Series PS1400 powered subwoofer (or other powered subwoofer), you may use the amplifier included in each subwoofer. If you are using a passive subwoofer, you will need to supply a subwoofer amplifier. All seven channels on the AVA7 are to be used for driving the left, center and right, and both side and both rear speakers.
Use the simplified wiring diagram below, which illustrates how to connect the JBL BassQ unit to a Performance Series system. This diagram is intended to show the signal flow through the system. WIRING DIAGRAM
SUGGESTED RACK-MOUNTING ORDER

INSTALLING THE JBL BASSQ PROCESSOR
PHYSICAL INSTALLATION
Installation of the JBL BassQ unit is a straightforward process.

IMPORTANT:
The JBL BassQ unit must be installed following the directions below.
Always put amplifiers on the bottom of a stack. Heavy equipment should not be supported solely by the front-mounting locations.
-
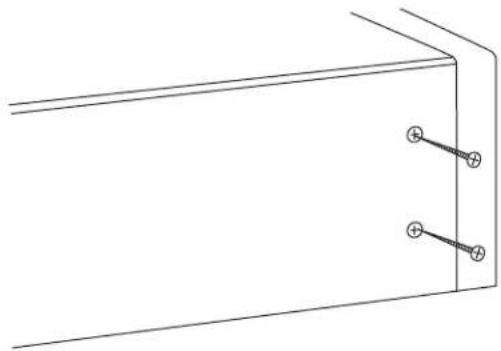
The JBL BassQ unit has been designed to be mounted in EIA-standard racks, or stacked freestanding. If the unit is being mounted in a rack, it is recommended that its feet be removed prior to installation. If it will be stacked with other components, use the feet that came attached to the unit. This will ensure that there is sufficient space underneath so that heat can be dissipated effectively. Two rack ears are included with the JBL BassQ unit. To install these rack ears, remove the two machine screws on each of the two side panels (see drawing), hold each rack ear in place, and attach it to the unit using the same two screws. Make sure that these screws are securely tightened.
-
Make sure that the unit is located in a well-ventilated, cool area. If it is installed inside a cabinet that is enclosed on all sides, the front of the cabinet must remain open to allow sufficient flow-through ventilation to avoid overheating.
-
With the help of another person to guide the unit into the rack, gently slide the JBL BassQ unit into place. Align the rack mounting holes to the rack ears of the equipment rack.
-
Starting with the bottom two screw holes and using two of the rack screws and plastic washers (if supplied with your rack), secure the JBL BassQ unit into the rack. It may be necessary to have a helper hold up the rear of the unit until you have started the threads of the screws.
Once the bottom mounting screws are installed, move to the top mounting screws. Once done, check and tighten all four screws. Always use all four screws when mounting any equipment.
natural_image
Pure technical line drawing of a rectangular panel with two small circular features and connecting lines (no text or symbols)Side view of amplifier without rack ear.

natural_image
Pure technical line drawing of a structural bracket with mounting holes and mounting holes (no text or symbols)Side view of amplifier with rack ear attached.

Front view of amplifier with rack ear attached.
CALIBRATION AND ROOM MODE CORRECTION
Once you have connected the subwoofer input into the JBL BassQ unit and connected the outputs from the unit to all subwoofers in the system, you will need to run the BassQ test to finalize the room calibration and correction.
Before You Begin
It is very important that all subwoofers are on and installed before you run the BassQ process. If you move a subwoofer or add a sub to the system, you will need to rerun the test. Set all initial settings on all attached subwoofers or subwoofer amplifiers to nominal or 0dB input level (phase set to 0°) and bypass all internal crossovers.
If Your System Includes an AV2
Before beginning any calibration, select BASSQ ->Yes from the AV2 Setup menu. This will optimize the delay settings and AV2 Autocal for use with the JBL BassQ processor. It will be necessary to manually set the subwoofer output level from the AV2 processor. See the AV2 manual for details.
Step One: Microphone Setup
Begin the calibration process by setting up the microphone array to test the listening area. The JBL BassQ unit includes four microphones, four microphone bases and eight microphone stands. Begin by screwing together two stands to make four tall stands. Press the poles firmly into the base. The hole in the base will securely hold the stand, but you should make sure that the stand is in the base before proceeding. Next, screw one microphone each into the top of the stand. Each microphone comes with an attached cable with a 1/4" jack on the end. Plug each microphone into the front of the JBL BassQ unit, using the diagram below as a reference for placement. It is important that the microphones cover the listening area.
Step Two: Turn On All Electronics
Make sure that all electronics are on, including all subwoofers or subwoofer amplifiers. Turn down or mute the volume on the preamp.
NOTE: Many self-powered subwoofers, such as the PS1400 and HTPS-400, have auto turn-on based on signal sensing. Either turn them to On or make sure that they are on and remain on for this test. If the subwoofers are not already on, the first part of the test tone will be clipped and BassQ will not properly calibrate the room.
Step Three: Begin the BassQ Process
The first time you power up the JBL BassQ unit, the blue light will be off and the unit will be in Bypass mode. Press the BassQ button. The BassQ light will begin to blink, indicating that it has started the process. You will hear a test tone from each subwoofer, one at a time. When the process is finished, the BassQ light will be solid and the subwoofer lights will flash briefly to indicate which outputs have subwoofers attached and are calibrated. You can confirm which outputs are calibrated by placing the unit into Standby mode and then on again. The lights will go on briefly to indicate which outputs are active.

NOTE: When using an AV2, it is important to run the Autocal only after using the BassQ process and setting the BassQ setting to Yes in the AV2 setup menu. See the AV2 manual for details.
Step Four: Level Calibration of Main Speakers
Level adjustments are best done using an SPL meter that is set to C-weighting and Slow response. Set the level control on your subwoofer to 0dB or a nominal reference level. Turn on the internal noise test from the AV1 (or other processor) and, using the level control in your preamp or processor, set all speaker levels to a 75dB reference level. If using the AV2 Autocal, the levels will automatically be set. Be sure to set the AV2 to Yes for BassQ in the AV2 setup menu.
Step Five: Distance Calibration
Due to the different distances between the listening position for the subwoofer, the front channel speakers and the surround speakers, the amount of time it takes for sound to reach your ears from front speakers versus surround speakers differs. You may compensate for this difference through the use of the delay settings to adjust the timing for the speaker placement and acoustic conditions in your listening room or home theater. Begin by measuring the distance between your listening position and each of the speakers in your system. Write these down, as you may need to remember them in the future. If you have more than one subwoofer, it is best to place them an equal distance from the listening position. If this is not possible, use the distance from the closest subwoofer for the speaker distance settings. If using the AV2 Autocal, the distances will automatically be set. Be sure to set the AV2 to Yes for BassQ in the AV2 setup menu.
Step Six: Enjoy the Music
You can now disconnect all the microphones and pack up the stands. Keep these, in case you need to rerun the test. Unmute the preamp and enjoy.
TROUBLESHOOTING
Problem: The JBL BassQ unit does not turn on. Neither the red nor blue indicator lights are on.
Make sure the JBL BassQ processor is plugged in, and verify that there is the proper voltage at the wall outlet. Make sure the Main Power Switch ① on the rear panel is in the On position.
Problem: The Standby Indicator ② lights red, but it does not change to blue when the Power Switch ① is depressed.
If the JBL BassQ processor is being used in a JBL Performance Series system, make sure that the surround processor is turned on, the Main
Power Switch 11 is in the On position, and there is a connection between the JBL BassQ unit's Trigger Input Jack 12 and another device providing a power-on voltage trigger. Please refer to the "Connecting Your JBL Performance Series System" section for reference. If the JBL BassQ unit is not being used with an AV1 or any other source providing a power-on trigger voltage signal, make sure that no connection is made to the Trigger Input 12 of the JBL BassQ processor.
Problem: There is no sound from the speakers, but the JBL BassQ unit is on (Standby Indicator ②is lit in blue).
- Make sure that the surround processor, amplifier or subwoofer is on, and that the correct source has been connected and selected.
- Make sure that the correct outputs are connected from the surround processor to the JBL BassQ unit.
- Make sure that the subwoofers are connected to the correct terminals. Check for short circuits at both ends of the speaker cables.
Problem: Not all the processors, amplifiers or subwoofers turn on in the system.
- Make sure that all required cables are connected between system components. Refer to the "Connecting Your JBL Performance Series System" section.
- Make sure that each component has its Main Power Switch if in the On position and is set to Auto turn-on, if necessary.
- Make sure the Power Switch ① on each JBL BassQ unit is in the On position (so that its Standby Indicator ② is lit in blue when the cable is removed from its Trigger Input Jack ⑫).
Problem: Insufficient sound output level from the speakers.
Check that the output levels of the surround processor or equalizer are set properly.
Problem: Insufficient bass.
Verify that the speakers have been wired to the JBL BassQ unit with the correct polarity.
Problem: Audible hum from the speakers.
- Check the power outlets and make sure that there is a solid earth ground present. (The services of an electrician may be required.)
- Make sure that all signal cables are routed away from power cords.
- If these suggestions fail, experiment by running ground wires between the rear-panel screws of the JBL BassQ processors and the other system components, such as the surround processor or signal processing package.
If you still encounter difficulty after trying the suggestions above, call your JBL authorized dealer, or 516.255.4JBL (USA only) directly, for further assistance.
GENERAL
| Power Requirements | 100V – 230V ~AC, 50Hz – 60Hz |
| Power Consumption | 15W |
| Operating Temperature | +5°C to +40°C (+41°F to 104.5°F) |
| Operating Humidity | 5% to 85% (no condensation) |
| Dimensions (H x W x D) | 2" x 17-3/8" x 15-1/8" (51mm x 440mm x 384mm) |
| Net Weight | 9 lb (4.1kg) |
| Packaged Weight | 19.16 lb (8.7kg) |
AUDIO CHARACTERISTICS
| THD | <0.01%, 20Hz – 180Hz |
| Input Impedance | 20k ohms |
| System Gain (Bypass Mode) | 1dB |
| Frequency Response (at 1V) | 20Hz – 150Hz, +0.5, -0.5dB |
| LP –3dB Point Bypass Mode | 180Hz |
| S/N Ratio | 112dBA |
| Dynamic Range | 102dB |
| Maximum Input Voltage | 2V RMS |
| Output Impedance | <600 Ohms |
Features, specifications and appearance are subject to change without notice.
JBL is a trademark of Harman International Industries, Incorporated, registered in the United States and/or other countries. Performance, JBL BassQ and Pro Sound Comes Home are trademarks of Harman International Industries, Incorporated.
JBL
PRO SOUND COMES HOME™
Harman Consumer Group, Inc., 250 Crossways Park Drive, Woodbury, NY 11797 USA
www.jbl.com
© 2008 Harman International Industries, Incorporated. All rights reserved.
Part No. 34-JBL-0015 5/08

A Harman International Company
Declaration of Conformity

We, Harman Consumer Group, Inc.
2, route de Tours
declare in own responsibility that the
product described in this owner's manual
is in compliance with technical standards:
EN 55013:2001+A1:2003
EN 55020:2002+A1:2003
EN 61000-3-2:2000
EN 61000-3-3:1995+A1:2001
EN 60065:2002

Laurent Rault
Harman Consumer Group, Inc.
- JBL® PERFORMANCE™ SERIES OWNER'S GUIDE
- JBL BASSQ™ AUTOMATIC ROOM-MODE-CORRECTION PROCESSOR
- IMPORTANT SAFETY INSTRUCTIONS
- INTRODUCTION AND FEATURES
- INTRODUCTION
- FEATURES
- Minimum Phase Distortion
- Mono or Stereo Inputs
- Multiple Subwoofer Outputs
- Auto Turn-On and Power-Sequencing
- Multiple Microphone Inputs
- Two Listening Curves
- INCLUDED ACCESSORIES
- Standby Indicator
- Input Overload
- BassQ
- Movie
- Stereo
- Bypass
- Subwoofer Indicators
- Microphone Inputs
- IR Sensor
- Main Power Switch
- Power Trigger Input Jack
- Power Trigger Outputs
- Movie Trigger Input
- Subwoofer Inputs
- Subwoofer Outputs
- AC Inlet
- RS-232 Port
- REMOTE CONTROL BATTERY INSTALLATION
- CONNECTING YOUR JBL PERFORMANCE SERIES SYSTEM
- GENERAL INFORMATION
- INSTALLING THE JBL BASSQ PROCESSOR
- PHYSICAL INSTALLATION
- IMPORTANT:
- CALIBRATION AND ROOM MODE CORRECTION
- Before You Begin
- If Your System Includes an AV2
- Step One: Microphone Setup
- Step Two: Turn On All Electronics
- Step Three: Begin the BassQ Process
- Step Four: Level Calibration of Main Speakers
- Step Five: Distance Calibration
- Step Six: Enjoy the Music
- TROUBLESHOOTING
- JBL
- PRO SOUND COMES HOME™
Brand : JBL
Model : BASS Q
Category : Audio Equalizer