
Kerta 52167-BAT-GR-BB - Bathtub Altair - Free user manual and instructions
Find the device manual for free Kerta 52167-BAT-GR-BB Altair in PDF.


| Product Type | Freestanding Bathtub |
| Brand | Altair |
| Model | Kerta 52167-BAT-GR-BB |
| Color | Grey (GR) with Black Feet (BB) |
| Material | Acrylic reinforced with fiberglass |
| Dimensions | 1800 mm (L) x 800 mm (W) x 600 mm (H) |
| Weight | Approximately 45 kg (empty) |
| Water Capacity | Approximately 250 liters |
| Power Supply | None (non-whirlpool, standard bathtub) |
| Installation Type | Freestanding with adjustable feet |
| Main Functions | Soaking bath; ergonomic backrest; integrated overflow and drain |
| Features | Slip-resistant bottom; easy-to-clean surface |
| Included Accessories | Pop-up drain, overflow cover, chrome feet |
| Cleaning Instructions | Use mild soap and water; avoid abrasive cleaners |
| Maintenance | Periodic check of drain seal; clean with non-acidic products |
| Safety | Slip-resistant floor; rounded edges; no electrical components |
| Spare Parts Availability | Drain kit, overflow assembly, feet available from manufacturer |
| Reparability | Acrylic surface can be polished; feet adjustable and replaceable |
| Weight Capacity | Maximum 300 kg (static load including water) |
| Warranty | 2 years against manufacturing defects |
Frequently Asked Questions - Kerta 52167-BAT-GR-BB Altair
User questions about Kerta 52167-BAT-GR-BB Altair
0 question about this device. Answer the ones you know or ask your own.
Ask a new question about this device
Download the instructions for your Bathtub in PDF format for free! Find your manual Kerta 52167-BAT-GR-BB - Altair and take your electronic device back in hand. On this page are published all the documents necessary for the use of your device. Kerta 52167-BAT-GR-BB by Altair.
USER MANUAL Kerta 52167-BAT-GR-BB Altair
FASHION BATHROOM LIFE
Altair Inc
Freestanding Tub with Metal feet Maintenance & Instructions
natural_image
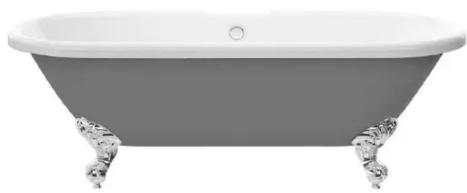
Exterior view of a classic white double-toll bathtub with ornate legs (no text or symbols)Please retain this manual after installation for future reference and maintenance
Product must be installed in compliance with relevant Water Bylaws
The Product is CUPC certified
Original certification model Code: DM1003-1.7 File No. 10288
Important:
* Two people are required for installation.
* Freestanding tub is not designed to take weight on the rim.
Do not sit or stand on the tub rim.
Parts List
| No. | Part Name Qty (pcs) | Pic | |
| A Bar | 4 | ||
| B Screw | 4 | ||
| C Nut | 12 (8 pcs pre-assembled on tub) | ||
| D Washer | 12 (8 pcs pre-assembled on tub) | ||
| E Fastener washer | 4 | ||
| F | Adjustable metal feet | 4 |
TOOLS REQUIRED
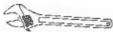 | Adjustable Wrench |
Step 1
* Turn over the tub on soft surface to make sure it is protected from scratches.
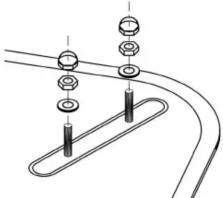
* Take off the plastic covers of screws and unscrew nuts and washers from the tub(pre-assembled on the tub).
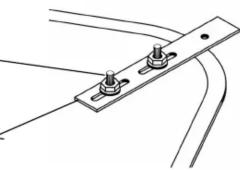
* Place the bars on the tub, position washers and screws, then fix the screws but not tighten them, because the bars could be adjusted during assembling.
natural_image
Pure mechanical assembly diagram showing a curved pipe with multiple bolted components (no text or symbols)Do not tighten the
screws before
adjustment.
Adjustment
space
natural_image
Pure technical line drawing of a mechanical bracket or mounting bracket without any text, numbers, or symbolsStep 2
* Position the feet on the bar, fasten with washers, fastener washers and screws, but not tighten screws right away. cloth and warm soapy water to wash away
* Adjust the feet to match the shape of the tub, bars could be adjusted if needed.
* Hold the feet firmly when tightening all screws, the feet must be secured fully to prevent any movement. sprays or dry cleaning liquid, etc.


natural_image
Diagram of a mechanical device with attached components and a close-up inset showing a detail (no text or symbols)Step 3
* Assemble the overflow and waste. Connect the tub trap (not supplied with the tub) to the fitted tub waste and connect that to the bathroom's waste pipes.
Step 4
* Place the tub to the desired location and water test the tub for any leaks before use.
Receive Your Tub
A) Unpack and check for damage.
After receiving your tub, please unpack and remove all covering, checking whether there is any damage. Repack the tub if it is not being immediately installed. It will be rejected any claim for damage if not notified in a timely manner.
B) Protect your tub.
Before commencing installation, ensure the tub is completely protected, leave covering in place until the bathroom is complete. Scratches and cracks incurred during installation are not covered by the warranty.
Cleaning & Maintenance:
A) To preserve the polished surface, after using your tub, clean with soft
B) Do not use powders, pastes, crème cleaners, thinners, window cleaning
C) When coloured essentials oils are used, first test that the colour won't stain your tub. Always add oils into a tub full of water. Never pour them into an empty tub.
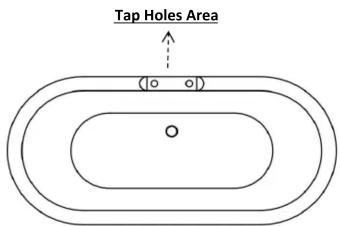
Tap Holes Drilling Attention if applicable
* Pay attention to below points if the tub is designed with tap deck.
* The tap holes are not pre-drilled on the deck, drill holes according to your need.
* Check and siliconed the tap holes to make sure the reinforcement layer holes are solid before installing the faucet.
* Check and make sure that there is no water leakage at the faucet.
Illustrations below are for reference only
Installation Instructions of the Bathtub drainer
Important:
We recommend that this product is installed by a qualified professional contractor.
Do NOT overtighten the waste as this may cause long term damage to the bath.
Never use abrasive detergents or disinfectants or those containing alcohol, hydrochloric acid or phosphoric acid.
- Remove cap, screw and gasket from fitting;
- Tighten the screw to the overflow body;
- Aim another side to the drain hole and screw the pop up cover slowly, but donot overtighten it;
- Loosen the screws on the three pipes and stretch the pipes to the appropriate length, fitting for the bathtub, and then tighten the screws.
- Connect approproate drain pipe;
- Check if there's any leakage.

Brand : Altair
Model : Kerta 52167-BAT-GR-BB
Category : Bathtub