
B4400 - Unknown LENOVO - Free user manual and instructions
Find the device manual for free B4400 LENOVO in PDF.


| Product Type | Laptop |
| Brand | Lenovo |
| Model | B4400 |
| Display Size | 14 inches (estimated) |
| Processor | Intel Core i3/i5 (estimated) |
| Memory (RAM) | Up to 8 GB DDR3L |
| Storage | Up to 1 TB HDD |
| Optical Drive | DVD±RW (select models) |
| Wireless | Wi-Fi 802.11 b/g/n, Bluetooth (optional) |
| Ports | USB 3.0 (x2), USB 2.0, HDMI, VGA, RJ-45, Combo audio jack |
| Card Reader | SD/MMC/SDHC/SDXC |
| Camera | Integrated 0.3 MP (estimated) |
| Battery | Lithium-ion, 6-cell (estimated) |
| Power Supply | AC adapter, 65W (estimated) |
| Operating System | Windows 7 or Windows 8.1 |
| Dimensions (W x D x H) | 340 mm x 240 mm x 25 mm (estimated) |
| Weight | 2.1 kg (estimated) |
| Security | Kensington lock slot, fingerprint reader (select models) |
| Spare Parts / CRU | Battery, hard drive, memory, optical drive, backup battery, Mini PCI Express Card |
Frequently Asked Questions - B4400 LENOVO
User questions about B4400 LENOVO
0 question about this device. Answer the ones you know or ask your own.
Ask a new question about this device
Download the instructions for your Unknown in PDF format for free! Find your manual B4400 - LENOVO and take your electronic device back in hand. On this page are published all the documents necessary for the use of your device. B4400 by LENOVO.
USER MANUAL B4400 LENOVO
- Before using the product, be sure to read Lenovo Safety and General Information Guide first.
- Some instructions in this guide may assume that you are using Windows® 7 or Windows 8.1. If you are using other Windows operating systems, some operations may be slightly different. If you are using other operating systems, some operations may not apply to you.
- The features described in this guide are common to most models. Some features may not be available on your computer and/or your computer may include features that are not described in this user guide.
- The illustrations in this manual may differ from the actual product. Please refer to the actual product.
Regulatory Notice
- For details, refer to Guides & Manuals at http://support.lenovo.com.
Second Edition (August 2013)
© Copyright Lenovo 2013.
LIMITED AND RESTRICTED RIGHTS NOTICE: If data or software is delivered pursuant a General Services Administration "GSA" contract, use, reproduction, or disclosure is subject to restrictions set forth in Contract No. GS-35F-05925.
Contents
Chapter 1. Getting to know your computer .... 1
Top view....1
Left-side view ....5
Right-side view....8
Front view 9
Bottom view....11
Chapter 2. Starting to use Windows ...... 12
Configuring the operating system for the first time ....12
Operating system interfaces ....12
Power-saving modes 15
Connecting to a wireless network ....17
Help and support....18
Chapter 3. Lenovo recovery system ...... 19
Windows 7 recovery system....19
Windows 8.1 recovery system....21
Chapter 4. Troubleshooting ...... 22
Frequently asked questions 22
Troubleshooting 25
Appendix. CRU (Customer Replaceable Units) instructions ..... 29
Replacing the battery....29
Replacing the backup battery....31
Replacing the hard disk drive ....33
Replacing memory 37
Replacing the Mini PCI Express Card....40
Removing the optical drive ....42
Trademarks....44
Chapter 1. Getting to know your computer
Top view

Note: The dashed areas indicate parts that are invisible from outside.
- Attention:
- Do not open the display panel beyond 130 degrees. When closing the display panel, be careful not to leave pens or any other objects in between the display panel and the keyboard. Otherwise, the display panel may be damaged.
Chapter 1. Getting to know your computer
| 1 | Integrated camera | Use the camera for video communication. |
| 2 | Wireless antennas | Connect to the wireless adapter to receive and send wireless radio. |
| 3 | Display | Provides brilliant visual output. |
| 4 | Power button | Press this button to turn on the computer. |
| 5 | Touch pad | The touch pad functions as a conventional mouse.To move the cursor on the screen, slide your fingertip over the pad in the direction in which you want the cursor to move. |
| 6 | Touch pad buttons | The functions of the left and right buttons correspond to those of the left and right buttons on a conventional mouse. |
Note: You can enable or disable the touch pad and the touch pad buttons by pressing Fn + F6.
7 System indicators
8 Speakers Provide audio output.
9 Fingerprint reader With the fingerprint reader you can register fingerprints and use them as passwords to secure your computer.
■ Using the keyboard
Your computer has a numeric keypad and function keys incorporated in its standard keyboard.
Numeric keypad
The keyboard has keys that, when enabled, work as a 10-key numeric keypad. To enable or disable the numeric keypad, press Fn + F8.

Note: The Num lock indicator will light on if the numeric keypad is enabled.
Function key combinations
Through the use of the function keys, you can change operational features instantly. To use this function, press and hold Fn1 then press one of the function keys 2

Chapter 1. Getting to know your computer
The following describes the features of each function key.
| Fn + Esc: | Windows 7: Opens the camera and audio settings window. The camera preview is turned on, and you can change the camera and audio settings as desired.Windows 8.1: Enables/disables the camera. |
| Fn + F1: Enter sleep mode. | |
| Fn + F2: Turns on/off the backlight of the display. | |
| Fn + F3: | Switches between the computer display and an external monitor. Works in the same way as the Windows key + P combination. |
| Fn + F5: | Open the interface for integrated wireless devices settings (on/off). |
| Fn + F6: | Enables/disables the touch pad and the touch pad buttons. |
| Fn + F8: Enables/disables the numeric keypad. | |
| Fn + F9: Starts/pauses playback of Windows Media Player. | |
| Fn + F10: Stops playback of Windows Media Player. | |
| Fn + F11: Skips to the previous track. | |
| Fn + F12: Skips to the next track. | |
| Fn + PrtSc: Activates the system request. | |
| Fn + Home: Activates the pause function. | |
| Fn + End: Activates the break function. | |
| Fn + PgUp: Enables/disables the scroll lock. | |
| Fn + PgDn: Activates the insert function. | |
| Fn + ↑/↓: | Increases/decreases display brightness. |
| Fn + →/←: | Increases/decreases sound volume. |
Left-side view
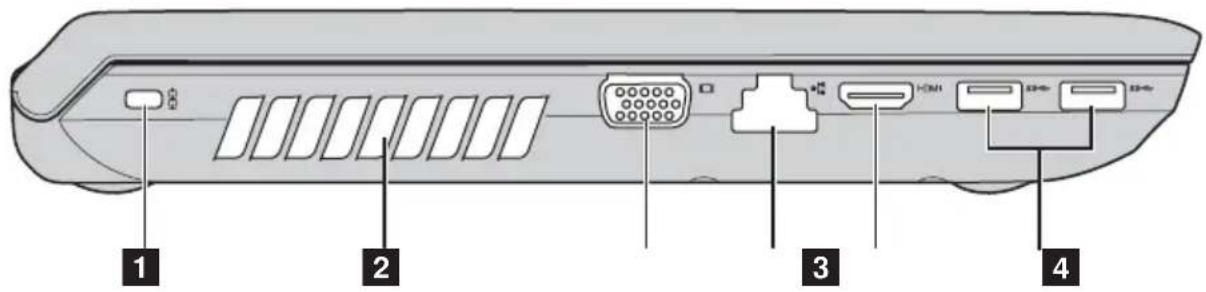
1 Kensington slot
Attach a security lock (not supplied) here to help protect your computer from theft and unauthorized use. You can attach a security lock to your computer to help prevent it from being removed without your permission. For details on installing the security lock, please refer to the instructions shipped with the security lock that you have purchased.
2 Ventilation slots
Dissipate internal heat.
- Attention:
- Make sure that none of the ventilation slots are blocked or else overheating of the computer may occur.
3 VGA port
Connects to external display devices.
4 RJ-45 port
Connects the computer to an Ethernet network.
5 HDMI port
Connects to devices with HDMI input such as a TV or a display.
6 USB 3.0 ports
Connects to USB devices.
Note: For details, see "Connecting USB devices" on page 6.
Chapter 1. Getting to know your computer
■ Connecting USB devices
You can connect a USB device to your computer by inserting its USB plug (Type A) into the USB port on your computer.

natural_image
Illustration of a hand inserting a USB drive into a computer port (no text or symbols visible)The first time you plug a USB device into a particular USB port on your computer, Windows automatically installs a driver for that device. After the driver is installed, you can disconnect and reconnect the device without performing any additional steps.
Note: Typically, Windows detects a new device after connecting it, and then installs the driver automatically. However, some devices may require you to install the driver before connecting. Check the documentation provided by the device's manufacturer before connecting the device.
Before disconnecting a USB storage device, make sure your computer has finished transferring data by that device. Make sure you properly eject the device from the Windows operating system, to avoid data corruption.
Notes:
- If your USB device uses a power cord, connect the device to a power source before connecting it. Otherwise, the device may not be recognized.
- When in sleep mode, you can only use keyboard instead of mouse to wake up the computer.
■ Connecting a Bluetooth device
If your computer has an integrated Bluetooth adapter card, it can connect to and transfer data wirelessly to/from other Bluetooth enabled devices, such as notebook computers, PDAs and cell phones. You can transfer data between these devices up to 10 meters range in open space.
Note: The actual maximum range may vary due to interference and transmission barriers. For best transfer speed, place the device as near your computer as possible.
Enabling Bluetooth and WLAN communications on your computer
Press Fn + F5 to make configuration.
Notes:
- When you do not need to use the Bluetooth function, turn it off to save battery power.
- You need to pair the Bluetooth enabled device with your computer before you can transfer data between them. Read the documentation supplied with the Bluetooth enabled device for details on how to pair the device with your computer.
Chapter 1. Getting to know your computer
Right-side view

1 Combo audio jack
Connects to headsets.
Notes:
- The combo audio jack does not support conventional microphones.
- The recording function may not be supported if third-party headphones or headsets are connected, due to different industry standards.
2 USB port
Connect to USB devices. For details, see "Connecting USB devices" on page 6.
3 Optical disc drive
Reads/burns optical discs.
Note: Some models are supplied with a dummy optical disc drive.
4 Power
Connect the AC power adapter here.
Front view

1 Power and battery indicator
| Indicator status Meaning | |
| Green 80% - 100% charged, or 20% - 100% discharged. | |
| Slow blinking green 20% - 80% charged. | |
| Slow blinking amber 5% - 20% charged. | |
| Amber 5% - 20% discharged. | |
| Fast blinking amber No more than 5% charged or discharged. | |
2 Built-in microphone Captures sound which can be used for video conferencing, voice narration, or audio recording.
3 Memory card slot Insert memory cards (not supplied) here. For details, see "Using memory cards (not supplied)" on page 10.
Chapter 1. Getting to know your computer
■ Using memory cards (not supplied)
Your computer supports the following types of memory card:
- Secure Digital (SD) card
• MultiMediaCard (MMC) - Secure Digital eXtended Capacity (SDXC) card
- Secure Digital High Capacity (SDHC) card
- Attention:
- Insert only one card in the slot at a time.
- This card reader does not support SDIO devices (e.g., SDIO Bluetooth, etc.).
Inserting a memory card
Slide a memory card in until it clicks into place.
Note: If a dummy card is shipped with the computer, push the dummy card and then remove it before inserting a memory card.
Removing a memory card
① Push the memory card in until you hear a click.
② Gently pull the memory card out of the memory card slot.
- Attention:
- Before removing a memory card, make sure you properly eject it from the Windows operating system, to avoid data corruption.
Bottom view

1 Battery latch - manual Keeps the battery pack secured in place.
2 Battery pack
3 Battery latch - spring loaded Keeps the battery pack secured in place.
4 Hard disk drive / Memory / Mini PCI Express Card slot compartment
5 Ventilation slots Allow air to enter the computer for cooling.
Chapter 2. Starting to use Windows
Configuring the operating system for the first time
You need to configure the operating system when it is first used. The configuration process may include the procedures below:
- Accepting the end user license agreement
- Configuring the Internet connection
- Registering the operating system
- Creating a user account
Operating system interfaces
This guide only takes Windows 8.1 as an example for your reference.
■ Start screen and Desktop
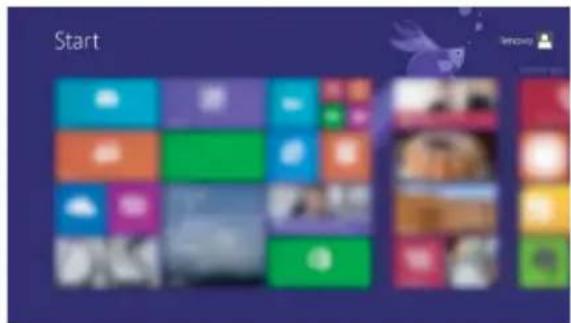
Windows 8.1 comes with two main user interfaces: the Start screen and the Windows desktop.
To switch from the Start screen to the Windows desktop, do one of the following:
- Select the Desktop tile on the Start screen.
- Press the Windows key D.
To switch from the desktop to the Start screen, do one of the following:
- Select Start from the charms bar.
- Press the Windows key .
- Move the cursor to the lower-left corner, then select the Start screen button.
Start screen Desktop

natural_image
Close-up of metallic ice cream with water droplets, no visible text or symbols on the ice itself- Charms and the charms bar
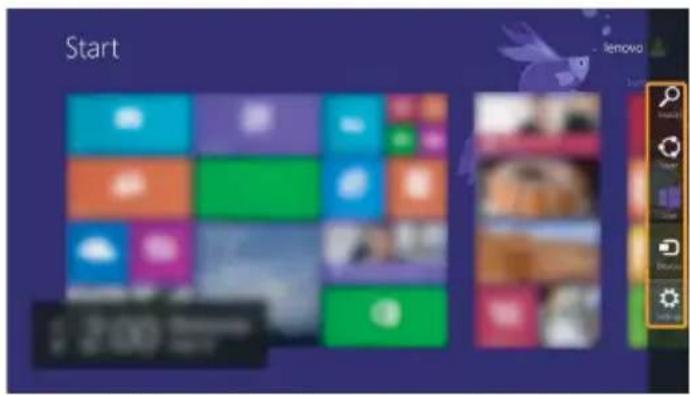
Charms are navigation buttons that let you access basic tasks quickly.
Charms include: Search, Share, Start, Devices, and Settings. The charms bar is the menu that contains the charms. To display the charms bar, do one of the following:
- Move the cursor to the upper-right or lower-right corner until the charms bar is displayed.
- Press the Windows key C.

Search charm
The Search charm is a powerful new way to find what you are looking for, including settings, files, Web images, Web videos, etc.

Chapter 2. Starting to use Windows

Share charm
The Share charm lets you send links, photos, and more to your friends and social networks without leaving the app you are in.

Start charm
The Start charm is a fast way to go to the Start screen.

Devices charm
The Devices charm allows you to connect or send files to connected external devices, including the devices to play, print, and project.

Settings charm
The Settings charm lets you perform basic tasks, such as setting the volume or shutting down the computer. Also, you can get to the Control Panel through the Settings charm when on the Desktop screen.

Power-saving modes
When you have finished working with your computer, you can put it to shut it down, sleep, or hibernate.
■ Shutting down the computer
If you are not going to use your computer for a long time, shut it down. To shut down the computer, do the following:
- Windows 7:
Click Start → Shut down.
- Windows 8.1:
① Open the charms bar, then select Settings

② Select Power ⏻ → Shut down.

1
2
- Putting your computer to sleep
If you will be away from your computer for only a short time, put the computer to sleep. When the computer is in sleep mode, you can quickly wake it to resume use, bypassing the startup process. To put the computer to sleep, do one of the following:
- Close the display lid.
- Press the power button.
- Press Fn + F1.
- Do the proper operations in the operating system.
Windows 7:
Click Start → Sleep.
Windows 8.1:
Open the charms bar, then select Settings → Power → Sleep.
- Attention:
- Wait until the power indicator light starts blinking (indicating that the computer is in sleep mode) before you move your computer. Moving your computer while the hard disk is spinning can damage the hard disk, causing loss of data.
To wake the computer, do one of the following:
- Press any key on the keyboard.
- Press the power button.
- Putting your computer to hibernate
By using this mode, you can turn off the computer completely without saving files or exiting from any program that is running. When the computer enters hibernation mode, all open programs, folders, and files are saved to the hard disk drive, and then the computer turns off.
To put the computer into hibernation mode, do the following:
- Windows 7:
Click Start → Hibernation.
- Windows 8.1:
Open the charms bar, then select Settings → Power → Hibernation.
Connecting to a wireless network
To connect to a wireless network, do the following:
① Press Fn + F5 to turn on the wireless feature.
② View the available wireless networks.
- Windows 7:
Click the wireless network connection status icon in the Windows notification area. A list of available wireless networks will be displayed.
- Windows 8.1:
Open the charms bar and select Settings → . A list of available wireless networks will be displayed.
③ Click a network name in the list, and then click Connect.
Note: Some networks require a network security key or passphrase for connection. To connect to one of those networks, ask the network administrator or the Internet service provider (ISP) for the security key or passphrase.

■ Software configuration
Consult your Internet Service Provider (ISP) for details on how to configure your computer.
Help and support
If you have questions about using the Windows operating system, refer to Windows Help and Support. To access Windows Help and Support, do one of the following:
- Windows 7:
Click Start → Help and Support.
- Windows 8.1:
- Open the charms bar and select Settings; select Help on the Settings menu.
- Press F1 or Fn + F1 (depending on your keyboard layout).
You can read the Windows Help and Support file on your computer. You can also get online help and support by clicking on one of the two links listed under More to explore.
Note: Windows 8.1 also provides an app, Help+Tips. You can find it on the Start screen, to learn more information on new features of Windows 8.1.
Chapter 3. Lenovo recovery system
The Lenovo recovery system is software designed to back up and restore your computer. You can use it to restore the system partition to its original status in case of a system failure. You can also create user backups for easy restoration as required.
Notes:
- If your computer is preinstalled with a GNU/Linux operating system, recovery system is not available.
- To utilize the features of the recovery system, your hard disk already includes a hidden partition by default to store the system image file and the recovery system program files. This default partition is hidden for security reasons, which explains why the available disk space is less than the stated capacity.
- The recovery process is irreversible. Make sure to back up any data you wish to save on the system partition before starting the recovery process.
- The recovery process may take a while. So be sure to connect the AC power adapter to your computer during the recovery process.
Windows 7 recovery system
Two recovery programs are installed on the Windows 7 operating system. To launch the programs, do the following:
- Product Recovery
Start the computer. Press F11 when the Lenovo logo is displayed.
- One Key Recovery Pro
Click Start → Lenovo Solution Center.
■ Recovery media and rescue medium
Recovery media is used to restore the hard disk drive to the factory default settings. Rescue medium is used to recover the computer from failures that prevent you from gaining access to the OneKey Recovery Pro workspace on your hard disk drive. It is important to create a rescue medium and a set of recovery media as early as possible and store them in a safe place for future use.
■ Performing backup operations
The OneKey Recovery Pro program enables you to back up all your hard disk drive contents including the operating system, data files, software programs, and personal settings. You can designate where the OneKey Recovery Pro program stores the backup.
Chapter 3. Lenovo recovery system
■ Restoring the operating system
To restore the Windows 7 operating system, do the following:
① Turn off the computer.
② Start the computer. press F11 when the Lenovo logo is displayed.
③ Follow the on-screen instructions to restore the operating system.
Windows 8.1 recovery system
To launch the recovery program, do the following:
① Turn off the computer.
② Start the computer. press F11 when the Lenovo logo is displayed.
■ Refreshing your computer
It is to restore your computer to the factory default settings while preserving the data on the hard disk drive.
To refresh your computer, do the following:
① Open the charms bar.
② Click Settings → Change PC settings → Update and recovery → Recovery.
③ In the Refresh your PC without affecting your files section, click Get started.
■ Resetting your computer
If your computer is reset, all the data stored on the hard disk drive will be deleted and the computer will be restored to the factory default settings. To reset your computer, do the following:
① Open the charms bar.
② Click Settings → Change PC settings → Update and recovery → Recovery.
③ In the Remove everything and reinstall Windows section, click Get started.
Note: After restoring your computer to the factory default settings, you might need to reinstall the drivers for some devices.
Chapter 4. Troubleshooting
Frequently asked questions
This section lists frequently asked questions by category.
■ Finding information
What safety precautions should I follow when using my computer?
The Lenovo Safety and General Information Guide which came with your computer contains safety precautions for using your computer. Read and follow all the precautions when using your computer.
Where can I find the hardware specifications for my computer?
You can find hardware specification for your computer from the printed flyers which came with your computer.
Where can I find warranty information?
For the warranty applicable to your computer, including the warranty period and type of warranty service, see the Lenovo limited warranty flyer that came with your computer.
- Drivers and preinstalled software
Where are the installation discs for Lenovo preinstalled software (desktop software)?
Your computer did not come with installation discs for Lenovo preinstalled software. If you need to reinstall preinstalled software, you can download it from the Lenovo consumer support Web site at http://support.lenovo.com.
Where can I find drivers for the various hardware devices of my computer?
You can download the latest device drivers from the Lenovo consumer support Web site at http://support.lenovo.com.
Lenovo recovery system
Where are the recovery discs?
Your computer did not come with recovery discs. Use the Lenovo recovery system if you need to restore the system to its factory status or to a previously generated backup.
What can I do if the back-up process fails?
If you can start the backup but it fails during the back-up process, try the following steps:
① Close all open programs, and then restart the back-up process.
② Check to see if the destination media is damaged. Select another path and then try again.
When do I need to restore the system to its factory status?
Use this feature when the operating system fails to start up. If there is critical data on the system partition, back it up before starting recovery.
BIOS setup utility
What is the BIOS setup utility?
The BIOS setup utility is ROM-based software. It communicates basic computer information and provides options for setting boot devices, security, hardware mode, and other preferences.
How can I start the BIOS setup utility?
To start the BIOS setup utility:
① Shut down the computer.
② Press F1 when the Lenovo logo is displayed on the screen while the computer is starting up.
How can I change the boot priority?
There are two boot priorities: UEFI First and Legacy First. To change the boot priority, start the BIOS setup utility and set UEFI/Legacy Boot Priority to UEFI First or Legacy First in the Startup menu.
Chapter 4. Troubleshooting
When do I need to change the boot priority?
The default boot priorities are UEFI First for Windows 8 and Legacy First for Windows 7. If you need to install a legacy operating system (that is, an earlier version than that of your current operating system) on your computer, you will need to change the boot priority to Legacy First. The legacy operating system cannot be installed if you do not change the boot priority.
Getting help
How can I contact the customer support center?
See “Chapter 3. Getting help and service” of Lenovo Safety and General Information Guide.
Troubleshooting
Display problems
When I turn on the computer, nothing appears on the screen.
- If the screen is blank, make sure that:
- The AC power adapter is connected to the computer, and the power cord is plugged into a working electrical outlet.
- The computer power is on. (Press the power button again for confirmation.)
- If you are using the AC power adapter or the battery, and the battery status indicator is on, press Fn + ↑ to make the screen brighter.
- If these items are properly set, and the screen remains blank, have the computer serviced.
When I turn on the computer, only a white cursor appears on a blank screen.
- Restore backed-up files to your Windows environment or the entire contents of your hard disk to its original factory contents using the Lenovo recovery system. If you still see only the cursor on the screen, have the computer serviced.
My screen goes blank while the computer is on.
- Your screen saver or power management may be enabled. Do one of the following to exit from the screen saver or to resume from sleep mode:
- Touch the touch pad.
- Press any key on the keyboard.
- Press the power button.
- Press Fn + F2 to confirm whether the backlight for the LCD screen has been turned off.
- If the problem persists, follow the solution in the next problem “The screen is unreadable or distorted.”
The screen is unreadable or distorted.
- Make sure that:
- The display device driver is installed correctly.
- The screen resolution and color quality are correctly set.
- The monitor type is correct.
Chapter 4. Troubleshooting
Incorrect characters appear on the screen.
- Are the operating system or programs installed correctly? If they are installed and configured correctly, have the computer serviced.
BIOS password problems
I forgot my password.
- If you forget your user password, you must ask the system administrator to reset your user password.
- If you forget your HDD password, a Lenovo authorized servicer cannot reset your password or recover data from the hard disk. You must take your computer to a Lenovo authorized servicer or a marketing representative to have the hard disk drive replaced. Proof of purchase is required, and a fee will be charged for parts and service.
- If you forget your administrator password, a Lenovo authorized servicer cannot reset your password. You must take your computer to a Lenovo authorized servicer or a marketing representative to have the system board replaced. Proof of purchase is required, and a fee will be charged for parts and service.
Sleep problems
The critical low-battery error message appears, and the computer immediately turns off.
The computer enters sleep mode immediately after Power-on self-test (POST).
- The battery power is getting low. Connect the AC power adapter to the computer, or replace the battery with a fully charged one.
- Make sure that:
- The battery is charged.
- The operating temperature is within the acceptable range. See “Chapter 2. Use and care Information” of Lenovo Safety and General Information Guide.
Note: If the battery is charged and the temperature is within range, have the computer serviced.
The computer does not return from sleep mode, and the computer does not work.
- If your computer is in sleep mode, connect the AC power adapter to the computer and then press any key or the power button.
- If the system still does not return from sleep mode, stops responding, or cannot be turned off, reset the computer. Unsaved data may be lost. To reset the computer, press and hold the power button for 4 seconds or more. If the computer is still not reset, remove the AC power adapter and the battery.
Sound problems
No sound can be heard from the speaker even when the volume is turned up.
- Make sure that:
- The mute function is off.
- The combo audio jack is not used.
- The speaker is selected as the playback device.
Battery problems
Your computer shuts down before the battery status indicator shows empty. -or-
Your computer operates after the battery status indicator shows empty.
The computer does not operate with a fully charged battery.
- Reset the battery gauge using Lenovo Energy Management. If the problem persists, replace with a new battery pack.
- The surge protector in the battery might be active. Turn off the computer for one minute to reset the protector; then turn on the computer again.
Chapter 4. Troubleshooting
A hard disk drive problem
| The hard disk drive does not work. | In the Startup menu in the BIOS setup utility, make sure that the hard disk drive is included in the Boot Priority Order list. |
| Other problems | |
| Your computer does not respond. | To turn off your computer, press and hold the power button for 4 seconds or more. If the computer still does not respond, remove the battery pack and the AC power adapter.Your computer might lock when it enters sleep mode during a communication operation. Disable the sleep timer when you are working on the network. |
| The computer does not start from a device you want. | See the Boot Priority Order list of the BIOS setup utility. Make sure that the BIOS setup utility is set so that the computer starts from the device you want.Also make sure that the device from which the computer starts is enabled. Make sure that the device is included in the Boot Priority Order list in the BIOS setup utility correctly.Press F12 when the Lenovo logo appears on the screen while the computer is starting up to select the device you want the computer starts from. |
| The connected external device does not work. | Do not connect or disconnect any external device cables other than USB while the computer power is on; otherwise, you might damage your computer.When using a high power consumption external device such as an external USB optical disk drive, use an external device power adapter. Otherwise, the device may not be recognized, or system shut down may result. |
Appendix. CRU (Customer Replaceable Units) instructions
Notes:
- Make sure the battery has been removed before replacing any devices.
- Write down the WLAN serial number on the attached label before removing the backup battery and Mini PCI Express Card. The serial number is required by Lenovo to replace with the proper unit.
Replacing the battery
Note: Use only the battery provided by Lenovo. Any other battery could ignite or explode.
To replace the battery, do the following:
① Turn off the computer. Disconnect the AC power adapter and all cables from the computer.
② Close the computer display, and turn the computer over.
③ Unlock the manual battery latch 1 Hold the spring-loaded battery latch in the unlocked position 2 remove the battery pack in the direction shown by the arrow 3

Appendix. CRU (Customer Replaceable Units) instructions
4 Install a fully charged battery.
⑤ Slide the manual battery latch to the locked position.
⑥ Turn the computer over again.
7 Connect the AC power adapter and the cables to the computer.
Replacing the backup battery
To replace the backup battery, do the following:
① Turn off the computer, then disconnect the AC power adapter and all cables from the computer.
② Close the computer display, and then turn the computer over.
③ Remove the battery pack.
4 Remove the Hard disk drive/Memory/Mini PCI Express Card slot compartment cover.
a. Loosen the screws that secure the compartment cover 1 b. Remove the compartment cover 2

Appendix. CRU (Customer Replaceable Units) instructions
5 Disconnect the backup battery cable connector 1 then pull the backup battery upward to remove 2

6 Install a new backup battery.
⑦ Reinstall the compartment cover and tighten the screws.
⑧ Reinstall the battery pack.
⑨ Turn the computer over again.
10 Connect the AC power adapter and the cables to the computer.
Replacing the hard disk drive
You can increase the storage capacity of your computer by replacing the hard disk drive with one of greater capacity. You can purchase a new hard disk drive from your reseller or Lenovo marketing representative.
Notes:
- Replace the hard disk drive only if you upgrade it or have it repaired. The connectors and bay of the hard disk drive were not designed for frequent changes, or drive swapping.
- The preinstalled software is not included on an optional hard disk drive.
Handling a hard disk drive
- Do not drop the drive or subject it to physical shocks. Put the drive on a material, such as soft cloth, that absorbs the physical shock.
- Do not apply pressure to the cover of the drive.
- Do not touch the connector.
The hard disk drive is very sensitive. Incorrect handling may cause damage and permanent loss of data on it. Before removing the hard disk drive, make a backup copy of all the information on it, and then turn the computer off. Never remove the drive while the system is operating, in sleep mode.
Appendix. CRU (Customer Replaceable Units) instructions
To replace the hard disk drive, do the following:
① Turn off the computer, then disconnect the AC power adapter and all cables from the computer.
② Close the computer display, and then turn the computer over.
③ Remove the battery pack.
4 Remove the Hard disk drive/Memory/Mini PCI Express Card slot compartment cover.
a. Loosen the screws that secure the compartment cover 1
b. Remove the compartment cover 2

Appendix. CRU (Customer Replaceable Units) instructions
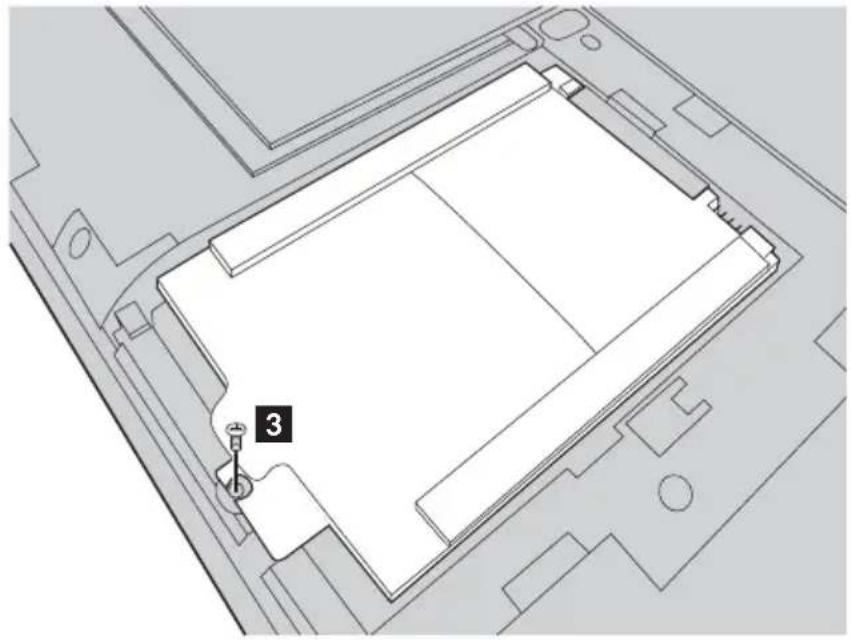
⑤ Remove the frame fixing screws 3
natural_image
Architectural floor plan showing a rectangular structure with a numbered marker '3' and a small inset detail (no text or symbols beyond the label)⑥ Pull the tab in the direction shown by arrow 4

natural_image
Architectural floor plan showing a rectangular storage unit with an arrow pointing to it, no text or symbols present.Appendix. CRU (Customer Replaceable Units) instructions
⑦ Take out the hard disk drive secured in a metal frame 5

natural_image
Technical line drawing of a mechanical component with a numbered arrow and label '5' (no readable text or symbols beyond the label)8 Remove the screws and detach the metal frame from the hard disk drive.
9 Attach the metal frame to a new hard disk drive and tighten the screws.
10 Put the hard disk drive gently into the hard disk drive bay with the tab facing upwards and the connectors facing each other, then push it firmly into space.
⑪ Reinstall the frame fixing screw.
⑫ Reinstall the compartment cover and tighten the screws.
13 Reinstall the battery pack.
14 Turn the computer over again.
15 Connect the AC power adapter and the cables to the computer.
Replacing memory
You can increase the amount of memory in your computer by installing a double-data-rate three low voltage synchronous dynamic random access memory (DDR3L SDRAM)-available as an option-in the memory slot of your computer. DDR3L SDRAMs are available in various capacities.
Note: Use only the memory types supported by your computer. If you incorrectly install optional memory, or install an unsupported memory type, a warning beep will sound when you try to start the computer.
To install a DDR3L SDRAM, do the following:
① Touch a metal table or a grounded metal object to reduce any static electricity in your body, which could damage the DDR3L SDRAM. Do not touch the contact edge of the DDR3L SDRAM.
② Turn off the computer. Disconnect the AC power adapter and all cables from the computer.
③ Close the computer display, and turn the computer over.
④ Remove the battery pack.
⑤ Remove the Hard disk drive/Memory/Mini PCI Express Card slot compartment cover.
a. Loosen the screws that secure the compartment cover 1
b. Remove the compartment cover 2

Appendix. CRU (Customer Replaceable Units) instructions
6 If two DDR3L SDRAMs are already installed in the memory slot, remove one of them to make room for the new one by pressing out on the latches on both edges of the socket at the same time. Be sure to save the old DDR3L SDRAM for future use.

⑦ Align the notch of the DDR3L SDRAM with the protrusion of the socket and gently insert the DDR3L SDRAM into the socket at a 30-45° angle.
⑧ Push the DDR3L SDRAM inward toward the socket until the latches on both edges of the socket are pushed into the closed position.
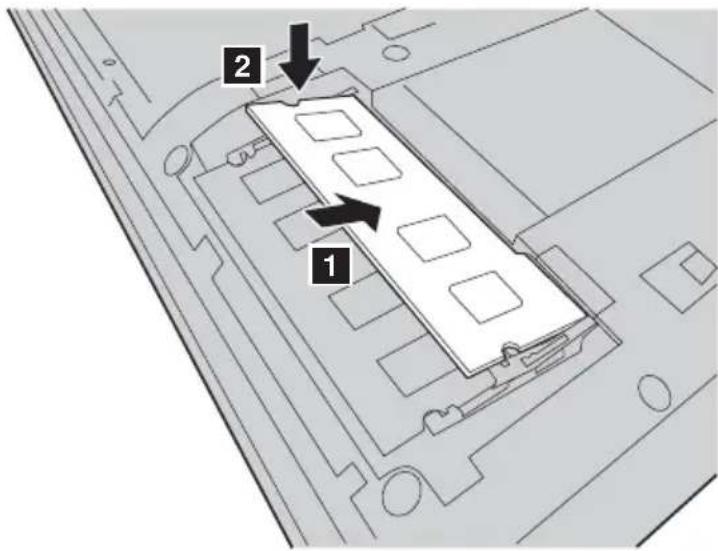
⑨ After aligning the attachment clips with their matching gaps, reinstall the compartment cover.
⑩ Reinstall and tighten the screws.
⑪ Reinstall the battery.
⑫ Turn the computer over again.
13 Connect the AC power adapter and the cables to the computer.
Appendix. CRU (Customer Replaceable Units) instructions
Note: If only one DDR3L SDRAM is used on the computer you are servicing, the card must be installed in SLOT-0 (a lower slot), but not in SLOT-1 ( : upper slot).

To make sure that the DDR3L SDRAM is installed correctly, do as follows:
① Turn the computer on.
② Hold F1 during startup. The BIOS setup utility screen opens. The Installed memory item shows the total amount of memory installed in your computer.
Replacing the Mini PCI Express Card
To replace the Mini PCI Express Card, do the following:
① Turn off the computer. Disconnect the AC power adapter and all cables from the computer.
② Close the computer display and turn the computer over.
③ Remove the battery pack.
④ Remove the Hard disk drive/Memory/Mini PCI Express Card slot compartment cover.
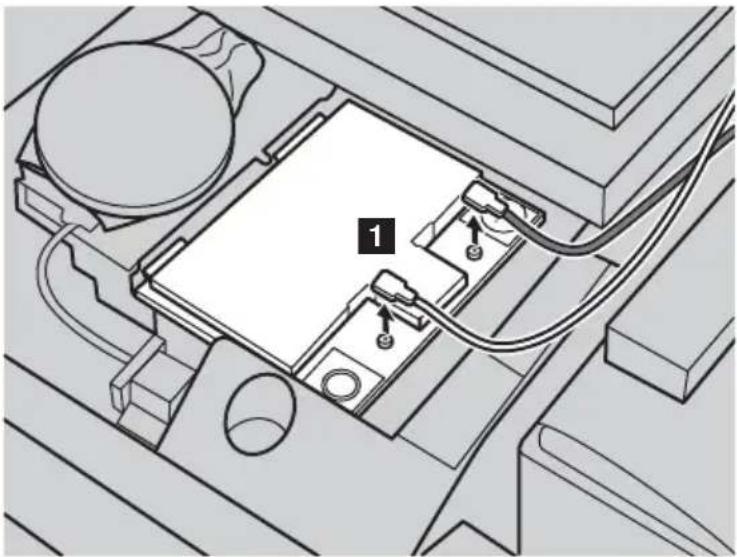
⑤ Disconnect the two cables (one black, one white) 1
natural_image
Technical diagram of an electronic device with labeled components (no readable text or symbols)Note: The Mini PCI Express Card in select models may have only one cable (black).
6 Remove the screw that secures the Mini PCI Express Card 2

natural_image
Technical diagram of an electronic device with a screw and wiring, no visible text or symbolsAppendix. CRU (Customer Replaceable Units) instructions
⑦ Take out the Mini PCI Express Card 3

natural_image
Technical diagram of a mechanical component with labeled part '3' and directional arrow (no text or symbols beyond label)8 Install the new Mini PCI Express Card.
⑨ Reinstall and tighten the screw.
10 Reconnect the two cables (one black, one white).

natural_image
Technical diagram of an electronic device showing internal components and wiring (no text or symbols)Note: When installing or reinstalling the Mini PCI Express Card:
- In models with a Mini PCI Express Card that has two cables:
a Plug the black cable (MAIN) into the jack labeled M(MAIN).
b Plug the white cable (AUX) into the jack labeled A(AUX).
- In models with a Mini PCI Express Card that has only one cable, plug the black cable (MAIN) into the jack labeled M(MAIN).
11 Reinstall the compartment cover and tighten the screws.
12 Reinstall the battery pack.
13 Turn the computer over again.
14 Connect the AC power adapter and the cables to the computer again.
Appendix. CRU (Customer Replaceable Units) instructions
Removing the optical drive
To remove the optical drive, do the following:
① Turn off the computer, then disconnect the AC power adapter and all cables from the computer.
② Close the computer display, and then turn the computer over.
③ Remove the battery pack.
4 Remove the Hard disk drive/Memory/Mini PCI Express Card slot compartment cover.
⑤ Remove the screw shown in the illustration 1
⑥ Gently pull the optical drive out 2

Appendix. CRU (Customer Replaceable Units) instructions
The following table provides a list of CRUs (Customer Replaceable Units) for your computer, and informs you of where to find replacement instructions.
| Setup Poster User Guide | |
| AC power adapter O | |
| Power cord for AC power adapter O | |
| Battery pack O O | |
| Hard disk drive O | |
| Memory O | |
| Optical drive O | |
| Backup battery O | |
| Mini PCI Express Card O |
Trademarks
The following terms are trademarks or registered trademarks of Lenovo in the United States, other countries, or both.
Lenovo
OneKey
Microsoft and Windows are trademarks of Microsoft Corporation in the United States, other countries, or both.
Other company, products, or service names may be trademarks or service marks of others.
lenovo.
- Regulatory Notice
- Second Edition (August 2013)
- Contents
- Chapter 1. Getting to know your computer .... 1
- Chapter 2. Starting to use Windows ...... 12
- Chapter 3. Lenovo recovery system ...... 19
- Chapter 4. Troubleshooting ...... 22
- Appendix. CRU (Customer Replaceable Units) instructions ..... 29
- Trademarks....44
- Chapter 1. Getting to know your computer
- Top view
- - Attention:
- ■ Using the keyboard
- Numeric keypad
- Function key combinations
- Left-side view
- Kensington slot
- Ventilation slots
- VGA port
- RJ-45 port
- HDMI port
- USB 3.0 ports
- ■ Connecting USB devices
- Notes:
- ■ Connecting a Bluetooth device
- Enabling Bluetooth and WLAN communications on your computer
- Right-side view
- Combo audio jack
- USB port
- Optical disc drive
- Power
- Front view
- Power and battery indicator
- ■ Using memory cards (not supplied)
- Inserting a memory card
- Removing a memory card
- Bottom view
- Chapter 2. Starting to use Windows
- Configuring the operating system for the first time
- Operating system interfaces
- ■ Start screen and Desktop
- Start screen Desktop
- - Charms and the charms bar
- Search charm
- Share charm
- Start charm
- Devices charm
- Settings charm
- Power-saving modes
- ■ Shutting down the computer
- - Putting your computer to sleep
- - Putting your computer to hibernate
- Connecting to a wireless network
- ■ Software configuration
- Help and support
- Chapter 3. Lenovo recovery system
- Windows 7 recovery system
- ■ Recovery media and rescue medium
- ■ Performing backup operations
- ■ Restoring the operating system
- Windows 8.1 recovery system
- ■ Refreshing your computer
- ■ Resetting your computer
- Chapter 4. Troubleshooting
- Frequently asked questions
- ■ Finding information
- - Drivers and preinstalled software
- Lenovo recovery system
- Where are the recovery discs?
- What can I do if the back-up process fails?
- When do I need to restore the system to its factory status?
- BIOS setup utility
- What is the BIOS setup utility?
- How can I start the BIOS setup utility?
- How can I change the boot priority?
- Getting help
- Troubleshooting
- Display problems
- BIOS password problems
- Sleep problems
- Sound problems
- Battery problems
- Appendix. CRU (Customer Replaceable Units) instructions
- Replacing the battery
- Replacing the backup battery
- Replacing the hard disk drive
- Handling a hard disk drive
- Replacing memory
- Replacing the Mini PCI Express Card
- Removing the optical drive
- Trademarks
- lenovo.
Brand : LENOVO
Model : B4400
Category : Unknown