
EVO Explorer - Drone Autel - Free user manual and instructions
Find the device manual for free EVO Explorer Autel in PDF.


| Product Type | Drone (Quadcopter) |
| Brand | Autel |
| Model | EVO Explorer |
| Mobile App | Autel Explorer (iOS 9.0+, Android 4.4+) |
| Camera Gimbal | XI-5A (3-axis stabilized) |
| Max Flight Speed (Novice Mode) | 5 m/s (18 km/h) |
| Max Flight Speed (Normal Mode) | 18 m/s (64.8 km/h) |
| Max Altitude (Novice Mode) | 30 m |
| Max Altitude (Normal Mode, default) | 120 m |
| Max Distance (Novice Mode) | 100 m |
| Max Distance (Normal Mode, default) | 800 m |
| Video Resolution | Up to 4K (3840x2160) at 60 fps, also 4K+, 2.7K, 1080P, 720P |
| Photo Resolution | 4000x3000 (4:3) or 4000x2250 (16:9) |
| Photo Format | JPG, RAW, JPG+RAW |
| Video Format | MOV, MP4 |
| Flight Modes | Dynamic Track, Viewpoint, Orbit, Waypoint, VR |
| Tracking Modes | Follow, Tripod, Parallel, Orbit |
| Safety Features | Obstacle Avoidance, Novice Mode, Go-Home Function, Low Battery Warning |
| Maintenance | SD Card Formatting, Compass Calibration, Remote Control Calibration, IMU Monitoring |
| Battery | Aircraft LiPo (11.72V total, 3.905V per cell typical) |
Frequently Asked Questions - EVO Explorer Autel
User questions about EVO Explorer Autel
0 question about this device. Answer the ones you know or ask your own.
Ask a new question about this device
Download the instructions for your Drone in PDF format for free! Find your manual EVO Explorer - Autel and take your electronic device back in hand. On this page are published all the documents necessary for the use of your device. EVO Explorer by Autel.
USER MANUAL EVO Explorer Autel
natural_image
Line drawing of a quadcopter drone with camera module (no text or symbols)App Manual
With XI-5A Gimbal
AUTEL
ROBOTICS
Contents
Chapter 1 About This Manual 1
1.1 Legends 1
1.2 Before Your First Flight 1
Chapter 2 Mobile Device Preparation 3
2.1 Installing the App 3
2.2 Pairing Your Mobile Device 3
Chapter 3 Home Page & Flight Mode 5
3.1 Home Page 5
3.2 Flight Mode 6
Chapter 4 Camera 7
4.1 Aircraft Status Bar 7
4.2 Camera Operation Panel 9
4.3 Camera Parameter Bar 10
4.3.1 Photo Parameter Bar 10
4.3.2 Video Parameter Bar 11
4.4 Gimbal Angle & Map Split Screen 13
4.4.1 Gimbal Angle 13
4.4.2 Map Split Screen 14
Chapter 5 Dynamic Track 16
5.1 Using Dynamic Track 16
5.2 Exiting Dynamic Track 17
Chapter 6 Viewpoint 19
6.1 Using Viewpoint 19
6.2 Exiting Viewpoint 20
Chapter 7 Orbit 21
7.1 Using Orbit 21
7.1.1 Basic Settings 21
7.1.2 Expert Mode 22
7.2 Exiting Orbit 23
Chapter 8 Waypoint 25
8.1 Using Waypoint 25
8.1.1 Basic Settings 25
8.1.2 Expert Mode 26
8.2 Exiting Waypoint 29
Chapter 9 VR 30
Chapter 10 Settings 31
10.1 Aircraft Status Settings 31
10.2 Flight Control Settings 33
10.3 Visual Navigation Settings 35
10.4 Remote Control Settings 35
10.5 Image Transmission Settings 35
10.6 Aircraft Battery Settings 36
10.7 Gimbal Settings 37
10.8 General Settings 37
Chapter 1
About This Manual
EVO™, Autel Explorer™, Starpoint™ and the Autel Robotics® logo are trademarks of Autel Robotics Co., Ltd., registered in China, the United States, and other countries. All other products and company names mentioned in this App Manual are registered trademarks of their respective holders.
Welcome to the Autel Robotics family. Use this manual to get a detailed look at the features and functions of the Autel Explorer™ app. Please read it in its entirety before pairing your EVO smart drone with your mobile device for the first time, and keep it at hand for easy consultation while you get to know how your aircraft, remote control, and mobile device work together.
1.1 Legends
Pay extra attention to the callouts appear throughout this manual.
⚠ WARNING: Points out a potentially hazardous situation.
IMPORTANT: Something to be aware of during flight operation.
NOTE: Supplementary information.
TIPS: How to get the most out of your Autel Explorer™ experience.
REFERENCE: A page number that guides you to the section containing relevant information in this manual.
1.2 Before Your First Flight
Prior to flying your EVO for the first time, make sure you've got all the documentation that will help you get started:
- EVO Packing List: Use the Packing List to verify that all the items are in the box. Contact us or your local retailer if anything's missing
- EVO Disclaimer & Safety Instructions: Notes on how to operate EVO safely and responsibly
- EVO Quick Guide: The basics of EVO operation
- Autel Explorer Mobile App Manual: This guide will walk you through the specifics of using your mobile device to enhance your EVO flight
experience
- EVO User Manual: Contains the finer points of EVO mastery. Visit www.autelrobotics.com/support/downloads/ to download it

NOTE:
Make sure the aircraft and other components in the box are accounted for. Do not use incompatible components or attempt to modify EVO in any way inconsistent with the instructions in the official aircraft documentation.
Chapter 2
Mobile Device Preparation
When you use the Autel Explorer™ app with EVO, your mobile device becomes a First-Person View (FPV) monitor and ground station for remote piloting and flight configuration.
2.1 Installing the App
Autel Explorer™ works with both iOS and Android smartphones and tablets. Search in App Store/Google Play by entering the keyword Autel Explorer (case insensitive) to download and install the app on your mobile device.

Available on the App Store

Get it on Google play
Supported systems:
- iOS 9.0 or later (compatible with iPhone 5s or later)
- Android 4.4 or later
IMPORTANT:
Autel Explorer ^™ will be updated regularly. Please check occasionally for the latest updates.
2.2 Pairing Your Mobile Device
The network will be established when the EVO, remote control and mobile device are properly connected, enabling your mobile to receive real-time flight data and video footage during the flight.
- Connecting the Mobile Device to the Aircraft
- Power on the remote control.
-
Power on the aircraft.
-
Connect your mobile device as shown below.

natural_image
Line drawings of a three-wheeled robot control system with connected devices (no text or symbols)- Open the Autel Explorer™ ( n ) app on your mobile device. When the connection is successful, the GO FLY button on the Home page will turn blue, and the battery levels for the aircraft and remote control will be displayed in the right lower corner.

Chapter 3
Home Page & Flight Mode
The Autel Explorer™ application is specially designed for EVO, giving the aircraft intelligent features including remote camera control, flight data review, tracking target, present waypoint navigation and so on. The unique functions located in different modules create the perfect experience for users. It makes your mobile device perform as the central monitor to achieve optimal flight performance.
3.1 Home Page

① Weather Test

Weather Conditions Satellites

Temperature Visibility

Wind Speed

NOTE:
The current weather conditions are displayed in the bottom left corner of the home screen.
- Pleasant Weather: Temperature, visibility and wind speed are all well-suited for flight
- Weather Cautious: Pay close attention to the weather conditions during flight
- Severe Weather: Dangerous weather conditions. DO NOT FLY THE AIRCRAFT

GO FLY
After connecting your mobile to the remote control, the GO FLY button will turn blue. Tap this button to enter the Camera view.

How to Connect
Before connecting your mobile device to the remote control, tap "How to Connect" in the right lower corner, then follow the pop-up instructions. When the connection is established, the aircraft and remote control battery level indicators will replace "How to Connect" in the lower right corner.
3.2 Flight Mode
After tapping GO FLY, you will automatically be taken to the Camera view. To view the options on the Intelligent Flight page, tap the green flight status indicator in the left top corner, as shown here.


NOTE:
When flying your EVO for the first time, Novice Mode will be enabled by default. If you want to fly using Intelligent Flight features, a pop-up message will ask you to disable Novice Mode.
Chapter 4
Camera
Tap Camera to enter the camera screen for a first-person view.
After you connect your mobile to EVO, the system will run a self-check to ensure it's ready to be flown safely. Window prompts will walk you through the overall status step by step.
The camera interface can be divided into 5 parts as shown in the diagram.
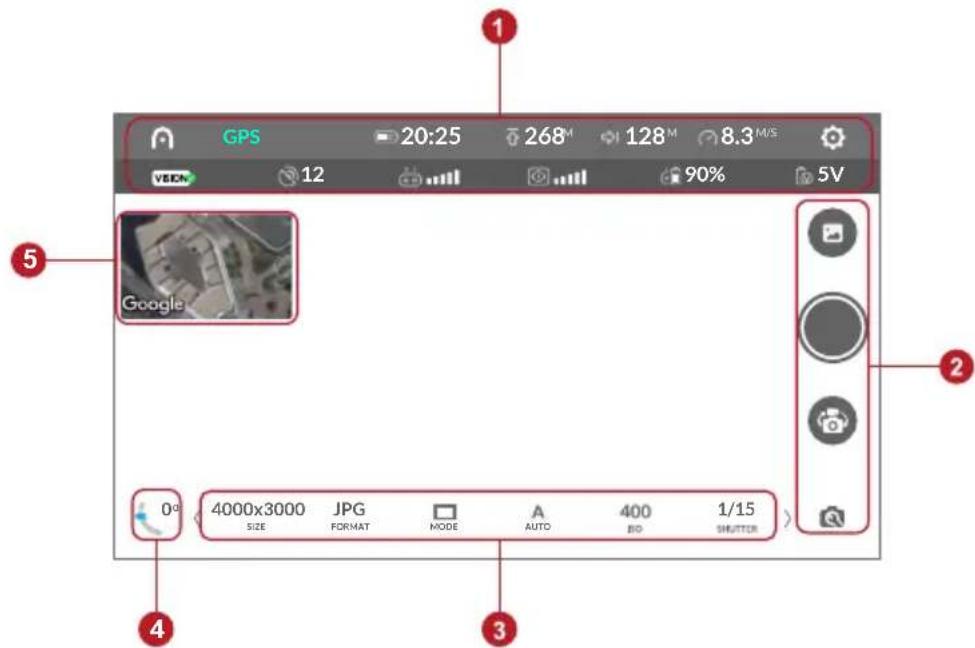
① Aircraft Status Bar
② Camera Operation Panel
③ Camera Parameter Bar
④ Gimbal Angle
⑤ Map Split Screen
4.1 Aircraft Status Bar
- Top Row

Home Icon
Tap this icon to go back to the Home page.

Exit Icon
Tap this icon to go back to the Intelligent Flight page.

Aircraft Battery Level
The battery icon displays the current Aircraft Battery Level. The number to the right of the icon indicates remaining flight time.

Altitude
The altitude of the aircraft relative to the Home Point level.

Distance
The horizontal distance between the aircraft and Home Point.

Flight Speed
The current flying speed of the aircraft.

Settings Icon
Tap this icon to open the Settings page. There, you can access Flight Control, Visual Navigation, Remote Control, Image Transmission, Aircraft Battery, Gimbal and General settings.
- Second Row

Visual Navigation
A green check on this icon indicates that Visual Navigation is enabled, whereas a red "X" indicates the Visual Navigation is disabled.

Satellites
Displays the number of GPS signals being received by the Flight Control System.

Remote Control Signal
The signal strength currently received by the remote control.

Image Transmission Signal
Displays the Image Transmission Signal strength.

Remote Control Battery Level
Displays the current remaining Remote Control Battery Level.

Aircraft Battery Voltage
Displays the Lowest Cell Voltage of the Aircraft Battery.
4.2 Camera Operation Panel
The vertical panel on the left-hand side of the Camera Interface displays the Camera Operation Panel.

Album Icon
Tap this icon to browse recorded pictures and videos.

Shoot/Record Icon
Tap this icon to take photos or record videos.

NOTE:
- Before taking a photo, select a shooting mode (Single, Burst, AEB, Time Lapse) from the Photo Parameter Bar.
- When shooting video, tap this icon again to stop recording.
- The icons in the Camera Parameter Bar will vary according to the shooting modes currently selected.

Shoot/Record Switch Icon
Tap this icon to switch between shooting and recording modes.

Camera Settings Icon
Tap this icon to access general settings for taking pictures and recording video.
| (*Default Value) |
| Grid *None, Grid, Grid + Line |
| Center Point *None, Square (Without Center Point), Square(With Center Point), Cross, Circle (With Center Point), Circle (Without Center Point) |
| Histogram ON, *OFF |
| Over Exposure Warning ON, *OFF |
| Subtitle. ASS File ON, *OFF |
| Anti-Flicker *Auto, 50Hz, 60Hz |
| Video Encoding Format *H.264, H.265 |
| Reset Camera ON, *OFF |
| Format SD Card ON, *OFF |
| Model Displays the current camera model |
| Camera Version Displays the current camera version |

NOTE:
- When you tap Reset Camera, all parameters located in Camera Settings and Camera Parameter Bar will return to their default values.
- The camera's default mode is recording. Tap the Shoot/Record Switch Icon if you wish to take photos.
- Please format the SD card via the Autel Explorer™ app. The camera may not be able to recognize the SD card if you format it using other devices.

WARNING
The Format SD Card option in Camera Settings will format the inserted SD card. Make sure to back up your files before formatting an SD card with data already on it.
4.3 Camera Parameter Bar
The Camera Parameter Bar displays the photo or video parameters currently selected.
4.3.1 Photo Parameter Bar
When in Photo mode, the Camera Parameter Bar reflects the following values.
| Photo (* Default Value) |
| Size *4000×3000(4:3), 4000×2250(16:9) |
| Format *JPG, RAW, JPG+RAW |
| Mode *Single, Burst (3/*5/7/14), Time Lapse(2/*5/7/10/20/30/60), AEB (*3/5) |
| EXPOSURE MODE *Auto, Manual |
| ISO *100 ( Exposure Mode->Manual), 200, 400, 800, 1600, 3200 (When the Exposure Mode is Auto, the default value is based on the selected EV values) |
| Shutter *1/60 ( Exposure Mode->Manual), the range is 1/8000~8". (When the Exposure Mode is Auto, the default value is based on the selected EV values) |
| EV -3.0, -2.7, -2.3, -2.0, -1.7, -1.3, -1.0, -0.7, -0.3, *0(Exposure Mode->Auto), +0.3, +0.7, +1.0, +1.3, +1.7, +2.0, +2.3, +2.7, +3.0 (When Exposure Mode is set to Manual, the default value is based on the selected ISO and Shutter values) |
| WB *Auto, Sunny, Cloudy, Incan, Neon, Custom (*6000K, the range is 2000K~10000K) |
| Color *None, Vivid, B&W, Art, Film, Beach, Dream, Classic, Log, Nostalgic |
| Style *Standard 000, Neutral -100, Landscape +1+10, Custom[Contrast (-3, -2, -1,*0, +1, +2, +3), Saturation (-3, -2, -1, *0, +1, +2, +3), Sharpness (-3, -2, -1, *0, +1, +2, +3)] |
| Digital Zoom *1.0X, 2.0X, 3.0X, 4.0X, 5.0X, 6.0X, 7.0X, 8.0X |

NOTE:
Use the Digital Zoom feature to zoom in or zoom out on the camera screen.
4.3.2 Video Parameter Bar
When in Video mode, the Camera Parameter Bar reflects the following values.
| Video (* Default Value) | |
| PIV *Manual, 5S, 10S, 30S, 60S | |
| Standard *NTSC, PAL | |
| Format *MOV, MP4 | |
| Resolution *4K (3840x2160), 4K+(4096x2160), 2.7K (2720x1530), 1080P (1920x1080), 720P (1280x720) | |
| Frame Rate 240FPS, 120FPS, 60FPS, 48FPS, 30FPS, 24FPS(The default value is based on the selected Resolution) | |
| EXPOSURE MODE *Auto, Manual | |
| ISO *100 (Exposure Mode->Manual), 200, 400, 800, 1600, 3200 (When the Exposure Mode is Auto, the default value is based on the selected Resolution and Frame Rate) | |
| Shutter *1/60 ( Exposure Mode->Manual), the range is 1/8000~1/25. (When the Exposure Mode is Auto, the default value is based on the selected Resolution and Frame Rate) | |
| EV -3.0, -2.7, -2.3, -2.0, -1.7, -1.3, -1.0, -0.7, -0.3, *0(Exposure Mode->Auto), +0.3, +0.7, +1.0, +1.3, +1.7,+2.0, +2.3, +2.7, +3.0 (When the Exposure Mode is Manual, the default value is based on the selected Resolution and Frame Rate) | |
| WB *Auto, Sunny, Cloudy, Incan, Neon, Custom (*6000K,the range is 2000K~10000K) | |
| Color *None, Vivid, B&W, Art, Film, Beach, Dream, Classic,Log, Nostalgic | |
| Style *Standard 000, Neutral -100, Landscape +1+10, Custom[Contrast (-3, -2, -1,*0, +1, +2, +3), Saturation (-3, -2, -1,*0, +1, +2, +3), Sharpness (-3, -2, -1, *0, +1, +2, +3)] | |
| Digital Zoom *1.0X, 2.0X, 3.0X, 4.0X, 5.0X, 6.0X, 7.0X, 8.0X |
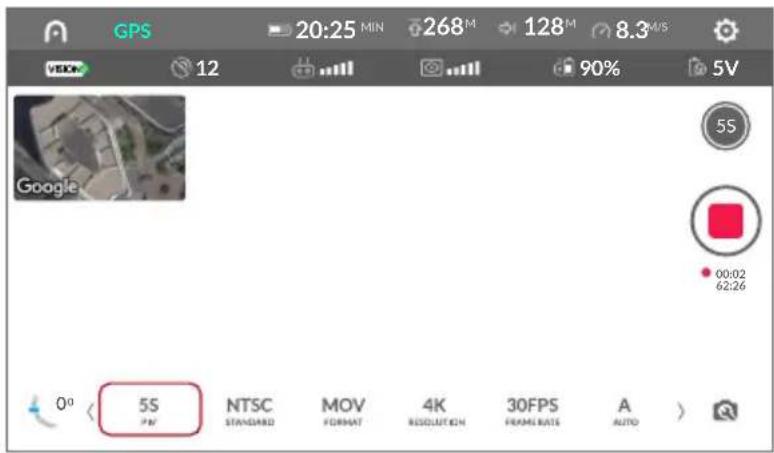
- PIV Settings
At times, you may want to take photos while recording video. Autel Explorer™ allows you to do just that. In PIV Settings, select Manual if you are going to take photos by yourself, or Auto if you want the camera to snap photos at predetermined intervals.
Manual
By selecting the Manual option in PIV Settings, you may now tap the Shoot Icon shown in the diagram to take photos while recording video.

Auto
There are 4 time intervals available in Auto mode: 5 seconds, 10 seconds, 30 seconds and 60 seconds. While recording video, the camera will automatically take photos according to the selected interval.
4.4 Gimbal Angle & Map Split Screen
4.4.1 Gimbal Angle

Gimbal Angle Icon
The number in the icon displays the Gimbal Angle in degrees. The blue arrow rotates as the angle changes.
- Adjusting the Gimbal Angle
The Gimbal Angle can be adjusted via 3 methods, via which the Camera Gimbal will rotate accordingly, as shown in the diagram.

Method 1: Touching the Camera Screen
Touch and hold the camera screen for approximately 2 seconds to activate Gimbal Adjustment, then move your finger forward or downward to adjust the Gimbal Angle.

Method 2: Tapping the Gimbal Angle Icon
Tap the Gimbal Angle Icon and choose the suitable angle.
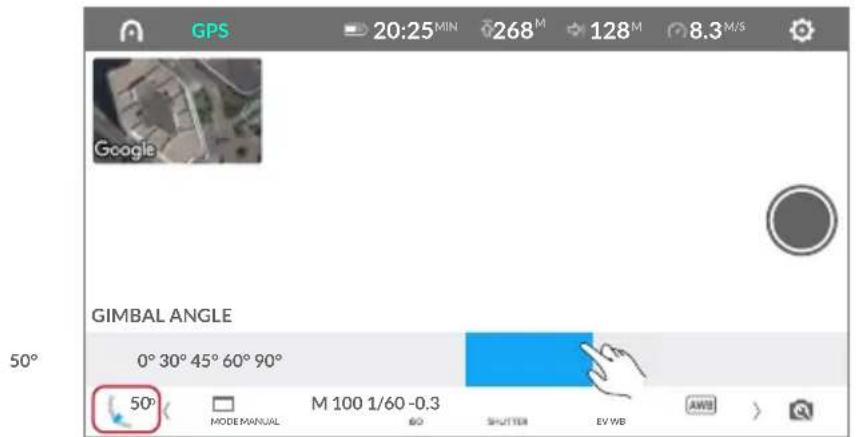
Method 3: Moving the Gimbal Pitch Dial
Move the Gimbal Pitch Dial on the remote control forward or downward. The number indicating the angle in degrees will change accordingly.
4.4.2 Map Split Screen
In the top left corner of the Camera screen lives a smaller split screen that displays the area surrounding your aircraft. As shown below, you can tap on this screen to switch to primary map view.
To view different areas, you can zoom in, zoom out or move the map.

On the right of the screen, 3 function icons give you different ways to control how the map is viewed:
| Icon Name Function | ||
 | Direction | Tap this icon to unlock the map; the red arrow will always indicate the north of this map. |
 | Location | Me: Move your current location to the center of the map. |
| Home: Move the Home Point to the center of the map. | ||
| Aircraft: Move the current aircraft location to the center of the map (this comes in handy when the aircraft is in danger of leaving in the map interface). | ||
 | Map Settings | Map View: Choose between Normal, Hybrid and GPS map views. |
| Calibrate Coordinate: This function applies exclusively to users in mainland China. | ||
| Show Flight Route: Turn this function on/off, or clear the flight route entirely. | ||
Chapter 5
Dynamic Track
Dynamic Track gives you 4 methods of tracking moving objects, including:
- People
- Animals
- Boats
- Vehicles
We strongly recommend flying the aircraft to a height of at least 2 meters before starting a tracking mission.
5.1 Using Dynamic Track
- The first time you enter Dynamic Track, follow the instruction prompts. After you've become familiar with the tracking operations, you can dismiss the prompts by tapping DO NOT SHOW AGAIN.
- On the righthand side of the screen, select the desired tracking mode from the mode list. The animated image will tell you the tracking pattern to help you handle this feature. Locate the target on your screen, use your finger to draw a box around the target, then tap START.

- Tap the Settings icon ( ) on the top right to see your options. You can enable/disable Backwards Flight and Obstacle Avoidance according to your preferences (Instructions for using these 2 features are available in the app itself).

NOTE:
When Obstacle Avoidance is enabled, EVO will avoid obstacles automatically during flight. When disabled, it will automatically hover when a nearby obstacle is detected.
- Follow Mode
When Follow Mode is selected, EVO will track the target at a fixed distance. If the target stops moving, the aircraft will hover until the target starts moving again.
- Tripod Mode
Rather than follow its target, EVO will hover while continuously changing direction so that the nose remains pointed at it.
- Parallel Mode
EVO tracks the target from the side at a fixed distance.
- Orbit Mode
The aircraft will always fly in a circular pattern around the moving target.
5.2 Exiting Dynamic Track
To exit Dynamic Track and return to the Camera view, follow one of these 2 methods.
- Press and hold the Pause Button ( ⑪ ) on the remote control for 3 seconds to end the Dynamic Track mission, after which you have active control of the aircraft.

NOTE:
To pause Dynamic Track, press the Pause Button ( ⑪ ) on the remote control for 1 second, or tap the Pause icon on the screen.
- Tap Exit in the top right corner to end the tracking mission.


NOTE:
When the aircraft battery reaches warning levels, the mission will be passively ended.
Low Battery Level: A window will pop up on the app screen to indicate the aircraft is returning home automatically.
Critically Low Battery Level: The tracking mission will end, and the aircraft will automatically land on-site.
Chapter 6
Viewpoint
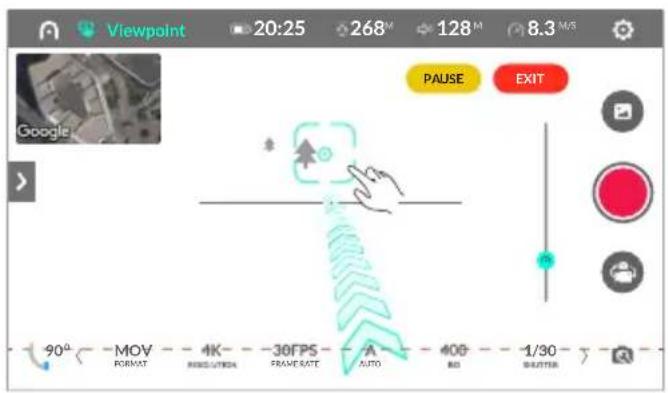
Follow the instructions in the app Learning Center before performing a Viewpoint mission for the first time. After closing the Learning Center, you'll see a horizontal line in the middle of the screen.
- Tap above the horizontal line to make EVO ascend
- Tap below the line to makeEVO descend
The dotted red line along the bottom of the screen indicates a safety zone, below which the aircraft will not descend.
6.1 Using Viewpoint
-
Tap the Settings icon ( ) on the top right to ensure that Obstacle Avoidance is enabled.
-
Tap the screen to select a target object, then tap the START button.
![Viewpoint 20:25 268M 128M 8.3 M/s Viewpoint Tap screen to select the object. Tap [START] to fly towards it. START](/content/2026/05/1108225/images/537916a522a536c697898f05cfb0b455d190491352395ea7ccd774670b65518c.jpg)
- The aircraft will fly towards the chosen target. Keep in mind that you can tap another point on the screen to change the flight direction. Change EVO flight speed by vertically sliding the Speed icon on the right-hand side of the screen.

NOTE:
Tap the top bar on the screen to see how many GPS satellite signals are available.
- If the connected GPS satellite signals are less than or equal to 5, the flight speed will range from 1 ~m / s to 2 ~m / s .
- If the GPS satellite signals are more than five, the flight speed will range from 2m/s to 10m/s.
6.2 Exiting Viewpoint
There are 2 easy ways to exit Viewpoint and go back to the Camera view.
- Pressing and holding the Pause Button (Ⅱ) for 3 seconds will end the Viewpoint mission, then you can regain the aircraft control.

NOTE:
Press the Pause Button (Ⅱ) on the remote control for 1 second or tap the Pause icon on the screen to pause the Viewpoint mission.
- Tap Exit in the top right corner to end the mission.


NOTE:
When the aircraft battery reaches warning levels, the mission will be passively ended.
Low Battery Level: A window will pop up on the app screen to indicate the aircraft is returning home automatically.
Critically Low Battery Level: The Viewpoint mission will end, and the aircraft will automatically land on-site.
Chapter 7
Orbit
Follow the instructions in the app Learning Center before creating an Orbit mission for the first time.
7.1 Using Orbit
After takeoff, increase the flight altitude to 10m or higher before using the Orbit function.

NOTE:
On the SET or START button, the capital "A" in the brackets stands for the Customizable Button A on the remote control. You can also press that button to create the same setting. All the letter A and letter B in the brackets stand for the related button on the remote control in the next steps.
7.1.1 Basic Settings
When setting an Orbit mission via Basic Settings, the aircraft location is the determining factor. Follow the 3 steps below.
- Tap SET to create a center point based on the current aircraft location.
- Use the Command Sticks on the remote control to move the aircraft and increase the orbit radius. The radius must be set between 10m and 100m. If the radius value is less than 10m, you'll see a red number as shown in the diagram.
- Choose clockwise or counterclockwise as the flight direction. Then tap START to begin the mission.

flowchart
graph LR
    A["Orbit"] --> B["Fly above the center point, tap [SET"] to set point]
    B --> C["SET(A)"]
    D["(B)"] --> E["Adjust Orbit Radius: 4 m"]
    E --> F["Fly aircraft to change orbit radius, tap [SET"] to set the radius]
    F --> G["SET(A)"]
    H["(B)"] --> I["How to Use Command Stick?"]
    I --> J["Flight Direction: CW"]
    J --> K["Tap [START"] to begin Orbit flight]
    K --> L["START(A)"]
7.1.2 Expert Mode
Tap Settings (≡) on the top of the screen to enter the Expert Mode. Then tap the drop-down box, at which point you'll see 3 ways to set the target location and create an Orbit mission.
● Different Location
- Select Aircraft Location, then tap SET to select the current aircraft location as the center point.
- Select My Location. After the map is displayed, tap SET to make your current location as the center point.
- Select Map Point. After displaying the map, tap it to choose a center point, then tap NEXT.
- Radius & Altitude Settings
Type the Radius and Altitude values into the box, then set the Flight Direction to your preference. Then tap START to begin the mission.


NOTE:
- Tap How to Use Command Sticks to double check the Remote Control Instructions.
- The Radius must be set between 10 meters to 100 meters.
- If the aircraft is connected and you've configured Altitude Limit in Settings > Flight Control, the altitude of the Orbit mission will be limited by this value; if the aircraft is disconnected, the Altitude Limit setting won't affect the Orbit settings.
7.2 Exiting Orbit
There are 2 ways to easily exit Orbit and go back to the Camera view.
- Press and hold the Pause Button ( ⑪ ) for 3 seconds to end the Orbit mission and retake control of the aircraft.

NOTE:
Press the Pause Button ( ⑪ ) on the remote control for 1 second or tap the Pause icon on the screen to pause the Orbit mission.
- Tap Exit in the top right corner to end the Orbit mission.


NOTE:
When the aircraft battery reaches warning levels, or GPS levels are insufficient, the mission will be passively ended.
Low Battery Level: A window will pop up on the app screen to indicate the aircraft is returning home automatically.
Critically Low Battery Level: The mission will end, and the aircraft will automatically land on-site.
ATTI Mode: If the GPS signal is too weak to enter the ATTI Mode, the Orbit mission will be forced to end, and you will return to the Camera screen.
Chapter 8
Waypoint
Waypoint can be employed via Basic or Expert mode. Read and understand the instructions on how to use the Command Sticks and Customizable Buttons before executing your first Waypoint mission.
8.1 Using Waypoint
8.1.1 Basic Settings
Via this mode, you can use successive aircraft locations to record waypoints.
- Tap SET to set the starting point. When the following images appear on the screen, the starting point has been established successfully.
- Executing a Waypoint mission requires more than one waypoint, so move your aircraft to the next target position and tap SET to establish the second waypoint. Subsequent waypoints can be set via the same method to establish a complete route (Tap Delete to remove the most recently established waypoint).
IMPORTANT:
Keep in mind that any 2 waypoints cannot be set within 5m of each other.
- Tap Save in the right top corner if you wish to save the current Waypoint mission.
- Tap START when you have set all relevant waypoints. EVO will fly to the starting point, and then proceed successively from point to point.

flowchart
graph LR
    A["Waypoint"] --> B["SET(A)"]
    B --> C["Delete(B)"]
    C --> D["SET(A)"]
    D --> E["Waypoint Counts: 1"]
    D --> F["Total Distance: 0m"]
    E --> G["START"]
    F --> H["Start"]
8.1.2 Expert Mode
Tap Settings (≡) on the top of the screen to enter Expert Mode. You can edit any preexisting routes by tapping them. If you wish to delete preexisting routes:
- Android Devices: tap the 3-bullet-dot icon on the top of the screen and select Edit.
- iOS Devices: tap Edit at the top of the screen.


If you wish to add a new Waypoint mission, tap NEW on the bottom of the screen. There are 3 ways to proceed in this mode.
- Aircraft Location
This method starts with the same steps as that in Basic Settings. However, it also allows you to customize Avoidance Priority, Finish Action, and Heading settings prior to setting the waypoints.
- Point on Map
- Select Point on Map from the drop-down box and your screen will display the map.
- Customize the different Avoidance Priority, Finish Action, and Heading before pointing on the map.
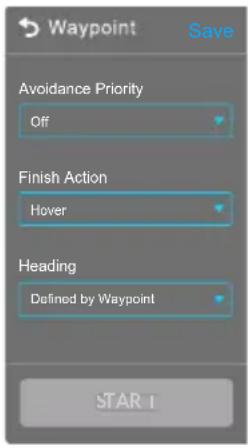
- After tapping a waypoint, you will enter the editing page:
A. Use the right and left arrow to select your waypoints.
B. Type values into the box to set Altitude and Speed.
C. When you select Defined by Waypoint from the Heading box in the last step, you'll be given the option to customize the heading angle.

NOTE:
When you set Altitude Limit and Speed Limit in Settings > Flight Control while EVO is connected, the altitude and speed of editing the waypoints will be limited according to these settings. If EVO is disconnected, the Altitude Limit and Speed Limit settings won't affect the Waypoint settings.
D. Tap Delete at the top of the screen to remove the highlighted waypoint.
E. Tap OK when your changes are completed.

- You may tap the map to pin up to 99 successive waypoints, which will then be linked automatically as a route.
-
Tap Save in the top right corner to save the current Waypoint mission.
-
Tap START when you have confirmed all the waypoints.
- Draw on Map
- Select Draw on Map from the drop-down box and your screen will display the map.
- Customize the different Avoidance Priority, Finish Action, and Heading before drawing on the map.
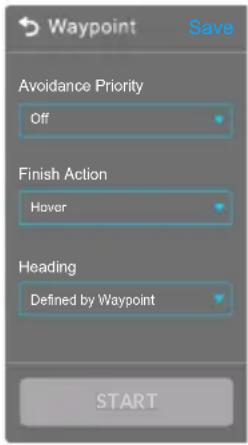
- Move your finger to draw a route on the map, and the waypoints will be identified automatically according to your route. Then you will enter the Editing page.
A. Upon displaying the Editing page, the system will automatically highlight all selected waypoints. Tap the point on the map to select one of them. Then tap the right and left arrows to highlight the next desired waypoint.
B. Edit the Altitude and Speed by typing values into the respective boxes. The value limit is the same as Point on Map.
C. After selecting Defined by Waypoint from the Heading box in the last step, you can also customize the heading angle.
D. Tap Delete at the top of the screen to remove the highlighted waypoint.
E. Tap OK when all changes are completed.

- Tap Save in the right top corner if you wish to save the current Waypoint mission.
- Tap START to begin the Waypoint mission.
There are 2 simple ways to exit Waypoint and go back to the Camera view.
- Pressing and holding the Pause Button (Ⅱ) for 3 seconds will end the Waypoint mission, then you can regain the aircraft control.

NOTE:
Press the Pause Button (Ⅱ) on the remote control for 1 second or tap the Pause icon on the screen to pause the Waypoint mission.
- Tap Exit in the top right corner to end the Waypoint mission.


NOTE:
When the aircraft battery reaches warning levels, or GPS levels are insufficient, the mission will be passively ended.
Low Battery Level: A window will pop up on the app screen to indicate the aircraft is returning home automatically.
Critically Low Battery Level: The mission will end, and the aircraft will automatically land on-site.
ATTI Mode: If the GPS signal is too weak to enter the ATTI Mode, the Waypoint mission will be forced to end, and you will return to the Camera screen.
Chapter 9
VR
The VR function lets you put your mobile device into your VR headset for an exclusive viewing experience while EVO is in flight.
Tap Settings ( ) on the VR screen. As shown below, you can customize Headset Adjustments, the Gimbal Mode (FPV or Stabilized), and turn Telemetry on/off.


NOTE:
When in VR mode, the Camera Gimbal will be bound to the mobile device. The Gimbal Angle will automatically rotate from 0° to 90° when you rotate the mobile device from the vertical to horizontal.
Chapter 10
Settings
Tapping the Settings icon (💡) on the Aircraft Status Bar to adjust any of the 8 categories:
- Aircraft Status
- Flight Control
- Visual Navigation
- Remote Control
- Image Translation
- Aircraft Battery
- Gimbal
- General
10.1 Aircraft Status Settings
After the self-check, the Aircraft Status page will display some important functions and parameters; you can manage or monitor the following settings:
- Compass Calibration
-
Tap the Calibrate button on the screen, follow the on-screen instructions that help you monitor the calibration status. The Rear LED Indicators on the aircraft will turn flashing yellow when you initiate the calibration process.
-
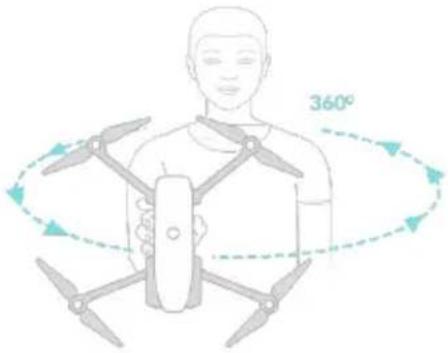
Hold the aircraft horizontally and rotate it until the Rear LED Indicators on the aircraft turn solid green, indicating this step has been completed successfully.

- Hold the aircraft vertically with the nose facing downward and rotate it until the Rear LED Indicators on the aircraft turn solid green, indicating that the calibration is successful.
natural_image
Diagram of a person holding a drone with 360° angle annotation, showing six propellers and motion arrows (no text or symbols on the diagram itself)- Flight Mode
The aircraft will automatically use GPS signals to choose the most suitable Flight Mode. However, you can set the current mode of the aircraft here.
IMU
This option lets you monitor the IMU status of the aircraft.
- Command Stick Mode
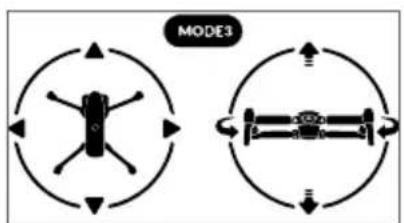
After the aircraft self-check, the screen will display the current Command Stick Mode; you can also choose a different Command Stick Mode to control your aircraft. There are three modes available: Mode 1, Mode 2 and Mode 3, controlling the aircraft in different manners. Below are the illustrations of these three modes.

flowchart
graph TD
    A["Central Drone Icon"] --> B["Directional Arrow"]
    B --> C["Top Right"]
    B --> D["Bottom Left"]
    style A fill:#f9f,stroke:#333
    style C fill:#bbf,stroke:#333
    style D fill:#bfb,stroke:#333

flowchart
graph TD
    A["MODE2"] --> B["Top Circular Flow"]
    B --> C["Left Circular Flow"]
    C --> D["Right Circular Flow"]
    D --> E["Bottom Circular Flow"]
    E --> F["Left Circular Flow"]
    F --> G["Right Circular Flow"]
    G --> H["Bottom Circular Flow"]
flowchart
graph TD
    A["Central Drone"] --> B["Directional Arrow"]
    B --> C["Clockwise Arrow"]
    C --> D["Directional Arrow"]
    D --> E["Clockwise Arrow"]
    E --> F["Directional Arrow"]
    F --> G["Clockwise Arrow"]
    G --> H["Directional Arrow"]
    H --> I["Clockwise Arrow"]
    I --> J["Directional Arrow"]
    J --> K["Clockwise Arrow"]
    K --> L["Directional Arrow"]
    L --> M["Clockwise Arrow"]
    M --> N["Directional Arrow"]
    N --> O["Clockwise Arrow"]
    O --> P["Directional Arrow"]
    P --> Q["Clockwise Arrow"]
    Q --> R["Directional Arrow"]
    R --> S["Clockwise Arrow"]
    S --> T["Directional Arrow"]
| Indicator Icons Aircraft Movement | |||
| Ascend Descend | |||
| Nose rotates left | Nose rotates right | ||
| Move forward Move backward | |||
| Move left Move right | |||
- Remote Control Battery
Displays the current Remote Control Battery level (It also can be checked on the Camera screen).
- Aircraft Battery
Displays the current Aircraft Battery level.
- Aircraft Battery Temperature
Shows the current temperature of the Aircraft Battery.
- Image Transmission Signal
Shows the current Image Transmission Signal strength (It also can be checked on the Camera screen).
- Gimbal Status
Displays the current status of the aircraft gimbal.
- SD Card
Displays the current SD Card status (Press the Format icon to format the SD Card).
10.2 Flight Control Settings
- Novice Mode
Slide this button to enable/disable Novice Mode, which features fixed maximum flight speed (5m/s), altitude (30m), and distance (100m).

NOTE:
When Novice Mode is activated, you cannot start the motors in non-GPS mode.
- Go-Home Altitude
Set a safe altitude for your aircraft to Go Home automatically in case of an emergency. If you set the Go-Home Altitude to a certain value, the aircraft will adjust its altitude to this value before returning to the home point. The default Go-Home Altitude is 30m.
- Speed Limit
Set EVO's maximum flight speed when Novice Mode is disabled. The default is 18m/s.
- Altitude Limit
Set EVO's maximum flight altitude when Novice Mode is disabled. This feature protects the aircraft from losing signal or flying out of sight. The default is 120m.
- Distance Limit
Slide this button to enable or disable the default Distance Limit (800m) when Novice Mode is disabled.
● Advanced Settings
Front LED Indicators
Slide this button to turn the Front LED Indicators on/off.
EXP
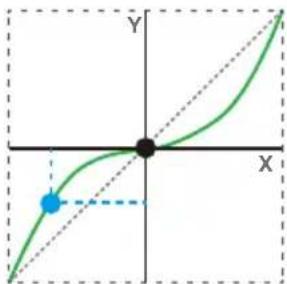
This function is used to control the aircraft rotation speed when you push the Command Stick. The following instructions are based on Mode 2.
-
Drag your finger across the screen in the pattern of the green curve toward the blue dot, as shown here. Push the Left Command Stick to the right. The aircraft will rotate right, slowly at first, then quickly.
-
Drag your finger across the screen in the pattern of the green curve toward the blue dot, as shown here. Push the Left Command Stick to the left. The aircraft will rotate left, slowly at first, then quickly.
-
Drag your finger across the screen in the pattern of the green curve toward the blue dot, as shown here. Push the Left Command Stick to the right. The aircraft will rotate right, quickly at first, then slowly.
-
Drag your finger across the screen in the pattern of the green curve toward the blue dot, as shown here. Push the Left Command Stick to the left. The aircraft will rotate left, quickly at first, then slowly.



10.3 Visual Navigation Settings
This part includes many visual features to protect the aircraft during the flight, these settings include:
• Visual Obstacle Avoidance
• Show Radar Map
- Landing Protection
- Accurate Landing
For each function, slide the button to turn it on/off. All the instructions related to visual features are written in details on the Autel Explorer™ app.
10.4 Remote Control Settings
The Remote Control Settings function grants access to Remote Control Calibration and Command Stick Mode.
- Remote Control Calibration
When you tap Start Calibration, the remote control will display the steps to complete the calibration process.
- Command Stick Mode
You can also choose between the 3 Command Stick Modes here. To do so, follow the steps on the Aircraft Status page.
10.5 Image Transmission Settings
- Channel Mode
Choose from 3 Image Transmission system channel modes as your flight environment dictates.

line
| Channel Mode | Value | | ------------ | --------- | | 900M | 910.0 MHz |
line
| Channel Mode | Value | | ------------ | --------- | | Stable | -70.0 MHz | | Unstable | -110.0 MHz |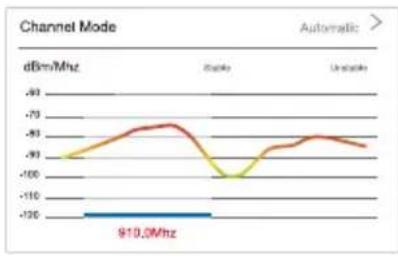
line
| Channel Mode | dBm/MHz | | ------------ | ------- | | Chapsin | -70 | | Uniputin | -100 | | 910.0 | 910.0 |
NOTE:
After selecting a Channel Mode, wait at least 5 seconds before selecting a different one.
- Broadband Settings
Select 10Mbps or 20Mbps.
- Image Transmission Mode
Select Normal, High Definition or Smooth.
● Image Transmission
When Image Transmission is active, the real-time video feed will be disabled on the Camera screen. All available bandwidth will be dedicated to browsing videos and images on the SD card.
10.6 Aircraft Battery Settings
Monitor current aircraft battery levels and warning status according to these readings.

bar
| Category | Value | |---|---| | Total Voltage | 11.72V | | Current Voltage | 3.905V | | Remaining Capacity | 3.91V | | Discharge Times | 3.906V | | Temperature | 27.5°C | | Residual Voltage | 2452 mAH | | Discharge Time | 80 | | Critically Low Battery Warning (%) | 10 | | Low Battery Warning (%) | 15 | | Low Battery Warning (%) | 25 | | Time to Discharge | 50 | | Time to Discharge > 3 Days > Battery Details > | | Battery Details >
NOTE:
For safety purposes, do not set the Low Battery Warning below 25%, as this is the minimum battery level for Go Home to function properly. Similarly, don't set the Critically Low Battery Warning below 15%, the minimum battery level required for safe on-site landing.
- Gimbal Mode
Select between:
Stabilized Mode: The gimbal's orientation will remain aligned with the aircraft's nose, but the gimbal will stay horizontal even when the aircraft tilts.
FPV Mode: The gimbal will be synchronized with the aircraft's movements, including rotation and tilt, yielding first-person view.
- Adjust Gimbal Roll Axis
Adjust the roll axis of the gimbal to find the best angle for your photos.
10.8 General Settings
- Home Point
Set your current location or the current aircraft location as the Home Point.
- Units
Choose your preferred unit system: Metric (km/h), Metric (m/s), or Imperial (mph). These units are used in the Speed Limit, Altitude Limit and Distance Limit displays in the Flight Control Settings.
● Show Aircraft Coordinates
There are three different kinds of coordinate modes: GPS, UTM and DMS.
- Firmware Version
View the firmware version of different components.
If you ever checked "Do Not Show Again" in the prompt messages, the corresponding message will never be displayed on the app anymore, tap Reset to restore all Do Not Show Again prompt messages.
- About
View the currently installed version of the Autel Explorer™ app.
AUTEL
ROBOTICS
WWW.AUTELROBOTICS.COM
© 2017-2018 Autel Robotics Co., Ltd. All Rights Reserved



- App Manual
- Contents
- Chapter 1 About This Manual 1
- Chapter 2 Mobile Device Preparation 3
- Chapter 3 Home Page & Flight Mode 5
- Chapter 4 Camera 7
- Chapter 5 Dynamic Track 16
- Chapter 6 Viewpoint 19
- Chapter 7 Orbit 21
- Chapter 8 Waypoint 25
- Chapter 9 VR 30
- Chapter 10 Settings 31
- Chapter 1
- About This Manual
- Legends
- Before Your First Flight
- NOTE:
- Chapter 2
- Mobile Device Preparation
- Installing the App
- Supported systems:
- IMPORTANT:
- Pairing Your Mobile Device
- - Connecting the Mobile Device to the Aircraft
- Chapter 3
- Home Page & Flight Mode
- Home Page
- ① Weather Test
- GO FLY
- How to Connect
- Flight Mode
- Chapter 4
- Camera
- Aircraft Status Bar
- - Top Row
- Home Icon
- Exit Icon
- Aircraft Battery Level
- Altitude
- Distance
- Flight Speed
- Settings Icon
- - Second Row
- Visual Navigation
- Satellites
- Remote Control Signal
- Image Transmission Signal
- Remote Control Battery Level
- Aircraft Battery Voltage
- Camera Operation Panel
- Album Icon
- Shoot/Record Icon
- Shoot/Record Switch Icon
- Camera Settings Icon
- WARNING
- Camera Parameter Bar
- Photo Parameter Bar
- Video Parameter Bar
- - PIV Settings
- Manual
- Auto
- Gimbal Angle & Map Split Screen
- Gimbal Angle
- Gimbal Angle Icon
- - Adjusting the Gimbal Angle
- Method 1: Touching the Camera Screen
- Method 2: Tapping the Gimbal Angle Icon
- Method 3: Moving the Gimbal Pitch Dial
- Map Split Screen
- Chapter 5
- Dynamic Track
- Using Dynamic Track
- - Follow Mode
- - Tripod Mode
- - Parallel Mode
- - Orbit Mode
- Exiting Dynamic Track
- Chapter 6
- Viewpoint
- Using Viewpoint
- Exiting Viewpoint
- Chapter 7
- Orbit
- Using Orbit
- Basic Settings
- Expert Mode
- ● Different Location
- - Radius & Altitude Settings
- Exiting Orbit
- Chapter 8
- Waypoint
- Using Waypoint
- Basic Settings
- Expert Mode
- - Aircraft Location
- - Point on Map
- /3 >
- - Draw on Map
- /3
- Chapter 9
- VR
- Chapter 10
- Settings
- Aircraft Status Settings
- - Compass Calibration
- - Flight Mode
- IMU
- - Command Stick Mode
- - Remote Control Battery
- - Aircraft Battery
- - Aircraft Battery Temperature
- - Image Transmission Signal
- - Gimbal Status
- - SD Card
- Flight Control Settings
- - Novice Mode
- - Go-Home Altitude
- - Speed Limit
- - Altitude Limit
- - Distance Limit
- ● Advanced Settings
- Front LED Indicators
- EXP
- Visual Navigation Settings
- Remote Control Settings
- - Remote Control Calibration
- Image Transmission Settings
- - Channel Mode
- - Broadband Settings
- - Image Transmission Mode
- ● Image Transmission
- Aircraft Battery Settings
- - Gimbal Mode
- - Adjust Gimbal Roll Axis
- General Settings
- - Home Point
- - Units
- ● Show Aircraft Coordinates
- - Firmware Version
- - About
- AUTEL
- ROBOTICS
Brand : Autel
Model : EVO Explorer
Category : Drone