
56P-QF60LCU - Screen MITSUBISHI - Free user manual and instructions
Find the device manual for free 56P-QF60LCU MITSUBISHI in PDF.


| Product Type | 56-inch LCD Monitor |
| Screen Diagonal | 56.2" (142.75 cm) |
| Viewable Size | 1244.16 x 699.84 mm |
| Native Resolution | 3840 x 2160 |
| Pixel Pitch | 0.108 (H) x 0.324 (V) mm |
| Color Depth | 16.77 million colors |
| Viewing Angle (Typ.) | 88° up/down, 88° left/right |
| Brightness (Typ.) | 500 cd/m² |
| Contrast Ratio (Typ.) | 1200:1 |
| Response Time (Typ.) | 6.5 ms (GTG) |
| PC Input Signal | 1920 x 1080 @ 60 Hz (Horizontal: 67.5 kHz) |
| Video Input Connectors | 4 x DVI-D |
| Control Connectors | RS-232C, LAN (Ethernet) |
| Power Supply | AC 100-240 V, 50/60 Hz, 5.5 A |
| Power Consumption (Max) | 550 W |
| Weight (Net) | 51 kg (approx.) |
| Gross Weight | 68 kg |
| Package Dimensions | 1452 (W) x 1020 (H) x 582 (D) mm |
| Cooling Fans | Built-in, ensure ventilation |
| Compliance | FCC Class A, ICES-003, CE (Class A) |
| Optional Accessories | Remote control unit (R-QF60TX), Power cords (North America/Europe/China) |
| Remote Control Battery | 2 x AAA (R03) |
| Cleaning | Use lint-free non-abrasive cloth; no liquid or glass cleaner |
| Safety Notes | Professional installation required; do not mount portrait or upside down; keep 5 cm clearance from walls |
| Image Persistence | Non-permanent; turn off monitor for duration of previous image to clear |
Frequently Asked Questions - 56P-QF60LCU MITSUBISHI
User questions about 56P-QF60LCU MITSUBISHI
0 question about this device. Answer the ones you know or ask your own.
Ask a new question about this device
Download the instructions for your Screen in PDF format for free! Find your manual 56P-QF60LCU - MITSUBISHI and take your electronic device back in hand. On this page are published all the documents necessary for the use of your device. 56P-QF60LCU by MITSUBISHI.
USER MANUAL 56P-QF60LCU MITSUBISHI
| Warning: | Be sure to follow the directions below. |
| This product requires special installation to prevent falling or toppling.Please ask installation specialists for installation.Don't attempt to install the product by yourself. |

CAUTION
RISK OF ELECTRIC SHOCK DO NOT OPEN

CAUTION: TO REDUCE THE RISK OF ELECTRIC SHOCK,
DO NOT REMOVE COVER (OR BACK)
NO USER-SERVICEABLE PARTS INSIDE
REFER SERVICING TO QUALIFIED SERVICE PERSONNEL.
The lightning flash with arrowhead symbol, within an equilateral triangle, is intended to alert the user to the presence of uninsulated “dangerous voltage” within the product’s enclosure that may be of sufficient magnitude to constitute a risk of electric shock.

The exclamation point within an equilateral triangle is intended to alert the user to the presence of important operating and maintenance (servicing) instructions in the literature accompanying the appliance.
WARNING:
TO PREVENT FIRE OR SHOCK HAZARD, DO NOT EXPOSE THIS APPLIANCE TO RAIN OR MOISTURE.
CAUTION:
TO PREVENT ELECTRIC SHOCK, DO NOT USE THIS (POLARIZED) PLUG WITH AN EXTENSION CORD, RECEPTACLE OR OTHER OUTLET UNLESS THE BLADES CAN BE FULLY INSERTED TO PREVENT BLADE EXPOSURE.
NOTE:
SINCE THIS PRODUCT IS PLUGGABLE EQUIPMENT, THE SOCKET-OUTLET MUST BE INSTALLED NEAR THE EQUIPMENT AND SHOULD BE EASILY ACCESSIBLE.
Index
Important safeguards....3
Contents 5
Parts Name and Functions....6
Control Panel 6
Terminal Panel 7
Installation 8
Connections....9
Basic Operation....10
Troubleshooting....11
Specifications 12
Pin Assignment....13
Please read all these instructions regarding your monitor and retain them for future reference. Follow all warnings and instructions marked on the monitor.
1. Read instructions
All the safety and operating instructions should be read before the appliance is operated.
2. Retain instructions
The safety and operating instructions should be retained for future reference.
3. Warnings
All warnings on the appliance and in the operating instructions should be adhered to.
4. Instructions
All operating instructions must be followed.
5. Cleaning
Unplug the power cord from the wall outlet before cleaning it. Do not use liquid aerosol cleaners. Use a damp soft cloth for cleaning.
6. Attachments and equipment
Never add any attachments and/or equipment without the approval of the manufacturer as such additions may result in the risk of fire, electric shock or other personal injury.
7. Water and moisture
Do not use this product near water or in contact with water.
8. Accessories
Do not place this product on an unstable cart, stand, tripod, bracket or table. Use only with a cart, stand, tripod bracket, or table recommended by the manufacturer or sold with the product. Any mounting of the appliance should follow the manufacturer's instructions and should use a mounting accessory recommended by the manufacturer.

An appliance and cart combination should be moved with care. Quick stops, excessive force and uneven surfaces may cause the appliance and cart combination to overturn.
9. Ventilation
Slots and openings in the cabinet are provided for ventilation, ensuring reliable operation of the product and to protect it from overheating. Do not block these openings or allow them to be blocked by placing the product on a bed, sofa, rug, or bookcase. Ensure that there is adequate ventilation and that the manufacturer's instructions have been adhered to.
10. Power sources
This product should be operated only from the type of power source indicated on the marking label. If you are not sure of the type of power, please consult your appliance dealer or local power company.
11. Power-cord protection
Power-supply cords should be routed so that they are not likely to be walked on or pinched by items placed upon or against them. Pay particular attention to cords at plugs, convenience receptacles, and points where they exit from the appliance.
12. Overloading
Do not overload wall outlets and extension cords as this can result in a fire or electric shock.
13. Objects and liquids
Never push objects of any kind through openings of this product as they may touch dangerous voltage points or short-out parts that could result in a fire or electric shock. Never spill liquid of any kind on the product.
14. Servicing
Do not attempt to service this product yourself. Refer all servicing to qualified service personnel.
15. Damage requiring service
Unplug the power cord from the wall outlet and refer servicing to qualified service personnel under the following conditions:
(a) If the power-supply cord or plug is damaged.
(b) If liquid has been spilled, or objects have fallen into the product.
(c) If the product does not operate normally after you follow the operating instructions. Adjust only those controls that are covered by the operating instructions. An improper adjustment of other controls may result in damage and may often require extensive work by a qualified technician to restore the product to its normal operation.
(d) If the product has been exposed to rain or water.
(e) If the product has been dropped or the cabinet has been damaged.
(f) If the product exhibits a distinct change in performance - this indicates a need for service.
16. Replacement parts
When replacement parts are required, be sure that the service technician has used replacement parts specified by the manufacturer or parts having the same characteristics as the original part. Unauthorized substitutions may result in fire, electric shock or other hazards.
17. Safety check
Upon completion of any service or repair to this product, ask the service technician to perform safety checks determining that the product is in a safe operating condition.
WARNING:
Unplug immediately if there is something wrong with your product.
Do not operate if smoke, strange noise or odor comes out of your product. It might cause fire or electric shock. In this case, unplug immediately and contact your dealer.
Never remove the cabinet.
This product contains high voltage circuitry. An inadvertent contact may result in an electric shock. Except as specifically explained in the Owner's Guide, do not attempt to service this product yourself. Please contact your dealer when you want to fix, adjust or inspect the product.
Do not modify this equipment.
It can lead to fire or electric shock.
Use the optional specifi ed power supply cord.
This apparatus must be grounded.
Place the product more than 5 cm (2 in.) from the wall to prevent blocking the intake, exhaust slots and ventilation of this product because hot air comes out of it.
Carry the product by all four handles, not by two handles.
Do not use the product under the following circumstances, which may cause fire or electric shock.
• in a dusty or humid place
- near a heater
• in a oily, smoky or damp place
- in direct sunlight
• with high temperature, such as the closed car
- where the temperature is lower than 5°C (41°F) or higher than 35°C (95°F)
CAUTION:
Battery replacement of the optional remote control
- Improper use may result in fire, injury, or spread dirt due to leakage, heat generation, or explosion.
- Replace all the batteries with new ones. Use two AAA batteries (R03).
- Load the batteries with their (+) and (-) sides correctly.
- Load the batteries from (-) sides first.
For the LAN terminal;, use an Ethernet cable only.
For your safety, connect to an Ethernet network which does not exceed the voltage limit of the Ethernet connector.
Use "CAT5 STP (Shielded twisted pair) Ethernet cable" for control.
If you use unshielded control cable, it may cause interference with radio and television reception.
Recommended Use
- For optimum performance, allow 30 minutes for warm-up.
- Rest your eyes periodically by focusing on an object at least 5 feet away. Blink often.
- Clean the monitor surface with a lint-free, nonabrasive cloth. Avoid using any cleaning solution or glass cleaner!
NOTE:
This product contains a Lithium Battery which contains Perchlorate Material - special handling may apply, See www.dtsc.ca.gov/HazardousWaste/perchlorate/

This symbol mark is for EU countries only.
This symbol mark is according to the directive 2002/96/EC Article 10 Information for users and Annex IV.
Your MITSUBISHI ELECTRIC product is designed and manufactured with high quality materials and components which can be recycled and reused.
This symbol means that electrical and electronic equipment, at their end-of-life, should be disposed of separately from your household waste.
Please, dispose of this equipment at your local community waste collection/recycling centre.
In the European Union there are separate collection systems for used electrical and electronic product.
Please, help us to conserve the environment we live in!
Image persistence
- Please be aware that LCD Technology may experience a phenomenon known as Image Persistence. Image Persistence occurs when a residual or “ghost” image of a previous image remains visible on the screen. Unlike CRT monitors, LCD monitors’ image persistence is not permanent, but constant images being displayed for a long period of time should be avoided. To alleviate image persistence, turn off the monitor for as long as the previous image was displayed. For example, if an image was on the monitor for one hour and a residual image remains, the monitor should be turned off for one hour to erase the image.
COMPLIANCE NOTICE OF FCC
This equipment has been tested and found to comply with the limits for a Class A digital device, pursuant to Part 15 of the FCC Rules. These limits are designed to provide reasonable protection against harmful interference when the equipment is operated in a commercial environment. This equipment generates, uses, and can radiate radio frequency energy and, if not installed and used in accordance with the instruction manual, may cause harmful interference to radio communications. Operation of this equipment in a residential area is likely to cause harmful interference in which case the user will be required to correct the interference at his own expense.
This digital apparatus does not exceed the Class A limits for radio noise emissions from digital apparatus as set out in the interference-causing equipment standard entitled “Digital Apparatus”, ICES-003 of the Department of Communications.
Changes or modifications not expressly approved by Mitsubishi could void the user's authority to operate this equipment.
COMPLIANCE NOTICE OF INDUSTRY CANADA
This Class A digital apparatus complies with Canadian ICES-003.
COMPLIANCE NOTICE OF EC DIRECTIVE
This monitor complies with requirements of 89/336/EEC, 2006/95/EC and 93/68/EEC. The requirements of susceptibility have chosen at a level, that makes interference free operation possible in living areas, office areas and light industry, related to indoor and outdoor operation. All places of operation are related to the public low voltage power supply.
This is a equipment of Class A. This device could cause interferences in residential areas; in the case of interferences it can be demand from the user to provide appropriate solutions and pay for it.
Warning:
This is class A information technology equipment. When used in a household environment, this product may cause radio interface. In such a case, the user may be required to take suitable countermeasures.
Contents
Your new 56P-QF60LCU monitor box should contain the following:
- Monitor
- User's Manual
* Remember to save your original box and packing material to transport or ship the monitor.
The following components are prepared as option.
- Remote control unit : R-QF60TX
• Power cord (North America) : JC-PC3MA (125V 10A)
• Power cord (Europe) : JC-PC3ME (250V 10A)
• Power cord (China) : JC-PC3MC (250V 10A)
Front panel

Switches the power on/off.
(2) MENU button
Activates the menu when the menu is turned-off.
(3) PLUS (+) button
Acts as (+) button to increase the adjustment with menu.
(4) MINUS (-) button
Acts as (-) button to decrease the adjustment with menu.
(5) UP (▲button
Acts as button to move the highlighted area up to select the adjustment with menu.
(6) DOWN (▼button
Acts as button to move the highlighted area down to select the adjustment with menu.
(7) EXIT button
Acts as EXIT button to move to previous menu with menu.
(8) Remote control sensor and power lamp
Receives the signal from the remote control (when using the optional wireless remote control). During start-up, it will blink green. Glows red when the LCD is in stand-by mode and glows green when the monitor is in active. When the LCD is in power save mode, it will glow both green and red. In the case of where a failure is detected, it will blink red. (Refer to page 11.)
Rear panel
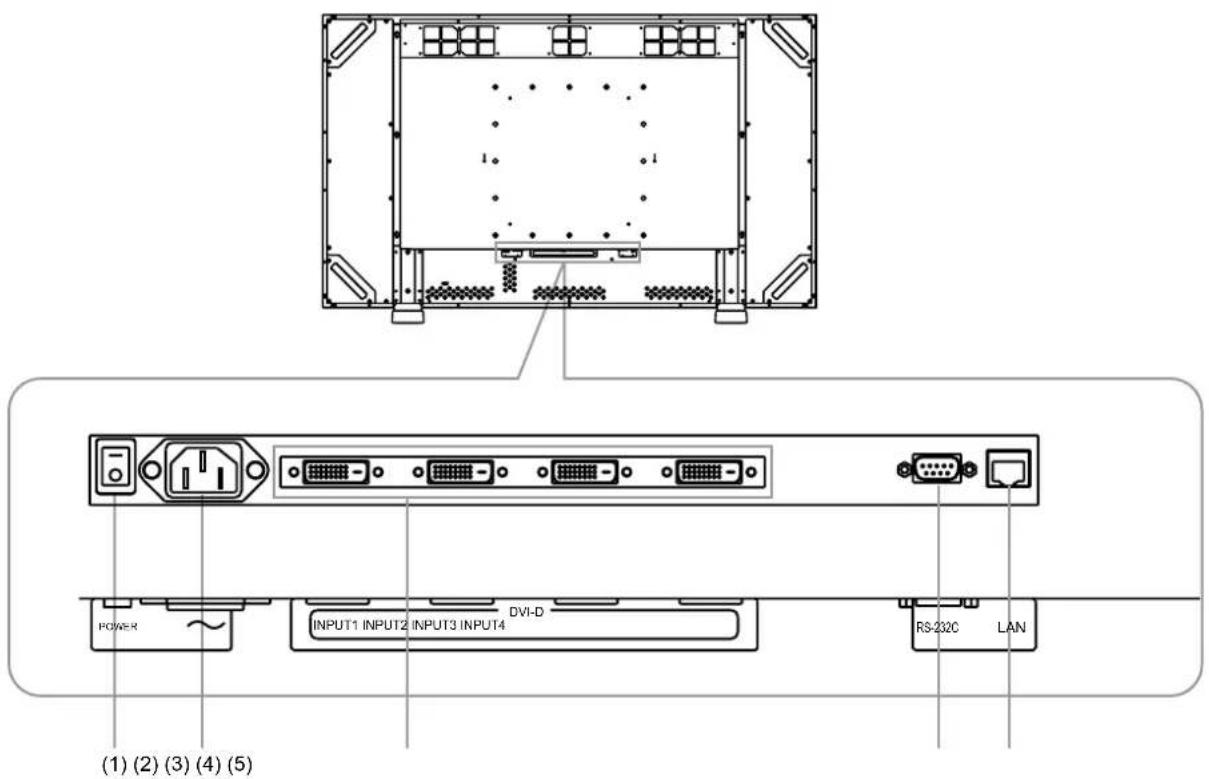
(1) Main Power Switch
On/Off Switch to turn main power on/off.
(2) AC IN connector
Connects with the power cord.
(3) INPUT 1 - 4 (DVI-D x 4)
Connect the DVI-D cable with the DVI-D connector of the computer.
(4) RS-232C connector
Connect the RS-232C cable with the RS-232C connector of the computer for control the monitor.
(5) LAN connector
Connect the LAN cable with the LAN connector of the computer for control the monitor.
Warning:
Be sure to follow the directions below.
This product requires special installation to prevent falling or toppling.
Please ask installation specialists for installation.
Don't attempt to install the product by yourself.
Determine the installation location
CAUTION:
DO NOT ATTEMPT TO INSTALL THE MONITOR BY YOURSELF.
Installing your monitor must be done by a qualified technician. Contact your dealer for more information.
CAUTION:
MOVING OR INSTALLING THE MONITOR MUST BE DONE BY TWO OR MORE PEOPLE.
Failure to follow this caution may result in injury if the monitor falls.
CAUTION:
Do not mount or operate the monitor in the portrait position, upside down, face up, or face down.
CAUTION:
Do not install the monitor where it will be exposed to direct sunlight, as this will result in display defects.
CAUTION:
The operation of this monitor is guaranteed at an ambient temperature of 35° C or lower. When using the product put in a case, etc., keep the temperature inside the case 35° C or lower by installing a fan or providing a ventilation slot.
CAUTION:
This monitor is equipped with cooling fans. Don't block the air vents especially near the cooling fans.
To avoid monitor from falling
Take measures to prevent the monitor from falling over in case of an earthquake or other disaster to lessen the probability of injury and damage resulting from fall.
As shown in the figure, secure the monitor to a solid wall or pillar using rope (commercially available) strong enough to bear the weight of the monitor. (Approx. 51 kg)
CAUTION:
Attach the ropes and screws securely.

When mounting the monitor on the wall or ceiling
CAUTION:
For preventing the monitor from falling
- To lessen the probability of injury and damage resulting from fall of the monitor in case of earthquake or other disaster, be sure to consult the bracket manufacturer for installation location.
- Do not sleep where the monitor may topple over or fall in case of an earthquake or other disaster.
- Do not mount or operate the monitor in the portrait position or upside down.
- Do not secure the monitor by the handles.
- Do not tilt the monitor 15 degrees or more when mounting it on the wall or ceiling.
When installing with the LCD surface up
CAUTION:
- Special installation works are required to ensure proper ventilation, etc. for safe use. Be sure to ask a qualified installation specialist to install the product.
- Ensure that the temperature near the air inlet is 33°C or lower.
Before making connections:
- First turn off the power of all the attached equipment and make connections.
- Refer to the user manual included with each separate piece of equipment.
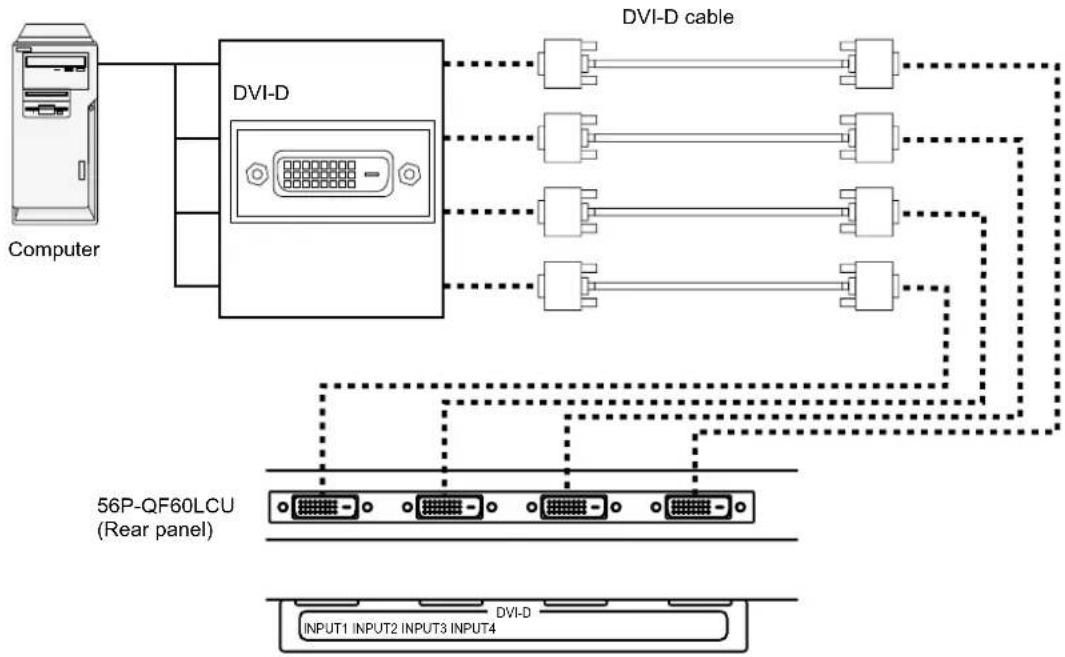
Recommended video signal timing for this product is as follows.
| Resolution Frequency Notes | |||
| Horizontal Vertical | |||
| 1920×1080 67.5 kHz 60 Hz | Each of INPUT 1 to 4 connectors | ||
• To display images at a resolution of 3840x2160, input 1920x1080 signal to each of INPUT 1 to 4 connectors.
- The image of 2544x1080 signal can not display correctly.
- Images may not be displayed correctly depending on the type of video card or driver.
- Signals input to INPUT 1 to 4 connectors are laid out on the screen as follows.
| INPUT1 | INPUT3 |
| INPUT2 | INPUT4 |
Connect the power cord
- Insert one end of the power cord into the power input connector of this product. Insert it as far as it will go.
- Clamp the power cord using the clamper.
- Plug the power cord in a wall outlet.

- The power outlet socket should be installed as near to the equipment as possible, and should be easily accessible.
- Fully insert the prongs into the power outlet socket. Loose connection may cause noise.
Power ON procedures
- Turn the Main Power Switch on the rear of the product to ON to turn on the main power.
The power lamp blinks green and then illuminates red. (You cannot turn on the power while the lamp is blinking green.)

Main Power Switch (Rear panel)
-
Press the power ( ⏻ ) button to turn on the power.
The power lamp illuminates green. -
Turn on the power of the other equipment.
CAUTION:
This monitor has the sensors to detect errors in the power, fan, temperature, and memory. When an error occurs, the power lamp illuminates. (See page 5.)
Power OFF procedures
-
Press the power ( ⏻ ) button to turn off the power.
The power lamp illuminates in red. -
Turn the Main Power Switch to the OFF mode.
The power lamp goes out.
NOTE:
For safety, unplug the power cord from the outlet.
Image persistence
- Please be aware that LCD Technology may experience a phenomenon known as Image Persistence. Image Persistence occurs when a residual or “ghost” image of a previous image remains visible on the screen. Unlike CRT monitors, LCD monitors’ image persistence is not permanent, but constant images being displayed for a long period of time should be avoided. To alleviate image persistence, turn off the monitor for as long as the previous image was displayed. For example, if an image was on the monitor for one hour and a residual image remains, the monitor should be turned off for one hour to erase the image.
NOTE:
As with all personal display devices, MITSUBISHI ELECTRIC recommends displaying moving images and using a moving screen saver at regular intervals whenever the screen is idle or turning off the monitor when not in use.
Consult the following table for troubleshooting a problem.
| Symptom Cause and remedy Reference | page | ||
| The monitor displays nothing. (The power lamp doesn't illuminate.) | Check that the power cord is connected securely. P.9 | ||
| Using other device, check that the wall outlet is receiving power. | - | ||
| Check that the main power switch isn't off. P.7 | |||
| The monitor displays nothing. (The power lamp is blinking red.) | An error may have occurred. Contact your MITSUBISHI dealer. | - | |
| Blinking red | |||
| 0.5 sec. 3 times ↔1 sec. 1 time Power error | |||
| 0.5 sec. 1 time ↔1 sec. 1 time Fan error | |||
| 0.5 sec. 4 times ↔1 sec. 1 time Temperature error | |||
| 0.5 sec. 2 times ↔1 sec. 1 time Memory check error | |||
| The monitor displays nothing. (The power lamp illuminates orange.) | The monitor displays nothing when the power saving function of your computer is active. Hit any key on the keyboard or move the mouse. Connect the signal cable correctly. Check that the computer isn't turned off. | - | |
| - | |||
| The monitor becomes dark, flickers, or displays nothing though it was displaying images properly. | Replace the LCD panel with new one. Contact your MIT-SUBISHI dealer. | - | |
| There are black spots (which don't illuminate) or bright spots (which stay illuminated) on the monitor. | They are not a failure, but due to the characteristics of the LCD panel. | - | |
| The monitor has uneven brightness. This symptom may occur depending on the displayed images. This is not a failure, but due to the characteristics of the LCD panel. | - | ||
| Faint vertical stripes appear on the monitor. This symptom may occur depending on the displayed images. This is not a failure, but due to the characteristics of the LCD panel. | - | ||
| Flickers and moire patterns appear when a fine pattern is displayed. | This symptom may occur when a fine pattern is displayed. This is not a failure, but due to the characteristics of the LCD panel. | - | |
| Lines aren't displayed in correct width. This symptom may occur when an image of other than 3840x2160 resolution is displayed. This is not a failure, but due to the characteristics of the LCD panel. | - | ||
| "Afterimage" appears on the non-display area. This symptom may occur when the entire monitor isn't filled with the display area and the same image is kept displayed for a long time. This is not a failure, but due to the characteristics of the LCD panel. | P.4, P.10 | ||
| The contrast varies depending on the viewing angle Depending on the viewing angle (angle at which you view the monitor), the contrast varies. This is not a failure, but due to the characteristics of the LCD panel. | - | ||
| The display quality varies. | Because the LCD panel uses a fluorescent light, its display quality varies with the lapse of the operating time. In addition, the display quality is affected by the ambient temperature. This is not a failure, but due to the characteristics of the LCD panel. | - | |
| A faint object persists on the screen even after switching the displayed image. | This symptom called "afterimage" may occur when the same still picture is kept displayed for a long time. The faint object fades away gradually by turning off the monitor or displaying a motion picture. Sometimes it cannot be eliminated but this is not a failure. | P.4, P.10 | |
| The monitor flickers (when connected via a distributor). | Connect the monitor and the computer directly each other, not via a distributor. | - | |
Others
| Symptom | Cause | Remedy | Reference page |
| The resolution and number of colors cannot be changed/they are fixed. | Signals aren't input/output correctly in rare cases. | Turn off the monitor and the computer and turn them back on. | - |
| When your computer's operating system isn't Windows®, it may not be able to recognize the driver for the graphic board correctly. | Reinstall the driver for the graphic board. As for reinstallation, see the user's guide of your computer or consult the support center for your computer. | - |
Specifications
| Model | 56P-QF60LCU | |
| Surface treatment | Glare | |
| Diagonal | 56.2" (142.75 cm) | |
| Viewable size | 1244.16 × 699.84 mm | |
| Resolution | 3840 × 2160 | |
| Pixel pitch | 0.108(H) × 0.324(V) | |
| Color | 16,770,000 | |
| View angle (Typ.)*1 | 88° (Up and Down), 88° (Left and Right) | |
| Brightness (Typ.) | 500 cd/m2 | |
| Contrast ratio (Typ.) | 1200 : 1 | |
| Response speed (Typ.) | GTG 6.5 ms*2 | |
| PC input | Input resolution | 1920 × 1080 |
| Horizontal frequency | 67.5 kHz | |
| Vertical frequency | 60 Hz | |
| Video input | Digital RGB | |
| Sync | Separate HV sync : TTL level | |
| Signal input connector | DVI-D | |
| Operational environment | Temperature | 5 - 35 °C |
| Humidity | 20 - 80 % (Without condensation) | |
| Storage environment | Temperature | - 20 - 55 °C |
| Humidity | 20 - 80 % (Without condensation) | |
| Power | Power supply | AC 100 - 240 V, 50/60Hz 5.5 A |
| Power consumption | Max 550 W | |
| Power connector | 3P IEC type | |
| Weight | 51 kg (Approximately) | |
| Accessories | User's manual | |
| Gross | 68 kg / 1452 (W) x 1020 (H) x 582 (D) mm | |
*1 Viewing angle: Angle at which images are displayed at a white-to-black contrast level of 30 or higher.
*2 Average of the response speeds between certain gradation levels (for example, 0, 63, 127, 191, 255)
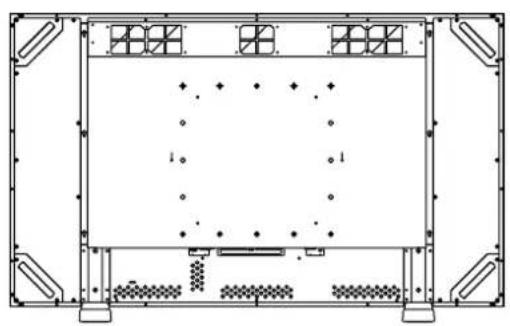
Outline drawings (mm)

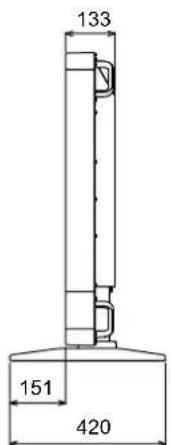
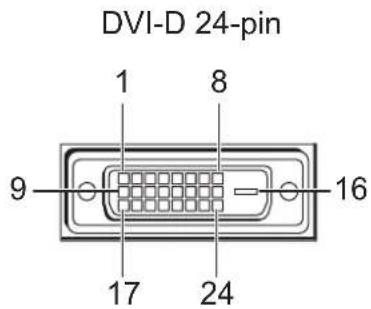
Pin Assignment
1) INPUT 1 - 4
| PIN No. Name PIN No. Name | |||
| 1 TX 2- 13 NC | |||
| 2 TX 2+ 14 +5V Power | |||
| 3 Shield (TX2/TX4) 15 Ground | |||
| 4 NC 16 Hot Plug Detect | |||
| 5 NC 17 TX 0- | |||
| 6 DDC-Serial Clock 18 TX 0+ | |||
| 7 DDC-Serial Data 19 Shield (TX0/TX5) | |||
| 8 | NC | 20 | NC |
| 9 TX 1- 21 NC | |||
| 10 | TX 1+ 22 | Shield (TXC) | |
| 11 | Shield (TX1/TX3) 23 | TXC + | |
| 12 NC 24 | TXC - | ||
2) RS-232C input/output
| Pin No | Name |
| 1 | NC |
| 2 RXD | |
| 3 | TXD |
| 4 | NC |
| 5 | GND |
| 6 | NC |
| 7 | RTS |
| 8 | CTS |
| 9 | NC |
3) LAN terminal
| Pin No | Name |
| 1 | TX+ |
| 2 | TX- |
| 3 | RX+ |
| 4 | NC |
| 5 | NC |
| 6 | RX- |
| 7 | NC |
| 8 | NC |



MITSUBISHI ELECTRIC CORPORATION
1 Zusho Baba, Nagaokakyo-City, Kyoto Japan
- CAUTION
- WARNING
- NOTE
- INDEX
- READ INSTRUCTIONS
- RETAIN INSTRUCTIONS
- WARNINGS
- INSTRUCTIONS
- CLEANING
- ATTACHMENTS AND EQUIPMENT
- WATER AND MOISTURE
- ACCESSORIES
- VENTILATION
- POWER SOURCES
- POWER-CORD PROTECTION
- OVERLOADING
- OBJECTS AND LIQUIDS
- SERVICING
- DAMAGE REQUIRING SERVICE
- REPLACEMENT PARTS
- SAFETY CHECK
- NEVER REMOVE THE CABINET
- DO NOT MODIFY THIS EQUIPMENT
- RECOMMENDED USE
- IMAGE PERSISTENCE
- COMPLIANCE NOTICE OF FCC
- COMPLIANCE NOTICE OF INDUSTRY CANADA
- COMPLIANCE NOTICE OF EC DIRECTIVE
- CONTENTS
- FRONT PANEL
- REAR PANEL
- BE SURE TO FOLLOW THE DIRECTIONS BELOW
- DETERMINE THE INSTALLATION LOCATION
- TO AVOID MONITOR FROM FALLING
- WHEN MOUNTING THE MONITOR ON THE WALL OR CEILING
- WHEN INSTALLING WITH THE LCD SURFACE UP
- BEFORE MAKING CONNECTIONS
- CONNECT THE POWER CORD
- POWER ON PROCEDURES
- POWER OFF PROCEDURES
- PIN ASSIGNMENT
- MITSUBISHI ELECTRIC CORPORATION
Brand : MITSUBISHI
Model : 56P-QF60LCU
Category : Screen