
RoadRunner 130 - Car camera PRESTIGIO - Free user manual and instructions
Find the device manual for free RoadRunner 130 PRESTIGIO in PDF.


| Product Type | Car Video Recorder (Dash Cam) |
| Brand | Prestigio |
| Model | RoadRunner 130 |
| Display | 1.5" TFT LCD, 480 x 240 pixels |
| Processor | GP6624 |
| Image Sensor | 0.3 MP CMOS (GC0308) |
| View Angle | 100° |
| Video Resolution | 1280 x 720p (30 fps), 640 x 480 (30 fps) |
| Photo Resolution | 3 MP (Interpolated) |
| Video Codec | AVI |
| Picture Format | JPG |
| Storage | microSD card up to 32 GB (SDHC recommended) |
| Microphone | Built-in |
| Motion Detection | Yes (automatically records when motion detected while engine off) |
| Loop Recording | 1, 3, 5, 10 minutes or off |
| Date Stamp | Yes (can be enabled/disabled) |
| Power Source | Rechargeable Li-ion battery 120 mAh, car charger (12V), micro USB (5V) |
| Interfaces | Micro USB (charging only) |
| Mount | 3M adhesive mount (included) |
| Operating Temperature | 0°C to 45°C |
| Dimensions (L x W x H) | 71 x 47 x 31 mm |
| Weight | 43.7 g |
| Package Contents | Car video recorder, car charger, 3M mount, quick start guide |
| Maintenance & Cleaning | Clean lens with soft dry cloth; format microSD card periodically to maintain performance |
| Safety | Use only included charger; avoid extreme temperatures; do not disassemble |
| Spare Parts & Repairability | Contact Prestigio support for accessories; device is not user-serviceable |
Frequently Asked Questions - RoadRunner 130 PRESTIGIO
User questions about RoadRunner 130 PRESTIGIO
0 question about this device. Answer the ones you know or ask your own.
Ask a new question about this device
Download the instructions for your Car camera in PDF format for free! Find your manual RoadRunner 130 - PRESTIGIO and take your electronic device back in hand. On this page are published all the documents necessary for the use of your device. RoadRunner 130 by PRESTIGIO.
USER MANUAL RoadRunner 130 PRESTIGIO
Car Video Recorder
RoadRunner 130
User Manual
Version 1.0
About this user manual
This user manual is specially designed to detail the device's functions and features.
- Please read this manual before using the device to ensure safe and proper use. - Descriptions are based on the device's default settings.
- Prestigio continuously strives to improve its products. Due to software upgrading, some contents in this user manual may be different from your product. Prestigio reserves the rights to revise this user manual or withdraw it at any time without prior notice. Please take your product as standard.
Conventions used in this manual
In this user manual, we use the following symbols to indicate useful and important information:

Caution: provides safety precaution and important information.

Note: gives additional information.

Tips: usage tips.
The order of options or menus you must select to perform a step.
Contents
1. Unboxing .... 1
Inside your package ....1
Device overview....1
2. Getting started....2
Insert a microSD card....2
Install the 3M mount ....2
Charge the battery 2
3. Settings....3
Video settings....3
Picture settings....3
General settings....3
4. Recording......4
Record a video 4
Take a picture....4
Record a sound ....4
5. File management .... 4
Browse files....4
Delete a file ....4
Lock and unlock a file....4
6. Playback....5
Play video on DVR 5
Playback on PC 5
7. Specifications....5
1. Unboxing
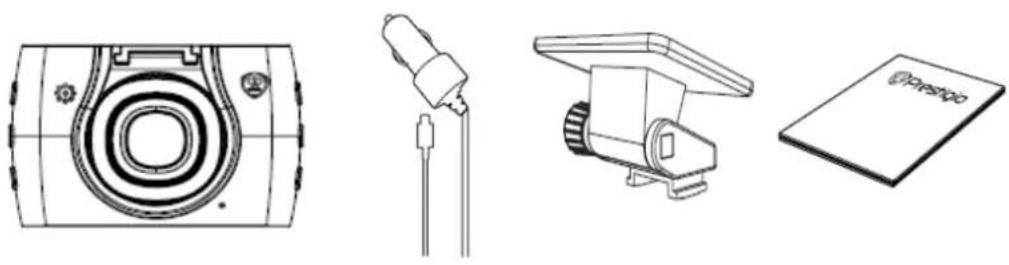
Inside your package
natural_image
Technical line drawings of four electronic components: a cylindrical device, a plug-in connector, a mechanical device with a label, and a flat base (no readable text or symbols)• Car video recorder • Car charger
- 3M mount
- Quick start guide
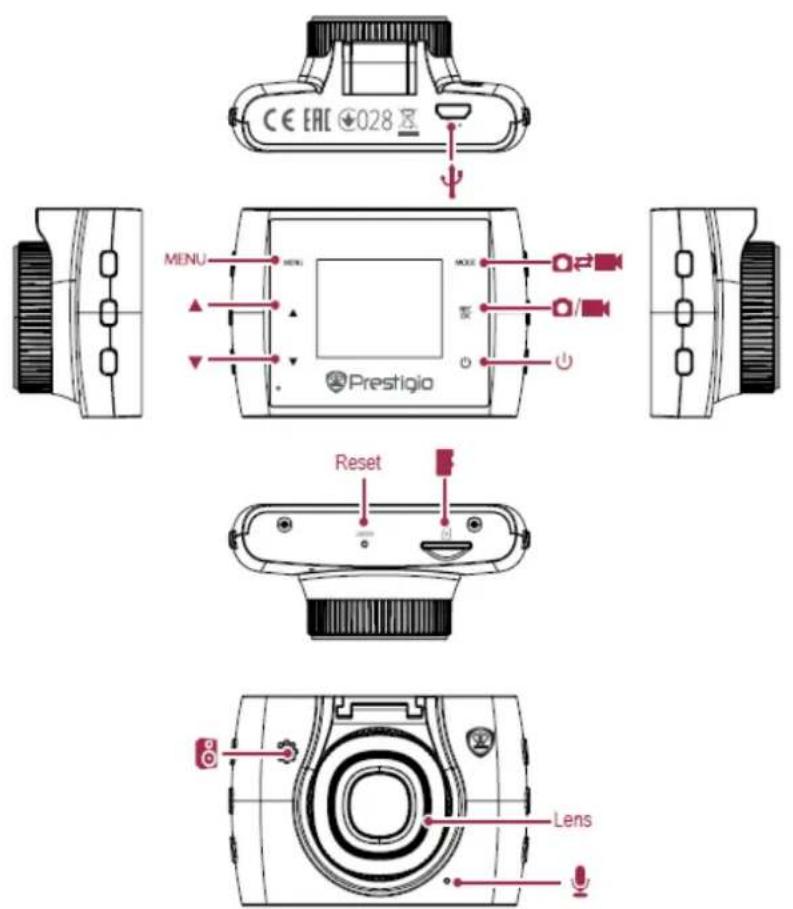
Device overview
2. Getting started
Insert a microSD card
Before starting video recording, please insert a microSD card (not included) into the slot until it locks in place.


The device will automatically recognize it as default storage and all the data will be saved on this card.
Install 3M mount

- Follow the arrow pointing direction to insert the 3M mount and lock the device into its holder
- Remove the protection paper from the 3M mount, and position the device on the clean windshield or dashboard.
Charge the battery
Before using the device for the first time, please fully charge the Li-ion battery. The battery will be completely charged in 1-2 hours.

natural_image
Diagram showing a cable being inserted into a device via a plug, with no visible text or symbols.- Using the car charger: charge the device through cigarette lighter. The device will start charging after the car engine is turned on.
- Using micro USB cable: connect the device to AC 5V adapter or the USB port of a computer/laptop.
3. Settings
Before recording, you can set up the device according to your requirements. -In video/picture preview mode, press [MENU] to enter video/picture settings, press it again go the general settings, press it third time to exit. -In setting list, use[4]/[ ] to navigate the menu, press [OK] to get the options and confirm the selection, press [MENU] to exit.
3
Video settings
- Resolution: Select the resolution of recorded video: 720P / 1280 x 720, VGA / 640 x 480
- Date stamp: Add date and time stamp onto videos.
- Motion detection: Turn on or off motion detection. If there is any motion detected while the car engine is stopped, your car DVR will start recording automatically.
- Loop recording: Set the video duration (1, 3, 5, 10 minutes or off) for loop recording. When the microSD card is full, the device will delete the oldest unlocked video file automatically.
Picture settings
- Size: Select the picture image size from 3M, 2M, 1.3M, VGA.
General settings
In preview mode, press [MENU] twice to enter general settings.
- Format: Format the memory card.

Formatting will erase all your stored data. Back up your data before proceeding.
• Language: Choose your language.
- Power off: Set automatic power off when the device is not in use.
- Default: Restore to default settings.
- Frequency: For a given luminance, the frequency of light fluctuation that evokes a sensation of flicker. Set a right flickering frequency to avoid horizontal stripe interference.
- Date/Time: Set date and time on device.
- Version: Display the current system version.
4. Recording
Record a video

Auto video recording
Connect the device to car charger, when the car engine launches, the device will automatically turn on and start loop video recording. When shut off the car engine, the device will save the last file and turn off.
Manual video recording
In video preview mode, press [OK] button to start and stop video recording.
Record the sound
In preview mode or recording mode, press [▲] to turn on or off the sound.
Lock a recording video
During recording, press [MODE] to lock the video.
Take a picture
Press [MODE] to select the picture mode, and then press [OK] to take photos.
5. File management
You can manage your videos and pictures in playback mode.

Browse files
- In video preview mode, press [MODE] two times to enter the playback mode.
- Press [▲]/[▼] to scroll through the files.
Delete a file
Press [MENU] to delete one file or all the files, and press [OK] to confirm the deletion.

To delete a protected file, remove the protection first.
Lock and unlock a file
Press [MENU] to protect or unprotect the selected file or all.
6. Playback

Play video on DVR
- In playback mode, press [▲]/[▼] to scroll through the files.
- Press [OK] to start/Pause playback.
- Press [MODE] to stop playing.
- Press [MENU] again to exit playback mode.
Playback on PC
Remove memory card from DVR and insert it into computer's card reader.

DVR's USB port is for charging purpose only.
7. Specifications

Display 1.5", 480 x 240 pixels
Processor GP6624
Image sensor 0.3 MP CMOS Sensor (GC0308)
View angle 100^
Video resolution 1280 x 720p (30 fps), 640 x 480 (30 fps)
Photo resolution 3 MP (Interpolated)
Video codec AVI
Picture format JPG
Memory up to 32 GB (high-speed SD card recommended, SDHC)
Microphone Built-in
Motion Detection Yes
Power source Detachable rechargeable battery 120 mAh, car charger
Interfaces Micro USB (for charging only)
Operating temperature 0 °C \~ 45°C
Dimension 71 x 47 x 31 mm (L x W x H)
Weight 43.7 g
- Car Video Recorder
- User Manual
- About this user manual
- Conventions used in this manual
- Contents
- Unboxing .... 1
- Getting started....2
- Settings....3
- Recording......4
- File management .... 4
- Playback....5
- Specifications....5
- Unboxing
- Getting started
- Insert a microSD card
- Install 3M mount
- Charge the battery
- Settings
- Video settings
- Picture settings
- General settings
- Recording
- Record a video
- Auto video recording
- Manual video recording
- Record the sound
- Lock a recording video
- Take a picture
- File management
- Browse files
- Delete a file
- Lock and unlock a file
- Playback
- Play video on DVR
- Playback on PC
- Specifications
Brand : PRESTIGIO
Model : RoadRunner 130
Category : Car camera