
BKK 2154 S - Kitchen appliance BEKO - Free user manual and instructions
Find the device manual for free BKK 2154 S BEKO in PDF.



| Product Type | Freestanding Refrigerator |
| Brand | Beko |
| Model | BKK 2154 S |
| Total Gross Capacity | 215 L |
| Fridge Net Capacity | 180 L |
| Freezer Net Capacity | 35 L |
| Energy Efficiency Class | A+ |
| Annual Energy Consumption | 220 kWh |
| Noise Level | 40 dB |
| Dimensions (H x W x D) | 1450 x 540 x 595 mm |
| Weight | 48 kg |
| Climate Class | N-ST |
| Defrost Type | Frost Free (No Frost) |
| Shelves Material | Glass |
| Interior Light | LED |
| Control Type | Mechanical |
| Reversible Door | Yes |
| Cooling Function | Static Cooling |
| Freezing Capacity | 3.5 kg/24h |
| Temperature Range Fridge | +2°C to +8°C |
| Temperature Range Freezer | -18°C |
| Adjustable Feet | Yes, front |
| Refrigerant | R600a |
Frequently Asked Questions - BKK 2154 S BEKO
User questions about BKK 2154 S BEKO
0 question about this device. Answer the ones you know or ask your own.
Ask a new question about this device
Download the instructions for your Kitchen appliance in PDF format for free! Find your manual BKK 2154 S - BEKO and take your electronic device back in hand. On this page are published all the documents necessary for the use of your device. BKK 2154 S by BEKO.
USER MANUAL BKK 2154 S BEKO
This product has been produced in environmentally friendly, modern facilities.
Dear customer,
We would like our product, which is manufactured in modern facilities and which has been subject to a detailed quality control process, to provide you with the highest productivity. Therefore, we would like you to read this manual thoroughly before you start using the product and we would like you to keep it as a reference.
BEKO
CONTENTS

Part 1: Safety Warnings / 3-4

Part 4: Maintenance and Cleaning / 16

Part 2: Technical Aspects of your machine / 5-6

Part 5: Easy Storage Ideas / 17-18

Part 3: Using your machine / 7-15
Part 1: Safety Warnings
When using electrical appliances, basic safety precautions should always be followed, including the following:
- Read all instructions before using the appliance. It is suggested that you keep these instructions in a safe place for future reference.
- Your voltage must correspond to the voltage printed on the bottom of the appliance. Connect to alternating current only.
To protect against electrical shock, do not put the motor housing (base), cord, or plug in water or other liquid.
- Close supervision is necessary when the appliance is used by or near children.
- Unplug from outlet when not in use, before putting on or taking off parts, and before cleaning.
- Avoid contacting moving parts at all times.
Do not operate the appliance with a damaged cord or plug or after the appliance malfunctions, or is dropped or damaged in any manner. Return the appliance to the nearest authorized service facility for examination, repair or electrical or mechanical adjustment.
- The use of accessories, including canning jars, which are not recommended in the instruction manual may cause fire, electric shock or injury to persons.
- Do not use outdoors. - Do not let cord hang over edge of table or counter, or touch hot surfaces.
- Keep hands and utensils away from moving blades or discs while processing food to reduce the risk of severe injury to persons or damage to the food processor. A scraper may be used but must be used only when the food processor is not running.
Attention!
Before using the product, read carefully the following operating instructions. It is suggested that you keep these instructions in a safe place.
Check whether the voltage indicated on the base of the product is the same as the voltage in your home.

Blades are sharp. Handle carefully. When handling the chopper blade, always hold it by the upper plastic part.
■ To reduce the risk of injury, never place cutting blades or discs on the base without first putting bowl properly in place.
- Be certain cover is securely locked in place before operating appliance.
- Never feed food by hand. Always use food pusher.
- Do not attempt to defeat the cover interlock mechanism.
Always operate blender with cover in place.
When blending hot liquids, remove center piece of two-piece cover.
Do not use the appliance if juicer filler is damaged or broken.

Please read all the following instructions carefully.
For your protection, Food Processor has a double safety device so that it cannot run unless the main lid (13) is locked in place and either the security cover (2) or the blender (8) is also locked in place.
Please Note
To remove security cover (2) or blender (8), you must first remove the main lid. - To operate the food processor, security cover (2) must be properly locked in place. - To operate blender (8), main lid
(13) must be locked in place. - When operating blender (8), make sure that all attachments are first removed from food processor bowl (11).
Do not attempt to use both blender and food processor at the same time.
Do not attempt to defeat the security cover (2) interlock mechanism or the main lid interlock.
This appliance is not intended for use by persons (including children) with reduced physical, sensory or mental capabilities, or lack of experience and knowledge, unless they have been given supervision or instruction concerning use of the appliance by a person responsible for their safety.
Children should be supervised to ensure that they do not play with the appliance.
Attention Before using your product, read carefully the following operating instructions. It is suggested that you keep these instructions in a safe place. Check whether the voltage indicated on the base of the product is the same as the voltage in your home.
Part 2: Technical Aspects of your machine
Voltage / Frequency : 230V - 50 Hz.
Power: 700 W Max.
Isolation Class:
Net weight: 4890 g.
Dimensions: 350 x 270 x 210 mm.


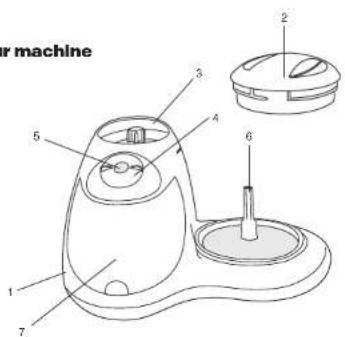




- Processor body
- Security cover
- Safety cover/blender location
- On/off/speed control dial/operation button
- Turbo/Pulse button
- Motor shaft
- Storage compartment
- Blender
- Blender lid
- Addition window lid
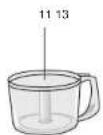
- Processor bowl
- Spindle
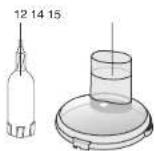
- Main lid
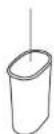
- Food pusher
- Storage dome
- Spatula
- Blade holder
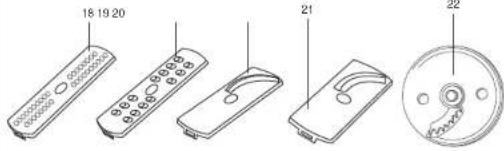
- Fine shredding blade
- Coarse shredding blade
- Coarse slicing blade
- Fine slicing blade
- Chipping blade
- Chopping blade
- Chopping blade protective cover
- Plastic kneading blade
- Plastic housing blade
- Whisk arm
- Whisk heater
- Onrus junc
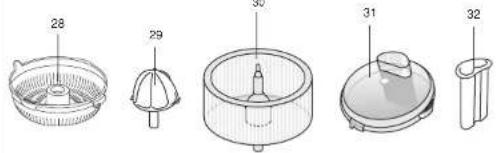
- Citrus con
- Citrus cone
- Juice extractor lid
- Juice extractor lid
- Juice extractor pusher
Part 3: Using your machine
Control Panel
After properly locking the security cover (2) in place, correctly locating the bowl (11) and locking the main lid (13), turn the operation button (4) to activate the unit from its off position.
For intermittent use, press onto "PULSE" button (5)
Food Processing
CAUTION: Make sure that the unit is unplugged from the power source and the operation button is on "OFF" before inserting or removing any attachments and before cleaning.
WARNING: Use extreme caution, blades are sharp.
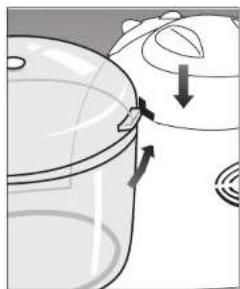
Place the security cover (2) in its place (3). Make sure that the two
arrows face each other and the security cover (2) is securely locked before operating the appliance. Do not attempt to defeat the cover interlock mechanism.
Attention!
The food processing unit will not operate if the security cover is not locked in place. This must be done before the bowl is locked in place.
Figure 1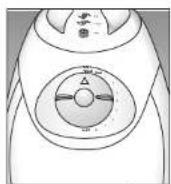
Figure 2 Figure 3 Figure 4
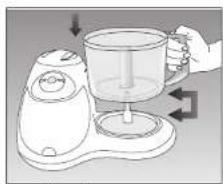


Place the bowl (11) on the motor shaft (6). (There is no need to turn it - it will lock in place by itself) Place the chopping blade (23) on the shaft inside the bowl. (Figure 6) Make sure that the chopping blade is correctly positioned in its place. Place the ingredients to be processed in the bowl (11).
WARNING: Use extreme caution - Blades are sharp, handle carefully.
Always hold the chopping blade by the upper plastic part. After using the chopping blade, always take it out of the bowl (11) before removing the processed food. Always store the chopping blade with its protective cover on. Place the main lid (13) on the bowl and guide the nozzle on the lid into the safety lock opening in the motor block, (Figure 8) until you hear it snap in place. Turn the appliance on.
Keep hands and utensils away from the cutting blade while chopping food, to reduce the risk of severe injury to persons or damage to the food chopper. A scraper may be used, but must be used only when the food processor is not running. Never feed food by hand. Always use food pusher (14) Do not leave the appliance unsupervised when it is operating.
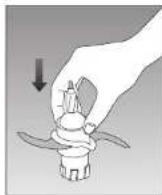
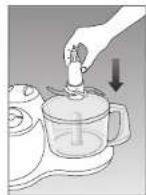
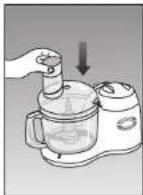
Figure 5 Figure 6 Figure 7 Figure 8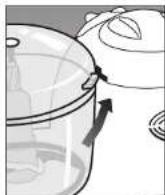
Processing Examples
The processing times indicated are
approximate and also depend on
the quality of the food to be
processed and the degree of
fineness you require.
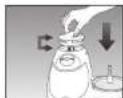
Figure 9 Figure 10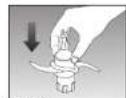
Food Processing
Product Recommended Levels Operation Times
Meat 700g. Max 10-20 sec.
Onions 700g. 5-6 10-20 sec.
Nue 600g 8-Max 10-20 sec
Fish 700g. 1-8 10-20 sec.
Cheese 700g. 1-8 10-20 sec.
Liquids (scup) 700g. 1-8 20 sec.
Carrots 700g. 5-8 20 sec.
Bread 4 pieces 6-8 10-20 sec.
Apple 700g. 8-Max 10-20 sec
Parsley Max 4 bundles Max 10 sec.
Mayonnaise Max 4 cups 1 L. 3-Max 20 sec

Figure 11 Figure 12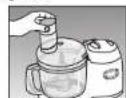

Figure 13 Figure 14
Dough Making
CAUTION: Make sure that the unit
is unplugged from power source
and operating button is on '0'
before inserting or removing
attachments
• Make sure the security cover (2)
is securely locked in its place (3)
- Place the bowl on the motor shall.
• Insert the dough kneader (25) on
the shaft inside the bowl.
- Place ingredients in the bowl.
- Place the main lid (13) and lock it.
• Recommended operation speed
level is MAX
• Maximum capacity for processing
dough is based on the mixture of
600 gr. of flour plus 400 gr. of water
in order to obtain 1 kg. of dough.
When preparing knead - dough, do
not operate the machine longer than
20 seconds. Afterwards wait at least
two minutes before operating the
machine a
• For your safety, keep the pusher
in its place while operating the
appliance.
Whipping
CAUTION: Make sure that the unit is unplugged from power source and operating button is on "OFF" before inserting or removing attachments.
- Make sure the security cover (2) securely locked in its place (3).
- Place the bowl on the motor shaft.
- Attach the removable beater (27) to the whisk arm attachment (26).
- Place the whisk arm (26) into the bowl.
- Place the ingredients in the bowl.
- Place the main lid (13) and lock it. • Recommended speed level for whipping is maximum.
- For your safety, the pusher must stay in its place while operating the appliance. Keep hands, hair, clothing as well as spatulas and other utensils away from beaters during operation to reduce the risk of injury to person, and/or damage to the appliance.
Figure 15

Figure 16 Figure 17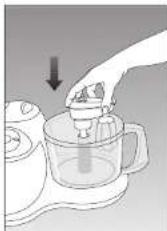
Attention!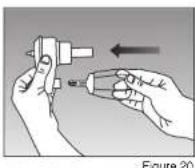
Never use the whipping attachment for dough kneading. Do not immerse the whisk arm attachment into water. For cleaning, remove beaters (27) from the whisk arm by pulling it out. Replace the beaters after washing the beaters only.
Figure 19 Figure 18
Citrus Juicer
CAUTION: Always operate the juicer only at minimum speed (MIN)
CAUTION: Make sure that the unit is unplugged from power source and operating button is on "OFF" before inserting or removing attachments.
- Make sure the security cover (2) is securely locked in its place (3) - Place the bowl on the motor shaft. - Place the citrus juicer filter (28) on the bowl and lock it by turning it. - Put on it the citrus corn (29)
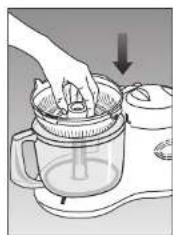
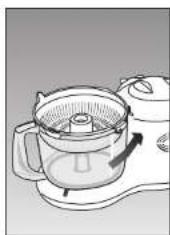
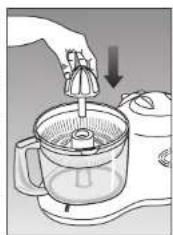
Figure 20 Figure 21 Figure 22
Continuous Slicer / Shredder
CAUTION: Make sure that the unit is unplugged from power source and operating button is on "OFF" before inserting or removing attachments.
- Make sure security cover (2) is securely locked in its place (3).
- Place the bowl on the motor block.
WARNING: Use extreme caution - blades are sharp. Handle carefully.
- Place the blade of your choice on the blade - holder (17)
- Place the blade holder (17) onto the bowl (Figure 25).
- Place the main lid on the bowl and lock it in place.
- For your safety, always use the pusher to press down the ingredients. Never feed food by hand. Moving parts: keep fingers out of the discharge opening.
- Do not overload the bowl. In one operation, you can process a maximum of 1.5 kg of food.
Processing Examples
For thin slicing: Blade - A (20) - Recommended speed level is between 5-6 (Cheese)
For thick slicing: Blade - B (21) - Recommended speed level is between 5-6 (Cabbage, carrots, onions)
For thin shredding: Blade - C (18) - Recommended speed level is between 5-6 (Carrots, cucumbers, cabbage)
For thick shredding: Blade - D (19) - Recommended speed level is between 5-6 (Lettuce, carrots, apples)
For French fries: Disc - (22) - Recommended speed level is between 5-6 (Potatoes)
Figure 23
Figure 24
Figure 25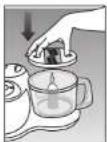
Figure 26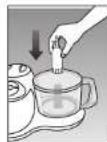
Blender
CAUTION: Make sure the unit is unplugged from the power source and the operating button is on "OFF" before inserting or removing attachments.
- First, remove the bowl (11) and main lid (13). - Remove the security cover (2).
- Remove the security cover (2) (Security cover can be removed only after the main lid (13) is removed)
- Place the blender on its place. - WARNING: Use extreme caution. - blades are sharp. Handle carefully.
- Place the bowl without any attachments on, and place the main lid and lock it in place.
IMPORTANT : Blender will not operate when lid (13) is not locked in place. The bowl must be empty and without attachments when blender is used.
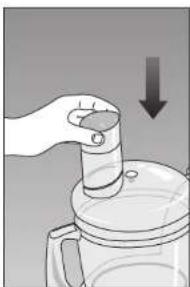
- Place the lids of the blender (9,
- Recommended speed levels for blending are between 5-Max. For soft vegetables and fruits (e.g: banana), shared with the low speed then increase according to your needs. For hard vegetables and fruits (e.g: carrots) always use the highest speed or Max. Do not load the blender with more than 300 gr. of hard vegetable in one time. Do not operate continuously more than 20 sec. In one time. - You can crash 10 oz. of ice cubes in 15-20 sec. In the blender.
CAUTION: To prevent spilling, do not operate the blender with more than 1000 ml. of soft liquid (e.g. soup). • Always operate the blender with lid in place.
- When blending hot liquids, remove
- Avoid contact with moving parts at all times. - Keep hands, hair, clothing, as well as spatulas and other utensils out of the container while blending, to reduce the risk of severe injury to persons of damage to the blender. A spatula may be used, but must be used only when the unit is not running.
To remove blender, you must first remove the main lid (13)
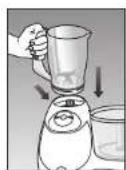
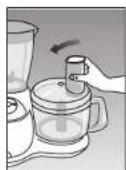
Figure 27 Figure 28 Figure 29
Juice Extractor
CAUTION : Make sure unit is unplugged from power source and operating button is on "OFF"
- Make sure the security cover lid is securely locked in its place.
- Place the bowl on the motor shaft
- Place in the juice extractor filter (30)
- Place the juice extractor lid (31) and lock it. • The recommended speed level is
MAX. for juice extracting.
- For your safety, always use the pusher to press down the ingredient.
- Always make sure juicer lid is locked securely in place before motor is turned on. Do not remove the juice extractor lid (31) while operating.
- Be sure to turn switch to "OFF" position after each use. Make sure the motor stops completely and unplug unit before disassembling.
- During use, turn "OFF" the appliance temporarily to clean the
pulp that remains in the filter, with the help of the spatula (16) - Do not put your fingers or other objects into the juicer opening while it is in operation. If food becomes lodged in the opening, use food pusher (32) or another piece of fruit or vegetable to push it down. When this method of removing food lodged in the opening is not possible, turn the motor "OFF" and disassemble juicer to remove the remaining food.
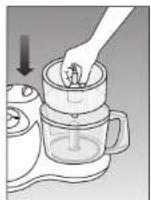

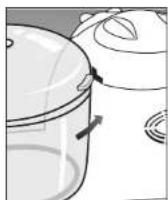
Figure 30 Figure 31 Figure 32 Figure 33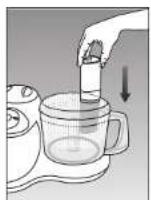

Part 4: Maintenance and Cleaning
CAUTION: Make sure the unit is unplugged from power and operating button is on 'OFF' before cleaning.
- Never immerse the unit or cord or plug in water.
- Clean the motor block with a damp cloth only.
- Only the stainless steel blades can be washed in the dishwasher.
- All other parts can be cleaned in warm sudsy water using regular dishwashing liquid.
Cleaning the blender
- Fill with sudsy warm water.
- Place cover.
- Run blender at maximum speed for 30 seconds. Rinse and repeat if necessary.

Figure 34 Figure 35
Part 5: Easy Storage Ideas
- 4 pcs. of slicing, shredding blades
- 1 pc of French fries cutting disc
- Blade holder
- Spindle
can be stored on the storage dome.(15) You can also place this storage basket onto the main lid (13) for more efficient space usage
- Spatula Can be placed on the spatula storage area which is on the unit.

Figure 36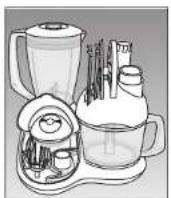
Figure 37

Figure 38
- Whisk arm
- Removable beater
- Chopping blade
can be stored on the storage compartment (7) which is on the main body.
• The power cord can be stored by
pushing in to the inside of the main
body.
Figure 39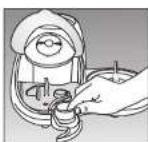
Figure 40
Figure 41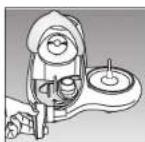
Figure 42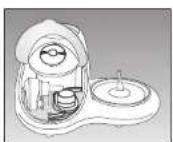
Figure 43 Figure 44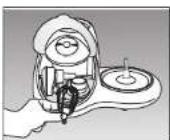
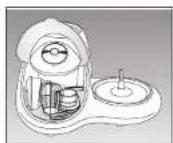
Figure 45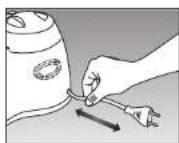


Brand : BEKO
Model : BKK 2154 S
Category : Kitchen appliance