
CR-421 - Radio DENVER - Free user manual and instructions
Find the device manual for free CR-421 DENVER in PDF.


| Product Type | Clock Radio with FM Tuner |
| Brand | Denver |
| Model | CR-421 |
| Power Supply | AC 230V ~ 50Hz; Battery backup: 2 x AAA (not included) |
| Radio Bands | FM |
| Preset Stations | 20 FM stations |
| Alarm Features | Dual alarms (buzzer or radio wake-up), snooze (5 min) |
| Sleep Timer | 10 to 90 minutes |
| Nap Timer | 45, 60, 90 or 120 minutes |
| Display Dimmer | High/Low brightness settings |
| Antenna | FM wire antenna, extendable |
| Additional Features | Battery backup for time/alarm settings, slip-proof silicon feet |
| Dimensions | Approximately 15 × 8 × 8 cm (estimated) |
| Weight | Approximately 0.5 kg (estimated) |
Frequently Asked Questions - CR-421 DENVER
User questions about CR-421 DENVER
0 question about this device. Answer the ones you know or ask your own.
Ask a new question about this device
Download the instructions for your Radio in PDF format for free! Find your manual CR-421 - DENVER and take your electronic device back in hand. On this page are published all the documents necessary for the use of your device. CR-421 by DENVER.
USER MANUAL CR-421 DENVER
USER MANUAL
CR-421
WWW.DENVER-ELECTRONICS.COM
Please read this user manual carefully before start using the product.
CONTROLS AND INDICATORS
Back view

- "SNOOZE / DIM / SLEEP" button
- "ON / OFF / NAP" button
- "P-" button
- "ALARM1 / VOL-" button
- "HOUR / TUNING—" button
- "TIME / PRESET" button
- "P+" button
- "ALARM2 / VOL +" button
- "MIN / TUNING +" button
- Battery compartment
- FM antenna
- AC plug
Front view

A. Time and radio frequency display
B. Alarm2 buzzer
C. Alarm2 radio indicator
D. FM
E. Alarm1 buzzer
F. Alarm1 radio indicator
PREPARATION FOR USE
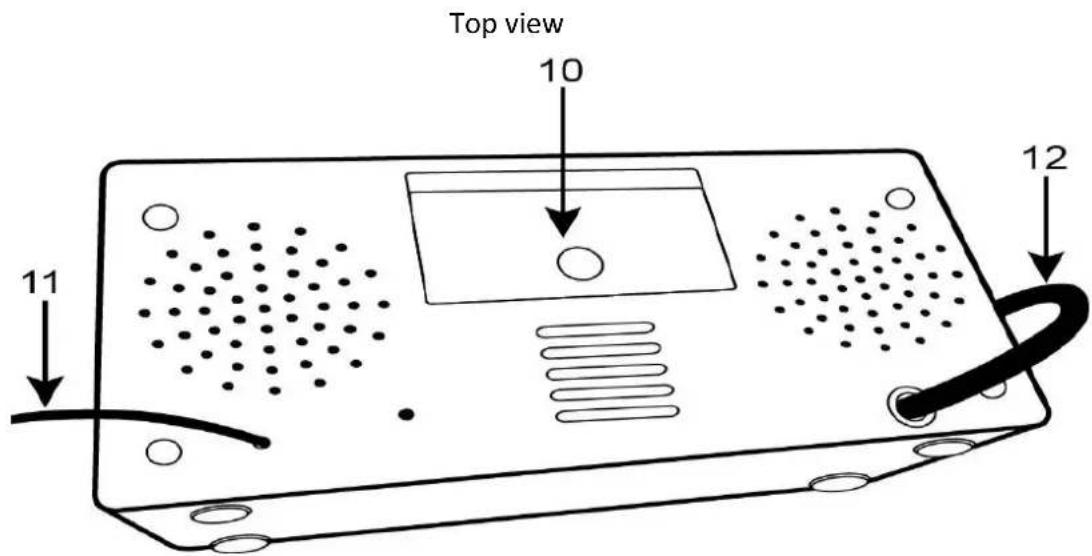
This clock radio includes a battery backup system that will maintain the time and alarm settings during a temporary power interruption. Insert two 'AAA' size batteries correctly by matching the polarity (+/-) markings in the battery compartment (10). If you experience a power failure while batteries are installed, the display will turn 'off' but the clock will continue to run and maintain your alarm settings. Please replace all batteries at the same time with only new batteries.
The clock radio has slip proof silicon feet. Place the clock radio only on protected furniture.
Plug AC plug (12) into 230vac electrical outlet.
Unwind the FM antenna (11) on the back of the clock radio. Extend and reposition the antenna for best radio reception.
- You cannot set any function when the clock display is blinking after plug in, press
the "TIME/PRESET" to stop blink and start setting.
- The time can only be set when the radio is turned off. Press the "ON / OFF / NAP" button (2) to turn radio on or off.
-
When the clock display is blinking, you cannot power on radio by the "ON / OFF / NAP" button (2).
-
Press and hold down "TIME / PRESET" button (6) for approximately 3 seconds until the display flashes.
-
Press "HOUR / TUNING—" button (5) repeatedly to change the hour setting.
-
Press "MIN / TUNING +" button (9) repeatedly to change the minute setting.
-
Press "TIME / PRESET" button (6) to confirm at the time and the display will stop flashing.
SETTING THE ALARM TIME
This clock radio has dual alarms that can be set and used independently. The procedure to set both alarms are the same. Both alarms can either sound the buzzer or wake up to radio.
Note: The alarm time can only be set when the radio is turned off. Press the "ON / OFF / NAP" button (2) to turn radio on or off.
- For setting alarm time 1 with buzzer, press "ALARM1 / VOL -" button (4) and
indicator (E) will flash. For setting alarm time 1 with radio, press "ALARM1 / VOL -" button (4) twice and indicator (F) will flash.
-
When the digits are flashing, press "HOUR / TUNING -" button (5) repeatedly to change the hour setting. Press "MIN / TUNING +" button (9) repeatedly to change the minute setting.
-
Press "ALARM1 / VOL—" button (4) to confirm.
-
To cancel alarm, press "ALARM1 / VOL -" button (4) three times when the current time is showing. The alarm indicators will be off.
-
When the alarm sounds, press any button to turn off alarm or press "SNOOZE /
DIM / SLEEP" button (1) to enter snooze mode. 📂 or 🌘 will blink during snooze mode. Alarm will sound again after 5 minutes. Alarm buzzer does not cut the radio sound. If alarm waken up by radio, volume control for radio is not available.
- Follow the same instructions for alarm time 2 with "ALARM2 / VOL +" button (8).
Note:
- You must make the time and alarm time adjustments while the display is flashing. The display will stop flashing after approximately 10 seconds if adjustments are not made.
- If two alarms are set together, for example alarm1 set to buzzer alarm and alarm2 set to radio alarm, when buzzer is activated by alarm1 and radio is activated by alarm2, the previous alarm does not stop automatically and has both buzzer and radio sound together.
RADIO OPERATION
General Operations
- Press the "ON/OFF/NAP" button (2) to turn radio on and off.
- For manual tuning, press "HOUR / TUNING -" button (5) or "MIN / TUNING +" button (9) for increments of 0.1mHz.
- For automatic tuning, press and hold down "HOUR / TUNING -" button (5) or "MIN / TUNING +" button (9) for approximately 3 seconds. Release the button and the radio will start to scan for the next available station.
- Press "ALARM1 / VOL—" button (4) or "ALARM2 / VOL +"button (8) to adjust volume level. The display changes to show the volume level indication (00 to 14) during the volume adjustments, then changes back to the radio station frequency and then the current time.
- Press "HOUR / TUNING -" button (5) or "MIN / TUNING +" button (9) to show the radio station frequency.
Pre-set Station Memory
- The radio can store up to 20 FM stations.
- To store a station in memory, tune to the desired radio station. Press and hold down "TIME/PRESET" button (6) for approximately 3 seconds and "P01" on the display will flash. Press "P+" button (7) or "P-" button (3) to the desired station memory (P01 to P20). Press "TIME/PRESET" button (6) once to confirm.
- Repeat the above steps for up to 20 stations.
- To recall the station, press "P+" button (7) or "P-" button (3) until desired station is reached.
Sleep mode
- When the radio is on, press "SNOOZE / SLEEP / DIM" button (1) to enter sleep mode. "OFF" will be displayed. Press "SNOOZE / SLEEP / DIM" button (1)
repeatedly for the duration of the “SLEEP” time. The range of “SLEEP” time is 90 minutes to 10 minutes, as displayed on the screen.
NAP
Set the desired NAP time and the radio will turn on automatically after the preset time.
- When the radio is off, press and hold "ON / OFF / NAP" button (2) for approximate 4 seconds and the display and FM indicator (D) will flash.
- Press "P+" button (7) or "P-" button (3) to set the desired nap time (45, 60, 90 or 120 mins)
- Press "ON / OFF / NAP" button (2) to confirm.
DIMMER
When the radio is off and the current time showing, press "SNOOZE / SLEEP / DIM" button (1) to select the brightness of the display for high or low.
ALL RIGHTS RESERVED, COPYRIGHT DENVER ELECTRONICS A/S
DENVER®
www.denver-electronics.com



Electric and electronic equipment contains materials, components and substances that can be hazardous to your health and the environment, if the waste material (discarded electric and electronic equipment) is not handled correctly.
Electric and electronic equipment is marked with the crossed out trash can symbol, seen below. This symbol signifies that electric and electronic equipment should not be disposed of with other household waste, but should be disposed of separately.
All cities have established collection points, where electric and electronic equipment can either be submitted free of charge at recycling stations and other collection sites, or be collected from the households. Additional information is available at the technical department of your city.
Imported by:
DENVER ELECTRONICS A/S
Omega 5A, Soeften
DK-8382 Hinnerup
Denmark
www.facebook.com/denverelectronics


Brand : DENVER
Model : CR-421
Category : Radio