
NVR2204/2208-4KS2 - Video Device Dahua Technology - Free user manual and instructions
Find the device manual for free NVR2204/2208-4KS2 Dahua Technology in PDF.


| Product Type | Network Video Recorder (NVR) |
| Model | NVR2204/2208-4KS2 |
| Channels | 4 or 8 (model dependent) |
| Max Recording Resolution | 4K (3840x2160) at 30 fps |
| Video Compression | H.265, H.264, MJPEG |
| Hard Drive Support | 1 SATA III HDD up to 10 TB |
| RAID Support | No |
| Power Supply | DC 12V, 2A (adapter included) |
| Power Consumption | ≤ 10W (without HDD) |
| Dimensions (W x D x H) | 260 x 220 x 44 mm (1U rackmount) |
| Weight | 1.2 kg (without HDD) |
| Operating Temperature | -10°C to +55°C |
| Humidity | 10% to 90% (non-condensing) |
| Network Interface | 1x RJ45 10/100/1000 Mbps |
| USB Ports | 2x USB 2.0 |
| HDMI Output | 1x HDMI 1.4 up to 3840x2160 |
| VGA Output | 1x VGA up to 1920x1080 |
| Audio I/O | 1ch RCA input, 1ch RCA output |
| Alarm I/O | 4ch alarm input, 1ch alarm output |
| Remote Access | Via web browser, mobile app (DMSS) |
| Recording Modes | Continuous, motion, alarm, schedule |
| Playback | Up to 4 channels simultaneous |
| Maintenance | Clean with dry cloth; avoid liquids |
| Safety | Use grounded outlet; surge protector recommended |
| Repairability | HDD replacement; no user-serviceable parts inside |
Frequently Asked Questions - NVR2204/2208-4KS2 Dahua Technology
User questions about NVR2204/2208-4KS2 Dahua Technology
0 question about this device. Answer the ones you know or ask your own.
Ask a new question about this device
Download the instructions for your Video Device in PDF format for free! Find your manual NVR2204/2208-4KS2 - Dahua Technology and take your electronic device back in hand. On this page are published all the documents necessary for the use of your device. NVR2204/2208-4KS2 by Dahua Technology.
USER MANUAL NVR2204/2208-4KS2 Dahua Technology
Network Video Recorder
Quick Start Guide

Foreword
General
This quick start guide (hereinafter referred to as "the Manual") introduces the functions and operations of the NVR device (hereinafter referred to as "the NVR").
Safety Instructions
The following categorized signal words with defined meaning might appear in the Manual.
| Signal Words | Meaning | |
 | DANGER | Indicates a high potential hazard which, if not avoided, will result in death or serious injury. |
 | WARNING | Indicates a medium or low potential hazard which, if not avoided, could result in slight or moderate injury. |
 | CAUTION | Indicates a potential risk which, if not avoided, could result in property damage, data loss, lower performance, or unpredictable result. |
 | TIPS | Provides methods to help you solve a problem or save you time. |
 | NOTE | Provides additional information as the emphasis and supplement to the text. |
Revision History
| Version | Revision Content | Release Time |
| V1.0.0 | First release. | July 2020 |
Privacy Protection Notice
As the NVR user or data controller, you might collect personal data of others such as face, fingerprints, car plate number, Email address, phone number, GPS. You need to be in compliance with the local privacy protection laws and regulations to protect the legitimate rights and interests of other people by implementing measures including but not limited to: providing clear and visible identification to inform data subject the existence of surveillance area and providing related contact.
About the Manual
- The Manual is for reference only. If there is inconsistency between the Manual and the actual product, the actual product shall prevail.
- We are not liable for any loss caused by the operations that do not comply with the Manual.
- The Manual would be updated according to the latest laws and regulations of related regions. For detailed information, see the paper manual, CD-ROM, QR code or our official website. If there is inconsistency between paper manual and the electronic version, the electronic version shall prevail.
- All the designs and software are subject to change without prior written notice. The product updates might cause some differences between the actual product and the Manual. Contact the
customer service for the latest program and supplementary documentation.
- There still might be deviation in technical data, functions and operations description, or errors in print. If there is any doubt or dispute, refer to our final explanation.
- Upgrade the reader software or try other mainstream reader software if the Manual (in PDF format) cannot be opened.
- All trademarks, registered trademarks and the company names in the Manual are the properties of their respective owners.
- Visit our website, contact the supplier or customer service if there is any problem occurred when using the NVR.
- If there is any uncertainty or controversy, refer to our final explanation.
Important Safeguards and Warnings
The following description is the correct application method of the NVR. Read the Manual carefully before use to prevent danger and property loss. Strictly conform to the Manual during application and keep it properly after reading.
Operating Requirements
• Install the PoE cameras indoors.
- Do not place and install the NVR in an area exposed to direct sunlight or near heat generating device.
- Do not install the NVR in a humid, dusty or fuliginous area.
- Keep its horizontal installation, or install it at stable places, and prevent it from falling.
- Do not drip or splash liquids onto the NVR; do not put on the NVR anything filled with liquids, in order to prevent liquids from flowing into the NVR.
- Install the NVR at well-ventilated places; do not block its ventilation opening.
- Use the NVR only within rated input and output range.
- Do not dismantle the NVR arbitrarily.
- Transport, use and store the NVR within allowed humidity and temperature range.
Power Requirements
- Use batteries according to requirements. Otherwise, it may result in fire, explosion or burning risks of batteries!
- To replace batteries, only the same type of batteries can be used.
- Dispose the exhausted batteries according to the instructions.
- Use electric wires within rated specifications recommended by local regulations.
- Use standard power adapter matched with this NVR. Otherwise, the user shall undertake resulting personnel injuries or NVR damages.
- Use power supply that meets SELV (safety extra low voltage) requirements, and supply power with rated voltage that conforms to Limited Power Source in IEC60950-1. For specific power supply requirements, refer to device labels.
- Products with category I structure shall be connected to grid power output socket, which is equipped with protective grounding.
- Appliance coupler is a disconnecting device. During normal use, keep an angle that facilitates operation.
Table of Contents
Foreword....
Important Safeguards and Warnings....III
1 Local Operations....1
1.1 Starting the NVR....1
1.2 Initializing the NVR....1
1.3 Configuring Network....4
1.4 Adding IP Camera 6
1.4.1 Initializing IP Camera....6
1.4.2 Adding IP Camera by Search Result....10
1.4.3 Manually Adding IP Camera....12
1.5 Configuring Recorded Video Storage Schedule....15
1.6 Configuring P2P Settings....17
1.6.1 Enabling P2P Function....17
1.6.2 Adding the NVR to Smart Phone Client....18
1.7 Smart Motion Detection 19
1.8 Live View....21
1.9 Recording Playback....23
2 Logging in to Web....25
Appendix 1 Cybersecurity Recommendations....26
1 Local Operations

Slight difference might be found on the interfaces of different models. Following figures are for reference only. The actual product shall prevail.
1.1 Starting the NVR
Before starting the NVR, make sure that:
- The rated input voltage matches the NVR's power requirements.
- The power wire connection is ready.
- For device security, connect the NVR to the power adapter first and then connect it to the power socket.
- Always use stable current. It is recommended to use UPS as the power source.
1.2 Initializing the NVR
This topic shows how to initialize the NVR before use.
Background Information
When booting up for the first time, you need to configure the password information for admin (by default). To guarantee device security, we strongly recommend you properly keep the login password and regularly modify it.
Procedure
Step 1 Turn on the NVR.
The system enters device initialization interface.
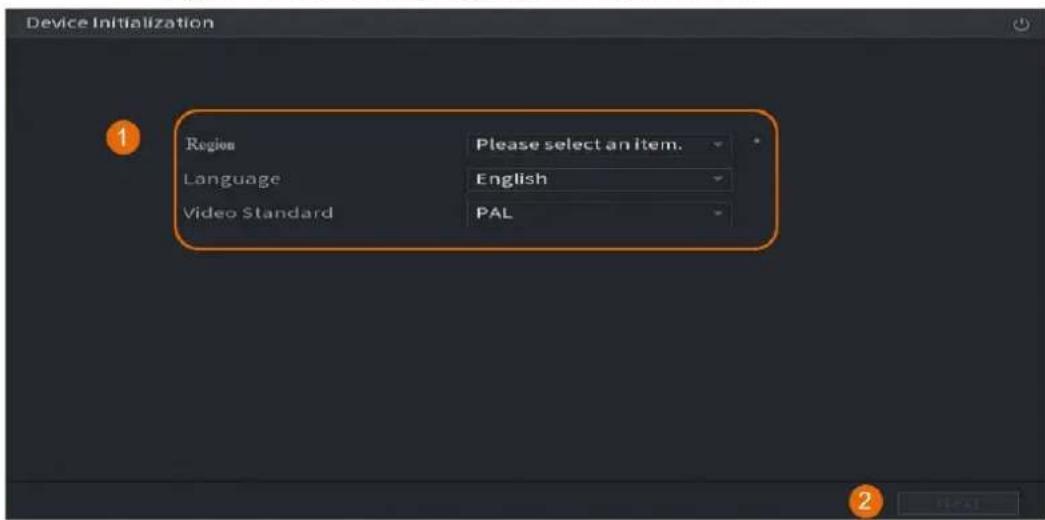
Step 2 From the drop-down lists, select region, language and video standard as needed.

You can change these settings on setting pages of the NVR after initialization.
Figure 1-1 Set location, language and video standard
Step 3 Click Next.
Step 4 Read the Software License Agreement and select I have read and agree to all terms, and then click Next.
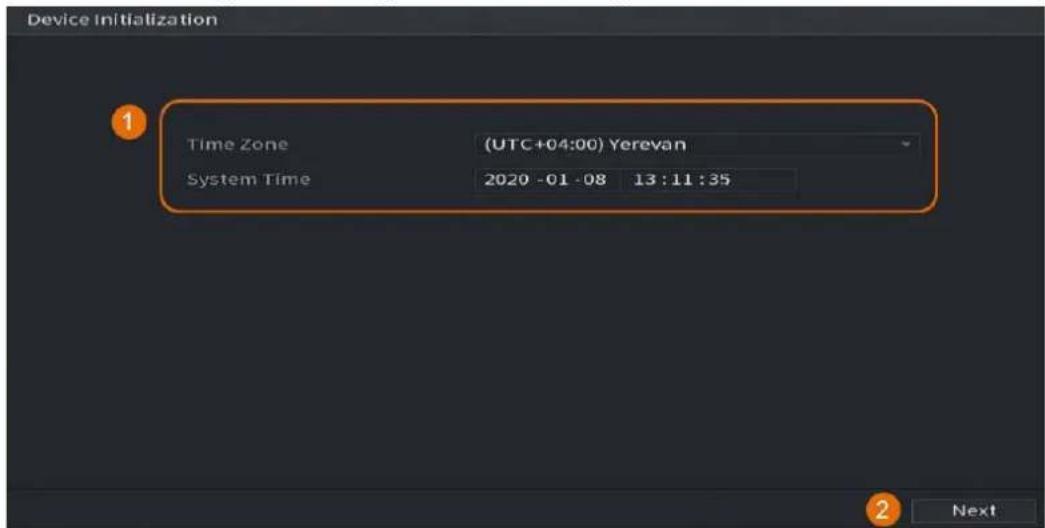
Step 5 Select time zone and configure system time, and then click Next.
Figure 1-2 Configure time zone and system time
Step 6 Configure the password information for device administrator, and then click Next.
Figure 1-3 Configure password information

Table 1-1 Password information
| Parameter | Description |
| Username By default, the | user is admin and you cannot change it. |
| Password Enter a new pass | Password for device administrator in Password field, and confirm the password in the next field. The new password can be set from 8 characters to 32 characters and contains at least two types from numbers, letters and special characters (excluding "", "", ";", ";" and "&"). The new password can be set from 8 characters to 32 characters and contains at least two types from numbers, letters and special characters (excluding "", "", ";", ";" and "&"). |
| Confirm Password | |
| Password Hint | Enter a prompt question that will help you recall the password for your device. On the login interface, click [icon] and the prompt will be displayed to help you reset the password. On the login interface, click [icon] and the prompt will be displayed to help you reset the password. |
Step 7 (Optional) Use mouse to draw an unlock pattern, and then draw it again for confirmation.
Figure 1-4 Draw an unlock pattern


- The pattern that you want to set must cross at least four points.
- If you do not want to configure the unlock pattern, click Skip.
- Once you have configured the unlock pattern, it will be used as the default authentication method. If you skip this setting, enter the password for login.
Step 8 (Optional) Apply reserved email and security questions to the NVR.
- Enable Reserved Email and enter the email address.
- Enable Security Question and select questions from the drop-down lists for Question 1, Question 2, and Question 3, and then enter the answers to those questions.
Figure 1-5 Apply reserved email and security questions

Step 9 Click OK.
1.3 Configuring Network
You can configure the basic network settings such as net mode, IP version, and IP address for the NVR.
Step 1 Select Main Menu > NETWORK > TCP/IP.
Step 2 Configure parameters.

You can also configure network parameters in the Startup Wizard.
Figure 1-6 TCP/IP

Table 1-2 TCP/IP parameters
| Parameter | Description |
| IP Version | In the IP Version list, you can select IPv4 or IPv6. Both versions are supported for access. |
| MAC Address | Displays the MAC address of the NVR. |
| DHCP | Enable the DHCP function. The IP address, subnet mask and default gateway are not available for configuration once DHCP is enabled.If DHCP is effective, the obtained information will be displayed in the IP Address, Subnet Mask and Default Gateway. If not, all values show 0.0.0.0.If PPPoE connection is successful, the IP address, subnet mask, default gateway, and DHCP are not available for configuration. |
| IP Address | Enter the IP address and configure the corresponding subnet mask and default gateway. IP address and default gateway must be in the same network segment. IP address and default gateway must be in the same network segment. |
| Subnet Mask | |
| Default Gateway | |
| Preferred DNS | Enter the IP address of DNS. |
| Alternate DNS | Enter the IP address of alternate DNS. |
| MTU | Enter a value for network card. The value ranges from 1280 byte to 1500 byte. The default is 1500.The suggested MTU values are as below.1500: The biggest value of Ethernet information package. This value is typically selected if there is no PPPoE or VPN connection, and it is also the default value of some routers, network adapters and switches.1492: Optimized value for PPPoE.1468: Optimized value for DHCP.1450: Optimized value for VPN. |
| Test | Click Test to test if the entered IP address and gateway are interworking. |
Step 3 Click OK.
1.4 Adding IP Camera
You can add an IP camera by search result or by manually entering IP information.

Cameras you want to add must be in the same network with the NVR.
1.4.1 Initializing IP Camera
The topic shows how to initialize new cameras or the cameras after restoring factory defaults.
Background Information
The IP camera shall be initialized before connecting to an NVR, otherwise the connection will fail. The initialization will change IP camera's login password and IP address.

When connect a camera to the NVR through PoE port, the NVR will automatically initialize the camera. And the camera adopts the password and email information of the NVR by default.
Procedure
Step 1 Select Main Menu > Camera > Camera List > Add Camera.
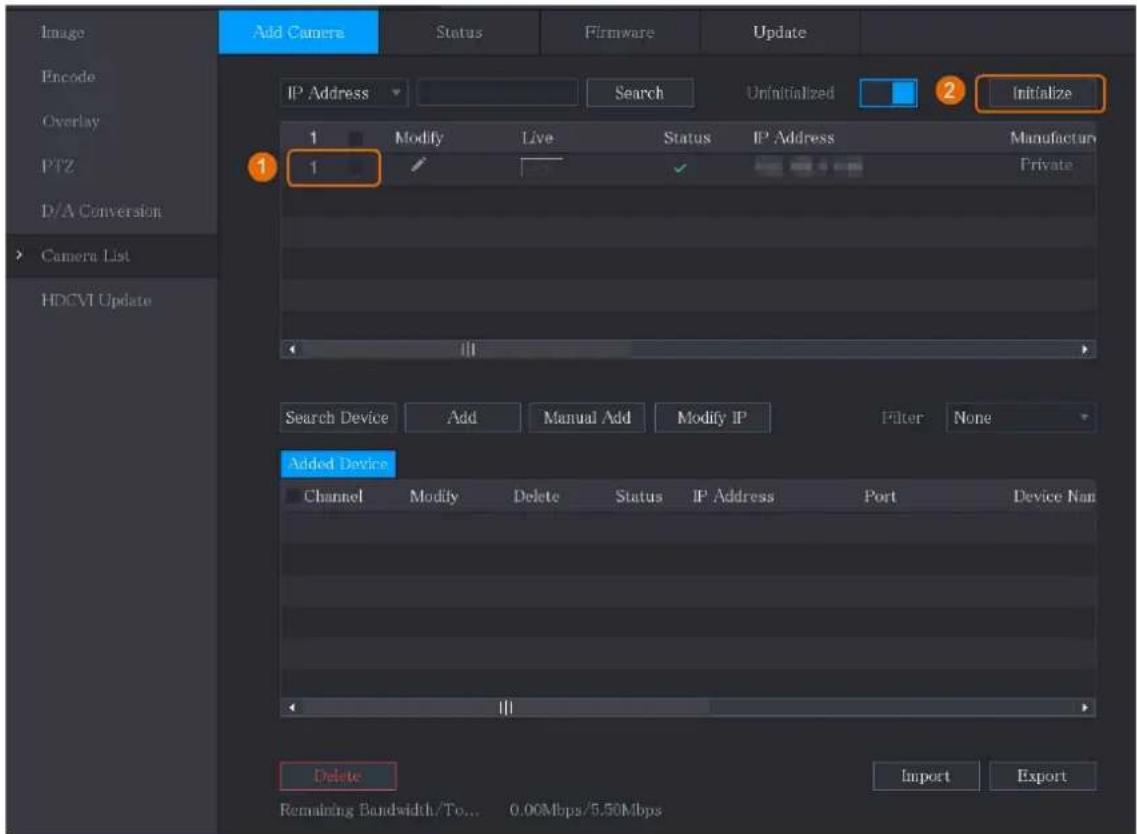
Step 2 Enable Uninitialized, and then click Search Device.
Figure 1-7 Search uninitialized device

Step 3 Select the camera to be initialized and then click Initialize.
Figure 1-8 Initialize the camera
Step 4 Apply password and email information to the IP camera.
- Use the NVR's settings.
- Select Using current device password and email info..

This check box is selected by default.
Figure 1-9 Apply device settings

- Click Next.
- Manually set password and email information.
- Cancel Using current device password and email info..
Figure 1-10 Set password

- Set password.
Table 1-3 Password
| Parameter | Description |
| User The default value is | admin that cannot be changed. |
| Password | The new password can be set from 8 characters to 32 characters and contains at least two types from numbers, letters and special characters (excluding", "", ";", ": " and "&").Enter a strong password according to the password strength bar indication. |
| Confirm Password |
- Click Next.
- Enter an email address and click Next.
Figure 1-11 Set email information

Step 5 Configure camera IP address.
- Select DHCP if there is a DHCP server deployed.
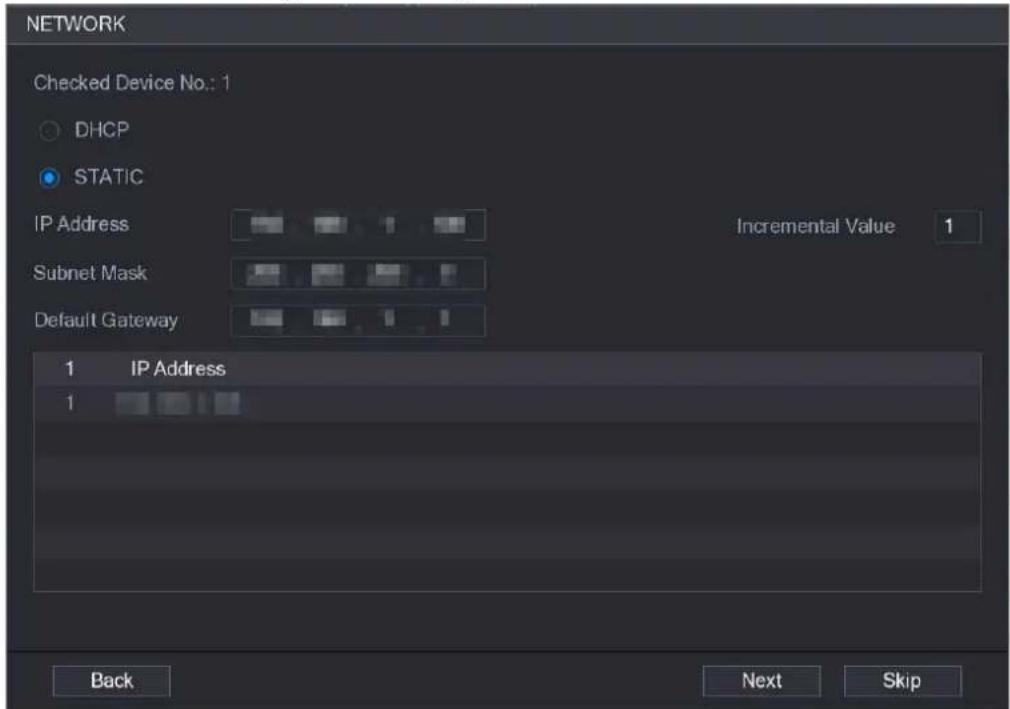
- Select Static, and then input IP address, subnet mask, default gateway and incremental value.

Set the incremental value when you need to change IP addresses of multiple cameras at one time. The NVR will incrementally add the value on to the fourth section of the IP address when allocate IP addresses for those cameras.
Figure 1-12 Configure IP address
Step 6 Click Next.
Wait 1–2 minutes for the initialization to complete.
Step 7 Click Finished.
1.4.2 Adding IP Camera by Search Result
Prerequisites
Make sure that the cameras you want to add have already been initialized and connected to the right network.
Procedure
Step 1 Select Main Menu > CAMERA > Camera List > Add Camera.
Step 2 Click Search Device.
Figure 1-13 Search device

Step 3 Add IP cameras.
- Add by double-click: Double-click the target camera to add it to Added Device list.

You can add only one camera by search result at one time.
- Add by check box: Select the check box of the target camera, and then click Add to add it to Added Device list.

You can select more than one check box and add cameras in batches.
Figure 1-14 Add IP camera by search result

Result
- If the status of the added camera is green (☐), it indicates the camera is properly added to the NVR.
- If the status of the added camera is red (☐), it indicates connection failure between the camera and the NVR. Check the parameters of the camera such as password, protocol and channel number, and then try adding it again.
1.4.3 Manually Adding IP Camera
You can add an IP camera by IP information at one time.
Prerequisites
Make sure that the cameras you want to add have already been initialized and connected to the right network.
Procedure
Step 1 Select Main Menu > CAMERA > Camera List > Add Camera.
Step 2 Click Manual Add.
Figure 1-15 Manual add

Step 3 In the Manual Add dialog box, configure parameters.
Figure 1-16 Configure manual add parameters

Table 1-4 Manual add parameters
| Parameter | Description |
| Channel | From the Channel drop-down list, select the channel that you want use on the NVR to connect the remote device. |
| Manufacturer | From the Manufacturer drop-down list, select the manufacturer of the remote device. |
| IP Address | In the IP Address field, enter the IP address of the IP camera. Change the default value (192.168.0.0) which the system cannot connect to. Change the default value (192.168.0.0) which the system cannot connect to. |
| RTSP Port | The default value is 554. You can change the value as needed. |
| HTTP Port | The default value is 80. You can change the value as needed. If you enter another value, for example, 70, and then you should enter 70 after the IP address when logging in to the NVR by browser. If you enter another value, for example, 70, and then you should enter 70 after the IP address when logging in to the NVR by browser. |
| TCP Port | The default value is 37777. You can change the value as needed. |
| Username | Enter the username of the remote device. |
| Password | Enter the password of the user for the remote device. |
| Remote CH No. | Enter the remote channel number of the remote device that you want to add. |
| Decoder Strategy In the Decoder Strategy list, select Default, Realtime, or Fluent as needed. | |
| Protocol Type | If the IP camera is added through private protocol, select TCP.If the IP camera is added through ONVIF protocol, the select Auto, TCP, UDP, or MULTICAST.If the IP camera is added through other manufacturers, select TCP or UDP. |
| Encryption | If the IP camera is added through ONVIF protocol, enabling the Encryption check box will provide encryption protection to the data being transmitted. To use this function, the HTTPS function must be enabled for the remote IP camera. To use this function, the HTTPS function must be enabled for the remote IP camera. |
Step 4 Click OK.
1.5 Configuring Recorded Video Storage Schedule
By default, all cameras continuously record videos 24 hours a day. You can modify the settings as needed.

You can also configure storage schedule in the Startup Wizard.
Procedure
Step 1 Select Main Menu > STORAGE > Schedule > Record.
Figure 1-17 Record schedule

Step 2 Configure parameters.
Table 1-5 Record parameters
| Parameter | Description |
| Channel | From the Channel drop-down list, select the channel to change video recording settings for. |
| Pre-record | In the Pre-record field, set the time for capturing extra video that occurs before an event to provide context to a recording. Value range: 0 to 30 s. |
| Redundancy | Allows users to set one of the HDDs as the redundant HDD to save the recorded files into different HDDs. In case of HDD failure, you can find the backup recoding in the redundant HDD.Select Main Menu >STORAGE >Disk Manager, and then set a HDD as the redundant HDD.Select Main Menu >STORAGE >Schedule >Record, and then select the Redundancy check box.If the selected channel is not recording, the redundancy function takes effect next time you record no matter you select the check box or not.If the selected channel is recording, the current recorded files will be packed, and then start recording according to the new schedule.This function is available on select models.The redundant HDD only backs up the recorded videos but not snapshots. |
| Event type | Select the check box of the event types.General: General recording means that the NVR records all videos for the specified time frame. General recording is represented by the color green.Motion: Motion recording means that the NVR records video only when the motion detection is triggered. Motion recording is represented by the color yellow.Alarm: Alarm recording means that the NVR records video when an alarm is triggered. Alarm recording is represented by the color red.M&A: M&A recording combines motion recording and alarm recording. The device records video when the motion detection or any alarm is triggered. M&A recording is represented by the color orange.Intelligent: Intelligent recording means that the NVR records video when the smart detection is triggered. Intelligent recording is represented by the color blue.POS: POS recording means that the NVR records video when the POS machine is used to make a payment. POS recording is represented by the color purple. |
| Period | Defines a period during which the configured recording setting is active. The system only activates the alarm in the defined period. |
| Copy to Click | Copy to to copy the settings to other channels. |
Step 3 Set the schedule by drawing or editing.
- Drawing: Press and hold the left button of the mouse and drag the mouse to draw the period.
- Editing: Click 🎨 to configure the period and then click OK.
Step 4 Click Apply.

The configured record schedule can come into effect only when the auto record function is enabled. For details to enable auto record, see User's Manual.
1.6 Configuring P2P Settings
You can use the QR code to connect a smart phone to the NVR for management.

Make sure that the NVR has been connected to the Internet, and if yes, in the Status box of the P2P interface, it shows Online.
1.6.1 Enabling P2P Function
You need to enter P2P interface to enable P2P function and scan the QR code to download the smart phone application.
Step 1 Select Main Menu > NETWORK > P2P.
Figure 1-18 P2P
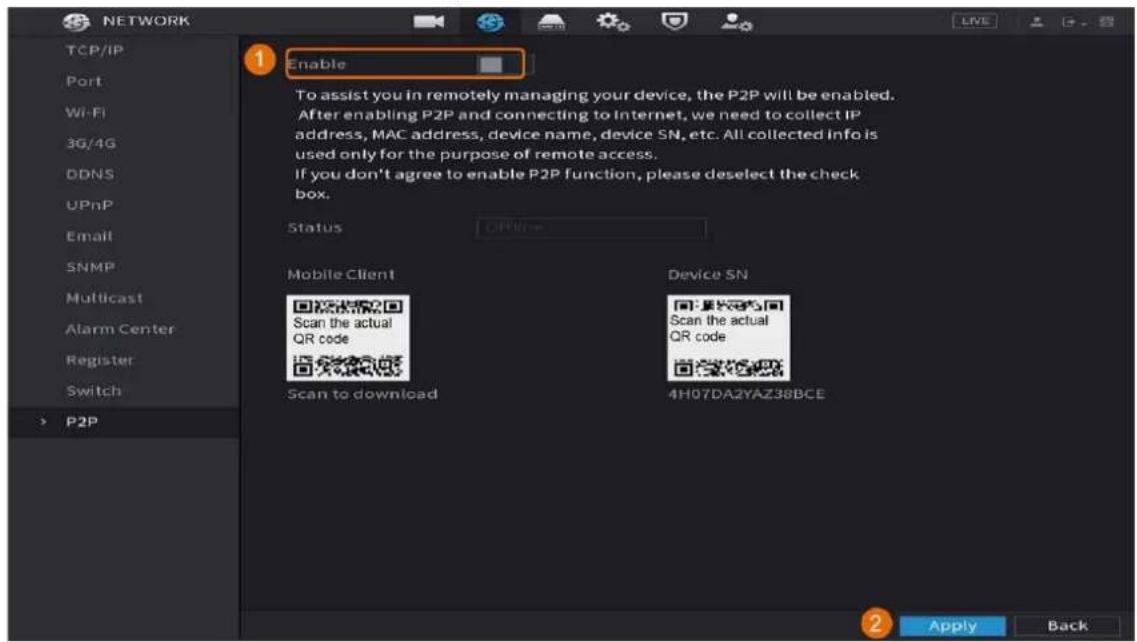
Step 2 Click Enable to enable P2P function.
Step 3 Click Apply
1.6.2 Adding the NVR to Smart Phone Client
This topic takes adding the NVR to smart phone client as an example for smart phone management.
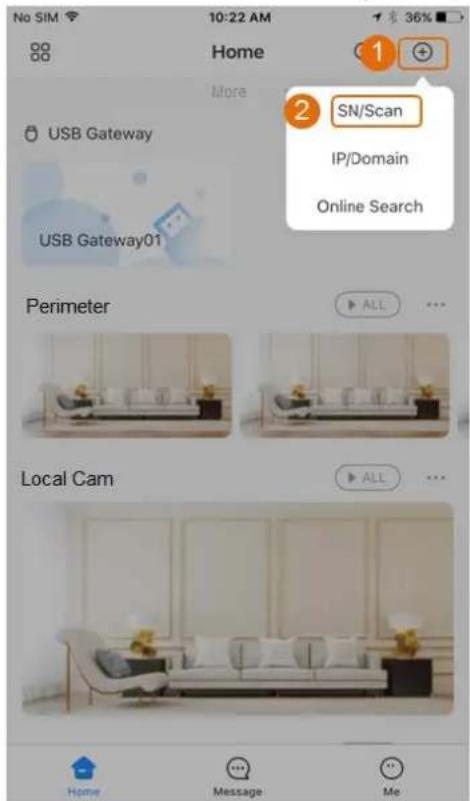
Step 1 Open the application and tap

Step 2 Select SN/Scan.
Figure 1-19 Add device


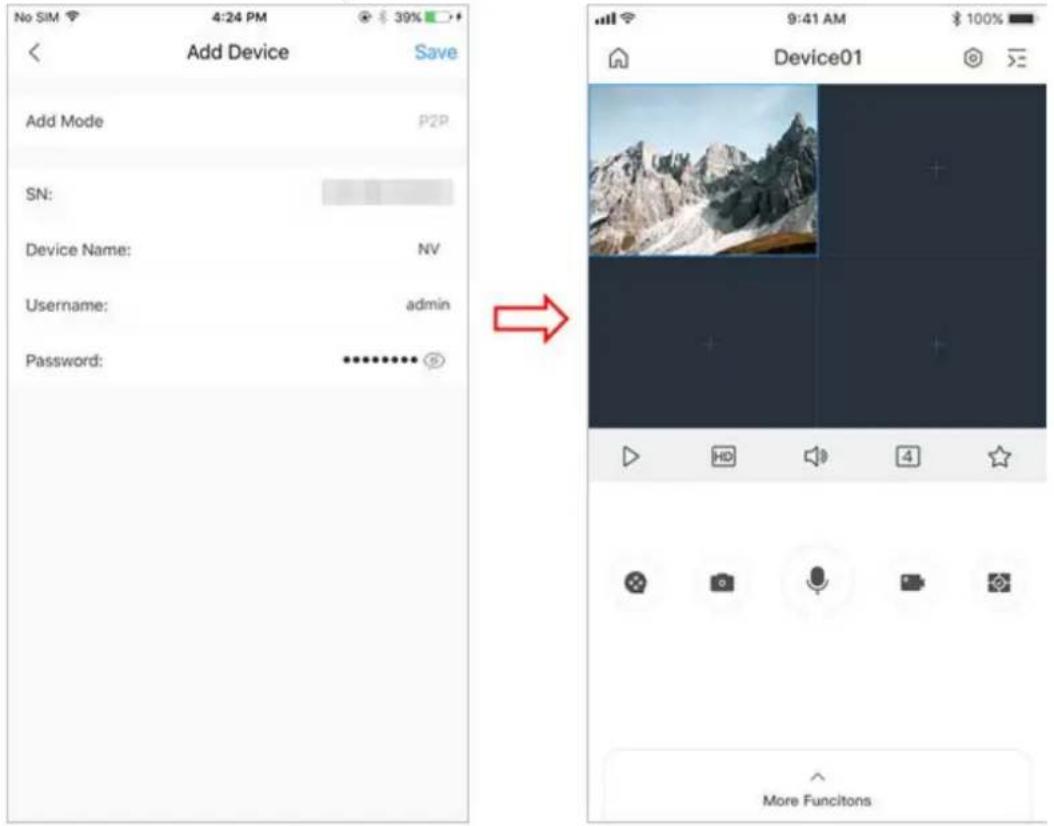
Step 3 Select, enter a name and password for the NVR, and then tap Save.
Figure 1-20 Start live view
1.7 Smart Motion Detection
This topic shows how to configure Smart Motion Detection (SMD).
Background Information
The Smart Motion Detection (SMD) is an ideal monitoring feature for low populated areas where you want an alert for human or vehicles anywhere in the scene without having to set rules and draw lines.
Procedure
Step 1 Select Main Menu > AI > Parameter > SMD.
Figure 1-21 SMD
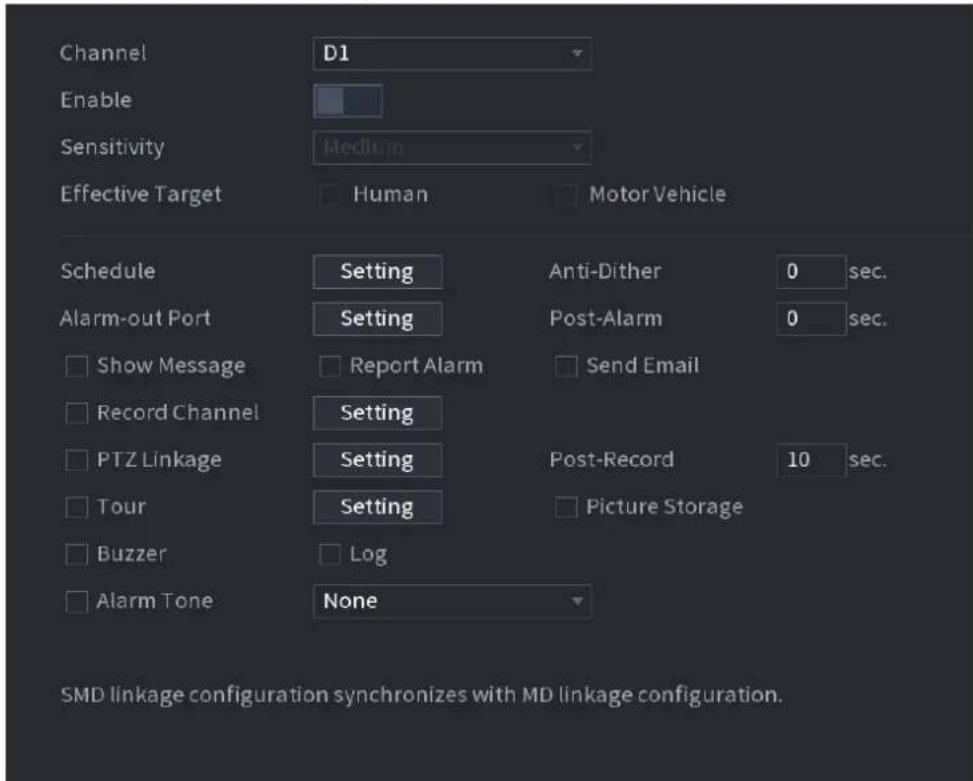
Step 2 Select and enable a channel, and then configure parameters.
Table 1-6
| Parameter | Description |
| Sensitivity | The higher the value is, the easier it is to trigger an alarm. But at the same time, the false alarm may occur. The default value is recommended. |
| Effective Target Choose human or motor vehicle or both. | |
| Schedule | Configure the period and in the set time range, the corresponding configuration item will be linked to start the alarm. |
| Anti-Dither | Indicates the time taken from the end of motion detection to the end of alarm linkage action. The range is 0 to 600 seconds. |
| Alarm-out Port | The alarm device (such as lights, sirens, etc.) is connected to the alarm output port. When an alarm occurs, the NVR device transmits the alarm information to the alarm device. |
| Post-Alarm | When the alarm ends, the alarm extended for a period of time. The time range is from 0 seconds to 300 seconds. |
| Show Message | Check box to enable a pop-up message in your local host PC. |
| Report Alarm | Select the check box. When an alarm occurs, the NVR device uploads an alarm signal to the network (including the alarm center). This function is available on select models.You need to set the alarm center first. This function is available on select models.You need to set the alarm center first. |
| Send Email | Select the check box. When an alarm occurs, the NVR device sends an email to the set mailbox to notify the user. You need to set the email first. You need to set the email first. |
| Record Channel | Select the check box and select the needed recording channel (support multiple choices). When an alarm occurs, the NVR device activates the channel for recording.[KSBT]You need to enable intelligent recording and auto recording first. |
| Post-Record | At the end of the alarm, the recording extends for a period of time. The time range is from 10 seconds to 300 seconds. |
| PTZ Linkage | Select the check box and click Setting to select the channel and PTZ action. When an alarm occurs, the NVR device associates the channel to perform the corresponding PTZ action. For example, activate the PTZ in channel one to turn to the preset point X.[8ABY]Tripwire alarm supports to activate PTZ preset point only.You need to set the corresponding PTZ actions first. |
| Tour | Select the check box and select the channel for tour. When an alarm occurs, the local interface of the NVR device displays the selected channel screen. You need to set the time interval and mode for tour first.After the tour is over, the preview interface is restored to the screen split mode before the tour. You need to set the time interval and mode for tour first.After the tour is over, the preview interface is restored to the screen split mode before the tour. |
| Picture Storage | Select the Snapshot check box to take a snapshot of the selected channel. To use this function, selectMain Menu > CAMERA > Encode >Snapshot, select Event in Type list. To use this function, selectMain Menu > CAMERA > Encode >Snapshot, select Event in Type list. |
| Buzzer | Select the check box to activate the buzzer when an alarm occurs. |
| Alarm Tone | Check the box and then select the corresponding audio file from the drop-down list. System plays the audio file when the alarm occurs.[DKBK]You need to add audio file first. |
Step 3 Click Apply.
1.8 Live View
After you logged in, the system goes to multiple-channel live view mode by default. You can view the monitoring video of each channel. Note that the number of displayed window may vary model
to model.
To enter the live view screen from other interfaces, click LIVE at the upper-right of the screen.
Figure 1-22 Live view

Live View Screen
You can view the live video from the connected cameras through each channel on the screen.
- By default, the system time, channel name and channel number are displayed on each channel window. This setting can be configured by selecting Main Menu > CAMERA > Overlay > Overlay.
- The figure at the lower-right corner represents channel number. If the channel position is changed or the channel name is modified, you can recognize the channel number by this figure and then perform the operations such as record query and playback.
For the icons displayed on each channel, see Table 1-7.
Table 1-7 Icon description
| Icon | Description |
 | Video is being recorded. |
 | Motion detection occurs in the scene. |
 Video loss is detected. Video loss is detected. | |
 Channel monitoring is locked. Channel monitoring is locked. |
1.9 Recording Playback
To play back a recording, you can select Main Menu > Playback or right-click on the live view interface and select Search.
Figure 1-23 Playback main interface
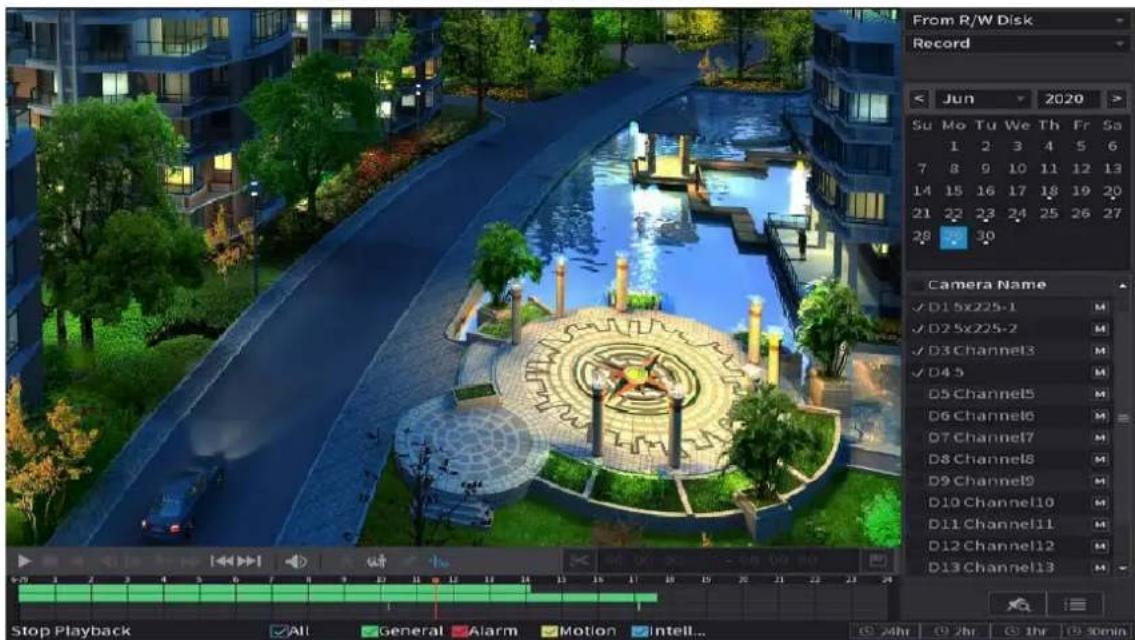

For details about the instructions on playback main interface, see User's Manual.
Instant Playback
You can play back the previous 5 minutes to 60 minutes of the recorded video.
By clicking 📄, the instant playback interface is displayed. The instant playback has the following features:
- Move the slider to choose the time you want to start playing.
- Play, pause and close playback.
- The information such as channel name and recording status icon are shielded during instant playback and will not display until exited.
- During playback, screen split layout switch is not allowed.
To change the playback time, select Main Menu > SYSTEM > General > Basic, in the Instant Play box, enter the time you want to play back.
Figure 1-24 Set instant playback time

Smart Search Playback
During playback, you can analyze a certain area to find if there was any motion detection event occurred. The system will display the images with motion events of the recorded video.

This function is for some series product only.
To use the Smart Search function, you need to enable the motion detection for the channel by selecting Main Menu > ALARM > Video Detection > Motion Detection.
2 Logging in to Web
The web provides most of the functions on local GUI. You can log in to web to manage the NVR as needed.

Slight difference might be found on the interfaces of different models. Following figures are for reference only. The actual product shall govern.
Procedure
Step 1 Open the browser and enter the IP address of the NVR, and then press Enter key. Step 2 Enter the username and password.
Figure 2-1 Login


- The default administrator account is admin. The password is the one that was configured during initial settings. To security your account, it is recommended to keep the password properly and change it regularly.
- Click to display the password.
Step 3 Click Login.
Appendix 1 Cybersecurity Recommendations
Cybersecurity is more than just a buzzword: it's something that pertains to every device that is connected to the internet. IP video surveillance is not immune to cyber risks, but taking basic steps toward protecting and strengthening networks and networked appliances will make them less susceptible to attacks. Below are some tips and recommendations on how to create a more secured security system.
Mandatory actions to be taken for basic equipment network security:
- Use Strong Passwords
Please refer to the following suggestions to set passwords:
- The length should not be less than 8 characters;
- Include at least two types of characters; character types include upper and lower case letters, numbers and symbols;
- Do not contain the account name or the account name in reverse order;
- Do not use continuous characters, such as 123, abc, etc.;
-
Do not use overlapped characters, such as 111, aaa, etc.;
-
Update Firmware and Client Software in Time
-
According to the standard procedure in Tech-industry, we recommend to keep your equipment (such as NVR, DVR, IP camera, etc.) firmware up-to-date to ensure the system is equipped with the latest security patches and fixes. When the equipment is connected to the public network, it is recommended to enable the auto-check for updates function to obtain timely information of firmware updates released by the manufacturer.
- We suggest that you download and use the latest version of client software.
"Nice to have" recommendations to improve your equipment network security:
- Physical Protection
We suggest that you perform physical protection to equipment, especially storage devices. For example, place the equipment in a special computer room and cabinet, and implement well-done access control permission and key management to prevent unauthorized personnel from carrying out physical contacts such as damaging hardware, unauthorized connection of removable equipment (such as USB flash disk, serial port), etc.
- Change Passwords Regularly
We suggest that you change passwords regularly to reduce the risk of being guessed or cracked.
- Set and Update Passwords Reset Information Timely
The equipment supports password reset function. Please set up related information for password reset in time, including the end user's mailbox and password protection questions. If the information changes, please modify it in time. When setting password protection questions, it is suggested not to use those that can be easily guessed.
- Enable Account Lock
The account lock feature is enabled by default, and we recommend you to keep it on to guarantee the account security. If an attacker attempts to log in with the wrong password several times, the corresponding account and the source IP address will be locked.
- Change Default HTTP and Other Service Ports
We suggest you to change default HTTP and other service ports into any set of numbers between 1024\~65535, reducing the risk of outsiders being able to guess which ports you are using.
6. Enable HTTPS
We suggest you to enable HTTPS, so that you visit Web service through a secure communication channel.
7. Enable Allowlist
We suggest you to enable allowlist function to prevent everyone, except those with specified IP addresses, from accessing the system. Therefore, please be sure to add your computer's IP address and the accompanying equipment's IP address to the allowlist.
8. MAC Address Binding
We recommend you to bind the IP and MAC address of the gateway to the equipment, thus reducing the risk of ARP spoofing.
9. Assign Accounts and Privileges Reasonably
According to business and management requirements, reasonably add users and assign a minimum set of permissions to them.
10. Disable Unnecessary Services and Choose Secure Modes
If not needed, it is recommended to turn off some services such as SNMP, SMTP, UPnP, etc., to reduce risks.
If necessary, it is highly recommended that you use safe modes, including but not limited to the following services:
- SNMP: Choose SNMP v3, and set up strong encryption passwords and authentication passwords.
- SMTP: Choose TLS to access mailbox server.
- FTP: Choose SFTP, and set up strong passwords.
- AP hotspot: Choose WPA2-PSK encryption mode, and set up strong passwords.
11. Audio and Video Encrypted Transmission
If your audio and video data contents are very important or sensitive, we recommend that you use encrypted transmission function, to reduce the risk of audio and video data being stolen during transmission.
Reminder: encrypted transmission will cause some loss in transmission efficiency.
12. Secure Auditing
- Check online users: we suggest that you check online users regularly to see if the NVR is logged in without authorization.
- Check equipment log: By viewing the logs, you can know the IP addresses that were used to log in to your devices and their key operations.
13. Network Log
Due to the limited storage capacity of the equipment, the stored log is limited. If you need to save the log for a long time, it is recommended that you enable the network log function to ensure that the critical logs are synchronized to the network log server for tracing.
14. Construct a Safe Network Environment
In order to better ensure the safety of equipment and reduce potential cyber risks, we recommend:
- Disable the port mapping function of the router to avoid direct access to the intranet devices from external network.
- The network should be partitioned and isolated according to the actual network needs. If there are no communication requirements between two sub networks, it is suggested to use VLAN, network GAP and other technologies to partition the network, so as to achieve the
network isolation effect.
- Establish the 802.1x access authentication system to reduce the risk of unauthorized access to private networks.
- It is recommended that you enable your device's firewall or blocklist and allowlist feature to reduce the risk that your device might be attacked.
- NETWORK VIDEO RECORDER
- FOREWORD
- GENERAL
- SAFETY INSTRUCTIONS
- REVISION HISTORY
- PRIVACY PROTECTION NOTICE
- ABOUT THE MANUAL
- IMPORTANT SAFEGUARDS AND WARNINGS
- OPERATING REQUIREMENTS
- POWER REQUIREMENTS
- TABLE OF CONTENTS
- 1 LOCAL OPERATIONS
- 1.1 STARTING THE NVR
- 1.2 INITIALIZING THE NVR
- BACKGROUND INFORMATION
- PROCEDURE
- 1.3 CONFIGURING NETWORK
- 1.4 ADDING IP CAMERA
- 1.4.1 INITIALIZING IP CAMERA
- 1.4.2 ADDING IP CAMERA BY SEARCH RESULT
- PREREQUISITES
- RESULT
- 1.4.3 MANUALLY ADDING IP CAMERA
- 1.5 CONFIGURING RECORDED VIDEO STORAGE SCHEDULE
- 1.6 CONFIGURING P2P SETTINGS
- 1.6.1 ENABLING P2P FUNCTION
- 1.6.2 ADDING THE NVR TO SMART PHONE CLIENT
- 1.7 SMART MOTION DETECTION
- 1.8 LIVE VIEW
- LIVE VIEW SCREEN
- 1.9 RECORDING PLAYBACK
- INSTANT PLAYBACK
- SMART SEARCH PLAYBACK
- 2 LOGGING IN TO WEB
- APPENDIX 1 CYBERSECURITY RECOMMENDATIONS
- ENABLE HTTPS
- ENABLE ALLOWLIST
- MAC ADDRESS BINDING
- ASSIGN ACCOUNTS AND PRIVILEGES REASONABLY
- DISABLE UNNECESSARY SERVICES AND CHOOSE SECURE MODES
- AUDIO AND VIDEO ENCRYPTED TRANSMISSION
- SECURE AUDITING
- NETWORK LOG
- CONSTRUCT A SAFE NETWORK ENVIRONMENT
Brand : Dahua Technology
Model : NVR2204/2208-4KS2
Category : Video Device