
GP-1096 - Uncategorized Salton - Free user manual and instructions
Find the device manual for free GP-1096 Salton in PDF.


| Product Type | Hot Air Popcorn Maker |
| Brand | Salton |
| Model | GP-1096 |
| Dimensions (approx.) | 30 x 20 x 20 cm |
| Weight | 1.5 kg |
| Power | 1200 W |
| Voltage | 120 V (US) / 230 V (EU) |
| Capacity | Up to 6 cups of popped popcorn |
| Heating Method | Hot air circulation |
| Butter Melter | Yes, removable butter tray on top |
| Material | Plastic housing with stainless steel heating element |
| Cleaning | Wipe with damp cloth; butter tray is dishwasher safe |
| Safety Features | Automatic shut-off, cool-touch handle, no exposed heating coils |
| Spare Parts | Butter tray available from Salton |
| Warranty | 1 year limited |
Frequently Asked Questions - GP-1096 Salton
User questions about GP-1096 Salton
0 question about this device. Answer the ones you know or ask your own.
Ask a new question about this device
Download the instructions for your Uncategorized in PDF format for free! Find your manual GP-1096 - Salton and take your electronic device back in hand. On this page are published all the documents necessary for the use of your device. GP-1096 by Salton.
USER MANUAL GP-1096 Salton
natural_image
Black metal stand with handle and metal frame, no visible text or symbolsInstruction Booklet
Model: GP-1096
IMPORTANT SAFEGUARDS
When using electrical appliances, basic safety precautions should always be followed including the following:
- Read all instructions.
- To reduce the risk of fire, electrical shock or injury, the following basic safety precautions should always be followed when using an electrical appliance.
- To protect against electrical hazards, do not immerse cord, plugs, or the appliance in water or other liquid.
- DO NOT use with an extension cord. Use only a wall receptacle.
- Close supervision is necessary when any appliance is used by or near children. Surfaces become hot during use so care must be taken to avoid burns or other injuries.
- Do not touch hot surfaces. Use handles or knobs.
- Unplug from outlet when not in use and before cleaning. Allow to cool before putting on or taking off parts, and before cleaning the appliance.
- Do not operate any appliance with a damaged cord or plug or after the appliance malfunctions, or has been damaged in any manner. Return appliance to Salton for examination, repair or adjustment. See Warranty.
- The use of accessories or attachments not recommended by Salton may cause hazards.
- Always turn the Timer Dial to the '0' position before plugging or unplugging the unit from the wall outlet.
- Do not use outdoors.
- DO NOT handle or use this unit while hands are wet.
- This unit is an electrical appliance.
DO NOT submerge it in water.
DO NOT use the electrical cord as a handle.
DO NOT allow cord to be crimped by closing it in doors.
DO NOT pull or stretch cord around sharp corners or edges. -
Keep electrical cord away from heated surfaces.
-
Always attach plug to appliance first, then plug cord into the wall outlet. To disconnect, turn any control to 'OFF', then remove plug from wall outlet. To unplug grasp plug and pull smoothly and firmly from the wall outlet. DO NOT attempt to unplug unit by pulling or tugging on the cord.
- Do not turn unit on its side when in use.
- Do not use water in the unit.
- Do not use appliance for other than intended use as described in this booklet.
- Do not leave unit unattended while in use.
- DO NOT disassemble unit or attempt to make any repairs yourself. Incorrect assembly or repair could result in a risk of fire, electric shock or injury to persons when operating the unit.
- Store unit in a cool dry place. Allow unit to cool completely and loop power cord loosely around unit before storing.
SAVE THESE INSTRUCTIONS
HOUSEHOLD USE ONLY
DESCRIPTION OF PARTS
- Clothes Hanger
- Tie/Belt Hanger
- Power Indicator Light
- Timer Dial
- Stopper
- Base
- Front Pressing Plate
- Pressing Bar
- Heating Plate
- Storage Compartments

BEFORE FIRST USE & ASSEMBLY
- Ensure that you have the following:
4 long screws
2 short screws
6 washers
1 Allen wrench
- To assemble the unit, lay the unit on its side or flat on top of a table.
- Attach the Base to the bottom of the unit (Ill. 1).
Ensure that the longer side of the Base faces the front (see sticker on Base). Line up the four holes in the Base with the four holes on the bottom of the unit. Insert 1 long screw and 1 washer into each hole in the Base. Tighten using the Allen Wrench.
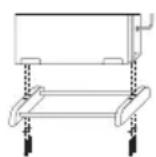
III. 1
- Stand the unit on the floor.
- Attach the Clothes Hanger to the top of the Garment Press. To do this, align the two holes on the end of the Tie/Belt Hanger with the holes on the top/back of the Garment Press. Slide a washer onto each of the short
screws and insert a short screw (with washer) into the front side of each hole in the Garment Press. Using an Allen Wrench, securely fasten the Tie/Belt Hanger to the Garment Press. (Ill. 2)

III. 2
- Your Garment Press is now ready to use.
HOW TO USE
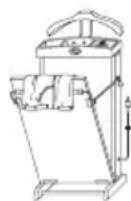
- Slowly pull the Pressing Bar up and open the Front Pressing Plate. The Pressing Bar will hold the Front Pressing Plate in the open position. (Ill. 3)

III. 4
- Place pants/skirt on the Front Pressing Plate, with cuffs or bottom of legs as far down as possible between the Front Pressing Plate and the Heating Plate. The waistline of pants/skirt should hang over the top edge of the Front Pressing Plate. (Ill. 4)
-
Close the Front Pressing Plate and carefully pull the Pressing Bar back down far enough so that it holds the Front Pressing Plate closed. Do not pull the Pressing Bar all of the way down. Do not lock it into place yet.
-
While the Front Pressing Plate is in this position, hold the waistline of the pants/skirt and gently pull upwards. This will smooth out any wrinkles and ensure that the pants/skirt are lying flat between the Front Pressing Plate and the Heating Plate.
-
Pull the Pressing Bar the rest of the way down, locking the Front Pressing Plate into the closed position. (III. 5)
III. 5

- Ensure that the Timer Dial is in the '0' position then plug the Power Cord into a convenient electrical wall outlet. The Power Indicator Light will illuminate.
CAUTION: Do not use an extension cord.
- To use the Timer Dial, turn clockwise to desired pressing time, 15, 30, 45 or 60 minutes. The Garment Press will turn off automatically once the time has expired. Alternatively, you can use the continuous 'On' position by turning the Timer Dial counterclockwise to the 'On' position. When using continuous 'On' you must manually turn the Garment Press off by turning the Timer Dial clockwise to the '0' position. Use caution to avoid over-pressing and damaging garments.
NOTE: A 45 minute pressing usually provides excellent results. However, heavier materials or exceptionally stubborn wrinkles may require additional time.
- Once pressing is complete, immediately unplug the Power Cord.
HELPFUL HINTS
- In order to protect your clothes, the Garment Press is designed to have a slow, low temperature heat-up for pants/skirts. It takes approximately 20 minutes to reach 122^ F ( 50^ C) and 60 minutes to reach the highest temperature of 140 - 158^ F (60 - 70^ C)
- The Garment Press is not designed as an iron press with high temperatures as would be used on a freshly cleaned pair of pants/skirt to crease and press. The Garment Press is designed for maintenance of your clothes after a day's wear and will eliminate baggy knees, wrinkles and put the crease back in pants.
- Your Garment Press is safe to use on any material that you would normally iron. However, you should check for any special instructions before pressing.
-
The Garment Press is equipped with a built-in thermostat that will automatically deactivate the heater to prevent overheating.
-
DO NOT dampen clothing before pressing.
- Press one pair of pants/skirt at a time and ensure that all pockets are empty.
CARE AND CLEANING
- Set the Timer Dial to the '0' position and unplug the power cord from the wall outlet.
- Allow unit to cool for a minimum of 30 minutes.
- The inside of the Front Pressing Plate may be wiped with a dry cloth. DO NOT use polish or cleaner on the inner Front Pressing Plate or Heating Plate surface.
- Ensure that the Pressing Plate is in the closed position and that the Pressing Bar is securely locked in place.
- Loop power cord loosely around the unit.
- Store in a cool, dry location.
POLARIZED PLUG
This appliance has a polarized plug (one blade is wider than the other). To reduce the risk of electric shock, this plug will fit in a polarized outlet only one way. If the plug does not fit fully in the outlet, reverse the plug. If it still does not fit, contact a qualified electrician. Do not modify the plug in any way.
LIMITED WARRANTY
Salton Canada warrants that this appliance shall be free from defects in material and workmanship for a period of one year from the date of purchase. During this 'in-warranty' period, defective products will be repaired or replaced at the discretion of the retailer and/or Salton Canada. This warranty covers normal domestic usage and does not cover damage which occurs in shipment or failure which results from alteration, accident, misuse, abuse, glass breakage, neglect, commercial use or improper maintenance.
A defective product should be returned to the original place of purchase within the retailer's stipulated return/exchange period*. If you are unable to have a defective product replaced under warranty by the retailer, please check our website at "www.salton.com" for the service centre nearest you. You may also contact us for assistance by mail, e-mail, fax or telephone as listed below.
To ensure prompt 'in-warranty' service securely package and return the product to us prepaid. Be sure to include the original proof of purchase and a description of the defect along with your address and postal code.
For repairs not covered by the warranty, please contact us for assistance.
SALTON CANADA
Customer Service Department
81A Brunswick,
Dollard-des-Ormeaux,
Quebec, Canada H9B 2J5
website: www.salton.com
E-mail: service@salton.com
Fax: 514-685-8300
Tel: 514-685-3660
* Return/exchange policies at each retailer vary and may differ from the SALTON Canada 1 year limited warranty period.
Brand : Salton
Model : GP-1096
Category : Uncategorized