
MMA3336 - Uncategorized MAGNAVOX - Free user manual and instructions
Find the device manual for free MMA3336 MAGNAVOX in PDF.


| Product Type | FM Transmitter with Bluetooth |
| Brand | Magnavox |
| Model | MMA3336 |
| Power Source | DC 12V or 24V from car cigarette lighter |
| Bluetooth Version | 3.0 |
| Bluetooth Operating Distance | 32 feet in open area |
| FM Transmitting Frequency Range | 87.5 - 108 MHz |
| USB Charger Output | DC 5V, 2.1A (Max) |
| Micro SD Card Support | Up to 32 GB, MP3 format |
| AUX Input | 3.5mm Jack |
| AUX Output | Via audio cable to car radio AUX IN |
| Built-in Microphone | Yes, for hands-free calling |
| Package Contents | Owner's Manual, Audio Connection Cable (3.5mm) |
| Warranty | 180 days limited warranty |
| FCC Compliance | Class B digital device |
| Power Consumption | 1300 mAh (Max) from car lighter |
| FM Transmitting Power | 87 dBuv/107 dBuv |
| Safety Features | Overload/overheat protection on USB charger |
Frequently Asked Questions - MMA3336 MAGNAVOX
User questions about MMA3336 MAGNAVOX
0 question about this device. Answer the ones you know or ask your own.
Ask a new question about this device
Download the instructions for your Uncategorized in PDF format for free! Find your manual MMA3336 - MAGNAVOX and take your electronic device back in hand. On this page are published all the documents necessary for the use of your device. MMA3336 by MAGNAVOX.
USER MANUAL MMA3336 MAGNAVOX
with Bluetooth® Wireless Technology
OWNER'S MANUAL
PLEASE READ BEFORE OPERATING THIS EQUIPMENT.
MODEL: MMA3336
FCC NOTICE:
This equipment has been tested and found to comply with the limits for a Class B digital device, pursuant to Part 15 of the FCC Rules. These limits are designed to provide reasonable protection against harmful interference in a residential installation. This equipment generates, uses and can radiate radio frequency energy and, if not installed and used in accordance with the instructions, may cause harmful interference to radio communications. However, there is no guarantee that interference will not occur in a particular installation. If this equipment does cause harmful interference to radio or television reception, which can be determined by turning the equipment off and on, the user is encouraged to try to correct the interference by one or more of the following measures:
● Reorient or relocate the receiving antenna.
- Increase the separation between the equipment and receiver.
- Connect the equipment into an outlet on a circuit different from that to which the receiver is connected.
- Consult the dealer or an experienced radio/TV technician for help.
FCC WARNING:
This equipment may generate or use radio frequency energy. Changes or modifications to this equipment may cause harmful interference unless the modifications are expressly approved in the instruction manual. Modifications not authorized by the manufacturer may void user's authority to operate this device.
LOCATION OF CONTROLS
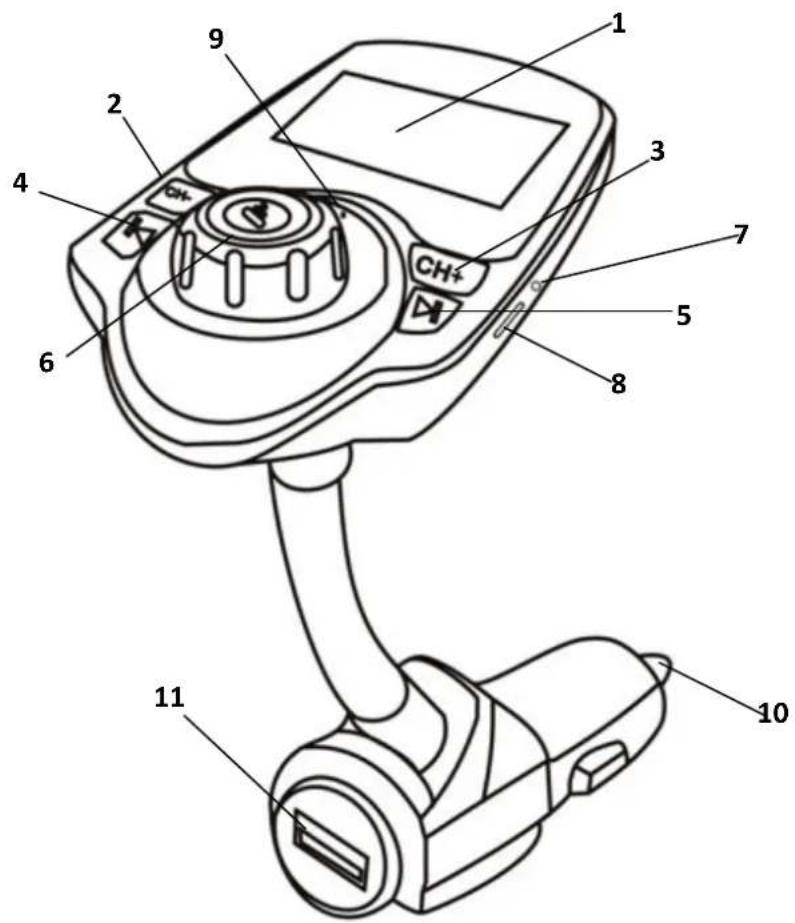
- LCD Display
- CH- Button
- CH+ Button
- Button
- Button
- Volume Control Knob
- AUX (In) Jack
- Micro SD Card Slot
- Built-in Microphone
- Car Cigar Lighter Plug
- USB Port (General Charging Purposes)
OPERATION
For listening to music from your BT Device through the unit and your Car Radio, follow the steps below:
PAIRING:
Step1:
Pairing the unit to your Car Radio:
- Connect the unit to the car cigar lighter socket as illustrated below:

- The unit will automatically power on and the voltage of the car battery will appear on the LCD Display on the unit as illustrated below:

- A few seconds later, the following screen will appear:
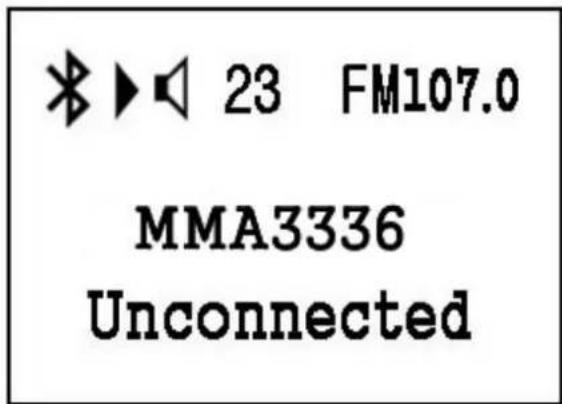
- Turn on your Car Radio and enter the radio FM mode as usual. Search for a blank FM channel without any radio signal received (For example: 107.0 MHz).
- Then press the CH- or CH+ Button on the unit repeatedly until the same channel frequency appear on the LCD display as illustrated below (For example: 107.0 MHz):

Step 2:
Pair your BT (Bluetooth) Device to the unit:
For first time use or re-pairing the unit to a new BT Device, follow directions below:
-
Power on and pair the unit to Car Radio as step 1 above.
-
The BT logo ✱ on the LCD Display and the Red Indicator on the Volume Control

Knob will blink.
-
Power on the external BT Device and enter to BT mode.
-
The unit will start pairing to the BT Device automatically. After pairing, the BT
logo * on the LCD Display and the Red Indicator on the Volume Control

Knob will stop blinking. The following picture will appear on the LCD Display (XXXX on the display is the name of paired device).

LISTENING TO MUSIC THROUGH PAIRED BT DEVICE:
-
After step 1 & 2, now you can play the music or answer the incoming call with the paired BT Device as usual.
-
During playback:
- Turn the Volume Control Knob on the unit to adjust volume level as desire. (Or, use the Volume Controls on the Car Radio or paired BT Device to adjust volume level).
- Press the Volume Control 📋 Knob to pause; press again to resume normal playback.
- Press the ◀ or ▶ Buttons repeatedly to skip tracks.
- If the unit is paired to a Cell Phone and a call is incoming during an active music
session. Press and release the Volume Control knob then speak to the built-in microphone to answer the call (Or, press and hold the knob approximately 1 second to reject the call). When your call is complete, press the Volume Control knob to disconnect or end the call and resume to music playback.
- To shut off the unit, unplug the unit from car cigar lighter socket.
Notes:
- When the external BT Device searches the unit, our model number "MMA3336" will appear on the display of external BT Device.
- If while pairing you are asked for a code please try "0000" or "1234".
Normal operation after paired:
- Power on the external BT Device and enter to BT mode.
- Power on the Car Radio and previously receiving the preset FM frequency same as the preset of unit (For example: 107.0 MHz).
-
Connect the unit to the car cigar lighter socket. The LCD Display will illuminate
and the BT logo and the Red Indicator on the Volume Control Know on it will blink. -
Wait a few seconds, the unit will automatically pair to the unit. After pairing, the
BT logo ✪ and the Red Indicator on the Volume Control 📋 Knob on the LCD Display will stop blinking.
- If pairing is complete you may now play music and answer the incoming call with your external BT Device.
AUX (IN):
For listening to music from external Audio Player (such as a MP3 Player, Discman ...etc.):
- Connect one end of the supplied Audio Connection Cable to the AUX Out/Line Out/Phone Jack on the external Audio Player.
-
Connect the other end of the cable to the AUX Jack on the right of unit.
-
Play the music on the connected Player as usual. (Make sure the volume level of the connected Audio Player is turned to high level.)
-
Power on the Car Radio and the unit will pair them together as previously step 1.
-
Play the music on the connected Player as usual. (Make sure the volume level of the connected Audio Player is turned to high level.)
-
During playback
- Use the Volume Controls on the Car Radio or connected Audio Player to adjust volume level.
- Press the Volume Control 📋 Knob to pause: press again to resume normal playback
- To shut off the unit, unplug the unit from car cigar lighter socket.
MICRO SD CARD:
- Insert the Micro SD Card into the Micro SD Card Slot as illustrated follows:

-
Connect the unit to the car cigar lighter socket to power on the unit. Play will automatically start.
-
During playback:
- Turn the Volume Control Knob on the unit to adjust volume level as desire. (Or, use the Volume Controls on the Car Radio or paired BT Device to adjust volume level).
- Press the Volume Control 📋 Knob to pause: press again to resume normal playback.
- Press the ◀ or ▶ Buttons to skip tracks.
- To shut off the unit, unplug the unit from car cigar lighter socket.
Notes:
- When Micro SD Card is inserted into the unit. BT will automatically shut off. Unplug the card from the unit before use BT.
● Up to maximum 32 GB (capacity) of Micro SD Card the unit support to play. - Before replacing Micro SD Card, make sure the unit is unplugged from the car cigar lighter socket.
- When inserting the Micro SD Card, make sure the direction you selected is correct. Never insert violently to avoid damaging the Micro SD Card or the unit.
- If it doesn't work, please check if the direction is correct.
- You also need to download the desired music in MP3 format into the Micro SD Card before insert into the unit.
AUX (OUT):
If your car radio (or any external Audio Player) equipped AUX IN Jack. Connect the unit to your car radio (or the external Audio Player) through it and listen music from the paired BT device (or the external Audio Player) as follow:
- Connect one end of the supplied Audio Connection Cable to the AUX IN Jack on your car radio (or the external Audio Player).
- Connect the other end of the cable to the AUX Jack on the right of unit.
- Power on the external BT Device and enter to BT mode.
- Power on the Car Radio (or the external Audio Player) and set the input source to AUX IN mode.
- Pair the external BT Device to the unit and play the music on it (or play the music on the Micro SD Card) as previously instructed.
6. During playback:
- Turn the Volume Control
Knob on the unit to adjust volume level as
desire. (Or, use the Volume Controls on the Car Radio or paired BT Device to adjust volume level).
● Press the Volume Control
Knob to pause; press again to resume
normal playback. - Press the ◀ or ▶ Buttons to skip tracks.


2. To shut off the unit, unplug the unit from car cigar lighter socket.
NOTE:
When the Audio Connection Cable is inserted into the AUX Jack, BT is cut off automatically. Unplug the cable from the AUX Jack before using BT.
BUILT-IN USB CHARGER:
The unit has a built-in USB Charger. Use it to charging the external USD Device as below:
- Connect the unit to the car cigar lighter socket to power on the unit.
- Connect the full size USB Plug of the charging cable from the external USB Device to the USB Port.
- Charging will automatically start. Monitor the charging status by the Charging Indicators on the external USB Device as usual.
- When finished charging, disconnect the external USB Device from the USB Port.
Note:
The unit has a built-in overload/overheat protector. If the output of the unit is overloaded (or short circuited). The charger will shut off. Unplug the external USB Device from the USB Port. The charge will auto reset.
TROUBLESHOOTING
Check the following before requesting service:
| SYMPTOM | POSSIBLE CAUSE | POSSIBLE SOLUTION |
| Car Radio no sound | The radio frequency between the unit and Car Radio mismatch | Find and set the radio frequency of the Car Radio and unit in the same frequency |
| No sound or sound weak | Volume of the unit was set to minimum position | Increase the volume by turn the Volume Control knob on the unit clockwise. |
| Volume level of paired/ connected device is in low level | Raise the volume level of the paired/connected device | |
| Sound distortion | Volume level too high | Reduce the volume level by turn the Volume Control knob on the unit counterclockwise |
| Volume level of the connected/paired device too high | Reduce the volume level of the connected/paired device | |
| BT not functioning | The external BT Device had NOT paired to the unit | Pair the external BT device to the unit as page 4-5 |
| The external BT device too far from the unit | Place the external BT device close to the unit | |
| Micro SD Card was inserted into the unit | Unplug the card from the unit before use BT | |
| Audio Connection Cable was inserted into the AUX Jack | Unplug the Audio Connection Cable from the AUX Jack before use BT |
SPECIFICATIONS:
Power source: DC---12 or 24 V, 1300 mAh (Max.) from car cigarette
lighter socket
Output from Built-in USB Charger: DC 5 V,2.1 A(Max.)
FM Transmitting Frequency: 87.5-108 MHz
FM Transmitting Power: 87 dBuv/107 dBuv
BT Version: 3.0
BT Operation Distance: 32 Feet in open area
PACKAGE INCLUDES:
1 x Owner's Manual
1 x Audio Connection Cables with 3.5mm Plugs
SPECIFICATIONS AND ACCESSORIES ARE SUBJECT TO CHANGE WITHOUT NOTICE
LIMITED WARRANTY
Craig Electronics warrants this product to be free from manufacturing defects in material and workmanship under normal use for a period of 180 days from date of purchase. If service is required, please return the product to the store where it was purchased for exchange; or, pack the unit in the original packing material with all accessories if applicable, a copy of your sales receipt and a Cashier's check or Money Order for \$7 (to cover shipping and handling costs) payable to Craig Electronics Inc. For consumers in Canada, please make sure that the cashier check or money order is redeemable through a U.S. bank. Ship your product freight pre-paid. Your unit will be repaired, replaced or if the unit cannot be repaired or replaced, a refund will be forwarded to you within four weeks of receipt of your unit. Please ship your unit to:
Craig Electronics Inc.
1160 NW 163 Drive
Miami, FI 33169
This warranty is void if the product has been: a) Used in a commercial application or rental. b) Damaged through misuse, negligence, or abuse. c) Modified or repaired by anyone other than an authorized Craig service center. d) Damaged because it is improperly connected to any other equipment.
Note: This warranty does not cover: a) Ordinary adjustments as outlined in the Owner's Manual which can be performed by the customer. b) Damage to equipment not properly connected to the product. c) Any cost incurred in shipping the product for repair. d) Damage to the product not used in the USA.
This warranty is not transferable and only applies to the original purchase. Any implied warranties, including the warranty of merchantability, are limited in duration to the period of this expressed warranty and no warranty whether expressed or implied shall apply to the product thereafter.
Under no circumstance shall Craig be liable for any loss or consequential damage arising out of the use of this product. This warranty gives specific legal rights. However, you may have other rights which may vary from state to state. Some states do not allow limitations on implied warranties or exclusion of consequential damage. Therefore, these restrictions may not apply to you.
This product has been manufactured by and is sold under the responsibility of Craig Electronics Inc, and Craig Electronics Inc is the warrantor in relation to this product. MAGNAVOX and SMART. VERY SMART are registered trademarks of Koninklijke Philips N.V. and are used under license from Koninklijke Philips N.V.
To Obtain Service on your Product
email:service@craigelectronics.com
- with Bluetooth® Wireless Technology
- FCC NOTICE:
- FCC WARNING:
- LOCATION OF CONTROLS
- OPERATION
- PAIRING:
- Step 2:
- Pair your BT (Bluetooth) Device to the unit:
- LISTENING TO MUSIC THROUGH PAIRED BT DEVICE:
- Notes:
- Normal operation after paired:
- AUX (IN):
- MICRO SD CARD:
- AUX (OUT):
- During playback:
- To shut off the unit, unplug the unit from car cigar lighter socket.
- NOTE:
- BUILT-IN USB CHARGER:
- TROUBLESHOOTING
- SPECIFICATIONS:
- PACKAGE INCLUDES:
- LIMITED WARRANTY
Brand : MAGNAVOX
Model : MMA3336
Category : Uncategorized