
PHLIRG39 - Toothbrush Pyle - Free user manual and instructions
Find the device manual for free PHLIRG39 Pyle in PDF.


| Product Type | Electric Toothbrush |
| Model | PHLIRG39 |
| Brand | Pyle |
| Dimensions (L x W x H) | 1.0 x 1.0 x 8.0 inches |
| Weight | 4.2 oz |
| Power Source | Rechargeable Lithium-Ion Battery |
| Charging Time | 8 hours |
| Usage Time per Charge | 14 days (2 min twice daily) |
| Motor Type | Sonic Vibration |
| Vibration Frequency | 31,000 strokes per minute |
| Brushing Modes | 3 (Clean, Soft, Massage) |
| Timer | 2-minute professional timer with 30-second interval |
| Bristle Type | Soft DuPont bristles |
| Waterproof Rating | IPX7 (fully waterproof for shower use) |
| Handle Material | ABS plastic with soft grip |
| Included Accessories | 1 brush handle, 2 brush heads, 1 charging base, 1 travel case |
| Brush Head Replacement | Every 3 months |
| Compatible Replacement Heads | Pyle PHLIRG39-HEAD (sold separately) |
| Warranty | 1-year limited |
Frequently Asked Questions - PHLIRG39 Pyle
User questions about PHLIRG39 Pyle
0 question about this device. Answer the ones you know or ask your own.
Ask a new question about this device
Download the instructions for your Toothbrush in PDF format for free! Find your manual PHLIRG39 - Pyle and take your electronic device back in hand. On this page are published all the documents necessary for the use of your device. PHLIRG39 by Pyle.
USER MANUAL PHLIRG39 Pyle
natural_image
Electric toothbrush and charging station with blue filter, no visible text or symbolsUSER MANUAL
PARTS LIST
| 1 | Cover |
| 2 | Water container |
| 3 | Device body |
| 4 | Water pressure reglating switch |
| 5 | Nozzle |
| 6 | Nozzle box |
| 7 | Power switch |
| 8 | Water switch push button |
| 9 | Irrigator holder |
| 10 | Spray tube |

FIGURES
ORAL CARE
The first sign is often bleeding gums in response to whatever friction is applied. As the condition progresses, the gum tissue tends to move away from the tooth allowing the bacteria to penetrate further following the gum tooth interface, finally reaching and attacking the supporting bone structure. As the bone is eroded by bacterial action, the gums tend to fall in toward the receding bone. The result is the appearance of tooth elongation as more of the gum support and support structures fall back. As the tooth loses its root anchor, it gradually becomes loose and eventually falls out. Occasionally, the bacterial invasion of support bone structure can lead to abscesses, cysts and creeping infection threatening the brain itself.
Consequently, it cannot be over stressed the importance of maintaining scrupulous oral hygiene. The use of the irrigator after every meal is an important first step in a meticulous program of oral hygiene both of busy executive and his family.
The irrigator is endorsed and recommended by professional dentists. It cleans teeth crevices, between the teeth and can access areas that brushing and flossing may not reach. The powerful water pressure flushes away food residue and massage the gums. It improves blood circulation and helps prevent periodontal disease, gingivitis, tooth decay and assists in inhibiting plaque formation. Using the device daily will promote and safeguard healthy teeth and gums. It is a remarkable, convenient tool for maintaining oral hygiene.

natural_image
Monochrome sketch of a person swimming near water with bubbles rising (no text or symbols)IMPORTANT SAFEGUARDS
When using electrical products, especially when children are present, the basic safety precautions that are listed below should be always followed. Please read all instructions before using the irrigator.
DANGER
• Always unplug this appliance immediately after using.
• Do not handle the plug with wet hands.
- Do not place or store product where it can fall or be pulled into a tub, sink, or shower stall.
• Do not use while bathing.
- Do not reach for any appliance that has fallen into the water. Unplug it immediately.
• Before using, check the power cord for damage.
WARNING
To reduce the risk of burns, electric shock, fire, serious injury or damage to person; Do not use the appliance if the power cord or plug is damaged, if it is not working properly, if it has been dropped or damaged, or dropped into any liquid. Return the appliance to an authorized service center nearby for examination and repair. Do not try to fix it yourself.
- When the appliance is used by, on, or near children, close supervision is very necessary.
- An appliance should never be left unattended when it is plugged in. Use the appliance only for its intended use as described in this manual. Do not use attachments or accessories not recommended by the manufacturer.
- Keep the power cord away from hot or heated surfaces.
- Remove the Water Tank before filling. Fill with lukewarm water or appropriate oral rinse products only. Do not overfill.
- Never drop or insert any object into any opening or hose.
- Do not operate where oxygen or aerosol sprays are being used.
• Do not use outdoors.
HOW TO USE
Filling the Water Tank
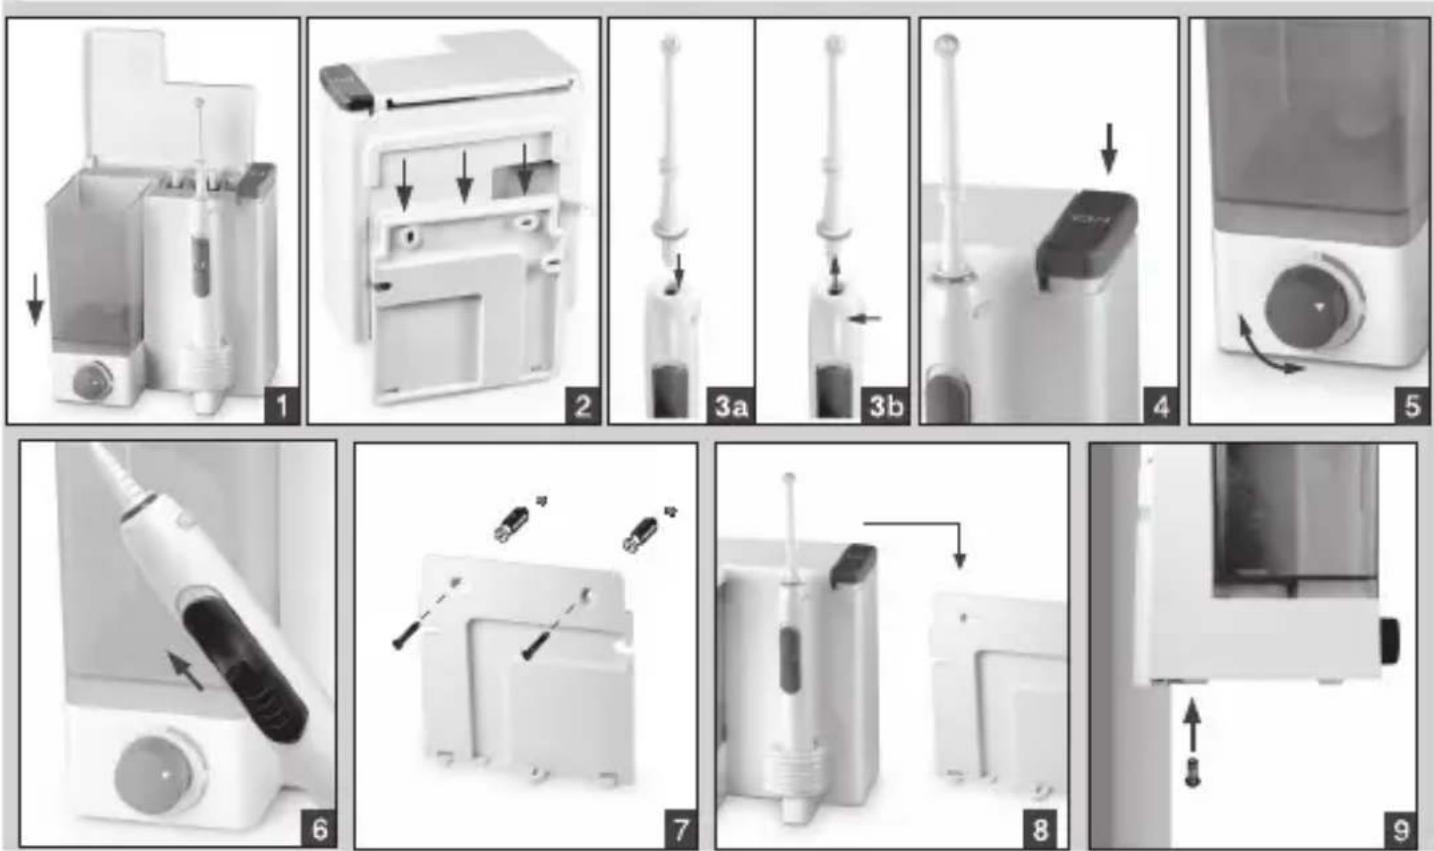
Open the cover and remove the water container. Fill the container with warm water or a special solution. When you first use the irrigator, fill the reservoir with warm water, put the regulator pressure of the jet to 0, and then gently turn the knob to 4 and back a few times until the water has filled the internal cavity. The device will be ready for first use, when the water in the reservoir is consumed completely. When done, fit it back to its position (fig.1).
Make sure the water temperature does not exceed 104 °F. Do not fill any hot water into the tank. The material is very sensitive and may be damaged by hot water.
Power Cord and Plug
A power cord is inserted into a special back-wall compartment (fig.2). slide down the back cover and take out the power cord. Place the back cover to its original position with the power cord brought out through a special opening.
Attaching/detaching Nozzle to Handle of Irrigator
This device is completed with 4 rigid and flexible attachments to have individually colored rims. Select and individually colored attachment for every member of your family. Use your individually colored attachment only.
This will allow following the full personal hygiene requirements. Insert an attachment into the irrigator knob up to it clicks, so that the attachment guide matches the irrigator knob groove (fig.3). Now, this device is ready for operation.
For removing an attachment press the button and pull the attachment holding it by notches (fig.3a).
Safe attachment removal recommendations:
If an attachment fails removing from the knob or slides in your hands watered, use a dry cloth. Wrap the attachment around by soft and dry cloth and try to remove it again.
When removing an attachment from the irrigator knob, DO NOT try it about its axis. An attachment turned can be damaged.
Power On Button
Press the power on button. For the first time use, please turn on the power on button for seconds until water coming out (fig.4)
Adjust Water Pressure
Adjust water pressure regulating knob before using (fig.5). turn it to the lowest setting (position 1) for first time use, especially if your gums tend to bleed or if children are using the irrigator. Gradually increase the water pressure over time until you find the most comfortable setting for yourself. Consult your professional dentists for recommendation of water pressure setting, particularly if the consumers have disease.
Start To Use
Bend over the nozzle tip and guide it to your teeth and gums. Start up water jet with the
water switch located on the handle of irrigator (fig.6) by sliding it up. Keep your mouth slightly poer to allow the water to run into the washbasin. You can block jet anytime sliding down water switch on the handle.
Direct the jet stream along the gum line with the jet tip. It can flush away the food particles remains on the teeth or between the teeth effectively and massage the gum gently.
After Use
According to studies of periodontal disease cases, the early stages of plaque formation are often ignored because of the lack of clear symptoms. Typically the disease is allowed to progress until the more serious middle or last stages. Bleeding from the gums upon use of the irrigator is symptomatic of periodontal disease, however, continued use of the irrigator tends to alleviate these symptoms and allows the gums return to a healthier state. If the bleeding carries on for more than two weeks, please consult your dentist.
After use, always empty the water tank, spray tube and nozzle entirely to prevent creating any bacteria from the standing water. Turn the power on button off. Take off the nozzle and store it into the nozzle retaining box. Wipe the handle dry and place it back onto its base.
Clean and Maintenance
Before cleaning and maintaining the irrigator, always unplug from the electrical outlet first. Regularly clean the housing with a damp cloth. The Water Tank and Nozzle are removable and dishwasher-safe. When cleaning, please do not use and rough tool or utensil to wash the main body (such as scrubbing pad) to prevent the irrigator from damaging.
Check and Installation
Every unit packed with 4 nozzles and a screw bag. After unpacking, please check them first. If there is any parts missing or broken, please contact your local dealer for replacement. The spray tube, nozzles or water tank may be with several drops of water left inside. It is left from the test. It is distilled water that is safe and hygienic. It is no harm to the health.
Do not repair or modify this irrigator yourself. If parts need to be replaced, changed or repaired, please contact your local dealer or an authorized service center.
Wall Mounting Installation
Take off the rear panel by pushing it downward. Drill two bores in the wall and drive two plastic inserts into. Screw in the rear panel (fig.7). take the power cord out of the storage box and fit it through the hole of rear panel. Do not press too hard to damage the power cord (fig.8). please make sure to screw in tightly (fig.9).
SPECIFICATIONS
Model....PHLIRG39
Power source....120V AC\~60HZ
Power consumption 24W
Water pressure....29\~81N
Pump frequency 1200imp/min
Max operating time....10 minutes
Water tank using time....1.5 minutes
Water tank....16.9 oz
External dimension(H*W*D)....7.08 × 6.49 × 5.51 in
Operating conditions....-14 °F \~ 95 °F, 95%
Storage and transportation environment....-14 °F \~ 95 °F, 95%
Net Weight 3.24 lb
TROUBLESHOOTING GUIDE
| PROBLEM CAUSE SOLUTION | ||
| Irrigator not working | Power isn't connected Unplug and plug in again | |
| Socket has no electricity Try another socket | ||
| Pump is functioning but no water is coming out | No water inside the water tank after using. | Refill water. In a few seconds, water stream will appear. |
| Water switch is in the bottom position. | Slide the water switch upwards | |
| Water pressure is too low | Wrong water pressure switch position. | Adjust the switch to the most suitable. |
| Water tank is placed in wrong location. | Check and make sure water tank is in the correct location. | |
PYLE® Health
- ORAL CARE
- IMPORTANT SAFEGUARDS
- DANGER
- WARNING
- HOW TO USE
- Filling the Water Tank
- Power Cord and Plug
- Attaching/detaching Nozzle to Handle of Irrigator
- Safe attachment removal recommendations:
- Power On Button
- Adjust Water Pressure
- Start To Use
- After Use
- Clean and Maintenance
- Check and Installation
- Wall Mounting Installation
- SPECIFICATIONS
- PYLE® Health
Brand : Pyle
Model : PHLIRG39
Category : Toothbrush