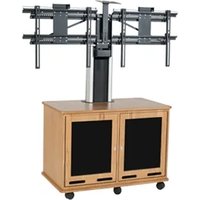
39978HWV - Meuble audiovisuel DA-LITE - Free user manual and instructions
Find the device manual for free 39978HWV DA-LITE in PDF.


| Product Type | Manual Pull-Down Projection Screen |
| Diagonal Screen Size | 80 inches (16:9 format) |
| Viewing Area | Approximately 39.3 x 69.7 inches |
| Overall Dimensions (HxWxD) | 41.5 x 72.5 x 3 inches |
| Weight | 15 lbs |
| Screen Material | Matte White with black borders |
| Gain | 1.0 |
| Viewing Angle | 160° |
| Operation | Manual pull-down with locking mechanism |
| Mounting | Wall or ceiling mountable (hardware not included) |
| Power Supply | None (manual operation) |
| Key Features | Keystone-alleviating design, noiseless pull-down, scratch-resistant screen surface |
| Cleaning Instructions | Wipe with a soft dry cloth; avoid abrasive cleaners |
| Safety | Secure mounting to prevent tipping; keep away from children |
| Spare Parts | Replacement screen material available; contact Da-Lite |
| Repairability | Limited; spring assembly and housing can be repaired by qualified technicians |
| Warranty | 2 years limited warranty |
Frequently Asked Questions - 39978HWV DA-LITE
User questions about 39978HWV DA-LITE
0 question about this device. Answer the ones you know or ask your own.
Ask a new question about this device
Download the instructions for your Meuble audiovisuel in PDF format for free! Find your manual 39978HWV - DA-LITE and take your electronic device back in hand. On this page are published all the documents necessary for the use of your device. 39978HWV by DA-LITE.
USER MANUAL 39978HWV DA-LITE
natural_image
Technical line drawing of a mechanical assembly with a control box and conveyor system (no text or symbols)INSTRUCTION BOOK FOR
Dual Monitor Video Conferencing Cart
Procedure
- Remove contents from carlons and examine for damaged or missing parts. The keys for the cabinet doors are tied to the outside of the cart.
CAUTION: The user of this product should exercise caution when moving the cart. Any sudden stop could cause instability of the stand and could cause serious injury and/or damage. The cart should always be pushed, never pulled, by the user. Always push from the side of the cart, never from the front or back of the cart. Use two people to lift the flat panel display and mount it on the bracket during assembly.
Required Tools
7/16" Wrench
1/2" Socket
9/16" Socket
Phillips Screwdriver
Ratchet and Extensions
Parts
| Item | Description | QTY | Item | Description | QTY | |
| 1 | Bar, Security 1 | J | Screw, SHCS M4 x 12mm | 4 | ||
| 2 | Bracket, Hanging 2 | K | Washer, Flat #10 | 4 | ||
| 3 | Flat Panel Mount Assembly 1 | L Washer, Flat #8 | 4 | |||
| 4 | Cover 1 | M | Wrench, Allen 4mm | 1 | ||
| 5 | Column, Aluminum 2 | N | Wrench, Allen 3mm 1 | |||
| 6 | Bracket, Mount Support | 1 | Package Set | 1 | ||
| 7 | Cover, Plastic | 1 | P | Screw, Mach 1/4"-20 x 2-1/2" | 1 | |
| 8 | Video Conferencing Shelf Assembly | 1 | Q | Nut, Hex 1/4"-20 Nylon Lock | 1 | |
| 9 | Plate, Base | 1 | R | Nut, Hex 1/4"-20 KEPS | 1 | |
| 10 | Package Set | 1 | Package Set | 1 | ||
| A | Padlock W/Keys | 1 | S | Nut, Sliding M8 | 4 | |
| Package Set | 1 | T | Plate, Reinforcing | 2 | ||
| B | Screw, SHCS M8 x 20mm | 4 | U | Screw, HHCS 3/8"-16 x 1", Blk | 4 | |
| C | Washer, Flat 3/8" | 4 | V | Screw, SHCS M8 x 16mm, Blk | 8 | |
| D | Wrench, Allen 6mm | 1 | W | Screw, SHCS M8 x 50mm, Blk | 4 | |
| Package Set | 1 | X | Velcro, Loop 3" | 1 | ||
| E | Screw, SHCS M6 x 20mm | 4 | Y | Velcro, Hook 3" | 1 | |
| F | Washer, Flat 1/4" | 4 | F Washer, Flat 1/4" | 8 | ||
| G | Wrench, Allen 5mm 1 | C | Washer, Flat 3/8" | 2 | ||
| Package Set | 1 | |||||
| H | Screw, SHCS M5 x 20mm | 4 | ||||

- You will need access to the inside of the cart. Remove the back panel by unlocking the two locks on the back of the cart. See Figure 1. The back panel can then be tilted and lifted out of the bottom recess.

Figure 1 Figure 3
- Install Mount Support Bracket onto Aluminum Columns. See Figure 3. Tighten all fasteners including those securing the Columns.

-
Install Flat Panel Mount Assembly onto the Mount Support Bracket. See Figure 4. Use the top of the cart for support. Fasten Flat Panel Mount through lower holes on Mount Support Bracket first. Rotale Flat Panel Mount Assembly upwards to secure upper holes on bracket. Tighten all fasteners.
-
Install Base Plate and Aluminum Columns onto top shelf. See Figure 2. Position the Base Plate and Columns with slots facing toward each other as shown. Use Reinforcing Plates where indicated. Leave fasteners loose. The proper allen wrench can be found with the monitor mounting fasteners.

Figure 2
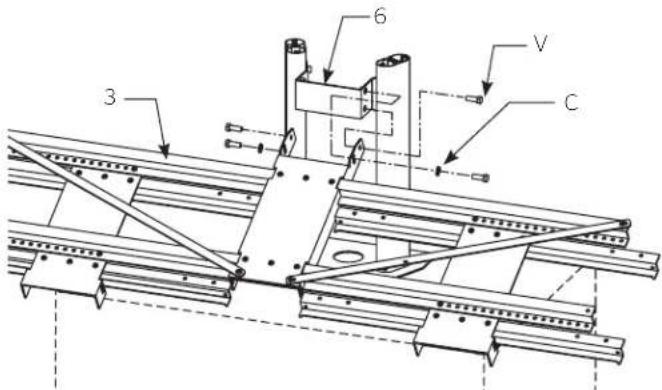
Figure 4
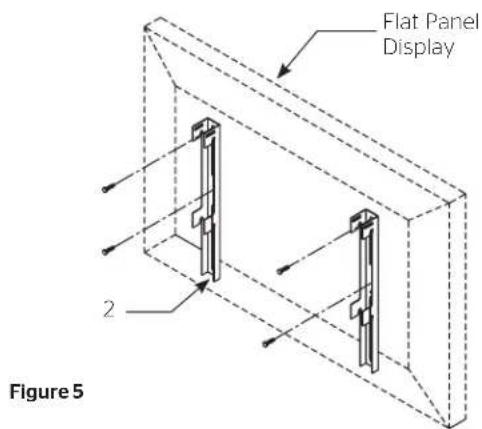
- Secure the Hanging Brackets to the back of both flat panel displays utilizing all of the fastener points recommended by the flat panel manufacturer. See Figure 5.
NOTE: It is the responsibility of the installer to obtain any additional fasteners needed to secure the Hanging Brackets to the flat panel unit.
- See Figure 6. The width of the flat panel unit "W" is the same distance that should be between the two Fixed Channels of the mount.
Remove two existing screws and nuts per Fixed Channel. Position the Fixed Channels into the desired locations. Secure each Fixed Channel with the two existing screws and nuts, and four other screws and nuts of similar type.

Figure 6
- Use two people to hang the flat panel units on the Flat Panel Mount Assembly making sure the top and bottom notches of each Hanging Bracket are placed over the upper and lower Zee-Bars.
- Slide the Security Bar through the slots in the Hanging Brackets and Mount, bolt one end to the Zee Bar and then secure the opposite end with the padlock See Figures 7 and 8.

Figure 7

- Install Cover. See Figure 9.11. Determine height needed for dual monitors. Trim Plastic
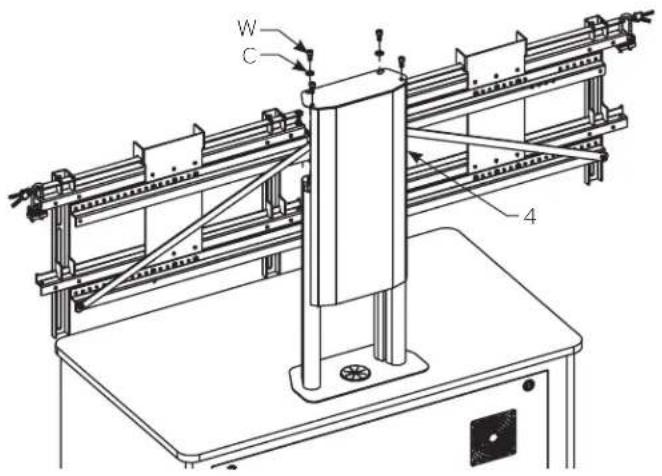
Figure 9
Cover to match height of open area between the Columns and underneath Mount Support Bracket. Bend Plastic cover and install between the columns.
See Figure 10.
Hang Video Conference Shelf on mount.
See instruction sheet E-431.

Figure 10
LIMITED ONE YEAR WARRANTY ON DA-LITE PRESENTATION PRODUCTS
Milestone AV Technologies LLC warrants certain Da-Lite branded products to the original purchaser only, to be free from defects in materials and workmanship for a period of one (1) year from the date of purchase by the original purchaser; provided they are properly operated according to Da-Lite's instructions and are not damaged due to improper handling or treatment after shipment from the factory.
This warranty does not apply to equipment showing evidence of misuse, abuse or accidental damage, or which has been tampered with or repaired by a person other than authorized Da-Lite personnel.
Da-Lite's sole obligation under this warranty shall be to repair or to replace (at Da-Lite's option) the defective part of the merchandise. Returns for service should be made to your Da-Lite dealer. If it is necessary for the dealer to return the screen or part to Da-Lite, transportation expenses to and from Da-Lite are payable by the purchaser and Da-Lite is not responsible for damage in shipment. To protect yourself against damage or loss in transit, insure the product and prepay all transportation expenses.
TO THE MAXIMUM EXTENT PERMITTED BY APPLICABLE LAW, THIS WARRANTY IS IN LIEU OF ALL OTHER WARRANTIES, EXPRESS OR IMPLIED, INCLUDING WARRANTIES AS TO FITNESS FOR USE AND MERCHANTABILITY. Any implied warranties of fitness for use, or merchantability, that may be mandated by statute or rule of law are limited to the one (1) year warranty period. This warranty gives you specific legal rights, and you may also have other rights, which vary from state-to-state. TO THE MAXIMUM EXTENT PERMITTED BY APPLICABLE LAW, NO LIABILITY IS ASSUMED FOR EXPENSES OR DAMAGES RESULTING FROM INTERRUPTION IN OPERATION OF EQUIPMENT, OR FOR INCIDENTAL, DIRECT, OR CONSEQUENTIAL DAMAGES OF ANY NATURE.
In the event that there is a defect in materials or workmanship of a Da-Lite product, you may contact our Sales Partners at PO Box 137, Warsaw, IN 46581-0137, (574) 267-8101, (800) 622-3737.
IMPORTANT: THIS WARRANTY SHALL NOT BE VALID AND DA-LITE BRANDED PRODUCTS SHALL NOT BE BOUND BY THIS WARRANTY IF THE PRODUCT IS NOT OPERATED IN ACCORDANCE WITH THE DA-LITE WRITTEN INSTRUCTIONS.
Keep your sales receipt to prove the date of purchase and your original ownership.

A Milestone AV Technologies Brand
3100 North Detroit Street
Warsaw, Indiana 46582
P: 574.267.8101 or 800.622.3737
F: 574.267.7804 or 877.325.4832
E: info@da-lite.com
www.da-lite.com
DL-0361 5.14
© 2014 Milestone AV Technologies LLC. Printed in U.S.A.
Brand : DA-LITE
Model : 39978HWV
Category : Meuble audiovisuel