
HIP-RA - AV Cable AG Neovo - Free user manual and instructions
Find the device manual for free HIP-RA AG Neovo in PDF.


| Product Type | HDMI over IP Extender |
| Model Number | HIP-T (Transmitter), HIP-R (Receiver) |
| Video Resolution | Up to 1080p |
| Maximum Distance | 120 m (400 ft) point-to-point, 100 m (330 ft) with switch |
| Compression Technology | Motion JPEG with low latency |
| Audio Support | PCM 2.0 |
| IR Frequency | 38-56 kHz |
| HDMI Compliance | HDMI 1.2 |
| HDCP Compliance | Yes |
| Network Bandwidth | Approximately 90 Mbps |
| Dimensions (L x W x H) | 103.5 x 93.5 x 24.6 mm |
| Weight | 220 g each |
| Power Supply | DC 5V/1A |
| Power Consumption | 3W max each |
| Operating Temperature | -5° to 40°C (32° to 104°F) |
| Storage Temperature | -20° to 60°C (-4° to 140°F) |
| Relative Humidity | 5% to 90% RH (non-condensing) |
| Network Configuration | Point-to-Point, Point-to-Multipoint, Multipoint-to-Multipoint |
| Mounting | Mounting ears included |
| Management | Web GUI (HTTP server) |
| Package Contents | Transmitter or Receiver, Power Adapter, IR cables, User Manual |
| Maintenance | Clean with soft dry cloth; avoid alcohol or solvents |
Frequently Asked Questions - HIP-RA AG Neovo
User questions about HIP-RA AG Neovo
0 question about this device. Answer the ones you know or ask your own.
Ask a new question about this device
Download the instructions for your AV Cable in PDF format for free! Find your manual HIP-RA - AG Neovo and take your electronic device back in hand. On this page are published all the documents necessary for the use of your device. HIP-RA by AG Neovo.
USER MANUAL HIP-RA AG Neovo
Important Safeguards
Safety Instructions
CE Declaration of Conformity
Product Description
Package Content
Panel Descriptions
Making Connections and Operations
Applications
Setup HIP-T and HIP-R
Choosing a Network Switch
Specifications
Features
Specifications
Appendix
Maintenance
Product Service
Getting Started
Dear Customer, thank you for purchasing AG Neovo products. For optimum performance and safety, please read these instructions carefully before connecting, operating or adjusting this product. Please keep this manual for future reference.
Notice:
AG Neovo reserves the right to make changes in the hardware, packaging and any accompanying documentation without prior written notice.
Important Safeguards
Please read all of these instructions carefully before you use the device. Save this manual for future reference. What the warranty does not cover
- Any product, on which the serial number has been defaced, modified or removed.
- Damage, deterioration or malfunction resulting from:
- Accident, misuse, neglect, fire, water, lightning, or other acts of nature, unauthorized product modification, or failure to follow instructions supplied with the product.
- Repair or attempted repair by anyone not authorized by us.
- Any damage of the product due to shipment.
- Removal or installation of the product.
- Causes external to the product, such as electric power fluctuation or failure.
- Use of supplies or parts not meeting our specifications.
• Normal wear and tear. - Any other causes which does not relate to a product defect.
- Removal, installation, and set-up service charges.
Safety Instructions
The HIP-Series, HDMI Extender has been tested for conformity to safety regulations and requirements, and has been certified for international use. However, like all electronic equipment's, the HIP-Series should be used with care. Read the following safety instructions to protect yourself from possible injury and to minimize the risk of damage to the unit.
- Do not dismantle the housing or modify the module.
- Dismantling the housing or modifying the module may result in electrical shock or burn.
• Refer all servicing to qualified service personnel. - Do not attempt to service this product yourself as opening or removing housing may expose you to dangerous voltage or other hazards
- Keep the module away from liquids.
- Spillage into the housing may result in fire, electrical shock, or equipment damage. If an object or liquid falls or spills on to the housing, unplug the module immediately.
- Have the module checked by a qualified service engineer before using it again.
- Do not use liquid or aerosol cleaners to clean this unit. Always unplug the power to the device before cleaning.
HIP-Series HDMI over IP Extenders
CE Declaration of Conformity
This device complies with the requirements set out in the Council Directive on the Approximation of the Laws of the Member States relating to Electromagnetic Compatibility (2014/30/EU), Low-voltage Directive (2014/35/EU), RoHS directive (2011/65/EU). This product has been tested and found to comply with the harmonized standards for Information Technology Equipment, these harmonized standards published under Directives of Official Journal of the European Union.
HIP-Series HDMI over IP Extenders
Product Description
Packing Contents
1) Main Unit. Transmitter or Receiver
2) Power adapter DC 5V/1A
3) IR-TX cable & IR-RX cable
4) User Manual
Panel Descriptions
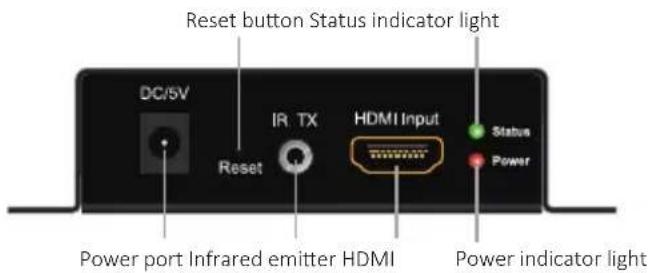
Transmitter panel

Receiver panel


HIP-Series HDMI over IP Extenders
Making Connections and Operations
1) Connect the HDMI signal source (Such as DVD, STB etc) to HDMI Transmitter.
2) Connect a Cat5e/6 cable to both the LAN of the transmitter and LAN port of the Receiver. (The cables must follow the standard of EIA-TIA 568B).
3) Connect the HDMI display into the Receiver.
4) Connect the power supply into the Power port.
5) Connect the IR TX cable into IR TX port on the back panel and affix the emitter onto the source IR sensor.
6) Connect IR-RX cable into IR-RX port on the receiver and affix the IR receiver in direct line of site with the handheld remote control. It is recommended to affix the receiver on the display frame/bezel or the display stand.
Attention: Insert/Extract cables gently.
Applications
Point-to-Point

flowchart
graph LR
    A["HDMI Source"] -->|HDMI Cable| B["Transmitter Receiver"]
    B -->|Cat5e/6 Cable| C["Transmitter"]
    C -->|HDMI Cable| D["Iridi Display IR Sensor"]
    D -->|DVD or STB Remote| E["Output"]
Point-to-Multipoint
Note:
Connect Transmitter and Receivers LAN ports to the Ethernet Switch.
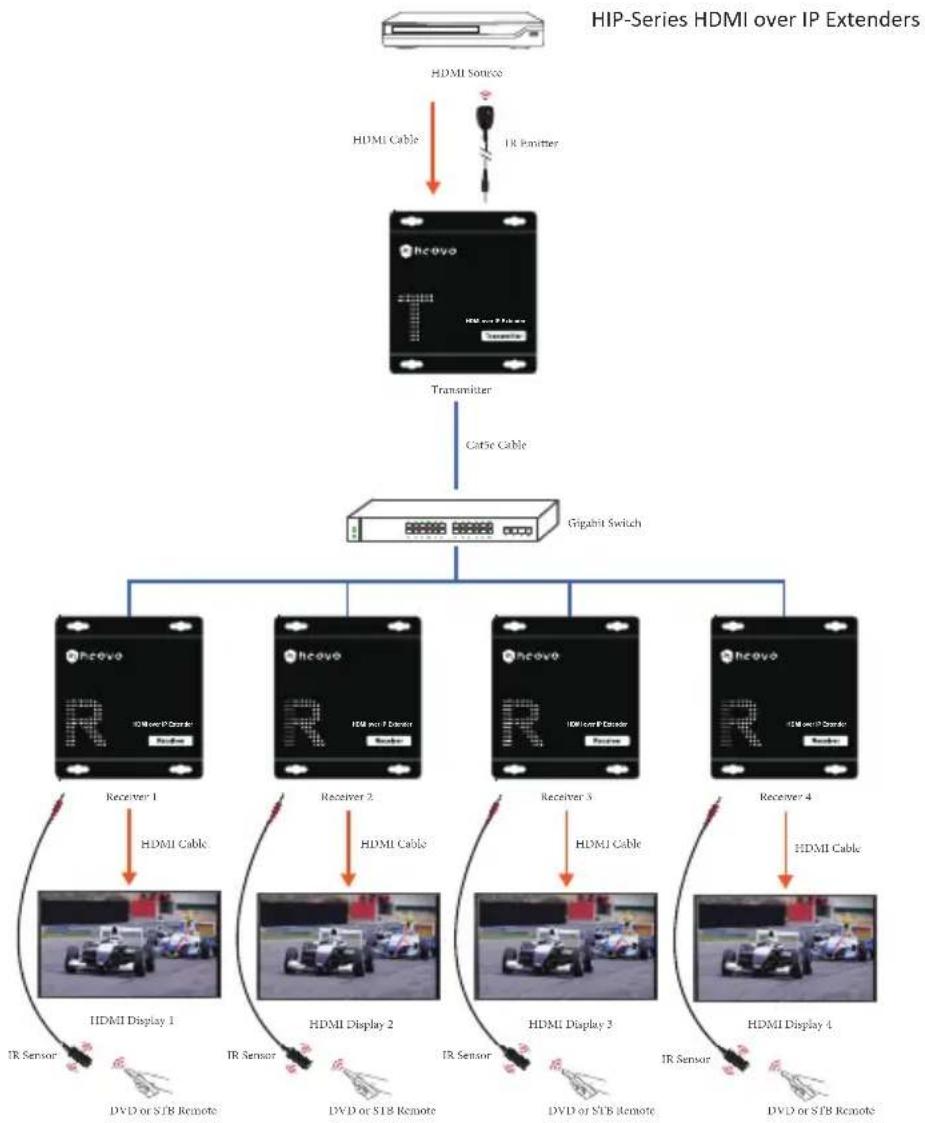
flowchart
graph TD
    A["HIP-Series HDMI over IP Extenders"] --> B["Transmitter"]
    B --> C["Cable Cable"]
    C --> D["Gigabit Switch"]
    D --> E1["Hcoyo"]
    D --> E2["Hcoyo"]
    D --> E3["Hcoyo"]
    D --> E4["Hcoyo"]
    E1 --> F1["Receiver 1"]
    E2 --> F2["Receiver 2"]
    E3 --> F3["Receiver 3"]
    E4 --> F4["Receiver 4"]
    F1 --> G1["HDMI Display 1"]
    F2 --> G2["HDMI Display 2"]
    F3 --> G3["HDMI Display 3"]
    F4 --> G4["HDMI Display 4"]
    G1 --> H1["IR Sensor"]
    G2 --> H2["IR Sensor"]
    G3 --> H3["IR Sensor"]
    G4 --> H4["IR Sensor"]
    G1 --> I["DVD or STB Remote"]
    G2 --> J["DVD or STB Remote"]
    G3 --> K["DVD or STB Remote"]
    G4 --> L["DVD or STB Remote"]
HIP-Series HDMI over IP Extenders
Multipoint-to-Multipoint
Notes:
- Connect Transmitters and Receivers LAN ports with a managed Gigabit switch.
(a Managed Gigabit Switch with VLAN and IGMP support is recommended). - An HTTP server is embedded into every HIP-T and HIP-R, you can setup the IP address for each unit via web browser.

flowchart
graph TD
    A["HDMI Source"] -->|HDMI Cable| B["Transmitter"]
    C["HDMI Source"] -->|IR Emitter| D["Transmitter"]
    E["HDMI Source"] -->|HDMI Cable| F["Transmitter"]
    G["HDMI Source"] -->|IR Emitter| H["Transmitter"]
    B --> I["Managed Gigabit Switch"]
    D --> I
    F --> I
    H --> I
    I --> J["Receiver 1"]
    I --> K["Receiver 2"]
    I --> L["Receiver 3"]
    J --> M["HDMI Display 1"]
    K --> N["HDMI Display 2"]
    L --> O["HDMI Display 3"]
    M --> P["IR Sensor"]
    N --> Q["IR Sensor"]
    O --> R["IR Sensor"]
    P --> S["DVD or STB Remote"]
    Q --> T["DVD or STB Remote"]
Setup HIP-T and HIP-R
An HTTP server is embedded into every HIP-T and HIP-R, you can setup the IP address for each unit via web browser.
The default IP address of the TX is 192.168.168.55, MAC address is: 00:0b:78:00:60:01.
The default IP address of the RX is 192.168.168.56, MAC address is: 00:0b:78:00:60:02.
Step 1: Assign the PC (or laptop) IP address on the computer : "Control Panel"→"Network Connections"→"Local Area Connections
Status"→"Properties"→"Internet Protocol (TCP/IP)", fill in the IP address field with 192.168.168.11 (0-255) and Subnet mask with 255.255.255.0. After that press OK to save the configuration.
Note: The IP address of PC should be different from the IP addresses of HIP-T and HIP-R units.
Step 2: Use an Ethernet cable to connect the PC and the extender. the power LED for the extender should become red and the status LED green.
HIP-Series HDMI over IP Extenders
Step 3: Ping the connected device through the sequence on computer:
"Start"→ "Run"→ input "CMD"→ input "ping 192.168.168.55" for HIP-T or input "ping 192.168.168.56" for HIP-R, you will receive the reply if the connection is established.
Step 4: Open a browser and type: 192.168.168.55 (default IP for HIP-T) or 192.168.168.56 (default IP for HIP-R), You can setup IP address, subnet mask, gateway, and MAC address for the HIP-T and HIP-R.
Please set IP address for each TX and each RX, IP:192.168.168.XX (XX:1-255.
all IP address for HIP-T and HIP-R must be different.
Please set MAC address for HIP-T and HIP-R, MAC:00:0b:78:XX:XX-XX (XX:01-FF),
The MAC address for each TX and each RX must be different.
Step 5: After clicking the "Apply" button, the green LED light on the device will go out, you have successfully set IP address for HIP-T and HIP-R.
Note: if you need to restore the device to its factory default settings, please power on the device, wait about 10 seconds after the red LED light turn on, the green LED light starts working, at this time press the reset button for about 5-10 seconds, then the green light will go off, and you have successfully restored the IP address to default factory IP address now.
Choosing a Network Switch
This section provides various general and specific recommendations for switches to use with HIP-Series. However, there is no substitute for testing in real world situations. If you are in doubt about which network switch to use, the safest approach is to select one from the list of recommended switches below.
The Basics In general, the network switches deployed in HIP-Series installation must support the following:
• Gigabit (or faster) Ethernet port
- VLAN tagging
- Multicast forwarding or filtering
• IGMP v2 Snooping (multicast)
- Support for jumbo frames (packets) up to 9216-byte size
- IGMP Snooping
- IGMP Querier
• IGMP Snooping Fast-Leave
• High bandwidth connection between switches
HIP-Series HDMI over IP Extenders
Types of High Performance Switch
A high performance network switch is the means of a successful HIP-Series setup. When choosing a network switch, first select the type:
Layer 2 or Layer 3 Switches
You will need to determine whether you need a layer 2 or a layer 3 switch for your HIP-Series network. Layer 3 switches cost more than layer 2 switches because they are more complex and handle more network traffic. The best way to calculate which type of switch you need is to first determine if you will have a dedicated network for the HIP-Series devices or if the HIP-Series devices will be on a network that shares throughput with other network equipment such as computers, servers and printers. If they share the network with other devices its best to consider a layer 3 switch and use layer 2 switches exclusively for the HIP-Series device connections. For larger installations we recommend using Layer 3 switches.
The major differences are:
- Layer 3 Switch: IP addresses in packets are examined and intelligent forwarding decisions are made. On a larger network broken into subnets across long distances, a layer 3 switch becomes the best choice as they can improve network efficiency and provide better traffic flow. They are better at directing more traffic to different locations on a larger more complex network, and with layer 2 switches working below them.
- Layer 2 Switch: Packets are examined and forwarded using only the MAC address. If you have a small central network, a layer 2 switch should do the job. If the network is exclusive and will only transmit the bandwidth of HIP-Series devices, layer 2 switches with the correct settings can get the job done effectively.
Further Considerations
Number of ports: Choose a switch that has enough ports to match the number of HIP-Series devices you will be installing. Switches typically come in 5, 8, 10, 16, 24, 28, 48, and 52-port configurations. If you are installing 12 HIP-T and 12 HIP-R, you will need to purchase a switch with at least 24 ports.
Recommended Switches
| Manufacturer Model | |
| D-Link GDS-1510 | |
| Zyxel GS1920 Series | |
| Cisco SG300, Catalyst 2960-X/XR | |
| Netgear GS724T, M4300-28G/52G | |
| H3C 5120 Series | |
| Edgecore Networks ECS-4120-52T | |
HIP-Series HDMI over IP Extenders
Features
- Extends 1080p HDMI signals up to 120 m (400 ft) over a single Cat5e/6 cable
- HDMI compliant
- HDCP compliant
- Supports up to 1080p resolutions
- Supports IR transmission for remote control
- Mounting ears for easy installation
- Easy-to-use web GUI
- Supports TCP/IP protocol
- Support Point-to-Point, Point-to-Multipoint and Multipoint-to-Multipoint network configuration
Specifications
| Model HIP-T HIP-R | ||
| Unit Description HDMI over IP Transmitter HDMI over IP Receiver | ||
| HDMI Compliance HDMI 1.2 | ||
| HDCP Compliance Yes | ||
| Maximum Distance | Cat5e/6: 100 m (330 ft) up to 1080p / Cat5e/6: 120 m (400 ft) when used point-to-point without a network switch | |
| Compression Technology Motion | JPEG compression with very low latency | |
| Network Bandwidth Approximately | 90 Mbps | |
| Video Resolutions 480i / 480p / 7 | 20p / 1080i / 1080p | |
| Audio Support PCM 2.0 | ||
| IR Frequency 38-56 kHz | ||
| Input RJ45 x 1 / HDMI x 1 / IR-TX | port x 1 | |
| Output RJ45 x 1 / HDMI x 1 / IR-RX | port x 1 | |
| Dimensions (L x W x H) 103.5 x 93.5 x 24.6 mm | ||
| Weight 220 g | ||
| Power Supply | DC 5V/1A | |
| Power Consumption | 3W Max Each | |
| Operating Temperature -5° to 40°C (32° to 104°F) | ||
| Storage Temperature | -20° to 60°C (-4° to 140°F) | |
HIP-Series HDMI over IP Extenders
| Relative Humidity 5% to 90% RH (non-condensation) | |
| Package Contents HIP-T: HIP Tran | smitter x 1 / Power Adapter x 1 / IR-TX Cable x 1 /User Manual x 1HIP-R: HIP Receiver x 1 / Power Adapter x 1 / IR-RX Cable x 1 /User Manual x 1 |
Note1: Specifications are subject to change without notice. Mass and dimensions are approximate.
Note2: For Point-to-Multipoint or Multipoint-to-Multipoint applications, the IP and MAC address of each unit must be different.
Appendix
Maintenance
Clean this unit with a soft, dry cloth. Never use alcohol, paint thinner of benzine to clean this unit.
Product Service
Europe
service.nl@agneovo.com
North and South America
service.us@agneovo.com
Asia and Rest of the World
service@agneovo.com
- Product Description
- Specifications
- Appendix
- Getting Started
- Notice:
- Important Safeguards
- Safety Instructions
- CE Declaration of Conformity
- Packing Contents
- Panel Descriptions
- Making Connections and Operations
- Applications
- Point-to-Multipoint
- Note:
- Multipoint-to-Multipoint
- Notes:
- Setup HIP-T and HIP-R
- Choosing a Network Switch
- Further Considerations
- Features
- Maintenance
- Product Service
Brand : AG Neovo
Model : HIP-RA
Category : AV Cable