
XSATACI - Carte contrôleur disque dur Hamlet - Free user manual and instructions
Find the device manual for free XSATACI Hamlet in PDF.


| Product Type | Portable Bluetooth Speaker |
| Brand | Hamlet |
| Model | XSATACI |
| Color | Black |
| Dimensions (W x H x D) | 18.5 x 6.5 x 6.5 cm |
| Weight | 0.54 kg |
| Battery Capacity | 2000 mAh |
| Playback Time | Up to 10 hours |
| Charging Time | 2-3 hours |
| Connectivity | Bluetooth 5.0 |
| Input | 5V/1A via micro USB |
| Output Power | 5W RMS |
| Frequency Response | 100 Hz - 20 kHz |
| Waterproof Rating | IPX5 |
| Features | Hands-free calling, TWS pairing |
| Controls | Volume, Play/Pause, Next/Previous |
| Included Accessories | Micro USB cable, User manual |
| Warranty | 1 year |
Frequently Asked Questions - XSATACI Hamlet
User questions about XSATACI Hamlet
0 question about this device. Answer the ones you know or ask your own.
Ask a new question about this device
Download the instructions for your Carte contrôleur disque dur in PDF format for free! Find your manual XSATACI - Hamlet and take your electronic device back in hand. On this page are published all the documents necessary for the use of your device. XSATACI by Hamlet.
USER MANUAL XSATACI Hamlet
natural_image
Red PCI expansion card with visible internal components and port connectors (no text or symbols)USER MANUAL
www.hamletcom.com
Dear Customer,
thanks for choosing an Hamlet product. Please carefully follow the instructions for its use and maintenance and, once this item has run its life span, we kindly ask You to dispose of it in an environmentally friendly way, by putting it in the separate bins for electrical/electronic waste, or to bring it back to your retailer who will collect it for free.

We inform You this product is manufactured with materials and components in compliance with RoHS directives: 2002/95/CE; with RAEE Directives: 2003/96/CE, Italian Legislative Decree 2005/151 and below EEC Directives: EN55022: 2006, EN55024: 1998 + A1: 2001 + A2: 2003, 2004/108/EC.
Trademarks
All trademarks and company names mentioned in this manual are used for description purpose only and remain property of their respective owners.
Changes
The material in this document is for information only and subject to change without notice. Hamlet reserves the right to make changes or revisions in the product design or the product manual without reservation and without obligation to notify any person of such revisions and changes.
System Requirements
• A Pentium processor or later
- CD-Rom drive
• One available PCI slot
• Windows 98SE/ME/2000/XP/Vista
This I/O card is made exclusively for the IBM-PC or compatible line of computer. If you are not sure what type of computer you have, check your system documentation for compatibility.
Package Contents
• PCI eSATA, Serial ATA and IDE Card
- CD Driver
• Installation Guide
Features
• Support RAID Level 0, Raid Level 1, 0+1 and JBOD
- Compliant with PCI Specification revision 2X.
• Supports up to 33/66 MHz PCI interface clock.
• Supports PCI native modes
- Support E-SATA port for 1.5Gb/s compliant to 3.0Gb/s SATA II interface.
• Supports SATA 1.0 (High Speed Serialized AT Attachment, Revision 1.0), 1.5 Gb/s data rate
• Supports internal PHY, with each PHY supporting up to SATA devices
• Supports Ultra DMA Mode Transfers up to Mode 6 Timing (133 Mbytes/sec)
- Option IDE interface can driver two 133M IDE HDD/CD ROM/DVD/DVD RW.
• Supports PIO Modes up to Mode 4 Timings.
- Multiword DMA Mode 0,1,2 with Independent Timing of up to 4 drives.
Introduction
The below image shows the position of the interface connectors of the Hamlet XSATACI PCI card.

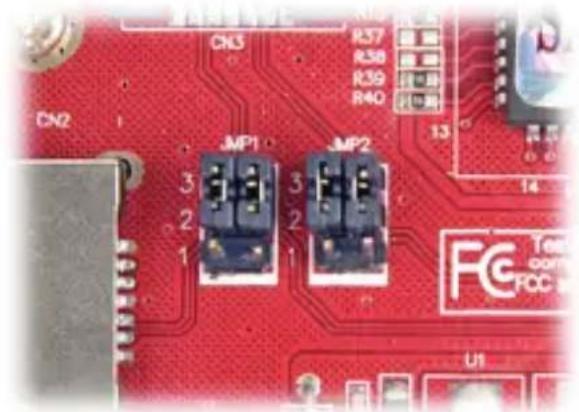
Please note that SATA 2 and eSATA connectors can not be used at the same time so you need to configure the card before its installation.
The 4 jumpers next to the eSATA connector are marked as JMP1 and JMP2 (see picture on the right).
You can setup the jumpers following the instructions below.
natural_image
Close-up of a red printed circuit board with two MP1 and MP2 connectors (no readable text or symbols)SATA 1 + SATA 2 SATA 1 + eSATA


PCI Card Installation
- Turn off your computer and unplug the power cord.
- Remove the outer cover of your computer (refer to your computers manual if needed.).
- Locate an available PCI slot (usually white colored).
- Remove the backplate (the small piece of metal that covers the opening for the PCI card).
- Insert the XSATACI carefully into the PCI slot.
Important Note: There is only way to mount the card, so if you are having problems inserting the card into the PCI slot, make sure that it is oriented correctly. Be sure that the gold contact pins of the PCI card are seated completely inside your computer's PCI slot. Be aware that it may take some force to get the card fully seated in the slot.
-
Secure the XSATACI with the screw from the backplate.
-
Connect a Serial ATA device (e.g Hard Disk Drive) with the SATA cable included.
-
Replace your computer's cover and plug in the power cord and turn on your computer
Once installed the PCI card into your computer you can proceed with driver installation. Please refer to the following pages for the correct installation procedure.
Windows XP Drivers Installation
- When Windows detects VIA SATA PCI Controller in the system, a dialog box named "Found New Hardware Wizard" will show on the screen. Select the "Install from a list or specific location (Advanced)" option then click Next to continue to setup.
- Insert the CD-Rom and type D:\WINXP on the field designating the file's location. Press Next to continue.
- Once the driver installation has finished, press Finish.
- Follow the instruction to restart the computer and complete driver installation.
Verify Installation
- Right-click My Computer icon on Desktop and select the Properties option from the menu.
- Select the Hardware tab in the "System Properties" window then click the Device Manager button on the panel. If "VIA VT6421 RAID Controller" device is shown below the "SCSI and RAID controllers" item (see the following figure), it means that the driver has been installed successfully.

- If there is a marking ! or ? in front of the VIA SATA PCI Controller device, it indicates that the driver has not been correctly installed. User should remove the device and reinstall.
Windows Vista Drivers Installation
- Start your computer to run Windows VISTA.
- When the "Found New Hardware" window appear, click on "Locate and install driver software (recommended)".

- Insert the disc that came with your RAID Controller and then click Next.

- Once the installation is completed, you will need to restart your computer to load the driver properly.
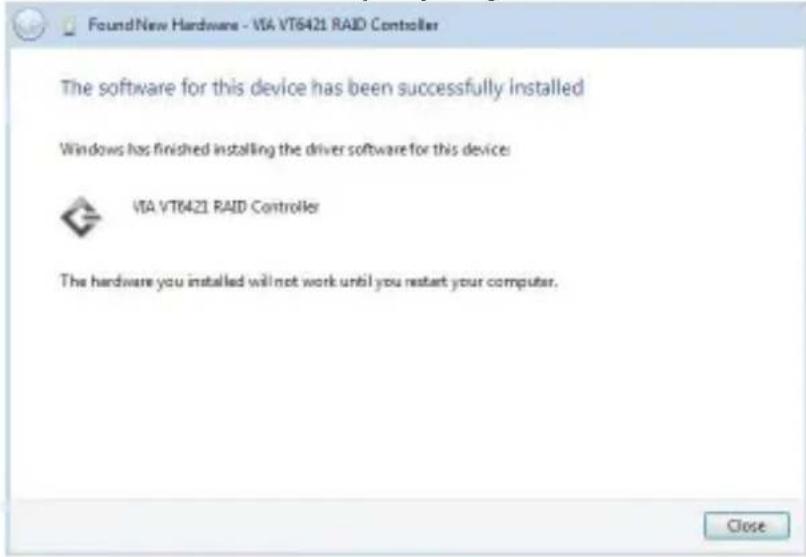
- Chick the “Device Manager” click on “Device Manager” to either “Storage controller” device options. VIA VT6421 RAID Controller should be displayed when successfully installed.
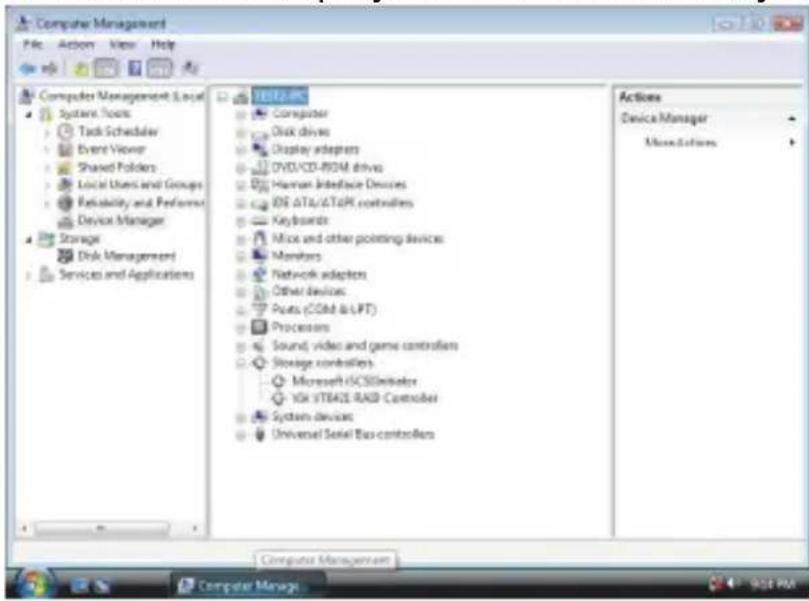
The XSATACI controller card is now ready to connect new device.
Brand : Hamlet
Model : XSATACI
Category : Carte contrôleur disque dur