
LKRL-Z214 - Projector Accessories SONY - Free user manual and instructions
Find the device manual for free LKRL-Z214 SONY in PDF.


| Product Type | Projection Lens (Accessory) |
| Brand | Sony |
| Model | LKRL-Z214 |
| Compatible Projectors | SRX-series (e.g., SRX-T110/T105) |
| Lens Type | Zoom Lens with motorized focus and zoom |
| Lens Shift (Vertical) | Up to 50% of original angle |
| Lens Shift (Horizontal) | Adjustable via H shift plate (center preset at factory) |
| Zoom/Focus Memory | Supported |
| Focus Adjustment | Remote control or manual spacer adjustment |
| Dimensions (W x H x D) | Approx. 187 x 222 x 455 mm (7 3/8 x 8 3/4 x 18 in) |
| Weight | Approx. 11 kg (24 lb 4 oz) |
| Supplied Accessories | Operating Instructions, Spacers (t0.1 x4, t0.05 x4) |
| Mounting Type | Screw attachment with positioning pins |
| Installation | Requires qualified Sony representative |
| Special Features | Lens shift adjustment, zoom/focus memory |
| Safety Notes | Heavy lens, handle with care; avoid touching lens surface |
| Compliance | Class A CISPR 32; not for residential use in Europe |
| Color | Black |
Frequently Asked Questions - LKRL-Z214 SONY
User questions about LKRL-Z214 SONY
0 question about this device. Answer the ones you know or ask your own.
Ask a new question about this device
Download the instructions for your Projector Accessories in PDF format for free! Find your manual LKRL-Z214 - SONY and take your electronic device back in hand. On this page are published all the documents necessary for the use of your device. LKRL-Z214 by SONY.
USER MANUAL LKRL-Z214 SONY
Operating Instructions
- Before operating the unit, be sure to read this manual thoroughly and retain it for future reference.
- You should request your Sony representative to attach the Projection lens.
LKRL-Z214
© 2009 Sony Corporation Printed in Japan

安全のために
For the customers in Europe, Australia and New Zealand
WARNING
This equipment is compliant with Class A of CISPR 32. In a residential environment this equipment may cause radio interference.
For the customers in Europe
This apparatus shall not be used in the residential area.
The LKRL-Z214 Projection Lens is a zoom lens for SRX-series projectors. The LKRL-Z214 is applicable to zoom/focus memory functions. The
position of the projected picture can be moved up or down to a maximum of 50% of the original angle, using the lens shift adjustment.
設置例/Installation Examples
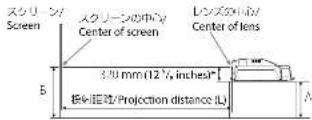
A.医からプロジェクトの済までの間断
Distance between the floor and the feet of the projector
- 康かうスクリーン中心までの中島(任意)
Distance between the floor and the center of screen
The value is for the SRX-T110/T105.
The data is presented in a table with two columns: "1" and "2".
THE DISTANCE BETWEEN THE LENS AND THE SCREEN Varies DEPENDING ON
the type of the input signal or size of the projected image. Use the appropriate chart and find an optimum screen width (W) to decide the
mmH = W × 0.52734, SS = W × 1.1305, Lmin = (W × 1.3592) - 130.49, Lmax = (W × 2.4298) - 128.27
nch: H = W × 0.52733, SS = W × 1.1305, Lmin = (W × 1.3592) 5.1515, Lmax = (W × 2.4398) 5.0507
W 3900137.2% 4000157.2% 4000167.7% 5000196.8% 6000236.9% 7000275.7% 8000314.4% 9000334.4% 10000393.9% 12000427.4% H 2625103.7% 3000118.7% 3375113.7% 3750147.7% 4300177.7% 5250196.7% 6000236.9% 6750265.7% 7500295.7% 9000354.4% SS 4375172.7% 5000196.7% 5625022.7% 6250245.7% 7500295.7% 8750344.7% 10000393.9% 11250442.7% 12500492.7% 13500589.7% Lmalu 6663262.7% 7633363.7% 8603388.7% 9573376.7% 1154445.7% 13844529.7% 1539586.7% 17335982.7% 19785288.7% 25157291.7% Lmald 1806472.7% 1833948.7% 1947269.7% 2172667.7% 2667811.7% 2433958.7% 27866108.7% 3187312.7% 34540135.7% 41473163.7%
mrc: H = W × 0.75000, SS = W × 1.2500, Lmin = (W × 1.9405) - 129.30, Lmax = (W × 3.4667) - 127.90
H = W × 0.74557, 33 = W × 1.2500, L_min = (W × 1.9000) = 3.0570, L_max = (W × 3.1666) = 1.5959
H (max) = L × 0.30787 + 40.174, H (min) = L × 0.21614 + 27.724
inch: H (max) = L × 0.30786 + 1.5078.H (min) = L × 0.21614 - 1.0909
[8-1]
185:1 display
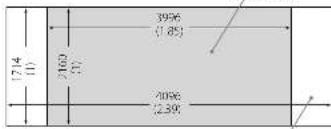
When using the LKRL-Z214 for cinema, check the projection distance and the appropriate screen size in the chart, "For 2.39:1 display and 1.85:1 display in the same height."
natural_image
Technical diagram of a mechanical assembly with labeled components (no readable text or symbols)Attaching the lens may cause fire or injury to the person.
Users should request qualified Sony representative to attach the lens.
Notes
- Handle the lens carefully as it is very heavy.
- When attaching the lens, adjust the lens shift to the center position.
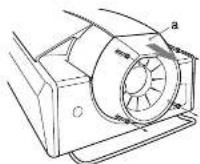
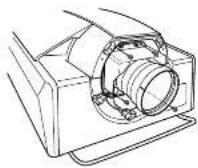
1 Loosen the four screws on the lens cover (a) with a hexagonal wrench, then remove the lens cover.
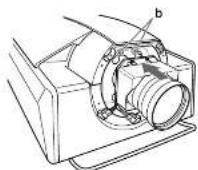
2 Holding the lens with both hands, align the holes on the lens with the positioning pins (b) on the projector, then insert the lens straight into the lens attachment part.
3 Tighten the four screws (M8) supplied with the projector by using a screwdriver to secure the lens.
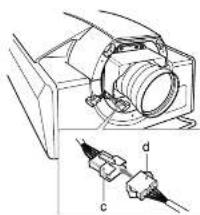
4 Connect the connectors for power focus, zoom and sensor on the lens to those on the projector.
The "FOCUS," "ZOOM" and "POTENTIO" indications will be found on the connectors of the lens and the projector. Be sure to connect each of them correctly.
5 Replace the lens cover and tighten it with the four screws. Be sure to put the connectors and their wires completely into the projector cabinet before replacing the lens cover.
Notes
- After replacing the lens with a new one, be sure to readjust the zoom and focus settings stored in each FUNCTION button. Otherwise, error message "DATA LOAD FAILURE LENS POSITION SENSOR" may appear.
- When removing the screws from the lens to remove the lens from the projector, be sure to hold the lens with your hands so that the lens does not drop.
- When attaching the lens, be careful not to tighten the lens too firmly.
• The lens scratches easily, so when handling it, always place it gently on a stable and level surface in a horizontal position.
- Avoid touching the lens surface.
Adjusting the focus
After attaching the lens, adjust the lens focus.
- When the focus is achieved as you click the + button in "Focus": If the focus is not achieved even when you click on the + button until you reach the end, remove the spacers.
- When the focus is achieved as you click the - button in "Focus": If the focus is not achieved even when you click on the - button until you reach the end, attach the supplied spacers.
Removing/Attaching the spacers (a)
- Remove the lens.
2 Remove the two screws each on the top and bottom of the projector.
3 According to the results from adjusting the focus, either remove the spacers (e) or attach the supplied spacers.
4 Tighten the two screws removed in step 2.
5 Attach the lens.
Adjusting the H shift (b)
The H shift plate is attached at the factory. The H shift preset at the factory is 0 mm (center). Adjust the H shift as follows:
1 Remove the screw (g) from the H shift plate (f).
2 Temporarily attach the screw (g) removed in step 1 through the slot loosely.
3 Loosen the screw (h).
4 Adjust the H shift by sliding the H shift plate (f) horizontally.
5 Tighten the screws (g) and (h).
主な仕様/Specifications
Supplied accessories
Approx. 187 × 222 × 455 mm (7 ^3 /6 × 8 ^3 /4 × 18 inches) Approx. 11 kg (24 lb 4 oz) Operating Instructions (1) Spacers (t0.1) (4) Spacers (t0.05) (4)
Design and specifications are subject to change without notice.
Note
Always verify that the unit is operating properly before use. SONY WILL NOT BE LIABLE FOR DAMAGES OF ANY KIND INCLUDING, BUT NOT LIMITED TO, COMPENSATION OR REIMBURSEMENT ON ACCOUNT OF THE LOSS OF PRESENT OR PROSPECTIVE PROFITS DUE TO FAILURE OF THIS UNIT, EITHER DURING THE WARRANTY PERIOD OR AFTER EXPIRATION OF THE WARRANTY, OR FOR ANY OTHER REASON WHATSOEVER.
Brand : SONY
Model : LKRL-Z214
Category : Projector Accessories