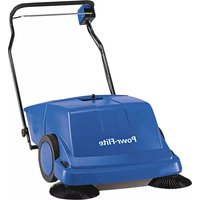
PS900 - Vacuum Cleaner Powr-Flite - Free user manual and instructions
Find the device manual for free PS900 Powr-Flite in PDF.


| Product Type | Walk-behind Battery-Powered Sweeper/Vacuum |
| Brand | Powr-Flite |
| Model | PS900 |
| Power Source | 12V Battery (Lead-Acid, replaceable) |
| Motor | 12V DC, 250W (Part PS942) |
| Battery Charger | Included (Part PS922) |
| Main Brush | Adjustable height (5 positions) with roller and belt drive |
| Side Brushes | Two, adjustable height (up/down with foot lever) |
| Filter | Laminate filter with vibrating cleaning mechanism; removable for tapping |
| Dirt Container | Removable; capacity not specified but easy to empty |
| Speed Control | Variable by pulling/pushing handle (forward motion only) |
| Safety Features | Overload protection (automatic shutoff), safety switch, instructions for safe use |
| Recommended Surfaces | Solid, level, dry surfaces with incline up to 2% |
| Drive System | Belt-driven (multiple toothed and V-belts) |
| Steering | Manual steering with friction clutch adjustment (part 95) |
| Maintenance | Daily: check brush height; Monthly: check battery level and belts; clean filter after each use |
| Parts Availability | Genuine Powr-Flite replacement parts recommended (full parts list in manual) |
| Charging | Charge after each use; socket on lower side of operating console |
| Weight | Not specified in manual |
| Dimensions | Not specified in manual |
Frequently Asked Questions - PS900 Powr-Flite
User questions about PS900 Powr-Flite
0 question about this device. Answer the ones you know or ask your own.
Ask a new question about this device
Download the instructions for your Vacuum Cleaner in PDF format for free! Find your manual PS900 - Powr-Flite and take your electronic device back in hand. On this page are published all the documents necessary for the use of your device. PS900 by Powr-Flite.
USER MANUAL PS900 Powr-Flite
OPERATORS MANUAL AND PARTS LIST
Model PS900
natural_image
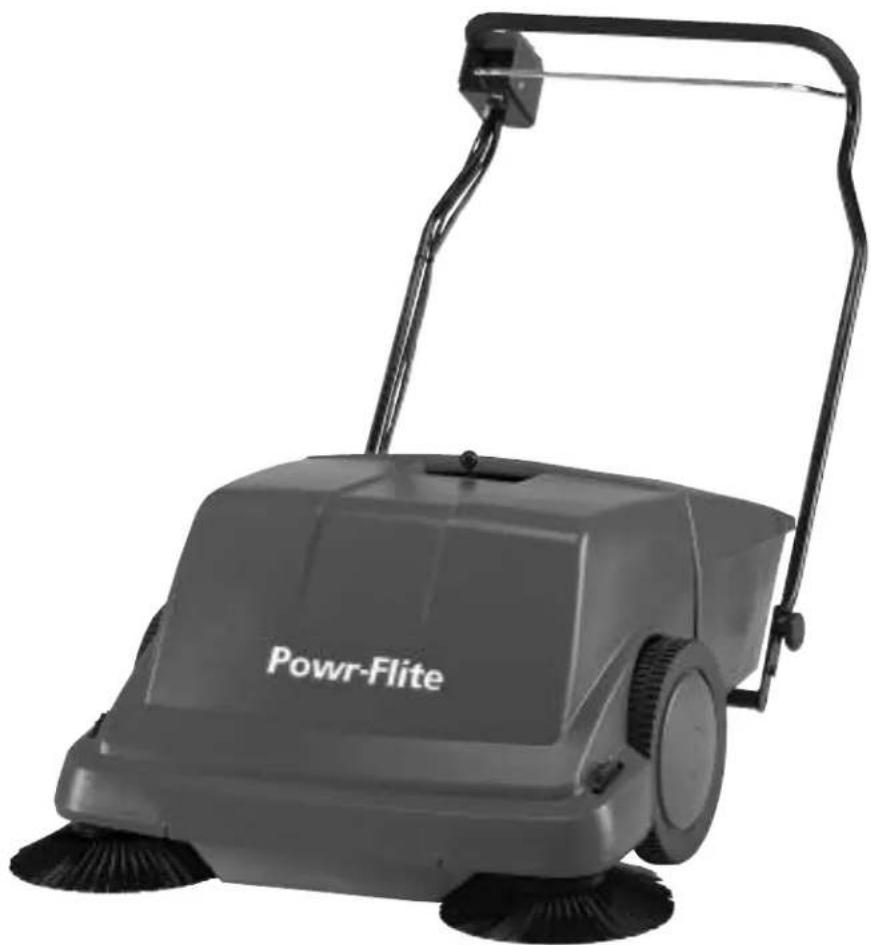
Exterior view of a power-ratio cleaning brush (Power-Flite) device with adjustable handle and wheels (no text or symbols on the device itself)WARNING: OPERATOR MUST READ AND UNDERSTAND THIS MANUAL COMPLETELY BEFORE OPERATING THIS EQUIPMENT.
SAVE THESE INSTRUCTIONS FOR FUTURE REFERENCE
Read all instructions before using this machine.
IMPORTANT SAFETY INSTRUCTIONS
This manual is to ensure that the PS900 is operated correctly. All operators must read, understand practice the following safety instructions.
Before use, check that the unit and operating equipment are in perfect condition and are safe to operate. Do not use the machine if it is not in perfect condition. This vacuum sweeper is intended exclusively for operation on solid, level and dry surfaces with an inclination not exceeding 2%.
CAUTION: Use only as described in this manual.
CAUTION: This sweeper must not be used for removing hazardous materials.
CAUTION: Use only on surfaces indicated in the operating instructions.
CAUTION: Never leave sweeper unattended while running.
CAUTION: Replace damaged or worn parts with genuine original equipment parts in order to maintain safety and to protect your warranty.
CAUTION: Never sweep over surfaces that are wet.
CAUTION: Do not store outdoors.
CAUTION: Keep hair, loose clothing, fingers, and all parts of body away from openings and moving parts.
CAUTION: Do not reach into or under the machine under any circumstances when the motor is running.
CAUTION: The hood latch should remain secured in the closed position except when performing maintenance work.
CAUTION: Switch off the motor and secure the unit before transporting.
CAUTION: Use only accessories and spare parts that have been approved by the manufacturer.
CAUTION: Do not spray clean the unit.
CAUTION: Repairs may only be carried out by authorized customer service centers.
Battery Operated Units
CAUTION: Remove the battery lug or disconnect the battery before working on the electrical system of battery-operated units.
CAUTION: Always keep the batteries clean and dry in order to avoid leakage current. Protect batteries from contaminants.
CAUTION: Do not place any tools, etc., on the battery to avoid risk of short-circuiting and explosion.
CAUTION: Do not smoke, generate sparks or use open flame near a battery or in a charging area.
CAUTION: Use caution when handling battery acid. Comply with corresponding safety regulations.
CAUTION: Avoid picking up strings, cords, wires or similar materials.
Unpacking and Assembly
-
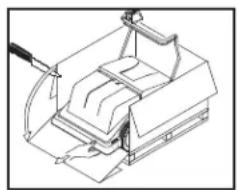
Your sweeper is shipped on a pallet. To remove the sweeper, cut the front side of the box open and fold it under to form a ramp. Roll the sweeper over the ramp so that the running wheels are still standing on the pallet.
-
While the machine is in this position, install the side brushes. The side brushes are located in the dirt container under the side brush plate in the front exterior portion of the machine. Simply apply light pressure, twisting the brushes upwards until you feel them lock into place.
NOTE: Do not tip over the machine in this process. There is a danger of battery acid running out, creating a hazardous condition.
-
Roll the machine from the box and of f of the pallet.
-
Put the handle in the upright position by pulling it downwards into the two tappets completely. Tighten with the two thumbscrews.
-
Install and connect the battery cables. Set the safety switch on the handle to the "0" position.
-
The tool to unlatch the main cover is found inside the dirt collector bin. Remove the dirt collector and using the tool, unlatch the main cover. Connect the positive pole of the battery and tighten with a wrench. Connect the negative pole of the battery and tighten with a wrench.
The machine is now assembled and ready for operation.
natural_image
Technical line drawing of a mechanical device with no visible text or symbols
natural_image
Pure mechanical diagram showing a rotating fan or wheel with motion lines, no text or symbols present
natural_image
Line drawing of a mechanical device with arrows indicating motion or force direction (no text or symbols)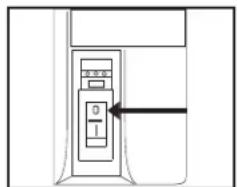
natural_image
Diagram of a device control panel with an arrow pointing to the left side (no text or symbols present)Starting Up/Operating
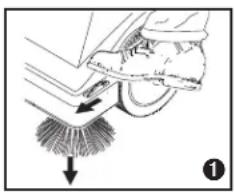
- Lower the two side brushes by pushing the thumb washer forward with your foot until the brushes just touch the floor. (see fig. #1)
- Adjust the height of the main sweeping brush so that the brush tips only touch the floor lightly. The adjustment handle is on the left side of the machine (under the dirt collector.) If the brushes are adjusted too low, this will increase the wear on the brushes and the gear components, as well as power consumption. (see fig. #2)
Position 1 – the highest brush position (for new, unworn rollers)
Position 5 – the lowest brush position (for worn brushes or very uneven floors for a short period of time).
- Turn the sweeper on by placing the safety switch on the handle to the "1" position. (see fig. #3)
The LED's over the switch will indicate how much of a charge is in the battery.
Green Light Sweeper is ready for operation.
Yellow Light Sweeper needs to be charged.
Red Light Turn the machine off immediately
(Turn the safety switch to "0") to keep the battery from loosing its charge.
The safety switch will automatically turn off "0" if the motor is being overloaded. If the motor load should become significantly higher, for example as a result of a blockage or excessive resistance in the drive, the switch will go to the "0" position and the sweeper will turn off. After eliminating the malfunction, the machine may be restarted.
-
The sweeper starts moving when you carefully pull the handle towards you. You can adjust speed by increasing or decreasing pressure on the handle. For more areas with a heavier concentration of debris, the sweeper should be pushed more slowly to achieve the optimum cleaning effect. Loosen the grip on the handle slightly when going around curves to lower the speed in the curve. To move the sweeper backwards, decrease pressure on the handle and pull the machine in the desired location.
-
After you have finished sweeping, shut off the machine (turn safety switch to "0.") (see fig. #3)
-
The filters must be cleaned after every use of the machine, prior to emptying the dirt collector. There is a small knob located on top of the filter, in the area of the dirt collector handle. Move the knob back and forth a number of times. A vibrating mechanism will come on, loosening dirt that is sitting between the lamellas so that it will fall directly into the dirt collector. If there is stubborn dirt, clean the filter with a brush or remove the filter and tap slightly. (see fig. #4)
-
Always remove the dirt collector using both hands. Put one hand in the front handle area in the middle of the machine. Put the other hand on the upper edge from behind. Lift the container upwards from behind. It is easiest to empty the dirt collector over the side edge. (see fig. #5 & 6)
-
The side brushes must be put in the 'up' position to alleviate the load on them and ensure they are long lasting. Push the thumb washers backward with your foot until the brushes clear the floor. (see fig. #7)
-
The battery should be charged after each use. This will guarantee that you will always have a machine that is ready for operation. The charging socket is located on the lower side of the operating console. Insert the charging plug and connect charger. Follow instructing from charger for charging times and cautions. (see fig. #8)
natural_image
Diagram of a hand cleaning a car wheel with a brush (no text or symbols)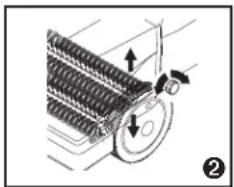
natural_image
Mechanical diagram showing a rotating wheel and gear mechanism with directional arrows (no text or symbols)
natural_image
Diagram of a door with a control panel and directional arrow, no text or symbols present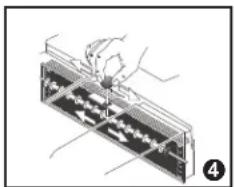
natural_image
Illustration of a hand using a tool to press or install a mechanical component (no text or symbols visible)
natural_image
Line drawing of a hand pressing down on a vehicle wheel (no text or symbols)
natural_image
Line drawing of a person standing beside an open box, no text or symbols present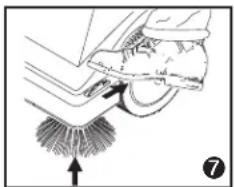
natural_image
Diagram showing a foot cleaning or cleaning process with a brush and directional arrow (no text or symbols)
natural_image
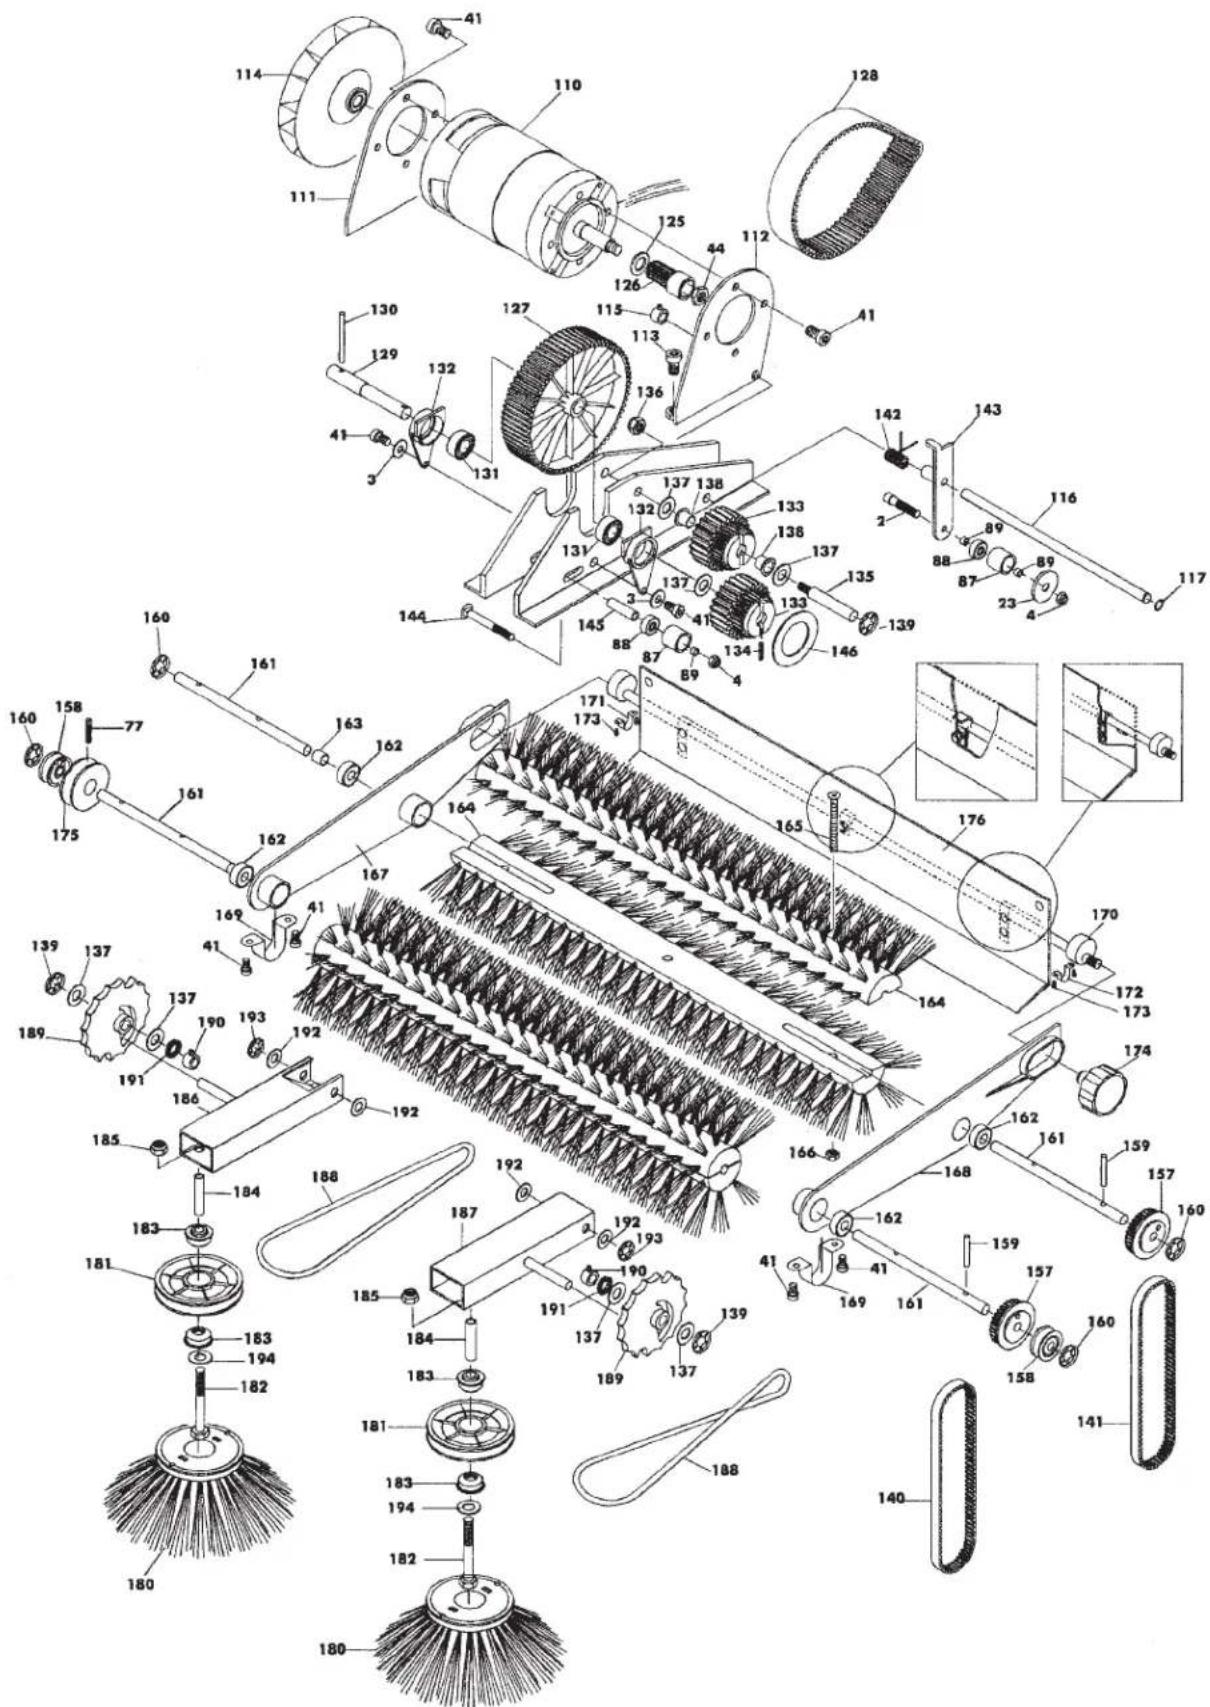
Diagram of a device with a cable and connector, no visible text or symbolsref# part # desc
| 1 Bonnet | |
| 2 Screw | |
| 3 Washer | |
| 4 Nut | |
| 5 Dirt collector | |
| 6 Reinforcement tube | |
| 7 Roll cover | |
| 8 Tension Band | |
| 9 PS901 Profiled gasket | |
| 10 PS902 Gasket, lhs + rhs | |
| 11 PS903 Gasket | |
| 12 Shaft | |
| 13 PS904 Rivet | |
| 14 Washer | |
| 15 PS905 Filter | |
| 16 PS906 Fixing sheet | |
| 17 Plate spring | |
| 18 Rivet | |
| 19 Filter protection plate lh | |
| 19N Rubberplate | |
| 20 Filter protection plate rh | |
| 21 Screw | |
| 22 Nut | |
| 23 PS907 Washer | |
| 24 PS908 Nut | |
| 25 Tube | |
| 26 PS909 Washer/ Rubber | |
| 27 PS910 Spacer | |
| 28 Axle | |
| 31 Locking washer | |
| 32 Spacer | |
| 34 PS911 Handle | |
| 35 Lever | |
| 40 Frame | |
| 41 PS912 Screw | |
| 42 PS914 Caster | |
| 43 | Screw |
| 44 Nut | |
| 50 | Steering handle |
| 51 | Accelerator |
| 52 Coverage | |
| 53 | Screw |
| 54 PS915 | Fixing handle |
| 55 Wire fixing | |
| 60 Battery-control | |
| 61 PS916 | Switch/ fuse |
| 62 PS917 Protection | |
| 63 PS918 Cable-set | |
| 64 | Wire |
| 65 PS920 Connector socket | |
| 66 PS921 Plug | |
| 67 | Terminal - |
| 68 | Terminal + |
| 69 Battery, 12 V | |
| 70 PS922 | Battery-charger |
| 75 PS923 | V-Belt, 10x475 |
| 76 Pulley | |
ref# part # desc
| 77 Headless screw | |
| 78 PS924 Spacer | |
| 79 PS925 Spacer | |
| 80 Shaft | |
| 81 PS926 Shell tape over. clutch | |
| 82 PS927 Ratched wheel | |
| 83 Bearing | |
| 84 PS928 Support for shaft | |
| 85 Sleeve | |
| 86 Screw | |
| 87 PS929 Tightener | |
| 88 PS930 Bearing | |
| 89 Spacer | |
| 90 Support for tightener | |
| 91 Spring | |
| 92 Locking washer | |
| 93 PS931 Exterior cable | |
| 94 PS932 Binding screw | |
| 95 PS933 Adjustment screw | |
| 96 PS934 Cable | |
| 97 PS935 Wheel | |
| 98 PS936 Profile rubber | |
| 99 PS937 Hub cap | |
| 100 PS939 Bearing | |
| 101 Serrated lock washer | |
| 102 PS940 Toothed belt, 750 mm | |
| 103 PS941 Screw | |
| 110 PS942 Motor, 12 V, 250 W. | |
| 111 PS943 Motor support right | |
| 112 PS944 Motor support left | |
| 113 PS946 Screw | |
| 114 PS947 Ventilator | |
| 115 PS948 Adjustment sleeve | |
| 116 PS949 Shaft | |
| 117 PS950 Circlip | |
| 125 Washer | |
| 126 PS951 Ratched wheel 14 teeth | |
| 127 PS952 Ratched wheel 98 teeth | |
| 128 PS953 Ratched belt, 550 mm | |
| 129 PS954 Shaft | |
| 130 PS955 Pin | |
| 131 PS956 Bearing | |
| 132 PS957 Support | |
| 133 PS958 Ratched wheel | |
| 134 PS959 Adapter sleeve | |
| 135 Shaft | |
| 136 Nut | |
| 137 PS960 Washer, plastic | |
| 138 PS961 Slide bearing | |
| 139 PS962 Locking washer | |
| 140 PS963 Ratched belt, 600 mm | |
| 141 PS964 Ratched belt, 635 mm | |
| 142 Spring | |
| 143 Support of tightener | |
| 144 Screw | |
| 145 Spacer, steel | |
| 156 Clip |
ref# part # desc
| 157 PS965 Ratched wheel 32 teeth | |
| 158 PS966 Pulley, sidebrush | |
| 159 PS967 Pin | |
| 160 PS968 Locking washer | |
| 161 PS969 Shaft | |
| 162 PS970 Bearing | |
| 163 PS971 Spacer | |
| 164 PS972 Brush roll half | |
| 165 PS973 Screw | |
| 166 PS974 Nut | |
| 167 PS975 Adjusting plate, right | |
| 168 PS976 Adjusting plate, left | |
| 169 PS977 Clip | |
| 170 Height adjustment | |
| 171 PS978 Clip, right | |
| 172 PS979 Clip, left | |
| 173 PS980 Screw | |
| 174 PS981 Adjustment handle | |
| 175 PS982 Pulley | |
| 176 PS983 Recirculating flap | |
| 180 Side brush | |
| 181 PS984 Pulley | |
| 182 PS985 Screw | |
| 183 Bearing | |
| 184 PS986 Spacer | |
| 185 Nut | |
| 186 Side brush holder, right | |
| 187 Side brush holder, left | |
| 188 PS987 V-belt | |
| 189 Adjustmentplate | |
| 190 Adjustment sleeve | |
| 191 Serrated lock washer | |
| 192 Washer | |
| 193 Locking washer | |
| 194 Washer | |
| 250 Clutch | |
| 251 | Support for clutch |
| 252 Circlip | |
| 253 | Screw |
| 254 | Screw |
| 255 Spacer | |
| 256 | Support |
| 257 | Screw |
| 258 Tube | |
| 259 Engine | |
| 260 | Support |
| 261 Screw | |
| 262 V-pulley | |
| 263 | Headless screw |
| 264 Shaft | |
| 265 Support | |
| 266 | Bearing |
| 267 | Screw |
| 268 Shaft | |
| 269 | Screw |
| 270 | Wire |
| 271 Switch | |


Service and Toubleshooting
Service Schedule
| Daily | |
| Sweeping brush check the height adjustment and if there are possibly stuck or rolled up objects | |
| Vacuum: brush on top clean / check for damage | |
| Monthly | |
| Battery check level of liquid and refill if necessary | |
| Belt check for defects and voltage | |
| Sweeping roller and side brush check for wear | |
Troubleshooting:
| A.) the motor doesn't startpossible reason potential solution: | |
| 1.) the battery is not charged Charge the battery | |
| 2.) the overload protection jumps out dirt container and removing objects from brushes | the drive is blocked or correct brush roller by removing the |
| 3.) interruption in the electrical line connection if necessary | check the line (see the wiring diagram) and repair the |
| B.) the results of sweeping are not satisfactorypossible reason potential solution: | |
| 1.) the dirt container is overfilled empty the dirt container | |
| 2.) sweepings are caught in the sweeping brush | take out the dirt container and remove the object |
| 3.) the roller RPM's are too low | charge the battery or check for brush blockage |
| 4.) height adjustment of the sweeping brush is wrong | adjust the height in such a fashion that only the tips of the bristles touch the floor |
| C.) the running time of the machine is insufficientpossible reason potential solution: | |
| 1.) the battery has little power | check the battery and refill acid if necessary and charge, exchange battery if necessary |
| 2.) the power consumption is too high | check the main brush for height adjustment and to see if they are blocked |
| 3.) the battery is insufficiently charged | check to see if the battery and battery charger are functioning perfectly |
| D.) the brushes do not rotatepossible reason potential solution: | |
| 1.) the belt of the power transmission unit is defective / has slipped off | check all of the belts on the machine (7 pieces) |
| 2.) sweepings are caught in the sweeping roller | the drive is blocked or correct brush roller by removing the dirt container and removing objects from brushes |
| E.) the steering drive is not functioning / not properlypossible reason | potential solution: |
| 1.) the tooth belt is defective / has slipped off | replace if defective and check all other belts |
| 2.) the friction clutch is not engaging | adjust the setting mechanism on the handle console (part 95) |
| F.) too much dust developspossible reason potential solution: | |
| 1.) the dust filter is clogged | tap out the filter; remove and replace if necessary |
| 2.) the container is improperly inserted | put the container properly in place |
Brand : Powr-Flite
Model : PS900
Category : Vacuum Cleaner