VZ-PRO-MINI - Controller ViewZ - Free user manual and instructions
Find the device manual for free VZ-PRO-MINI ViewZ in PDF.


| Type | Digital Signage Controller (Software-based) |
| Model | ViewZ VZ-PRO-MINI |
| Operating System | Windows 7 (or later) |
| CPU Requirement | 2 GHz dual-core processor (32-bit or 64-bit) |
| RAM Requirement | 1 GB minimum |
| Video Card Requirement | DirectX 9 compatible with 256 MB video memory (for preview) |
| Maximum Clients | Up to 1000 |
| Supported Media Formats | JPEG, BMP, PNG, TIFF, AVI, H.264, VC-1, WMV, PCM, WMA, WAV, Flash, PowerPoint, Web pages |
| Network Support | LAN, Internet |
| Main Functions | Layout design, scheduling, remote client management, emergency messaging, user management, reporting |
| Client Types | Online and Offline |
| User Roles | Administrator, Designer, Scheduler, Auditor, Client |
| Database | MySQL Server required |
| Software Components | Server (Media & Controller), Client, Controller |
| Dimensions | Not specified (varies by hardware) |
| Weight | Not specified |
| Power Supply | Not specified |
| Safety | Standard PC safety precautions apply |
| Maintenance | Regular software updates; clean hardware as needed |
| Spare Parts | Not applicable (software-based) |
Frequently Asked Questions - VZ-PRO-MINI ViewZ
User questions about VZ-PRO-MINI ViewZ
0 question about this device. Answer the ones you know or ask your own.
Ask a new question about this device
Download the instructions for your Controller in PDF format for free! Find your manual VZ-PRO-MINI - ViewZ and take your electronic device back in hand. On this page are published all the documents necessary for the use of your device. VZ-PRO-MINI by ViewZ.
USER MANUAL VZ-PRO-MINI ViewZ
DRIVING VISUAL INNOVATION
S3 MagicView
Server Edition
Version 3.2
User Manual

© 2014 ViewZ USA. All rights reserved
www.viewzusa.com
ViewZ S3 Graphics Terms and Conditions of Software Use
Please read these Terms and Conditions carefully before you download, install or use any ViewZ S3 Graphics Software. By installing the S3 Graphics Software, you accept all the Terms and Conditions of this Agreement. If you do not agree to the Terms and Conditions of this Agreement, do not use the S3 Graphics Software.
ViewZ USAS PROVIDES THIS DRIVER PACKAGE SO THAT YOU MAY USE ViewZ S3 GRAPHICS SOFTWARE WITH A ViewZ S3 GRAPHICS CHIP AND RECEIVES SUCH UPDATES AND SUPPORT FOR THE ViewZ S3 GRAPHICS CHIP AS ViewZ S3 GRAPHICS MAY ELECT TO PROVIDE. THE SOFTW ARE AND ANY UPDATES S3 GRAPHICS MAY ELECT TO PROVIDE ARE REFERRED TO AS THE "SOFTWARE." ViewZ S3 GRAPHICS IS WILLING TO LICENSE THE SOFTW ARE TO YOU ONLY UPON THE CONDITION THAT YOU ACCEPT ALL OF THE FOLLOWING TERMS AND CONDITIONS. IF YOU DO NOT AGREE WITH THE TERMS AND CONDITIONS, YOU SHOULD PROMPTLY EXIT THIS SERVICE. YOU MAY NOT DUPLICATE ALL OR ANY PART OF THE ITEMS CONTAINED IN THE SOFTW ARE PACKAGE, OR CREATE DERIVATIVE WORKS BASED IN W HOLE OR IN PART ON THE ViewZ S3 GRAPHICS ITEMS, EXCEPT AS EXPRESSLY SET FORTH IN THESE TERMS AND CONDITIONS.
Software License: Except as otherwise provided by an ViewZ S3 Graphics License Agreement to which you are a party, you (i) may only use the Software on a single system that contains the ViewZ S3 Graphics Chip that the Software is designed for, (ii) may not use the Software for any other purpose or reproduce, decompile, reverse engineer, disassemble or otherwise reduce the Software to human-readable form, (iii) may make one copy of the Software for backup purposes only, and (iv) acknowledge that all copies of the Software in whatever form provided are the sole property of ViewZ S3 Graphics, and that you have no right, title or interest in the Software or any copies of the Software, except as expressly provided in these Terms and Conditions.
Warranty: YOUR USE OF ViewZ S3 GRAPHICS ITEMS IS AT YOUR OWN RISK. THE SOFTW ARE IS PROVIDED "AS IS" WITHOUT WARRANTY OF ANY KIND, EXPRESS OR IMPLIED, INCLUDING, BUT NOT LIMITED TO IMPLIED WARRANTIES OF MERCHANTABILITY, FITNESS FOR A PARTICULAR PURPOSE AND AGAINST INFRINGEMENT. CONDITIONS OF USE OF THE ViewZ S3 GRAPHICS ITEMS ARE BEYOND ViewZ S3 GRAPHICS' KNOW LEDGE AND CONTROL, AND ViewZ S3 GRAPHICS ASSUMES NO LIABILITY FOR RESULTS OBTAINED OR LOSS OR DAMAGE INCURRED AS A RESULT OF THE APPLICATION OF THE DATA, INFORMATION OR SOFTW ARE CONTAINED ON THE WEB OR IN ViewZ S3 GRAPHICS ITEMS.
No Liability for Damages: IN NO EVENT SHALL ViewZ S3 GRAPHICS BE LIABLE FOR ANY DAMAGES WHATSOEVER (INCLUDING WITHOUT LIMITATION, DAMAGES FOR LOSS OF BUSINESS PROFITS, CONSEQUENTIAL OR INCIDENTAL DAMAGES) ARISING FROM THE USE OF OR INABILITY TO USE THE SOFTW ARE. INNO EVENT WILL ViewZ S3 GRAPHICS ENTIRE LIABILITY TO YOU FOR ALL DAMAGES, LOSSES AND CAUSES OF ACTION EXCEED THE AMOUNT PAID BY YOU FOR THE SOFTW ARE.
Export Restrictions: You agree that you will not, directly or indirectly, export the ViewZ S3 Graphics Items including the Software to any country to which such export is restricted by applicable U.S. export control laws without the prior consent, if required, of the U.S. Department of Commerce or such other governmental entity as any have jurisdiction over such export.
Complete Agreement: These Terms and Conditions, together with your ViewZ S3 Graphics License Agreement, if any, constitute the entire agreement between you and ViewZ S3 Graphics with respect to the use of the web site and the S3 Items including the Software.
Term: These Terms and Conditions are effective until terminated. These Terms and Conditions will terminate immediately without any notice from S3 Graphics if you fail to comply with any provision of these Terms and Conditions. Upon termination, you must destroy ViewZ S3 Graphics Items including the Software and any related documentation that you may have.
Copyright 2014. ViewZ USA. All rights reserved.
1. Introduction 5
1.1 List of Features 5
1.2 Minimum System Requirements 6
1.3 Software Requirements 7
1.4 User Guide Overview 7
1.5 Key Definitions 8
2. Installation 11
2.1 Database Installation 11
2.2 Server/Client/Controller Installation 24
3. Quick Start 43
3.1 Server Setup 44
3.2 User Accounts 48
3.3 Multimedia Library 52
3.4 Creating/Managing Layouts 56
3.5 Editing Timetables/Schedules 62
3.6 Register Clients 69
4. Components 72
4.1 Layout 72
4.2 Layer 73
4.3 Images 74
4.4 Video 75
4.5 Messages 76
4.6 PowerPoint 77
4.7 Flash 77
4.8 WebBrowser 78
4.9 Clock 78
4.10 Empty 79
4.11 Audio 79
4.12 S3Weather 79
4.13 RTSP (Capture) 80
5. Servers 82
5.1 Server types 82
5.2 Server configuration 82
5.3 Media Server Name or IP 84
Media Server Port 84
6. Clients 86
6.1 Client types 86
6.2 Activate Client 87
6.3 Client Registration 88
6.4 Rs232 Tools 94
6.5 Setting Client Special screen 99
6.6 Grouping a client 101
6.7 S3 MagicView Client Web Manager 103
7. Controller 112
7.1 S3 MagicView Main Menu 112
7.2 Media Library 113
7.3 Layout Manager 118
7.4 Layout Designer 121
7.5 Timetable Designer 128
7.6 Scheduler 132
7.7 Client Manager 138
7.8 Client Alarm 142
7.9 Client Report 143
7.10 User Manager 144
7.11 Log 147
ViewZ SB GRAPHICS
1. INTRODUCTION
S3 MagicView is a powerful and user-friendly content management software for designing, distributing and displaying of digital signage. It combines the qualities of traditional multimedia with the graphics power of contemporary computer technology. S3 MagicView can be applied on a variety of digital signage systems, from single-computer systems to scalable multi-computer systems, from systems distributed on LANs to systems connected to the Internet.
The Server edition is the ultimate, full-featured edition of the S3 MagicView product offering. It consists of three major components: Server, Client and Controller. Each part may be installed and launched separately on different machines connected to the same network. The Server edition supports a dedicated Controller server and Media server. More than one Controller may be launched on different machines to design and upload various layouts simultaneously.
1.1 List of Features
| Single or Multiple Computer support |
| LAN support |
| Remote Controller |
| Dedicated Controller Server |
| Dedicated Media Server |
| Maximum number of clients = 1000 |
| Client Web Management |
| Support for various digital multimedia formats: JPEG, BMP, PNG, TIFF, AVI, H.264, VC-1, WMV, PCM, WMA and WAV |
| Transparent/semi-transparent image support |
| Emergency Message broadcast support |
| Easy to use drag-and-drop Layout Management: create/edit/publish layouts |
| Online/Offline Scheduling Management |
| Administrator Account Management |
| Report Generation and Export to CSV-formatted file |
| Remote Update of Client software |
Table 1.1-1
1.2 Minimum System Requirements
| Server | Client | Controller | |
| CPU | 2 GHz, 32-bit (x86) or 64-bit (x64) Dual Core processor | ||
| System Memory | 2.0 GB 1.0 GB 1.0 GB | ||
| Video Card | Not required | VIA Embedded/ VIA uH8/4 adapters | DirectX9 graphics processor with 256MB video memory |
| OS | Windows 7, Window Server 2008 | Windows 7 Windows 7 | |
Table 1.2-1
Notes:
- Before configuring the Server, please disable UAC on Control Panel -> User Account -> Change User Account Control settings -> drag the scroll bar to Never Notify.
- Keep Time Zone sync of the Server, the Client and the Controller. Make sure to update time by Internet.
1.3 Software Requirements
√ Client: VIA Embedded/S3 Graphics driver package
√ Controller: DX9c-compatible graphics adapter driver if user need preview on Controller
Prior to the installation of S3 MagicView Client, the third-party software should be installed on the Client and Controller systems to play back multimedia content:
√ Adobe Flash Player 9 or later: for playing Flash files http://www.adobe.com/support/flashplayer/downloads.html
√ Microsoft PowerPoint Viewer: for playing Microsoft PowerPoint files http://www.microsoft.com/download/en/details.aspx?displaylang=en&id=6
Note: Microsoft PowerPoint Viewer must be initialized before playing PowerPoint files with ViewZ S3 MagicView.
√ S3 Graphics Video Filters: for playing video clips
√ DirectX runtime, VC runtime: plug-in for playing http://www.microsoft.com/en-us/download/details.aspx?id=8109 http://www.microsoft.com/en-us/download/details.aspx?id=5555
1.4 User Guide Overview
This User Guide describes the features of S3 MagicView and provides instructions on how to operate it.
The User Guide is divided into two sections:
- Quick Start Section: An overview of ViewZ S3 MagicView. Start at the beginning of this section if you are a new user or just want to familiarize yourself with ViewZ S3 MagicView's capabilities. [Quick start].
- Component Reference Section: Describes all windows, menus, commands and other functions. Refer to this section to learn more about specific functions in ViewZ S3 MagicView . [Components]
1.5 Key Definitions
| Server | A server acts as the interface between the Clients and Controllers. There are two types of servers in ViewZ S3 MagicView : a Media server and a Controller server.•Media serverThe Media server is a file server. All multimedia content, layouts and schedules are stored on the Media server, which provides the content for clients during the downloading process.•Controller serverThe Controller server stores the controller database, the system logs, and media information. It also provides the authorization for users to access the Media server.Server types |
| Client | The Client's main purpose is to display the digital signage contents. The Client downloads content from the Media server and plays it according to a schedule. There are two types of clients in ViewZ S3 S3 MagicView : an online client and an offline client.•Online ClientThe online Client connects to the network and communicates with the Controller Server via a network to update schedules and contents.•Offline ClientThe offline Client is not connected to the network. This client will detect a USB flash device when it is connected and will automatically download schedules and contents from the device.Client types |
| Controller | The Controller is a standalone application and serves as the main graphical user interface for S3 MagicView . It can be launched without the Server and Client installed. Users can run the Controller on any machine connected on the video wall network. Users can run the Controller on the same computer on which servers run or simply run on the administrator's laptop.S3 MagicView Main Menu |
| Group | S3 MagicView divides Clients into groups and assigns each group a schedule. All Clients in the group share the same schedule. |
| Component | Component refers to all multimedia content that S3 MagicView supports. New components may be added into S3 MagicView by registering the corresponding plug-in.Components |
| Layout | A layout contains all multimedia content and display information. After layouts are assigned to a schedule, the Client that is assigned to theschedule will download and play its corresponding layouts. Layout |
| Layer | As the basic element of the layout, a layer contains one or more types of multimedia contents and components. Layer |
| Timetable | A timetable consists of multiple layouts in a specific playback order, displaying the duration of each layout. There are no empty timeslots between the layouts. Editing Timetables and Schedules |
| Schedule | A schedule is a timetable of the layouts played by the clients at the specified time. Each group of Clients is assigned a schedule. Scheduler |
| Emergency Message | The emergency message function allows users to publish a text message for immediate display by the Client to the selected group. Emergency Message menu |
| Transition | A transition is a video effect added between video clips or images to join them together. Transition In The animation at the beginning of the content. Transition Out The animation at the end of the content. |
| Duration | Duration is the amount of time that multimedia content lasts. Each media content has a duration parameter. Transitions also have a duration parameter. Users can use the duration parameter to control the playback time and playback loops of the multimedia content. |
| User type | In S3 MagicView , the User type determines the level of access to the controller and other functions, such as starting and stopping servers, registering clients, etc. User types are defined as follows: Administrator A user who can access all pages of the controller and use all functions of the S3 MagicView software. Auditor An auditor is in charge of approving Media, Layouts and Timetables for playing. Client A Client user is only permitted to register Clients on the client machine. It cannot log into the Controller. Designer A designer has the authority to log into the Controller and access the Layout Designer page; however, the Client Manager page is not available to the Designer. SchedulerA scheduler is responsible for arranging schedules and assigning them to the clients. A scheduler can log onto the Controller and access theClient ManagerandSchedulerpages. |
| Approval Status | ViewZ, S3 MagicViewhas a process to supervise the multimedia, layouts and timetables uploaded to the server. Only contents approved by the administrators or auditors can be played back by the Clients.There are four types of approval status:RequestedRequested is the default status for all new uploaded content, including multimedia, layouts, and timetables. Contents in the Requested status are waiting for the approval of administrators.ApprovedAfter the administrators grant their approval, contents can be downloaded and played by the clients.RejectedIf the administrators feel that the contents do not meet the requirements, they can reject the use of those contents for downloading and playing.RetiredA multimedia file in the Retired status can be used at any time in the original layout or timetable that contains the file. New layouts or timetables may not use this multimedia file. |
2. INSTALLATION
This chapter describes the software and hardware environment and how to install and configure S3 MagicView. The following chart shows a quick reference to the installation components.
| Installation Component |
| 1. S3 Graphics 5400EW display driver |
| 2. S3 Graphics video filter |
| 3. Microsoft PowerPoint viewer |
| 4. Adobe Flash Player |
| 5. MySQL Servers |
| 6. MySQL Connector ODBC |
| 7. Media Server |
| 8. Controller Server |
| 9. S3S3 MagicView Controller Server |
| 10. S3 MagicView Controller/Manager |
| 11. S3 MagicView Client |
Table 2.2-1
2.1 Database Installation
The Server Edition requires the MySQL Server and MySQL Connector/ODBC for the database. This section provides step-by-step instructions on how to setup and configure the MySQL Server database.
MySQL Server Installation
Step 1. Run the MySQL Server Setup Wizard in the Database folder: mysql-5.5.11-win32.msi.
Step 2. Click the Next button in the Welcome page.

Figure 2.1-1
Step 3. In the End-User License Agreement page, check "I accept the terms in the License Agreement" box and click the Next button.

Figure 2.1-2
Step 4. Setup type: Choose Typical then click the Next button.
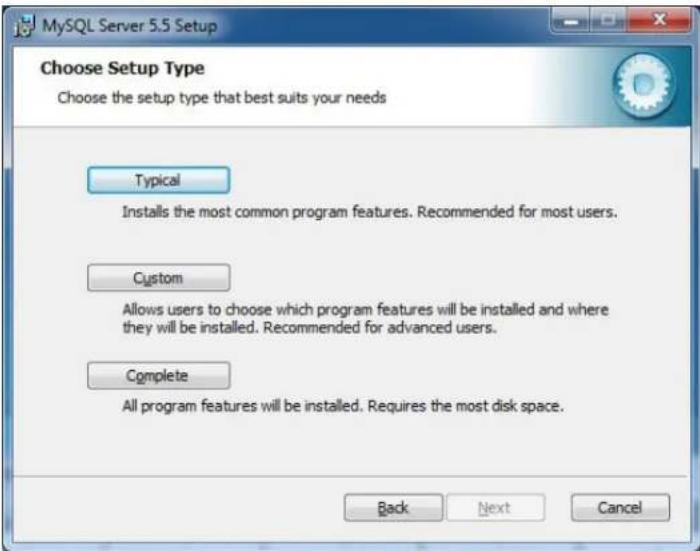
Figure 2.1-3
Step 5. Click the Install button to begin the installation.

Figure 2.1-4
Step 6. During the installation, the MySQL Enterprise window pops up; click the Next button on this page.

Figure 2.1-5
Step 7. Click the Next button on this page.

Figure 2.1-6
Step 8. Check the "Launch the MySQL Instance Configuration Wizard" box, and click the Finish button to exit the Setup Wizard.
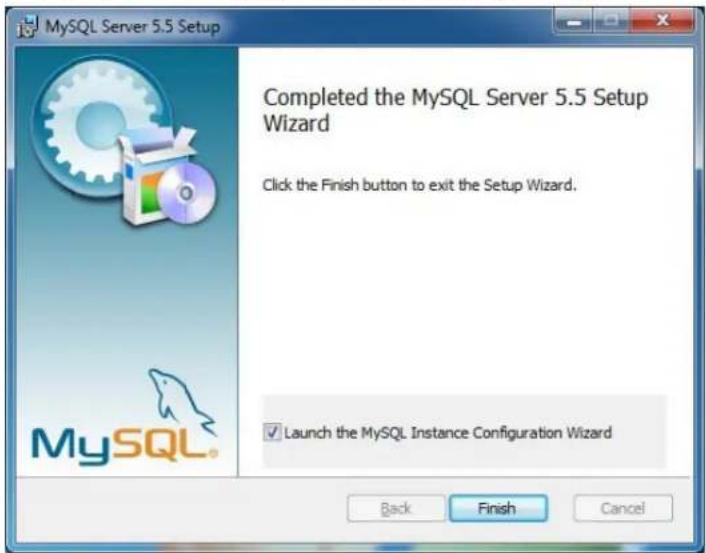
Figure 2.1-7
Step 9. After the installation is completed, the MySQL Instance Configuration Wizard window pops up. Click the Next button to configure the MySQL Server.
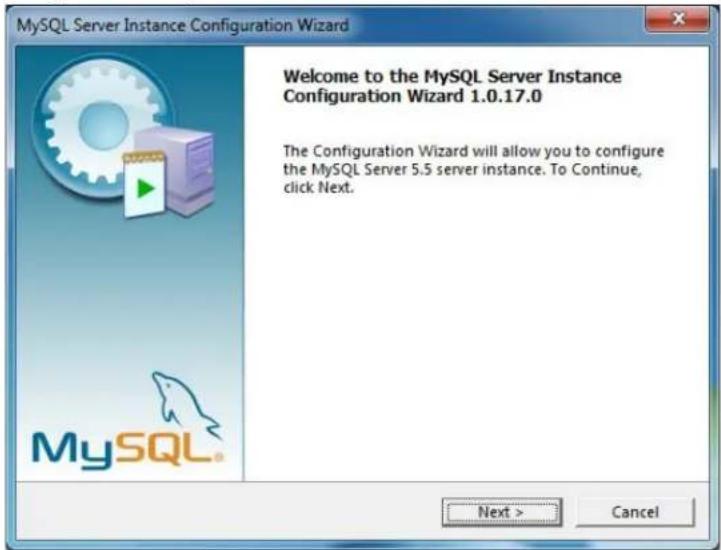
Figure 2.1-8
Step 10. Configuration type: In the MySQL Server Instance Configuration Wizard, select the Detailed Configuration and click the Next button.
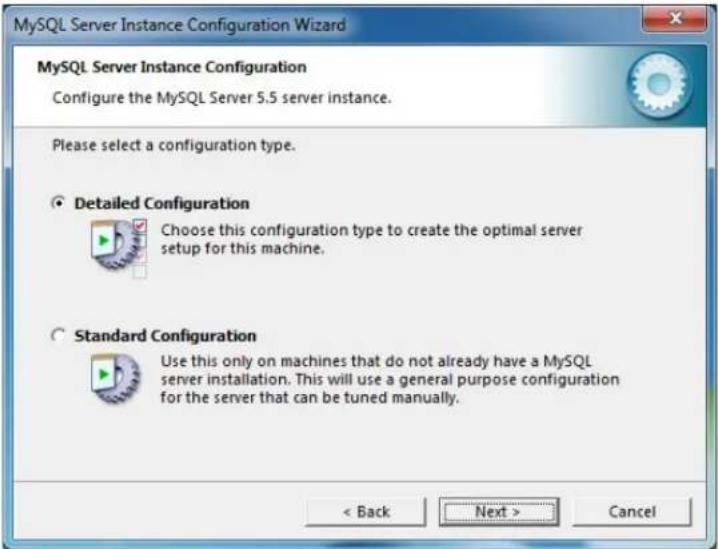
Figure 2.1-9
Step 11. Server type: Select Server Machine and click the Next button.

Figure 2.1-10
Step 12. Database Usage: Select the Transactional Database Only and click the Next button.
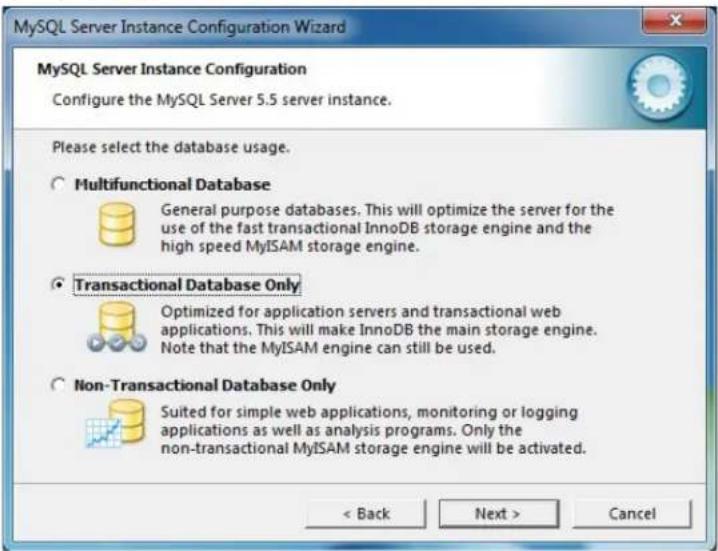
Figure 2.1-11
Step 13. Drive for the InnoDB datafile: Keep the default settings for the InnoDB Tablespace Settings unchanged and click the Next button to continue.

Figure 2.1-12
Step 14. Approximate number of concurrent connections to the server: Select the Online Transaction Processing (OLTP) and click the Next button.

Figure 2.1-13
Step 15. Networking Options: Check the "Enable TCP/IP Networking" and "Add firewall exception for this port" boxes;
Uncheck the "Enable Strict Mode" box;
Keep the default Port Number unchanged and click the Next button.

Figure 2.1-14
Step 16. Default Character Set: Select the Best Support for Multilingualism and click the Next button.

Figure 2.1-15
Step 17. Window Options: Check the "Install As Windows Service, Launch the MySQL Server automatically and Include Bin Directory in Windows PATH" boxes and click the Next button.

Figure 2.1-16
Step 18. Security Options: Check the Modify Security Settings and Enable root access from remote machines boxes, type in your New root password and Confirm the password and click the Next button.

Figure 2.1-17
Note: The password set here is for MySQL Server Database initialization. The default password is 123456
Step 19. In the Ready to Execute page, click the Execute button to start the configuration.
![MySQL Server Instance Configuration Wizard Configure the MySQL Server 5.5 server instance. Ready to execute ... ○ Prepare configuration ○ Write configuration file ○ Start service ○ Apply security settings Please press [Execute] to start the configuration. < Back Execute Cancel](/content/2026/05/1090545/images/b31148ee191e8814b693f757e5b1a2eacc2da6765d652f2fc3ae7962cbe0c8fa.jpg)
Figure 2.1-18
Step 20. Click the Finish button to close the Wizard and complete the MySQL Server Instance configuration.
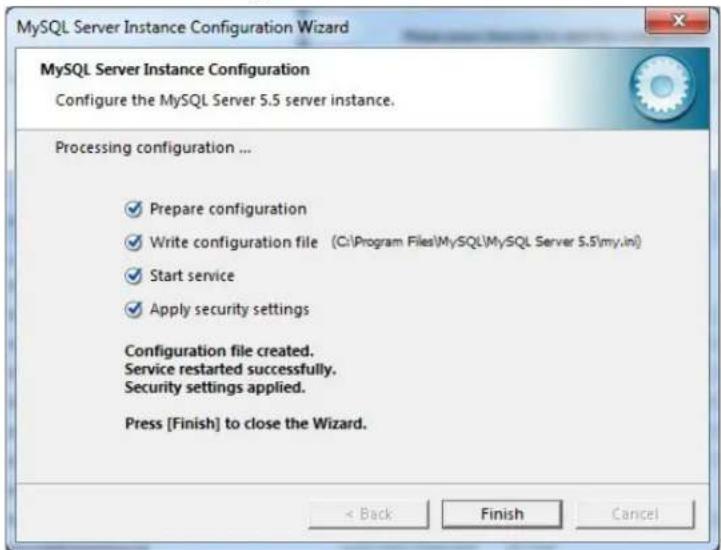
Figure 2.1-19
MySQL Connector ODBC 5.1.8 Installation
Step 1. Run the MySQL Connector/ODBC Setup Wizard in the Database folder: mysql-connector-odbc-5.1.8-win32.msi.
Step 2. Click the Next button in the Welcome page.
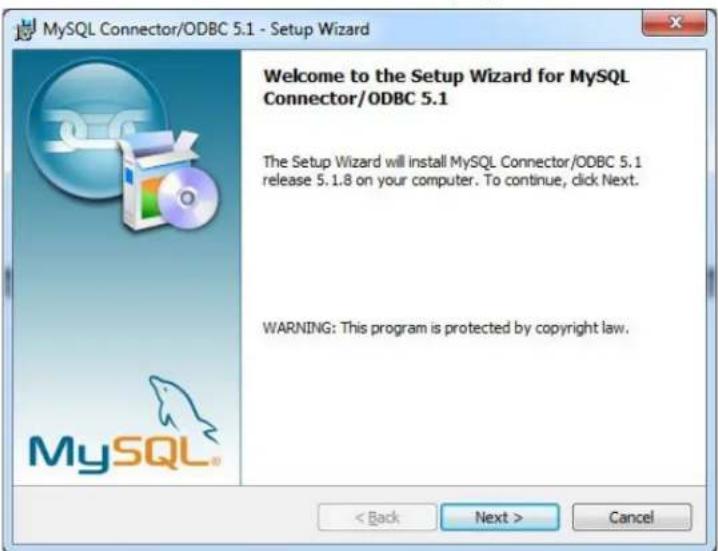
Figure 2.1-20
Step 3. Setup type: Choose Typical and click the Next button.
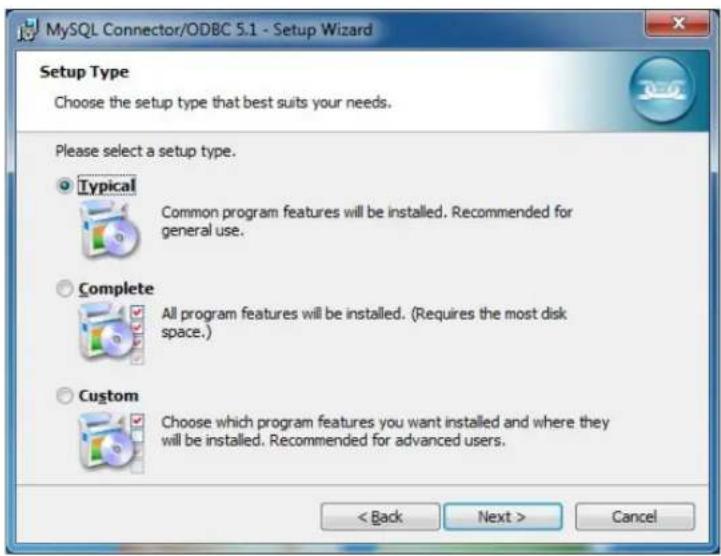
Figure 2.1-21
Step 4. Click the Install button to begin the installation.
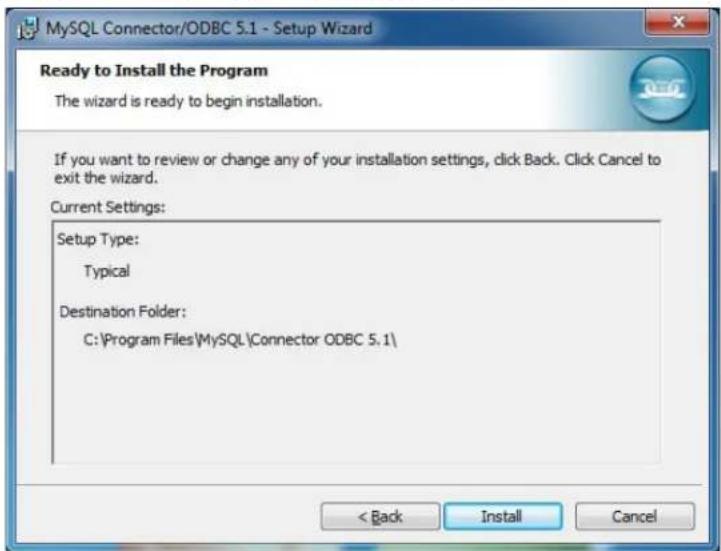
Figure 2.1-22
Step 5. Click the Finish button to exit the Setup Wizard and complete the installation.

Figure 2.1-23
2.2 Server/Client/Controller Installation
Each component, the Server, the Client and the Controller may be installed and launched separately on different machines connected to the same network. The Server Edition supports a dedicated Controller server and Media server. More than one controller can be used on different machines to design and upload layouts simultaneously.
S3 MagicView Server installation
There are two types of servers that must be installed:
- Media Server
- Controller Server
Media Server installation
To install the Media Server:
Step 1. Run the Media Server setup in the MediaServer folder: MediaServerSetup.msi
Step 2. Click the Next button to continue.

Figure 2.2-1
Step 3. In the End-User License Agreement page, check the "I accept the terms in the License Agreement" box and click the Next button.
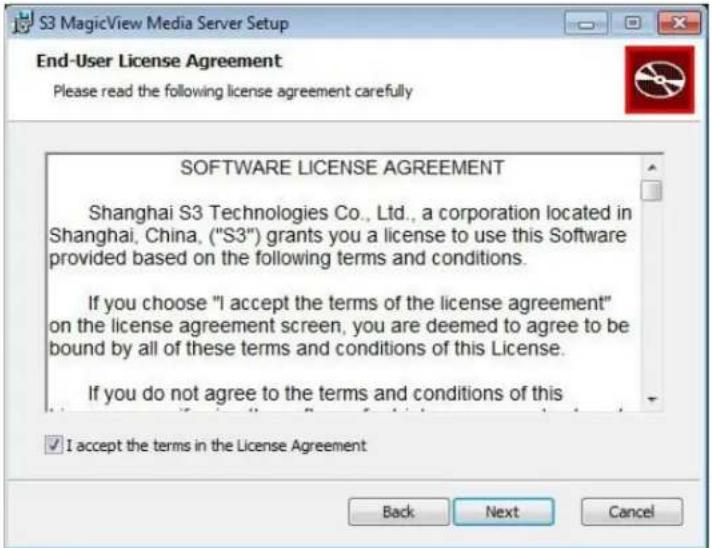
Figure 2.22
Step 4. In this page, click the Get Adobe Flash Player, Get Microsoft PPT Viewer 2007 and Get S3 Filter buttons to install the third-party software. Click the Next button to continue.
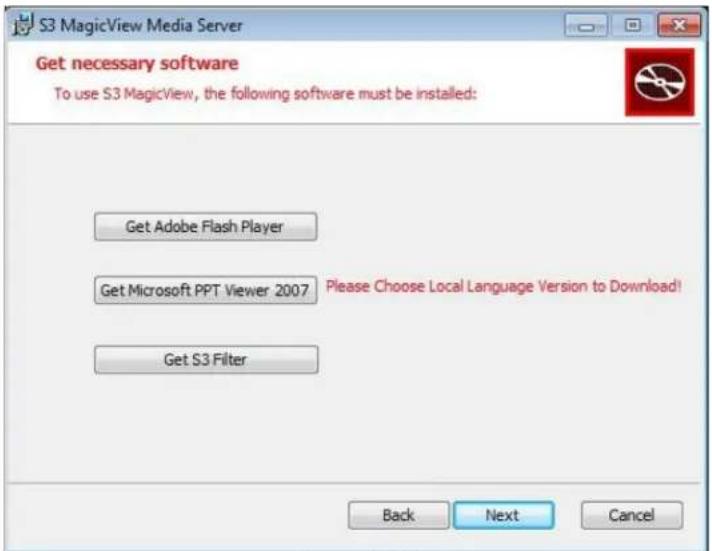
Figure 2.2-3
Step 5. Media Server Configuration: Type the Controller Server Name or Port then check Start S3 MagicView Media Server On System Startup and click the Next button.

Figure 2.2-4
Note: The Default Media server name or IP is local IP: 127.0.0.1
Step 6. Choose Setup Type: Select the Typical type to install

Figure 2.2-5
Step 7. Click the Install button to start the installation.

Figure 2.2-6
Step 8. Installation Complete: Click the Finish button to exit and complete the installation.
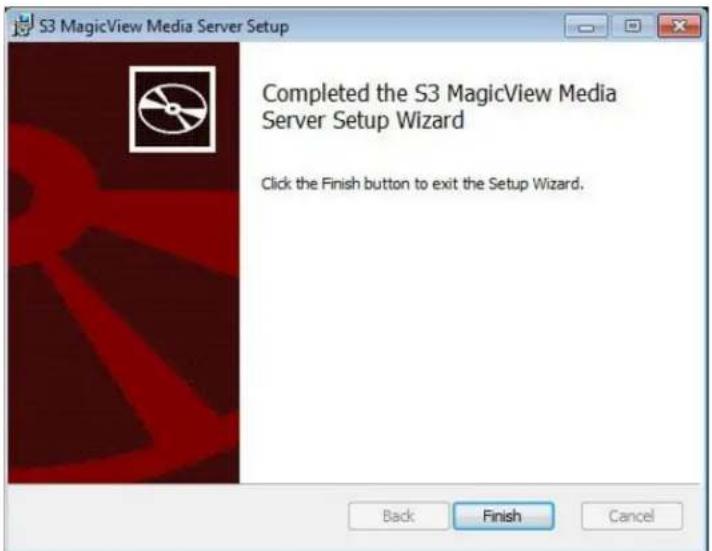
Figure 2.2-7
Controller Server installation
To install the Controller Server:
Step 1. Run the Controller Server Setup in the Controller Server folder: ControllerServerSetup.msi
Step 2. Click the Next button to continue.

Figure 2.2-8
Step 3. Check the "I accept the terms in the License Agreement"box and click the Next button.

Figure 2.2-9
Step 4. If the necessary software has not been installed yet, click the Get Adobe Flash Player, Get Microsoft PPT Viewer 2007 and Get S3 Filter buttons to install the third-party software. Click the Next button to continue.
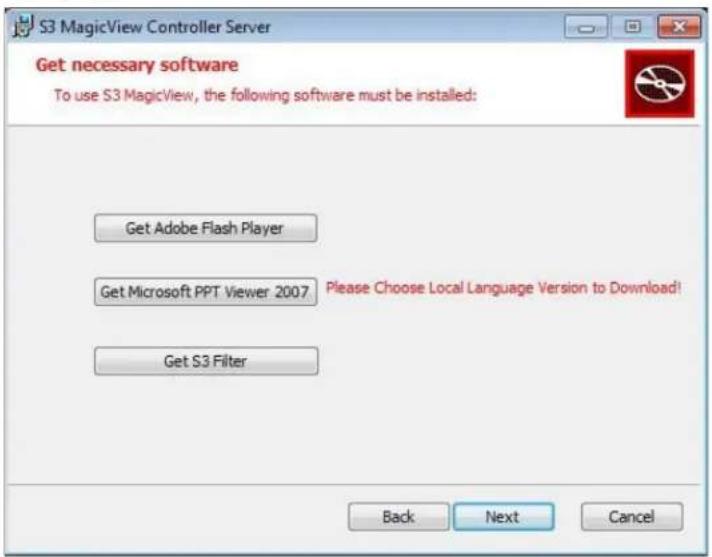
Figure 2.2-10
Step 5. Type the Controller Server Port, Media Server Name or IP address and the Media Server Port then check the Start S3 MagicView Controller Server on System Startup box, and click the Next button.

Figure 2.2-11
Note: The default Controller Server values are as follows:
- Controller server port: 2000
- Media server name or IP: 127.0.0.1
- Media server port: 6419
Step 6. Configure the MySQL settings; click the Next button.
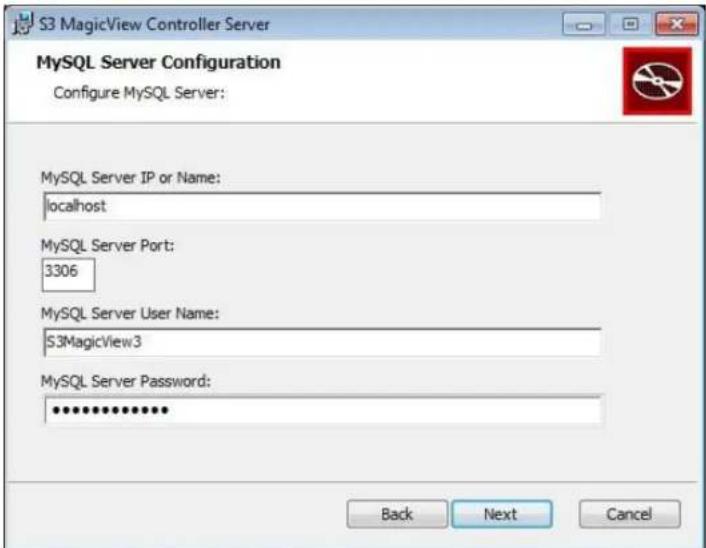
Figure 2.2-12
Note: The default MySQL settings are as follows:
- MySQL server IP or Name: localhost
- MySQL server port: 3306
- MySQL server User Name: S3MagicView3*
- MySQL server Password: S3MagicView3*
*The User Name and Password are set in MySQL Server Installation step 18.
Step 7. Select Typical Setup Type to install.

Figure 2.2-13
Step 8. Confirm Installation: Click the Install button to start the installation.
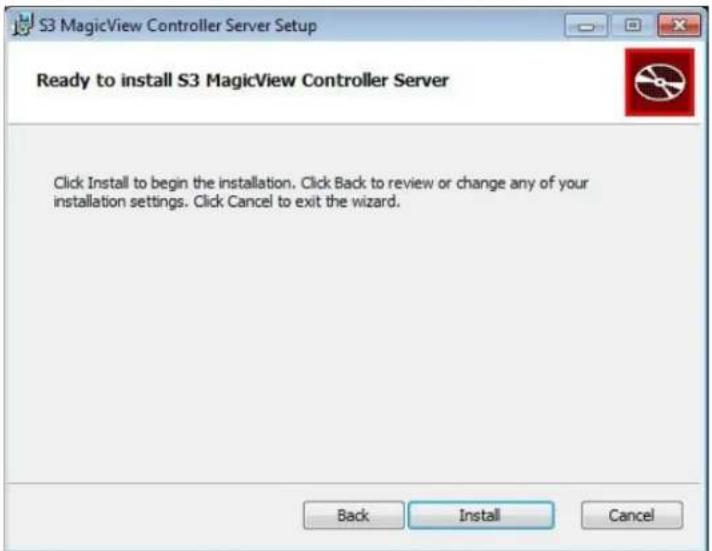
Figure 2.2-14
Step 9. Installation Complete: Click the Finish button to exit and complete the installation.

Figure 2.2-15
Note:
Run the " Initialize S3 MagicView Database" on desktop. Input the root password set in MySQL 5.5.11 installation step19 then S3 MagicView will initialize the database automatically.
MySQL Database initialization
S3 MagicView provides a script to initialize the MySQL database. After you installed the S3 MagicView Controller Server, the S3 MagicView Controller-Server shortcut will be placed on the desktop.
To initialize the database:
Step 1. Double-click the shortcut.
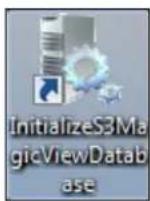
Figure 2.2-16
Step 2. Type the Root Password, which was setup in the MySQL Server configuration (The Default password is 123456).

Figure 2.2-17
The initialization of the database is complete.

Figure 2.2-18
Controller/Manager installation
To install the S3 MagicView Controller:
Step 1. Run: ControllerSetup.msi in the Controller folder.
Step 2. Click the Next button to continue.

Figure 2.2-19
Step 3. Check the "I accept the terms in the License Agreement" box and click the Next button.

Figure 2.2-20
Step 4. If the necessary software has not been installed yet, click the Get Adobe Flash Player, Get Microsoft PPT Viewer 2007 and Get S3 Filter buttons to install the third-party software. Click the Next button to continue.
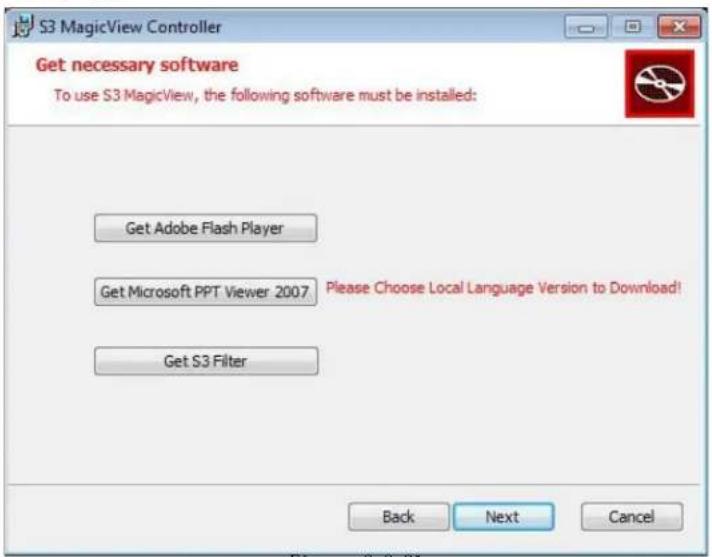
Figure 2.2-21
Step 5. Type the Controller Server Name or IP address and the Controller Server Port, and click the Next button.

Figure 2.2-22
Note: The default Controller server values are as follows:
- Controller server name or IP: 127.0.0.1
- Controller server port: 2000
Step 6. Select Typical setup type to install.
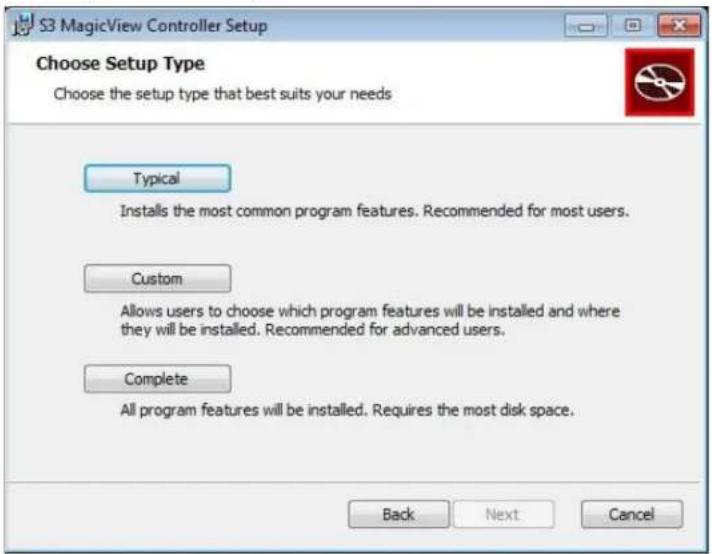
Figure 2.2-23
Step 7. Confirm Installation: Click the Install button to start the installation.
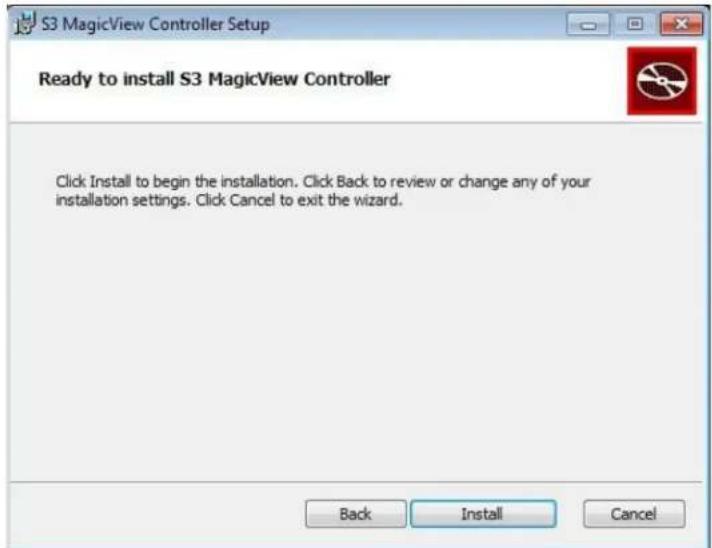
Figure 2.2-24
Step 8. Click the Finish button to complete the installation.

Figure 2.2-25
Client installation
To install the S3 MagicView Client:
Step 1. Run: ClientSetup.msi in the Client folder.
Step 2. Click the Next button to continue.

Figure 2.2-26
Step 3. Check the "I accept the terms in the License Agreement" box, and click the Next button.

Figure 2.2-27
Step 4. If the necessary software has not been installed yet, click the Get Adobe Flash Player, Get Microsoft PPT Viewer 2007 and Get S3 Filter buttons to install the third-party software. Click the Next button to continue.

Figure 2.2-27
Step 5. User can select to auto start up Client when system is turned on.

Figure 2.2-28
Step 6. Select the Typical setup type to install.

Figure 2.2-29
Step 7. Confirm Installation: Click the Install button to start the installation.

Figure 2.2-30
Step 8. Installation Complete:
- Confirm the Launch ClientConfigure.exe option box is checked, and click the Finish button to go to the Client Registration window.

Figure 2.2-31
Step 9. Client Registration: Fill in the table then click the Register Client button to complete the registration, or click the Close button to register the client later and continue with the installation. The registration method is described in 6.3 Client Registration section.

Figure 2.2-32
Note:
The Controller Server must be running in order to register the client and complete the registration.
3. QUICK START
This section is intended to get you up and running quickly and productively using S3 MagicView. S3 MagicView features are presented through examples and step-by-step procedures.
Note:
You will need to prepare your own multimedia content before you begin. The contents used in the examples are not included with the S3 MagicView software.
The S3 MagicView system consists of:
- a Controller Server
- a Media Server
- a Controller
- a Client
The IP addresses of the four computers are as follows:
| Computer name | IP address | |
| Controller server computer | Computer1 | 10.3.8.1 |
| Media server computer Computer2 | 10.3.8.2 | |
| Controller computer | Computer3 | 10.3.8.3 |
| Client computer | Computer4 | 10.3.8.4 |
Table 3.3-1
Note:
For illustrating the concepts of the Server, Client and Controller components, each component is installed separately onto four different computers for this example. Alternatively, user may also choose to install these components all on a single machine and assign their IP addresses to the local host 127.0.0.1.
3.1 Server Setup
Servers store the media files (saved in the form of layouts), controller database, system logs and other information. Servers also function as the interface to the Client and the Controller. The Media Server and the Controller Server must both be configured and started.
Before configuring the Server, please temporary disable the UAC..
Configuring and starting the Media Server
- Double-click the MediaServer.exe icon on Computer2.

Figure 3.1-1
- After the Media Server icon appears in the notification area of the task bar, right click the icon and click the Settings button.
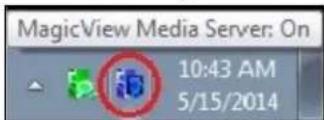
Figure 3.1-2
- Enter the information for your Media Server settings (for more information, refer to section: Media Server Configuration).

Figure 3.1-3
Home Directory: C:\ProgramData\S3 MagicView\S3 MagicView Media Server\ServerRoot
Server Port: 6419
Idle Time Out: 300
Max Clients Count per IP: 5
Clients Max Count: 256
Max Login Attempts: 10
- Change the default Controller Server Name or IP to: 10.3.8.1
- Click the OK button.
- Right click the MediaServer.exe icon again. Restart the Server by clicking the Stop Server button and then click the Start server button.
The Media Server is now running for the first time and the icon color changes to blue. After the initial setup, the Media Server will automatically start after loading the OS.
Configuring and starting the Controller Server
- Double-click the ControllerServer.exe icon on Computer1.
Figure 3.1-4
- After the Controller Server icon appears in the notification area of the task bar, right click the icon and click the Settings button.

Figure 3.1-5
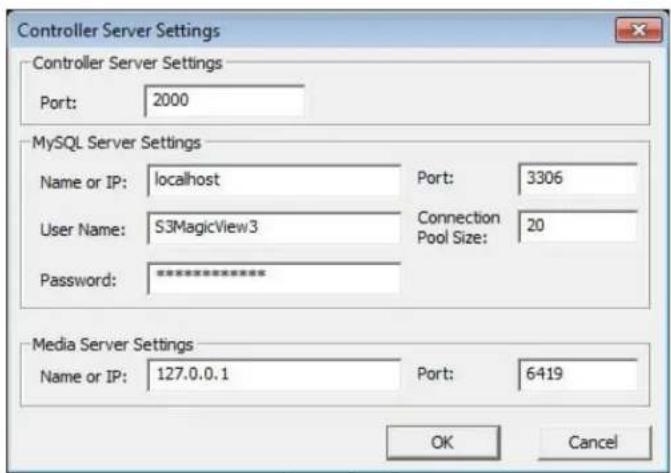
Figure 3.1-6
- Enter the Controller Server Port. The default port is 2000.
- Input MySQL Server Settings:
Name or IP: localhost
User Name: root
Password: (enter the password, which was set in Step18 of MySQL Configuration)
Port: 3306
Connection Pool Size: 20
- Controller Server Settings: Enter Name or IP and Port. The default IP is the local IP address, and the default Media Server Port is 6419. In this example, we changed the default Media Server Name to 10.3.8.2 and keep the default Media Server Port of 6419.
- Click the OK button.
- Right click again the Controller Server icon. Click the Stop Server button then click the Start server button.
The Controller Server is now running for the first time and the icon color changes to green. After the initial setup, the Controller Server will automatically start after loading the OS.
3.2 User Accounts
In S3 MagicView, user accounts are used to start and stop Servers, log into Controller and register Clients.
Creating a new User Account
- Run S3 MagicView Manager Controller on Computer3

Figure 3.2-1
- Click the Setting button.
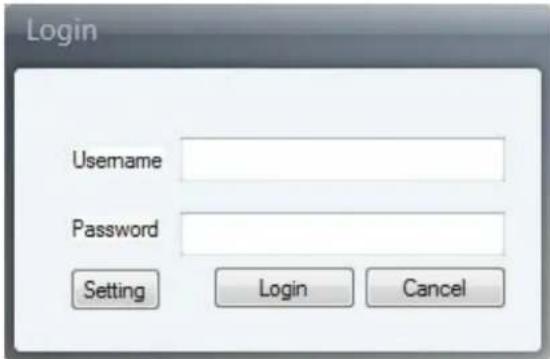
Figure 3.2-2
- Input the IP address: 10.3.8.1 and port: 2000, and click the OK button. (The default values are 127.0.0.1 and 2000, respectively).
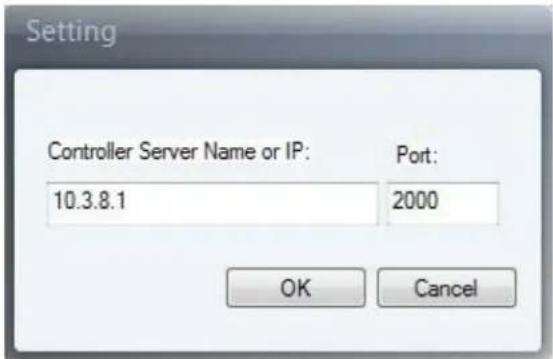
Figure 3.2-3
- Log into the Controller on Computer3 by entering the existing user account and password.
For the initial Controller login, use admin for the User name and the password.

Figure 3.2-4
5. Click the User Manager tab.

Figure 3.2-5
6. Select the Create menu button.
7. In the New Account dialog box, enter:
- User ID: User1
and confirm Password
• User type: Administrator- Description
(For more information, refer to section: User Manager).
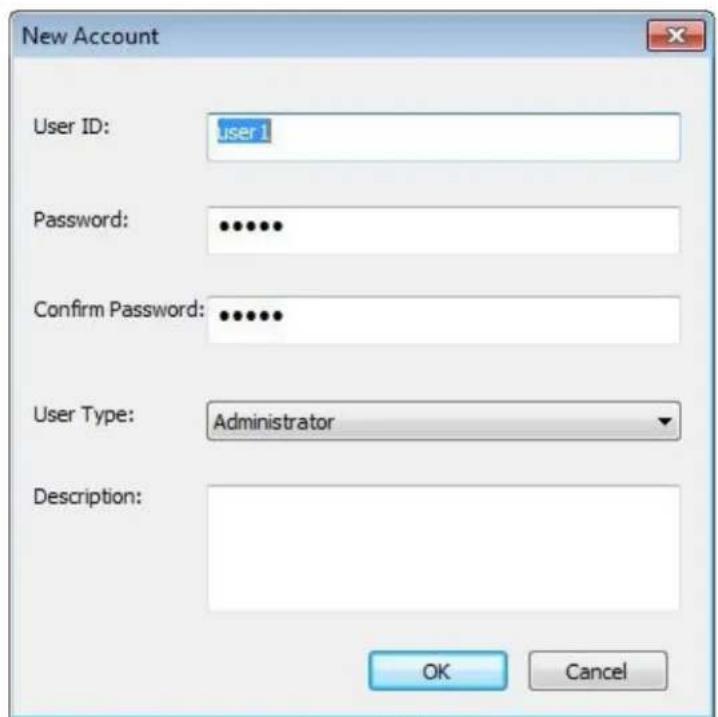
Figure 3.2-6
- Click the OK button.
A new administrator account called user1 is created.
Note:
S3 MagicView set a default administrator, both account and passwords are: admin.
Deleting a User Account
- Log into the Controller on Computer4 by entering the existing user account and password.
- Click the User Manager tab.
- Select the user account you wish to delete.
- Select the Delete menu button and confirm the deletion.
The selected user account is deleted.
3.3 Multimedia Library
S3 MagicView uses a unified multimedia library to manage the upload and download of multimedia files. Multimedia files, including video clips, pictures, audio files, etc., are first uploaded into the Media Library. Once the files have been uploaded, the contents can be edited on the Controller and played back on the Client. Details on uploading multimedia file, please refer to section 0
Components
Uploading files
- Log into the Controller on Computer3 by entering the existing user account and password.
- Click the Media Library tab.
- Click the Create New Category button in the Media Library Category Tree to create a new category and rename it with Category1.

Figure 3.3-1
- Select the Upload Media button on the menu bar.
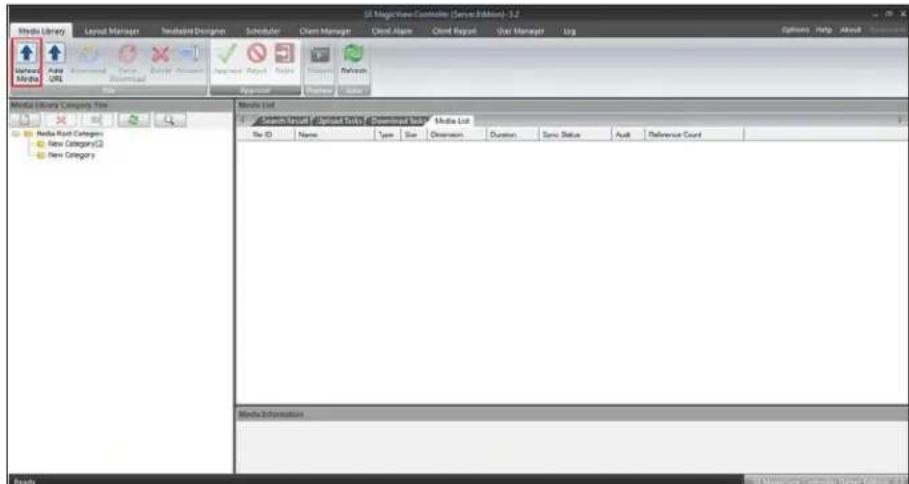
Figure 3.3-2
- Select the file to upload in the pop-up window and click the Open button.
The selected file will be uploaded to the current category, Category1. The Media List window will show the current uploading status. User can upload pictures, video, PPT, Flash files and etc.
Adding a website (URL) for multimedia content
- Log into the Controller on Computer3 by entering the existing user account and password.
- Click the Media Library tab.
- Select the Category1 in the Media Library Category Tree.
- Select Add URL on the menu bar.

Figure 3.3-3
- Input the URL in the pop-up window and click the OK button.
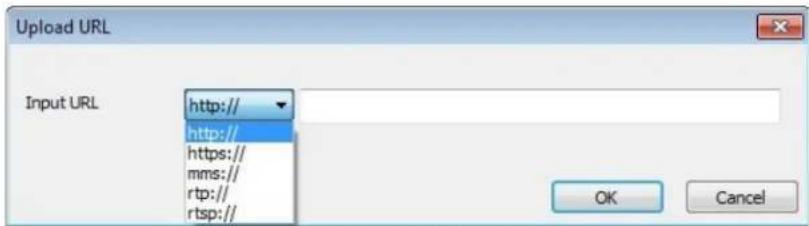
Figure 3.34
The URL file will be uploaded to Category1. The Media List window will show the uploading status. User can upload http/https/mms/rtsp files.
Approving multimedia content
All uploaded files and URLs must be approved by an administrator before they can be added into a layout. Administrators can verify the contents using the following steps:
- Log into the Controller on Computer3 by entering the existing user account and password.
- Click the Media Library page.
- Select the Media List tab in the Media List window.
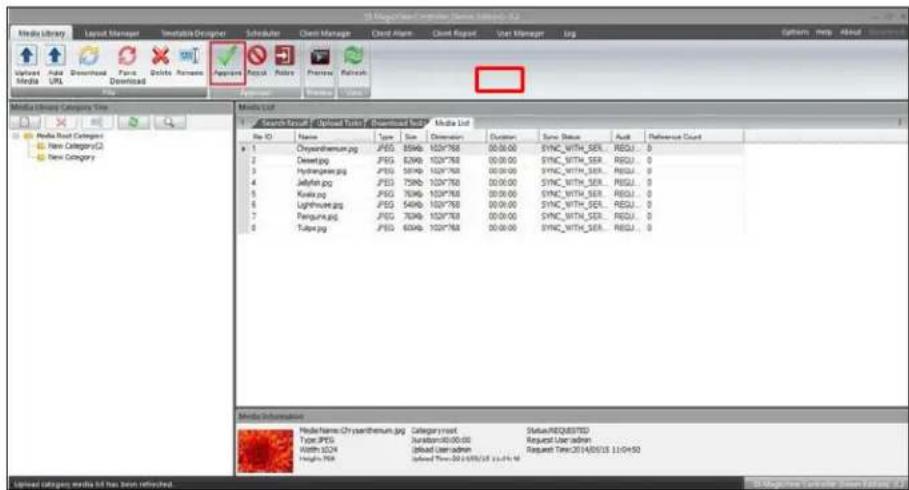
Figure 3.3-5
- Select the file or URL requesting the approval in the window.
- Select Approve on the menu bar.
The file or URL is now approved for layout designs.
3.4 Creating/Managing Layouts
Before playing the multimedia content on the Client, users need to design their multimedia content in the form of Layouts. A layout contains all the multimedia files and their corresponding playback information.
Creating a new layout
- Log into the Controller on Computer3 by entering the existing user account and password.
- Click the Layout Manager tab.
- Create a new Category1 in the Layout Category Tree.
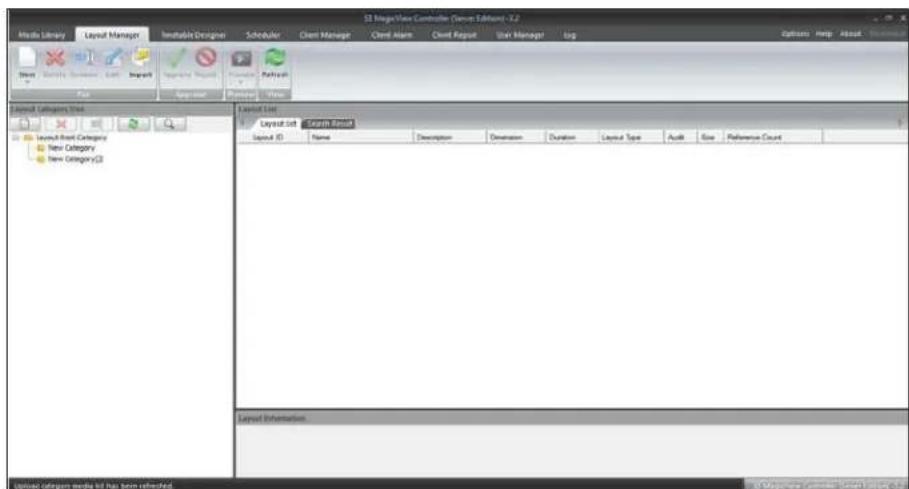
Figure 3.4-1
- Select New on the menu bar to open the Designer page.

Figure 3.4-2
- In the Properties window, enter a name for the new layout: Layout1 and type a description for the layout.

Figure 3.4-3
- Set the size to 1920x1080, and Background Color to black for the layout in the Properties window.

Figure 3.4-4
- Search for multimedia content in the Media Category window (these files are approved in Media Library).

Figure 3.4-5
- Drag the multimedia content from the Media Category window into the layout.
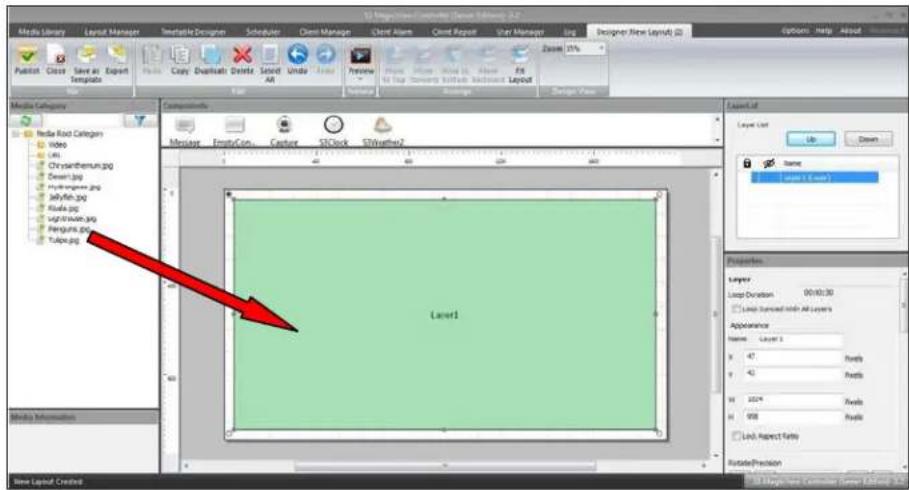
Figure 3.4-6
- Edit the settings for the newly created layer (for more information, refer to section 4.2 Layer).
- After completing the design of your layout, select one of two options to save/publish the layout:
Option 1. Click the Publish menu button to save the layout to the server.
Option 2. Export the layout, formatted as an XML file to the local drive.
Option 1 example:
To save the layout to the server, click the Publish menu button.
- Click the Yes button to preview the layout.

Figure 3.4-7
- Click the OK button to continue.

Figure 3.4-8
- The layout will be previewed in a separate window. Click the OK button to save/publish it.
Tip: One layer can contain more than one component.
Notes:
- New layers cannot be created directly above an existing layer.
- Different components have unique settings.
Managing layouts
S3 MagicView allows users to manage layouts using the Layout List tab.

Figure 3.4-9
Double click the layout to delete, rename, approve or preview.
Approving Layouts
Layouts must be approved by an administrator before they can be added into a timetable or schedule. Administrators may approve the layouts using the following steps:
- Click the Layout Manager tab.
- Select the Layout1 in the Layout List window.
- Select Approve on the menu bar.
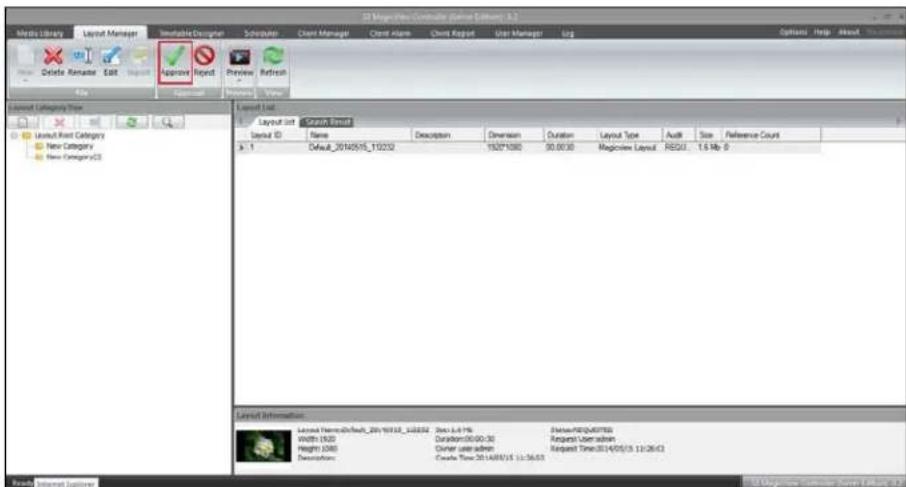
Figure 3.4-10
The Layout1 is approved and may now be used in the Timetable Designer and the Scheduler page.
3.5 Editing Timetables/Schedules
This section describes how to create and edit a timetable and a schedule. A timetable consists of multiple layouts with a playback order, and a schedule may include multiple layouts and timetables.
Editing timetables
A timetable consists of multiple layouts with a playback order and the duration of each layout. There can be no empty timeslots between the layouts.
-
Log into the Controller on Computer3 by entering the existing user account and password.
-
Click the Timetable Designer tab.

Figure 3.5-1
- Select New on the menu bar to setup a new timetable.
-
Select the approved Layout1 in the Layout List on the right side.
-
Drag Layout1 to the main window.

Figure 3.5-2
- Set the duration and number of times to repeat this layout in the Timetable Item Edit window.
- Repeat with additional layouts if desired.
- Click the Publish button.
- Type: Timetable1 for the New Name to create a new timetable.

Figure 3.5-3
- Click the OK button to create the timetable.
A new timetable, Timetable1, is created.
Approving timetables
Timetables need to be approved by an Administrator. The Administrators can approve a timetable using the following steps:
- Click the Timetable Designer tab.
- Select the Timetable1 in the Timetable Category window on the left side.
- Select Approve on the menu bar.

Figure 3.5-4
Timetable1 is approved and may now be used in the Scheduler page.
Editing schedules
- Log into the Controller on Computer3 by entering the existing user account and password.
-
Click the Scheduler tab.
-
Double-click a client group, such as Default, to open its schedule.
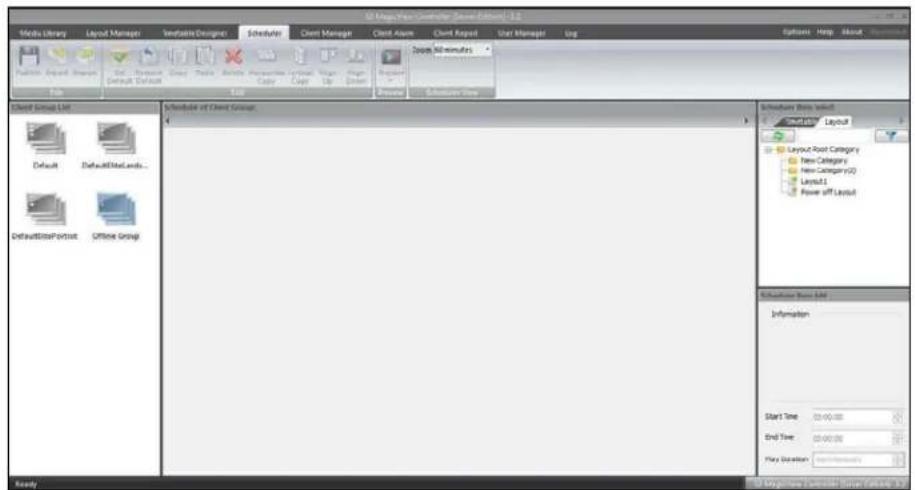
Figure 3.5-5
- Select the date for the schedule.

Figure 3.56
-
Search the Timetable1 in the Scheduler Item Select window.
-
Drag the Timetable1 to the main window.
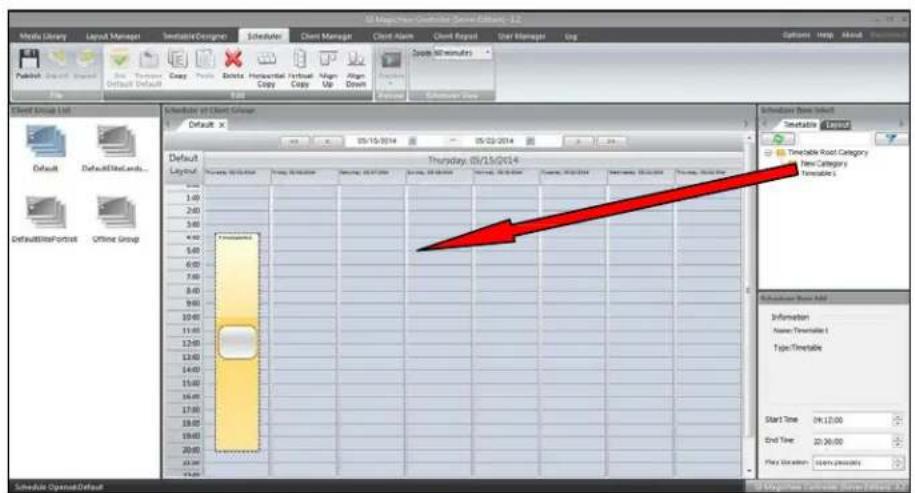
Figure 3.5-7
- Set the playing time of the timetable in the Scheduler Item Edit window.

Figure 3.58
- Select the Layout tab in the Scheduler Item Select window, and find the Layout1.
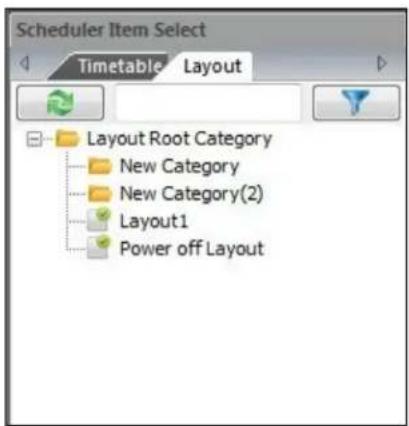
Figure 3.5-9
Note:
Power off Layout is the default layout of S3 MagicView. User can arrange Client into dormancy by the Power off layout.
- Drag the Layout1 to the main window.
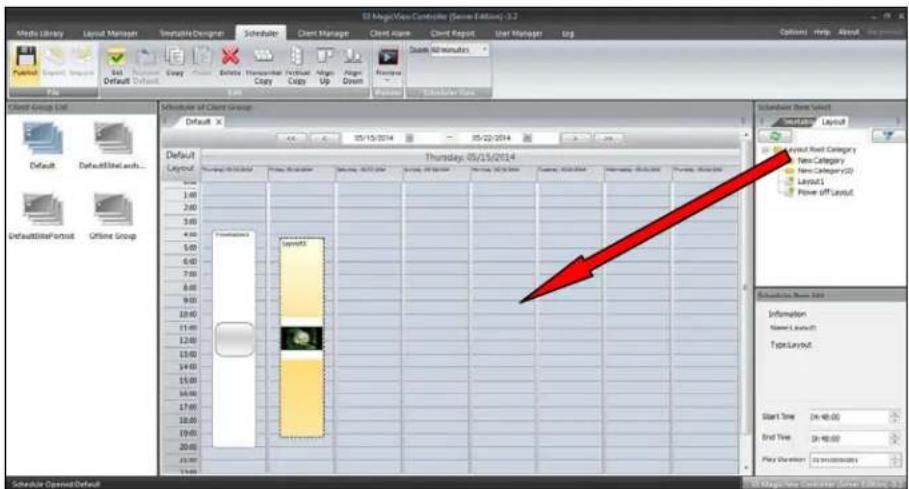
Figure 3.5-10
-
Set the playing time of Layout1 in the Scheduler Item Edit window.
-
Select Publish on the menu bar.
Notes:
-
The Horizontal Copy and Vertical Copy functions are provided to help quickly duplicate layouts horizontally and/or vertically in the Scheduler.
-
The File menu in the Scheduler window is different between the online schedule and the offline schedule. (For more information, refer to the File section).
3.6 Register Clients
A Client is an application run on the computer dedicated to display the digital signage contents. Users must register a Client upon initialization. For details, please refer to section 6.3 Client Registration.
Register client
Double-click the ClientConfigure.exe shortcut to bring up the Client Registration dialog.

Figure 3.6-1
Step 1. Enter the Controller Server settings:
Server Name or IP
The Server Name (or IP) to communicate with the Server. The default value is a local IP address: 127.0.0.1.
Server Port
The port by which the Client communicates with the Server.
Step 2. Enter the Account settings:
| User Name | The name of the authorized user to register clients. |
| Password | The password of the name to register clients. |
Step 3. Enter the Client Information:
| Client Name | A unique name for the Client. |
| Client Location | The physical location of the Client. |
| Company | The Client's company name. |
| Admin Name | Administrator's name. |
| Telephone | The phone number of the administrator. EmailThe e-mail address of the administrator. |
| Rotation | The orientation (any degrees) of the S3 |
| MagicView | |
| images/video clips. |
Step 4. Enter the Local Settings:
| Local Library | The local path for saving schedules and layouts. |
| Update time | The time when the Client updates the schedule. |
| Mode Type | Online Client or Offline Client. |
| Min Free Disk Space | The free disk space below which the client will send an alert to the server. |
| Min FPS | The number of Frames Per Second below which the client will send an alert to the server. |
| Hardware ID | The unique identification of the machine. |
| COMPort | COMPort defaulted in machine |
Step 5. Alarm setting Set warning threshold upon client machine HW
Step 6. Enter the License information:
| Check License | When the Check License button is clicked, users can retrieve the maximum number of monitors that may be connected to the Client system. |
Step 7. Select the Language to display on the UI:
| Language | Three languages supported: English, Chinese, and Japanese. |
Step 8. Shortcuts:
Close Client
The shortcut to ESC the client
Note:
After the schedule is assigned to the group, all the online Clients in the group will download the schedule at once. If a Client loses the network connection while the schedule is downloading, it will resume updating the latest schedule once it gets back online.
4. COMPONENTS
A component refers to all multimedia content supported by S3 MagicView . S3 MagicView supports a wide variety of multimedia content, such as images, videos and text. A majority of the popular formats is supported, including, but not limited to: JPEG, BMP, PNG, TIFF, AVI, H.264, VC-1, WMV, PCM, WMA and WAV. Images with transparent and semi-transparent areas (alpha channel) are also supported.
S3 MagicView does not include functions for creating or editing multimedia content. All multimedia content used in your layout must be generated and edited outside of S3 MagicView.
4.1 Layout
A layout contains all multimedia content and the display information. After layouts are assigned to a schedule, the client that is assigned to the schedule will download and play layouts.
Layout Properties
A layout has the following properties:
| • Duration | The duration property is used to control the playback time of the content. A layout's duration is dependent on the duration of the longest layer. |
| • Basic Information: | |
| Name | The layout name. |
| Category | Layouts can be classified into different categories. |
| Description | The information added by the user to describe the layout. |
| Client Size | The client's resolution in the layout. |
| • Size and Color: | |
| Standard size | The most commonly used size. |
| Custom size | A unique size user can assign to the layout, independent of the standard size. |
| Keep Aspect Ratio | Maintain the aspect ratio of the layout while playingon a client with a different aspect ratio. |
| Background Color | The background color displayed on the client. |
| • Layer List | A list of all layers defined in the layout. |
Form4.1-1
4.2 Layer
As the basic element of the layout, a layer contains one or more types of multimedia content. The contents in the layer inherit the properties of that layer.
Layer Properties
A layer has the following properties:
| · Loop Duration | The sum of all the durations of the components in the layer. |
| · Loop Synced With All Layers | If checked, the layer will loop until all layers are complete. |
| · Position and Size: | |
| X | X coordinate of the layer. |
| Y | Y coordinate of the layer. |
| W | Width of the layer. |
| H | Height of the layer. |
| Keep Aspect Ratio | Maintain the aspect ratio of the layer when a component with a different aspect ratio is inserted. |
| · Contents: | A list of all contents in the layers. |
| Insert empty content | Insert an empty content as a time delay. |
| Delete | Delete the content. |
| Move Item Up | Move the play order of the item to play earlier. |
| Move Item Down | Move the play order of the item to play later. |
| · Detail | List the detailed information of the item. |
| · Duration | The length of time that the layer lasts. |
| · Transition In: | |
| Duration | The length of time the Transition In lasts. |
| Type | The type of the Transition In effect. |
| Direction | The direction of the Transition In effect. |
| • Transition Out: | |
| Duration | The length of time the Transition Out lasts. |
| Type | The type of the Transition Out effect. |
| Direction | The direction of the Transition Out effect. |
Form4.2-1
Notes:
-
One layer can contain several multimedia contents, but only one of those contents will be played at one time.
-
The order of the contents in the layer properties is the same as the playlist order of the contents. This order may be changed by moving the contents up or down.
-
All the contents in the layers will inherit the properties of the layer; therefore, the Position and Size, and Contents properties are not listed in the following sections.
-
Audio contents do not contain Transition properties as they are not displayed on the screen.
4.3 Images
Images may be used as backgrounds or superimposed on top of other images. The level of transparency, scaling and rotation may be set for all images.
Image Formats
S3 MagicView accepts a majority of the standard image formats, e.g., JPEG, BMP, GIF, PNG and TIFF.
Notes:
-
S3 MagicView does not support animated images.
-
The maximum resolution of an image file is 4kx2k (ARTiGO machine only supports 2kx2k); the maximum color depth is 32 bpp and 8 bits per channel.
Image Properties
An image has the following properties:
| • Play Settings: | |
| Background Color | The background color displayed on the client. |
| Original Aspect Ratio | Maintain the image’s playback aspect ratio. |
| Transparency | The transparency level of the image. |
Form4.3-1
4.4 Video
S3 MagicView can play back video clips saved in a Windows Media (DirectShow) format. Such files are commonly referred to as a movie.
Video Formats
• S3 MagicView supports a majority of the standard video formats:
| Format | Video codec | Audio codec | Container |
| H.264/AVC | H.264/AVC | PCM | .mkv.avi |
| WMV | WMV | WMA | .wmv.avi |
| VC-1 | VC-1 | WMAPCM | .wmv.avi |
Form 4.4-1
Video Properties
A video clip has the following properties:
| • Play Settings: | |
| Background Color | The background color displayed on the client. |
| Original Aspect Ratio | Maintain the video's playback aspect ratio. |
| Transparency | The transparency level of the video. |
Form 4.4-2
4.5 Messages
Users can publish information through a Message. Messages provide special text effects, such as scrolling, transparency and font adjustment.
Note: The maximum text size is 500 characters.
Message Properties
Messages have the following properties:
| • Play Settings: | |
| Background Color | The background color displayed on the client. |
| Transparency | The transparency level of the message. |
| • Text Settings: | |
| Text | The text message to be displayed. |
| Font | Text font. |
| Color | Text color. |
| Size | Text size. |
| B | Font style: Bold |
| I | Font style: Italic |
| U | Font style: Underline |
| Speed | Text scrolling speed. |
| Transparency | Text transparency. |
| Actual Run Time | Set the required time to display the complete message. |
Form 4.5-1
4.6 PowerPoint
S3 MagicView support Microsoft PowerPoint file (PPT) playback. These type contents should be created by PowerPoint SW; Client needs to install PPT viewer but not PowerPoint to display it.
Notes:
- If the size of the Web Browser page is larger than 2kx2k, S3 MagicView will automatically reduce the size to 2kx2k in order to play back at an optimal performance level.
- S3 MagicView could not support PowerPoint Viewer 2010.
PowerPoint Properties
PowerPoint files have the following properties:
| • Play Settings: | |
| Background Color | The background color displayed on the client. |
| Transparency | The transparency level of the PowerPoint file. |
Form 4.6-1
4.7 Flash
S3 MagicView supports Flash content with the Adobe® Flash® Player on the client before running the layout.
Note:
If the size of the Flash content is larger than 4kx2k, S3 MagicView will automatically reduce the size to 4kx2k (ARTiGO machine only supports 2kx2k) in order to play back at an optimal performance level.
Flash Properties
Flash content has the following properties:
| • Play Settings: | |
| Background Color | The background color displayed on the client. |
| Transparency | The transparency level of the Flash. |
Form 4.7-1
4.8 WebBrowser
S3 MagicView can display a WebBrowser file by using Microsoft's Internet Explorer® web browser. WebBrowser contents can be a local file or a URL. Users can upload the URL address to Media Library and then add the Web contents to the layout.
Notes:
- IE playback support IE8, other version might cause unknown issues.
- Local Web content should use .mht, the HTML format will cause pictures and videos loss.
- If the size of the WebBrowser page is larger than 2kx2k, S3 MagicView will automatically reduce the size to 2kx2k in order to play back at an optimal performance level.
WebBrowser Properties
A WebBrowser file has the following properties:
| • Play Settings: | |
| Background Color | The background color displayed on the client. |
| Transparency | The transparency level of the WebBrowser. |
Form 4.8-1
4.9 Clock
S3 MagicView has a clock component allowing you to insert a digital or analog clock into your layout.
Clock Properties
A Clock component has the following properties:
| • Play Settings: | |
| Background Color | The background color displayed on the client. |
| • Configure: | |
| Language | The language used to display the date and week. |
| Background | Show the clock with its default background or a transparent background. |
| Time zone | Select the time zone of the clock. |
| Clock Type | Show an analog or digital clock. |
| Show Date and Day of the Week | Display the date and day of the week on the clock. |
| 24-hour clock | Show the time in 24-hour mode or 12-hour mode. |
Form 4.9-1
4.10 Empty
An Empty component may be created to delay the start time of contents in a layer. For example, setting up 10-second Empty content will delay the playback of the content after the Empty content by 10 seconds.
4.11 Audio
Audio is used in S3 MagicView in the form of a background sound. Simply bring the sound file into S3 MagicView and add the file in the Properties window of the layout. S3 MagicView can support standard audio file formats such as PCM, WMA and WAV.
Audio Properties
An Audio component has the following properties:
| • Play Settings: | |
| Volume | The audio playback sound level. |
Form 4.11-1
4.12 S3Weather
The S3Weather component can be used to retrieve the weather information for the selected location from the Internet and output the data as a layer.
S3Weather Properties
An S3Weather component has the following properties:
| Configure S3Weather: | |
| Area | Select the area of the location. China or International. |
| Continent | Select the continent of the location. |
| Location | Select the location to display its weather information. |
| Proxy: | |
| Proxy IP | The proxy address through which the S3Weather |
| Port• Transparent | connects to the Internet.The port by which the S3Weather communicates with the Server on the Internet.Display S3Weather component with a transparent background. |
Form 4.12-1
4.13 RTSP (Capture)
The RTSP component can be used to monitor Public safety for surveillance area. This is new feature of S3 MagicView 3.2 Version.
Capture Properties
Controller computer must install the S3 Capture card if the user needs to use this function. For details please refer to 《Capture card Installation guide》.
Drag the Capture component into layout window. Open the Configure Capture dialog box. User can choose one Video signal to play.
Note: One Capture can input 4 lines Signal source.
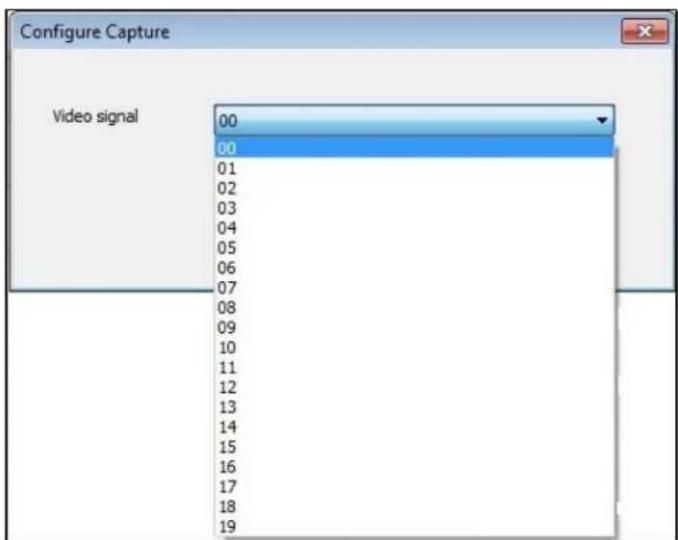
IP Camera list
| Label | Model | Resolution |
| BOSCH | NBC-265-P 720P | |
| GE | TVC-MP2B-S 1080P | |
| hikvision | DS-2CD883F 1080P | |
| GeoVision | GV-BX220D | 1080P |
Form 4.13-1
5. SERVERS
A Server acts as the interface between the Clients and Controllers.
Servers save all the media files (as layouts), controller database, system logs and other information.
5.1 Server types
There are two types of servers required to configure and start S3 MagicView :
- Media server
The Media server is a file server. All multimedia content, layouts and schedules are stored in the Media server, which provides the content for clients during the downloading process.
- Controller server
The Controller server stores the controller database, the system logs and media information. It also provides the authorization for users to access the Media server.
5.2 Server configuration
Users must configure the servers before using the servers. This section describes how to configure the Controller and Media Servers.
Note: Disable UAC, and Reboot the system before configuring the server setting.
The Controller Server Setting dialog is shown below:

Figure 5.2-1
• Controller Server Port
Users may change the port assignment of the Controller server to avoid a conflict with other web services. The default Controller Server Port is 2000.
- MySQL Server configuration
Name or IP: the address through which the Controller Server connects the database. The default MySQL Server value is localhost.
Port: the default MySQL Server Port value is 3306.
User Name and Password: the User Name and Password are requested when you connect MySQL. The default value is S3S3 MagicView 3 for both user name and password.
Connection Pool Size: the number of databases simultaneous connected. The default value is 20.
5.3 Media Server Name or IP
The Controller Server needs the Media Server Name (or IP) to communicate with the Media Server. The default value is the local IP address: 127.0.0.1.
Media Server Port
This port is the Media Server Port for the Controller Server to visit.
Media server Configuration
The Media Server Setting dialog is shown below:
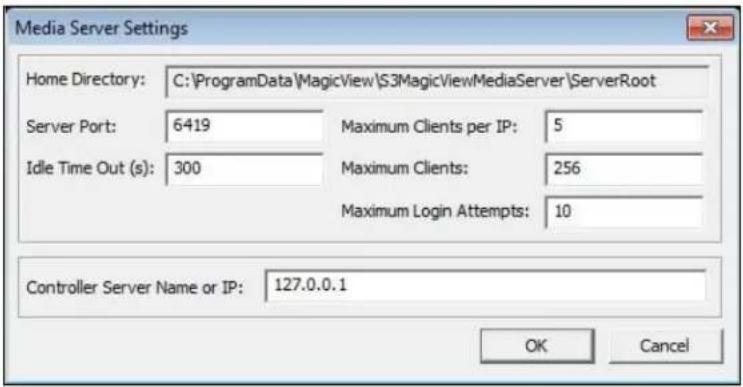
Figure 5.3-1
• Home Directory
The local path used by the Media Server to save files.
• Media Server Port
The port to communicate with the Media Server.
- Idle Time Out
The time after which the Media Server will be suspended.
• Max Clients Count per IP
The maximum numbers of clients for one IP address to access the Media Server at a time.
- Clients Max Count
The maximum number of clients that are allowed to access the Media Server at a time.
• Max Login Attempts
The maximum times a client may attempt to log in. If the number of log in attempts goes over this value, the client will be locked out for 1 hour.
• Controller Server Name or IP
The Media Server needs the Controller Server Name (or IP) to communicate with the Controller Server. The default value is a local IP address: 127.0.0.1.
6. CLIENTS
A Client is an application which runs on the computer dedicated to display the digital signage contents. The Client downloads the contents from the Media server and plays them according to the schedule.
6.1 Client types
There are two types of clients in S3 MagicView : an online client and an offline client.
- Online client
The online client connects to the network and communicates with the Control Server over a network to update the schedules and contents.
- Offline client
The offline client is not connected to the network. This client will detect a removable device when it is connected and will automatically download the schedules and contents from the device.
Note:
For offline clients, the client application must be launched before the removable device is inserted in order for the client application to automatically download the schedules and contents from the removable device.
6.2 Activate Client
Connect your Client machine to access the Internet and activate the Client before running the client application. (VIA Platform does not need to activate the Client.) Steps:
- Double-click the "S3 MagicView Client Activator" shortcut on your desktop.

Figure 6.2-1
- Input the Activation Code (Please contact your agent for the code.)

Figure 6.2-2
- Click OK to activate the Client.
After registration, activation and grouping your clients, the last step is to launch the client application on Computer4. To do this, double-click the S3 MagicView Client shortcut on your desktop.
- For online clients, the client application will receive orders from the server and download the schedules and layouts automatically.
- For offline clients, users can connect a removable device to store the saved schedules. The client application will scan the device and download the schedules from the removable device.
Note:
If S3 MagicView 's Client.exe has been added to the Windows startup after the client installation package is completed, the client will be automatically
launched every time the Operating System loads. If the system shows a black screen on startup, press 'Esc' key to stop running the client.
6.3 Client Registration
- Run: ClientConfigure.exe on Computer4.
Start the Client by launching ClientConfigure.exe in the S3 MagicView installation directory. If you are using the default directory, the file would be:
located in C:\Program Files\S3 Graphics Co., Ltd\S3 MagicView \S3 MagicView
Client.
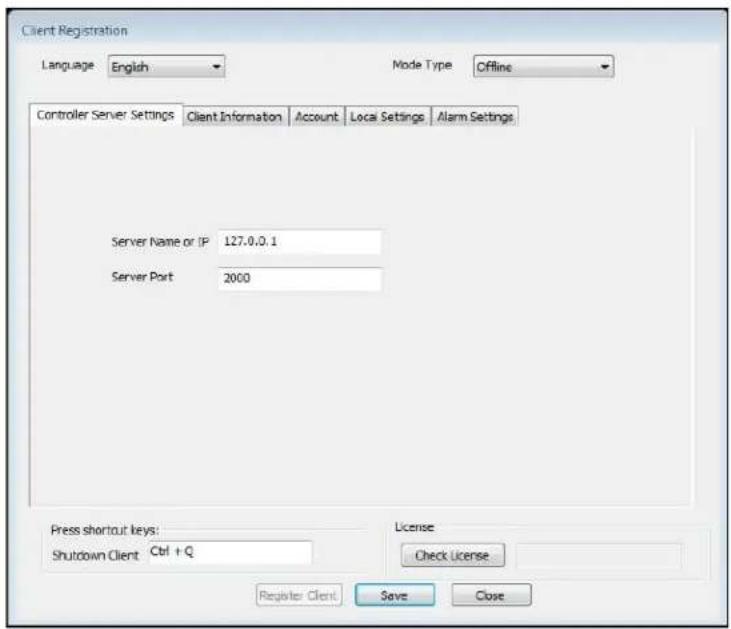
Figure 6.3-1
- In the Client Configuration dialog box, enter the Controller Server settings:
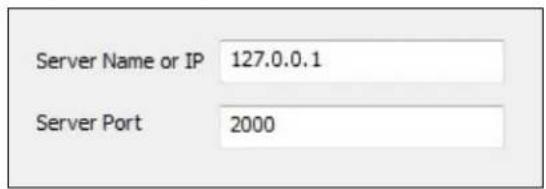
Figure 6.3-2
• Controller Server Name or IP: 127.0.0.1
• Controller Server Port: 2000
3. Enter Account information:

Figure 6.3-3
- User Name: client
- Default password: client
4. Enter Client information:

Figure 6.3-4
User could customize the items shown in the above image and save the config, related info will be shown in controller accordingly.
5. Enter your Local settings:
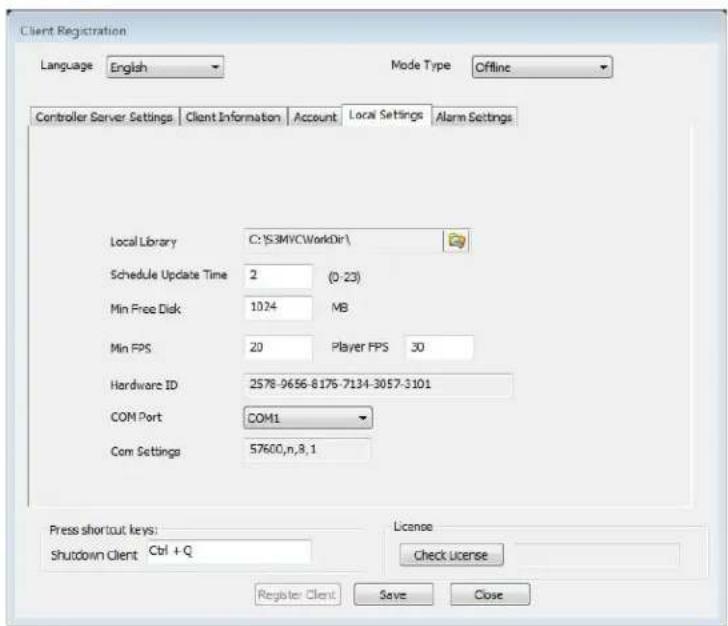
Figure 6.3-5
- Mode Type: Online. Online Client can be real-time controlled by Controller. Offline Client cannot be real-time controlled, but user can release schedule by USB store.
- Local Library: (the local folder to save the schedules, layouts and contents)
• Schedule Update time: Default time is 2 (hours)
• Min Free Disk Space: 1024 MB - Min FPS: 20
• Hardware ID: (S3 Client configuration will automatically assign an ID)
• COM The COM port in Client
• COM setting Default value is: 57600,n,8,1
Notes:
- There are both offline mode and online mode in the setting. Online mode clients could be controlled online, while offline mode only could be accessed by removal devices.
- The Hardware ID is a unique number to identify the client machine.
6. Enter Alarm Setting

Figure 6.3-6
User can add CPU Temperature、Motherboard Temperature、HDD Temperature、GPU Temperature、Fan Speed、CPU Usage、Memory Usage Value into system for controlling. If the hardware temperature or usage is over the setting value, the alarm info will show on Controller Client Alarm page

Figure 6.3-7
P0 is the third level alarm: Client starts alarm every one minute, if user does nothing, Client will automatically shutdown after 5 minutes. (e.g.: Motherboard Temperature >=100 degree)
P1 is the second level alarm: Client starts alarm every 5 minutes, but system remains running. (e.g.: Motherboard Temperature > = 90 degree)
P2 is the first level alarm: Client starts alarm every 15 minutes, but system remains running. (e.g.: Motherboard Temperature >=80degree)
The alarm threshold value could be customized.
- Click the Register Client button.
- Confirm that the Client Server and the Controller Server are in the same time zone; click the OK button to continue.
- After the client registration is completed, the newly created client will be displayed in the Default group on the Client Manager page of the Controller on Computer3.
6.4 Rs232 Tools
This section describes how to use Rs232Tool to Control S3 MagicView Client playback. To use Rs232 tool, a control computer connected to Client computer by Rs232 cable is required.
Note: This control computer is not the S3 MagicView Controller computer.
Rs232 settings on Client machine
Rs232 tool is not needed by S3 MagicView Controller, only through Rs232 control line can control Client content playback. After installing the Client on Client machine, Rs232Tool will be created on installation path. User need to copy this Rs232Tool to control the computer.
- Select the correct COM Port on Client Registration->Local setting interface, Com Setting is the default setting.

Figure 6.4-1
- Open Device Manage->Disk Manage->Port, select the Com that Client machine uses, right click property, and open Port settings, select the following Com setting on Client Registration interface.
Figure 6.4-2
Rs232 setting on control computer
- Double click Rs232Tool on control computer, select the COM Port that is used on control computer.
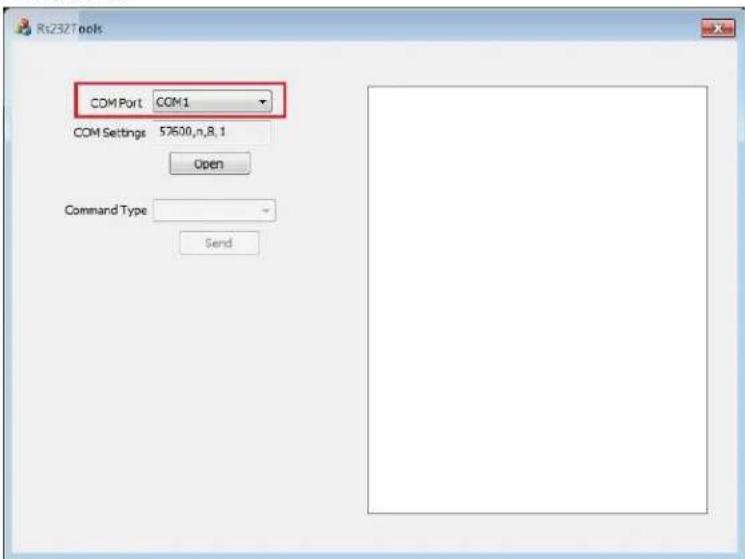
Figure 6.4-3
- Open Device Manage->Port, select the COM Port that is used on control computer, right click property, and open Port settings, select the following Com setting on Client Registration interface.
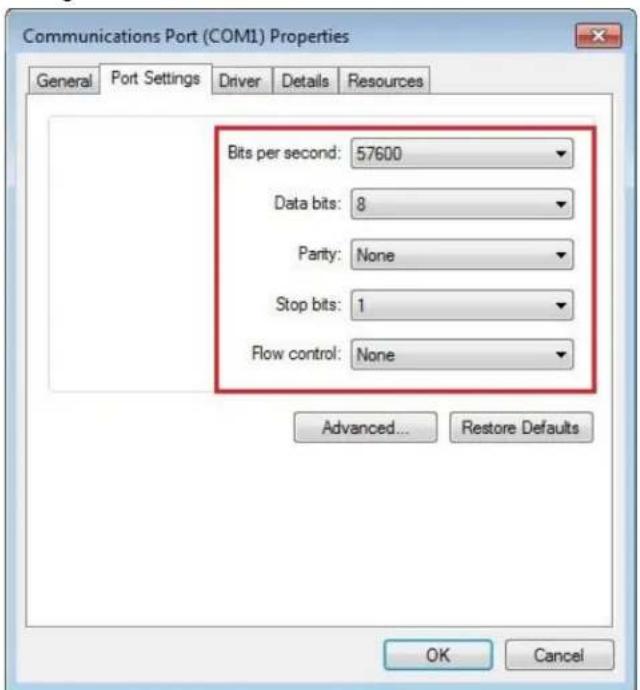
Figure 6.4-4
Rs232 Tool Operation
- After setting the COM Port, click Open button to launch Rs232 function.

Figure 6.4-5
- Select Command Type
Load: Client will play new content
Resume: Client starts to play the schedule that publishes on Controller
Stop: Client stops to playback
Sleep: Client enters into a state of dormancy. Wake up client manually or by controller.

Figure 6.4-6
- Command Type is Load. User can select Layout ID to load the layout of S3 MagicView Controller. Click Send button, after OK! is shown on right zone, it means that load is successful and Client will play the Layout.
Note: the Layout ID is Layout ID on S3 MagicView Controller Layout Manage list.
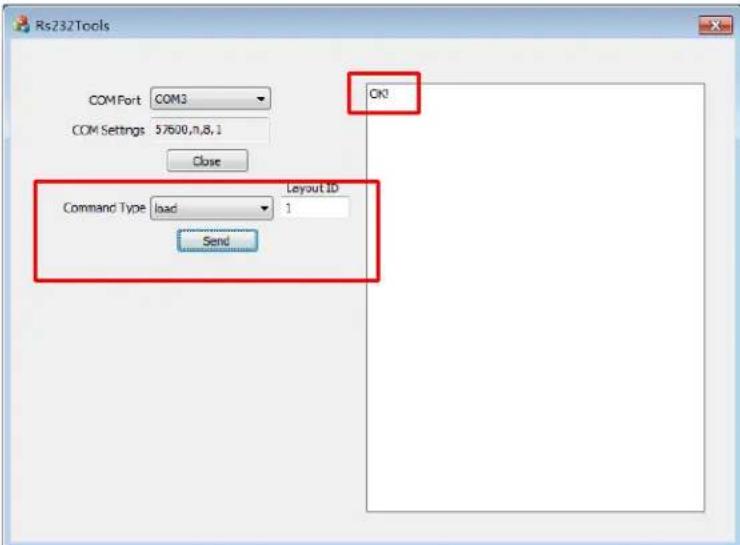
Figure 6.4-7
6.5 Setting Client Special screen
S3 MagicView 3.2 supports setting client special screen, user can set as below steps:
- Right-Click Screen resolution on Client machine desktop, check the Change the appearance of your displays. User can change the Client group position by dragging the window
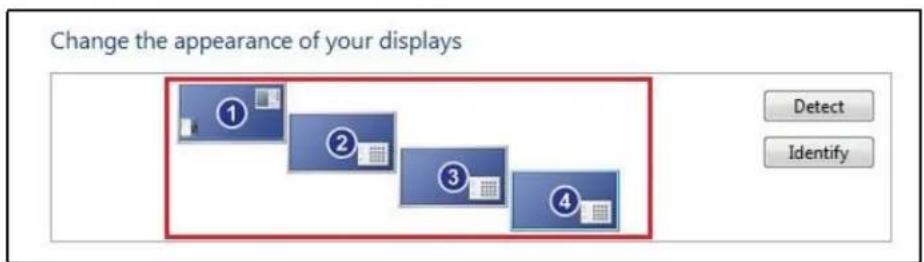
Figure 6.5-1
- Launch Controller; create a new Designer, open Size and Color item from properties list on right side. Click Choose Client Size, choose one Client that user needs to change. After clicking OK, the Client Special screen-Monitor Slot mode will be shown on design window.

Figure 6.5-2

Figure 6.5-3

Figure 6.5-4
- User can drag layer into Special screen mode and publish to Client to play
6.6 Grouping a client
Since schedules are assigned by group, you need to assign a new client or move an existing client from group to a group before distributing the schedule.
To move an existing client to a group:
- Log into the Controller on Computer3 by entering the existing user account and password.
- Click the Client Manager tab.
- Click Default in the Group List window and select Client1 in the Client State View window.
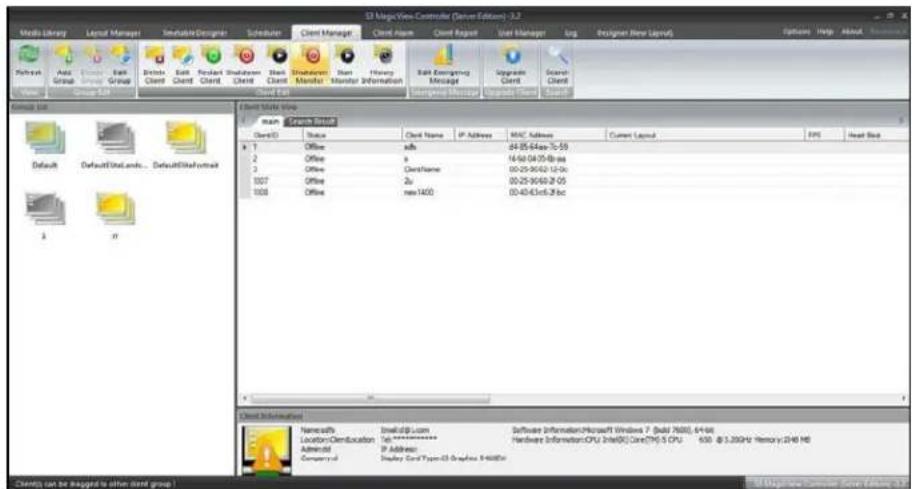
Figure 6.6-1
- Click the Add Group button and type the name Group1 for the new group

Figure 6.6-2
- Drag Client1 to Group1.
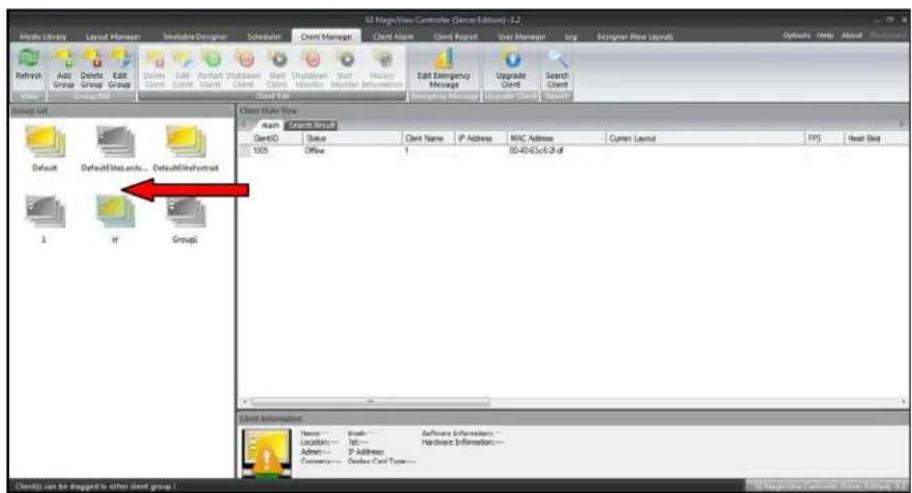
Figure 6.6-3
6.7 S3 MagicView Client Web Manager
After running the client, user can manage and monitor the client using S3 S3 MagicView's Client Web Manager.
Please enter following address in Firefox, Chrome or other Non-IE browsers: https://IP:38081 or 38080, for example: https://10.3.8.1:38081。
The initial password: 123456 should be used when logging into the Client Web Manager for the first time.
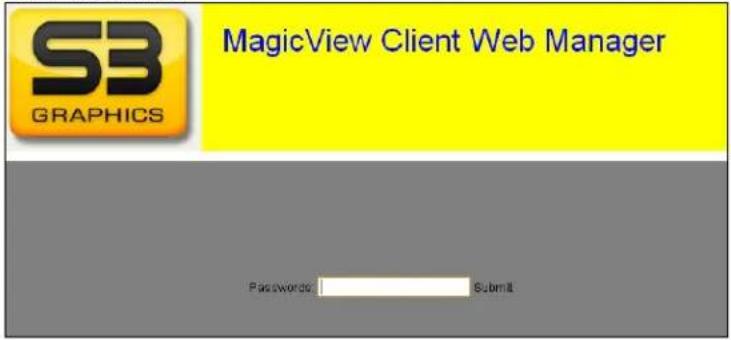
Figure 6.7-1
1 Overview page
The Overview page consists of three tabs. System, Network and Server.
System tab:
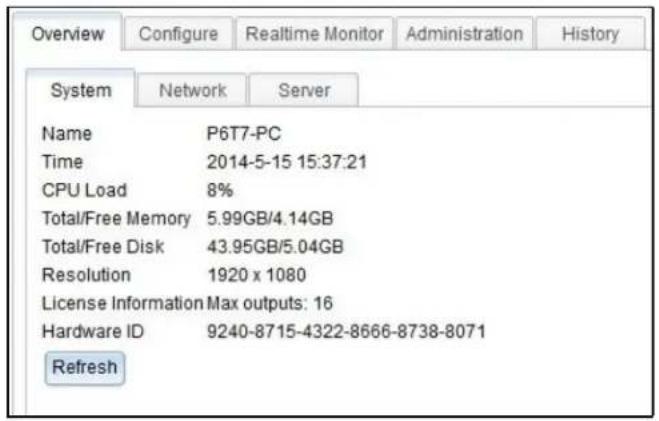
Figure 6.7-2
Name Computer name of the Client.
Time Current time of the Client.
CPU Load Current CPU usage.
Total/Free Memory Total and free memory size.
Total/Free Disk Total and free disk size.
Resolution Screen resolution of the Client.
License Information Maximum number of monitors that may be connected to the Client system.
Hardware ID Automatically generated by S3 MagicView.
Refresh button Updates the system information.
Network tab:
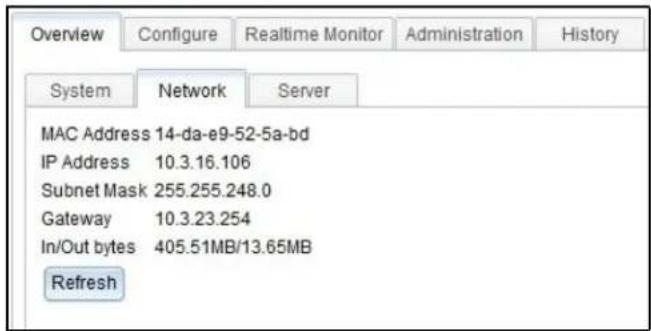
Figure 6.7-3
MAC Address MAC address of the Client.
IP Address IP Address of the Client.
Subnet Mask Subnet Mask of the Client.
Gateway Gateway of the Client.
In/Out bytes Upload and download data transfer.
Refresh button Updates the network information.
Server tab:

Figure 6.7-4
Controller Server IP Address
IP Address of the Controller Server.
Controller Server Connection
Connection status between the Client and Controller Server.
Refresh button
Updates the Controller Server information.
2 Configure page
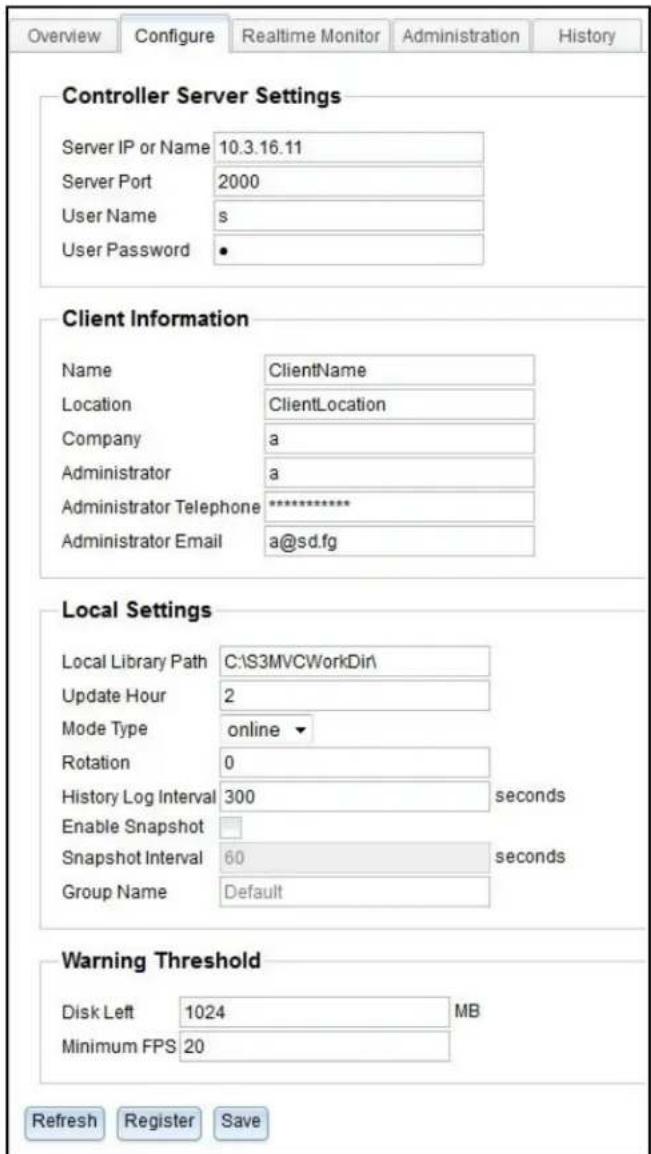
Figure 6.7-5
Controller Server Settings:
| Server IP or Name | Server IP or Server Name to communicate with the Server. The default value is the local IP address: 127.0.0.1. |
| Server Port | The port by which the Client communicates with the Server. |
| User Name | Name of the authorized user to register User Password Password of the name to register clients. (Default: client) |
| Client Information: | |
| Name | A unique name for the Client. |
| Location | Physical location of the Client. |
| Company | Client's Company. |
| Administrator | Administrator name. |
| Administrator Telephone | Administrator's Phone number. |
| Administrator E-Mail | Administrator's E-mail address. |
| Local Settings: | |
| Local Library Path | Local path for saving schedules and layouts. |
| Update Hour | The time when the Client updates schedules. |
| Mode Type | Online Client or Offline Client. |
| Rotation | The orientation (0, 90, 180, 270 degrees) of the S3 MagicView images/video clips. |
| History Log Interval | Time interval of the history log. |
| Enable Snapshot checkbox | If checked, automatic snapshots are enabled. |
| Snapshot Interval | Time interval between automatic snapshots. Range: 60 to 3600 seconds. |
Warning Threshold:
| Disk Left | The free disk space below which the client will send an alert to server. |
| Minimum FPS | The number of Frames Per Second below which the client will send an alert to server. |
| Refresh button | Updates the Client configuration. |
| Register button | Registers and sends all changes to the Controller server for the online Client. |
| Save button | Saves all changes to the local drive for the offline Client. |
3 Real-time Monitor page

Figure 6.7-6
| CPU Usage | Current CPU usage. |
| Memory Usage | Current Memory usage. |
| Disk Usage | Current Disk usage. |
| Fan Speed | Current CPU Fan speed. CPU |
| Temperature | Current CPU temperature. |
| Motherboard Temperature | Current Motherboard Temperature. |
GPU Temperature
Current GPU temperature. HDD
Temperature
Current HDD temperature.
Manually Snapshot
Generate a snapshot manually.
Snapshot area
Show snapshot in this area; the snapshot will update automatically according to the snapshot Interval setting.
4 Administration page

Figure 6.7-7
Tools:
Reboot
Reboot Client machine.
Shutdown
Shutdown Client machine.
Hibernate
Hibernate Client machine.
Password:
Old Password
Input old password.
New Password
Input new password.
New Password Confirm
Input new password again.
OK
Confirm the change.
Upgrade:
The S3 MagicView Client Web Manager provides a function to upgrade the Client remotely.
User can select the upgrade file and S3 MagicView will complete the upgrade process automatically.
Choose file
Choose the installation file for upgrade.
Submit
Start the upgrade. The Client machine will reboot automatically after the upgrade is completed.
5 History page
The Client will save information to a log file automatically according to the Log Interval setting.
| Overview | Configure | Realtime Monitor | Administration | History | |||||||
| ID | Timestamp | CPU Usage | Memory Usage | Disk Usage | Net In bytes | Net out bytes | CPU Temperature | Motherboard Temperature | HDD Temperature | GPU Temperature | Fan Spe |
| 1 | Wed Aug 08 2012 14:35 58 GMT+0800 (China Standard Time) | 66 | 65 | 34 | 50448470 | 6773366 | N/A | N/A | 42 | N/A | N/A |
| 2 | Wed Aug 09 2012 14:37 04 GMT+0800 (China Standard Time) | 29 | 64 | 34 | 50686475 | 6804855 | N/A | N/A | 42 | N/A | N/A |
| 3 | Wed Aug 08 2012 14:38 43 GMT+0800 (China Standard Time) | 20 | 67 | 34 | 50692838 | 6824853 | N/A | N/A | 42 | N/A | N/A |
| 4 | Wed Aug 08 2012 14:40 40 GMT+0800 (China Standard Time) | 12 | 66 | 34 | 50713859 | 6842889 | N/A | N/A | 42 | N/A | N/A |
| 5 | Wed Aug 08 2012 14:45.41 GMT+0800 (China Standard Time) | 25 | 67 | 34 | 51020146 | 6928025 | N/A | N/A | 42 | N/A | N/A |
Figure 6.7-8
Client History includes the following information:
• ID
- Timestamp
- CPU Usage
- Memory Usage
- Disk Usage
- Net in bytes
- Net out bytes
- CPU Temperature
- Motherboard Temperature
- HDD Temperature
- GPU Temperature
- Fan Speed and
- Layout ID.
7. CONTROLLER
The Controller is a standalone application and serves as the main user interface control of S3 MagicView. It can be launched without the Server and Client installed. The Controller may run on any machine connected with S3 MagicView Servers and Clients through network and on either the same computer on which the servers run or just run on the administrator's laptop.
7.1 S3 MagicView Main Menu
Upon initialization of S3 MagicView, eight major pages are displayed on the left side of the main menu bar:
• Media Library
- Layout Manage
- Timetable Designer
- Scheduler
- Client Manager
- Client Alarm
- Client Report
- User Manager
- Log

Figure 7.1-1
Functions provided on the right side of the main menu bar are: Options, Help, About and Reconnect.

Figure 7.1-2
- Options
Common
Sets the root working directory, server name/IP and port.
Designer
Sets the display settings of the grid.
Client Manager Sets Auto Refresh duration for the Controller information.
Language Sets the display language.
- Help S3 MagicView User Manual for user reference.
- About Shows the S3 MagicView version number.
- Reconnect Reconnects to the Controller server.
7.2 Media Library
The Media Library page manages the upload and download of multimedia files. All multimedia files, e.g., video clips, pictures and audio files, are uploaded into the Media Library. From here, contents may be edited on the Controller and played back on the Client.
Windows

Figure 7.2-1
Media Library Search bar
The Media Library Search bar allows you to search the multimedia files by name, category, owner, size, type, heights, width, status and date.
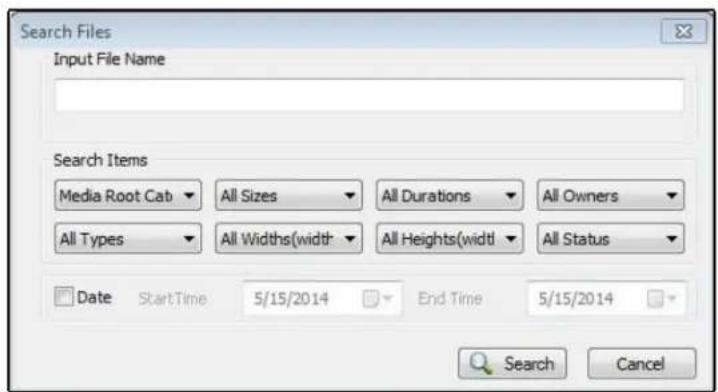
Figure 7.2-2
Media Library Category Tree
All multimedia files are uploaded onto the server and separated by categories. The Media Library Category tree lists the categories and provides functions: New, Delete, Rename, Refresh and Search.

Figure 7.2-3
- New Creates a new category folder.
- Delete Deletes the selected category folder.
- Rename Renames the selected category folder.
- Refresh Refreshes the category tree.
- Search Searches for the specified media file.
Media List window
The Media List window contains tabs to show the Media files and their status:
- Search Result tab
- Upload Tasks tab
- Download Tasks tab
• Media List tab.
| Media List | |||||||||
| File ID | Search Result | Upload Tasks | Download Tasks | Media List | |||||
| Name | Type | Size | Dimension | Duration | Sync Status | Audit | Reference Count | ||
| 35 | [大话西游之仙兽奇读].A.CHI AVI | 19.8Mb | 900 * 540 | 00:01:32 | NOT AVAILABLE_IN_LOC/APPROVED | 1 | |||
| 36 | gidtzl.awf | ShockWave | 1.9Mb | 450 * 300 | 00:03:12 | NOT AVAILABLE_IN_LOC/APPROVED | 1 | ||
| 37 | Hydrangeas.jpg | JPEG | 581Kb | 1024 * 758 | NOT AVAILABLE_IN_LOC/APPROVED | 1 | |||
| 38 | Sample1.ppt | ppt | 636Kb | NOT AVAILABLE_IN_LOC/APPROVED | 1 | ||||
| 39 | GTHD_Concept_Digest_MovAMPEG-4 | 30.3Mb | 1920 * 1080 | 00:00:46 | NOT AVAILABLE_IN_LOC/APPROVED | 1 | |||
| 40 | CHD联盟.CHP@史密斯夫妇 AVI | 4402.3Mb | 1920 * 1088 | 00:38:10 | NOT AVAILABLE_IN_LOC/REQUESTED | 0 | |||
| 41 | Cora_Reef_Adventure_WMVWindows Media | 81.9Mb | 1280 * 720 | 00:01:45 | NOT AVAILABLE_IN_LOC/REJECTED | 0 | |||
| 42 | 魔力女战士-VC1_1080P.avi AVI | 500.8Mb | 1920 * 1080 | 00:03:09 | NOT AVAILABLE_IN_LOC/REQUESTED | 0 | |||
| 43 | http://WWW.SINA.COM URL | Ob | SYNC_WITH_SERVER REJECTED | 0 | |||||
| 44 | Wildlife.wmv Windows Media | 25.0Mb | 1280 * 720 | 00:00:30 | SYNC_WITH_SERVER REJECTED | 0 | |||
Figure 7.2-4
Search Result tab
The Search Result tab shows the search results of the Media Library Search, including NO., Name, Type, Size, Category, Dimension, Duration, Sync Status, Audit and Reference Count.
Upload Tasks tab
The Upload Tasks tab shows all currently uploading and uploaded contents and their information, including NO., Status, Name, Type, Size, Percent, Category, Dimension, Duration and Available.
Upload Tasks includes seven buttons:
- Refresh Refreshes all the uploading and uploaded contents.
- Start Restarts contents that are stopped.
- Stop Stops the uploading of content.
- Delete Deletes the selected content.

Figure 7.2-5
Download Tasks tab
The Download Tasks tab shows the currently downloading and downloaded
contents and their information, including NO., Status, Name, Type, Size, Percent, Category, Dimension, Duration, and Available.
Download Tasks includes seven buttons:
- Refresh Refreshes all the downloading and downloaded contents.
- Start Restarts the content that is stopped.
- Stop Stops the downloading of content.
- Delete Deletes the selected content.
![Media List Search Result Upload Tasks Download Tasks Media List Fl... / Status Name Type Size Percent Dimension Duration Available 4 Finished [蜜蜂电影].Bee.Movie.Matroska 28.4Mb/28.4Mb 100% 1024 * 576 00:01:05 True 23 Finished Sample_Slide_show_1.ppt 653Kb/653Kb 100% True](/content/2026/05/1090545/images/05b5a7404f6b08b6e57d11f5b30c5ab6da89ca8474f1e5102d5f5f572455e63e.jpg)
Figure 7.2-6
Media List tab
The Media List tab shows information for the multimedia contents for the category selected in the Media Library Category Tree, including NO., Name, Type, Size, Category, Dimension, Duration, Sync Status, Audit, and Reference Count.
| Media List | |||||||||
| Search Result | Upload Tasks | Download Tasks | Media List | ||||||
| File ID | Name | Type | Size | Dimension | Duration | Sync Status | Audit | Reference Count | |
| 35 | 大话西游之仙眼奇... | AVI | 19.8... | 960*540 | 00:01:32 | NOT_AVAILABLE_ | APPR... | 1 | |
| 36 | gxdtzl.swf | Sho... | 1.9Mb | 450*300 | 00:03:12 | NOT_AVAILABLE_ | APPR... | 1 | |
| 37 | Hydrangeas.jpg | JPEG | 581Kb | 1024*768 | 00:00:00 | NOT_AVAILABLE_ | APPR... | 1 | |
| 38 | Sample 1.ppt | ppt | 636Kb | 0*0 | 00:00:00 | NOT_AVAILABLE_ | APPR... | 1 | |
| 39 | GTHD_Concept_Dig... | MPE... | 80.3... | 1920*1080 | 00:00:46 | NOT_AVAILABLE_ | APPR... | 1 | |
| 40 | CHD联盟.CHP@史... | AVI | 4403... | 1920*1088 | 00:38:10 | NOT_AVAILABLE_ | REQU... | 0 | |
| 41 | Coral_Reef_Adventur... | Win... | 81.9... | 1280*720 | 00:01:45 | NOT_AVAILABLE_ | REJEC... | 0 | |
| 42 | 魔力女战士-VC1_10... | AVI | 500... | 1920*1080 | 00:03:09 | NOT_AVAILABLE_ | REQU... | 0 | |
| 43 | http://WWW.SINA.C... | URL | Ob | 0*0 | 00:00:00 | SYNC_WITH_SER... | REJEC... | 0 | |
| 44 | Wildlife.wmvv | Win... | 25.0... | 1280*720 | 00:00:30 | SYNC_WITH_SER... | REJEC... | 0 | |
Figure 7.2-7
Media Info window
The Media Info window shows detailed information for the multimedia content selected in the Media List window. It includes information about the file, the upload status and time, and the approval status.

Figure 7.2-8
Menu bar
The Menu bar, located at the top left corner of the S3 MagicView Manager application, provides the main control functions for the current page. The menu bar of the Media Library page consists of the File, Approval, and View menus

Figure 7.2-9
File menu
The File menu contains the Add Media, Add URL, Download, Force Download, Delete and Rename buttons.
- Add Media Add multimedia files to the Media Library.
- Add URL Add an online file specified by its URL address to the Media Library.
- Download Download multimedia files from the Media Library to your local storage device for previewing.
- Force Download Allows users to download existing contents that are damaged.
- Delete Deletes the multimedia file selected in the Media List window.
- Rename Renames the multimedia file selected in the Media List window.
Approval menu
All multimedia content must be approved by an administrator in order to be used in the Layout Design page. The Approval menu provides these functions:
- Approve Approves the multimedia file to be used in the Layout Design page.
- Reject Rejects the use of a multimedia file that does not meet the requirements.
- Retire Marks a multimedia file as Retired to prevent new layouts from calling this file. Previously created layouts that contain
the selected file may continue to use files marked as Retired.
View menu
The View menu provides a Preview function to allow users to play back multimedia contents within the Controller. Selected multimedia content is played back in windowed mode and will continue looping.
Note:
Since the layouts are played back in windowed mode and may be ran on non-S3 video cards, the performance in Preview mode may be lower than that in full-screen mode on the client machine.
7.3 Layout Manager
The Layout Manager page provides functions to create, edit and publish layouts.
Windows
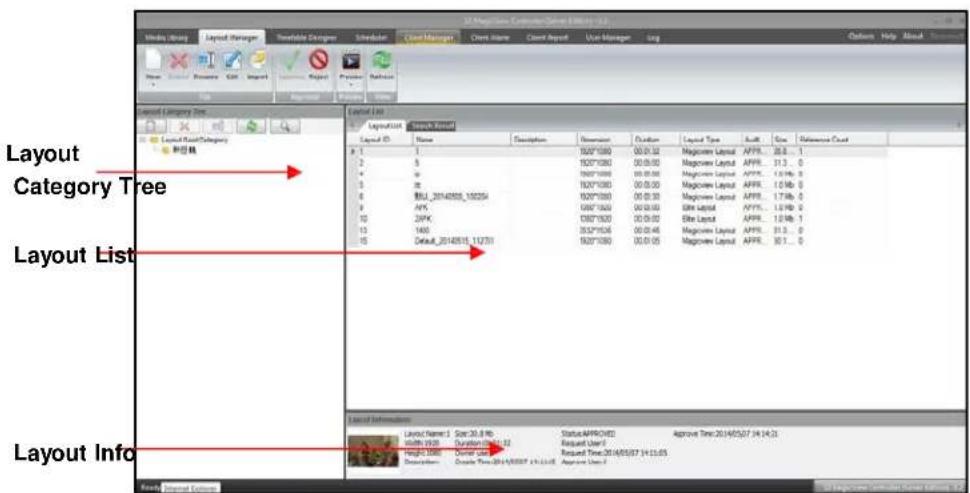
Figure 7.31
Layout Search Bar
The Layout Search Bar allows you to search layouts by name, category, owner, file size, file status and date.

Figure 7.3-2
Layout Category Tree
All layouts are uploaded onto the server and separated by categories. The Layout Category Tree lists the category folders and provides functions: New, Delete, Rename and Refresh.

Figure 7.3-3
- New Creates a new layout category folder.
- Delete Deletes the selected category folder.
- Rename Renames the selected category folder.
- Refresh Refreshes the category tree.
- Search Search layout on request.
Layout List window
The Layout List window contains two tabs to show the layouts and their status:
- Layout List tab and
- Search Result tab.
Layout List tab
The Layout List tab shows all layouts selected in the Layout Category Tree, including Layout ID, Name, Description, Dimension, Duration, Audit and Refers.
Search Result tab
The Search Result tab shows the search results of the Layout Search, including Layout ID, Name, Description, Dimension, Duration, Audit and Refers.
Layout Info window
The Layout Info window shows detailed information of the layout selected in the Layout List window. It includes basic information about the layout, the layout creation time and the approval status

Figure 7.3-4
Menu bar
The Menu bar of the Layout Manager page consists of the File, Approval, Preview and View menus.

Figure 7.35
File menu
The File menu contains the New, Delete, Rename, Edit and Import buttons.
- New Creates a new layout and opens the Layout Designer page.
- Delete Deletes the selected layout in the Layout Category Tree.
- Rename Renames the selected layout in the Layout Category Tree.
- Edit Opens the Layout Designer page for editing.
- Import Imports existing layouts from local or remote devices.
Approval menu
All layouts must be approved by an administrator in order to be used in timetables and schedules. The Approval menu provides these functions:
- Approve Approves the layout to be used in timetables and schedules.
- Reject Rejects the use of a layout that does not meet the requirements.
Preview menu
The Preview menu provides a Preview function to allow users to play back multimedia contents within the Controller. Selected multimedia content is played back in windowed mode and will continue looping.
Note:
Since the layouts are played back in windowed mode and may be ran on non-S3 video cards, the performance in Preview mode may be lower than that in full-screen mode on the client machine.
View menu
The View menu provides a Refresh function to synchronize the layouts in the Layout List window with the server. It requires users to refresh the layout list manually to show the changes of layouts.
7.4 Layout Designer
The Layout Designer contains all multimedia files that may be used on the display monitors. The Layout Designer page provides functions to design, edit and publish layouts.
Windows
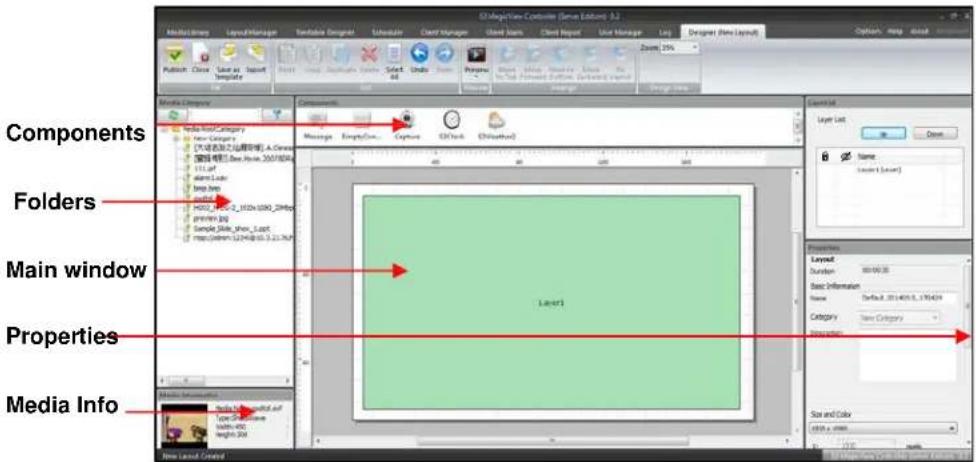
Figure 7.4-1
Components
The Components window shows all the registered components. Components can be selected from the Component window and dragged to the main window to add contents to the layout.
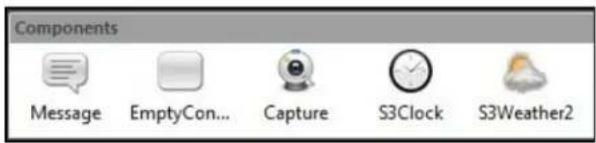
Figure 7.4-2
Folders window
The Folders window displays the multimedia files approved in the Media Library.
![Media Category Media Root Category New Category [大话西游之仙履奇缘].A.Chinese [蜜蜂电影].Bee.Movie.2007.BDRi 111.gif alarm1.wav bmp.bmp gxdztl.swf H002_MPEG-2_1920x1080_20Mbp Media Information Media Name:gxdztl.swf Size:1.9Mb Type:ShockWave Width: 450 Height:300 Category:root Duration:00:03:12 Upload User:I Upl…](/content/2026/05/1090545/images/2abcba074cd5d2b426d0a995da990ab235b063ed1231a70e5a18b7d0ba943fcf.jpg)
Figure 7.4-3
Main window
The Main window provides a display area, represented by a grey virtual coordinated plane, to design your layout. The grid display area shows the canvas and all the contents in the layout.

Figure 7.4-1
Users can zoom in or zoom out the display area of the main window by holding the Alt key on the keyboard and rolling the mouse wheel. Users are also able to adjust the vertical or horizontal position of the display area using the mouse wheel, or pressing the Ctrl key and rolling the mouse wheel.
A layer may be added to the layout by dragging it from the folders window to the desired location in the main window. A corresponding layer window will be shown in the display area. Layers containing different contents will be drawn in various colors. Each Layer is assigned with a name which will be displayed in the layer window. Layers may be removed by selecting it and clicking the Delete button on the Edit menu.
A layer may be positioned by dragging it in the main window. More than one layer may be selected at one time. A layer may also be resized by dragging its borders.
Users can click the left mouse button on the X and Y axis to create a scaling line, which may be useful for the alignment of the layers.
Note:
Users may drag layers out of the layout, but display monitors only show the layout area.
The main window does not limit the number of layers. All layers in the main window are assigned to a depth value. A newly-created layer has the least depth value, so it lies on top of the existing layers. The later the layer is created, the higher the layer lies. Obscured layers will not be displayed on the actual monitors. Clicking the buttons on the Arrange menu can adjust the depth of the layer.
Properties window
The Properties window is used to edit the properties of layers and components in the main window. When a layer or component in the main window has been selected, the Properties window will show its settings.
Each component has its unique properties. The component properties are described in the Components section.

Figure 7.4-5
Media Info window
The Media Info window shows detailed information about the multimedia file selected in the Folders window. The information includes the name, size, type, width/height, category, duration, upload time and status and approval information.

Figure 7.4-6
Menu bar
The Menu bar of the Layout Designer page consists of File, Edit, View, Arrange and Zoom menus to control the layout.

Figure 7.4-7
File menu
The File menu contains commands related to the entire layout design, such as creating new layouts, opening old layouts, or publishing layouts to the server. The File menu contains the Publish, Close, Import and Export buttons.
- Publish Packs up the layout contents into a folder and uploads it to the server. After clicking the Publish button, S3 MagicView launches a preview window for creating the snapshot of the layout.
- Close Closes the current layout.
- Import Imports the XML layout from the local file system.
- Export Exports the layout as an XML file to the local file system.
Edit menu
The Edit menu contains commands to edit the layers in the layout.
- Copy Copies the selected layer(s) in the Main window.
- Paste Pastes the copied layer(s) to the Main window.
- Delete Deletes the selected layer(s) in the Main window.
-
Select All Selects all layers in the Main window.
-
Undo Cancel the last operation.
- Redo Restore the last operation.
View menu
The View menu provides a Preview function to allow users to play back multimedia contents within the Controller. Selected multimedia content is played back in windowed mode and will continue looping. The contents and effects in preview mode are same as those played on the clients.
The Preview function provides three common modes: 1024x768, 1280x1024, and 1920x1080 to review the layouts.
Note:
Since the layouts are played back in windowed mode and may be ran on non-S3 video cards, the performance in Preview mode may be lower than that in full-screen mode on the client machine.
Arrange menu
When users add layers to their layouts, the layers automatically stack as users add them. Users see the stacking order when components overlap — the top component covers a portion of the components beneath it.
The Arrange menu consists of functions to change the stacking order of the layers: Move to Front, Move Forward, Move to Back and Move Backward.
- Move to Front Moves the selected layer in front of all other layers so that no part of it is hidden behind another layer.
- Move Forward Moves the selected layer one level closer to the front.
- Move to Back Moves the selected layer behind all other layers.
- Move Backward Moves the selected layer one level to the back.
• Fit Layout The layer selected extents to layout
Layer-list
Layer-list can help users to easily edit the layers when the number of layers is large.
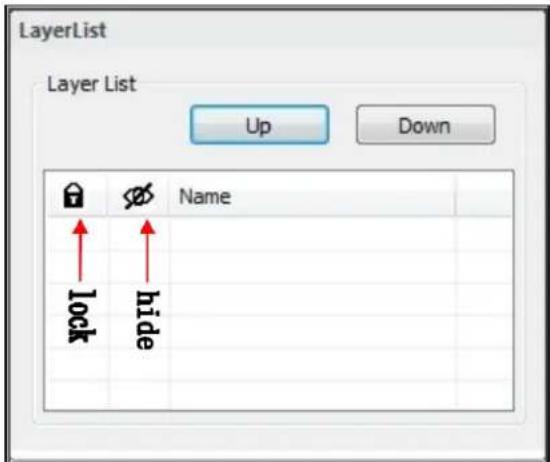
图7.4-8
- UP
Move the layer up in case if there are multi layers in one layout
- Down
Move the layer down in case if there are multi layers in one layout
- Hide
Hide the layers
- Lock
Lock the layers, prevent from wrong operations
Note:
- Only affect the designer, clients won't be affected
Zoom menu
The Zoom menu provides a Zoom function to allow users to get a close-up view of the layout or to see more of the area at a reduced size. The zoom drop list provides a zoom range from 2% to 1600%.
7.5 Timetable Designer
The Timetable Designer page allows users to create and edit timetables. A timetable consists of multiple layouts in a specific playback order, displaying the duration of each layout. A timetable combines more than one layout together for playing back in a loop.
Windows

Figure 7.5-1
Timetable List
The Timetable List shows all the timetables on the server. It provides the functions: New, Delete, Rename and Refresh.
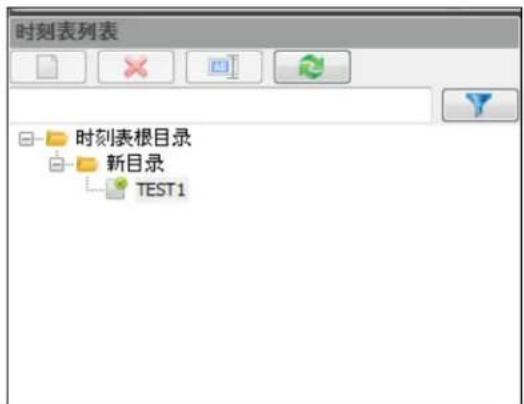
The Timetable Window is the main window used to insert and edit the layouts in the timetable. It displays the time for one 24-hour day. Users can open multiple timetables at the same time.

The Layout List window shows all layouts approved by administrators. Users can drag layouts into the Timetable Window to create a timetable.

Figure 7.5-4
- Refresh Refreshes the layout folders.
- Filter Filters layouts specified by the input condition.
Timetable Info window
The Timetable Info window shows detailed information about the timetable. It includes information such as the name, creator, status, request user and request time.

Figure 7.5-5
Timetable Item Edit window
The Timetable Item Edit window is used to set the duration and loop count for each layout in the timetable.
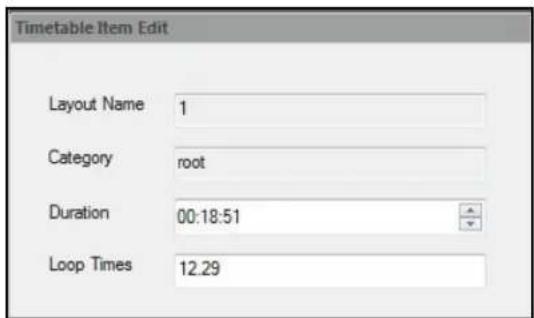
Figure 7.5-6
Menu bar
The Menu bar of the Timetable Designer page provides functions to create, edit, approve and preview timetables. The menu bar consists of File, Approval, Edit, Preview and Timetable View menus.

Figure 7.5-7
File menu
The File menu contains the Create, Edit, Delete, Publish and Publish All buttons.
- Create Create a new timetable and open it in the Timetable window.
- Edit Edit an existing timetable in the Timetable window.
- Delete Delete the timetable from the server.
- Publish Publish the current timetable to the server. A window pops up to enter the timetable name after the Publish button is clicked.
- Publish All Publish all open timetables to the server.
Approval menu
All layouts must be approved by an administrator in order to be used in timetables and schedules. The Approval menu provides these functions:
- Approve Approve the layout to be used in timetables and schedule.
- Reject Reject the layouts that do not meet the requirements.
Edit menu
The Edit menu provides functions to edit the layers in the layout.
- Copy Copy the selected layer(s) to the Main window.
- Paste Paste the copied layer(s) to the Main window.
- Delete Delete the selected layer(s) from the Main window.
Preview menu
The Preview menu allows users to play edited contents in the Controller. The content is played back in windowed mode and will keep looping. The contents and effects in Preview mode are the same as those played on the Clients.
The Preview menu provides three common modes: 1024x768, 1280x1024 and 1920x1080 to review the layouts.
Note:
Since the layouts are played back in windowed mode and may be ran on non-S3 video cards, the performance in Preview mode may be lower than that in full-screen mode on the client machine.
Timetable View menu
The Timetable View menu provides a Zoom function to allow users to get a close-up view of the layout or to see more of the area at a reduced size. The zoom drop list provides a zoom range from 2% to 1600%.
7.6 Scheduler
Scheduler can setup client's playback time and layout. It consists of multiple schedules or layouts. Each client has a unique schedule.
Windows
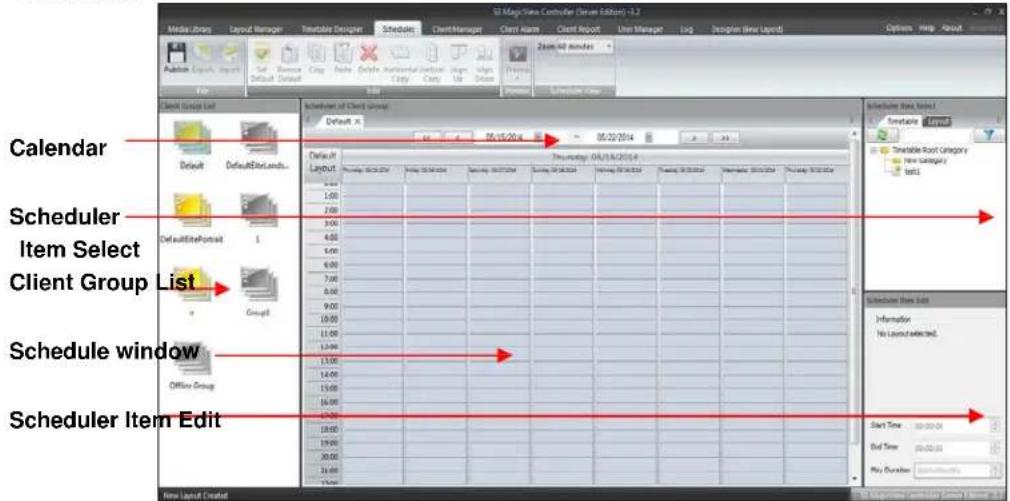
Figure 7.6-1
Client Group List window
The Client Group List window shows all client groups. Users can double-click group icons to open the schedule window for that group. There are two pre-defined groups: Offline Group and Default. All new registry clients are assigned to the Default group.
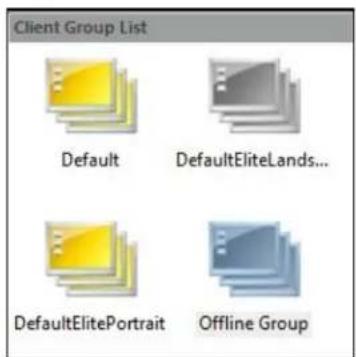
Figure 7.6-2
Schedule Item Select window
The Schedule Item Select window helps users to locate the timetables and layouts approved by the administrators. Users can filter timetables and layouts by name.
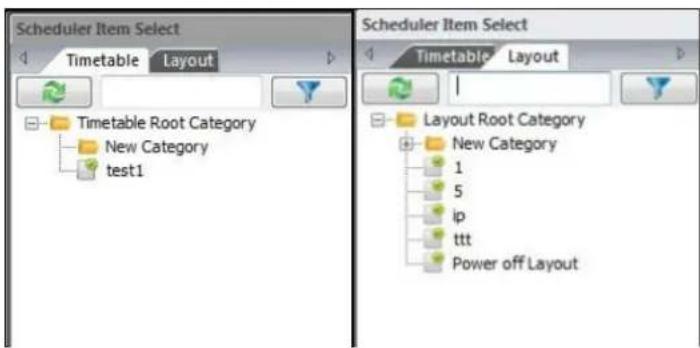
Figure 7.6-3
Power off Layout is the default layout of S3 MagicView. User can arrange Client into dormancy by the Power off layout. For example, User can drag a Power off Layout into schedule window, set the Start Time 04/07 02:00, End Time 04/07 20:00, save this schedule and publish to Client. The Client will enter sleep mode during this period of time, after 04/07 20:00 the Client will be waked up.

Figure 7.6-4
Scheduler of Client Group window
The Scheduler of Client Group window is the main area for users to create schedules. It shows the current date in the Calendar window and provides a convenient way in which users can drag and drop layouts to create their schedules. Users can also resize layouts in this window to modify layout and timetable durations.

Figure 7.6-5
Default layout
The Default layout will be displayed when there is no layout defined in the schedule plan.
Notes:
- Users are not allowed to edit schedules occurred in the past.
- Users cannot create or copy a layout into a time that is occupied by another layout.
Tip: Layouts in the schedule window may be grouped and edited together.
Calendar window
The Calendar window allows users to create schedules for a single day or a longer period of time. The Calendar window shows the date in Month view. The display range of the calendars is automatically sized to fit the size of the Calendar window. After selecting the days that users want to schedule, which are highlighted in color, the detailed schedule will be displayed in the Schedule window.
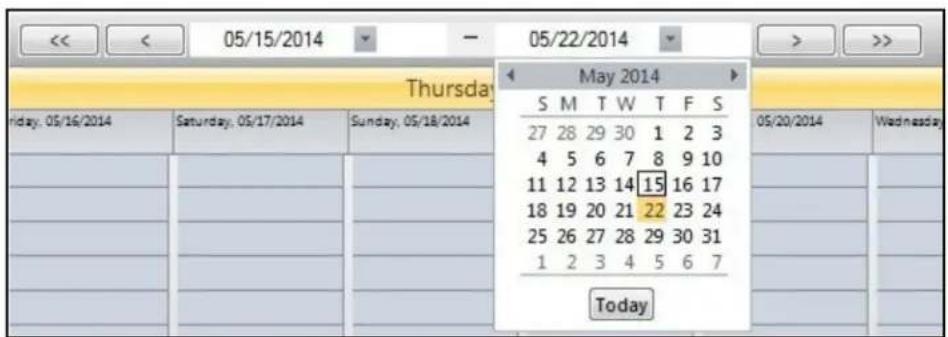
Figure 7.6-6
Schedule Item Edit window
The Schedule Item Edit window shows the detailed information about the current layout in the Scheduler window and allows users to edit the Start Time, End Time and Play Duration of the layouts.

Figure 7.6-7
Menu bar
The menu bar consists of File, Edit, Preview and Scheduler View menus.

Figure 7.68
File menu
The Scheduler's File menu contains functions enabled based on the type of schedule selected: one is for the online schedule and the other one is for the offline schedule.
Online Schedule functions
- Publish Uploads the schedule information to server and refreshes the schedule of the current group.
Offline Schedule functions
- Export Saves the current schedule information with all the layout contents to the local file system.
- Import Loads the schedule information and layouts from the local file system.
Edit menu
The Edit menu provides functions related to the operations of a schedule.
- Set Default Sets the selected layout to be the default layout which will be played when no schedule is assigned.
- Remove Default Clears the default layout, but keeps the layout and the contents.
- Copy Copies the selected layout(s) and put it on the clipboard.
- Paste Pastes the layout(s) from the clipboard.
- Delete Deletes the selected layer(s) from the Scheduler window.
• Horizontal Copy Copies the selected layout(s) and pastes them to the dates selected in the Calendar window. The Start time, End time, and Duration of the pasted layouts are the same as the original values.

Figure 7.6-9
Tip: Users can paste layouts to the specific days by selecting the dates in the Calendar window.
- Vertical Copy
Copies the selected layout(s) and pastes them to the dates input by the user, right after the selected layout(s).

Figure 7.6-10
Note:
The copied layouts will follow the selected layout, but they cannot exceed 24:00.
- Align Up
Moves the selected layout(s) to the beginning of the day or immediately after the above layouts in the same day, while maintaining the duration.
- Align Down
Moves the selected layout(s) to the end of the day or immediately before the below layouts in the same day, while maintaining the duration.
Preview menu
The Preview menu provides a Preview function to allow users to play back the current layout on the machine that runs the CMS Controller. The current layout is played back in windowed mode and will continue looping until it is closed. The contents and effects in the Preview mode are the same as those on the Clients.
The Preview menu provides three common modes: 1024x768, 1280x1024 and 1920x1080 for users to review their layouts.
Note:
Since the layouts are played back in windowed mode and may be ran on non-S3 video cards, the performance in Preview mode may be lower than that in full-screen mode on the client machine.
Scheduler View menu
The Scheduler View menu provides a Zoom function to allow users to get a close-up view of the current schedule or to see more of the area at a reduced size. The zoom drop list provides a zoom range from 1 minute to 60 minutes.
7.7 Client Manager
For the distribution of layouts, S3 MagicView creates groups and assigns the Clients into different groups. By assigning a schedule, which can contain a variety of layouts, to each group, Clients will get the layouts and play them according to the schedule.
Windows

Figure i. i-1
Group List window
The Group List window lists all groups on the server. After selecting a group in the Group List window, all clients in that group are displayed in the Client State View window.
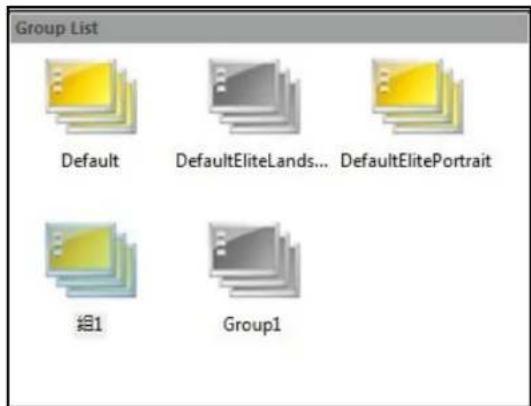
Figure 7.7-2
Client State View window
The Client State View window shows all the clients selected in Group List window. It also displays the detailed information of each client.

Figure 7.7-3
Client Info window
The Client Info window shows detailed information for the client selected in the Client List window. It includes description of the client, location, administrator name, company, administrator e-mail address, phone number, IP address and display card information.

Figure 7.7-1
Menu bar
The Menu bar of the Client Manager page provides the functions to manage groups and Clients. The menu bar consisted of Page, Group Edit, Client Edit, Emergency Message and Update Client menus.

Figure 7.7-5
Page menu
The Page menu provides a Refresh function to refresh the latest Client status.
Group Edit menu
The Group Edit menu provides functions related to group operations.
- Add Group Creates a new Group.
- Delete Group Deletes the selected Group in the Group List window.
- Edit Group Edits the group name and description.
Note: The default group is a system-reserved group and cannot be deleted.
Client Edit menu
The Client Edit menu provides functions related to Client operations.
- Delete Client Deletes the selected clients in the Client State View window.
- Edit Client Edits the Client information, e.g., description, address, administrator, e-mail, etc.
- Restart Client Restarts the Client computer.
- Shutdown Client Shuts down the Client computer.
- Start Client Boots up the Client computer.
Notes:
- Remote Control client must operate on the local area network.
- The Client Edit menu of the Controller does not provide a method to create a Client. To add a new Client, users must register the Client machine through ClientConfigure.exe (Refer to Client Registration for more information.)
Emergency Message menu
The Emergency Message menu provides the Edit Emergency Message function to allow users to publish a text message for immediate display by the Client to the selected group.

Figure 7.7-6
The Edit Emergency Message button brings up the Emergency Message Setting dialog with the following functions:
- Message List Lists all emergency messages.
- Text Input To enter text messages to publish.
- Text Properties Set properties for your text message:
Date Start date.
Start Time Start time.
Duration Message duration.
Font Text font.
Direction Direction in which the message scrolls.
Color Text color.
Size Text size.
B Font style: Bold.
I Font style: Italic.
U Font style: Underline
Speed Text scrolling speed.
Transparency Text transparency level.
Upgrade Client menu
The Upgrade Client menu provides an Update Client function to allow users to update the client software remotely. Users can select the client that needs to be updated and select the client software program.
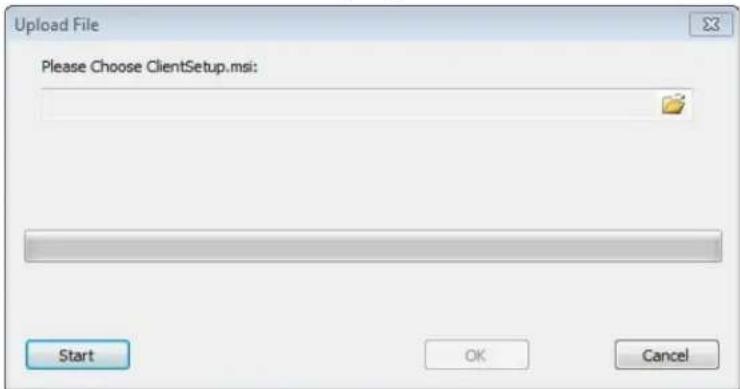
Figure 7.77
Search Client
User can search client by Group name, Client name, Location, Company, Admin, Telephone, E-Mail, IP Address and Hardware info.
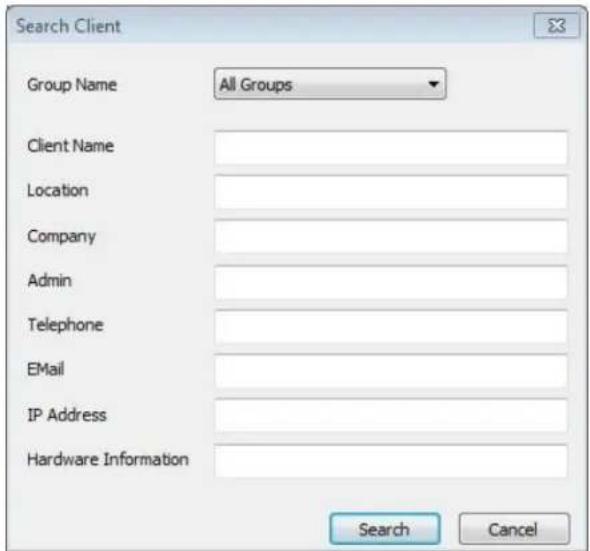
Figure 7.7-8
- Search Search on request
- Cancel Cancel the search
7.8 Client Alarm
The Client Alarm page provides the Client Hardware information for users. User can set Client machine's hardware alarm level on Client Alarm page, when the value is over this level, the alarm info will show on Client and Controller Alarm page, allowing user to check and solve immediately.
Windows
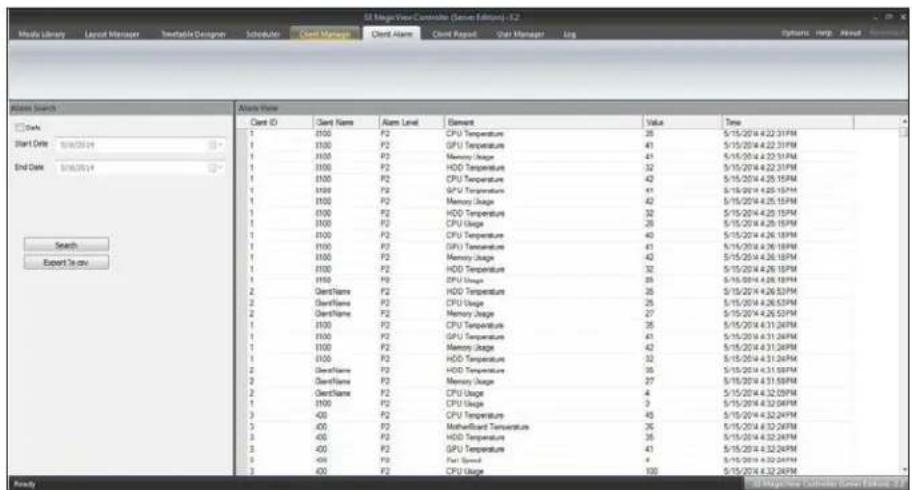
Figure 7.8-1
7.9 Client Report
The Client Report page provides statistical data of the Client for users. Users may export the report as a CSV file.
Windows
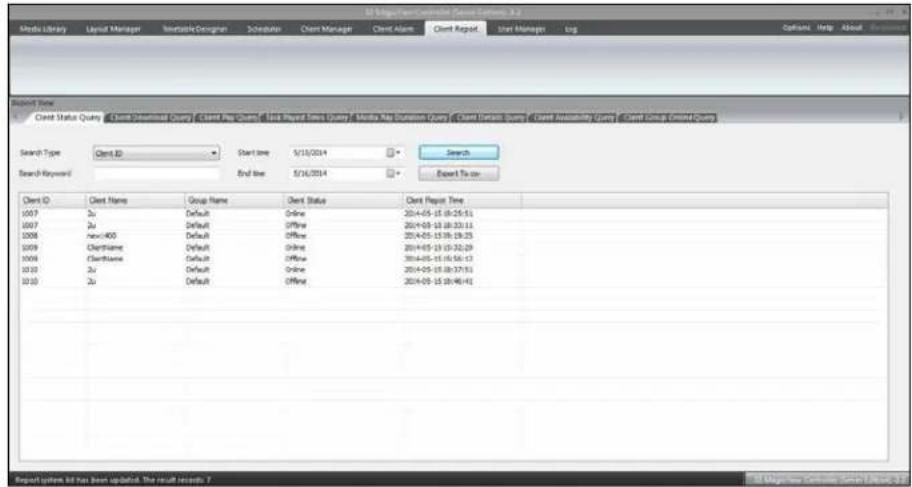
Figure 7.9-1
The Report System page provides the following functions:
| Client Status Query | Generates a report showing the online and offline status of clients. |
| Client Download Query | Generates a report showing the downloaded contents. |
| Client Play Query | Generates a report showing the tasks that the Client played. |
| Task Play Sum Query | Generates a report showing the times of the tasks that were played. |
| Media Play Duration Query | Generates Media playback duration |
| Client Details Query | Displays detailed information for the Clients. |
| Client Availability Query | Displays how much free time the Clients are not assigned a task. |
| Client Group Online Query | Generates a report showing the online rate of the Client groups. |
7.10 User Manager
The User Manager page is used for organizing all the users that can log into the Controller and register Clients. There are five user types: Administrator, Designer, Scheduler, Client and Auditor. Each has permission to take control of different functions of S3 Magic-View.
Windows
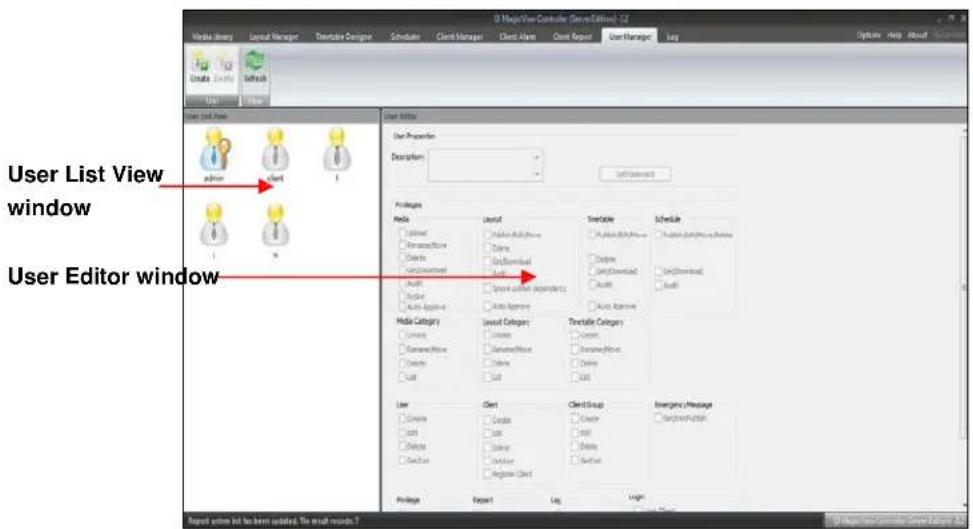
Figure 7.10-1
User List View window
The User List View window shows a list of all users. The Administrator icon is different from icons of other types of users.
- Administrator

- Designer, Scheduler, Client, and Auditor

User Editor Window
The User Editor window displays information for the selected user in the User List View window. It allows you to edit the user description, change their password and set the privileges for each page.
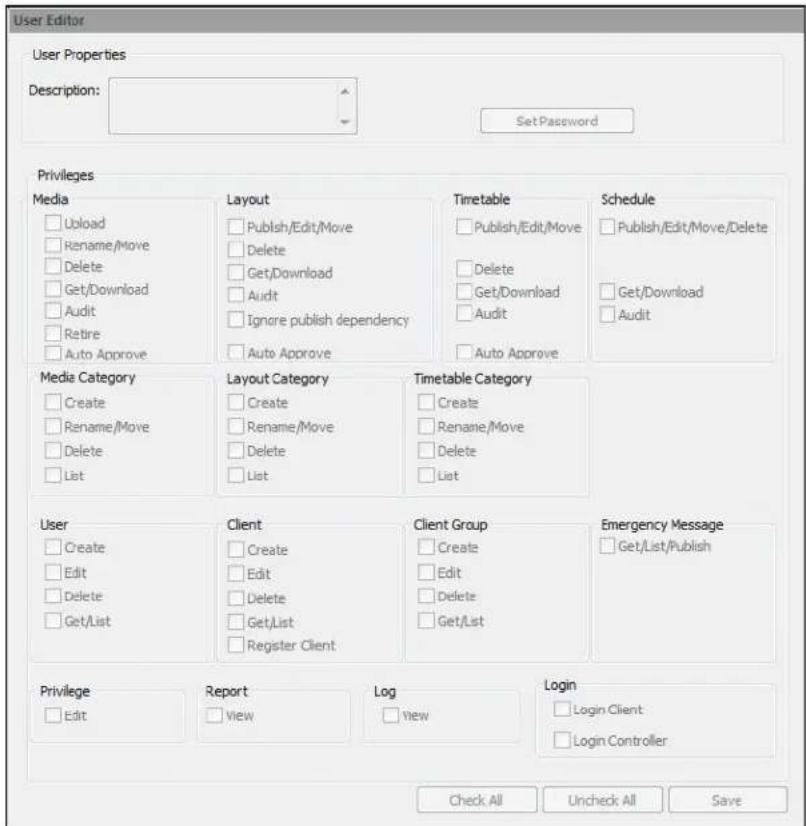
Figure 7.10-2
Menu bar
The Menu bar of the User Manager page consists of User menu with the Create, Delete and Refresh buttons.

Figure 7.10-3
- Create
Creates a new User.
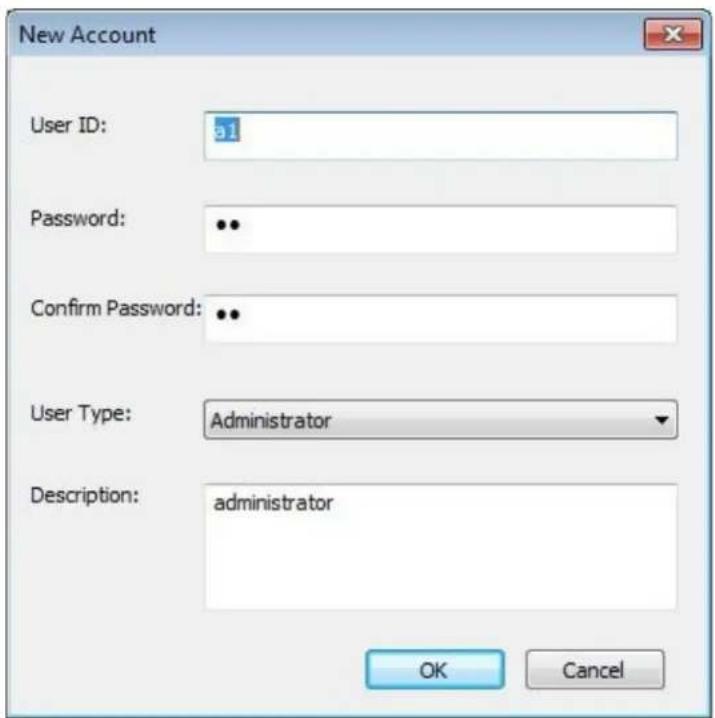
Figure 7.10-4
- Delete Deletes the selected User.
- Refresh Refreshes the list of Users in the User List View window.
7.11 Log
The Log page is used by administrators to check user operations.

Figure 7.11-1
Log search window
The Log search window allows administrators to search logs by operator in a specific period of time. The search result is displayed in the Log View window, and can be exported as a CSV file.
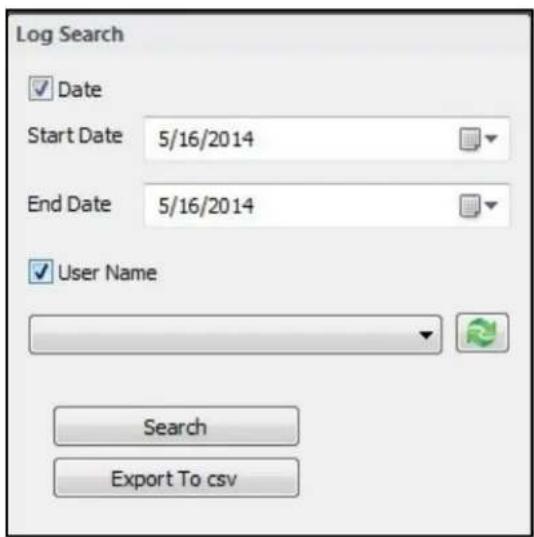
Figure 7.11-2
Log View window
The Log View window displays all user operations: User Name, Login IP and Operation Time.
| Log View | ||||
| User Name | Login IP | Operation Time | Operation | |
| admin | 127.0.0.1 | 5/7/2014 2:03:10 PM | login. | |
| admin | 127.0.0.1 | 5/7/2014 2:03:28 PM | add user "I". | |
| admin | 127.0.0.1 | 5/7/2014 2:03:33 PM | add user "s". | |
| admin | 127.0.0.1 | 5/7/2014 2:03:39 PM | add user "w". | |
| admin | 127.0.0.1 | 5/7/2014 2:03:46 PM | logout. | |
| | | 127.0.0.1 | 5/7/2014 2:03:49 PM | login. | |
| | | 127.0.0.1 | 5/7/2014 2:06:22 PM | Upload media "[12猴子].... | |
| | | 127.0.0.1 | 5/7/2014 2:06:36 PM | Upload media "[Mibu] Ey... | |
| | | 127.0.0.1 | 5/7/2014 2:06:39 PM | Upload media "[大话西... | |
| | | 127.0.0.1 | 5/7/2014 2:06:42 PM | Upload media "[蜜蜂电... | |
| | | 127.0.0.1 | 5/7/2014 2:06:55 PM | Upload media "04_yama... | |
| | | 127.0.0.1 | 5/7/2014 2:06:58 PM | Upload media "111.gif". | |
| | | 127.0.0.1 | 5/7/2014 2:07:00 PM | Upload media "1000x30... | |
| | | 127.0.0.1 | 5/7/2014 2:07:03 PM | Upload media "1920x10... | |
| | | 127.0.0.1 | 5/7/2014 2:07:07 PM | Upload media "alarm1.w... | |
| | | 127.0.0.1 | 5/7/2014 2:07:13 PM | Upload media "AQUOS... | |
| | | 127.0.0.1 | 5/7/2014 2:07:20 PM | Upload media "AVCHD... | |
| | | 127.0.0.1 | 5/7/2014 2:07:26 PM | Upload media "bmp.bmp". | |
| | | 127.0.0.1 | 5/7/2014 2:07:28 PM | Upload media "down.pn... | |
| | | 127.0.0.1 | 5/7/2014 2:07:30 PM | Upload media "gxdtzl.swf". | |
| | | 127.0.0.1 | 5/7/2014 2:07:43 PM | Upload media "H002_M... | |
| | | 127.0.0.1 | 5/7/2014 2:07:46 PM | Upload media "Hydrang... | |
| | | 127.0.0.1 | 5/7/2014 2:07:58 PM | Upload media "MPEG2... | |
| | | 127.0.0.1 | 5/7/2014 2:08:10 PM | Upload media "MPEG4... | |
| | | 127.0.0.1 | 5/7/2014 2:08:13 PM | Upload media "previewj... | |
| | | 127.0.0.1 | 5/7/2014 2:08:18 PM | Upload media "Ricky_M... | |
| | | 127.0.0.1 | 5/7/2014 2:08:20 PM | Upload media "Ringtone... | |
| | | 127.0.0.1 | 5/7/2014 2:08:24 PM | Upload media "Robotica... | |
| | | 127.0.0.1 | 5/7/2014 2:08:26 PM | Upload media "Sample... | |
| | | 127.0.0.1 | 5/7/2014 2:08:28 PM | Upload media "Sample1.... | |
Figure 7.11-3
- S3 MAGICVIEW
- SERVER EDITION
- VERSION 3.2
- USER MANUAL
- VIEWZ S3 GRAPHICS TERMS AND CONDITIONS OF SOFTWARE USE
- INTRODUCTION 5
- INSTALLATION 11
- QUICK START 43
- COMPONENTS 72
- SERVERS 82
- CLIENTS 86
- CONTROLLER 112
- VIEWZ SB GRAPHICS
- INTRODUCTION
- 1.1 LIST OF FEATURES
- 1.2 MINIMUM SYSTEM REQUIREMENTS
- NOTES
- 1.3 SOFTWARE REQUIREMENTS
- 1.4 USER GUIDE OVERVIEW
- 1.5 KEY DEFINITIONS
- INSTALLATION
- 2.1 DATABASE INSTALLATION
- MYSQL SERVER INSTALLATION
- STEP 4. SETUP TYPE: CHOOSE TYPICAL THEN CLICK THE NEXT BUTTON
- STEP 5. CLICK THE INSTALL BUTTON TO BEGIN THE INSTALLATION
- MYSQL CONNECTOR ODBC 5.1.8 INSTALLATION
- STEP 3. SETUP TYPE: CHOOSE TYPICAL AND CLICK THE NEXT BUTTON
- STEP 4. CLICK THE INSTALL BUTTON TO BEGIN THE INSTALLATION
- 2.2 SERVER/CLIENT/CONTROLLER INSTALLATION
- S3 MAGICVIEW SERVER INSTALLATION
- MEDIA SERVER INSTALLATION
- STEP 7. CLICK THE INSTALL BUTTON TO START THE INSTALLATION
- STEP 8. INSTALLATION COMPLETE: CLICK THE FINISH BUTTON TO EXIT AND COMPLETE THE INSTALLATION
- CONTROLLER SERVER INSTALLATION
- STEP 7. SELECT TYPICAL SETUP TYPE TO INSTALL
- STEP 8. CONFIRM INSTALLATION: CLICK THE INSTALL BUTTON TO START THE INSTALLATION
- NOTE
- MYSQL DATABASE INITIALIZATION
- STEP 2. TYPE THE ROOT PASSWORD, WHICH WAS SETUP IN THE MYSQL SERVER CONFIGURATION (THE DEFAULT PASSWORD IS 123456)
- THE INITIALIZATION OF THE DATABASE IS COMPLETE
- CONTROLLER/MANAGER INSTALLATION
- CLIENT INSTALLATION
- STEP 8. INSTALLATION COMPLETE
- QUICK START
- 3.1 SERVER SETUP
- CONFIGURING AND STARTING THE MEDIA SERVER
- CONFIGURING AND STARTING THE CONTROLLER SERVER
- 3.2 USER ACCOUNTS
- CREATING A NEW USER ACCOUNT
- CLICK THE USER MANAGER TAB
- SELECT THE CREATE MENU BUTTON
- IN THE NEW ACCOUNT DIALOG BOX, ENTER
- DELETING A USER ACCOUNT
- 3.3 MULTIMEDIA LIBRARY
- UPLOADING FILES
- ADDING A WEBSITE (URL) FOR MULTIMEDIA CONTENT
- APPROVING MULTIMEDIA CONTENT
- 3.4 CREATING/MANAGING LAYOUTS
- CREATING A NEW LAYOUT
- OPTION 1 EXAMPLE
- MANAGING LAYOUTS
- APPROVING LAYOUTS
- 3.5 EDITING TIMETABLES/SCHEDULES
- EDITING TIMETABLES
- APPROVING TIMETABLES
- EDITING SCHEDULES
- 3.6 REGISTER CLIENTS
- REGISTER CLIENT
- STEP 8. SHORTCUTS
- COMPONENTS
- 4.1 LAYOUT
- LAYOUT PROPERTIES
- 4.2 LAYER
- LAYER PROPERTIES
- 4.3 IMAGES
- IMAGE FORMATS
- IMAGE PROPERTIES
- 4.4 VIDEO
- VIDEO FORMATS
- VIDEO PROPERTIES
- 4.5 MESSAGES
- MESSAGE PROPERTIES
- 4.6 POWERPOINT
- POWERPOINT PROPERTIES
- 4.7 FLASH
- FLASH PROPERTIES
- 4.8 WEBBROWSER
- WEBBROWSER PROPERTIES
- 4.9 CLOCK
- CLOCK PROPERTIES
- 4.10 EMPTY
- 4.11 AUDIO
- AUDIO PROPERTIES
- 4.12 S3WEATHER
- S3WEATHER PROPERTIES
- 4.13 RTSP (CAPTURE)
- CAPTURE PROPERTIES
- SERVERS
- 5.1 SERVER TYPES
- MEDIA SERVER
- CONTROLLER SERVER
- 5.2 SERVER CONFIGURATION
- CONTROLLER SERVER PORT
- MYSQL SERVER CONFIGURATION
- 5.3 MEDIA SERVER NAME OR IP
- MEDIA SERVER PORT
- MEDIA SERVER CONFIGURATION
- CONTROLLER SERVER NAME OR IP
- CLIENTS
- 6.1 CLIENT TYPES
- ONLINE CLIENT
- OFFLINE CLIENT
- 6.2 ACTIVATE CLIENT
- 6.3 CLIENT REGISTRATION
- ENTER ACCOUNT INFORMATION
- ENTER CLIENT INFORMATION
- ENTER YOUR LOCAL SETTINGS
- ENTER ALARM SETTING
- 6.4 RS232 TOOLS
- RS232 SETTINGS ON CLIENT MACHINE
- RS232 SETTING ON CONTROL COMPUTER
- RS232 TOOL OPERATION
- 6.5 SETTING CLIENT SPECIAL SCREEN
- 6.6 GROUPING A CLIENT
- 6.7 S3 MAGICVIEW CLIENT WEB MANAGER
- 1 OVERVIEW PAGE
- NETWORK TAB
- 4 ADMINISTRATION PAGE
- UPGRADE
- CHOOSE FILE
- SUBMIT
- 5 HISTORY PAGE
- CONTROLLER
- 7.1 S3 MAGICVIEW MAIN MENU
- OPTIONS
- 7.2 MEDIA LIBRARY
- MEDIA LIBRARY SEARCH BAR
- MEDIA LIBRARY CATEGORY TREE
- MEDIA LIST WINDOW
- SEARCH RESULT TAB
- UPLOAD TASKS TAB
- DOWNLOAD TASKS TAB
- MEDIA LIST TAB
- MEDIA INFO WINDOW
- MENU BAR
- FILE MENU
- APPROVAL MENU
- VIEW MENU
- 7.3 LAYOUT MANAGER
- WINDOWS
- LAYOUT SEARCH BAR
- LAYOUT CATEGORY TREE
- LAYOUT LIST WINDOW
- LAYOUT LIST TAB
- LAYOUT INFO WINDOW
- PREVIEW MENU
- 7.4 LAYOUT DESIGNER
- FOLDERS WINDOW
- MAIN WINDOW
- PROPERTIES WINDOW
- EDIT MENU
- ARRANGE MENU
- LAYER-LIST
- ZOOM MENU
- 7.5 TIMETABLE DESIGNER
- TIMETABLE LIST
- TIMETABLE INFO WINDOW
- TIMETABLE ITEM EDIT WINDOW
- TIMETABLE VIEW MENU
- 7.6 SCHEDULER
- CLIENT GROUP LIST WINDOW
- SCHEDULE ITEM SELECT WINDOW
- SCHEDULER OF CLIENT GROUP WINDOW
- DEFAULT LAYOUT
- CALENDAR WINDOW
- SCHEDULE ITEM EDIT WINDOW
- VERTICAL COPY
- ALIGN UP
- ALIGN DOWN
- SCHEDULER VIEW MENU
- 7.7 CLIENT MANAGER
- GROUP LIST WINDOW
- CLIENT STATE VIEW WINDOW
- CLIENT INFO WINDOW
- PAGE MENU
- GROUP EDIT MENU
- CLIENT EDIT MENU
- EMERGENCY MESSAGE MENU
- UPGRADE CLIENT MENU
- SEARCH CLIENT
- 7.8 CLIENT ALARM
- 7.9 CLIENT REPORT
- 7.10 USER MANAGER
- USER LIST VIEW WINDOW
- USER EDITOR WINDOW
- CREATE
- 7.11 LOG
- LOG SEARCH WINDOW
- LOG VIEW WINDOW
Brand : ViewZ
Model : VZ-PRO-MINI
Category : Controller