
MCD610BT - Car Radio CALIBER - Free user manual and instructions
Find the device manual for free MCD610BT CALIBER in PDF.


| Product Type | Car Stereo with MP3/WMA/MPEG4 Player and Bluetooth |
| Model | Caliber MCD610BT |
| Power Supply | 12V DC (10.8-15.6V allowable) |
| Speaker Impedance | 4 or 8 Ohm |
| Output Power | 75W x 4 channels |
| Fuse | 10A |
| Tuner Frequency Range (FM) | 87.5-108 MHz |
| Tuner Sensitivity (FM) | 2.8 μV |
| Stereo Separation (FM) | 30 dB |
| Signal to Noise Ratio (FM) | 50 dB |
| MP3/WMA Signal to Noise Ratio | >60 dB |
| MP3/WMA Channel Separation | >50 dB (1kHz) |
| MP3/WMA Frequency Response | 20 Hz - 20 kHz |
| Line-Out Output Voltage | 1300 mV (max.) |
| Line-Out Impedance | 10k Ohm |
| AUX-IN Sensitivity | 775 mV |
| AUX-IN Impedance | 20k Ohm |
| Display | 3 Inch TFT-LCD |
| Bluetooth | Yes, with phone and audio streaming (A2DP) |
| USB/SD/MMC Input | Front USB and SD/MMC slot |
| Front Panel | Flip down, detachable for theft protection |
| Remote Control | Included, with battery |
| RDS Functions | AF, TA, PTY |
| Installation Angle | Max 30° inclination |
Frequently Asked Questions - MCD610BT CALIBER
User questions about MCD610BT CALIBER
0 question about this device. Answer the ones you know or ask your own.
Ask a new question about this device
Download the instructions for your Car Radio in PDF format for free! Find your manual MCD610BT - CALIBER and take your electronic device back in hand. On this page are published all the documents necessary for the use of your device. MCD610BT by CALIBER.
USER MANUAL MCD610BT CALIBER
RMD 610BT
INSTRUCTION MANUAL
Car Stereo
MP3/WMA/MPEG4 Player
with PLL FM Stereo Radio
Radio Data System
3 Inch TFT-LCD Display
Bluetooth Function in Phone Mode
Touch Screen Control
USB / SD/MMC Card Input
Front AUX IN
Flip Down/Detachable Front Panel
INSTALLATION
PRECAUTIONS
- Choose the mounting location carefully so that the unit will not interfere with the normal driving functions of the driver.
- Avoid installing the unit where it would be subject to high temperatures, such as from direct sunlight or hot air from the heater, or where it would be subject to dust, dirt or excessive vibration.
- Use only the supplied mounting hardware for a safe and secure installation.
- Be sure to remove the front panel before installing the unit.
NOTE : Inclination angle for car radio installation must not exceed 30° otherwise the front panel will not open.

NOTE: Keep the release key in the safe place as you may need it in future to remove the unit from the car.
Detaching and attaching the front panel
The front panel of this unit can be detached in order to prevent the unit from being stolen.
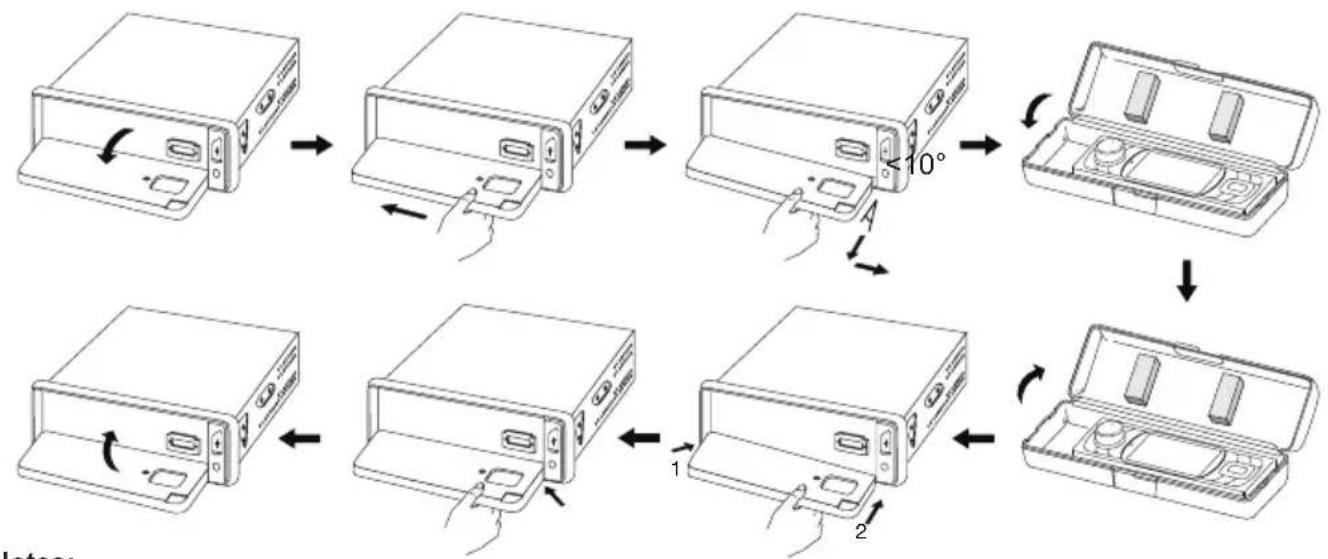
FOLDING DOWN AND DETACHING/ATTACHING THE FRONT PANEL
Before detaching the front panel, be sure to press the button (1) OFF first.
Then press the button, let the Front Panel arrive in horizontal position and detach the panel by pulling it towards you as illustrated.
flowchart
graph TD
    A["Device 1"] --> B["Device 2"]
    B --> C["Device 3"]
    C --> D["Device 4"]
    D --> E["Device 5"]
    E --> F["Device 6"]
    F --> G["Device 7"]
    G --> H["Device 8"]
    H --> I["Device 9"]
    I --> J["Device 10"]
    style A fill:#f9f,stroke:#333
    style B fill:#f9f,stroke:#333
    style C fill:#f9f,stroke:#333
    style D fill:#f9f,stroke:#333
    style E fill:#f9f,stroke:#333
    style F fill:#f9f,stroke:#333
    style G fill:#f9f,stroke:#333
    style H fill:#f9f,stroke:#333
    style I fill:#f9f,stroke:#333
    style J fill:#f9f,stroke:#333
Notes:
- Do not press the front panel hard against the unit when attaching it. It can be easily attached by pressing it lightly against the unit.
- When you carry the front panel with you, put it in the supplied front panel case.
- Do not press hard or give excessive pressure to the display window of the front panel when attaching it to the unit.
CLEANING THE CONNECTOR
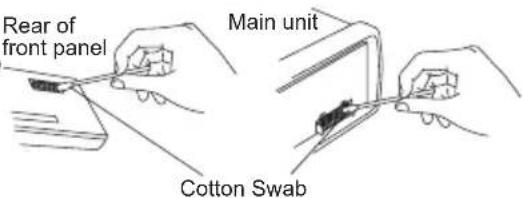
The unit may not function properly if the connectors between the unit and the front panel are contaminated with dirt. In order to prevent this from happening, detach the front panel by pressing the button and clean the connector from time to time.
Clean the connector with a cotton swab together with contact cleaner as illustrated. Be sure to clean them carefully pin by pin and make sure not to damage the connecting points.
TO SUPPORT THE UNIT
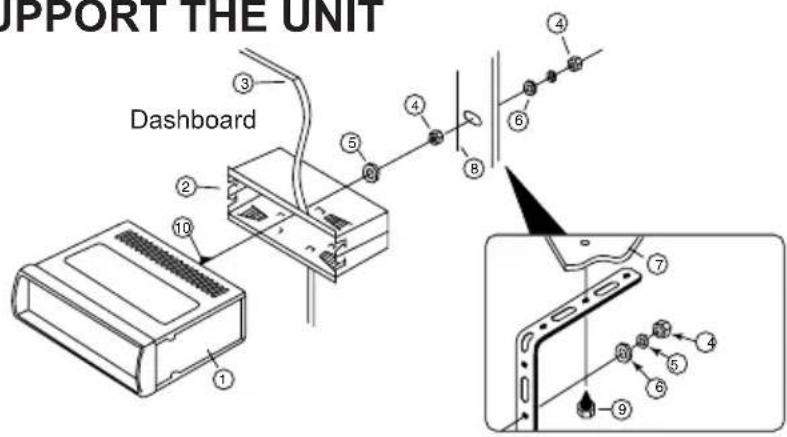
- UNIT
- RELEASE CASE
- DASH BOARD
- HEX NUT
- LOCK WASHER
- PLAIN WASHER
- CAR BODY
- REAR SUPPORT STRAP
- TAPPING SCREW
- M5 X 15 HEX BOLT
WIRE CONNECTION
IN / OUT CONNECTOR
Audio Out: White (L) Red (R)
Connect this wire to rear seat A/V monitor system
Line Out (Front): White (L) Red (R)
Line Out (Rear): White (L) Red (R)
External Bluetooth Microphone
2 Video Outputs: Yellow
Connect to external A/V system to display
Video In: Yellow
Connect to external Video equipment
Connect to rear camera output
CONTROL WIRE
Parking (Gray) : Connect this wire to car hand brake system
Tel mute (Black) : Connect to mobile phone unit
When receiving calls, audio sound will be muted.
Rear camera (Red) : Connect to back rear camera
During back gear condition, this wire should be connected to high voltage.
DRIVING WITHOUT VIDEO DISPLAY
Follow the installation below so when the car is in motion, no video will come out from the LCD screen. Only sound can be heard from speaker.
Note:
- Only sound can be heard when car is in motion.
- Refer and follow your country's law regarding driving with video.
Caution:
- Do not attempt to install it by yourself if the instruction is not clear to you. Consult you dealer concerning the installation procedures.
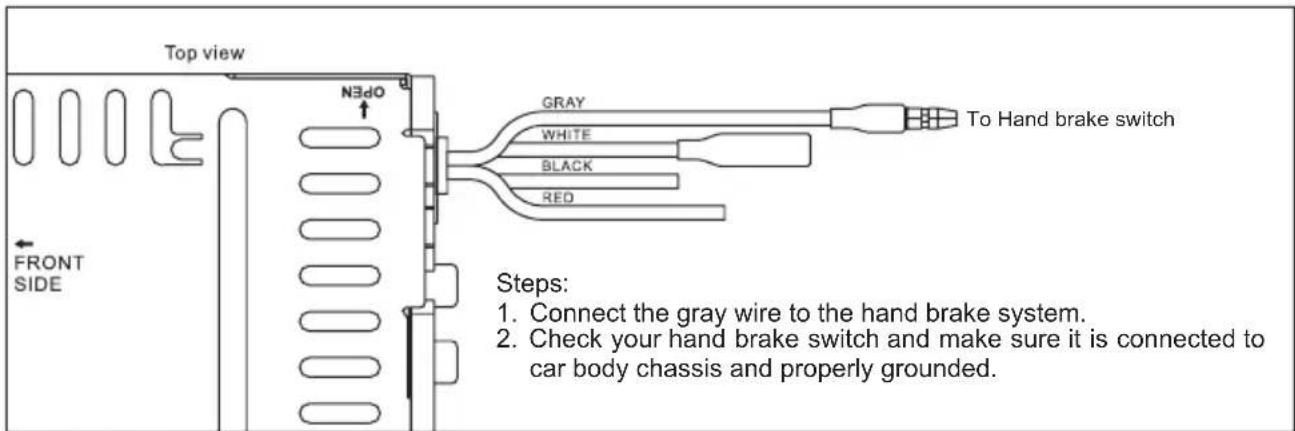
DRIVING WITH VIDEO DISPLAY
By following the installation below, video will always be shown on LCD screen no matter the car is in motion or not.
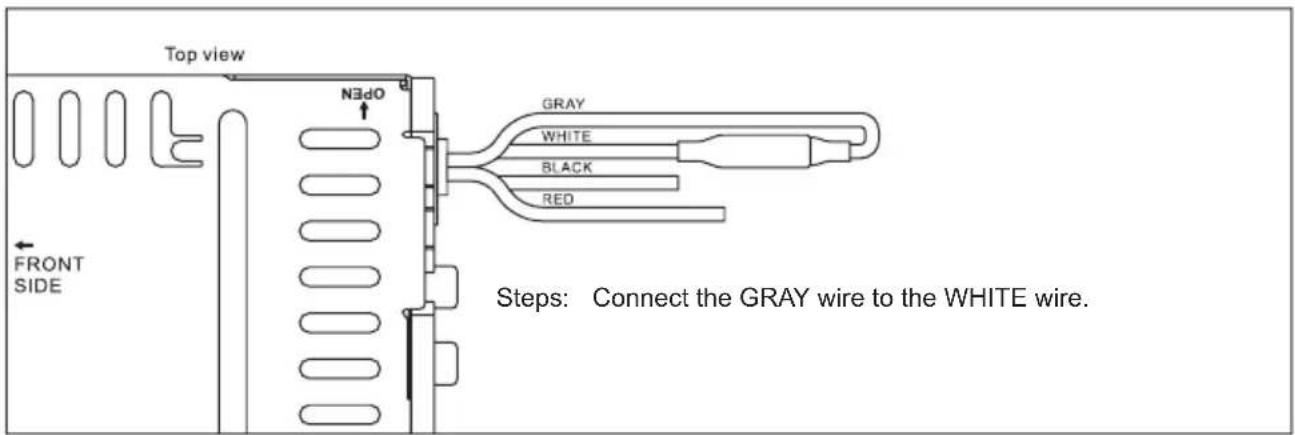
INSTALLING REAR CAMERA FOR PARKING/REVERSE MOTION
You can install an separate camera at the car rear end so when doing parking or reverse motion, the unit will automatically switch the video to the rear camera to guide the driver.
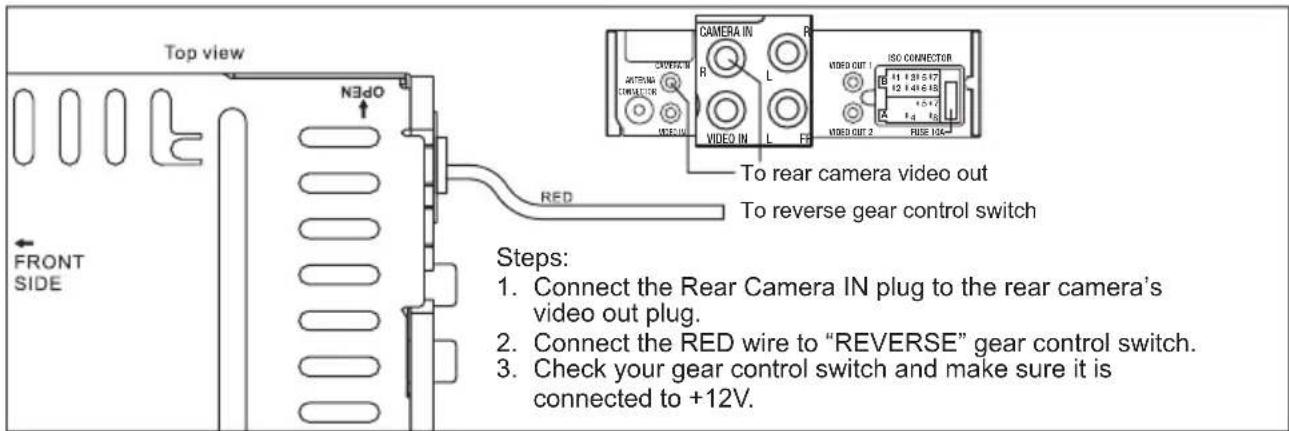
CONNECTOR A
- MEMORY +12V
- AUTO ANTENNA OUTPUT
- +12V (TO IGNITION KEY)
- GROUND
NOTE: (connector A no. 7) must be connected by car ignition key in order to avoid that car battery becomes weak when the car will be not used for long period.
CONNECTOR B
- REAR RIGHT SPEAKER (+)
- REAR RIGHT SPEAKER (-)
- FRONT RIGHT SPEAKER (+)
- FRONT RIGHT SPEAKER (-)
- FRONT LEFT SPEAKER (+)
- FRONT LEFT SPEAKER (-)
- REAR LEFT SPEAKER (+)
- REAR LEFT SPEAKER (-)
Maintenance
FUSE REPLACEMENT
If the fuse blows, check the power connection and replace the fuse. If the fuse blows again after the replacement, there may be an internal malfunction. In this case, consult your nearest repairing center.
Warning
Use the specified amperage fuse for each lead. Use of a higher amperage fuse may cause serious damage.

LOCATIONS OF PARTS (MAIN UNIT)
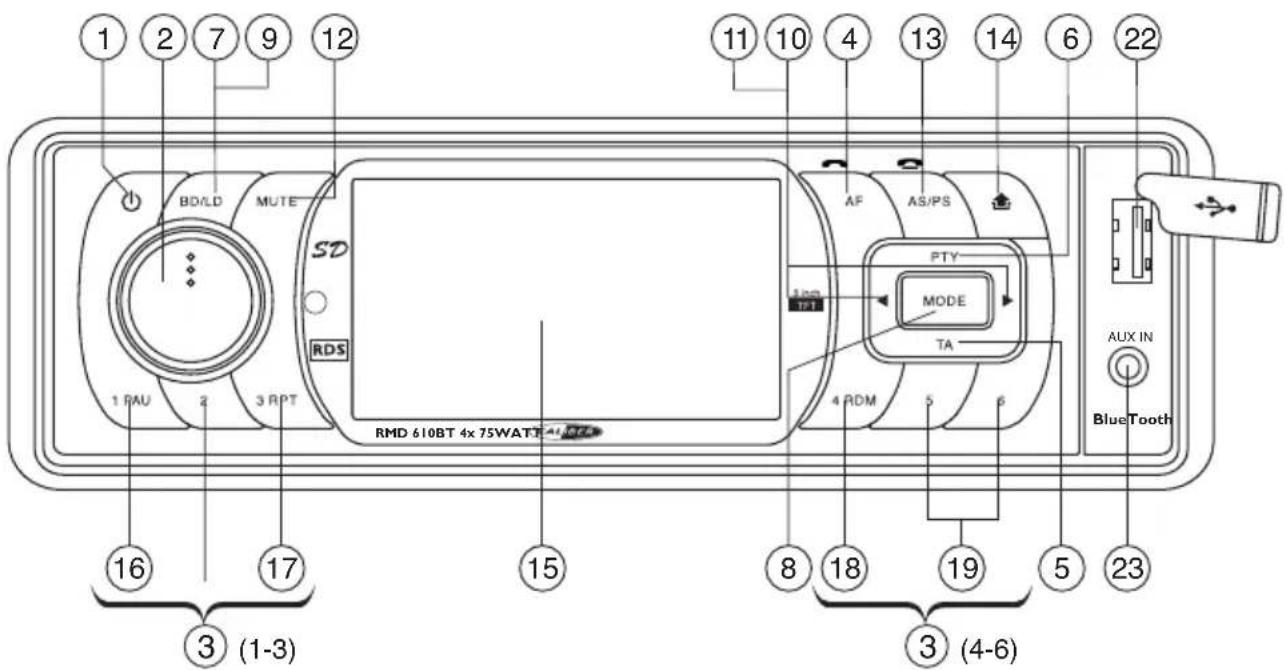
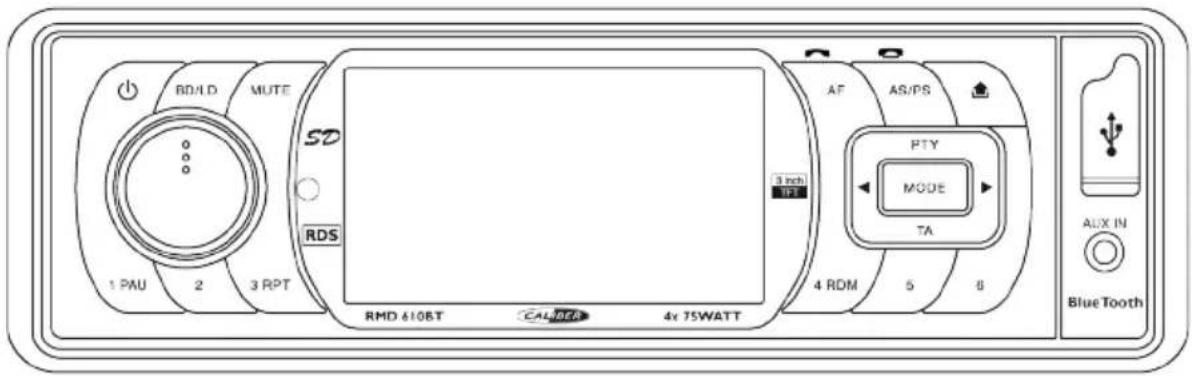
- POWER ON/OFF ( )
- SELECT FUNCTION BUTTON
- PRESET STATIONS (1,2,3,4,5,6)
- 'AF' FUNCTION BUTTON (ALTERNATIVE FREQUENCIES) / ANSWER CALL ()
- 'TA' FUNCTION BUTTON (TRAFFIC ANNOUNCEMENT)
- 'PTY' FUNCTION (PROGRAM TYPE)
- LOUDNESS BUTTON (LD)
- MODE BUTTON (MODE)
- BAND BUTTON (BD)
- TRACK / SEARCH BUTTON
- AUTO SEEK TUNING
- MUTE BUTTON (MUTE)
- AUTO SEEK SEARCH TUNING (AS/PS) / END A CALL ()
- PANEL RELEASE BUTTON ( )
- TFT-LCD DISPLAY
- PLAY/PAUSE BUTTON
- REPEAT BUTTON
- RANDOM BUTTON
- 10 TRACK SEARCH DOWN/UP
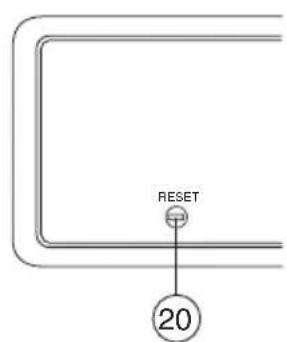
- RESET BUTTON
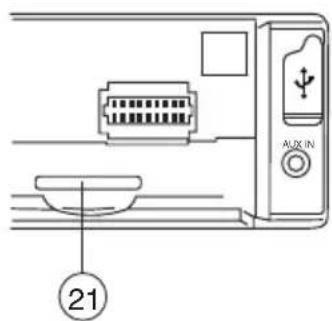
- SD/MMC CARD SLOT
- USB PORT
- FRONT AUX IN
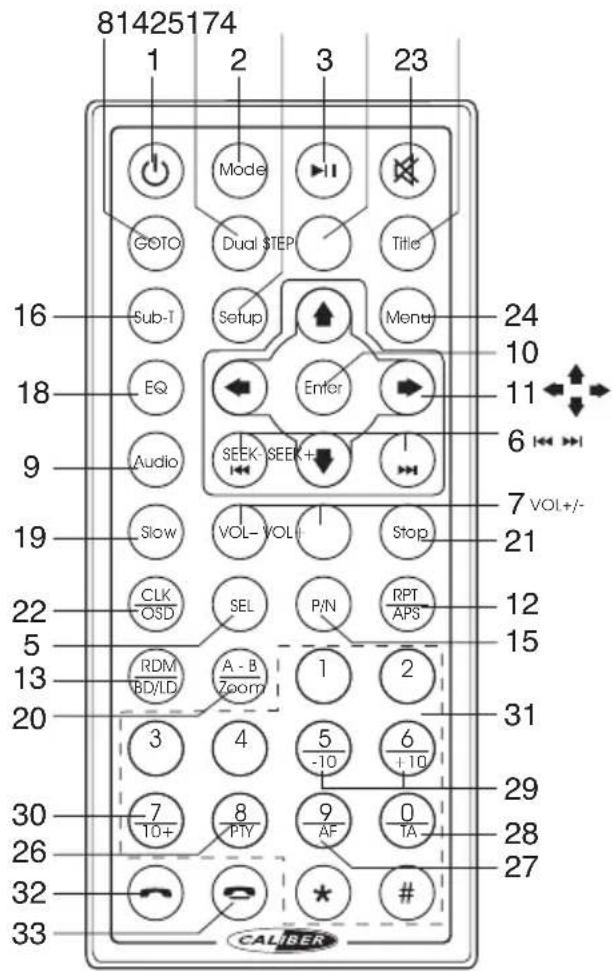
LOCATIONS OF PARTS (REMOTE CONTROL)
- POWER ON/OFF
- MODE
- PLAY/PAUSE
- TITLE
- SELECT
- SEEK+/SEEK- / TRACK/SEARCH
- VOL+/VOL-
- GOTO
- AUDIO
- ENTER
- NAVIGATION
- AUTO SEEK / PRESET SCAN / REPEAT
- RANDOM / BAND / LOUDNESS
- DUAL
- PAL / NTSC SYSTEM
- SUBTITLE
- SETUP
- EQUALIZER
- SLOW MOTION
- ZOOM / A-B REPEAT
- STOP
- CLOCK / ON SCREEN DISPLAY
- MUTE
- MAIN MENU
- STEP (FRAME BY FRAME PLAYBACK)
- PROGRAM TYPE
- ALTERNATIVE FREQUENCIES
- TRAFFIC ANNOUNCEMENT
- 10 TRACK SEARCH DOWN/UP
- TWO DIGIT TRACKS SEARCHS
- KEYPAD
- ANSWER CALL
- END A CALL
Use and care of the remote control
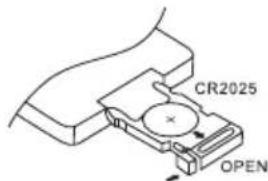
Installing the battery
Slide the tray out on the back of the remote control and insert the battery with the (+) and minus (-) poles pointing in the proper direction.
- When use for the first time, pull out the film protruding the tray.
CAUTIONS
- Remove the battery if the remote control is not used for a month or longer.
- Do not recharge, disassemble, heat or dispose the battery on fire.
- Do not store the battery with metallic materials.
- In the event of battery leakage, wipe the remote control completely clean and install a new battery
- When disposing of used batteries, please comply with government regulations or environmental public institution's rule that apply in your country/area.
- Always check carefully that you are loading the battery with plus (+) and minus (-) poles facing the proper directions.
Using the remote control
Point the remote control in the direction of the front panel to operate.
IMPORTANT
- Do not store the remote control in high temperatures or direct sunlight.
- Do not let the remote control fall onto the floor, where it may become jammed under the brake or accelerator pedal.
OPERATIONS
Turning the unit ON/OFF (∅)
Press "button to turn on unit. To turn off, press the button again.
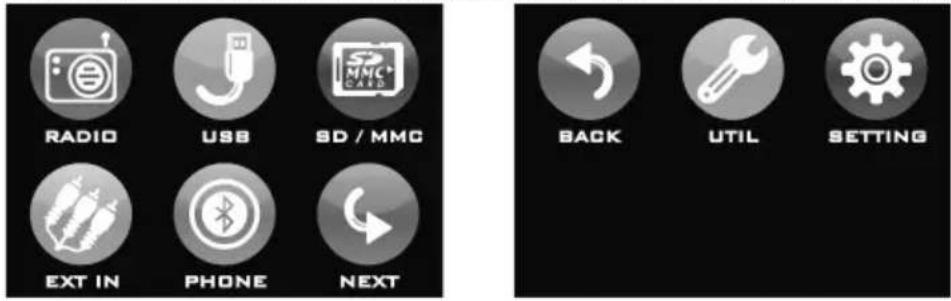
MAIN MENU
This is the root of the screen hierarchy and you can simply access all features by tapping on the touch screen buttons.
Selecting a source (MODE)
Press MODE repeatedly to switch between TUNER, AUX IN, USB, SD/MMC or BLUETOOTH (if Bluetooth is connected) mode.
Adjusting Volume
• Head Unit: Rotate VOL knob right or left to increase or decrease volume.
- Remote Control: Press VOL+ or VOL- to increase or decrease volume.
Mute Button
• Head Unit: Press MUTE button to mute the sound at once. Press again to return to previous volume level.
• Remote Control: Press button.
Loud Button (LD)
Press and hold LD button to turn on/off LOUD feature.
Equalizer (EQ)
Main Unit: On main menu, touch SETTINGS > EQ SETTINGS. Under Dsp-preset, select by touching the desired EQ setting.
Remote: Press EQ button. Under Dsp-preset, select the desired EQ by pressing (◀/▶).
CLOCK
To show clock, switch to RADIO mode and press CLK on remote control.
How to Set Clock
- Press UTIL on main menu.
- Press (/) to set the time.
- Press X to save and exit.
DUAL SETTINGS
DUAL is a feature that lets user listen to radio while the passenger at the back can watch video. This unit supports connection of external AV device such as portable TV through the AUDIO OUT and VIDEO OUT port.
1. Connect the AUDIO OUT and VIDEO OUT port at the back of head unit to the LINE IN of external AV device.
2. Press and hold MODE. Select memory card or USB source.
3. Press DUAL key on remote control to select which mode you want to control.
T = TUNER, C = CARD, U = USB
Note: You will need to connect an external portable TV or monitor when using this feature.
VIEWING PHOTO
- Insert disc, USB memory stick or SD/MMC card containing picture file format.
- Using remote ( / ), select PHOTO function and press ENTER.
- Using remote (▲ / ▼), select a file to view and press ENTER.
Note:
Press MENU on remote control to exit photo playback.
Press MENU on remote control will also go back one level or return to previous menu.
RESET
Reset button is placed on the housing. To reset, use a sharp point object and press and hold the RESET button for 2 seconds.
The reset button is to be activated for the following reason:
- Initial installation of the unit when all wiring is completed.
• All the function buttons does not operate. - Error symbol on the display.
LISTENING TO RADIO
Band (BD)
Pressing this key repeatedly will toggle cyclically between each band. FM1---FM2---FM3.
Automatic or Manual tuning (SEEK + / SEEK -)
When pressed short, these keys are operated as MANUAL tuning mode.
When pressed longer than 1 sec., they are operated as AUTOMATIC tuning mode.
Auto Seek/Preset scan (A/PS)
Preset Scan (PS) - By pressing shortly, the radio plays each preset station for 5 seconds.
Auto Seek (AS) - By pressing longer than 1 sec, auto seek is activated. The strongest stations are preset and stored in the corresponding preset number. When Auto Seek operation is finished, the radio executes the preset scan.
Storing and Recalling Frequencies
If you press any of the NUMBER (1-6) you can easily store up to six broadcast frequencies for later recall with the touch of a button.
- Choose a desired BAND.
- When you find a frequency that you want to store in memory, press a NUMBER 6) and hold until the preset number shows and lit in the display.
- The selected radio station frequency has been stored in memory. The next time you press the same NUMBER (1-6) the radio station frequency is recalled from memory.
Note: Up to 6 stations can be stored in each band.
Currently Tuned Station
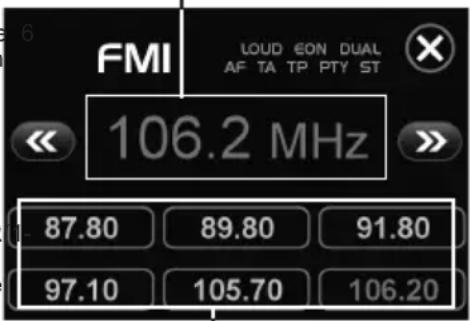
Preset Memory Station 1-6
USING THE RDS FUNCTION
What is RDS?
The RDS (Radio Data System) is a digital information system developed by the EBU (European Broadcast Union). Piggy-backed on normal FM broadcasts, RDS offers a variety of information services and automatic retuning functions for RDS-compatible car stereos. In 1988, RDS became available in the United Kingdom, France, West Germany, Ireland and Sweden.
'AF' Function (Alternative Frequencies)
- Press AF to toggle alternative frequency On/Off.
- When AF is ON, the radio checks the signal strength of the AF all the time, when it becomes too weak, the unit search for a better signal within AF lists then switch to that frequency.
'TA' Function (Traffic Announcement)
When pressed short, it is activated as TA mode on or off. When TA mode is on and traffic announcement is transmitted.
- If the volume level was under the threshold point, it will be raised to the threshold point.
'PTY' Function (Program Type)
- Press and hold PTY button to turn ON Program type.
- Rotate VOL knob to select program type.
- Once desired program shows, simply press PTY button once more and unit start searching for available stations.
Note: Program type will flash when searching for stations.
OPERATIONS COMMON FOR MP3/WMA/MPEG4
-10 Tracks Down / +10 tracks Up
- Press -10 button to jump 10 tracks backward starting from currently played track.
- Press +10 button to jump 10 tracks forward starting from currently played track.
Specifying particular track
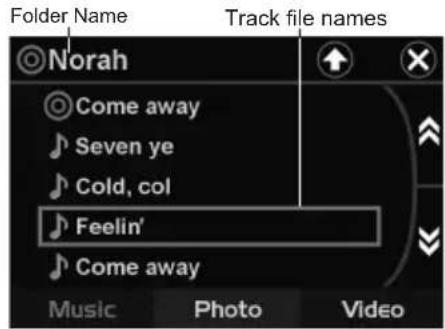
During playback, all track file names under a folder will be displayed on the screen categorized by Music, Photo, Video. Simply tap the screen on which category you want to play and rotate the volume knob to select file then push volume know to start playback.
Random Playback
Press RDM during playback to play the tracks in random/shuffle order. Press it again to cancel.
Tips: RDM is SHUFFLE on screen.
Stopping Playback
-
Press Stop on remote control during playback to stop playback. That position is stored in memory.
-
Press to continue. Playback starts from the position at which it was stopped.
Note: There is no STOP function in audio playback. Audio playback uses function.
Fast Forward / Fast Reverse
Note: ▶ on remote control is the same function as or on head unit.
-
During playback, press and hold on unit scans at the speed of x2 - x4 - x8 - x16 - x20
-
To resume normal playback at a desired point, press ▶1
Note: No sound is played during fast forward / fast reverse.
Finding the Beginning of Tracks
During playback, press on.
: Press to start playback from the beginning of the previous chapter or track.
: Press to start playback from the beginning of the following chapter or track.
Pause Playback
During playback, press ▶Press again to resume playback.
A-B Repeat Playback
This feature allows you to loop playback a section of the movie starting from Point A to B.
-
Press the button to play the movie.
-
Once you have located the section you wish to playback on loop repeat, press and hold A-B button. You will see "Rep-A" on the screen.
-
Let the movie play on until you have reached the end of the section you wish to watch on continuous loop. Once you have reached this point, press and hold A-B button again. "Rep-A-B" will appear on your screen. Playback will now start from Point A-B.
-
To stop A-B repeat playback, press and hold A-B button once more until "A-B CANCEL" disappears and normal playback resumes.
Displaying information (OSD)
During playback, you can see all information and current play settings. Display will show related playback time, elapse time, title number, chapter number and other information.
- Press OSD on the remote control once. Unit will display the play time and the disc elapse time.
- Press it once more and all other settings information will be displayed.
LISTENING TO MP3/WMA
Repeat tracks
You can choose between repeat playback of a single track or all tracks.
- Press RPT on the remote control during playback.
- Every time you press this button, the unit switches to the following settings:
Repeat 1 ☐1 – Repeat the current playback track.
Repeat All □ – Repeat all folders and tracks.
Return / Go Back
Press TITLE on remote control to go back one level or return to previous menu.
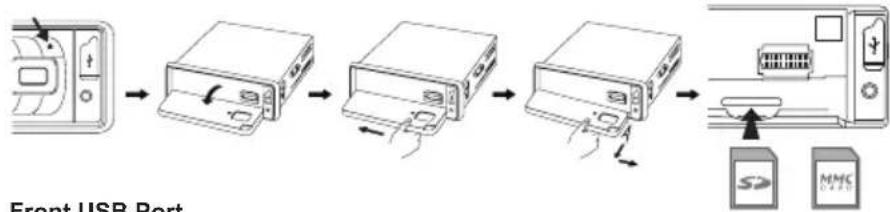
SD/MMC Card Input
Support MP3/WMA ID3 format music only.
- Press button and the front panel will open.
- Detach the panel by pulling it towards you.
- Carefully insert the SD/MMC card into the disc slot, attach back the panel. Unit starts playback automatically.
flowchart
graph LR
    A["Device Input"] --> B["Device 1"]
    B --> C["Device 2"]
    C --> D["Device 3"]
    D --> E["Device 4"]
    E --> F["Output Port"]
    style A fill:#f9f,stroke:#333
    style F fill:#bbf,stroke:#333
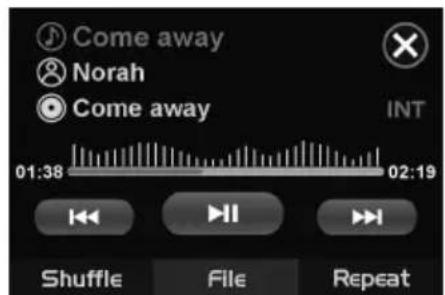
Player File Info
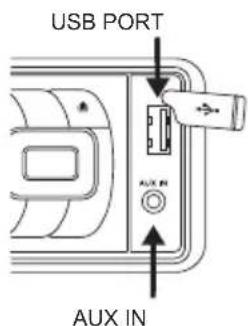
Front USB Port
Using USB cable to connect Your Portable MP3 Player.
\* IMPORTANT INFORMATION:
BECAUSE OF THE GREAT VARIETY OF PRODUCTS WITH USB, SD AND MMC CARD PORTS AND THEIR SOMETIMES QUITE MANUFACTURER-SPECIFIC FUNCTIONS WE CAN NEITHER GUARANTEE THAT ALL DEVICES WILL BE RECOGNIZED NOR THAT ALL OPERATING OPTIONS THAT ARE POSSIBLE IN THEORY WILL ACTUALLY WORK
Front Aux In
Convenient easy to use front "AUX IN" input jack, allows easy connection of Portable Media and other digital MP3 Players.
PLAYING MPEG4
Repeat Playback
-
Press RPT on the remote control during playback.
-
Every time you press this button, the unit switches to the following settings:
Repeat 1 – Repeat the current playback track.
Repeat All – Repeat all folders and tracks.
Repeat OFF – Turn off repeat function.
Searching for particular track using GOTO
You can use the GOTO function to search for a desired track number or particular point of a track to play.
1 Press GOTO on the remote control during playback. Time and track number search appears.
2 Enter the minutes and seconds for the currently played track if you want to search by time. Press Enter.
3 Enter track number if you want to search by tracks. Press Enter.
Changing the subtitle language during playback (Multi-subtitle)
With MPEG4 featuring multi-subtitle recordings, you can switch between subtitle languages during playback.
- Press Sub-T on the remote control during playback. Press repeatedly until the supported desired subtitle appears.
Slow motion playback
This feature lets you slow down playback.
- Press Slow on the remote control during playback.
- Pressing it repeatedly will switch you to the following steps: 1/2 - 1/3 - 1/4 - 1/5 - 1/6 - 1/7.
Note:
• To resume normal playback, press PLAY/PAUSE ()▶
• There is no sound during slow motion playback.
Zooming in During Playback
You can zoom in into the picture during playback.
-
Press ZOOM on the remote control during playback.
-
Every time you press this button, the unit will zoom 2 - 3 - 4 - 1/2 - 1/3 - 1/4 times and OFF.
Frame-by-frame playback
This lets you move ahead one frame at a time during playback.
1 Each time you press Step button on remote control, you move ahead one frame.
To return to normal playback, press ▶II
PAL / NTSC (P/N)
Press and hold P/N button to switch between PAL, NTSC system.
Return / Go Back
Press MENU on remote control to go back one level or return to previous menu.
HOW TO USE BLUETOOTH IN YOUR CAR AUDIO
HOW TO PERFORM PAIRING
Before you can dial out from the car stereo, you must first perform PAIRING. Pairing is a procedure used to connect 2 Bluetooth devices together
- On Main Menu, tap PHONE > Pairing.
- Turn on Bluetooth feature of your mobile phone. Perform "Add Bluetooth device" from your mobile phone. The mobile will search for any Bluetooth devices within the range. Select "CAR-BT" and enter Passkey: "0000" to connect. (Please refer to the instruction manual of your mobile phone for Bluetooth Pairing).
- After successful pairing, connect the Bluetooth function of your mobile with the car stereo. A Bluetooth logo will appear on top of phone menu screen.
Note: "CAR-BT" is the Bluetooth device name of the car stereo.
Audio Streaming
If your phone is "A2DP" format compatible, then you can play music in your mobile and the sound will be transferred to car head unit.
- Make sure your mobile and the unit is properly paired and connected.
- Play the music through your mobile music player software.
- Press PHONE > MUSIC on head unit. The sound will be transferred to the head unit.
- You can press the / button on head unit to play previous / next song stored in mobile.
Making Calls
Important: Before you make calls, make sure that the devices are properly paired and connected.
- On Main Menu, tap PHONE > DIAL.
- To make calls via remote control, enter the phone number via the remote control keypad and press 📄 button to dial out.
- To make calls via the touch screen, tap those number keys on screen and press CALL button to dial out.
- Press button to end call.
Answering / Hanging Up
- To answer a call, press the button.
- Once you have finished your conversation, press the button to hang up.
Contacts
Contacts allow the users to add contacts directly stored in head unit.
- On Main Menu, tap PHONE > Contacts.
- Press the "+" button to add a contact.
- Enter the name then press Next.
- Enter the number then press Next.
- Select the number type then press the SAVE logo button.
History
History contain the lists of outgoing and incoming numbers.
- On Main Menu, tap PHONE > History.
- Select the number you wish to call out and then press CALL button.
- You can also delete the selected number by pressing Delete button or clear all the entries by pressing CLEAR ALL.
CUSTOMIZING AUDIO / VIDEO SETTINGS
AUDIO SETUP
- Press VOL knob to enter AUDIO setup. Selected item will be highlighted. You can set BASS, TREBLE, BALANCE, FADER, TA VOLUME.
- Press ◀ or ▶ button to select item. Rotate VOL knob to make adjustments.
- Press VOL knob to exit settings.
VIDEO SETUP
- Press and hold VOL knob to enter VIDEO setup. Selected item will be highlighted. You can set BRIGHTNESS, CONTRAST, SATURATION, HUE, SHARPNESS.
- Press ◀ or ▶ button to select item. Rotate VOL knob to make adjustments.
- Press and hold VOL knob to exit settings.
Note: Depending on model's feature, some items may not show on screen.
SETTING THE MPEG4 PLAYER
You can flexibly customize the unit to suit your preference. You can set the language and other video and audio settings so when playback starts it will always use your preferred settings.
Important:
- Play any video file before you can access the setup.
- Press Setup on the remote control.
- Use ( ) to return / enter category.
| Settings | Category | Options |
| System Setup | TV System | NTSC, PAL, AUTO |
| Auto Play | ON, OFF | |
| TV Type | 4:3PS, 4:3LB, 16:9 | |
| Password | Setup password | |
| Rating | Setup rating level | |
| Default | Restore to factory settings | |
| Language Setup | OSD Language | Select preferred options appear on screen |
| Audio Language | ||
| Subtitle Language | ||
| Menu Language | ||
| MPEG4 Language | ||
| Video Setup | Brightness | Use navigation keys on remote control to setup desired level. |
| Contrast | ||
| Hue | ||
| Saturation | ||
| Sharpness |
Setting Rating Password
1 Press Setup on the remote control.
2 Using Navigation keys select System Setup > Password and press Enter.
3 Enter the default password '0000' and press Enter to unlock first and then enter new 4 digit password and press Enter. The unlock logo will switch to lock indicating password has been set.
Note:
- The default password is '0000'.
- In case you forgot your password, you can use the master password '0000' to unlock and reset the password.
- Master password will only work while SETUP button is press during playback.
TECHNICAL SPECIFICATIONS
MP3/WMA PLAYER SECTION
Signal to Noise Ratio > 60 dB
Channel Separation > 50 dB (1kHz)
Frequency Response 20 Hz - 20 kHz
TUNER (FM)
Frequency Range 87.5-108 MHz
Channel Step 50 kHz
Sensitivity 2.8 μV
Stereo Separation 30 dB
Signal to Noise Ratio 50 dB
LINE-OUT
Output 1300 mV (max.)
Impedance 10k Ohm
AUX-IN
Frequency Response 20 Hz - 20 kHz
Sensitivity 775 mV
Impedance 20k Ohm
GENERAL
Power Supply 12V DC (10.8-15.6V allowable)
Speaker Impedance 4 or 8 Ohm
Output power 75W x 4CH
Fuse 10A
Note: Specification and the design are subject to possible modification without notice due to improvements.
- RMD 610BT
- INSTRUCTION MANUAL
- INSTALLATION
- PRECAUTIONS
- Detaching and attaching the front panel
- FOLDING DOWN AND DETACHING/ATTACHING THE FRONT PANEL
- Notes:
- CLEANING THE CONNECTOR
- WIRE CONNECTION
- IN / OUT CONNECTOR
- Video Outputs: Yellow
- CONTROL WIRE
- DRIVING WITHOUT VIDEO DISPLAY
- Note:
- Caution:
- DRIVING WITH VIDEO DISPLAY
- INSTALLING REAR CAMERA FOR PARKING/REVERSE MOTION
- CONNECTOR A
- CONNECTOR B
- Maintenance
- FUSE REPLACEMENT
- Warning
- LOCATIONS OF PARTS (MAIN UNIT)
- LOCATIONS OF PARTS (REMOTE CONTROL)
- Use and care of the remote control
- Installing the battery
- CAUTIONS
- Using the remote control
- IMPORTANT
- OPERATIONS
- Turning the unit ON/OFF (∅)
- MAIN MENU
- Selecting a source (MODE)
- Adjusting Volume
- Mute Button
- Loud Button (LD)
- Equalizer (EQ)
- CLOCK
- How to Set Clock
- DUAL SETTINGS
- VIEWING PHOTO
- RESET
- LISTENING TO RADIO
- Band (BD)
- Automatic or Manual tuning (SEEK + / SEEK -)
- Auto Seek/Preset scan (A/PS)
- Storing and Recalling Frequencies
- USING THE RDS FUNCTION
- What is RDS?
- 'AF' Function (Alternative Frequencies)
- 'TA' Function (Traffic Announcement)
- 'PTY' Function (Program Type)
- OPERATIONS COMMON FOR MP3/WMA/MPEG4
- -10 Tracks Down / +10 tracks Up
- Specifying particular track
- Random Playback
- Stopping Playback
- Fast Forward / Fast Reverse
- Finding the Beginning of Tracks
- Pause Playback
- A-B Repeat Playback
- Displaying information (OSD)
- LISTENING TO MP3/WMA
- Repeat tracks
- Return / Go Back
- SD/MMC Card Input
- Front USB Port
- \* IMPORTANT INFORMATION:
- Front Aux In
- PLAYING MPEG4
- Repeat Playback
- Searching for particular track using GOTO
- Changing the subtitle language during playback (Multi-subtitle)
- Slow motion playback
- Zooming in During Playback
- Frame-by-frame playback
- PAL / NTSC (P/N)
- HOW TO USE BLUETOOTH IN YOUR CAR AUDIO
- HOW TO PERFORM PAIRING
- Audio Streaming
- Making Calls
- Answering / Hanging Up
- Contacts
- History
- CUSTOMIZING AUDIO / VIDEO SETTINGS
- AUDIO SETUP
- VIDEO SETUP
- SETTING THE MPEG4 PLAYER
- Important:
- Setting Rating Password
- TECHNICAL SPECIFICATIONS
- MP3/WMA PLAYER SECTION
- TUNER (FM)
- LINE-OUT
- AUX-IN
- GENERAL
Brand : CALIBER
Model : MCD610BT
Category : Car Radio