
AAP-340F - Kettle Aroma - Free user manual and instructions
Find the device manual for free AAP-340F Aroma in PDF.


| Product Type | Electric Hot Water Dispenser (Kettle) |
| Model | AAP-340F |
| Brand | Aroma |
| Capacity | 4 quarts (16 cups) |
| Heating Time | Approximately 30 minutes to boil full capacity |
| Temperature Settings | 150°F, 185°F, 210°F (adjustable) |
| Dispensing Methods | Automatic button, manual pump, cup switch |
| Delay Start | 3, 6, or 9 hours |
| Reboil Function | Yes, with REBOIL button |
| Auto Lock | Yes, activates after each use |
| Water Tank Material | Stainless steel |
| Inner Lid Material | Stainless steel |
| Lid Removal | Removable for easy cleaning and filling |
| Power Rating | 120V, 60Hz (estimated 1500W) |
| Dimensions (Approx.) | 10.5 x 12.5 x 12 inches |
| Weight (Approx.) | 3.8 pounds |
| Cord Length | Short power cord (approx. 2-3 ft) |
| Grounding | 3-prong grounded plug |
| Warranty | 1 year limited warranty (continental US) |
| Care and Cleaning | Not dishwasher safe; wipe with damp cloth; use lemon juice solution for hard water stains |
| Safety Features | Auto-lock to prevent accidental dispensing, safety lock on manual pump, boil-dry protection (via minimum fill level) |
| Included Accessories | None specified beyond the unit itself |
| Manufacturer | Aroma Housewares Company, San Diego, CA |
Frequently Asked Questions - AAP-340F Aroma
User questions about AAP-340F Aroma
0 question about this device. Answer the ones you know or ask your own.
Ask a new question about this device
Download the instructions for your Kettle in PDF format for free! Find your manual AAP-340F - Aroma and take your electronic device back in hand. On this page are published all the documents necessary for the use of your device. AAP-340F by Aroma.
USER MANUAL AAP-340F Aroma
natural_image
White portable water heater with digital thermometer and floral decoration (no visible text or symbols)Manuel de instructions
aqua caliente
Dispenador electro de
Hot Water Central
AROWA®
AROMA®
Hot Water Central™
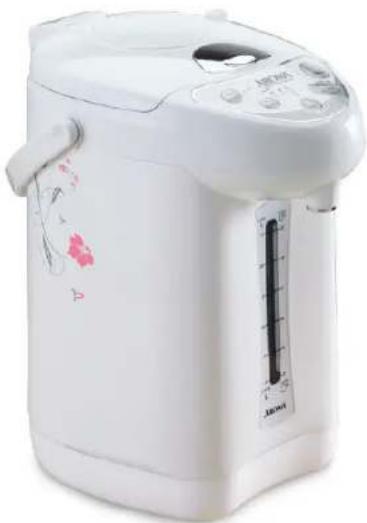
Electric Hot Water Dispenser
Instruction Manual
natural_image
White rice cooker with digital display and temperature scale (no visible text or symbols)www.AromaCo.com
AAP-340F
With the Aron#hot Water Central hot water is just a button press away. Boil up to 4 quarts of water in just 30 minutes, then have it hot throughout the day.
With hot water available around the clock, the Hot Water Central ideal for the quick preparation of all kinds of hot meals and beverages. Including:
- Hot Tea
- Hot Chocolate
- Quick Noodles
- Baby Formula
- Instant Coffee
- Oatmeal
The Aroma Hot Water Centra includes adjustable temperature levels which are great for setting temperature just right. And the Delay Start function allows for the Hot Water Centra be shut down when no one's home, but have hot water ready again right when it's needed.
For more information on your Hot Water "Central additional kitchen solutions, visit us online at www.Aromaco.com.
⑤ 2010 Arcoma Housewares Company.
WW.AromaCo.com
1-800-276-6286
u.s.
San Diego, CA 92121
6469 Flinders Drive
Aroma Housewares Co.
Please read the following instructions carefully before your first use Para mayor information sobre su Hot Water Garden Soluciones adiclonales para su cocina, vistinos en línea al: wuw.Aromaco.com
© 2010 Aroma Housewares Company All rights reserved.
calientes; including:
electrodomesticos, including as signatures:
Basic safety precautions should always be followed when using electrical appliances, including the following:
-
Read all instructions before use.
-
Do not touch hot surfaces. Use handles or knobs.
-
To protect against electrical shock, do not immerse the cord, the appliance in water or any other liquid.
-
Close supervision is necessary when this appliance is used nea children. This appliance is not intended to be used by childre
-
Unplug from outlet when not in use and before cleaning. All cool completely before putting on or taking oparts, and before cleaning.
-
Do not operate this appliance with a damaged cord or plug the appliance malfunctions or has been damaged in any mar Contact Aromácustomer service for examination, repair or adjustment.
-
The use of accessory attachments not recommended by Arom Housewares may cause injuries or damage to the product.
-
Do not use outdoors.
-
Do not allow the cord to hang over the edge of a table or to touch hot surfaces.
-
Do not place on or near a hot gas or electric burner, or in oven.
-
Extreme caution must be used when moving the appliance containing hot water.
-
Always attach the plug to the appliance first, then plug the wall outlet. To disconnect, remove the plug from the wall
13.Do not use this appliance for other than intended use.
- Never fill water beyond the "FULL" mark in the inner pot or I "REFILL" mark on the water level indicator, other will spill it over or dry-up during boiling.
15.Do not open the lid when water is boiling to avoid scalding steam.
-
Do not fill the Hot Water Central any substance other than water.
-
Water in the Hot Water Cewill be extremely hot. Use caution when serving as hot water may cause scalding. Always test temperature before serving.
-
If making baby formula with hot water, always add cold water well. Water from the Hot Water can trade too hot for the bab The amount of cold water needed to reach an adequate temperature will vary. Always test the temperature before servin
SAVE THESE INSTRUCTIONS
SHORT CORD INSTRUCTIONS
- A short power-supply cord is provided to reduce the risks resulting from becoming entangled in or tripping over a longer cord.
- Longer extension cords are available and may be used if care is exercised in their use.
- If a longer extension cord is used: a. The marked electrical rating of the extension cord should be at least as great as the electrical rating of the appliance.
b. The longer cord should be arranged so that it will not drape over the countertop or tabletop where it can be pulled by children or tripped over unintentionally.
c. If the appliance is of the grounded type, the extension cord should be
DO NOT DRAPE CORD!

GROUNDING INSTRUCTIONS
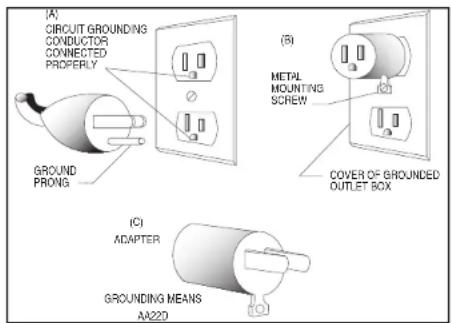
This appliance must be grounded while in use to protect the operator from electrical shock. The appliance is equipped with a 3-conductor cord and a 3-prong grounding-type plug to fit the proper grounding-type receptacle. The appliance has a plug that looks like sketch A. An adapter, sketch B, should be used for connecting sketch-A plug plugs to two-plugs to two-prong receptacles. The grounding tab, which extends from the adapter, must be connected to a permanent ground such as a properly grounded outlet box as shown in sketch C using a metal screw.
This appliance is for household use only.
乙
uso domestico.
IDENTIFICATION DE LAS PARTES
PARTS IDENTIFICATION


- Handle
- Lid Removal Hinge
- Manual Dispense Pump
- Manual Dispense Safety Lock
- Lid Latch
- Control Panel
- Dispensing Spout
- Cup Switch
- Water Level Indicator Window
- Stainless Steel Water Tank
- Stainless Steel Inner Lid
Control Panel
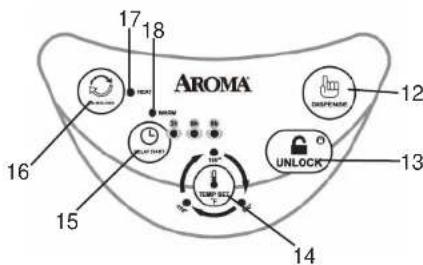
- Automatic Dispense Button
- Unlock Button
- Temp Set Button
- Delay Start Button
- Reboiling Button
- Heat Indicator Light
- Warm Indicator Light
USING YOUR HOT WATER CENTRAL™
Before First Use:
- Read all the instructions and important safeguards.
- Remove all packaging materials; check that all items are received in good condition.
- Wash the stainless steel water tank with warm, soapy water using a sponge or dishcloth.
- Rinse thoroughly to remove any soapy residue.
- Wipe body and stainless steel inner lid clean with a damp cloth.
NOTE:
- Do not use abrasive cleaners or scouring pads.
- Do not immerse the appliance, cord or plug in water at any time.
To Heat Water:
- Lift the lid latch to open the lid. If needed, for filling purposes, the entire lid can be removed from the lid removal hinge on the back of the lid. See "Removing the Lid" on page 7 for details.
- Fill the stainless steel water tank with water anywhere between the "Full" mark in the stainless steel inner pot and the 2 cup mark on the water level indicator. Properly replace the lid before heating water.
- Attach the power cord by plugging the connector to the Hot Water Central" and then connect the plug to an available wall outlet.
- The water will automatically begin heating and the heat indicator light will illuminate.
- The warming temperature selection will default to 185°. To select another temperature, press the TEMP SET button to toggle between 150°, 185° and 210°.
- Once the water has come to a boil, the unit will automatically switch to the Warm function. The heat indicator light will go off and the warm indicator light will illuminate.
- The Hot Water Central ^™ will keep the water warm at the selected warm temperature as long as it is plugged in, unless the Delay Start function is used.
NOTE:
- If filled to the full, 16-cup capacity, water will take approximately 30 minutes to reach a boil. Smaller amounts of water will have a proportionally shorter boiling time.
- Never fill water past the "FULL" mark in the stainless steel inner pot or below the 2 cup mark on the water level indicator, otherwise it may spill over or cause damage to the unit.
- Do not open the lid while water is boiling to avoid scalding by hot steam.
natural_image
Diagram showing a tool interacting with a curved surface, labeled 'Figure A' at the bottom (no other text or symbols)G
USING YOUR HOT WATER CENTRAL™
The Automatic Locking Feature:
- For safety reasons, the Hot Water Central ^™ will automatically lock after each use. All buttons will be locked and water will not dispense.
- To use the unit, press the UNLOCK button. The warm indicator light will illuminate and all buttons will function properly.
To Dispense Water:
For your convenience, there are three easy ways to dispense hot water from your Hot Water Central ^™ .
Automatically:
- Disable the automatic lock as instructed above.
- Press the AUTOMATIC DISPENSE button. Water will begin to pour. Water will continue to dispense as long as the button is pressed.
- To stop dispensing, release the AUTOMATIC DISPENSE button.
- The Hot Water Central ^™ will automatically lock shortly after the AUTOMATIC DISPENSE button is released.
Manually:
- To dispense water with the MANUAL DISPENSE PUMP, move the MANUAL DISPENSE SAFETY LOCK on the top of the lid to the "On" position.
- Press down on the MANUAL DISPENSE PUMP. Pressing down will dispense water.
- Repeat until the needed amount of water has been dispensed.

HELPFUL HINT:
- The manual dispense option is excellent for serving, since no power is needed. Disconnect the cord and bring the Hot Water Central™ where it's needed. It's perfect for making and sharing favorite hot beverages with guests and family.
Cup Switch Dispensing:
- Disable the automatic lock as instructed above.
- Press a heat-safe cup against the CUP SWITCH located behind the dispensing spout (see Figure A).
- Water will begin pouring once the switch is depressed.
- To stop dispensing, simply remove the cup.
- The Hot Water Central ^™ will automatically lock shortly after the CUP SWITCH is released.

USING YOUR HOT WATER CENTRAL™
To Reboil:
Water may be reboiled at any time after the Hot Water Central ^™ has entered the Warm function.
- Press the REBOILING button. The Hot Water Central™ will begin to reboil the water and the heat indicator light will illuminate.
- The warm temperature selection will remain at the previous level. To change the warm temperature, press the TEMP SET button.
- Once the water reaches a boil, the Hot Water Central™ will automatically switch back to Warm mode. The heat indicator light will turn off and the warm indicator light will illuminate.
- The Hot Water Central ^™ will keep the water at the chosen warm temperature until it is unplugged or the Delay Start function is selected.
NOTE:
- Reboil time will vary based on the amount of water being reboiled. - Never operate the Hot Water Central ^™ if the amount of water is below the 2 cups line.
To Use the Delay Start:
The Delay Start function is a great way to cut down on power use by having the Hot Water Central ^™ power off when no one is home, then reboil the water just in time.
- Press the DELAY START button. The Delay Start function will default to 6 hours, meaning that in 6 hours the Hot Water Central ^™ will be back on and have water at a boil.
- To adjust the Delay Start time, press the DELAY START button to toggle between the Delay Start time options. The Hot Water Central will Delay Start for 3, 6 or 9 hours.
- Once the DELAY START button is pressed, the Hot Water Central™ will power off for the chosen time.
- The Hot Water Central ^™ will have water reach a boil once the selected time has passed.
HELPFUL HINTS:
- Pressing the REBOILING button at any time will cancel the Delay Start function and the Hot Water Central™ will begin to reboil the water.
- Water may still be dispensed from any of the 3 pouring options during the Delay Start. Simply follow the steps in "To Dispense Water" on page 5.
Para guitar la tapa:
Always unplug the unit and allow it to cool completely before cleaning.
- Wipe the lid and body clean with a damp cloth.
- When the unit has cooled completely, wash the stainless steel water tank with warm, soapy water and a sponge. Rinse thoroughly to remove soapy residue. For easy cleaning, the lid can be completely removed. Properly replace the lid before next use.
- Wipe the stainless steel inner lid with a warm, damp sponge or dishcloth.
NOTE:
- If you live in an area that has hard water, the stainless steel water tank may discolor slightly. To remedy this, mix a solution of lemon juice and water, filling the stainless steel water tank up to the "Full" mark. Boil water and let soak for one hour. Repeat cleaning instructions above to remove any lemon juice residue.
- Never immerse the appliance in water or any other liquid.
• This product is NOT d ishwasher safe.
Removing the Lid:
For easier cleaning and filling, the lid of the Hot Water Central ^™ may be removed. To remove the lid:
- Press down on the lid removal hinge (Figure B).
- While holding down on the lid removal hinge remove the lid as shown in Figure C.

natural_image
Line drawing of a hand inserting a switch into a cylindrical device (no text or symbols)Figure B

Figure C
- To replace the lid, position it back into place while holding down on the lid removal hinge.
- Once the lid is in place, release the lid removal hinge.
LIMITED WARRANTY
Aroma Housewares Company warrants this product free from defects in material and workmanship for one year from provable date of purchase in continental United States.
Within this warranty period, Aroma Housewares Company will repair or replace, at its option, defective parts at no charge, provided the product is returned, freight prepaid with proof of purchase and U.S. \$15.00 for shipping and handling charges payable to Aroma Housewares Company. Before returning an item, please call the toll free number below for return authorization number. Allow 2-4 weeks for return shipping.
This warranty does not cover improper installation, misuse, abuse or neglect on the part of the owner. Warranty is also invalid in any case that the product is taken apart or serviced by an unauthorized service station.
This warranty gives you specific legal rights, which may vary from state to state, and does not cover areas outside the United States.
AROMA HOUSEWARES COMPANY
6469 Flanders Drive
San Diego, California 92121
1-800-276-6286
M-F, 8:30 AM - 4:30 PM, Pacific Time
Website: www.AromaCo.com

- AROWA®
- AROMA®
- SHORT CORD INSTRUCTIONS
- GROUNDING INSTRUCTIONS
- USING YOUR HOT WATER CENTRAL™
- Before First Use:
- NOTE:
- To Heat Water:
- G
- The Automatic Locking Feature:
- To Dispense Water:
- Automatically:
- Manually:
- HELPFUL HINT:
- Cup Switch Dispensing:
- To Reboil:
- To Use the Delay Start:
- HELPFUL HINTS:
- Removing the Lid:
- LIMITED WARRANTY
Brand : Aroma
Model : AAP-340F
Category : Kettle