
PD-6907U - Information station Posiflex - Free user manual and instructions
Find the device manual for free PD-6907U Posiflex in PDF.


| Brand | Posiflex |
| Model | PD-6907U |
| Product Type | Information Kiosk / All-in-One Touch Terminal |
| Display Size | 15 inches (diagonal) |
| Display Resolution | 1024 x 768 pixels (XGA) |
| Touch Technology | Resistive touchscreen |
| Aspect Ratio | 4:3 |
| Brightness | 250 cd/m² |
| Contrast Ratio | 500:1 |
| Viewing Angle | 160° horizontal / 130° vertical |
| Connectivity | VGA, USB, RS-232, Ethernet |
| Power Supply | 12V DC, 60W |
| Power Consumption | Less than 50W typical |
| Dimensions (W x H x D) | 380 x 300 x 50 mm |
| Weight | Approximately 5 kg |
| Mounting | VESA 75 x 75 mm |
| Operating Temperature | 0°C to 40°C |
| Storage Temperature | -20°C to 60°C |
| Certifications | CE, FCC |
| Cleaning Instructions | Use a soft, dry cloth; avoid solvents and abrasive cleaners |
| Safety Precautions | Use a grounded power outlet; keep away from moisture and direct sunlight |
| Spare Parts Availability | Contact Posiflex authorized service providers for replacement parts |
Frequently Asked Questions - PD-6907U Posiflex
User questions about PD-6907U Posiflex
0 question about this device. Answer the ones you know or ask your own.
Ask a new question about this device
Download the instructions for your Information station in PDF format for free! Find your manual PD-6907U - Posiflex and take your electronic device back in hand. On this page are published all the documents necessary for the use of your device. PD-6907U by Posiflex.
USER MANUAL PD-6907U Posiflex
PD-6907U Rear-Mount Customer Display User Manual

natural_image
Front view of a flat-screen computer monitor with no visible text or symbols on the screen.Package Contents
√ 7" Rear-Mount Customer Display with Bracket (x 1)
√ Thumbscrew (x 2)
√ USB Cable for PD-6907U (x 1)
FCC NOTES
This system meets industry & government requirements and applicable standards. This equipment generates, uses, and can radiate radio frequency energy and, if not installed and used in accordance with the instructions manual, may cause interference to radio communications. It has been tested and found to comply with limits for a Class A digital device pursuant to subpart B of Part 15 of FCC Rules, which are designed to provide reasonable protection against interference when operated in a commercial environment. Operation of this equipment in a residential area is likely to cause interference in which case the user at his own expense will be required to take whatever measures to correct the interference.
This device complies with part 15 of the FCC Rules. Operation is subject to the following two conditions: (1) This device may not cause harmful interference, and (2) this device must accept any interference received, including interference that may cause undesired operation.
CE CLASS A WARNING
This equipment is compliant with Class A of CISPR 32. In a residential environment this equipment may cause radio interference.
AVERTISSEMENT CE CLASSE A
Warranty will terminate automatically when the machine is opened by any person other than the authorized technicians. The user should consult his/her dealer for the problem happening. Warranty voids if the user does not follow the instructions in application of this merchandise. The manufacturer is by no means responsible for any damage or hazard caused by improper application.
LIMITES DE GARANTIE
Views of the PD-6907U
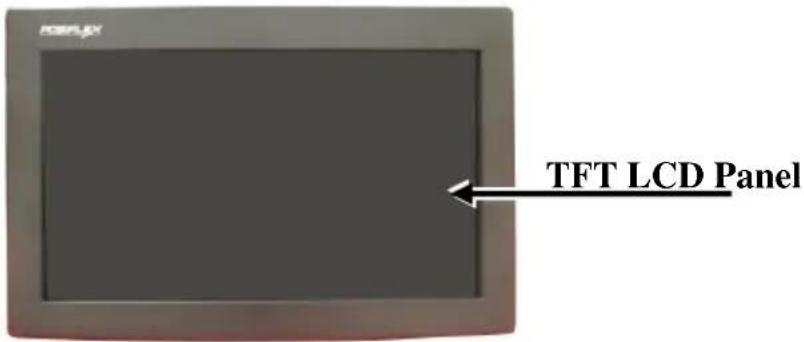
Front View
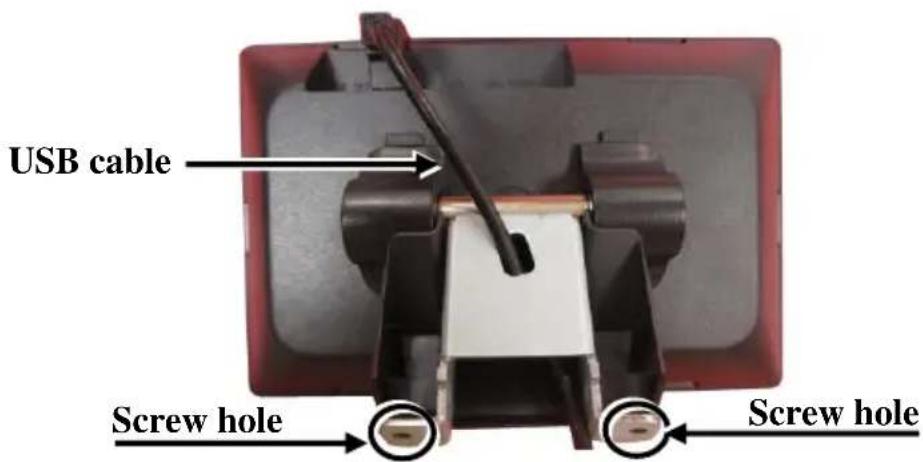
Rear View
I/O View

Mounting the Rear-Mount Display onto ZT Series POS Terminal
The following instructions are provided to help you mount your PD monitor to Posiflex ZT series POS terminals. During installation, please ensure the terminal is properly turned off and disconnected from the power sources to avoid potential hazards.
- Rotate the screen to the horizontal position like the below picture, and there is a base cover latch on the front side of the base stand.

natural_image
Close-up of a black electronic device with a circular component inserted, shown from an inset close-up (no text or symbols visible)- Push the latch (toward left side) through the direction of the arrow like below pictures, and then you can release the base cover.

natural_image
Two-step photo showing hands operating a device with directional arrows indicating movement (no text or symbols present)- Take off the base cover.
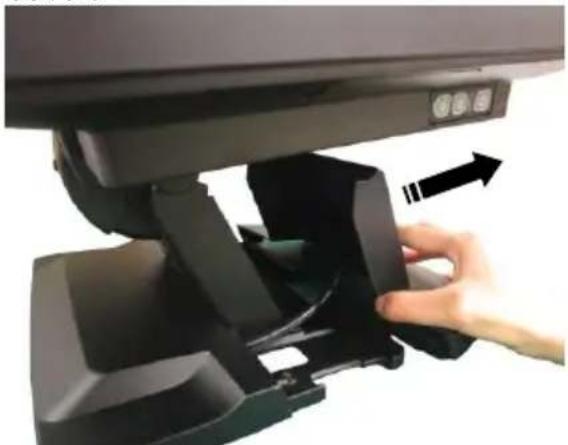
natural_image
Close-up of a hand inserting a device into a black plastic component, with no visible text or symbols.- Rotate the screen to the upright position like below pictures.

natural_image
Two views of a desktop monitor with an arrow indicating the change from left to right (no text or symbols visible)- There is a latch inside cable exit on the rear side of the POS terminal.

natural_image
Close-up of a computer monitor with cable and stand, showing internal components and a magnified view of the device (no text or symbols visible)- Push the latch with the thumb of the left hand, and then the touch monitor will release automatically.

natural_image
Close-up of a hand pressing down on a black cylindrical device with a white arrow pointing to a component (no text or symbols visible)- Open the touch monitor with two hands, and then you can do the maintenance work.

natural_image
Two-step diagram showing hands holding a tablet device, one with rotation arrows and the other with curved arrows indicating assembly (no text or symbols)- Remove the attachment cover on the top side by pressing the inner hook on both sides.

- Fix the PD line display with two thumbscrews, and then connect the USB cable to the ZT series main board.

natural_image
Close-up of a hand inserting cables into a computer motherboard with visible circuit board (no text or symbols)- Tilt the line display screen to your desired angle. While setting up the tilting adjustment, be careful NOT to press on the LCD panel.

natural_image
Two black computer monitors with red structural frames, shown in side and top views (no text or symbols visible)Installing the Virtual COM Driver for PD-6907U
Refer to the following steps for the driver installation.
-
Connect the USB cable of PD-6907U to your POS terminal.
-
Locate the "SA_PD_LM" folder from the "Drivers" folder in the Local Disk (C:) of your POS terminal
-
You will find the "USB_VCOM" folder and double click it.
-
Then double click the "USB_VCOM_v519bx" folder.
-
In the folder, double click the PDF named USB VCOM Drivers Installing Guide to open.
-
Then, refer to this installation guide to complete the driver installation.


Setting up the PD-6907U Customer Display
POS Graphics Display Tool is a helpful tool designed to assist PD-6907U users in managing the customer display settings according to your personal preference. To start with the tool, you will need to access the executable file, GraphicsDisplay_Setup Tool.exe, under the directory
C:\Drivers\ SA_PD_LM\ GraphicsDisplay_Setup Tool. As for the more detailed instructions on the operation of the tool, please refer to the file named by PD6X07 Setup Tool Guide.pdf in the same directory.
Before using the tool to configure the display, determine that you have installed the Microsoft .NET Framework 3.5 or above. Also, to avoid users from damaging the main board of the display, it is highly recommended that the configuration is implemented by professional technicians.
Driver Download
After installing the side attachment, you have to download the relevant driver first. Please download the relevant driver that you need from the Posiflex website (https://download.posiflex.com/en-global/Download/index/driver/Line-Display/PD-6907U).
Specifications
| PD-6907U | |
| Display | |
| Display Type | 7" TFT LCD |
| Number of Characters | 40 characters x 12 rows max. for Alphanumerical characters20 characters x 12 rows max. for Chinese characters |
| Dot Matrix /Resolution | 800 x 480 display resolution |
| Display Color | Font : Red / Green / Blue / Yellow / Orange / White / BlackBackground : Black / White / Blue |
| Multimedia Support | JPEG graphics support |
| Interface | USB |
| Power Supply | Powered by standard USB ports |
| Mechanical | |
| Dimension (WxHxD in mm) | 187.55 x 124.18 x 29.8 mm (without hinge bracket) |
| Net Weight | 0.54 kg |
Outline Dimension

※ The product information and specifications are subject to change without prior notice.
- PD-6907U Rear-Mount Customer Display User Manual
- Package Contents
- FCC NOTES
- CE CLASS A WARNING
- AVERTISSEMENT CE CLASSE A
- LIMITES DE GARANTIE
- Views of the PD-6907U
- Front View
- Rear View
- I/O View
- Mounting the Rear-Mount Display onto ZT Series POS Terminal
- Installing the Virtual COM Driver for PD-6907U
- Setting up the PD-6907U Customer Display
- Driver Download
- Outline Dimension
Brand : Posiflex
Model : PD-6907U
Category : Information station