SPL0100 - Training equipment True - Free user manual and instructions
Find the device manual for free SPL0100 True in PDF.


| Product Type | Training Equipment |
| Brand | True |
| Model | SPL0100 |
| Dimensions (L x W x H) | 60 x 40 x 50 inches (approx.) |
| Weight | 250 lbs |
| Power Supply | 110-120V AC, 60Hz |
| Main Functions | Strength training, adjustable resistance, multiple exercise positions |
| Material | Steel frame, foam padding, plastic covers |
| Maintenance | Wipe clean with damp cloth; lubricate moving parts monthly |
| Safety Features | Safety locks, emergency stop, stable base |
| Spare Parts | Available from manufacturer; includes cables, pulleys, handles |
| User Capacity | Up to 300 lbs |
| Assembly Required | Yes, instructions included |
| Warranty | 2 years on frame, 1 year on parts |
| Recommended Use | Home or light commercial gym |
Frequently Asked Questions - SPL0100 True
User questions about SPL0100 True
0 question about this device. Answer the ones you know or ask your own.
Ask a new question about this device
Download the instructions for your Training equipment in PDF format for free! Find your manual SPL0100 - True and take your electronic device back in hand. On this page are published all the documents necessary for the use of your device. SPL0100 by True.
USER MANUAL SPL0100 True
natural_image
Modern fitness machine with adjustable arm and seat, no visible text or symbols on the device itself.IMPORTANT!
All products shown are prototype. Actual product delivered may vary. Product specifications, features, and software are subject to change without notice. For the current owner's manual and documents in additional languages please visit https://truefi.tness.com/support/user-manuals/
IMPORTANTE!
Since its founding in 1981, TRUE Fitness has been built on two core guiding principles: Build the highest quality products and support them with superior service. Today, TRUE is the global leader in premium fitness equipment for the commercial and residential markets.
Over the years, the fitness industry has changed, new markets have sprung up, and the needs of our customers have evolved, but those principles remain constant, and we remain ever-vigilant in working to achieve them.
In keeping with our values, TRUE has always strived to equip our machines with the latest technology and safety features since the beginning, giving our customers the very best exercise experience possible while providing peace of mind.
As your dedicated partner, we will do whatever it takes to keep your facility going strong. Our experienced team provides end-to-end service, from facility planning and maintenance to providing your machines with the newest technologies. You can count on TRUE Fitness for the best service in the industry, provided by a team focused on optimizing the life of your equipment.
Contacting Our Support Team
Before you contact TRUE, we recommend gathering the serial number, model number, and a brief description of the reason for your request. After you have all the pertinent information, we suggest you contact your selling dealer or local service company to set up an appointment. If you are not familiar with who is in your area, you can visit https://shop.truefitness.com/store-locator/ and use our store locator to obtain the contact information for the closest dealer.
If you still need help, please contact our product support team.
| Address TRUE Fitness | Attn: Product Support865 Hoff RoadSt. Louis, MO 63366 |
| Phone 800.883.8783 | |
| Email service@truefi tness.com | |
| Hours of Operation Mon | Monday - Thursday 8:30am - 6:00pm (CST)Friday 8:30am - 5:00pm (CST) |
Contacting Our Sales Team
Interested in owning more TRUE products? Please contact us with any product inquires so that we may direct you to the appropriate sales representative to help answer your questions.
| Address TRUE Fitness | Attn: Sales Department865 Hoff RoadSt. Louis, MO 63366 |
| Phone 800.426.6570 | |
| Email sales@truefi tness.com | |
| Hours of Operation Mon-day - Friday 8:30am - 5:00pm (CST) | |
Reporting Freight Claims or Parts Damage
Unfortunately, sometimes materials can be damaged during shipment. If materials are damaged during shipment, please follow the guidelines below to determine the appropriate process for you to follow.
Severe Damage—Obvious damage to external packaging and internal product.
Please refuse the shipment and it will be returned to TRUE by the carrier. Contact TRUE product support by calling 800.883.8783 or sales support by calling 800.426.6570 Monday-Friday during normal business hours to notify us that the shipment has been refused. Once we have received the damaged shipment, a replacement shipment will be sent to you. If the shipment comes in multiple boxes, only refuse boxes with damage.
Slight Damage—Minimal damage to external packaging with unknown internal damage to product.
If the shipment has minimal damages and you are not sure if the actual product is damaged, you must sign the bill of lading as damaged when accepting the shipment. Once you have opened the box and you have determined something is indeed damaged, please gather the serial number, model number, description of damage, and photos of damage. Please make sure the photos include the damaged product as well as the damaged box the product arrived in. Contact TRUE product support (service@truefitness.com // 800.883.8783) or TRUE sales support (sales@truefitness.com // 800.426.6570) Monday-Friday during normal business hours.
Concealed Damage—No damage to external packaging but internal damage to product.
You may receive a shipment that looks intact and discover once the box has been opened that there are hidden damages. Please notify the carrier immediately. TRUE will not be able to file a claim if the carrier is not notified in a timely manner. Once you have called the carrier you will need to gather the serial number, model number, description of damage, and photos of damage. Contact TRUE product support (service@truefitness.com // 800.883.8783) or TRUE sales support (sales@truefitness.com // 800.426.6570) Monday-Friday during normal business hours.
TABLE OF CONTENTS
SAFETY INSTRUCTIONS
IMPORTANT SAFETY INSTRUCTIONS—SAVE THESE INSTRUCTIONS....7
GENERAL CARE AND MAINTENANCE....9
COMMERCIAL MAINTENANCE SCHEDULE....10
COMPLIANCES....10
DIMENSIONS AND WEIGHTS....11
SHROUD OPTIONS....11
WEIGHT STACK CONFIGURATIONS....12
WARNING AND INTENDED USE LABELS....13
ASSEMBLY INSTRUCTIONS
PREASSEMBLY CHECKLIST....15
ASSEMBLY STEPS....17
PREVENTATIVE MAINTENANCE
DAILY INSPECTION AND MAINTENANCE....37
WEEKLY INSPECTION AND MAINTENANCE....37
OTHER SCHEDULED PREVENTATIVE MAINTENANCE....38
CLEANING THE EQUIPMENT....38
CABLE INSPECTION AND MAINTENANCE....39
WEIGHT STACK SELECTOR PIN INSPECTION....42
WARRANTY INFORMATION
SPL0100 COMMERCIAL LIMITED WARRANTY....43
IMPORTANT SAFETY INSTRUCTIONS—SAVE THESE INSTRUCTIONS
FACILITY AND USER SAFETY PRECAUTIONS
- Review and understand all of the warning labels affixed to this machine and on the facility safety sign.
- Be certain that the machine operation is understood before it is used. Refer to the instructional procedure label affixed to the machine.
- Make sure all users are properly trained on how to use this equipment. If this machine is being used in a commercial setting, end users may not have access to this owners manual. It is the responsibility of the facility to instruct users as to the proper usage of the equipment as well as making them aware of potential hazards. Maximum user weight is 300 lbs (136 kg) unless otherwise stated in the manual.
- Use each machine only for the intended exercise. Do not allow anyone to invent exercises not included on the instructional procedure label or the intended use label.
- Do not modify the machine.
- This equipment meets industry safety standards for stability when used for the intended exercise. Do not allow straps, resistance bands or other means to be attached to the framework of this machine to perform stretching or body weight exercises. This can result in machine instability and lead to serious crushing injuries.
- Keep children away from this equipment. Adults should closely supervise use by teenagers.
- It is recommended that users receive a thorough medical exam before commencing an exercise program. All medical issues should be reviewed to ensure that weight training will not aggravate pre-existing medical conditions.
- If the machine appears damaged or inoperable, contact a facility staff member to place an "OUT OF ORDER, DO NOT USE" sign on the machine until it is repaired. Only use TRUE supplied replacement components to service this machine.
- Instruct users not to wear loose or dangling clothes or have headphone wires hanging when using this equipment.
- Do not attempt to free any jammed assemblies by yourself as this may cause injury.
- On Plate Loaded and Free Weight machines:
Use of spotter(s). Instruct users to seek the advice of the facility staff as to the appropriate use of spotters when lifting. More than one spotter may be required depending upon the amount of weight being lifted.
- Instruct users to load weight plates evenly and carefully to avoid tipping equipment and crushing injuries.
If the machine is equipped with safety stops or catches, inspect them and verify their proper operation before use and make sure they are securely in place before using or exiting the machine. Be certain members are instructed on how to operate and adjust all safety mechanisms.
- This equipment is designed for standard olympic size weight plates with a 50mm bore (1.9").
Do not exceed the maximum weight capacity of the machine. Maximum plate size is 45 lbs (25 kg).
- On Selectorized and Cable equipped machines:
Do not allow users to perform any exercise by holding the end of the cable and/or the cable end fitting. Use only appropriate handles or attachments properly connected to the cable end.
Do not high-pin or double-pin the weight stack. Do not allow the machine to be used if the top plate or weight stack is pinned in a raised position. Use an assistant and carefully return the machine to the proper position with the cap plate resting on the top weight. Inspect the entire length of the cable to ensure that it is properly seated in all of the pulley grooves.
Do not allow the use of weight plates or dumbbells to be used as a means to add additional weight to the weight stacks. Use only the TRUE adder weight system specifically designed for the machine.

INSTALLATION SAFETY PRECAUTIONS
- Read this installation manual entirely before assembling this equipment.
- Verify that there is adequate space surrounding this piece of equipment for safe access and operation. Installation must meet ADA requirements for accessibility.
- Install this piece of equipment on a solid level surface that does not deviate more than 1/8" over a 10' distance (or as defined and required by local building and architectural codes.)
- TRUE strongly recommends that all equipment be anchored to the floor to prevent movement and increase stability.
Due to the wide variation of flooring on which the unit can be installed, contact a qualified contractor to determine an appropriate fastening system for your floor.
Use 3/8" diameter hardware (10 mm) to anchor the machine. Anchors should have a minimum pull out force of 220 lb (110 kg) for each position.
When attaching the machine to the floor, if there is a gap between the machine foot and the floor, do not use the anchor to remove the gap as this can cause the machine frame to deform. Instead, place a shim between the bottom of the foot and the floor, then tighten the anchor.
○ Anchoring holes are provided on the feet of the frame. All anchoring locations must be used when anchoring the equipment to the floor.
- DO NOT install any fitness equipment near a pool, hot tub or other damp locations. Corrosion caused by installation in these locations can lead to premature failure of components.
- Be sure all hardware is tight before using this machine.
- Some assembly materials may come preassembled in the carton. Refer to the Assembly Instructions for instructions on disassembling assembly materials where appropriate before beginning assembly.

MAINTENANCE SAFETY PRECAUTIONS
- Refer to the maintenance schedule table in this manual for when to perform maintenance.
- Check the function of your machine DAILY by verifying the following:
If equipped with cables, inspect cables and end fittings for any signs of wear. Replace if worn, frayed, or damaged with TRUE replacement components.
- Verify that all adjustments are possible and carried out with ease. Make sure that each adjustment pin inserts completely into each position without binding.
- Verify that safety catches and stops are in proper working order and engaged.
- Verify that the exercise is performed smoothly, free of noise, and/or binding.
- If equipped with a weight stack, verify that the proper weight selector pin is in place.
- Check the function of your machine WEEKLY by verifying the following:
Nuts, bolts, and fasteners—check tightness weekly. If any hardware has become loose, retighten and/or use Loctite™ brand Threadlocker 242. Be sure all hardware is tight before using the machine.
- Frames and Lifting Arms: Inspect weekly for integrity and function. Replace any component at first signs of wear. Use only TRUE supplied components.
- Replace any warning label at the first sign of wear. Labels and the facility safety sign may be obtained from TRUE.
GENERAL CARE AND MAINTENANCE
IMPORTANT
Preventative maintenance is crucial to maintaining the function and safety of this equipment. Your facility must establish written guidelines for preventative maintenance and keep written or online records of the maintenance performed on these products. As a minimum, the items presented in the SAFETY section of this document and the items that follow here, should be included in your maintenance program.
- Cables (if equipped)—inspect end fittings daily for wear. Inspect the entire length of the cable weekly. Replace cables at the first sign of wear and on an annual basis. If the cable tension has been adjusted, be certain that the cable nut is tight.
- Nuts, bolts, and fasteners—check tightness weekly. If any hardware has become loose, retighten and/or use Loctite™ brand Threadlocker 242. Be sure all hardware is tight before using the machine.
- Safety catches—inspect catches, stop rods and their associated fasteners. Tighten any loose hardware and replace any components at first signs of wear.
- Frames—sweat, disinfecting sprays and spills can lead to corrosion which may lead to premature failure of components. Wipe all machines down with a damp cloth and dry completely each day. This includes painted parts, chrome parts and upholstered pads.
- Painted and chrome plated parts—use Simple Green with a dilution of 32:1 or similar cleaner for light dirt and grime. Use Turtle Wax Polishing Compound or a good car polish to remove heavier dirt and grease as well as for polishing. DO NOT use solvents, lacquer thinner, acetone or finger nail polish remover. For scuffs and marks that are not removed by the above methods use a soft scrub cleanser. Make sure all parts are dry upon completion.
- Weight stack enclosures (shrouds) (if equipped)—wipe down with a damp cloth as needed.
• Exercise instruction labels—clean with soap and water as needed.
- Guide rods (if equipped)—wipe all dirt and dust from the guide rods before applying a light application of Tri-Flow™ or other tefl on spray lubricant. Spray the Tri-Flow™ on a rag and then wipe the guide rods with the rag. DO NOT use oil lubricants such as WD-40.
CAUTION: Tri-Flow™ will stain carpet and clothing.
- Bronze bushings—check monthly for signs of wear and replace as needed.
- Linear bearing shafts—wipe any accumulation of dust or other contaminants from the shafts on a weekly basis. Apply a thin layer of a Tefl on® (PTFE) grease on a weekly basis. TRUE recommends Magnalube® brand.
- When replacing any component, use only TRUE supplied parts.
- Be sure all hardware is tight before using the machine.
Retain these instructions for future reference. If you have any questions, do not hesitate to contact your TRUE dealer or TRUE product support (service@truefi tness.com // 800.883.8783).
COMMERCIAL MAINTENANCE SCHEDULE
| Commercial Maintenance Schedule | ||||||
| Daily | Weekly | Monthly | 6 Months | Annually | ||
| Inspect cables for wear, tension, and proper connection if equipped. Replace at the first sign of wear. | X | |||||
| Inspect cable length and cable end fittings. Replace at the first sign of wear. | X | |||||
| Inspect all nuts and bolts and tighten if needed. X | ||||||
| Inspect safety catches, stop rods, and their fasteners. Replace at the first sign of wear. | X | |||||
| Inspect all anti-slip surfaces and replace as needed. | X | |||||
| Inspect all adjustment pins, weight stack pins, set screws, gas shocks, snap links, and pulleys if equipped. | X | |||||
| Inspect all accessory bars and handles. X | ||||||
| Inspect all safety and instructional decals. X | ||||||
| Inspect all weight stack shields if equipped. X | ||||||
| Clean guide rods and lubricate with a tefl on lubricant if equipped. | X | |||||
| Clean upholstery. X | ||||||
| Lubricate pivot bearings and linear bearings. X | ||||||
| Replace cables if equipped. X | ||||||
COMPLIANCES
This equipment complies with all applicable codes and regulations. For a complete list of compliances, please visit www.truefi.tness.com.
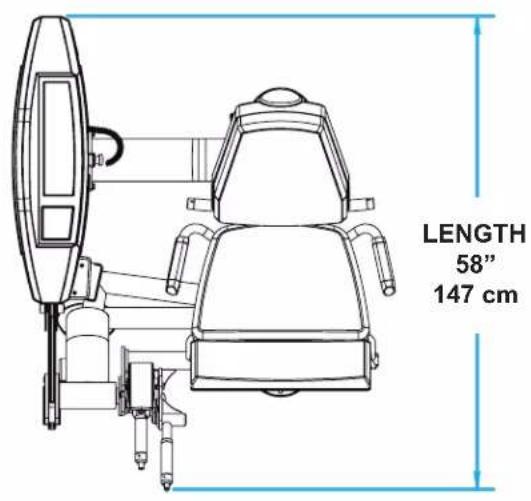
DIMENSIONS AND WEIGHTS
• ASSEMBLED DIMENSIONS (L X W X H)
58" x 41" x 58" / 147 cm x 104 cm x 147 cm
• PRODUCT WEIGHT
Metal Shrouds - 460 lbs / 209 kg Acrylic Shrouds - 437 lbs / 199 kg
• MAXIMUM USER WEIGHT
300 lbs / 136 kg
- WEIGHT STACK OPTIONS
190 lbs / 87 kg 250 lbs / 114 kg 310 lbs / 141 kg

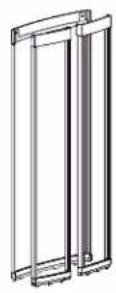
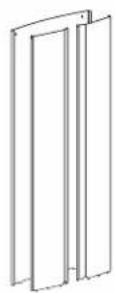
SHROUD OPTIONS
| Shroud Options | |||
| Shrouds | |||
| Model D | Description Acrylic Metal | ||
| SPL0100 Leg Extension | SPLSRDPS | SPLSRDMS | |
 |  | ||
WEIGHT STACK CONFIGURATIONS
| Weight Stack Confi guration | |||||||||
| Number of Weight Plates* Number of Bumpers Top Weight** | |||||||||
| Model Description Light (L) Standard Heavy (H) Light (L) Standard Heavy (H) Generation 1 Generation 2 | |||||||||
| SPL0100 Leg Extension | 12 16 20 6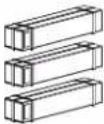 | 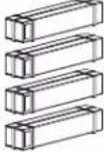 | 4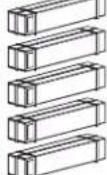 | 2 | $PL-00-[BH3Y] | TPL200X | SPL-00-TPL300X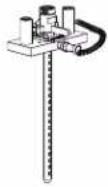 | ||
* One box contains four 15lb / 6.8kg weight plates. ** IMPORTANT NOTES:Generation 1 Top Weight SPL-00-TPL200X is only compatible with SPL-ADRWT REV02 or lower.Generation 2 Top Weight SPL-00-TPL300X is only compatible with SPL-ADRWT REV03 or higher. ** IMPORTANT NOTES:Generation 1 Top Weight SPL-00-TPL200X is only compatible with SPL-ADRWT REV02 or lower.Generation 2 Top Weight SPL-00-TPL300X is only compatible with SPL-ADRWT REV03 or higher. | SPL-ADRWT REV02 | SPL-ADRWT REV03 | |||||||
\*\* IMPORTANT NOTES:
- Generation 1 Top Weight SPL-00-TPL200X is only compatible with SPL-ADRWT REV02 or lower.
- Generation 2 Top Weight SPL-00-TPL300X is only compatible with SPL-ADRWT REV03 or higher.
WARNING AND INTENDED USE LABELS
WARNING: Replace all labels that may be worn, damaged, or missing.
To replace any worn or missing decals contact TRUE product support (service@truefitness.com // 800.883.8783).

TRUE
TRUE FITNESS TECHNOLOGY, INC
865 HOFF RD, ST LOUIS MISSOURI 63366 USA
MODEL NO: SPL0100
SERIAL NO: 22-SPL0100000
SPL-00-LBLSN

LBL-WRN-SPLMAINT

WARNING
SERIOUS INJURY CAN OCCUR ON THIS EQUIPMENT IF THE PIN IS NOT COMPLETELY INSERTED BEFORE USE.
P/N B2065
ASTM F1749
B2065

LBL-WRN-SPL021

WARNING
SERIOUS INJURY CAN OCCUR ON THIS EQUIPMENT. FOLLOW THESE PRECAUTIONS TO HELP AVOID INJURY.
- BEFORE USING: Read and understand all of the warnings and obtain instruction on the use of this machine. DO NOT modify the machine.
- Get a medical exam before beginning an exercise program.
- Keep body and clothing clear of all moving parts. DO NOT wear anything loose or dangling.
- Inspect the machine before use. DO NOT use if it appears damaged. DO NOT try to fix any machine. Notify staff immediately.
- INSPECT MACHINE DAILY for loose, worn or damaged parts. Replace any part or label at first signs of wear. Inspect all cables and their connections closely. If you are in doubt about any part, DO NOT use the machine until the part is replaced.
- Inspect all cables and connections before using the machine. DO NOT use this machine if any part appears worn or damaged.
- Be certain that weight pin is completely inserted. Use only the pin provided by the manufacturer. If unsure, seek assistance.
- NEVER pin weights or top plate into an elevated position. DO NOT use the machine if found in this condition. DO NOT try to fix. Seek assistance.
- Use only the incremental weights supplied by the manufacturer. DO NOT use dumbbells or other means to add resistance to machine.
- NEVER allow children near this machine. Supervise teenagers.
- DO NOT REMOVE THIS LABEL. REPLACE IF DAMAGED.
LBL-WRN-SPL01ASTM F17
LBL-WRN-SPL01

WARNING
DAMAGE TO MACHINE WILL OCCUR IF KNOB IS ADJUSTED WHILE USING MACHINE.
LBL-WRN-SP022
LBL-WRN-SPL022
WARNING AND INTENDED USE LABELS
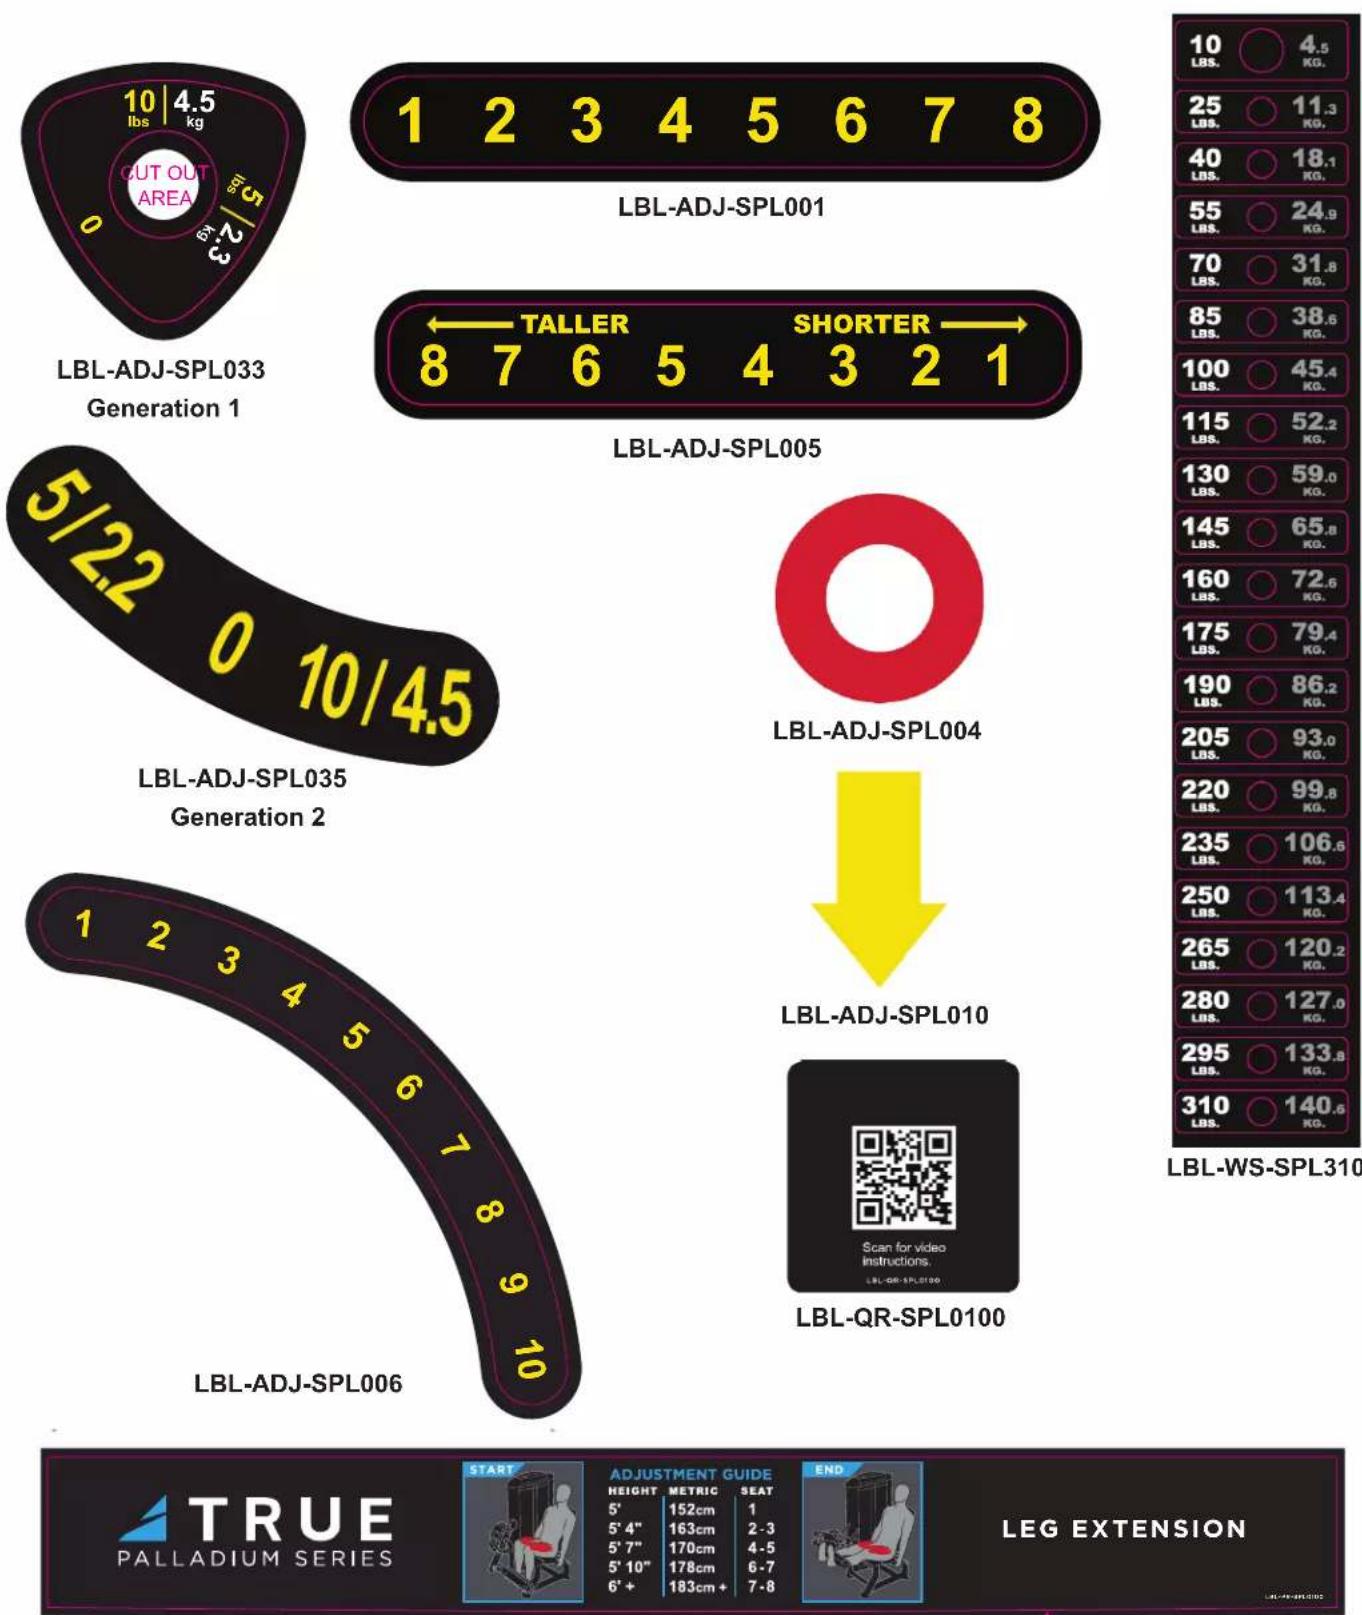
LBL-PR-SPL0100
ASSEMBLY INSTRUCTIONS
PREASSEMBLY CHECKLIST
CAUTION:

Use caution when assembling this product. Unpacking and assembling this product requires two or more people.

Use caution when unpacking this product. Avoid damage to the product and product pads. DO NOT use a box cutter. DO NOT slice into the packaging.
VERIFY BOX CONTENTS
IMPORTANT! Please verify box contents. If you have questions, or if there are any missing parts, contact product support at 800.883.8783 or service@truefi tness.com.
| TOOLS NEEDED FOR ASSEMBLY | INCLUDED IN BOX | |
| #2 Phillips Screwdriver NO |  | |
| Flat Head Screwdriver NO | [0X47] | |
| 3/32" Allen Wrench NO |  | |
| 1/8" Allen Wrench |  | NO |
| 5/32" Allen Wrench | [AB4K] | NO |
| 3/16" Allen Wrench NO | [6524] | |
| 5/16" Allen Wrench NO |  | |
| TOOLS NEEDED FOR ASSEMBLY | INCLUDED IN BOX | |
| 7/32" Allen Wrench NO |  | |
| Wrench NO |  | |
| Socket Wrench Set NO | [7DOC] | |
| Rubber Mallet NO |  | |
| Cloth NO |  | |
| Lubricant | [2AA8] | NO |
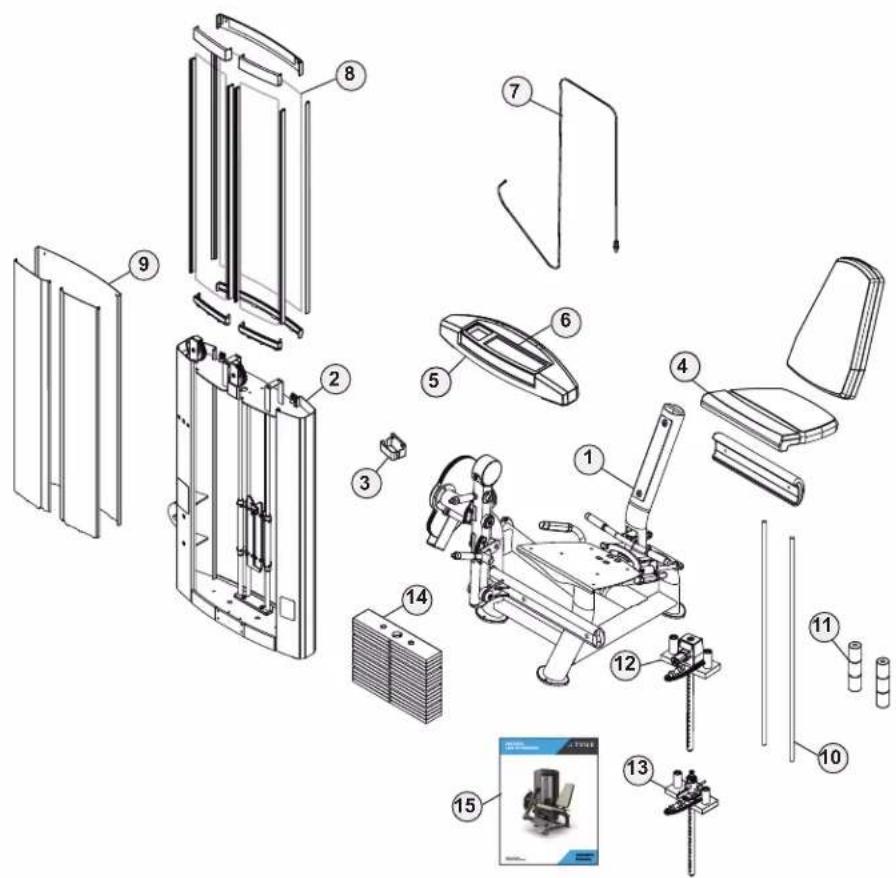
BOX CONTENTS

NOTE: Supplemental unboxing video available on vimeo.com: https://vimeo.com/723498648?share=copy.
| ITEM | PART NUMBER | DESCRIPTION QTY | |
| 1 SPL- | 01-MFR250X MAIN FR | AME ASSEMBLY 1 | |
| 2 SPL- | 01-UPR200X UPRIGHT | ASSEMBLY 1 | |
| 3 SPL- | 00-RCK001 HOLDER, | PHONE 1 | |
| 4 SPL0 | 1PDKT KIT, SPL0100 | PAD 1 | |
| 5 SPL- | 00-CVR021 CAP, UPR | RIGHT 1 | |
| 6 SPL- | 00-CVR022 TRAY, UPR | RIGHT COVER 1 | |
| 7 SPL- | 01-CBL100 CABLE ASSEMBLY 1 | ||
| 8* | SPLSRDPS* | SHROUD SET SHORT ACRYLIC, SPL | 1* |
| 9* | SPLSRDMS* | SHROUD SET, SPL, SHORT METAL | 1* |
| 10 | SPL-00-GRD101X | GUIDE ROD ASSEMBLY | 2 |
| 11** | SPL-00-WBR002** | WEIGHT STACK BUMPER | 6** |
| 12*** | SPL-00-TPL200X*** | SUBASSEMBLY, TOP WEIGHT - GENERATION 1 | 1*** |
| 13*** | SPL-00-TPL300X*** | SUBASSEMBLY, TOP WEIGHT - GENERATION 2 | 1*** |
| 14** | SPLBX15** | SUBASSEMBLY, SPL WEIGHT PLATES 4X15LB | 4** |
| 15 | MAN-SPL0100 | MANUAL, SPL0100 | 1 |
*Acrylic or metal shrouds are dependent on the configuration that was ordered.
**Weight stack and bumper quantities are dependent on the weight configuration that was ordered.
***12Generation 1 Top Weight SPL-00-TPL200X is only compatible with SPL-ADRWT REV02 or lower.

***13Generation 2 Top Weight SPL-00-TPL300X is only compatible with SPL-ADRWT REV03 or higher.

ASSEMBLY STEPS
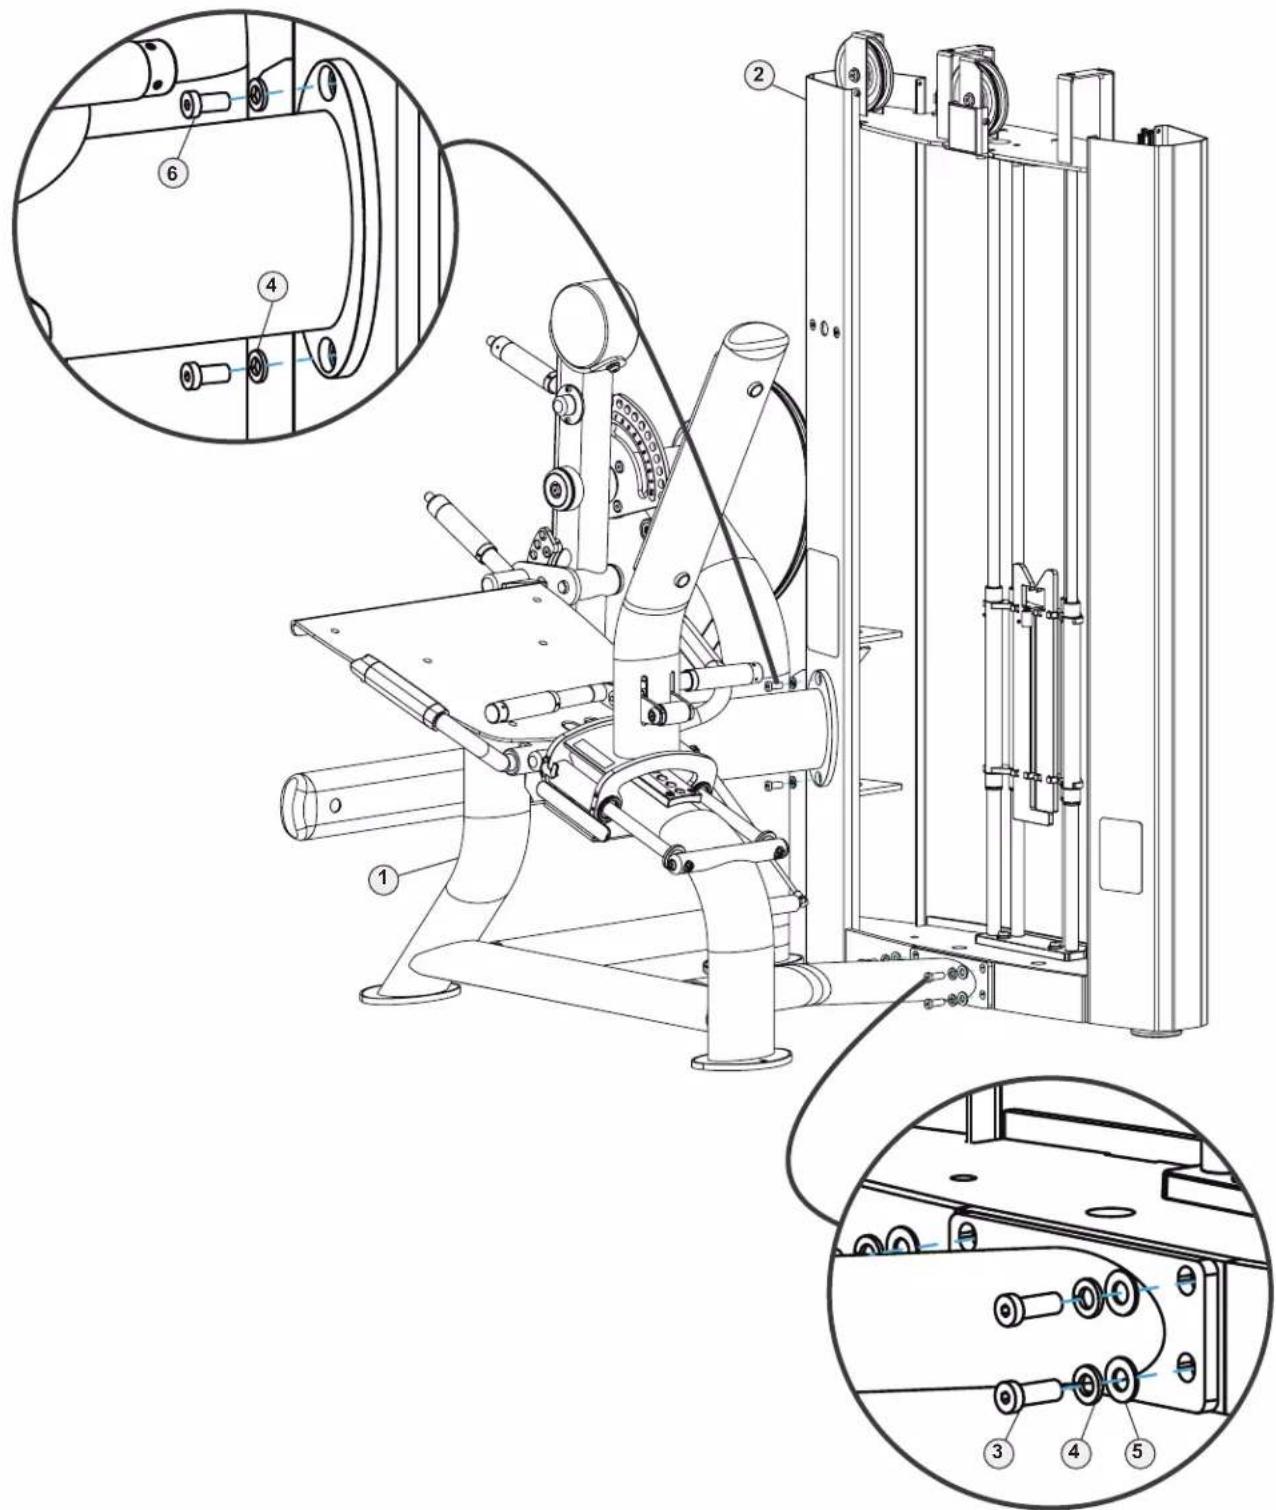
STEP 1—ATTACH MAIN FRAME ASSEMBLY TO UPRIGHT ASSEMBLY

NOTE: Supplemental assembly video available on vimeo.com: https://vimeo.com/723456483?share=copy.
| TOOL NEEDED | |
| Allen Wrench | [xckx] |
| ITEM | PART DESCRIPTION | QTY | |
| 1 SPL-01-MFR250X MAIN | FRAME ASSEMBLY 1 | ||
| 2 SPL-01-UPR200X UPRIGHT ASSEMBLY 1 | |||
| 3 C1256 LPSHCS, 3/8"-16 | X 1" E-COAT 4 | ||
| 4 C749B LOCK WASHER, 3/8", BLK ZP 6 | |||
| 5 C754B WASHER, FLAT, 3/8" SAE, BLK | 4 | ||
| 6 C1255 LPSHCS, 3/8"-16 | X 3/4" E-COAT 2 | ||
a. Using an allen wrench, remove the 6 hex screws, 6 lock washers, and 4 flat washers from the upright assembly.

STEP 1—ATTACH MAIN FRAME ASSEMBLY TO UPRIGHT ASSEMBLY CONTINUED
b. Align the main frame assembly with the upright assembly. Using an allen wrench, attach the main frame assembly to the upright assembly using the 6 hex screws, 6 lock washers, and 4 flat washers you removed previously.
NOTE: To help align parts, loosely attach all screws before fully tightening.
STEP 2—ROUTE CABLE THROUGH UPRIGHT AND MAIN FRAME ASSEMBLIES
| TOOLS NEEDED | |
| Allen Wrench |  |
| Wrench |  |
| Socket Wrench |  |
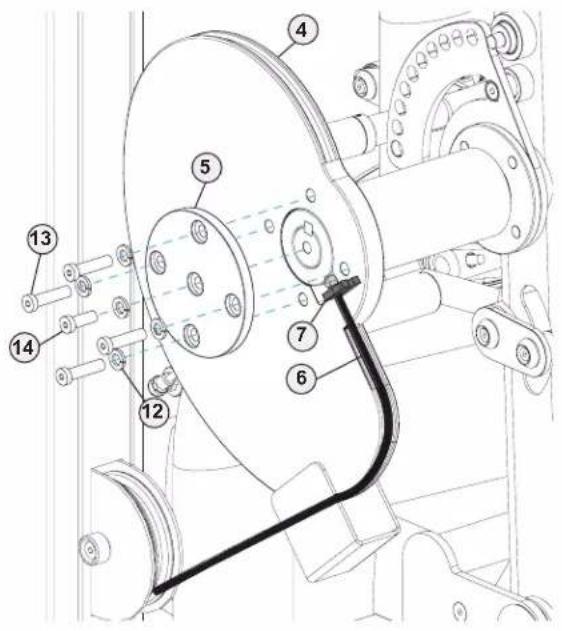
| ITEM | PART DESCRIPTION | QTY | |
| 1 SPL-01-UPR200X UPRIGHT ASSEMBLY 1 | |||
| 2 SPL-01-MFR250X MAIN | FRAME ASSEMBLY 1 | ||
| 3 SD0183 PULLEY 114MM | 3 | ||
| 4 SPL-01-CAM001 LEG EXT CAM 1 | |||
| 5 SPL-01-CAP201 CAP, CAM | 1 | ||
| 6 SPL-01-CBL100 | CABLE ASSEMBLY | 1 | |
| 7 SPL-00-CBL001 | CABLE BLOCK | 1 | |
| 8 C1258 | LPSHCS, 3/8"-16 X 1-3/4" E-COAT | 2 | |
| 9 | C 766A | LOCK NUT, 3/8"-16 X 17/64", NYLON | 2 |
| 10 | C 754B | WASHER, FLAT, 3/8" SAE, BLK | 4 |
| 11 | C1260 | LPSHCS, 3/8"-16 X 2" E-COAT | 1 |
| 12 | C 749B | LOCK WASHER, 3/8", BLK ZP | 6 |
| 13 | C1259 | LPSHCS, 3/8"-16 X 1-1/2" E-COAT | 4 |
| 14 | C1256 | LPSHCS, 3/8"-16 X 1" E-COAT | 1 |
NOTE: The cable is routed through the upright assembly to the cam assembly. The left end of the cable goes to the cam side while the right end goes to the weight stack side.

natural_image
Technical line drawing of a mechanical device with two circular insets showing close-ups of components (no text or symbols)STEP 2—ROUTE CABLE THROUGH UPRIGHT AND MAIN FRAME ASSEMBLIES CONTINUED
a. Using an allen wrench and a socket wrench or open end wrench, remove and set aside the top upright pulleys using 2 hex screws, 4 fl at washers, and 2 lock nuts.
b. Using an allen wrench, remove and set aside the lower upright pulley using 1 hex screw and 1 lock washer.

STEP 2—ROUTE CABLE THROUGH UPRIGHT AND MAIN FRAME ASSEMBLIES CONTINUED
c. Route the cable through the top of the upright assembly and around the pulleys.
d. Using an allen wrench and a socket wrench or open end wrench, reattach the top upright pulleys using 2 hex screws, 4 fl at washers, and 2 lock nuts.
e. Route the cable through the lower opening of the upright assembly and around the pulley.
f. Using an allen wrench, reattach the lower upright pulley using 1 hex screw and 1 lock washer.

STEP 2—ROUTE CABLE THROUGH UPRIGHT AND MAIN FRAME ASSEMBLIES CONTINUED
g. Using an allen wrench, remove and set aside the cam assembly and cable block using 4 hex screws, 5 lock washers, and 1 shorter hex screw.

h. Route the cable around and through the cam assembly and secure it to the cable block.

i. Using an allen wrench reattach the cam assembly using 4 hex screws, 5 lock washers, and 1 shorter hex screw.
STEP 3—ATTACH WEIGHT STACK TO UPRIGHT ASSEMBLY

NOTE: Supplemental weight stack video available on vimeo.com: https://vimeo.com/773978716?share=copy.
| TOOLS NEEDED | |
| Allen Wrench |  |
| Wrench |  |
| Cloth |  |
| Lubricant |  |
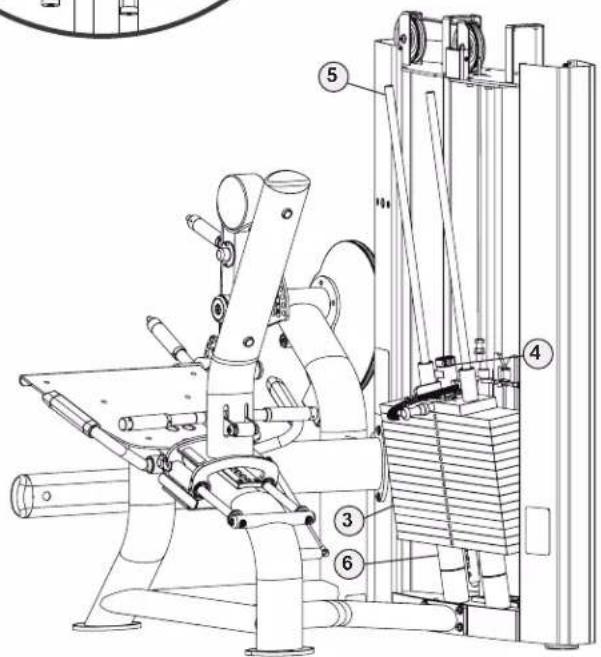
| ITEM | PART DESCRIPTION | QTY | |
| 1 SPL | -01-UPR200X UPRIGHT ASSEMBLY 1 | ||
| 2 SPL | -00-GRB001 BRACE, GUIDE ROD 1 | ||
| 3* SPL | LBX15* SUBASSEMBLY, SPL WEIGHT PLATES 4X15LB 4* | ||
| 4 SPL | -00-TPL300XSPL-00-TPL200X | SUBASSEMBLY, TOP WEIGHT - GENERATION 2SUBASSEMBLY, TOP WEIGHT - GENERATION 1 | 1 |
| 5 SPL | -00-GRD101X GUIDE ROD ASSEMBLY | 2 | |
| 6* SPL | -00-WBR002* WEIGHT STACK BUMPER | 6* | |
| 7 SPL | -00-PIN030X SUBASSEMBLY, SELECTORY PIN | 1 | |
| 8 SPL | -01-CBL100 CABLE ASSEMBLY | 1 | |
| 9 D1 | 261 CABLE BOLT FTG, 1/2-13 X 1-3/4" | 1 | |
| 10 | C1256 | LPSHCS, 3/8"-16 X 1" E-COAT | 2 |
| 11 | C 749B | LOCK WASHER, 3/8", BLK ZP | 2 |
| 12 | C 754B | WASHER, FLAT, 3/8" SAE, BLK | 2 |
| 13 | C 603A | SHCS, 10-32, 1/2" BLK | 1 |
| 14 | C 900B | LOCK WASHER, #10 MED SPLIT, BLK | 1 |
| 15 | C 900A | WASHER, FLAT, #10 USS, ZP (.0028#) | 1 |
| 16 | LBL-WS-SPL310 | LABEL, SPL WEIGHT STACK LABEL 310LBS 20 PLATE | 1 |
*Weight stack and bumper quantities are dependent on the weight configuration that was ordered.
STEP 3—ATTACH WEIGHT STACK TO UPRIGHT ASSEMBLY CONTINUED
a. Using an allen wrench, remove and set aside the guide rod bracket from the upright assembly using 2 hex screws, 2 lock washers, and 2 fl at washers.
b. Slide the 2 guide rods into place on the upright assembly.
c. Wipe all dirt and dust from the guide rods before lightly applying Tri-Flow™ or another tefl on spray lubricant. Spray the Tri-Flow™ on a cloth or paper towel and use it to wipe down the guide rods.
IMPORTANT! DO NOT use oil lubricants such as WD-40.
IMPORTANT! Tri-Flow™ will stain carpet or clothing.
d. Slide the bumpers, weights, and top weight assembly down the guide rods.
IMPORTANT! DO NOT drop the weight plates when sliding onto guide rods.
IMPORTANT! Adjust the adder weight selection knob to 0lbs/kg prior to installing the top weight assembly.
IMPORTANT! On previous versions of this model, the top weight assembly and adder weight assembly are visually different.
However, the general assembly procedure is the same.
| Top Weight and Adder Weight Assemblies | |
| SPL-00-TPL200X | SPL-00-TPL300X |
 |  |
| SPL-ADRWT REV02 S | SPL-ADRWT REV03 |
 |  |
| Generation 1Top WeightSPL-00-TPL200X isonly compatible withSPL-ADRWT REV02or lower. | Generation 2Top WeightSPL-00-TPL300X isonly compatible withSPL-ADRWT REV03or higher. |

STEP 3—ATTACH WEIGHT STACK TO UPRIGHT ASSEMBLY CONTINUED
e. Using an allen wrench, reattach the guide rod bracket to the upright assembly using 2 hex screws, 2 lock washers, and 2 fl at washers.
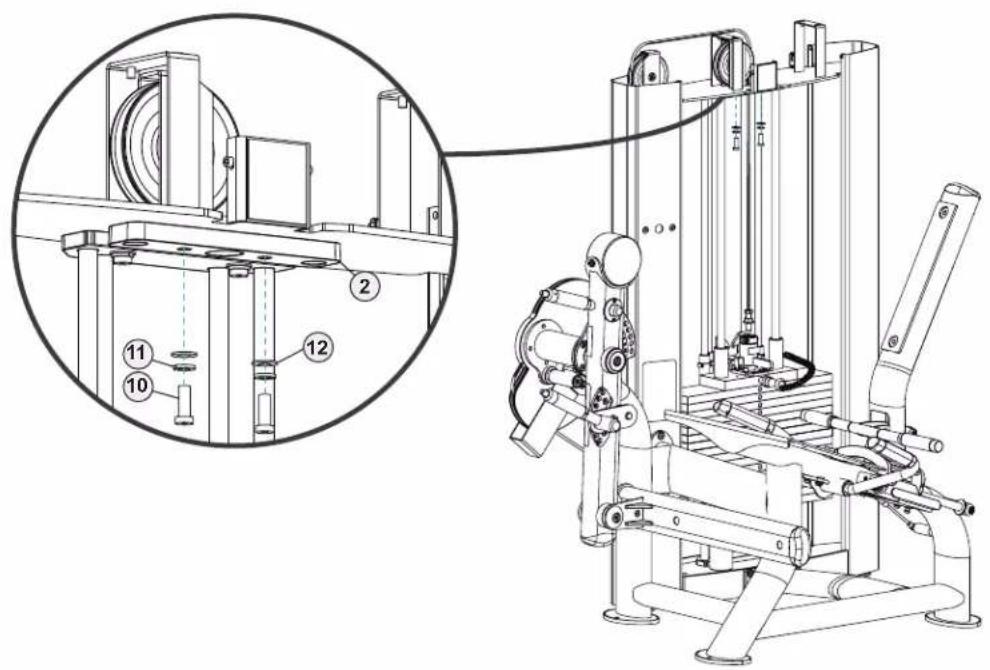
STEP 3—ATTACH WEIGHT STACK TO UPRIGHT ASSEMBLY CONTINUED
f. Insert the selector pin and route the cable down through the hole on the upright assembly. Using an open end wrench, attach the cable bolt to the top weight assembly.
IMPORTANT! A minimum of 1/2" (12.7 mm) of the threaded portion of the cable bolt must be threaded into the top weight assembly.
NOTE: Verify the selector pin slides in and out of each weight plate.
g. Using an allen wrench, remove the 1 hex screw, 1 lock washer, and 1 flat washer from the top right side of the Generation 1 top weight assembly. Using an allen wrench, remove the 1 hex screw, 1 lock washer, and 1 flat washer from the top right attachment point of the Generation 2 top weight assembly.

STEP 3—ATTACH WEIGHT STACK TO UPRIGHT ASSEMBLY CONTINUED
h. Insert the hex screw through the lock washer, flat washer, and selector pin attachment point and reattach it to the Generation 1 top weight assembly using an allen wrench. Insert the hex screw through the lock washer, flat washer, and selector pin attachment and reattach it to the Generation 2 top weight assembly using an allen wrench.
i. Using a degreaser and cloth, remove oil from the weight plates that was applied for anti corrosion during the manufacturing process.

STEP 3—ATTACH WEIGHT STACK TO UPRIGHT ASSEMBLY CONTINUED
j. After selecting the appropriate weight stack label, peel and remove the backing from the weight stack label. Using the selector pin retainer tube and the selector pin in the heaviest weight plate option, align the weight stack label with the plates. After applying the weight stack label for the appropriate model and weight stack option, peel and remove the front from the weight stack label, leaving the individual weight call outs for each plate.

STEP 4—ATTACH ACRYLIC SHROUDS TO UPRIGHT ASSEMBLY

NOTE: Supplemental acrylic shroud video available on vimeo.com: https://vimeo.com/723539522?share=copy.
NOTE: Supplemental metal shroud video available on vimeo.com: https://vimeo.com/774417897?share=copy.
| TOOLS NEEDED | |
| Allen Wrench |  |
| Flat Head Screwdriver |  |
| Rubber Mallet |  |
| Socket Wrench |  |
| Wrench |  |
| ITEM | PART DESCRIPTION | QTY | |
| 1 SPL | -01-UPR200X UPRIGHT ASSEMBLY 1 | ||
| 2* SPLSRDPS* SHROUD SET SHORT ACRYLIC, SPL 1* | |||
| 3* SPLSRDMS* SHROUD SET, SPL, SHORT METAL 1* | |||
| 4 C 603A SHCS, 10-32, 1/2" BLK | 4 | ||
| 5 C 900E LOCK NUT, 10-32, NYL INS BLK | 4 | ||
| 6 D2157 | SCREW, TWIST LOCK | 2 | |
| 7 D2158 | LOCK WASHER | 2 | |
*Acrylic or metal shrouds are dependent on the configuration that was ordered.
a. Using an allen wrench, socket wrench or open end wrench, and a flat head screwdriver, remove and set aside the shroud fasteners from the upright assembly using 4 hex screws, 4 lock nuts, 2 twist lock screws, and 2 lock washers.

STEP 4—ATTACH ACRYLIC SHROUDS TO UPRIGHT ASSEMBLY CONTINUED
b. Assemble the acrylic front shrouds and insert them into the upright assembly using a rubber mallet.
c. Using an allen wrench and a socket wrench or open end wrench, insert and tighten the 4 hex screws and 4 lock nuts into the front shrouds.
d. Assemble the acrylic rear shroud and insert it into the slots of the upright assembly.
e. Using a flat head screwdriver, insert and tighten the 2 twist lock screws and 2 lock washers into the rear shroud.
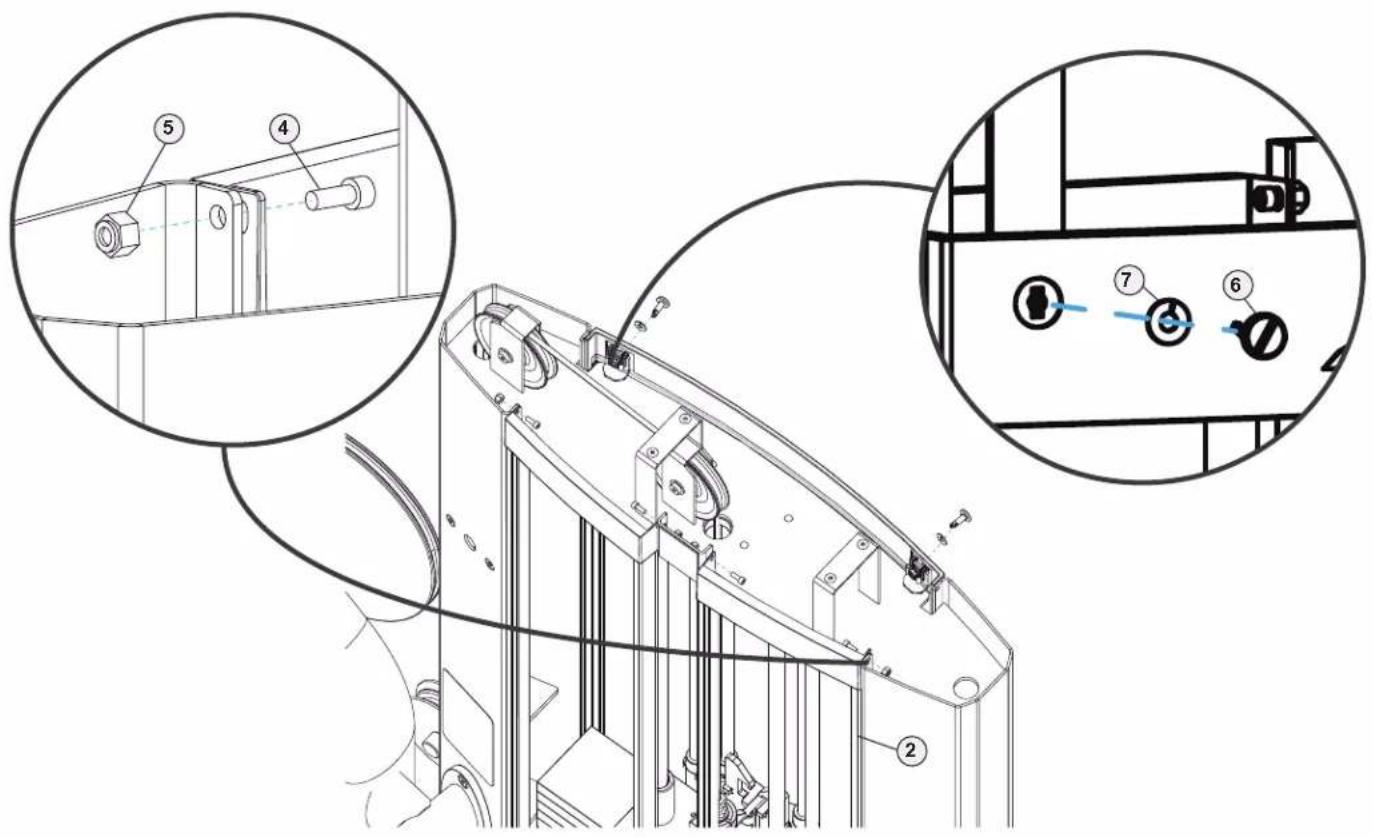
STEP 4—ATTACH METAL SHROUDS TO UPRIGHT ASSEMBLY
a. Using an allen wrench, socket wrench or open end wrench, and a flat head screwdriver, remove and set aside the shroud fasteners from the upright assembly using 4 hex screws, 4 lock nuts, 2 twist lock screws, and 2 lock washers.

STEP 4—ATTACH METAL SHROUDS TO UPRIGHT ASSEMBLY CONTINUED
b. Slide the front metal shrouds onto the upright assembly.
c. Using an allen wrench and a socket wrench or open end wrench, secure the front shrouds to the upright assembly using the 4 hex screws and 4 lock nuts.
d. Slide the rear shroud onto the upright assembly.
e. Using a flat head screwdriver, secure the rear shroud to the upright assembly using the 2 twist lock screws and 2 lock washers.

STEP 5—ATTACH TOP COVER TO UPRIGHT ASSEMBLY

NOTE: Supplemental top cover video available on vimeo.com: https://vimeo.com/723539522?share=copy.
| TOOLS NEEDED | |
| Allen Wrenches3/32" and 5/32" |  |
| ITEM | PART DESCRIPTION | QTY | |
| 1 SPL | -01-UPR200X UPRIGHT ASSEMBLY 1 | ||
| 2 SPL | -00-CVR021 CAP, UPRIGHT 1 | ||
| 3 SPL | -00-CVR022 TRAY, UPRIGHT COVER 1 | ||
| 4 SPL | -00-CVR023 MAT, UPRIGHT TRAY 1 | ||
| 5 C1 | 239 FHCS, 8-32 X 1/2" 4 | ||
| 6 C1 | 240 FHCS, 1/4"-20 X 1/2" 4 |
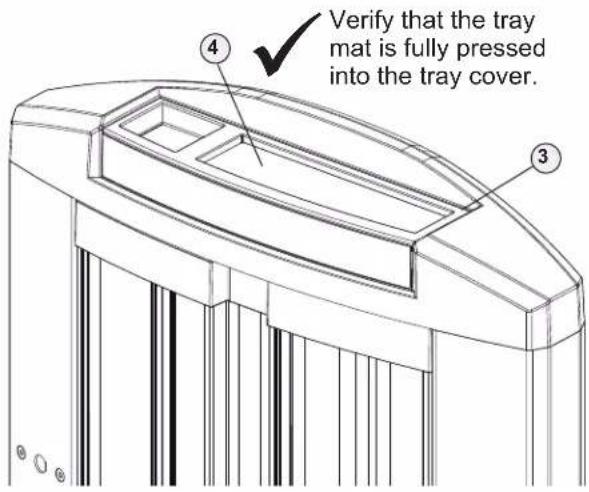
a. Using a 5/32" allen wrench, remove and set aside the 4 top cover hex screws from the upright assembly.
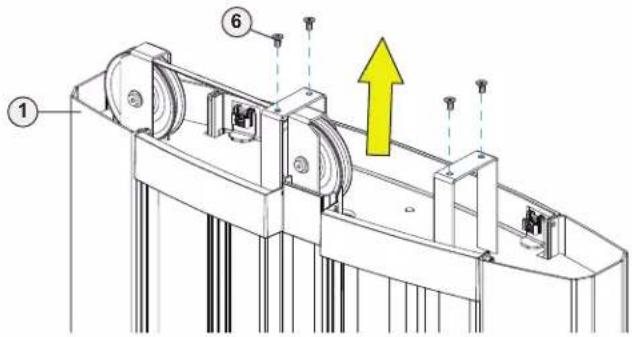
b. Place the top cover onto the upright assembly. Remove and set aside the tray mat.

c. Using a 3/32" allen wrench, remove and set aside the 4 tray cover hex screws. Remove and set aside the tray cover.

d. Attach the top cover to the upright assembly using the 4 previously set aside top cover hex screws.

STEP 5—ATTACH TOP COVER TO UPRIGHT ASSEMBLY CONTINUED
e. Reattach the tray cover onto the top cover using the 4 previously set aside the tray cover hex screws.

f. Fully press the tray mat onto the tray cover.
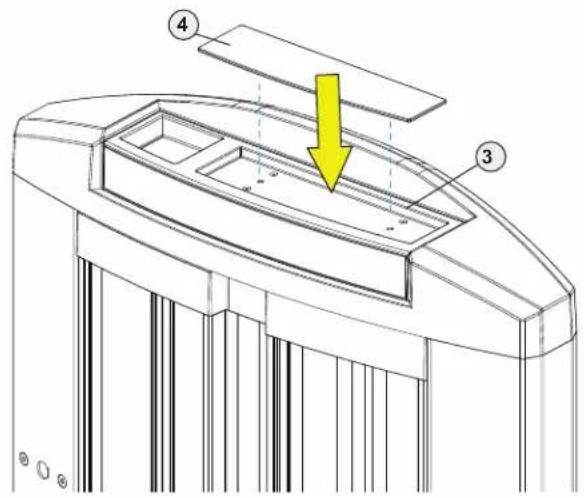
STEP 6—ATTACH PHONE HOLDER TO UPRIGHT ASSEMBLY
| TOOL NEEDED | |
| #2 Phillips Screwdriver |  |
| ITEM | PART DESCRIPTION | QTY | |
| 1 SPL-01-UPR200X UPRIGHT ASSEMBLY 1 | |||
| 2 SPL-00-RCK001 HOLDER, PHONE 1 | |||
| 3 C1226 PHCS, #10-32 X 1", BLK 2 | |||
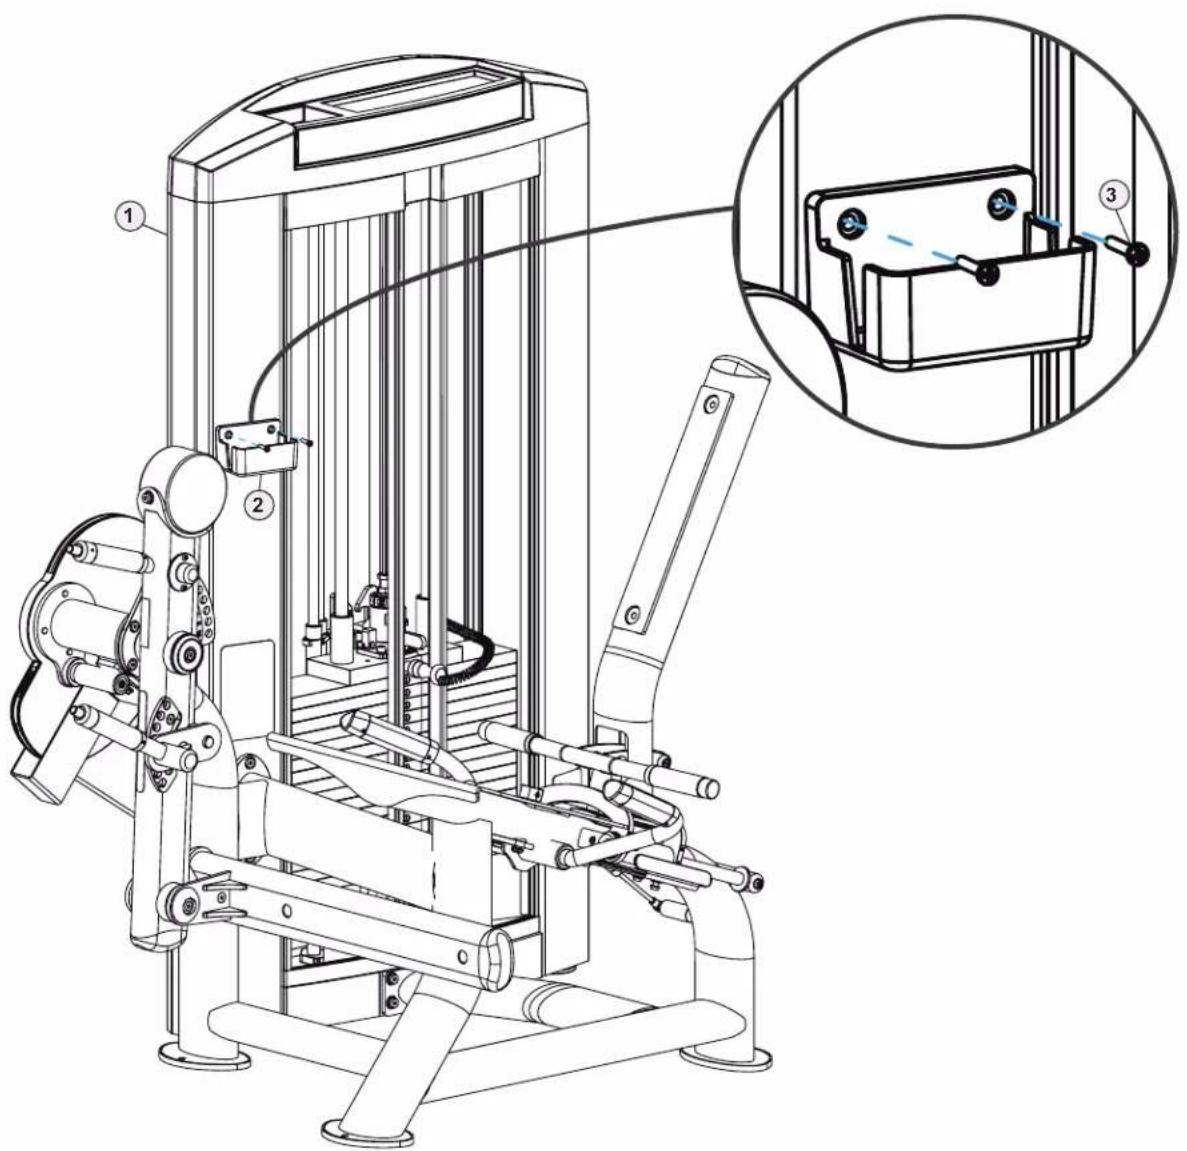
Using a #2 Phillips screwdriver, attach the phone holder to the upright assembly using 2 screws.
STEP 7—ATTACH PADS TO MAIN FRAME ASSEMBLY
| TOOL NEEDED | |
| Allen Wrench |  |
| ITEM | PART DESCRIPTION | QTY | |
| 1 | SPL-01-MFR250X MAIN | FRAME ASSEMBLY 1 | |
| 2 | SPL01PDKT KIT, SPL01 | 00 PAD 1 | |
| 3 | C 631A SHCS, 3/8"-16 X | 3" BLK 2 | |
| 4 | C 749B LOCK WASHER | 3/8", BLK ZP 10 | |
| 5 | C1 257 LPSHCS, 3/8"-16 | X 1-1/4" E-COAT 6 | |
| 6 | C 754B WASHER, FLAT | 3/8" SAE, BLK | 6 |
| 7 | C 629A SHCS, 3/8"-16 X | 2-1/2", BLK | 2 |
| 8 | SPL-02-PAR110 | SLEEVE, PAD BOLT | 2 |
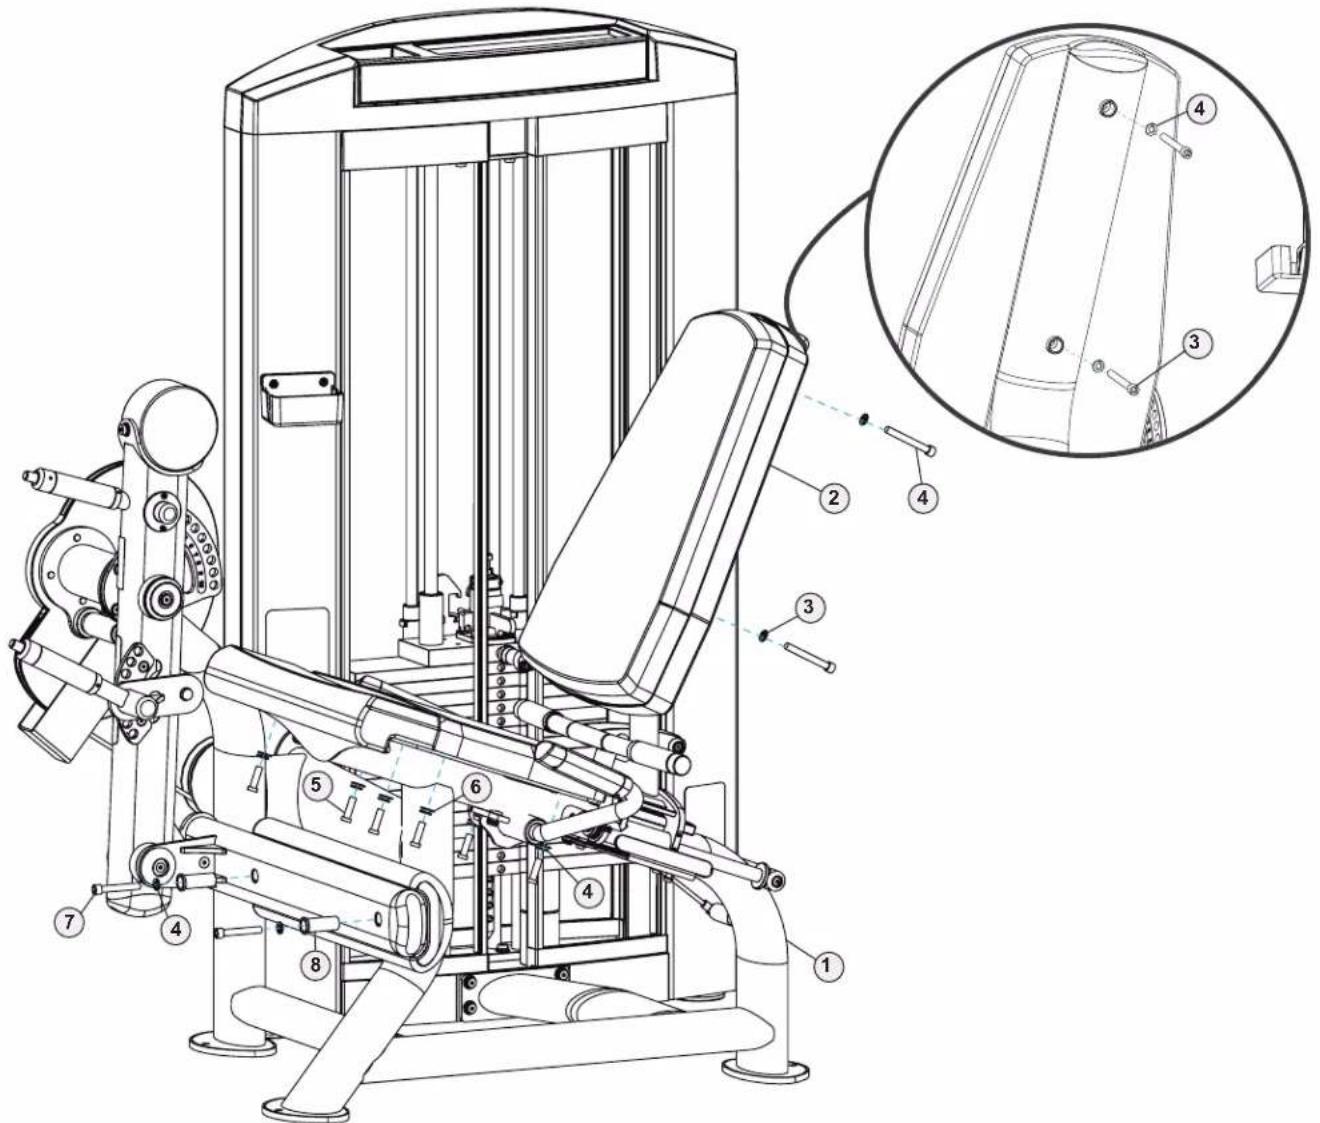
a. Using an allen wrench, attach the back seat pad to the main frame assembly using 2 hex screws and 2 lock washers.
b. Using an allen wrench, attach the middle seat pad to the main frame assembly using 6 hex screws, 6 flat washers, and 6 lock washers.
c. Using an allen wrench, attach the front seat pad to the main frame assembly using 2 hex screws, 2 lock washers, and 2 bolt sleeves.
PREVENTATIVE MAINTENANCE
Preventative maintenance is crucial to maintaining the function and safety of this equipment. Your facility must establish written guidelines for preventative maintenance and keep written or online records of the maintenance performed on these products. As a minimum, the items presented in the Safety Instructions section of this document and the items that follow here, should be included in your maintenance program.
IMPORTANT! Always purchase replacement parts from TRUE. Many parts are tested and manufactured specifically for TRUE equipment. Use of unapproved parts may cause serious injury and/or void the limited warranty.
DAILY INSPECTION AND MAINTENANCE
The following items are critical to the safety of users and maintenance staff as well as ensuring the optimum performance of the machines. These inspections should be performed each day before the equipment is subject to use. TRUE is not responsible for performing or scheduling regular maintenance or inspections.
- Inspect cables for wear, tension, and proper connection if equipped. (See cable inspection and maintenance.)
- Inspect all adjustment pins, weight stack pins, set screws, gas shocks, snap links, and pulleys if equipped.
- Inspect all safety and instructional decals.
- Inspect all weight stack shields if equipped.
- Verify that rubber hand grips are intact and secure.
- Verify that anti-skid foot grips are intact and secure.
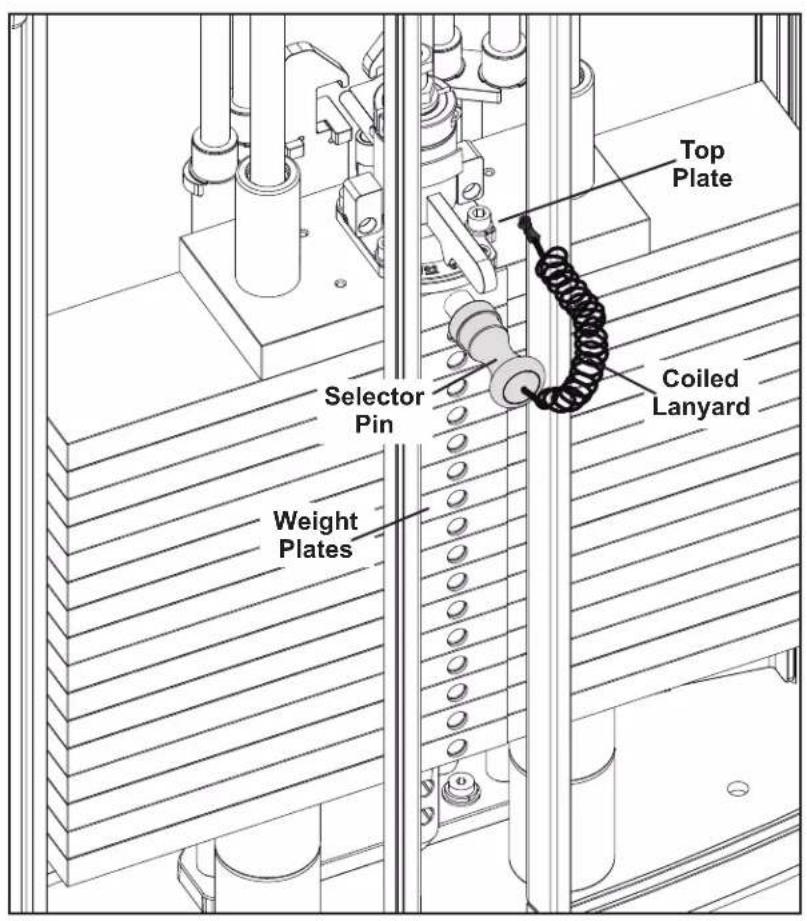
- Verify that the weight stack selector pin is attached with the coiled lanyard to the top plate if equipped. (See weight stack selector pin inspection.)
WEEKLY INSPECTION AND MAINTENANCE
The following items are critical to the safety of users and maintenance staff as well as ensuring the optimum performance of the machines. These inspections should be performed each week. TRUE is not responsible for performing or scheduling regular maintenance or inspections.
- Check entire length of cable and end fittings for any signs of wear if equipped. (See cable inspection and maintenance.) Replace immediately as required.
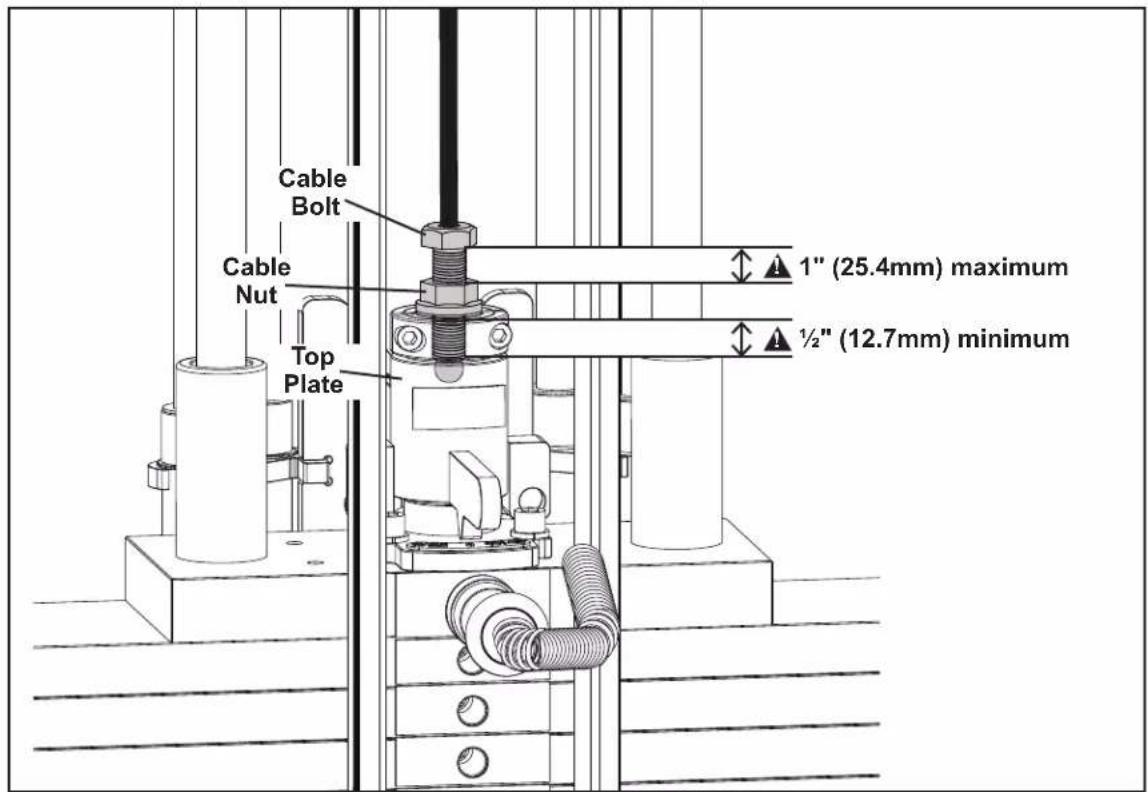
- Verify that a minimum of 12 " (12.7mm) of the threaded portion of the cable bolt is threaded into the top plate and that the nut is tight if equipped with a cable. (See cable inspection and maintenance.)
- Perform a function test by placing the selector pin in the top plate and cycling the machine through the intended motion if equipped with a cable. Verify that the machine operates smoothly without binding. Select a moderate weight and repeat. (See weight stack selector pin inspection.)
- Verify that each pulley rotates freely when performing the exercise if equipped with pulleys. A pulley that does not rotate will cause extreme cable wear and could lead to cable failure. Determine cause and remedy immediately.
- Verify that the adjustment pop pins retract easily and fully engage (when released) into each adjustment disc hole/slot. The pop pins are spring loaded so they should return to the engaged position when you release the knob.
- Verify that the adjustment pin disengages and engages freely when actuating the adjustment mechanism. Be sure that the adjustment pin inserts fully into the adjustment disc.
- Verify that all hardware is tight and that associated frame members are secure. Apply a few small drops of a thread locking compound such as Loctite on any loose bolts.
- Inspect frame for integrity and function. Replace any components at the first sign of wear with only TRUE supplied parts.
OTHER SCHEDULED PREVENTATIVE MAINTENANCE
TRUE recommends that scheduled maintenance be performed by a qualified service technician. Please contact your dealer or visit www.truefitness.com to contact a local TRUE authorized service technician.
Monthly
Clean guide rods and lubricate with a Teflon grease if equipped with guide rods.
Every 6 Months
Lubricate pivot bearing and linear bearings with lithium grease.
CLEANING THE EQUIPMENT
Daily Cleaning
Wipe all machines with a water dampened cloth and dry completely. This includes painted parts, chrome plated parts (except guide rods), plastic parts, and upholstered pads. It is important not to leave parts damp. This will increase the potential for corrosion to occur.
CAUTION: Certain anti-bacterial cleaners and other harsh cleaning agents can induce corrosion on the machine components. These solutions can also dry out and cause cracking and splitting on the upholstery.
Heavy Duty Cleaning
- Guide Rods (if equipped)—Clean and lubricate with a Teflon Spray. Be sure to coat the entire guide rod. Spraying lubricant into the cap plate bushings is also recommended.
- Chromed Adjustment Tubes—Wipe away dust and dirt before applying a Teflon spray lubricant. TRUE recommends using TriFlow™ or a similar brand.
- Linear Bearings—Clean the linear shaft and lubricate (as required) with Teflon based grease. Keeping linear bearings clean and lubricated is critical to long life and good performance.
- Painted Frames—If you have scuff marks, grease or a heavy dirt buildup on frame components, start with a mild soap solution or a diluted solution of a product such as Simple Green with a dilution of 32:1. If you cannot remove the marks using those methods, use a car polish/cleaner. DO NOT use solvents such as lacquer thinner, mineral spirits or acetone. For deeper scuff marks, use an automobile finish rubbing compound.
- Upholstery—For heavy duty cleaning, use a mild soap solution. This method should be sufficient in the majority of instances. In severe stain cases, you can use a solution of 5-10% household bleach diluted with water. Be sure to test an inconspicuous area first. DO NOT use chemical cleaners on the vinyl upholstery. You can also use a lanolin based hand cleaner to clean your upholstery. Wipe off after cleaning with a damp cloth and thoroughly dry.
- Plastic Parts—Use a mild soap solution to clean dirt and grease marks.
- Labels—Use a mild soap solution to clean dirt and grease marks.
- Shrouds—Use a mild soap solution to clean dirt and grease marks.
CAUTION: Do not use any acidic cleaners. Doing so will weaken the paint or powder coatings and may void the TRUE Warranty. Never pour or spray liquids on any part of the equipment. Allow the equipment to dry completely before using.
CAUTION: If you determine that the equipment needs service, make sure that the equipment cannot be used inadvertently and ensure other users know that the machine needs service.
To order parts or to contact a TRUE authorized service representative, please visit www.truefitness.com.
CABLE INSPECTION AND MAINTENANCE
One of the most critical areas that require frequent inspection on any weight machine is the cable or belt system that lifts the weight stack if the machine is equipped with those items. Sudden failure of a worn cable can, in some instances, result in injury to the user. It is the responsibility of the facility to inspect the cables frequently. Cables are components that wear over time. This means that the more often a piece of equipment is used, the greater the likelihood that cable wear will occur. This holds true for equipment made by any manufacturer and applies to urethane belts as well as wire rope cables. Listed below are the areas of the cable that require inspection.
IMPORTANT! TRUE recommends that all cables be replaced on an annual basis to maintain the safety of all users.
CABLE WEAR
Inspect all cables for any signs of wear. Pay close attention to the cable in the area of the end fittings and attachment points. Inspect the areas around the pulleys and/or cams. Shown below are examples of cables that exhibit signs of potential failure. If any of these conditions are apparent, the machine should immediately be taken out of service and repaired. Be sure to use only cables supplied by TRUE. DO NOT use cables that have fittings attached with hand-crimp tools.
| Examples of Cable Wear | |
Twisted Cable (Zig-Zag Pattern) Break in the Cable Cover | 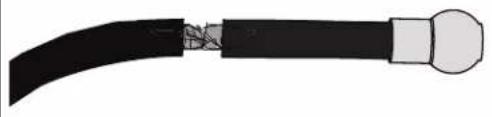 |
Break or Bend in the Cable Tear in the Cable Cover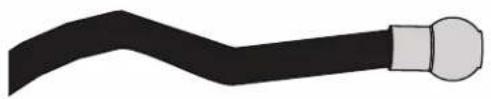 |  |
Stretched Cable Covering Crimp Connector Dislodged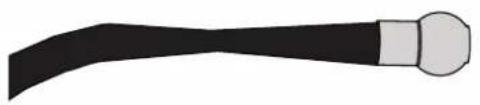 |  |
CABLE TENSION
Ensure that the cables are adjusted to remove any slack using the threaded end fittings. These are normally located at the weight stack connection. Depending upon the machine, there may be multiple threaded fitting on multiple cables. You can determine if there is too much slack by performing the exercise. As you start to move a load arm or handle, the weight stack should lift immediately. If not, the cable tension needs to be adjusted.
To adjust the cable tension, loosen the cable nut that is located on the cable bolt connected to the top plate. Tighten the cable bolt until the top plate is barely lifted off of the first weight plate and then re-tighten the cable nut.
CAUTION: A minimum of 12 " (12.7mm) of the threaded portion of the cable bolt must be threaded into the top plate. No more than 1" (25.4 mm) of the threaded portion of the cable bolt should be visible.
HANDLE FITTINGS (IF APPLICABLE)
Inspect the cable and fittings where handles are attached to the end of the cable. The fittings originally supplied with your machine are load rated snap-links and quick-links. Be sure the hex nut on the quick link is fully tightened. Be sure that the snap-link opens and closes easily and is fully engaged when closed. Replace if either are damaged.

CABLE FITTING ATTACHMENTS (IF APPLICABLE)
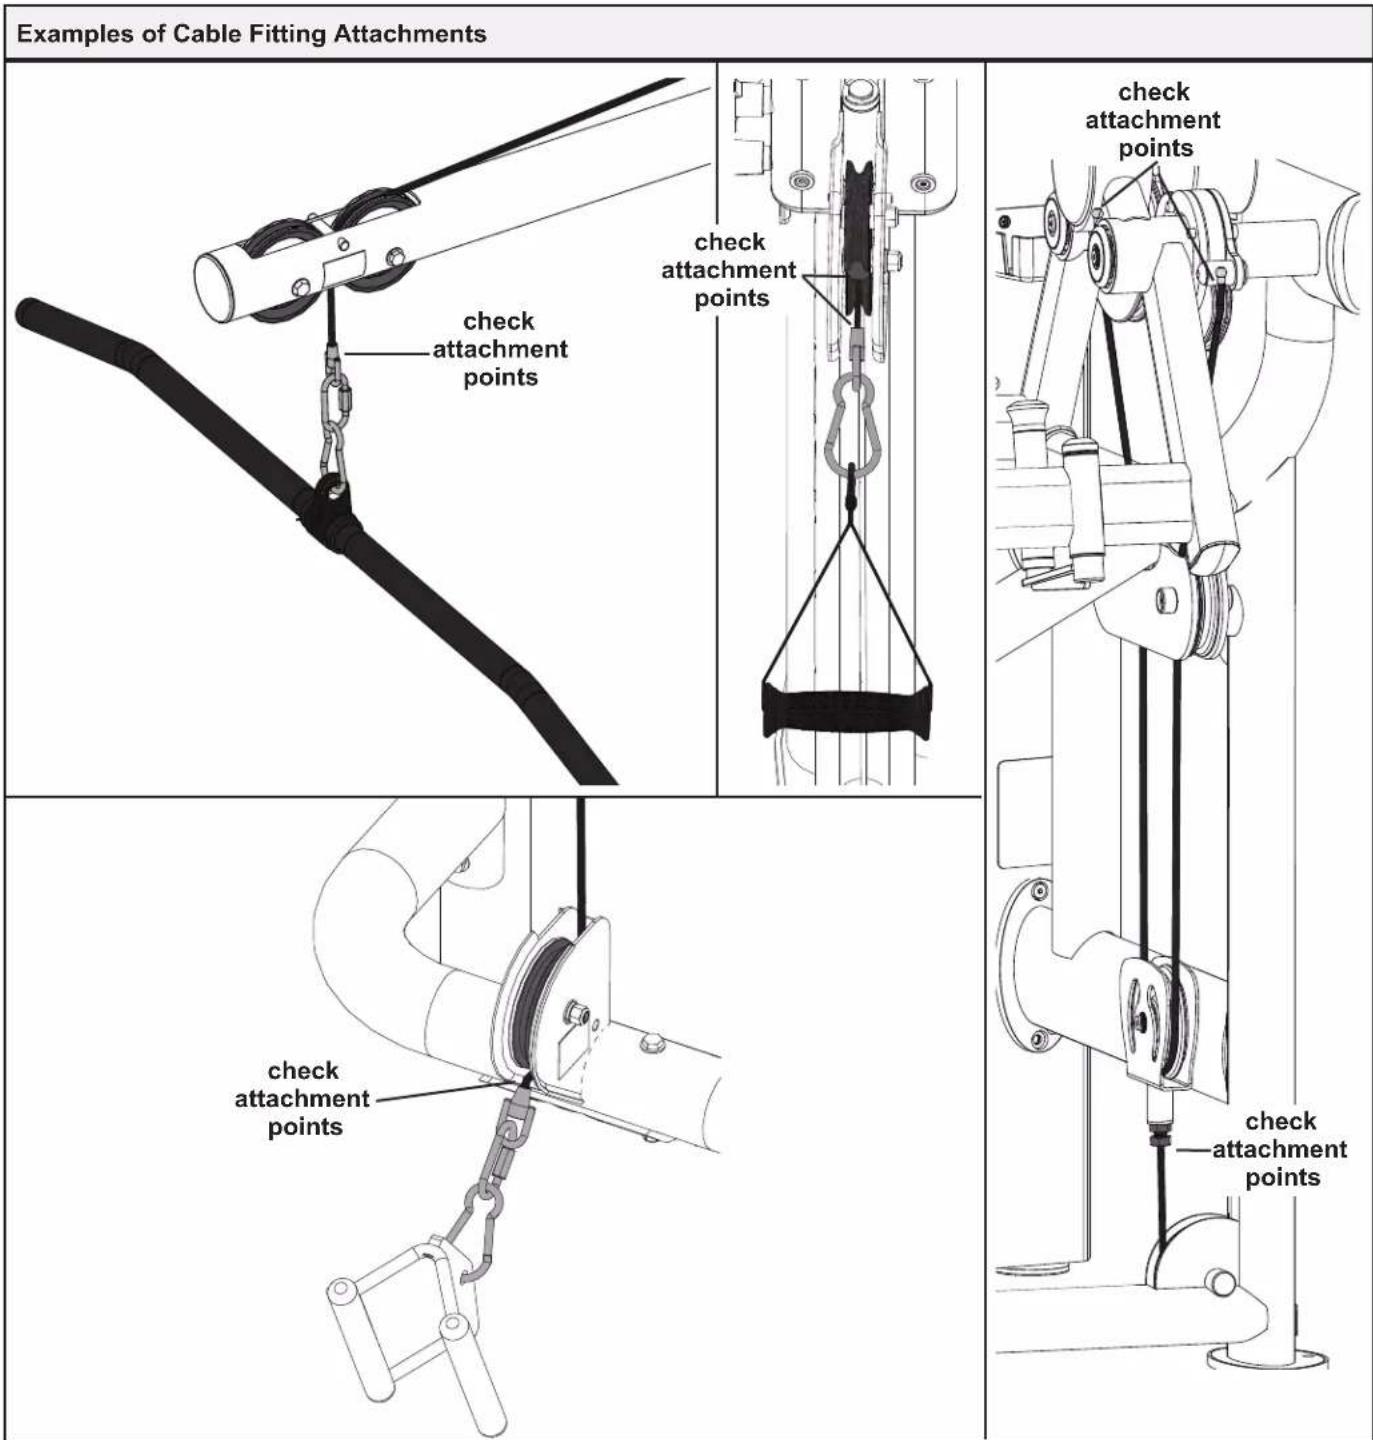
Depending upon the machine, cable end fittings can either be securely fixed, rotate about a single axis, or can be free floating. On machines where the cable fitting is designed to rotate about a single axis, verify that the fitting rotates freely and that the hardware used to secure the cable pivot axle (most likely a pin or a bolt) is correctly fastened.
⚠CAUTION: When tightening hardware for cable fittings that are designed to rotate, make sure not to overtighten as to cause the cable fitting to bind. An occasional application of synthetic grease can be applied to the cable fitting pivot axle.
WEIGHT STACK SELECTOR PIN INSPECTION
Verify that the weight stack selector pin is attached with the coiled lanyard to the top plate (if equipped). Verify the selector pin slides in and out of each weight plate. Place the selector pin in the top plate. Cycle the machine through the intended motion. Verify that the machine operates smoothly without binding.

natural_image
Technical diagram showing two views of a mechanical assembly with yellow directional arrows indicating motion or force (no text or symbols present)WARRANTY INFORMATION
SPL0100 COMMERCIAL LIMITED WARRANTY
Save Time and Register Online!
Activate Multiple Warranties at truefi tness.com
All TRUE® Fitness products are distributed by TRUE and are warranted to the original registered product purchaser and the parts of the TRUE product (the "Product") listed below, under normal use and service, shall be free of manufacturing defects in workmanship and materials only for the period of time beginning from the original date of purchase set forth below.
| Frame* 10 Years | |
| PartsBearings, Bushings, and Weight PlatesGuide Rods and PulleysCables and BeltsCosmetics, Coatings, Grips, and Upholstery | 5 Years5 Years1 Year3 Months |
| LaborFrameBearings, Bushings, and Weight PlatesGuide Rods and PulleysCables and BeltsCosmetics, Coatings, Grips, and Upholstery | 1 Year1 Year1 Year1 Year3 Months |
NOTES:
- Warranty valid for USA and Canada only.
- Failure to register this product will result in no servicing or authorization of parts to be shipped.
- Buying after-market products from a 3rd party will result in voided warranty.
- This product is intended for Commercial use. If this product will not be used in this particular setting, please contact TRUE as this warranty is void.
*Frame: The frame is warranted for defects in material and workmanship for a 10 years. The frame is warranted for labor and freight (for parts shipped from TRUE) for one year from date of purchase. This limited warranty on structural frame does not include paint or coatings. Frame warranty shall not exceed seven years after discontinuation of specific model.
Parts: The SPL Strength Line mechanical parts are warranted for defects in material and workmanship for fi ve years with one year labor warranty. Cables and belts are warranted for defects in material and workmanship for one year with one year labor warranty. This limited warranty does not cover damage or equipment failure resulting from or caused by improper assembly/installation, failure to follow instructions and warnings in the owner's manual, accident, misuse, abuse, unauthorized modification, or failure to provide reasonable and necessary maintenance.
Cosmetics: The SPL Strength Line cosmetic parts, coatings, grips and upholstery are warranted for defects in material and workmanship for three months with labor warranty to match the parts warranty period. This limited warranty does not cover damage or equipment failure resulting from or caused by improper assembly/installation, failure to follow instructions and warnings in the owner's manual, accident, misuse, abuse, unauthorized modification, or failure to provide reasonable and necessary maintenance. This limited warranty will apply to, but may not be limited to, plastic covers, shrouds, caps, badges, overlays, paint, coatings, soft step inserts, and grips.
Labor: Labor is covered for a period of one year from the date of purchase unless otherwise expressed within this limited warranty as long as a TRUE authorized service provider performs the service. Service that requires over 50 miles of travel may be subject to additional charges. Reasonable and necessary maintenance guidelines can be found in the owner's manual.
Claims Procedure: TRUE limited warranty service may be obtained by contacting the authorized TRUE dealer from whom the Product was purchased. If the dealer from whom the Product was purchased is no longer an authorized TRUE dealer, then TRUE limited warranty service may be obtained by contacting TRUE directly at:
• service@truefi tness.com
800.883.8783
HOURS OF OPERATION
• Monday - Thursday 8:30am - 6:00pm (CST)
• Friday 8:30am - 5:00pm (CST)
SPL0100 COMMERCIAL LIMITED WARRANTY
Save Time and Register Online!
Activate Multiple Warranties at truefi tness.com
KEEP THIS PAGE FOR YOUR RECORDS
- THIS LIMITED WARRANTY GIVES YOU SPECIFIC LEGAL RIGHTS AND YOU MANY ALSO HAVE OTHER RIGHTS, WHICH VARY FROM STATE TO STATE.
- This Limited Warranty can be processed only if the Warranty Registration Form is completed online; or if the attached form is filled in, signed by the original purchaser and mailed to TRUE within 30 days of purchaser's receipt of this Product. The serial number must be intact on the Product for this Limited Warranty to be valid.
- This Limited Warranty applies to the product only while the Product remains in the possession of the original purchaser and is not transferable.
- This Limited Warranty becomes VALID ONLY if the Product is initially assembled/installed by a TRUE authorized dealer/ technician (if anyone other than a TRUE authorized dealer/ technician initially assembles and installs the Product, this Limited Warranty will be void unless the written authorization of TRUE is first obtained).
- This Limited Warranty does not cover damage or equipment failure resulting from or caused by improper assembly/installation, failure to follow instructions and warnings in owner's manual, accident, misuse, abuse, unauthorized modification, or failure to provide reasonable and necessary maintenance (as referenced in the owner's manual.)
- This Limited Warranty applies only to the cost of repair or replacement of parts and does not include labor (beyond the above warranty period), transportation, service, return and freight charges associated therewith except as expressly specified herein.
- This Limited Warranty shall not apply to: Service calls to correct installation of the equipment or instruction to owners on how to use the equipment; or any labor costs incurred beyond the applicable labor warranty period.
- This Limited Warranty, which is given expressly and in lieu of all other express warranties, constitutes the only warranty made by TRUE.
- ANY IMPLIED WARRANTY, INCLUDING WITHOUT LIMITATION THE WARRANTIES OF MERCHANTABILITY AND FITNESS FOR A PARTICULAR PURPOSE, IS LIMITED IN DURATION AND REMEDY TO THE TIME PERIOD COVERED BY THE LIMITED WARRANTY. SOME STATES DO NOT ALLOW LIMITATIONS ON HOW LONG AN IMPLIED WARRANTY LASTS, SO THE ABOVE LIMITATION MAY NOT APPLY TO YOU.
- THE REMEDIES DESCRIBED ABOVE ARE YOUR SOLE AND EXCLUSIVE REMEDIES AND TRUE'S ENTIRE LIABILITY FOR ANY BREACH OF THIS LIMITED WARRANTY. TRUE'S LIABILITY SHALL UNDER NO CIRCUMSTANCES EXCEED THE ACTUAL AMOUNT PAID BY YOU FOR THE PRODUCT, NOR SHALL TRUE UNDER ANY CIRCUMSTANCES BE LIABLE FOR ANY CONSEQUENTIAL, INCIDENTAL, SPECIAL OR PUNITIVE DAMAGES OR LOSSES, WHETHER DIRECT OR INDIRECT. SOME STATES DO NOT ALLOW THE EXCLUSION OR LIMITATION OF INCIDENTAL OR CONSEQUENTIAL DAMAGES, SO THE ABOVE LIMITATION OR EXCLUSION MAY NOT APPLY TO YOU.
NOTE TO AUTHORIZED WARRANTY LABOR PROVIDERS: Warranty labor reimbursement or warranty parts rights may not be transferred to, reassigned to, a third party without the express written consent of TRUE. Even jobbing out warranty labor requires TRUE's written approval.
SERIAL NUMBER:
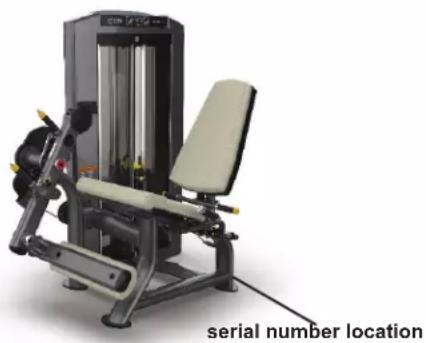
The SPL0100 comes with one serial number on the base of the machine. Please write down your serial number below and keep for your records.
PLEASE RETAIN THIS PORTION FOR YOUR RECORDS
SERIAL NUMBER:
natural_image
Exterior view of a gym machine with labeled serial number location (no other text or symbols visible)SERIAL NUMBER EXAMPLE
TRUE
TRUE FITNESS TECHNOLOGY, INC 865 HOFF RD, ST LOUIS MISSOURI 63366 USA
MODEL NO: SPL0100
SERIAL NO: 22-SPL0100000
SPL0100 COMMERCIAL LIMITED WARRANTY
Save Time and Register Online!
Activate Multiple Warranties at truefi tness.com
Thank you for purchasing a TRUE product. To validate the TRUE product warranty the fast and easy way, please go online now to truefitness.com and register your product. The information you provide will never be distributed to any other individuals or agencies for any purpose. If you prefer to mail your warranty card, have the owner of the product complete the information below and return it to TRUE Fitness within 30 days from the date of equipment installation.
IMPORTANT! Failure to register this product will result in no servicing or authorization of parts to be shipped.
To mail your warranty information, please fill in the information below and mail to: Service Dept., TRUE Fitness, 865 Hoff Road, St. Louis, MO 63366 (or save postage and register online at www.truefitness.com).

Commercial Warranty Registration
Serial Number
Purchase Date
Company (if applicable)
Customer Name (First and Last)
Email Address
Phone Number
Street Address City

State
Postal Code Country

TRUEFITNESS.COM
TRUE®
INTEGRITY MATTERS


TRUE Fitness Technology, Inc | 865 Hoff Road, St. Louis, MO 63366
© 2023 TRUE. All Rights Reserved.
SPL0100 Owner's Manual, Assembly Guide, and Warranty Card
(MAN-SPL0100 REV00)
- IMPORTANT!
- IMPORTANTE!
- Contacting Our Support Team
- Contacting Our Sales Team
- Reporting Freight Claims or Parts Damage
- Severe Damage—Obvious damage to external packaging and internal product.
- Slight Damage—Minimal damage to external packaging with unknown internal damage to product.
- Concealed Damage—No damage to external packaging but internal damage to product.
- TABLE OF CONTENTS
- SAFETY INSTRUCTIONS
- ASSEMBLY INSTRUCTIONS
- PREVENTATIVE MAINTENANCE
- WARRANTY INFORMATION
- IMPORTANT SAFETY INSTRUCTIONS—SAVE THESE INSTRUCTIONS
- FACILITY AND USER SAFETY PRECAUTIONS
- INSTALLATION SAFETY PRECAUTIONS
- MAINTENANCE SAFETY PRECAUTIONS
- GENERAL CARE AND MAINTENANCE
- IMPORTANT
- COMPLIANCES
- DIMENSIONS AND WEIGHTS
- \*\* IMPORTANT NOTES:
- WARNING AND INTENDED USE LABELS
- TRUE
- WARNING
- PREASSEMBLY CHECKLIST
- CAUTION:
- VERIFY BOX CONTENTS
- BOX CONTENTS
- ASSEMBLY STEPS
- STEP 1—ATTACH MAIN FRAME ASSEMBLY TO UPRIGHT ASSEMBLY
- STEP 1—ATTACH MAIN FRAME ASSEMBLY TO UPRIGHT ASSEMBLY CONTINUED
- STEP 2—ROUTE CABLE THROUGH UPRIGHT AND MAIN FRAME ASSEMBLIES
- STEP 2—ROUTE CABLE THROUGH UPRIGHT AND MAIN FRAME ASSEMBLIES CONTINUED
- STEP 3—ATTACH WEIGHT STACK TO UPRIGHT ASSEMBLY
- STEP 3—ATTACH WEIGHT STACK TO UPRIGHT ASSEMBLY CONTINUED
- STEP 4—ATTACH ACRYLIC SHROUDS TO UPRIGHT ASSEMBLY
- STEP 4—ATTACH ACRYLIC SHROUDS TO UPRIGHT ASSEMBLY CONTINUED
- STEP 4—ATTACH METAL SHROUDS TO UPRIGHT ASSEMBLY
- STEP 4—ATTACH METAL SHROUDS TO UPRIGHT ASSEMBLY CONTINUED
- STEP 5—ATTACH TOP COVER TO UPRIGHT ASSEMBLY
- STEP 5—ATTACH TOP COVER TO UPRIGHT ASSEMBLY CONTINUED
- STEP 6—ATTACH PHONE HOLDER TO UPRIGHT ASSEMBLY
- STEP 7—ATTACH PADS TO MAIN FRAME ASSEMBLY
- DAILY INSPECTION AND MAINTENANCE
- WEEKLY INSPECTION AND MAINTENANCE
- OTHER SCHEDULED PREVENTATIVE MAINTENANCE
- Monthly
- Every 6 Months
- CLEANING THE EQUIPMENT
- Daily Cleaning
- Heavy Duty Cleaning
- CABLE INSPECTION AND MAINTENANCE
- CABLE WEAR
- CABLE TENSION
- HANDLE FITTINGS (IF APPLICABLE)
- CABLE FITTING ATTACHMENTS (IF APPLICABLE)
- WEIGHT STACK SELECTOR PIN INSPECTION
- SPL0100 COMMERCIAL LIMITED WARRANTY
- NOTES:
- HOURS OF OPERATION
- KEEP THIS PAGE FOR YOUR RECORDS
- SERIAL NUMBER:
- SERIAL NUMBER EXAMPLE
- Commercial Warranty Registration
- TRUEFITNESS.COM
- TRUE®
- INTEGRITY MATTERS
Brand : True
Model : SPL0100
Category : Training equipment