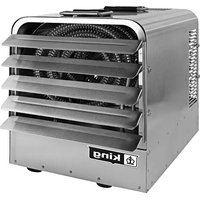
PKBS2010-1-T-FM - Frying Pan KING - Free user manual and instructions
Find the device manual for free PKBS2010-1-T-FM KING in PDF.


| Type | Industrial Portable Unit Heater |
| Model | PKBS2010-1-T-FM |
| Brand | KING |
| Material | Stainless Steel (PKBS series) |
| Voltage Options | 208V, 240V, 480V (single or three phase) |
| Power Range | 5 kW to 20 kW (depending on configuration) |
| Phase Options | Single or Three phase (model dependent) |
| Heating Element | Open coil (exposed, requires careful cleaning) |
| Safety Features | Tip-over auto disconnect (30° tilt), overheat limit control |
| Thermostat | Adjustable knob (continuous range) |
| Power Cord | Cord with specific pin & sleeve plug (NEMA not supplied) |
| Installation | Floor use only, maintain 3 ft clearance from combustibles, 6 in from walls |
| Cleaning | Remove front ducted housing, blow debris, clean fan and motor with soft cloth |
| Control Type | Manual thermostat (no remote) |
| Application | Industrial, commercial workshops, warehouses |
| Certifications | Designed to meet safety standards (refer to manual) |
| Warranty | Not specified in manual; contact KING for details |
Frequently Asked Questions - PKBS2010-1-T-FM KING
User questions about PKBS2010-1-T-FM KING
0 question about this device. Answer the ones you know or ask your own.
Ask a new question about this device
Download the instructions for your Frying Pan in PDF format for free! Find your manual PKBS2010-1-T-FM - KING and take your electronic device back in hand. On this page are published all the documents necessary for the use of your device. PKBS2010-1-T-FM by KING.
USER MANUAL PKBS2010-1-T-FM KING
SAVE THESE INSTRUCTIONS
CLEANING INSTRUCTIONS
Before cleaning this heater, the heating element must be cool.
- Before removing front ducted housing, turn the electrical power OFF by unplugging it; if not, electricity may still be flowing to the heater; if you are uncomfortable working with electrical appliances consult a qualified electrician. Once power is off completely, proceed to the next step.
- Remove 5 x 1/4-20 screws located on the sides of the ducted housing. Wipe housing with soft cloth or brush.
-
Using a hair cryer or vacuum on blow cycle, blow debris back through the element. Do not touch element. Vacuum lose debris without touching the elements.
-
Replace ducted housing and secure with screws.
- To clean the fan and motor remove the safety grid from the rear of the heater. This provides access to the fan and motor. Wash Grill with hot soapy water and dry immediately
- Wipe the fan and motor with a soft cloth or brush.
- Replace safety grill & plug the unit back in

TROUBLESHOOTING
Troubleshooting Chart for Electric Heaters
| SYNFT OM | PROBLEM | SOLUTION |
| Breaker Tips | 1. Short Circuit2. Overloaded Circuit3. Improcer Village | 1. Find source of short. Trace heater circuit and verify the heater is fixed properly.2. Reduce wallage in circuit. Refer to circuit sizing table for maximum wallage.3. Verify the heater voltage matches the supply voltage. |
| Heater not working | 1. No Power2. Loose Connections3. Defective Limit | 1. Turn Breaker ON, turn thermostat ON, check that the breaker is positioned properly on panel bus but. A 2-Pole breaker must be connected to solid bus bus (ASE proximity to product 240V power).2. Tighten wire connections.3. By-pass the limit to test in heater works, replace the limit. |
| Heater Smoke | 1. Cell or Element2. Needs Cleaning | 1. It is normal to the element to turn off or light finishing oil area in the manufacturing process when first energized. Op to windows and allow room to vent until 600s, usually within a few minutes.2. Remove any cost or dirt accumulation. |
| Room Temperature does not match thermostat setting | 1. Thermostat affected by orders or no source.2. Improcer calibration | 1. Sight or other heat sources can affect the thermostat. Move the thermostat to another location or remove the next source.2. Remove cover and adjust calibration screw. |
| Room Temperature switches from not to low cold | 1. Defective or low quality thermostat | 1. Prepare with a better quality thermostat. Anticipated thermostats are fairly accurate; an electronic thermostat is best. |
KONG ELECTRIC MFG CD · 9131 10TH AVENUE SOUTH · SEATTLE, WA 98108 · PH 206 762 0400 · FAX: 208 763 7738 · www.king-electric.com
SAVE THESE INSTRUCTIONS
INSTALLATION AND MAINTENANCE

PKB-FM / PKBS (Stainless Steel)
Industrial Portable Unit Heater


Figure 1
WARNING
READ CAREFULLY - Use the heater only as described in this manual. Any other use is not recommended and could result in fire, electric shock, and personnel injury. Following these instructions will prevent difficulties that might occur during the installation and use of the header. Please study the instructions first, as they may save considerable time and trouble during use, in addition to providing important safety information. Make sure to save these instructions for future use.
Read all instructions before using this heater.
-
WARNING: This heater is hot when in use. To avoid burns, do not let bare skin touch hot surfaces. Keep combustible materials, such as furniture, pillows, bedding, papers, clothes, etc. and curtains at least 3 feet (0.9 m) from the front of the heater and keep them away from the sides and rear.
-
Extreme caution is necessary when heater is used by or near children or invalids and whenever the heater is left operating and unattended.
-
Always unplug heater when not in use.
-
WARNING: Do not operate heater with damaged card or plug, after it malfunctions, has been cropped, or damaged in any manner. Discard heater or return to authorized service facility for examination and/or repair.
-
WARNING: Do not use outdoors.
- This heater is not intended for use in bathrooms, laundry and similar indoor areas. Never locate heater where it can fall into a bathtub or other water container.
- WARNING: Do not run cord under carpeting. Do not cover cord with throw rugs, runners, or similar coverings. Do not route
cord under furniture or appliances. Arrange cord away from traffic area and where it will not be tripped over.
-
To disconnect heater, turn controls to oil, then remove plug from outlet.
9 Connect to property grounded outliers only -
WARNING: Do not insert or allow foreign objects to enter any ventilation or exhaust opening as this may cause an electric shock or fire, or damage the heater.
- WARNING: To prevent a possible fire, can not block air intakes or exhaust in any manner.
- WARNING: A heater has hot and arcing or sparking parts inside. Do not use it in areas where gasoline, paint, or fammable vapors or liquids are used or stored.
- Use this heater only as described in this manual. Any other use not recommended by the manufacturer may cause fire, electric shock, or injury to persons.
- Always plug heater into well outlet or receptacle. Never use with extension cord or relocatable power tap, or power strip
KING ELECTRIC MFG CO · 9131 10TH AVENUE SOUTH · SEATTLE, VIA 98108 · PH206 782 0400 · FAX: 206 763 7738 · www.king-electric.com
104398 Rev. 10-6-20 Print 10-6-20
SAVE THESE INSTRUCTIONS
ASSEMBLY & SETUP

Figure 2
CAUTION!
Remove power by unplugging the Heater while setting up or placing
(1) 2017年1月1日
Rating

King Constrad Mfg. 1231 10th am ss. Saoe's Wt. 2015 POTELLOON-04 JUL 2016 WITTELLOON SOUT 1 CHF PHASE & LUTTER FOR CABBAGE BY BISCUITER, 1987 (1988) TURB, 1994 (1995) 10000000000000000000000000000000000000000000000000000000000
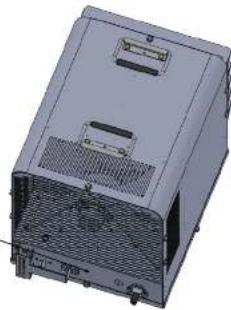
HEATER SETUP
- Unpack and inspect your heater for any damage. Any damage discard heater or return to authorized service facility immediately.
- Place heater at least 6" (15cm) away from vertical surfaces and keep the intake clear of obstructions. Keep all combustible materials, such as furniture, papers, clothes, drapes, and curtains at least 3 feet (0.9 m) from the front of the heater and keep them away from the sides and rear.
- Route power cord sway from traffic areas to avoid tripping. NEVER rout power cord under carpets, rugs, drops furniture or other equipment.
- Plug power cord into a grounded wall outlet, only DO NOT use an extension cord or power strip.
-
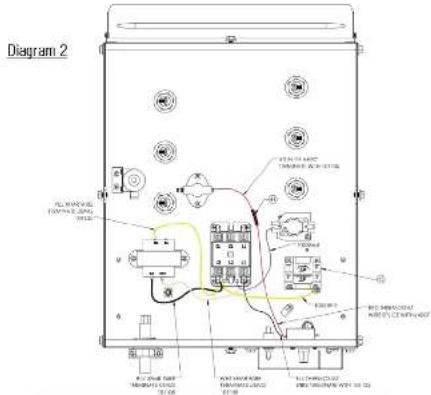
Wiring diagram located in wiring housing.
-
WARNING: This heater is for floor use ONLY and should not be upcera on side placed upside down, mounted on or inserted into a wall. A tip-over auto disconnect switch will activate when Toped more than 30°
- DO NOT use heater in areas where gasoline, paint, or other flammable liquids are used.
- Notice: When installing in a laundry bath or shower area, the baseboard is required to be on a CFO protected circuit.
- Store unplugged and in a dry indoor location
- This heater is for use on 240 (208 or 480 volts). The type outlet is a 240 (or 206) volt grounding outlet. When properly installed, it provides a ground connection through the cord to the heater to protect the operator from electric shock.
SAVE THESE INSTRUCTIONS
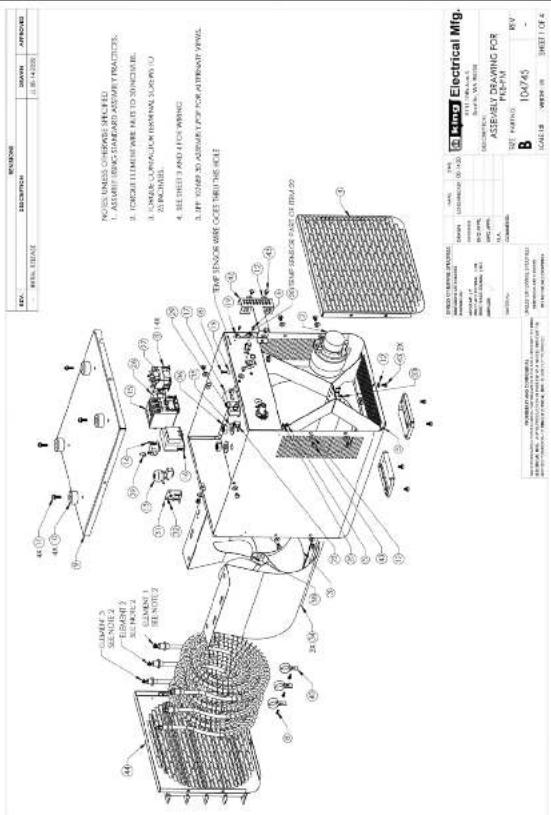
EXPLODED DIAGRAM
Diagram 3
KING ELECTRIC MFG CO · 9131 10TH AVENUE SOUTH · SEATTLE, WA 98108 · PH 208 762 0400 · FAX: 206 763 7738 www.king-electric.com
KING ELECTRIC MFG CO 9131 10TH AVENUE SOUTH SEATTLE, WA 98108 PH:206 752 0400 FAX:206 763 7738 www.king-electric.com
SAVE THESE INSTRUCTIONS
INTERNAL WIRING DIAGRAMS
Diagram 1
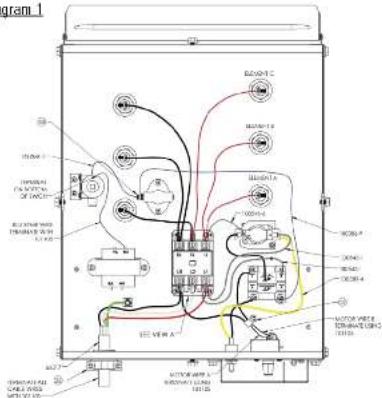

VIEW A
KING ELECTRIC MFG CO · 9131 10TH AVENUE SOUTH · SEATTLE, WA 90108 · PH 208 782 0400 · FAX: 206 768 7738 · www.king-electric.com
SAVE THESE INSTRUCTIONS
PKB PLUG SELECTION
Check rating label on heater (See Figure 2) and verify the proper voltage and SO cond type. P/B Series requires the below rated plug and receptacle per the amperage requirement (Not provided). No adapter is available for this blade configuration.
HUBBELL®
Device-Kellems

Dual-Certified IEC Pin & Sleeve Devices
| KW | PHASE | VOLTS | AMPS | SOON CORD GAUGE |
| 5 | 1 | 208 | 24 | 12/3 |
| 7.5 | 1 | 208 | 35.1 | 8/3 |
| 10 | 1 | 208 | 48.1 | 6/3 |
| 15 | 1 | 208 | 72.1 | 2/3 |
| 5/3.7 | 1 | 240/208 | 29.8/18.0 | 12/3 |
| 7.5/5.6 | 1 | 240/208 | 31.3/26.9 | 8/3 |
| 10/7.5 | 1 | 240/208 | 41.7/36.1 | 6/3 |
| 12.5/9.4 | 1 | 240/208 | 52.1/45.1 | 6/3 |
| 15/11.25 | 1 | 240/208 | 52.5/54.1 | 4/3 |
| 5 | 1 | 490 | 10.4 | 14/3 |
| 7.5 | 1 | 490 | 15.6 | 14/3 |
| 10 | 1 | 490 | 20.8 | 12/3 |
| 12.5 | 1 | 490 | 26 | 10/3 |
| 15 | 1 | 490 | 31.3 | 8/3 |
| 5 | 3 | 208 | 13.9 | 14/4 |
| 7.5 | 3 | 208 | 20.8 | 10/4 |
| 10 | 3 | 208 | 27.7 | 8/4 |
| 15 | 3 | 208 | 41.6 | 6/4 |
| 20 | 3 | 208 | 55.5 | 6/4 |
| 5/3.75 | 3 | 240/208 | 12.0/10.3 | 14/4 |
| 7.5/5.6 | 3 | 240/208 | 18.0/15.6 | 12/4 |
| 10/7.5 | 3 | 240/208 | 24.1/20.6 | 10/4 |
| 12.5/9.4 | 3 | 240/208 | 30.1/26.1 | 14/4 |
| 15/11.25 | 3 | 240/208 | 36.1/54.1 | 6/4 |
| 20/15 | 3 | 240/208 | 48.1/41.6 | 6/4 |
| 5 | 3 | 490 | 6 | 14/4 |
| 7.5 | 3 | 490 | 9 | 14/4 |
| 10 | 3 | 490 | 12 | 14/4 |
| 12.5 | 3 | 490 | 15.1 | 12/4 |
| 15 | 3 | 490 | 18.1 | 12/4 |
| 20 | 3 | 490 | 24 | 12/4 |
| Rating | Waterlight Devices | ||||
| Amp | Power/Wire | Configuration Replaces/ Pugplant | AC Voltage | Replaces | Plug |
| 60/63 | 2F 2W | 220-240V250V | HBL360RW | HBL360PW | |
| 60/63 | 2F 2W | 220-240V250V | HBL360RW | HBL360PW | |
| 60/63 | 2F 2W | 220-240V250V | HBL360RW | HBL360PW | |
| 100 | 2F 2W | 250V | HBL3100RW | HBL3100PW | |
| 60/63 | 2F 2W | 220-240V250V | HBL360RW | HBL360PW | |
| 60/63 | 2F 2W | 220-240V250V | HBL360RW | HBL360PW | |
| 60/63 | 2F 2W | 120-240V250V | HBL360RW | HBL360PW | |
| 60/63 | 2F 2W | 220-240V250V | HBL360RW | HBL360PW | |
| 100 | 2F 2W | 250V | HBL3100RW | HBL3150PW | |
| 60 | 2F 2W | 480V | HBL360R7W | HBL360P7W | |
| 60 | 2F 2W | 480V | HBL360R7W | HBL360P7W | |
| 60 | 2F 2W | 480V | HBL360R7W | HBL360P7W | |
| 60 | 2F 2W | 480V | HBL360R7W | HBL560P9W | |
| 60 | 2F 2W | 480V | HBL360R7W | HBL560P9W | |
| 60/63 | 4P SW | 32V120/208V | HBL560R9W | HBL560P9W | |
| 60/63 | 4P SW | 32V120/208V | HBL560R9W | HBL560P9W | |
| 60/63 | 4P SW | 32V120/208V | HBL560R9W | HBL560P9W | |
| G0VS8 | 4P SW | 32V120/208V | HBL560R9W | HBL560P9W | |
| G0VS8 | 4P SW | 32V120/208V | HBL560R9W | HBL560P9W | |
| G0VS8 | 4P SW | 32V120/208N | HBL560R9W | HBL560P9W | |
| G0VS8 | 4P SW | 32V120/208V | HBL560R9W | HBL560P9W | |
| G0VS8 | 4P SW | 32V120/208V | HBL560R9W | HBL5650PW | |
| G0VS8 | 4P SW | 32V120/208V | HBL560R9W | HBL560PW | |
| G0VS8 | 4P SW | 32V120/208V | HBL560R9W | HBL560PW | |
| G0VS8 | 4P SW | 32V120/208V | HBL560R9W | HBL560PW | |
| G0VS8 | 4P SW | 32V12O208V | HBL560R9W | HBL560PW | |
| G0VS8 | 4P SW | 32V120/208V | HBL560R9W | HBL560PW | |
| G0VS8 | 4P SW | 32V120/208V | HBL560R9W | HBL5650PW | |
| G0VS8 | 4P SW | 32V120/208V | HBL560R9W | HBL560PW | |
| G0VS8 | 4P SW | 32V120K208V | HBL560R9W | HBL560PW | |
| G0VS8 | 4P SW | 32V120/208V | HBL560R9W | HBL560PW | |
| G0VS8 | 3F 4W | 32V120/208V | HBL460R7W | HBL460P7W | |
| G0VS8 | 3F 4W | 32D 480V | HBL460R7W | HBL460P7W | |
| 60 | 3F 4W | 32D 480V | HBL460R7W | HBL460P7W | |
| 60 | 3F 4W | 32D 480V | HBL460R7W | HBL460P7W | |
| 60 | 3F 4W | 32D 480V | HBL4650TW | HBL460P7W | |
| 60 | 3F 4W | 32D 480V | HBL460R7W | HBL460P7W | |
KING ELECTRIC MFG CO · 9131 10TH AVENUE SOUTH · SEATTLE, VA 98108 · PH:206 762 0400 · FAX: 206 763 7735 · www.ling-electric.com
SAVE THESE INSTRUCTIONS
OPERATION AND ADJUSTING THERMOSTAT
This heater must be properly placed before it is used.
DO NOT tamper with or change the operation of this heater. All service should be preformed by an authorized service representative. Only replace components with King approved replacement parts.
Operation:
- After the electric heater has been completely placed, the thermostats should be turned to LOW or NO HEAT position.
- Plug unit into grounded outlet, Do not use extension cords.
-
Turn thermostats to highest position and wait 3 to 5 minutes. Check to see that all heaters are operating. Should any not be operating, disconnect power and check wiring.
-
Allow entire system to operate steadily for 1/2 hour. This should remove oily residue from manufacturing. (Some smoking may occur).
Selecting desired temperature on the thermostat:
To adjust the temperature to your requirements, turn the dial on the thermostat clockwise all the way to turn heater on. When the room reaches the desired temperature, turn the thermostat knob counter clockwise until you hear the click. Leave in this position to maintain the room temperature at this setting. For additional heat, turn clockwise until you hear the click and the heater will turn on. PROTECTION
A safety limit control is provided to turn off the heater automatically if it is blocked or otherwise overheats due to an abnormal condition. DO NOT bypass or remove this safety device from the electrical circuit. During normal use, this safety control should not operate. If you find that this control is operating, make sure the heater is not being blocked. If it continues to cycle the heater off, disconnect power to heater and have it checked and repaired by a qualified electrician.
KING ELECTRIC MFG CO · 9131 10TH AVENUE SOUTH · SEATTLE, WA 98108 · PH208 782 C400 · FAX: 206 769 7738 · www.king-electric.com
SAVE THESE INSTRUCTIONS
WIRING SCHEMATIC

KING ELECTRIC MFG CO · 9131 10TH AVENUE SOUTH · SEATTLE, WA 96108 · PH:206 762 0400 · FAX: 206 763 7739 · www.kang-electric.com
Brand : KING
Model : PKBS2010-1-T-FM
Category : Frying Pan