LS9A123-1-01 - LED Lighting Cotech - Free user manual and instructions
Find the device manual for free LS9A123-1-01 Cotech in PDF.


| Brand | Cotech |
| Model | LS9A123-1-01 |
| Product Type | Power Tool (Cordless Drill/Screwdriver) |
| Voltage | 18 V |
| Battery Type | Lithium-Ion |
| Charging Time | Approx. 1 hour |
| No-Load Speed | 0-600 rpm |
| Max Torque | 30 Nm |
| Chuck Type | Keyless |
| Chuck Capacity | 1-10 mm |
| Weight (with battery) | 1.5 kg |
| Dimensions (L x W x H) | 200 x 200 x 70 mm |
| Material | Plastic housing, metal gears |
| Safety Features | Overload protection, safety trigger lock |
| Included Accessories | Battery, charger, carrying case |
| Color | Green/Black |
| Warranty | 2 years |
| Intended Use | Drilling and screwdriving |
| Maintenance | Keep clean, store in dry place |
| Spare Parts Availability | Available from manufacturer |
| Noise Level | 75 dB (approx.) |
Frequently Asked Questions - LS9A123-1-01 Cotech
User questions about LS9A123-1-01 Cotech
0 question about this device. Answer the ones you know or ask your own.
Ask a new question about this device
Download the instructions for your LED Lighting in PDF format for free! Find your manual LS9A123-1-01 - Cotech and take your electronic device back in hand. On this page are published all the documents necessary for the use of your device. LS9A123-1-01 by Cotech.
USER MANUAL LS9A123-1-01 Cotech
Extendable RGBW LED Strip Light
Art.no
36-7974
Model
\$9A123-1-01
36-7975
LS9A123-2-01
Read the entire instruction manual before use and save it for future reference. We apologise for any text and picture errors and any changes of technical data. If you have any questions concerning technical problems please contact our Customer Services.
Safety
Warning:
- Neither the product nor its main adapter may be dismantled or modified in any way.
- Never use the product or the mains adapter if it is in any way damaged or malfunctioning. Unplug the product immediately if it is damaged.
- Do not use the product in environments where explosive or flammable gases are stored or used.
- The product must only be connected to the included mains adapter.
- Never connect several or other types of devices to the mains adapter.
- The product must not be installed on a wet or electrically conductive surface.
- Make sure that the cables are not damaged whilst the product is being installed.
- Always unplug the mains adapter from the wall socket when the product is not in use.
- Do not carry the product using the mains load and do not use it for other unsuitable purposes.
- Never let children play with the product
- The product may be used by persons with reduced physical, sensory or mental capabilities or persons with a lack of experience or knowledge which could jeopardise their safety, provided they have been instructed in the safe operation of the product and understand the hazards involved.

- The LEDs cannot be replaced. When the LEDs have reached the end of their service life, the entire product must be discarded.
• This product is intended only for private use.

Risk of eye damage. Do not look directly at the light source.

The product is not suitable for illuminating a room.

The product is intended for indoor use only.

Class II mains adapter.

Class III strip light
Installation

Information
The LED strip light can be mounted using the double-sided adhesive tape (mounted). For best adhesion, ensure that the surface is clean, dry and free of grease.
The length of the light strip can be adjusted by cutting it at one of the soldering points which are spaced every 53 cm along its length.
Note: Once the strip light has been cut and shortened, it is no longer possible to extend it with additional strip lights.
- Strip light: Remove the protective film from the tape on the back of the light strip and attach it to a clean, grease-free surface. The strip light may also be screwed on with plastic clips.
- Connectors, Connect the strip light and the control box together.
Note: Make sure the strip light is connected in the right way, with the arrows pointing towards each other. Otherwise the strip light will not work. - IR Receiver.
Note: Make sure there are no obstacles between the IR receiver on the LED control unit and the remote control. - Control unit
- Connection cable: Connect the connection cable to the LED control unit.
- Mains adapter: Plug the mains adapter into an electrical outlet.
LED strip light extension set
Art. no: 38-7975 (sold separately)
1. Linplug the adapter from the electrical outlet.
2. Remove the protective film
from the tape on the back
of the strip light and attach
the strip to a clean, grease-
free sound. The simple light you also be perceived as what
may also be screwed on with plastic clips.
- Connect the strip lights together with one another.
Note: Make sure the strip light is connected in the right way.
Otherwise the strip light will not work.
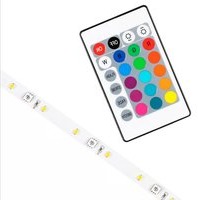
Remote control
- 12 colour tones within the RGB spectrum
- [R] Red light
[G] Green light
[B] Blue light
[W] White light - [+] Increase light intensity
Decrease light intensity - OFF Turn bar strip light off
- [ON] Turn the strip light on [ON] Turn the slip light on
- [FLASH] Change slowly between all the colours
- [PEKSI] (Omba) Akti) Between all the markets
- [STROBE] Change quickly between all the colours
- [FADE] Charge between all the colours, the colours fade into one another
- | SMOOTH | Change between all colours with no visible transition

Care and maintenance
- Unplug the mains lead from the wall socket before cleaning.
- The product should be cleaned using a dry cloth or vacuum cleaner.
Responsible disposal
This symbol indicates that
the product should not be
disposed of with general
household waste. This appl
throughout the entire EU. In
order to prevent any harm
to the environment or health
nazards caused by incorrect waste
disposal, the product must be handed to for moving so that the material
In for recycling so that the material are be disposed of in a responsible
can le disposed it in a responsable manner. Video recycling your product
takult to your local collection facility or
tane it to your food collection facility of contact the place of purchase. They will
ensure that the product is disposed of
an environmentally sound manner.
Specifications
Mains adapter
Power supply 230 V AC, 50/60 Hz
Output 24 V DC, 1 A, 24 W
Strip light
36-7974
Dimensions 6003 x 10 mm
Light source 324 x LED
36-7975
Dimensions 3000 x 10 mm
Light source 162 x LED
Remote control
Range Max 7 m from straight
ahead, 3 m from the sides.
Battery 1 x CR2025 (included)

Utbyggbar LED-list RGBW
Art.nr 36-7974 Modell LS9A123-1-01
36-7975
LS9A123-2-01
Batter 1 × CR2025 (modulator)

SVERIGE • KUNDTJÄNST tel 0247/445 00 e-post kundservice@clasohlson.se
Internet www.clasohlson.se brev Clas Ohlson AB, 793 85 INSJÖN
Utbyggbar LED-list RGBW
Art.nr. 36-7974 Modell LS9A123-1-01
36-7975
LS9A123-2-01
Vedlikehold
Brand : Cotech
Model : LS9A123-1-01
Category : LED Lighting