
ELVOX 46522.036D - Camera Vimar - Free user manual and instructions
Find the device manual for free ELVOX 46522.036D Vimar in PDF.


| Product Type | Camera |
| Brand | Vimar |
| Model | ELVOX 46522.036D |
| Sensor | 1/3 CMOS, 4.0 Megapixel |
| Effective Pixels | 2688 (H) x 1520 (V) |
| Video Output | AHD, PAL/NTSC selectable |
| Frame Rate | 25/30 fps |
| Minimum Illumination | 0.01 Lux (IR ON) |
| IR Range | 20 meters (Smart-IR) |
| Waterproof Standard | IP66 |
| Power Supply | 12 Vdc |
| Current Consumption | 150 mA (IR ON), 53 mA (IR OFF) |
| Dimensions | 70 mm (H) x 94 mm (∅) |
| Weight | 570 g ±15% |
| Lens | 3.6 mm HD fixed lens |
| Operating Temperature | -10°C to 50°C, RH 90% MAX |
| Storage Temperature | -20°C to 50°C |
| Main Features | IR-CUT filter, Smart-IR, D-WDR, 2DNR, OSD menu, White Balance, AGC |
| Maintenance | Clean body with dry cloth; sensor with ethanol and lens tissue |
| Safety | Use correct power supply; do not disassemble; avoid pointing at bright sources |
| Service | No user serviceable parts; contact qualified service personnel |
Frequently Asked Questions - ELVOX 46522.036D Vimar
User questions about ELVOX 46522.036D Vimar
0 question about this device. Answer the ones you know or ask your own.
Ask a new question about this device
Download the instructions for your Camera in PDF format for free! Find your manual ELVOX 46522.036D - Vimar and take your electronic device back in hand. On this page are published all the documents necessary for the use of your device. ELVOX 46522.036D by Vimar.
USER MANUAL ELVOX 46522.036D Vimar
The camera adopt 4.0 mega pixels high performance 1/3 CMOS sensor. The camera adopt new material with IP66 waterproof standard, IR-CUT filter, smart-IR control. Fashionable and professional design.
ATTENTION
Thank you for your purchasing this product. Before attempting to connect or operate this product, please read these instructions carefully and save this manual for future use.

- Use the Appropriate Power Supply
The input power for the camera is 12 Vdc. Be sure to connect it to the appropriate power. Wrong connection may cause malfunction and/or damage to the video camera.
- Do not attempt to disassemble the camera.
To prevent electric shock, do not remove screws or covers. There are no user serviceable parts inside. Ask a qualified service person for servicing.
- Handle the camera with care.
Do not abuse the camera. Avoid striking, shaking, etc. The camera could be damaged by improper handling or storage.
- Do note use strong or abrasive detergents when cleaning the camera body.
Use a dry cloth to clean the camera when dirty. In case the dirt is hard to remove. Use a mild detergent and wipe gently.
- Clean the sensor faceplate with care.
When cleaning the sensor panel, do not use strong or abrasive detergents. Use a piece of lens tissue or cotton tipped applicator and ethanol.
-
Do not attempt to aim the camera at the sun or other extremely brightobjects that causes mear to appear irrespective of whether the camera is operating or not. This can damage the sensor.
-
Do not put the camera in a place with interference.
When this camera is installed near the equipment like wireless communication device which emits strong electromagnetic field, some irregularity such as noise on monitor screen may happen.
FEATURES
- 4.0 Megapixel high performance 1/3 CMOS sensor, no compressed, no delay, and real-time transmission image.
- Built in IR-CUT, ensure the camera work properly both day and night.
- IP66 waterproof standard
- Long-life IR LED design, whose brightness is several times higher and service life longer than ordinary LED's
- SMART-IR, 20 meters IR range
Long-effective IR Light Source Design
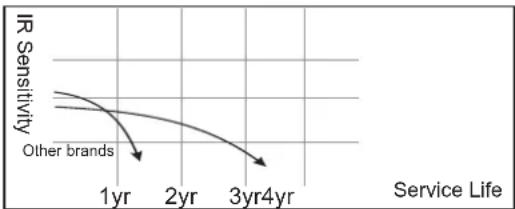
line
| Service Life | IR Sensitivity | | ------------ | -------------- | | 1yr | 0.8 | | 2yr | 0.6 | | 3yr4yr | 0.4 |PARTS INSTRUCTION AND INSTALLATION

- Take out the fixing screws on the lock base by the allen wrench in the accessory bag. (Another way: hold the base plate and turn it in anti-clockwise direction)
- Separate the base plate from the lock base.
- Use screws to fix the base plate to the needed place.
- Then put the sphere and the lock base to where they belong and screw up the fixing screws.
- Adjust Lens focal length.
DIMENSIONS (mm)


| Model 46522.0$6D | |
| Sensor 1/3 CMOS | |
| Effective Pixels | 2688(H)x1520(V) |
| Video Frame Rate | 25/30fps |
| Video format | PAL/NTSC |
| Mini-illumination | 0.01 Lux (IR ON) |
| S/N Ration | ≥50 dB |
| OSD | Support |
| AGC | 0-15 |
| White Balance | ATW / INDOOR / OUTDOOR / MANUAL |
| BLC | AUTO |
| NR | 2DNR |
| AES | AUTO 1/50 (1/60) - 1/50,000sec |
| AWB | AUTO |
| Day/Night | EXT, COLOR, B/W, AUTO |
| Sync code | Internal |
| Voltage | 12 Vdc |
| Current | 150mA ±15% (IR ON); 53mA ±15% (IR OFF) |
| Lens | 3.6mm HD Lens |
| IR range | 20m |
| Waterproof standard | IP66 |
| Video output | AHD |
| Storage temperature | -20°C ~50°C |
| Operate Temperature | -10°C ~ 50°C RH 90% MAX |
| Size | 70mm(H)*94mm(∅) |
| Weight | 570g ±15% |
*Specifications subject to change without notice.
46522.036D
Press the button into the main menu, set the LENS mode, EXPOSE, BACKLIGHT, WHITE BALANCE, DAY&NIGHT, NR, SPECIAL, ADJUST as needed.
| MAIN MENU | |
| 1.EXPOSURE | ↓ |
| 2.BACKLIGHT | OFF(BLC ↓,HSBLC ↓) |
| 3.WHITE BAL | ATW(AWC →SET ↓,INDOOR,OUTDOOR, MANUAL ↓) |
| 4.DAY&NIGHT | EXT ↓(AUTO ↓,COLOR,B/W ↓) |
| 5.NR | ↓ |
| 6.SPECIAL | ↓ |
| 7.ADJUST | ↓ |
| 8.EXIT | RET ↓ |
1. EXPOSURE
Press the menu button into the expose's submenu, set the SHUTTER\AGC\BRIGHTNESS\D-WDR as needed.
| EXPOSURE | |
| 1.SHUTTER | AUTO(1/25,1/50,1/200,1/400,1/1000,1/2000,1/5000,1/10000,1/50000,FLK) |
| 2.AGC | 15 (0-15) |
| 3.BRIGHTNESS | 34 (0-100) |
| 4.D-WDR | AUTO(OFF,ON↓) |
| 5.RETURN | RET↓ |
| D-WDR | |
| 1.LEVEL | 0 (0-15) |
| 2.RETURN | RET↓ |
2. BLC
Press the menu button into the BLC's submenu, set the LEVEL\AREA\DEFAULT as needed.
| BLC | |
| 1.LEVEL | MIDDLE( )HIGH,LOW |
| 2.AREA | |
| 3.DEFAULT | |
| 4.RETURN | RET |
| HSBLC | |
| 1. SELECT | ARE1-ARE4 |
| 2. DISPLAY | ON (OFF) |
| 3. BLACK MASK | ON(OFF) |
| 4. LEVEL | 20 (0-100) |
| 5. MODE | ALL DAY(NIGHT) |
| 6. DEFAULT | RET |
| 7. RETURN | |
| NIGHT MODE | |
| 1.AGC LEVEL | 20 (0-100) |
| 2.RETURN | RET↓ |
3. WB (WHITE BALANCE)
Press the menu button into the WB's submenu, set the BLUE\ RED tone as needed.
| MANUAL WB | |
| 1.BLUE | 50 (0-100) |
| 2.RED | 50 (0-100) |
| 3.RETURN | RET |
4. D&N (DAY & NIGHT)
Press the LEFT OR RIGHT button choose the D&N's mode, and then press the menu button into the submenu, set the params as needed.
| D&N EXT | |
| 1.D-N (DELAY) | 2 (0-60) |
| 2.N-D (DELAY) | 2 (0-60) |
| 3.RETURN | RET↓ |
| D&N AUTO | |
| 1.D→N(CDS) | 18 (0-255) |
| 2.D-N (DELAY) | 1 (0-60) |
| 3.N→D(CDS) | 18 (0-255) |
| 4.N-D (DELAY) | 1 (0-60) |
| 5.RETURN | RET↓ |
| B/W | |
| 1.IR SMART | OFF(ON↓) |
| 2.IR PWM | 50 (0-100) |
| 3.RETURN | RET↓ |
| IR SMART | |
| 1.LEVEL | |||||||| 2 (0-15) |
| 2.AREA | j |
| 3.RETURN | RETj |
5.NR( NOISE REDUCE)
Press the menu button choose the NR mode, and then press the menu button into the submenu, set the params as needed.
| NR | |
| 1.2D NR | HIGH(MIDDLE,OFF,LOW) |
| 3.RETURN | RET↓ |
6. SPECIAL
Press the menu button into the submenu, set the MIRROR, DPC, LANGUAGE as needed.
| SPECIAL | |
| 1.MIRROR | OFF(MIRROR,V-FLIP,ROTATE) |
| 2.DPC | |
| 3.LANGUAGE | END ↓ (CHN1 ↓,CHN2 ↓,TUR ↓,NED ↓,POR ↓,RUS ↓,POL ↓,SPA ↓,ITA ↓,FRA ↓,GER ↓,JPN ↓) |
| 4.RETURN | RET ↓ |
| DPC | ||
| 1.LEVEL DPC | ON↓( ) | OFF |
| 2.WHITE DPC | ON↓( ) | OFF |
| 3.BLACK DPC | ON↓( ) | OFF |
| 4.RETURN | RET↓ | |
| LIVE DPC | |
| 1.AGCLLEVEL | 128 (0-255) |
| 2.LEVEL | 16 (0-100) |
| 3.RETURN | RET |
| WHITE DPC | |
| 1.POS/SIZE | |
| 2.START | |
| 3.DPC VIEW | ON(OFF) |
| 4.LEVEL | |
| 5.AGC | |
| 6.RETURN | RET |
| BLACK DPC | |
| 1.POS/SIZE | ↓ |
| 2.START | ↓ |
| 3.DPC VIEW | ON(OFF) |
| 4.LEVEL | |||||||| 20 (0-60) |
| 5.RETURN | RET ↓ |
7. ADJUST
Press the menu button into the submenu, set the SHARPNESS, MINITOR, LSC, OUTPUT MODE as needed.
| ADJUST | |
| 1.SHARPNESS | AUTO ↓(OFF) |
| 2.MONITOR | ↓ |
| 3.LSC | ON(OFF) |
| 4.OUTPOT MODE | ↓ |
| 5.RETURN | RET ↓ |
| SHARRNESS | |
| 1.LEVEL | |||||||||| 2 (0-10) |
| 2.STARTAGC | |||||||||| 20 (0-255) |
| 3.END AGC | |||||||||| 20 (0-255) |
| 4.RETURN | RET ↓ |
| MONITOR | ||
| 1.GAMMA | USER( ) | 0.45-1.00 |
| 2.BLUE GAIN | ...... 50 (0-100) | |
| 3.RED GAIN | ...... 50 (0-100) | |
| 4.RETURN | RET ↓ | |
| OUTPUT MODE | |
| 1.FORMAT | AHD↓ |
| 2.VIDEO OUT | PAL ↓(NTSC ↓) |
| 3.NRT | OFF |
| 4.RETURN | RET ↓ |
Brand : Vimar
Model : ELVOX 46522.036D
Category : Camera