
VW2354DDB - Car accessory Scosche - Free user manual and instructions
Find the device manual for free VW2354DDB Scosche in PDF.


| Product Type | In-Dash Installation Kit |
| Model | VW2354DDB |
| Brand | Scosche |
| Compatible Vehicles | 2010-Up Volkswagen Touareg II (7P/7PH) with base model radio |
| Radio Form Factor | Double DIN (ISO) |
| Material | Plastic, metal brackets |
| Dimensions (Faceplate) | Approx. 7 x 4 inches (178 x 102 mm) |
| Weight | Approx. 0.6 lbs (0.27 kg) |
| Color | Black |
| Mounting Type | In-dash, screw-mounted |
| Included Components | Face plate, mounting brackets, OEM button unit adapter, screws |
| Main Function | Enables installation of an aftermarket double DIN stereo into the vehicle's dashboard |
| Installation Required Tools | Panel removal tool, screwdriver |
| Safety Warnings | Disconnect negative battery terminal; avoid airbag wiring; use volt/ohm meter |
| Care Instructions | Clean with a soft, damp cloth; avoid harsh chemicals |
| Repair / Spare Parts | Contact Scosche toll-free: 1-800-621-3695 x3 |
| Warranty | See manufacturer |
| Country of Origin | Germany (per manual) |
Frequently Asked Questions - VW2354DDB Scosche
Do not return the product to the retailer.
User questions about VW2354DDB Scosche
0 question about this device. Answer the ones you know or ask your own.
Ask a new question about this device
Download the instructions for your Car accessory in PDF format for free! Find your manual VW2354DDB - Scosche and take your electronic device back in hand. On this page are published all the documents necessary for the use of your device. VW2354DDB by Scosche.
USER MANUAL VW2354DDB Scosche
IN-DASH INSTALLATION KIT FOR FOR 2010-UP VOLKSWAGEN TOUAREG II (7P/7PH) VEHICLES

Tools Required:
• PRT (Panel Removal Tool)
- Screwdriver
INTRODUCTION/PRELIMINARY
This premium installation kit is for 2010-Up Volkswagen Touareg II (7P/7PH) vehicles with base model radio (dash modification required). Included are all the parts you need to mount your car stereo or CD player into your vehicle's dash. Refer to individual instruction in this manual to remove your vehicles factory radio and assemble the kit.
CAUTION: DISCONNECT YOUR VEHICLE NEGATIVE BATTERY TERMINAL BEFORE THE INSTALLATION TO HELP PREVENT ELECTRICAL DAMAGE. WE RECOMMEND THE USE OF A VOLT/OHM METER OVER A TEST LIGHT TO CHECK WIRING. A TEST LIGHT OR GROUNDED WIRE PROBE CAN CAUSE DAMAGE TO THE VEHICLE'S COMPUTER AND/OR DIAGNOSTIC SYSTEMS. AVOID ALL FACTORY AIRBAG WIRING - AIRBAGS CAN ACCIDENTALLY DEPLOY CAUSING SERIOUS INJURY OR DEATH.
NOTES
- See your vehicle's instructions for any special tools your installation might require.
- Read all instructions accompanying your car stereo for proper wiring and mounting instructions.

IMPORTANT! DO NOT RETURN PRODUCT TO THE RETAILER IF YOU NEED ASSISTANCE OR REPLACEMENT PARTS CALL US TOLL FREE: 1800-621-3695 X3 HOURS: MON-FRI 8AM-5:30PM (PST) SATURDAY 8AM-2PM (PST)
LIABILITY DISCLAIMER
This instruction booklet is based on carefully documented data and research of automobile disassembly, wire harness/codes and information pertaining to the installation of this kit. Scosche Industries, Inc. cannot be held responsible for discrepancies/inconsistencies that may occur due to the automobile manufacturing changes or options, or damage that may occur in the automobile during the installation of components while using this booklet.
If you have any further questions, call our toll free technical help line at:
1-800-621-3695×3
FACTORY STEREO REMOVAL
Step 1
Open upper tray on dashboard and locate the screw in the middle of the upper tray (See arrow)

natural_image
Close-up of a car hood with an open lid and internal components, showing a white arrow pointing to a component (no text or symbols visible)Step 2
Remove screw inside upper tray.
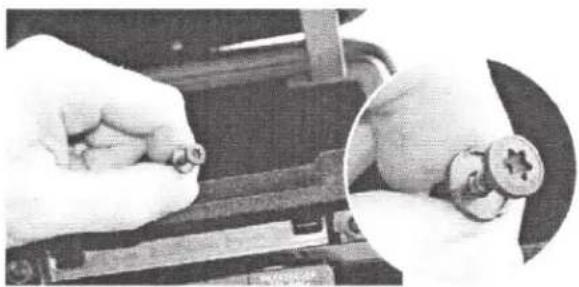
natural_image
Close-up of a hand holding a small tool, with a close-up inset showing a mechanical component (no visible text or symbols)Step 3
Remove upper tray

natural_image
Close-up of a car's front compartment showing engine, grille, and dashboard components (no visible text or symbols)Step 4
Remove screws from OEM head unit (see arrows)

natural_image
Top-down view of a car's front compartment showing engine, dashboard, and control panel (no readable text or symbols)FACTORY STEREO REMOVAL

natural_image
Interior view of a car dashboard with a mounted laptop and gear assembly (no visible text or symbols)Step 5
Remove OEM head unit from the dashboards

natural_image
Top-down view of a vehicle's rearview mirror showing four rectangular panels (no text or symbols visible)Step 6
Remove the button unit from the OEM head unit
(Highlighted by white rectangular boarder)
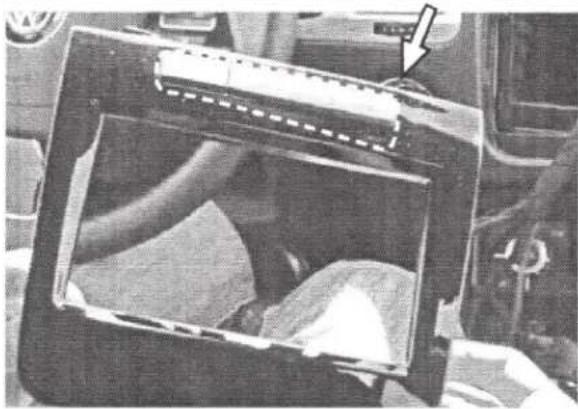
natural_image
Interior view of a vehicle showing a car's dashboard and engine compartment (no visible text or symbols)Step 7
Attach the OEM button unit to the face plate
(Highlighted by arrow and dotted rectangle)

natural_image
Close-up of a mechanical component with visible mounting holes and wiring (no text or symbols)Step 8
Attach mounting brackets to the double DIN head unit
INSTALLATION GUIDE
Step 9
Connect all the required circuit point
Place double DIN head unit on dashboard
Attach double DIN with two (2) screws as indicated by arrows and screws in the image.
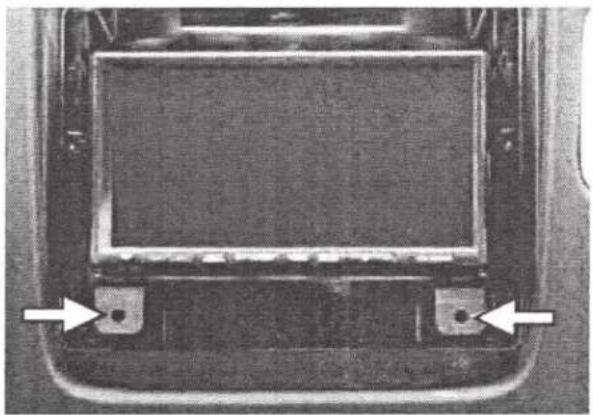
natural_image
Top-down view of a car's front panel showing a rectangular display and two mounting points with arrows pointing to the sides (no text or symbols visible)Step 10
Attach the double Din face plate

natural_image
Front view of a car's front grille and dashboard (no visible text or symbols)Step 11
Re-install upper tray on the dashboard to complete your installation

natural_image
Top-down view of a car air vent with grille and roof (no visible text or symbols)
SCOSCHE®
010VW2354DDB
2010 Up VW Touareg ISO Double Din Kit

Made in Germany
California Proposition 65
WARNING: This product contains a
chemical(s) known to the state of
California to cause cancer and birth
dissess and other reproductive harm.

Brand : Scosche
Model : VW2354DDB
Category : Car accessory