Deluxe Healthy Care B2105 - Chair Fisher Price - Free user manual and instructions
Find the device manual for free Deluxe Healthy Care B2105 Fisher Price in PDF.


| Product Type | Deluxe Healthy Care Baby Bouncer/Chair |
| Brand | Fisher Price |
| Model | Deluxe Healthy Care B2105 |
| Dimensions (Assembled) | Approx. 25 x 18 x 24 inches (LxWxH) |
| Weight | Approx. 8 lbs |
| Maximum Weight Capacity | Up to 20 lbs (approx. 9 kg) |
| Power Source | Manual (no batteries required); some models may require 3x AA batteries for vibration |
| Reclining Positions | Multiple recline positions for comfort and feeding |
| Vibration | Soothing vibration with adjustable intensity (battery operated) |
| Toy Bar | Removable toy bar with two soft toys for playtime |
| Safety Harness | 3-point harness system |
| Fabric | Plush, removable and machine-washable seat pad |
| Frame Material | Steel frame with powder coating |
| Cleaning Instructions | Wipe frame with damp cloth; machine wash seat pad cold, tumble dry low |
| Assembly Required | Yes, simple tool-free assembly |
| Warranty | Limited 1-year warranty from date of purchase |
| Safety Standards | Meets ASTM and CPSC safety standards |
| Recommended Age | Newborn to approximately 6 months (or until child can sit up unassisted) |
Frequently Asked Questions - Deluxe Healthy Care B2105 Fisher Price
User questions about Deluxe Healthy Care B2105 Fisher Price
0 question about this device. Answer the ones you know or ask your own.
Ask a new question about this device
Download the instructions for your Chair in PDF format for free! Find your manual Deluxe Healthy Care B2105 - Fisher Price and take your electronic device back in hand. On this page are published all the documents necessary for the use of your device. Deluxe Healthy Care B2105 by Fisher Price.
USER MANUAL Deluxe Healthy Care B2105 Fisher Price
Deluxe Healthy Care™ High Chair
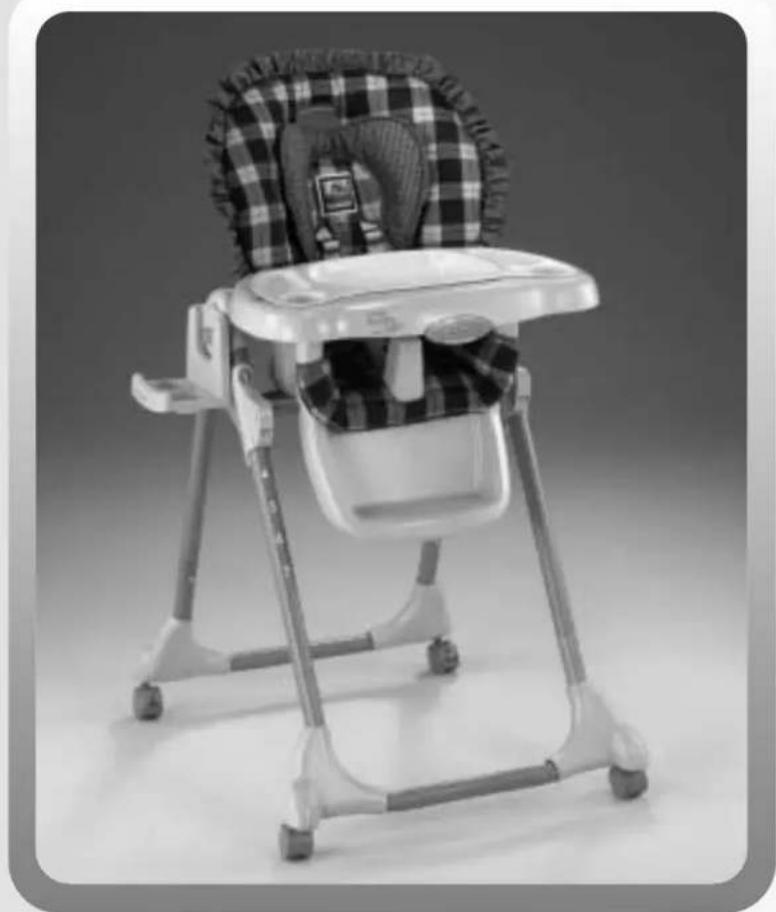
Product features and decoration may vary from the photo above.
Model Number: B2105, B0326
Please keep this instruction sheet for future reference, as it contains important information.
Adult assembly is required.
Tool needed for assembly: Phillips Screwdriver (not included).
Discover what's possible™...www.ft
Consumer InformationWarnings an

WARNING
Prevent serious injury or death from falls or sliding out.
- The child should be secured in the high chair at all times by the restraining system, either in the recline, semi-recline or upright position. The restraint belts must be adjusted to fit your child snugly. The tray is not designed to hold the child in the chair.
• Always leave wheels locked.
• N ever use near stairs.
• Always keep child in view while in the high chair.
• N ever leave child unattended. - It is recommended that the high chair be used in the upright position only by children capable of sitting upright unassisted.
Occasionally a consumer may experience a problem with one of our products. If this should happen, please call us toll-free, rather than return this product to the store. Usually, we can solve the problem over the telephone or send you replacement parts. Please call Fisher-Price® Consumer Relations, toll-free at 1-800-432-5437, 8 AM - 6 PM EST Monday through Friday. Hearing-impaired consumers using TTY/TDD equipment, please call 1-800-382-7470. Or, write to:
Fisher-Price®
Consumer Relations
636 Girard Avenue
East Aurora, New York 14052

CAUTION
This product contains small parts in its unassembled state. Adult assembly is required.
Parts

8 x 3/4" Screw - 8
SHOWN ACTUAL SIZE
10 x 7/8" Black Screw - 7 SHOWN ACTUAL SIZE
Assembly
IMPORTANT! Before assembly, inspect this product for damaged hardware, loose joints, missing parts or sharp edges. DO NOT use if any parts are missing or broken. Contact Fisher-Price® for replacement parts and instructions if needed. Never substitute parts.

- P lace the seat bottom face down on a flat surface.
- A t an angle, fit the footrest on the seat bottom, as shown.

- S lide a seat bottom tube through each set of plastic rings on the seat bottom.
3


8 x 3/4" Screw - 4
SHOWN ACTUAL SIZE
- A lign the holes in the plastic rings and the seat bottom tubes.
- Insert a #8 x 3/4 " screw through each plastic ring and into the seat bottom tubes, as shown.
- Tighten the screws with a Phillips screwdriver. Do not over-tighten.
- Push the seat bottom tubes back and forth to be sure they are secured to the seat bottom. If the seat bottom tubes move, you have probably not fastened them properly. Remove the screws and check to be sure the screw holes in the seat bottom tubes and seat bottom plastic rings are aligned. Replace and tighten the screws.
4


10 x 7/8" Black Screw - 2 SHOWN ACTUAL SIZE
- Insert two #10 x 7/8 " black screws through the footrest and into the seat bottom.
- Tighten the screws with a Phillips screwdriver. Do not over-tighten.
Assembly
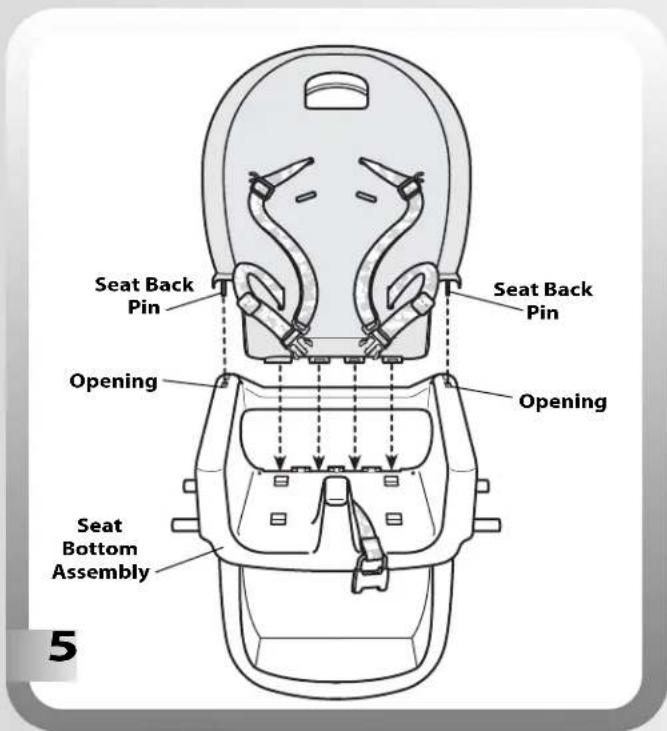
- T urn the seat bottom assembly upright.
- F it the seat back pins into the openings in the top side of the seat bottom assembly.

- T urn the seat assembly face down.
- Insert the hinge rod through the hinge on the seat back and seat bottom, as shown.
- Insert a #10 x 7/8" black screw into the hinge rod.
- Tighten the screw with a Phillips screwdriver. Do not over-tighten.
- S et the seat assembly aside for Assembly step 11.

- Pull the frame leg out on each frame to open. Make sure it "clicks" into place.
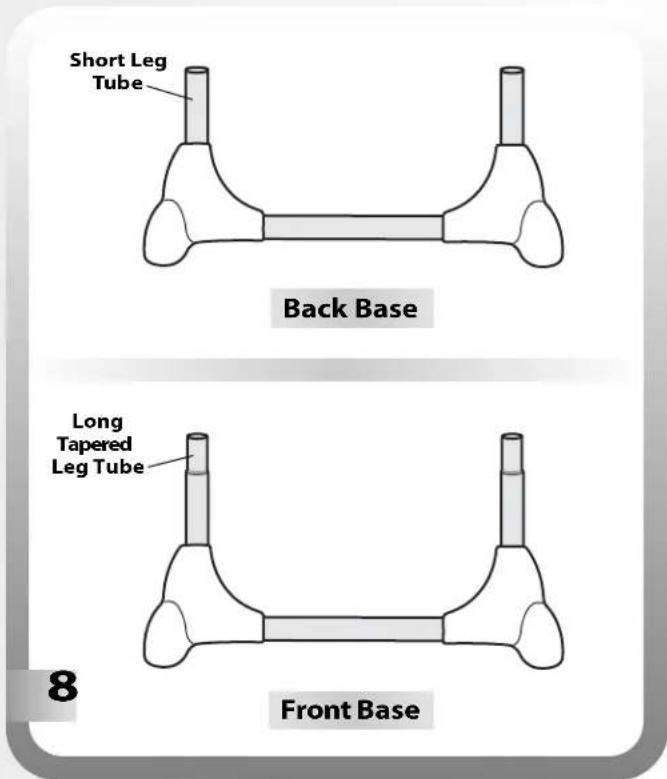
- Identify the back and front base. The back base has short leg tubes and the front base has long, tapered leg tubes. You will use the back base for the next assembly step.
Assembly
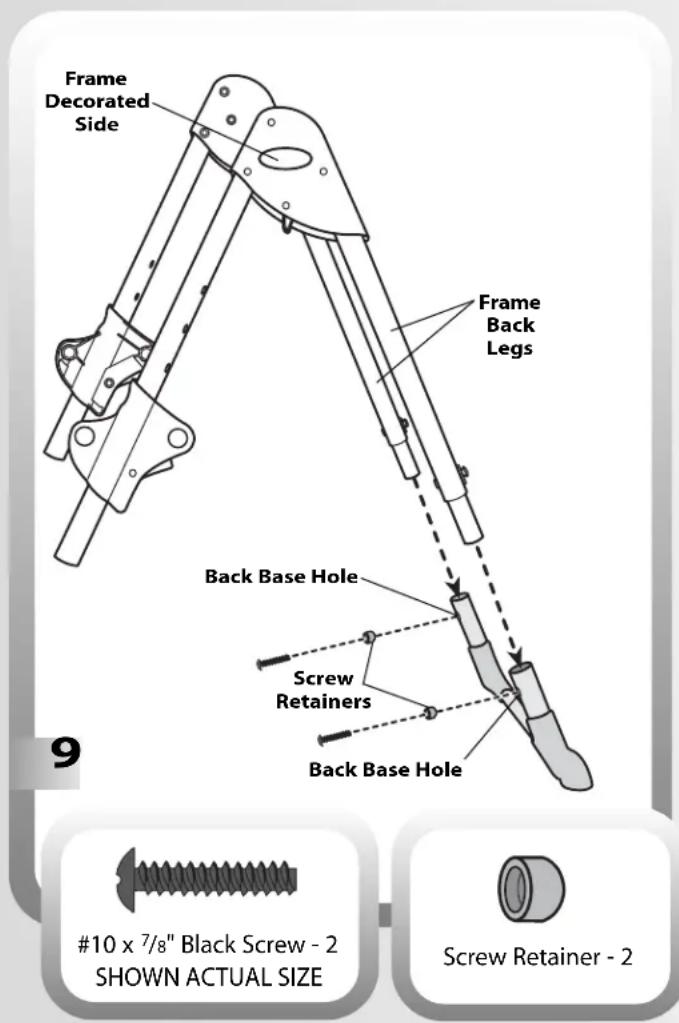
- P position a frame so that the decorated side is outward.
- Insert the back leg of a frame into the back base.
- F it a screw retainer over the hole in the back base, as shown.
- Insert a #10 x 7/8" black screw through the screw retainer and back base.
- Tighten the screw with a Phillips screwdriver. Do not over-tighten.
- R repeat this procedure to attach the other frame back leg to the other side of the back base.

- While pressing the levers on the seat height adjusters, lift them to position 4 on the frame front legs, as shown.
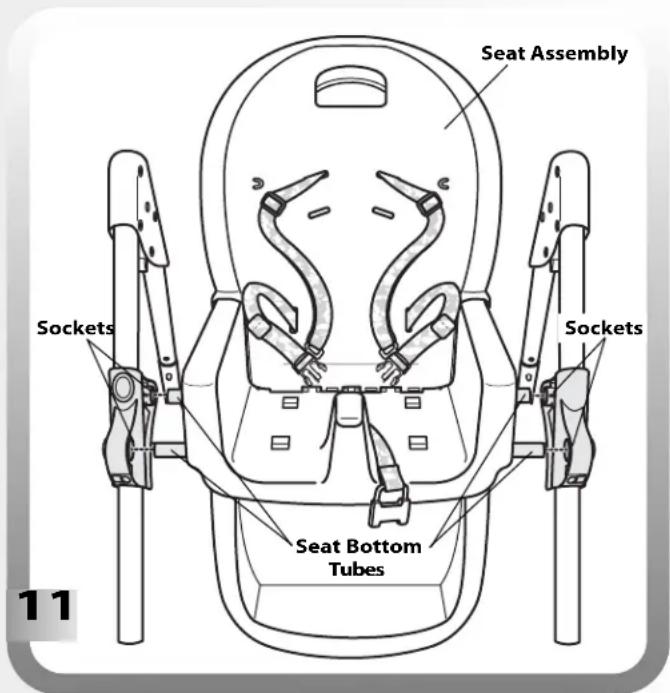
- F it the seat assembly between the two frames.
- Insert the seat bottom tubes into the sockets in each seat height adjuster.
Hints:
- Be sure the seat height adjusters are in the same position (position 4).
- You may need to push the frames apart slightly to fit the seat bottom tubes into the seat height adjuster sockets.
Assembly

12

Screw Retainer - 2
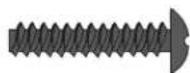
10 x 7/8" Black Screw - 2 SHOWN ACTUAL SIZE
- F it the frame front legs onto the front base.
• F it a screw retainer over a hole in the front leg. - Insert a #10 x 7/8" black screw through the screw retainer and front leg.
- Tighten the screw with a Phillips screwdriver. Do not over-tighten.
- R repeat this procedure to secure the other end of the front base with the remaining screw retainer and #10 x 7/8" black screw.

- Push each seat height adjuster to be sure they are completely on the seat bottom tubes.
- Insert a #8 x 3/4 " screw through each seat height adjuster and the ends of the seat bottom tube.
- Tighten the screws with a Phillips screwdriver. Do not over-tighten.
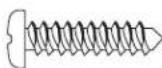
8 x 3 /4" Screw - 2
SHOWN ACTUAL SIZE
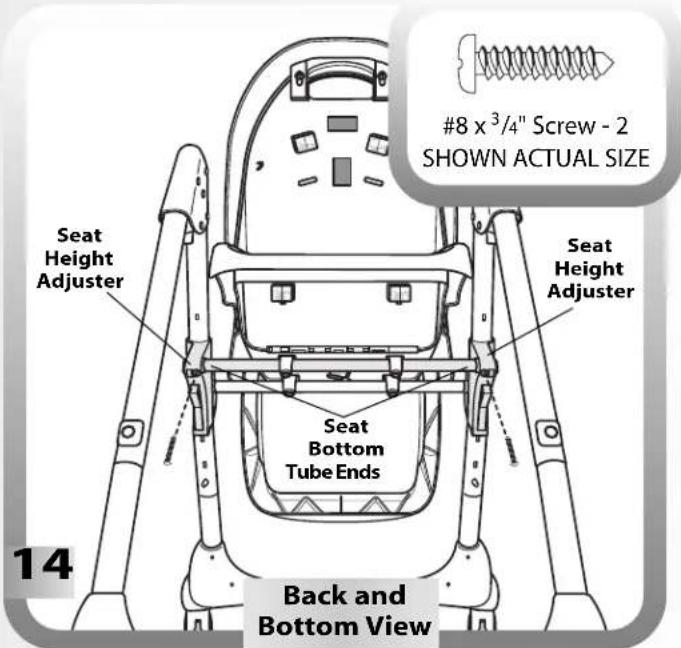
- F r om the back and bottom of the assembly, insert a #83/4" screw through both seat height adjusters and the ends of the seat bottom tube.
- Tighten the screws with a Phillips screwdriver. Do not over-tighten.
Assembly

15
Bottom View
- T ip the assembly so that the back of seat is flat on the floor and the front and back bases are facing up.
- Insert and "snap" the peg on a wheel into each of the four holes in the front and back bases.
Hint: To remove the wheels from the front and back base, simply pull and remove. Store the wheels in a safe place for future use.


- Lift the assembly upright.
- F r om the front of the assembly, place the pad onto the seat.
- Lift the bottom of the pad. Insert the two elastic loops on the pad through the holes in the seat bottom.
- From the back and bottom of the seat, hook the elastic loops to the tabs on the seat.
Assembly

- Insert the crotch belt through the slot in the pad. Make sure the crotch belt is not twisted.

- Lift the top of the pad.
- Thread the waist/shoulder belts through the bottom slots in the back of the seat pad.
• F old the top of the pad down.
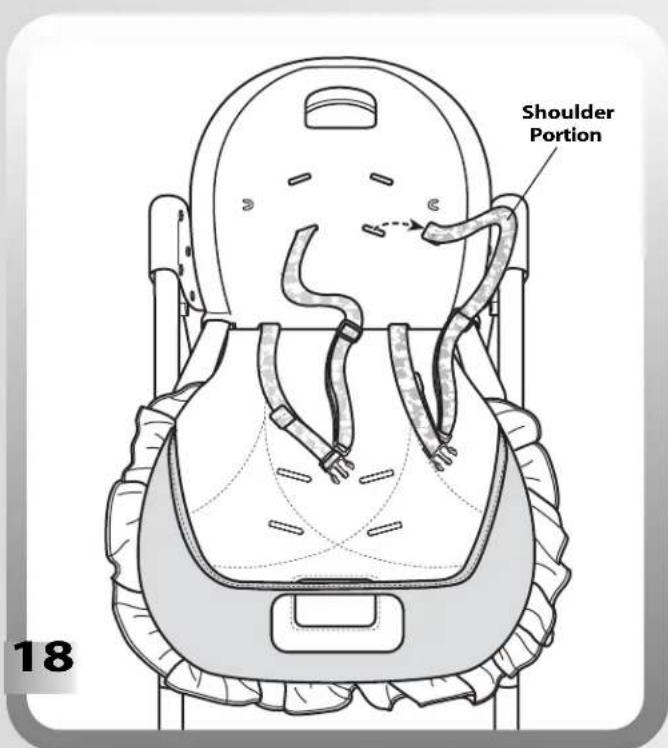
- Remove the shoulder portion of the waist/shoulder belts by feeding them through the slots in the seat back.

- F it the top of the pad over the seat back.
- F old the bottom edge of the pad under the edge of the seat bottom to fasten it.
- F irst, insert the shoulder portion of the shoulder/waist belt through the slots in the headrest pad. Then, insert the shoulder portion of the shoulder/waist belt through the slots in the pad and seat back.
- Use the lower shoulder belt slots for a smaller baby.
- Use the upper shoulder belt slots for a larger baby.
Assembly

- F it the strap on the top of the headrest through the handle.
-
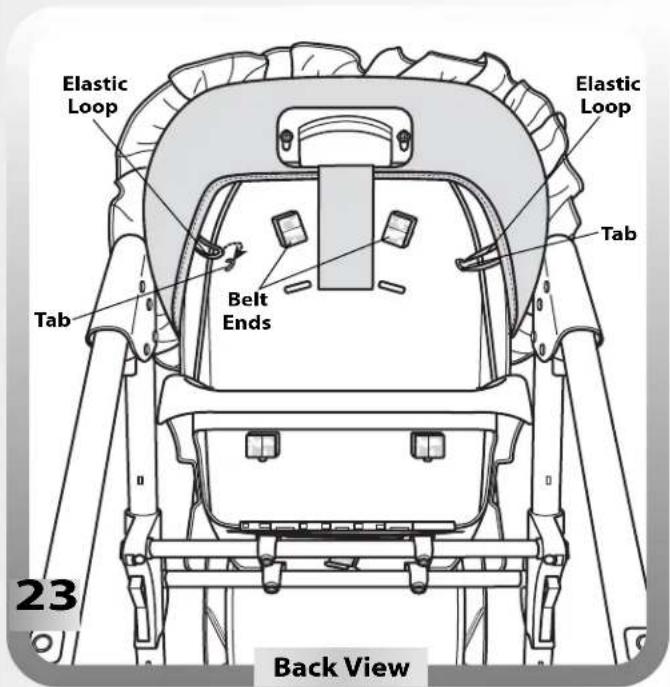
F r om behind the seat, be sure the shoulder portion of the waist/shoulder belts are secure in the seat back slots.
-
Hook the elastic loops on each side of the pad onto the tabs in the seat back.

- F it the pad strap through the handle and press it to the small fastener on the back of the seat.
- F it the headrest strap through the handle and press it to the large fastener on the back of the seat.

- A t an angle, fit the storage caddy onto the tab on either frame.
Assembly is now complete.
Securing Your Child
IMPORTANT! Before each use, inspect this product for damaged hardware, loose joints, missing parts or sharp edges. DO NOT use if any parts are missing or broken. Contact Fisher-Price® for replacement parts and instructions if needed. Never substitute parts.

WARNING
Prevent serious injury or death from falls or sliding out.
The child should be secured in the high chair at all times by the restraining system, either in the recline, semi-recline or upright position. The restraint belts must be adjusted to fit your child snugly. The tray is not designed to hold the child in the chair.
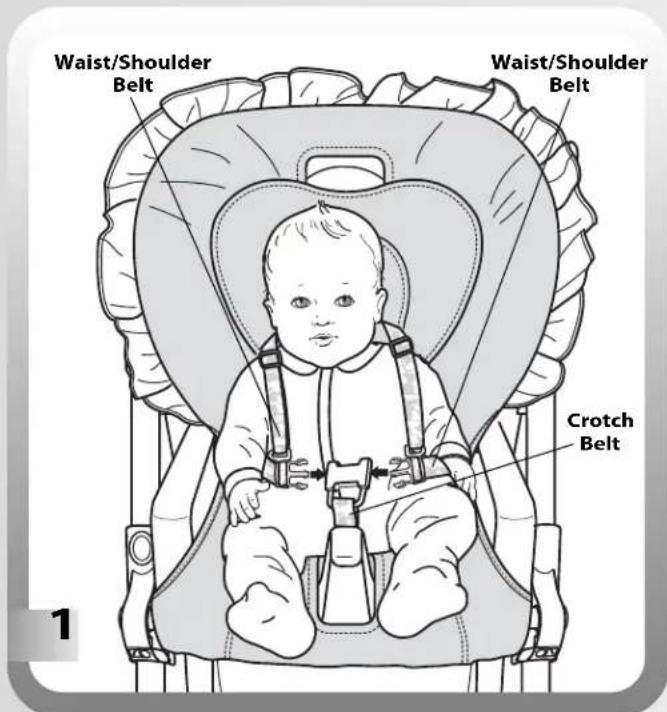
- P lace your child in the seat. Position the crotch belt between your child's legs.
- F asten both waist/shoulder belts to each side of the crotch belt. Make sure you hear a "click" on both sides.
- Check to be sure the restraint system is securely attached by pulling it away from your child. The restraint system should remain attached.

To tighten the waist belts:
- F eed the anchored end of the waist belt up through the buckle to form a loop A
• P ull the free end of the waist belt B - Repeat this procedure to tighten the other waist belt.
To loosen the waist belts:
- Feed the free end of the waist belt up through the buckle to form a loop Ⓐ.
- Enlarge the loop by pulling on the end of the loop toward the buckle.
- P ull the anchored end of the waist belt to shorten the free end of the waist belt B
- R repeat this procedure to loosen the other waist belt.

To tighten the shoulder belts: Hold the adjuster and pull the front shoulder strap down.
To loosen the shoulder belts: Slide the adjuster down.
Note: After adjusting the restraint system to fit your child, make sure you pull on it to be sure it is securely fastened.
Securing Your Child

To change shoulder belt slots:
- From the back of the high chair, push the shoulder portion of the waist/shoulder belts through the seat back slots.
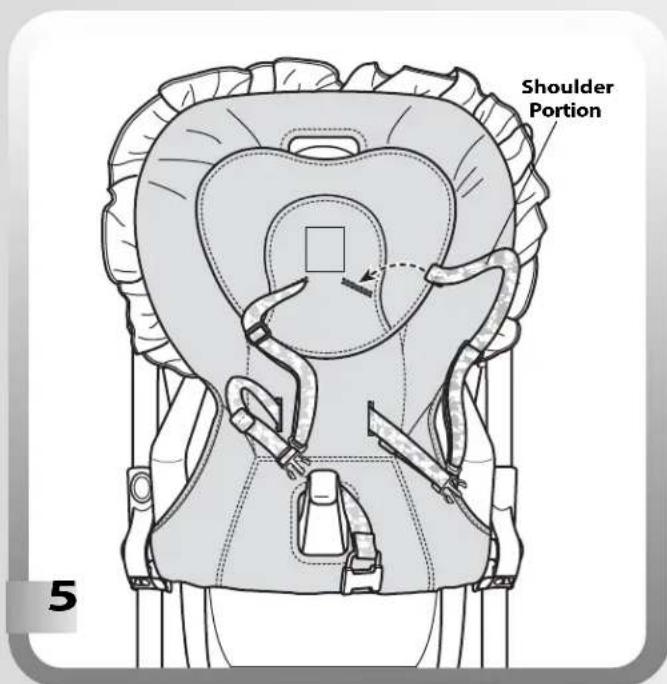
- From the front of the high chair, pull the shoulder portion of the waist/shoulder belts out and then fit them back through the desired shoulder belt slots in the headrest pad, seat pad and the seat back. Pull on the belts to be sure they are secure in the seat back.
Using the Trays

WARNING
Prevent serious injury or death from falls or sliding out.
The child should be secured in the high chair at all times by the restraining system, either in the recline, semi-recline or upright position. The restraint belts must be adjusted to fit your child snugly. The tray is not designed to hold the child in the chair.
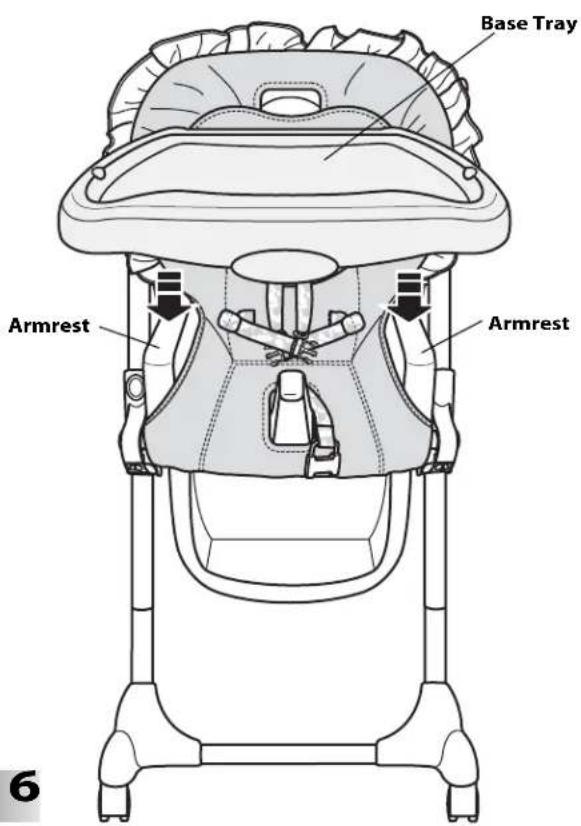
- F it the base tray onto the seat armrests. Push down until the base tray "snaps" into place.
Hint: Before use, thoroughly wash all parts (the trays) that may contact food.
Using the Trays
Hint: The base tray can be adjusted for your child's comfort two ways (see steps 7 and 8)!

- While pushing the release bar on the front of the base tray, adjust the base tray forward or backward.
Hint: The base tray can be removed two ways (see steps 9 and 10)!
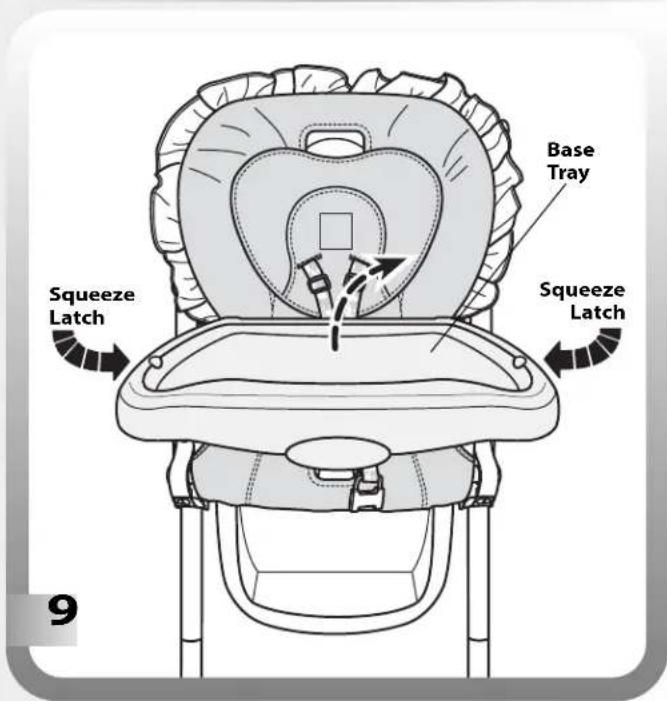
- Squeeze one or both of the latches underneath the base tray and lift.

- While squeezing the latches underneath the base tray, adjust the base tray forward or backward.

- While pushing the release bar on the front of the base tray, pull the tray base towards you and remove.
Using the Trays Using the Brakes
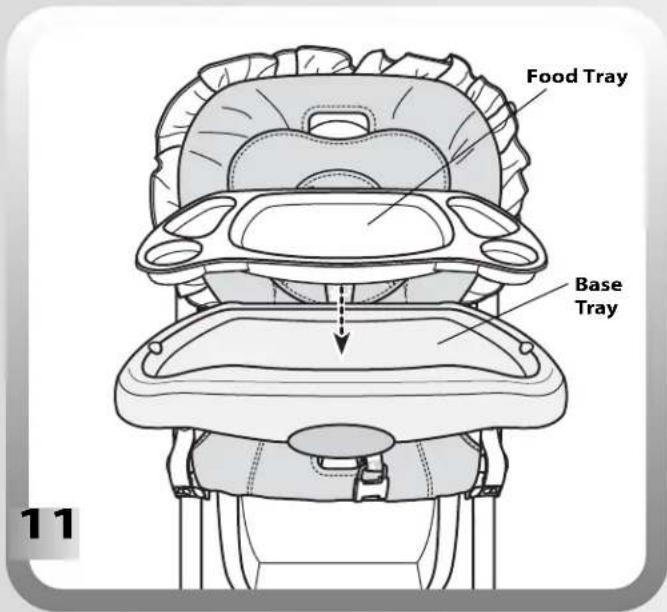
- F it the food tray into the base tray, as shown.
Hint: Before use, thoroughly wash all parts (the trays) that may contact food.

WARNING
Prevent serious injury or death from falls or sliding out.
• Always leave wheels locked.
• N ever use near stairs.

12


TO LOCK: Press the tab on all four wheels down until you hear a "snap".
TO UNLOCK: Lift the tab on all four wheels up.
Adjusting the Seat

WARNING
Prevent serious injury or death from falls or sliding out.
It is recommended that the high chair be used in the upright position only by children capable of sitting upright unassisted.
Hint: Adjust the seat height to any of seven positions!

To adjust the seat height:
- P r ess the levers on both seat height adjusters and lift or lower the seat to the desired height.
- Make sure both sides of the seat are adjusted to the same height. Push the seat bottom to be sure the seat is locked in place.

Hint: Adjust the seat angle to any of three positions: Upright, Semi-Recline or Recline.

To adjust the seat angle:
- S squeeze the seat back handle and push the seat back forward or, pull it backwards to the desired position.
- Push the seat back to be sure it is latched in position.

Storage

- F it the holes on the base tray latches onto the pegs on the back of the high chair frame.
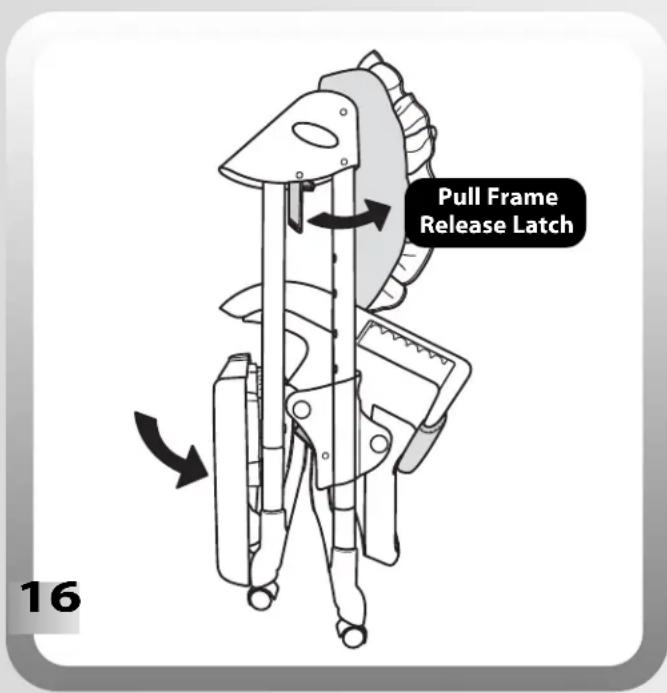
- With the legs all the way open, lower the seat to position 1 (the lowest position).
- Pull the frame release latches forward and push the rear legs toward the front legs.
Printed in China B2105-0920
Care
- T he pad and headrest are machine washable. Wash the pad and headrest separately in cold water on the gentle cycle. Do not use bleach. Tumble dry separately on low heat and remove promptly.
- The frame and base tray may be wiped clean using a mild cleaning solution and a damp cloth. Do not immerse the base tray.
- T he food trays are dishwasher safe. Simply remove the food tray from the base tray and place in your dishwasher.
Toremove the pad:
- Remove the four elastic loops from the pegs on the underside and back of the seat.
- U nfasten the pad strap and headrest strap from the seat back.
- Feed the shoulder portion of the waist/shoulder belts through the slots in the seat back, the pad and the headrest.
- F eed the waist portion of the waist/shoulder belts and crotch belt down through the slots in the seat.
- Remove the waist/shoulder belts and crotch belt through the slots in the pad.
- U nfasten the pad fasteners from the front edge of the seat bottom.
- R remove the pad.
To replace the pad and headrest: refer to Assembly steps 16-23.
IMPORTANT! Never use this product without the restraint system. Replace the waist/shoulder belts and crotch belt.
For other countries, outside the United States:
Canada: call 1-800-567-7724, or write to: Mattel Canada Inc., 6155 Freemont Blvd. Mississauga, Ontario L5R 3W2.
Great Britain: telephone 01628 500302.
Australia: Mattel Australia Pty. Ltd., 658 Church Street, Locked Bag #870, Richmond, Victoria 3121 Australia. Consumer Advisory Service 1300 135 312.
New Zealand: 16-18 William Pickering Drive, Albany 1331, Auckland.
Fisher-Price, Inc., a subsidiary of Mattel, Inc.
East Aurora, New York 14052, U.S.A.
©2002 Mattel, Inc. All Rights Reserved.
® and ™ designate U.S. trademarks of Mattel, Inc.
- DELUXE HEALTHY CARE™ HIGH CHAIR
- CONSUMER INFORMATIONWARNINGS AN
- WARNING
- PREVENT SERIOUS INJURY OR DEATH FROM FALLS OR SLIDING OUT
- CAUTION
- PARTS
- 8 X 3/4" SCREW - 8
- 10 X 7/8" BLACK SCREW - 7 SHOWN ACTUAL SIZE
- ASSEMBLY
- 8 X 3/4" SCREW - 4
- 10 X 7/8" BLACK SCREW - 2 SHOWN ACTUAL SIZE
- HINTS
- 8 X 3 /4" SCREW - 2
- BOTTOM VIEW
- ASSEMBLY IS NOW COMPLETE
- SECURING YOUR CHILD
- TO TIGHTEN THE WAIST BELTS
- TO LOOSEN THE WAIST BELTS
- TO CHANGE SHOULDER BELT SLOTS
- USING THE TRAYS
- USING THE TRAYS USING THE BRAKES
- ADJUSTING THE SEAT
- TO ADJUST THE SEAT HEIGHT
- TO ADJUST THE SEAT ANGLE
- STORAGE
- CARE
- TOREMOVE THE PAD
- FOR OTHER COUNTRIES, OUTSIDE THE UNITED STATES
Brand : Fisher Price
Model : Deluxe Healthy Care B2105
Category : Chair