
M19LED - Monitor Speco Technologies - Free user manual and instructions
Find the device manual for free M19LED Speco Technologies in PDF.


| Product Type | 19" CCTV LCD Monitor with HDMI |
| Display Resolution | 1920 x 1080 (Full HD) |
| Display Panel Type | TN mode, Normally white |
| Dot Pitch | 0.24825(H) x 0.24825(V) mm |
| Aspect Ratio | 16:9 |
| Display Colors | 16.7M |
| Brightness (Center) | 250 cd/m² (typical) |
| Contrast Ratio | 1000:1 |
| Viewing Angle | Left 85° / Right 85° / Up 80° / Down 80° (CR>10) |
| Response Time | 5 ms |
| Video Inputs | HDMI x1, BNC x1, VGA x1 |
| Video Output | BNC x1 (looping, 75 ohm auto termination) |
| Audio Input | RCA x2 (L/R), PC-Audio In x1 |
| Built-in Speakers | 1W + 1W |
| Power Supply | DC 12V, 5A (adapter included, input 100-240VAC) |
| Power Consumption | 20W (MAX) |
| Operating Temperature | 0°C to 50°C (32°F to 122°F) |
| Storage Temperature | -10°C to 60°C (14°F to 140°F) |
| Dimensions (W x H x D) | 443 x 348 x 60.5 mm |
| Weight (Net / Gross) | 3 kg / 4.5 kg |
| Mounting | VESA 100mm x 100mm (M4x10L screws) |
| Special Features | PIP, 3D Comb Filter, 3D De-interlace, Auto Source Detection, Light Sensor, Color Temperature 6500K/9300K |
| Safety Compliance | FCC Class B, UL listed (implied) |
| Maintenance | Clean with dry cloth; unplug before cleaning. Avoid liquid cleaners. |
| Spare Parts / Repairability | No official spare parts list provided. For repairs, contact Speco Technologies or a qualified technician. User manual available for troubleshooting. |
Frequently Asked Questions - M19LED Speco Technologies
User questions about M19LED Speco Technologies
0 question about this device. Answer the ones you know or ask your own.
Ask a new question about this device
Download the instructions for your Monitor in PDF format for free! Find your manual M19LED - Speco Technologies and take your electronic device back in hand. On this page are published all the documents necessary for the use of your device. M19LED by Speco Technologies.
USER MANUAL M19LED Speco Technologies
(19" CCTV LCD Monitor with HDMI)
M215LED
(21.5" CCTV LCD Monitor with HDMI)
USER MANUAL
Speco Technologies
200 New Highway
Amityville, NY 11701
800-645-5516
www.specotech.com
WARNING:
TO REDUCE THE RISK OF FIRE OR ELECTRIC SHOCK, DO NOT EXPOSE THIS PRODUCT TO RAIN OR MOISTURE.
DO NOT INSERT ANY METALLIC OBJECT THROUGH VENTILATION GRILLS.
CAUTION:

Explanation of Graphical Symbols

The lightning flash with arrowhead symbol, within an equilateral triangle, is intended to alert the user to the presence of uninsulated "dangerous voltage" within the product's enclosure that may be of sufficient magnitude to constitute a risk of electric shock to persons.

The exclamation point within an equilateral triangle is intended to alert the user to the presence of important operating and maintenance (servicing) instructions in the literature accompanying the product.
Important Information
IMPORTANT SAFEGUARDS
1. READ INSTRUCTIONS
All the safety and operating instructions should be read before the unit is operated.
2. RETAIN INSTRUCTIONS
The safety and operating instructions should be retained for future reference.
3. HEED WARNINGS
All warnings on the unit and in the operating instructions should be adhered to.
4. FOLLOW INSTRUCTIONS
All operating and usage instructions should be followed
5. CLEANING
Unplug this unit from the wall outlet before cleaning. Do not use liquid cleaners or aerosol cleaners. Clean only with a dry cloth.
6. ATTACHMENTS
The manufacturer of this unit does not make any recommendations for attachments, as they may cause hazards.
7. WATER AND MOISTURE
Do not use this unit near water. For example, near a bathtub, washbowl, kitchen sink, laundry tub, in a wet basement, or near a swimming pool.
8. ACCESSORIES
Do not place this unit on an unstable cart, stand, tripod, bracket, or table. The unit may fall, causing serious injury, and serious damage to the unit. An appliance and cart combination should be moved with care. Quick stops, excessive force, and uneven surfaces may cause the appliance and cart combination to overturn.
9. VENTILATION
Slots and openings at the rear cabinet and bottom are provided for ventilation, these are to ensure reliable operation of the unit, and to protect it from overheating. These openings must not be blocked or covered. The openings should never be blocked by placing the unit on a bed, sofa, rug, or other similar surface. This unit should never be placed near or over a radiator or heat source. This unit should not be placed in a built-in installation such as a bookcase or rack unless proper ventilation is provided or the manufacturer's instructions have been adhered to.
10. POWER SOURCE
This unit should be operated only from the type of power source indicated on the rating plate. If you are not sure of the type of power supply to your home, consult your appliance dealer or local power company.
11. POWER-CORD PROTECTION
Power-supply cords should be routed so that they are not likely to be walked on or pinched by items placed upon or against them, paying particular attention to cords at plugs, convenience receptacles, and the point where they exit from the appliance.
12. LIGHTNING
To protect your unit from a lightning storm, or when it is left unattended and unused for long periods of time, unplug it from the wall outlet and disconnect the antenna or cable system. This will prevent damage to the unit due to lightning and power line surges.
13. POWER LINES
An outside antenna system should not be located in the vicinity of overhead power lines or other electric light or power circuits, or where it can fall onto or against such power lines or circuits. When installing an outside antenna system, extreme care should be taken to keep from touching such power lines or circuits, as contact with them might be fatal.
14. OVERLOADING
Do not overload wall outlets and extension cords, as this can result in a risk of fire or electric shock.
15. OBJECT AND LIQUID ENTRY
Do not push objects through any openings in this unit, as they may touch dangerous voltage points or short out parts that could result in fire or electric shock. Never spill or spray any type of liquid into the unit.
16. HEAT
The product should be situated away from heat sources such as radiators, heat registers, stoves, or other products (including amplifiers) that produce heat.
17. CONNECTING
When you connect the product to other equipment, turn off the power and unplug all of the equipment from the wall outlet. Failure to do so may cause a product damage. Read the owner's manual of the other equipment carefully and follow the instructions when making any connections.
18. LCD
Do not press on or jolt the LCD panel. Doing so may cause the LCD panel glass to break and injury may occur. Should the LCD panel be broken and liquid leaks out, do not inhale or swallow it. Doing so may cause poisoning. If you have got it into your mouth, wash it out and consult your doctor. If your hands or clothes have touched it, wipe them with alcohol and a cleaning cloth and then wash them well.
Safety Precautions
Federal Communications Commission (FCC) Statement
This Equipment has been tested and found to comply with the limits for a Class B digital device, pursuant to Part 15 of the FCC rules. These limits are designed to provide reasonable protection against harmful interference in a residential installation. This equipment generates, uses and can radiate radio frequency energy and, if not installed and used in accordance with the instructions, may cause harmful interference to radio communications. However, there is no guarantee that interference will not occur in a particular installation. If this equipment does cause harmful interference to radio or television reception, which can be determined by turning the equipment off and on, the user is encouraged to try to correct the interference by one or more of the following measures:
-Reorient or relocate the receiving antenna.
-Increase the separation between the equipment and receiver.
-Connect the equipment into an outlet on a circuit different from that to which the receiver is connected.
-Consult the dealer or an experienced radio/TV technician for help.
- You are cautioned that changes or modifications not expressly approved by the party responsible for compliance could void your authority to operate the equipment.
This device complies with Part 15 FCC Rules. Operation is subject to the following two conditions:
(1) This device may not cause harmful interference.
(2) This device must accept any interference received including interference that may cause undesired operation
Table of Contents
Warning....2
Important Information.... 3
Safety Precautions....4
Table of Contents....5
Components....5
Feature....6
Exploring Your New Monitor....
7
Backside Connections....8
Setup your Monitor....9
Remote Controller....10
Video/HDMI Setting....1
VGA Setting....1
Audio Setting....1
PIP Setting....1
System Setting....1
Troubleshooting....20
Applicable Timing....21
LCD Color Monitor Specifications....
.22
Components
A. LCD Color Monitor x1
B. Accessories
I. Power cord x1
II. User Manual x1
C. VGA cord x1
D. PC audio cord x1
E. Adapter x1
F. Remote controller x1
*VGA cord (pin4 and pin11 N/A)
Feature
- Professional TFT LCD for surveillance.
- Compatible with VGA(640 x 480), SVGA(800 x 600), XGA(1024 x 768), SXGA(1280 x 1024) resolution, FULL HD (1920x1080)
- All plastic case.
- Video input HDMI x 1 / BNC x 1 / VGA x 1.
- Video output BNC x 1.
- Audio input RCA x 2 / phone jack x 1. Audio speaker x 2.
- Picture-In-Picture feature that allow multi-picture display.
- High brightness level and contrast ration with super wide viewing angle.
- Built-in 3D comb filter and 3D de-interlace for crispy picture performance.
- Fast response time and refresh rate without time lagging.
- Provides 6500°K and 9300°K color temperature selection for user's preference.
- Video Inputs support NTSC / PAL standards.
- Video looping Output supports 75ohm auto termination.
- VESA standards (100mm x 100mm) bracket.
- Light detection sensor to save energy.
Exploring Your New Monitor
You can operate your monitor by using the buttons on the front panel. The side panels provide the inputs to connect other equipment to your monitor.
Front Panel

| 1 | Menu button |
| 2 | Menu return button and exit |
| 3 | Menu enter button |
| 4 | Menu item down button |
| 5 | Menu item up button |
| 6 | Video source select button |
| 7 | IR receiver |
| 8 | Power button |
| 9 | Light sensor |
Back

natural_image
Front view of a black computer monitor with a stand (no visible text or symbols)Side
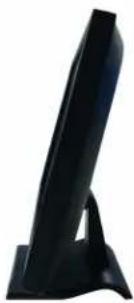
natural_image
Black sculpted object resembling a stylized blade or support structure (no text or symbols visible)Backside Connections

natural_image
Back panel of a computer interface showing ports and connectors (no visible text or labels)Illustration :
● 1. Power in :DC 12V input
● 2. HDMI: HDMI input(1080p)
● 3. VGA: VGA input (VGA cord pin4 and pin11 N/A)
4. RS485 (Disabled)
5. PC AUDIO IN: PC audio input
6. AUDIO IN: Audio input. RCA jack.
● 7. VIDEO IN: Camera or DVR source input
VIDEO OUT: Video looping output
Setup your Monitor

MENU: OSD menu ON / OFF control.(EXIT Item)
RETURN: Return to last page
ENTER: Auto-optimize displaying picture under PC mode. Enter: This "Auto" Button can be either "Enter" function in OSD Menu)
ADJUST: Increase or decrease the value on OSD menu. Up: Increase value or turn ON / OFF function. Down: Decrease value or turn ON / OFF function
SOURCE: Select input signal from HDMI / AV1 or VGA (PC).
POWER: Monitor power ON / OFF. At OFF mode, monitor will be at standby status. Green Light: ON Mode Red Light: OFF Mode
Remote Controller

| Key | Define |
 | LCD power on / off |
 | RS485 menu setup |
 | LCD / DVR / CAM OSD item select up/down/left/right keyDVR playback status |
LCD/DVR/CAM | LCD / DVR / CAM control mode switch |
 | Call desire LCD / DVR / CAM Device Menu |
 | Displays the LCD source information |
 | LCD volume setup |
 | LCD audio soundless |
 | VGA mode auto adjust |
 | Quit desire DVR OSD setup or number wrong typing |
 | |
 | Direct to select the AV1 source input |
 | For SDI switch depends on model |
 | Direct to select the VGA source input |
 | For HDMI / DVI switch depends on model |
 | Jump to Picture in picture of screen display |
 | Picture in picture of screen source select |
 | Picture in picture of screen source exchange |
 | Picture ratio under / full / over select |
 (Disabled) (Disabled) | |
 | Channel sequence |
 | Quad screen select |
 | 9 split screen select |
 | 16 channel select |
 | Jump to playback mode |
 | Manual record |
 | Jump to time search of playback mode |
 | Jump to backup mode |
 | (Disabled) |
 | PTZ dome ID select / Set;Call;Clear preset DVR full channel select |
| FOCUS | |
 | PTZ dome's Lens in manual focus |
 | PTZ dome's Lens in manual focus |
 | |
 | PTZ dome's Lens in manual Iris |
 | PTZ dome's Lens in manual Iris |
 | |
 | Control PTZ dome's Lens zoom in and out |
| PRESET | |
 | Set a preset point |
 | Call a preset point |
 | Clear a preset point |
Video/HDMI Setting
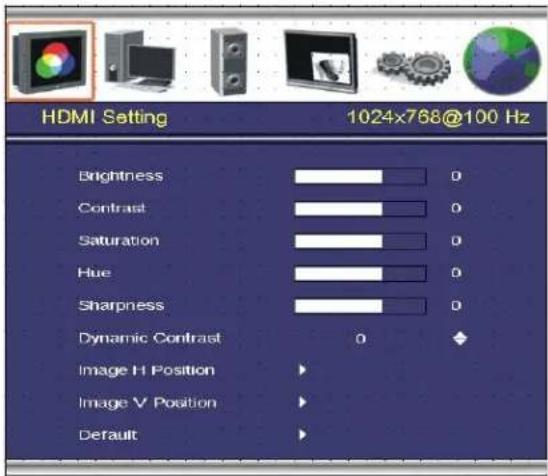
Brightness: Adjusts the overall picture shade and brightness.
Contrast: Permits adjustment of contrast between light and dark areas of the picture.
Saturation: Adjusts the intensity of the color.
Hue: To determine the lightness and colorfulness of the picture.
Sharpness: Sets the desired sharpening enhancement to the picture.
Dynamic Contrast: To determine the luminosity of motions of an object
Image H Position: Allows adjustment for horizontal position.
Image V Position: Allows adjustment for vertical position.
Default: Settings return to factory default.
VGA Setting

Brightness: Adjusts the overall picture shade and brightness.
Contrast: Permits adjustment of contrast between light and dark areas of the picture.
Auto Adjustment: Picture adjustment automatic correction, like clock and phase.
Image H Position: Allows adjustment for horizontal position.
Image V Position: Allows adjustment for vertical position.
Phase : Is used to adjust best picture quality. It adjusts the sampling phase across one pixel time. When the phase is not adjusted properly, the picture will be unclear. Therefore this value should be carefully adjusted.
Note: improper adjustment will cause image failure.
Clock / Line : Is used to adjust best picture quality. It adjusts the numbers of the pixel clock across one line time. Therefore it can affect the picture position and size.
Note: improper adjustment will caused image failure.
Default:
Audio Setting

Volume: Controls built-in speakers' output volume.
Balance: Adjusts the softness or loudness of notes in the sound.
Mute: Disables the audio function. To enable, press MUTE again.
PIP Setting
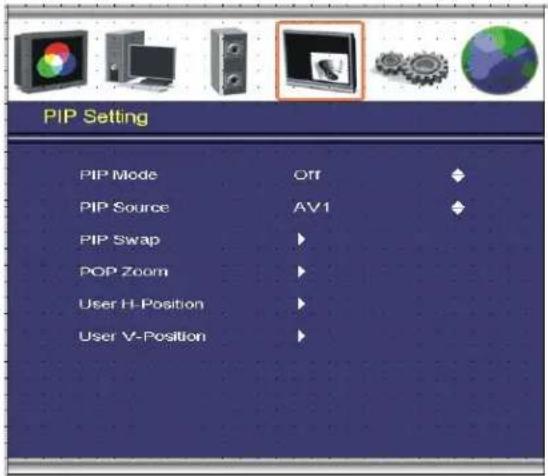
PIP Mode: This function allows the PIP mode to be selected.
PIP Source: This function allows the source of the PIP to be selected.
PIP Swap: This function allows the position of PIP to be exchanged.
POP Zoom: Only Operate under POP (Side By Side) mode.
User H-Position: Allows adjustment for horizontal position.
User V-Position: Allows adjustment for vertical position.
System Setting


Aspect Ratio: To change the display mode.
Auto Source Detection: The monitor will auto detect the video source when power ON.
Color Temperature: Selects color temperature of either 6500°K or 9300°K.
Key Lock: The Key-Lock function is provided to prevent tempering.
To unlock, press and ▽.
Channel Display: This function is to allow the channel title to be displayed on the monitor.
Language: English.
Power On Control: This function is to assign a specific video signal when power ON.
LCD monitor brightness will vary with the environment brightness.
Light sensor on / off, power on level 50\~80, power off level 0\~30
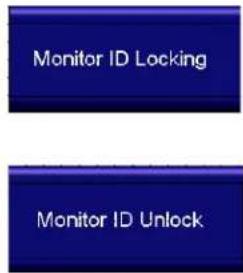
Monitor ID:
Monitor group ID set for management and remote controller button key lock. Back to live, press remote button "0" to active lock function.

Troubleshooting
Before calling a service technician, please check the following table for a possible cause of the problem and some solution.
Symptom
Monitor will not turn on
Solution
- Make sure the power cord is plugged in, then press POWER button
No picture, no sound
- Check cable connections.
No sound, picture OK
- Check audio Cable Connections
- Try pressing Volume up button in the Menu.
Poor color, sound OK
- Check cable connections
- Adjust Video set up menu.
Poor color or no color
- Adjust Color and / or TINT (NTSC only)
Applicable Timing
VGA Timing
There are a total of 11 timing modes that can be saved in memory by FIFO detecting architecture.
VGA Support Timing
| Mode | Resolution | H Freq. (kHz) | V Freq. (Hz) | Pixel clock (MHz) | 21.5° |
| 920*1080 60Hz | |||||
| VGA | 640x480@60 | 31.469 | 59.940 | 25.175 | - |
| 640x480@72 | 37.861 | 72.809 | 31.500 | - | |
| 640x480@75 | 37.500 | 75.000 | 31.500 | - | |
| SVGA | 800x600@60 | 37.879 | 60.317 | 40.000 | - |
| 800x600@72 | 48.077 | 72.185 | 50.000 | - | |
| 800x600@75 | 46.875 | 75.000 | 49.500 | - | |
| XGA | 1024x768@60 | 48.363 | 60.004 | 65.000 | - |
| 1024x768@70 | 56.576 | 70.069 | 75.000 | - | |
| 1024x768@75 | 60.023 | 75.029 | 78.750 | - | |
| SXGA | 1280x1024@60 | 63.980 | 60.000 | 108.000 | - |
| 1280x1024@75 | 79.976 | 75.025 | 135.000 | - | |
| Full HD | 1920x1050@50 | 67.500 | 60.00 | 148.500 | - |
HDMI Timing
| Format | Resolution | Type | Vertical frequency |
| 480i/p | 720x480 | SD | 60Hz |
| 720p | 1280x720 | HD | 60Hz |
| 1080p | 1920x1080 | Full HD | 60Hz |
PC RGB Input
| Input Signal | Analog RGB 0.7Vp-p |
| Input Impedance | 75 Ohm ± 2% |
| Polarity | Positive, Negative |
| Amplitude | 0 ~0.7 ± 0.05Vp |
| Multi-mode Supported | Horizontal Frequency: 30~80KHzVertical Frequency: 50~75Hz |
Power Supply
| Input Voltage | 100~240VAC, 50/60Hz |
| Output Voltage | +12V DC,5A |
Environment
| Operation Condition | Temperature | 0°C to 50°C / 32°F to 122°F |
| Relative Humidity | 20% to 85% | |
| Storage Condition | Temperature | -10°C to 60°C / 14°F to 140°F |
| Relative Humidity | 5% to 85% |
LCD Color Monitor Specification
| Model | M19LED | M21LED |
| Button Control | Power / OSD Control / Source | |
| Display Resolution | 1920 x 1080 | 1920 x 1080 |
| Supported Resolutions | 640 x 480 @ 60/72/75800 x 600 @ 56/60/72/751024 x 768 @ 60/70/751280 x 1024 @ 60/751280 x 720 @ 601360X768 @ 601440 x 900 @ 601680X1050 @ 601920 x 1080 @ 60 | |
| Active Area | 409.8 (H) x 230.4 (V)mm | 476.64(H) x 268.11(V)mm |
| LCD Panel Type | TN mode, Normally white | |
| Dot Pitch | 0.24825(H) x 0.24825(V)mm | |
| Display Ratio | 16:9 | |
| Display Color | 16.7M colors | |
| Brightness (Central) | 250cd/m2 | |
| Contrast Ratio | 1000:1 | |
| Viewing Angle | Left 85° / Right 85° / Up 80° / Down 80° CR>10 | |
| Response Time | 5ms | |
| Input Voltage | DC12V | |
| Input Signal | 1Vp-p composite video | |
| Input Impedance | 75 ohm | |
| Output Signal | 1.0Vp-p±0.2Vp-p composite video ( Auto Termination) | |
| Scanning system | NTSC:525 lines, 60 fields / sec ; PAL:625 lines, 50 fields / sec | |
| Video Input / Output | HDMIx1, Video In x 1 (BNC), Video Out x 1 (BNC), VGA x 1, | |
| Audio Input | RCA jack x 2(L/R), PC-Audio In x 1 | |
| RS485 jack | Disabled | |
| Protocol | Disabled | |
| Control device | Disabled | |
| Control ID | Disabled | |
| Speaker | 1W + 1W | |
| Power Consumption | 20W (MAX) | 25W (MAX) |
| Operating Temperature | -10°C ~ 50°C (14°F ~ 122°F) | |
| Storage Temperature | -20°C ~ 60°C (-4°F ~ 140°F) | |
| Dimension | 443(W) x 348(H) x 60.5(D)mm | 516(W) x 411.4(H) x 55(D)mm |
| Weight | N.W./G.W.: 3KG / 4.5KG | N.W./G.W.: 3.6KG / 5.3KG |
(1) The brightness specification is from panel spec.
Design and Specifications are subject to change without notice.
(2) It is not guaranteed for all the specified range.
*VESA mount M4x10L
Dimensions

- WARNING:
- CAUTION:
- Explanation of Graphical Symbols
- Important Information
- IMPORTANT SAFEGUARDS
- READ INSTRUCTIONS
- RETAIN INSTRUCTIONS
- HEED WARNINGS
- FOLLOW INSTRUCTIONS
- CLEANING
- ATTACHMENTS
- WATER AND MOISTURE
- ACCESSORIES
- VENTILATION
- POWER SOURCE
- POWER-CORD PROTECTION
- LIGHTNING
- POWER LINES
- OVERLOADING
- OBJECT AND LIQUID ENTRY
- HEAT
- CONNECTING
- LCD
- Safety Precautions
- Federal Communications Commission (FCC) Statement
- Table of Contents
- Components
- Feature
- Exploring Your New Monitor
- Front Panel
- Backside Connections
- Illustration :
- Setup your Monitor
- Remote Controller
- Video/HDMI Setting
- VGA Setting
- Audio Setting
- PIP Setting
- System Setting
- Troubleshooting
- Symptom
- Solution
- Applicable Timing
Brand : Speco Technologies
Model : M19LED
Category : Monitor