
H390 - Headphones ZEBRA - Free user manual and instructions
Find the device manual for free H390 ZEBRA in PDF.


| Product Type | Wired Over-Ear Headset |
| Brand | Zebra |
| Model | H390 |
| Connectivity | USB-A |
| Compatibility | Windows, macOS, Linux |
| Driver Size | 40 mm |
| Frequency Response | 20 Hz - 20 kHz |
| Impedance | 32 Ω |
| Sensitivity | 100 dB ± 3 dB |
| Microphone Type | Noise-Cancelling Boom Microphone |
| Microphone Frequency Response | 100 Hz - 10 kHz |
| Controls | In-line volume control, mute button |
| Cable Length | 2.0 m |
| Ear Cushion Material | Leatherette |
| Headband Padding | Yes, adjustable |
| Dimensions (W x H x D) | 20 x 18 x 8 cm |
| Weight | 150 g (without cable) |
| Color | Black |
| Power Source | USB powered (no batteries) |
| Warranty | 1 year |
Frequently Asked Questions - H390 ZEBRA
User questions about H390 ZEBRA
0 question about this device. Answer the ones you know or ask your own.
Ask a new question about this device
Download the instructions for your Headphones in PDF format for free! Find your manual H390 - ZEBRA and take your electronic device back in hand. On this page are published all the documents necessary for the use of your device. H390 by ZEBRA.
USER MANUAL H390 ZEBRA
Before using this product, read the Important Safety and Legal Information pamphlet and follow its instructions.
Take a moment before you get started to familiarize yourself with your new H390 Headset.

①
CHARGE
Your Headset's Battery

1 Verify slide switch is in the off position (toward the charging port).
2 Plug the Motorola charger into the end of the headset.
The indicator light turns red or yellow when the battery is charging. It may take up to 1 minute for the indicator light to turn on. When the headset's battery is fully charged (about 2 hours), the indicator light turns green.
3 Disconnect the charger.
Note: Headset is not functional while charging.
Note: This product uses a lithium ion, rechargeable, non-replaceable battery. Under normal use, the expected life of the rechargeable battery is approximately 400 charges.
②
START BLUETOOTH FEATURE
Your Phone
Your phone's Bluetooth feature is off by default. To use your headset, you must turn on the Bluetooth feature in your phone.
For most Motorola phones (at the main menu):
1 Press ☐ (Menu) > Settings > Connection > Bluetooth Link > Setup.
2 Scroll to Power.
3 Select Change.
4 Scroll to On.
5 Press Select to turn on the Bluetooth feature. The Bluetooth feature remains on until you turn the feature off.
Note: These steps are for most Motorola phones. For other phones, see your phone's user's guide.

PAIR
Your Headset
Before you can use your headset, you must pair (link) it with your phone.
Step A - ENSURE HEADSET IS IN PAIRING MODE
Power on headset by sliding the Power switch towards the microphone to initiate easy pairing. After a few moments, the indicator light will be steadily lit in blue to indicate headset is in pairing mode.

If the headset does not enter pairing mode, see TROUBLESHOOTING for help.
Motorola, Inc.
Consumer Advocacy Office
1307 East Algonquin Road
Schaumburg, IL 60196
www.motorola.com
1-877-MOTOBLU
1-888-390-6456 (TTY/TDD United States for
hearing impaired)
Guide Number: 68000192001-A
Bluetooth QD ID: B014439
MOTOROLA and the Stylized M Logo are registered in the US Patent & Trademark Office. The use of wireless devices and their accessories may be prohibited or restricted in certain areas. Always obey the laws and regulations on the use of these products. The Bluetooth trademarks are owned by their proprietor and used by Motorola, Inc. under license. All other product or service names are the property of their respective owners.

natural_image
Completely dark image with no visible content, text, or symbols.
PAIR CONTINUED Your Phone
Step B - SET YOUR PHONE TO LOOK FOR YOUR HEADSET
For most Motorola phones:
1 On your Motorola phone, press ☐ (Menu) > Settings > Connection > Bluetooth Link > Handsfree > Look for Devices.
The phone lists Bluetooth devices it finds.
2 Select Motorola H390.
3 Select OK or Yes to pair your headset with your phone.
4 Enter the passkey: 0000
5 Select OK.
When your headset successfully pairs and connects with your phone, the indicator light changes from steadily lit to flashing blue and purple.
Note: These steps are for most Motorola phones.
For other phones, see your phone's user's guide.

TEST AND USE
Your phone and headset are now paired and ready to make and receive calls.
To make a call:
1 Place the headset over your ear.
2 On the phone, dial the number you want to call and press SEND key on your phone.
If your phone and headset are successfully paired, you will hear ringing on the headset.
After you have successfully paired your phone and headset, you don't need to repeat these steps. For daily use, ensure that your headset is turned ON and that your phone's Bluetooth feature is ON.
USING YOUR H390
See
Features and
Functions Guide
on the reverse side
for information on
using your H390

natural_image
Abstract blue and white graphic with curved arrow-like shape (no text or symbols)Note: If desired, your headset can be restored to original factory settings. This action will erase all pairing information stored in your headset. Thus, you will need to pair your phone and headset again (see step 3).
Note: To restore your headset to original factory settings, press and hold both Volume buttons and the Call button at the same time for 10 seconds.
TROUBLESHOOTING
My headset will not enter pairing mode. Make sure that any devices previously paired with the headset are turned off. If the indicator light is not steadily lit in blue, turn off both the other device and headset, wait 10 seconds, then turn headset back on. Wait for the indicator light to become steadily lit in blue, indicating the headset is now in pairing mode.
My phone doesn't find my headset. Make sure the indicator light on your headset is on (lit in blue) and steady when your phone is searching for devices (see step 3).
My headset worked before but now it's not working.
Make sure your phone is on and the Bluetooth feature is turned on in your phone (see step 2). If the Bluetooth feature was turned off or was turned on only temporarily, you may need to restart the Bluetooth feature (see step 2) and pair your phone and headset again (see step 3).
Support.
If you need more help, contact us at 1-877-MOTOBLU or visit us at www.motorola.com/Bluetoothsupport

Features and Functions Guide
H390 Bluetooth® Handsfree Headset
IMPORTANT: Be sure to first follow the Quick Start Guide on the reverse side of this guide to complete initial setup of your H390.
TURNING HEADSET ON AND OFF
To turn your headset on, slide the switch toward the microphone. The indicator light flashes blue three times, then flashes in blue and purple (if connected with a device) or is steadily blue (if ready to be paired).
To turn your headset off, slide the switch toward the charging plug. The indicator light flashes three times then turns off.

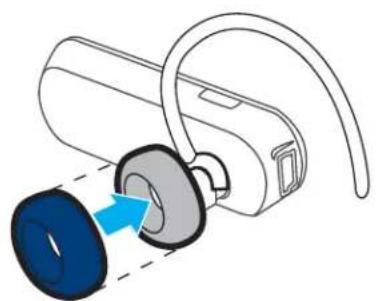
EARBUDS AND YOUR HEADSET
Your H390 headset is supplied with multiple earbuds. The earbud is fitted onto the end of your headset's earpiece speaker, and placed onto your ear when using your headset.
natural_image
Diagram of a device with a blue circular component inserted into a gray ring, showing mechanical components and a blue arrow indicating direction (no text or symbols present)Your headset's performance is greatly dependent upon achieving a good fit on your ear. Therefore, we recommend trying all the supplied earbuds with your headset.
WEARING THE HEADSET
To wear your headset, flex the earhook and loop it over your ear as shown.

natural_image
Illustration of a wireless ear with a device and antenna, showing ear rotation and signal waveform (no text or symbols)Be sure to position the ear cushion into your ear canal for optimal audio performance and comfort.
CHANGING FOR USE ON OTHER EAR
You can wear your H390 headset on your left or right ear. The headset comes ready for the right ear. To change the headset for the left ear:
1 Gently lift and pull the top of the earhook up and off speaker stem, as shown.

natural_image
Diagram of a medical device with a blue arrow indicating direction, no text or symbols present2 Flip the headset over.
3 Attach the earhook to the speaker stem, as shown.

natural_image
Diagram of a device with blue arrows indicating motion or force direction, no text or symbols presentCHANGING VOLUME BUTTON ORIENTATION
You can also change the orientation of the volume buttons on your headset.
1 Turn the headset power off.
2 Press and hold the Volume button you want to assign as the "volume up" button and slide the switch toward the microphone. The indicator light flashes blue three times, then steady blue. When connected, it will flash blue/purple.

European Union Directives Conformance Statement

Hereby, Motorola declares that this product is in compliance with:
- The essential requirements and other relevant provisions of Directive 1999/5/EC.
• All other relevant EU Directives.

The above gives an example of a typical Product Approval Number.
You can view your product's Declaration of Conformity (DoC) to Directive 1999/5/EC (to R&TTE Directive) at www.motorola.com/rtte. To find your DoC, enter the product Approval Number from your product's label in the "Search" bar on the web site.
QUICK BATTERY CHECK
When not on a call, you can check your headset's battery charge level by pressing and holding both Volume buttons.
The indicator light displays charge status for 5 seconds. See below for details on indicator light and charge status.
Headset Indicator Talk Time
| Red | Less than 2.5 hours | |
| Yellow | Betweenhours | |
| Green | Up to 8 hours | |
To save battery power, turn OFF the headset when you don't use it for an extended time by sliding the switch towards the charging plug.
Note: Your battery is designed to last the life of the product. It should only be removed by a recycling facility. ANY ATTEMPT TO REMOVE OR REPLACE YOUR BATTERY WILL DAMAGE THE PRODUCT.
MAKING CALLS
| Function | Action | |
| Receive a call Tap the Call button | ||
| Mute or unmute a call Tap both Volume buttons | ||
| Reject a call Press and hold a Volume the button | ||
| End a call Tap the Call button | ||
| Redial last call Press and hold the Call hear button two | ||
| Make a voice dial call Tap the Call button and wait for voice prompt | ||
| Answer second incoming call Use phone to answer (follow your instructions) | ||
Note: Your H390 supports both Handsfree and Headset Profiles. Accessing call functions depends upon which profile your phone supports. See your phone's user's guide for more information.
Note: Some features are phone/network dependent.
INDICATOR LIGHT
With the Charger Plugged In
| Headset Indicator | Headset Status | ||
| Red | Charging (battery level less charge) | ||
| yellow stops | Charging level more charge) | (battery | |
| Green | Charging complete | ||
| until tones | you | ||
phone's
INDICATOR LIGHT
With No Charger Plugged In
| Headset Indicator | Headset Status | |
| Off | Power off | |
| Three blue flashes | Powering on/off | |
| Steady blue | Pairing/connect mode | |
| Rapid blue/purple flashes | Connection successful | |
| Quick blue flash | Incoming/outgoing call | |
| Slow blue pulse | Connected (on a call) | |
| Slow blue flash | Standby (not on a call) | |
| Slow red flash | Idle (not connected to phone) | |
| Slow purple pulse | Connected call muted | |
| Steady red | Attempting to connect | |
| Quick red flash | Low battery | |
Note: After 30 minutes on a call or of inactivity, the light stops flashing to conserve power, but the headset remains on.
AUDIO TONES
| Audio Tone | Headset Status |
| Ascending tone | Powering on |
| Two descending tones | Powering off |
| Ring tone | Incoming call |
| Two short tones when pressing Volume button | Volume at minimum or maximum |
| High/low tones repeated every 60 sec. | Low battery |
| No audio indications; deteriorating quality | Out of range |
| Two ascending tones | Connected to phone |
| Two rapid ascending tones | Mute enabled |
| Two rapid descending tones | Mute disabled |
| Low tone every 10 seconds | Mute reminder |
- ①
- CHARGE
- ②
- START BLUETOOTH FEATURE
- PAIR
- Your Headset
- Step A - ENSURE HEADSET IS IN PAIRING MODE
- PAIR CONTINUED Your Phone
- Step B - SET YOUR PHONE TO LOOK FOR YOUR HEADSET
- TEST AND USE
- USING YOUR H390
- TROUBLESHOOTING
- Features and Functions Guide
- TURNING HEADSET ON AND OFF
- EARBUDS AND YOUR HEADSET
- WEARING THE HEADSET
- CHANGING FOR USE ON OTHER EAR
- CHANGING VOLUME BUTTON ORIENTATION
- European Union Directives Conformance Statement
- QUICK BATTERY CHECK
Brand : ZEBRA
Model : H390
Category : Headphones