
ND1950 - Desktop computer Planar - Free user manual and instructions
Find the device manual for free ND1950 Planar in PDF.


| Product Type | Desktop Computer |
| Model | ND1950 |
| Brand | Planar |
| Processor | Intel Core i5 (10th Gen) |
| Memory | 8 GB DDR4 RAM |
| Storage | 256 GB SSD |
| Operating System | Windows 10 Pro |
| Display | 19.5-inch LED (if integrated) |
| Dimensions (W x H x D) | 18.5 x 14.2 x 8.3 inches |
| Weight | 12.5 lbs (5.7 kg) |
| Power Supply | 90W AC Adapter |
| Connectivity | USB 3.0 (4), HDMI, VGA, Ethernet |
| Wireless | Wi-Fi 5, Bluetooth 4.2 |
| Cleaning Instructions | Use a soft dry cloth; avoid liquids |
| Safety | UL, CE, FCC compliant |
| Spare Parts | Contact Planar support |
| Warranty | 3 years limited |
Frequently Asked Questions - ND1950 Planar
User questions about ND1950 Planar
0 question about this device. Answer the ones you know or ask your own.
Ask a new question about this device
Download the instructions for your Desktop computer in PDF format for free! Find your manual ND1950 - Planar and take your electronic device back in hand. On this page are published all the documents necessary for the use of your device. ND1950 by Planar.
USER MANUAL ND1950 Planar
Integrated Thin Client
Network Display
USER'S GUIDE
www.planar.com
Planar Systems, Inc
1195 NW Compton Drive
Beaverton, OR 97006-1992
www.planar.com
Customer Service
Planar provides the following technical support services:
Internet Support
For support available 24/7, visit Planar's Online Technical Support at www.planar.com/support. Our Online Technical Support is where you will find solutions to many common issues, download documentation, view answers to frequently asked questions and get troubleshooting advice. You can also email your support question directly from this location.
Technical Support
1.866.PLANAR1 (866.762.5271) or 1.503.748.5799. Telephone support is available 24/7.
Email: Support@Planar.com
For warranty information, please visit the Planar website at www.planar.com/support/warranty.
Contents
Contents ...... 1
Preface 2
Installation 4
Unpacking 4
Desktop Installation....4
Connecting the Network Display and Base....4
Viewing Angle Adjustment....4
Alternate Mounting Solutions....5
Detaching Network Display from Its Stand 5
Interface for Arm/ Wall Mount Applications ....5
Connecting the Display to Your Network 5
Connecting User Devices....6
Connecting the AC Power 6
Setting Up the Network Display 6
Display Controls 7
User Controls....7
Power Modes....8
Adjusting the Display....8
Function Description......8
Technical Information 9
Specifications 9
Supported Display Resolutions....10
Troubleshooting....11
End User License Agreement ("License")......12
Preface
This manual is designed to assist users in setting up and using the Integrated Thin Client Network Display (Network Display). Information in this document has been carefully checked for accuracy; however, no guarantee is given to the correctness of the contents. The information in this document is subject to change without notice. This document contains proprietary information protected by copyright. All rights are reserved. No part of this manual may be reproduced by any mechanical, electronic or other means, in any form, without prior permission of the manufacturer.
FCC Statement Warning
This equipment has been tested and found to comply with the limits for a Class B digital device, pursuant to Part 15 of the FCC Rules. These limits are designed to provide reasonable protection against harmful interference in a residential installation. This equipment generates, uses, and can radiate radio frequency energy, and if not installed and used in accordance with the instruction, may cause harmful interference to radio communications. However, there is no guarantee that interference will not occur in a particular installation. If this equipment does cause harmful interference to radio or television reception, which can be determined by turning the equipment off and on, the user is encouraged to try to correct the interference by one or more of the following measures:
- Reposition or relocate the receiving antenna.
- Increase the separation between the equipment and the receiver.
- Connect the equipment into an outlet on a circuit different from that to which the receiver is connected.
- Consult the dealer or an experienced monitor technician for help.
Warning
Use only shielded signal cables to connect I/O devices to this equipment. You are cautioned that changes or modifications not expressly approved by the party responsible for compliance could void your authority to operate the equipment.
This device complies with part 15 FCC Rules. Operation is subject to the following two conditions (1) This device may not cause harmful interference. (2) This device must accept any interference received, including interference that may cause undesired operation.
Canadian DOC Notice

This Class B digital apparatus complies with Canadian ICES-003.
Important Safety Instructions
Please read the following instructions carefully. This manual should be retained for future use.
- To clean the Network Display screen;
-- Power off the Network Display and unplug the AC Cord.
-- Spray a non-solvent cleaning solution onto a soft cloth.
-- Gently clean the screen with dampened cloth.
- Do not place the Network Display near a window. Exposing the display to rain water, moisture or sunlight can severely damage it.
- Do not apply pressure to the LCD screen. Excess pressure may cause permanent damage to the display.
- Do not remove the cover or attempt to service this unit yourself. Servicing of any nature should be performed by an authorized technician.
- Store (not connected to the AC power source) the Network Display in a room with a room temperature of -20^ 60^ (or -4^ 140^ ). Storing the Network Display outside this range could result in permanent damage.
- If any of the following occurs, immediately unplug your monitor and call an authorized technician.
- AC Power cable is frayed or damaged.
• Liquid is spilled into the Network Display or it has been exposed to rain.
• LCD display or the Network Display case is damaged.
- Only use the supplied main lead (AC Power Cord) to connect the monitor. For a nominal current up to 6A and a device weight above 3kg , a line not lighter than H05VV-F, 3G, 0.75mm^2 must be used.
Important Recycle Instruction:

LAMP(S) INSIDE THIS PRODUCT CONTAIN MERCURY AND MUST BE RECYCLED OR DISPOSED OF ACCORDING TO LOCAL, STATE OR FEDERAL LAWS. FOR MORE INFORMATION, CONTACT THE ELECTRONIC INDUSTRIES ALLIANCE AT WWW.EIAE.ORG. FOR LAMP SPECIFIC DISPOSAL INFORMATION CHECK WWW.LAMPRECYCLE.ORG.
Contains Mercury, Dispose of Properly

Installation
Unpacking
Before unpacking the Network Display, prepare a suitable workspace for your Monitor and computer. You need a stable and clean surface near a wall power outlet. Make sure that Network Display has enough space around it for sufficient airflow. Though the Network Display uses very little power, some ventilation is needed to ensure that the Monitor does not become too hot.
After you unpack the Network Display, make sure that the following items were included in the box:
- Network Display
- User's Guide
- Desk Stand Base
- Power Cord
- USB Keyboard
- PS2 Mouse
If you find that any of these items are missing or appear damaged, contact Planar immediately.
Register Your Planar Products Today
Thank you for choosing Planar. To assure you receive all the benefits of your Planar product and services, register your Planar product today. Visit our website to register your product at http://www.planar.com/support/product_registration.html
Cables, Replacement Lamps and Accessories
To find cables, replacement lamps and accessories for your Planar projector, LCD monitor, touchscreen or other Planar products visit our online store at www.PlanarOnline.com or find other stores who carry Planar products at http://www.planar.com/howtobuy
Desktop Installation
Connecting the Network Display and Base
When you open the box to take the base and put on the desk first. Then connect the Network Display and base please.(See fig.1-1)

natural_image
Line drawing of a flat-screen monitor with a circular base (no text or symbols)Figure 1-1
Viewing Angle Adjustment
The Network Display is designed to allow users to have a comfortable viewing angle. The viewing angle can be adjusted from -5^ to +20^ . (See fig. 1-2)
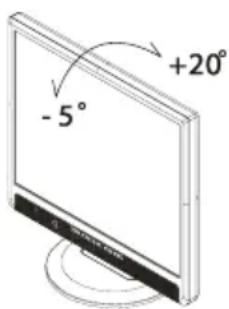
Figure 1-2
Warning
Do not force the Network Display over its maximum viewing angle settings as stated above. Attempting to do so will result in damaging the Network Display and Display Stand.
Alternate Mounting Solutions
Detaching Network Display from Its Stand
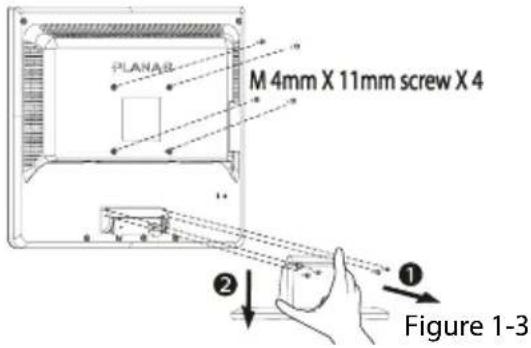
Unscrew screws ① the swivel base support column and pull down ② the hinge to release.
Interface for Arm/ Wall Mount Applications
Before installing to mounting device, please refer to Fig.1-3. The rear of this LCD display has four integrated 4 mm, 0.7 pitch threaded nuts, as well as four 5 mm access holes in the plastic covering as illustrated in Figure 1-4. These specifications meet the VESA Flat Panel Monitor Physical Mounting Interface Standard (paragraphs 2.1 and 2.1.3, version 1, dated 13 November 1997).
Note: M4mm x 11mm (L) screws should be used for a 3mm thick mounting plate application. Thicker plates should use appropriately longer screws. The screw threads should extend between 8 and 10 mm beyond the display surface of the mounting plate. Follow the mounting device manufacturer's recommendations.
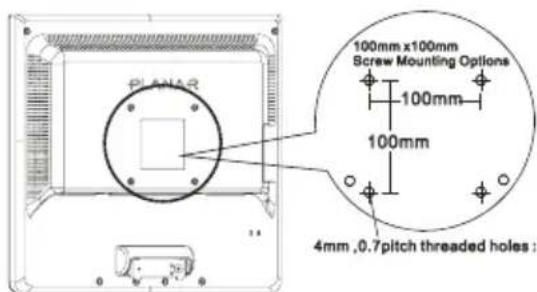
Figure 1-4
Connecting the Display to Your Network
- Make sure the AC Power Cord is disconnected
- Connect one end of the Ethernet cable to the Network Display's Ethernet (ENET) port. (See Fig 1-5)
- Verify that the other end of the Ethernet cable is connected to your LAN/WAN network.
- Make sure connections are secure and that the Ethernet connectors have “clicked” into place.
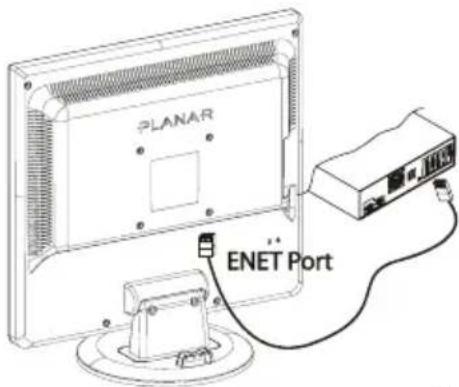
Figure1-5
Connecting User Devices
-
USB devices such as the Keyboard can be connected to ports on the side or bottom (See Fig. 1-6 and Figure 1-7)
-
The unit may be secured through the use of Kensington locking devices. (See Figure 1-6)
-
The Headset/Handset port (RJ22) is reserved for future use with VOIP software support tools. It is designed for connection to analog telephone headsets or handsets. We recommend only the use of a UL or other safety agency approved device.
Caution: This is not a telephone modem connection and should not be connected to a telephone line. Damage to the unit might occur.
- The PS2 Mouse connects to the PS2 connector on the right end of the keyboard.

natural_image
Illustration of a computer keyboard with an external mouse, connected by a cable (no text or symbols)- A stereo headphone may be connected to the front of the Network Display
Connecting the AC Power
- Connect the power cord to the AC adapter (See Fig. 1-8)
-
Connect the AC adapter's DC output connector to the DC Power Jack of the display.
-
Connect the power cord to a 100-240 VAC, 50/60Hz power source.

Figure 1-6

Figure 1-7

Figure 1-8
Setting Up the Network Display
- Make sure the AC power cord is connected to the Power Adapter.
- Press the Network Display's power switch, located on the bezel of the monitor. (See Figure 2-1)
- After power-on, the thin client will boot and commence a series of tests and communication checks which will be shown in the System Information Event Log.
- For the Network Display to properly connect to your network and applications servers, the Network Display and your network environment must be appropriately configured. Please contact your Information Technology specialist for further details.
- A detailed User Guide and Administrators Guide for the Wyse Thin Client Operating System (WTOS) may be obtained at http://www.planar.com/support/for this product model number.
Display Controls
User Controls
A brief description and the location of all Network Display functions controls and indicators:

Figure 2-1
| 1 |  | Power Control - LEDModes are changed by pressing the Power Control Button (Please refer to Figure 2-2) |
| 2 |  | Brightness Function / Adjust increase |
| 3 |  | Brightness Function / Adjust decrease |
| 4 |  | Audio Volume Function / Adjust increase |
| 5 |  | Audio Volume Function / Adjust decrease |
Power Modes
The Network Display has three modes of operation.
Figure 2-2
The following assumes the AC Power Adapter is connected to the display and an AC power source.
| Power Mode LED | Operation Description | ||
| 1 | Off | Dark | Power button is pressed for 3 Sec while in Standby mode (Thin client is switched off)Power button is pressed for 3 Sec while in Run mode (Thin client and display are switched off)Caution: Be very careful to not turn off the Display while the operating system is downloading a software update! |
| 2 | Run | Green | If the Power button is momentarily pressed when in the Off mode the display is powered and the thin client will boot.If the Power button is momentarily pressed while in Standby mode, the display returns to Run mode. |
| 3 | Standby | Yellow | If the Power button is momentarily pressed while in Run mode the display is turned off while the Thin Client continues to operate.This mode can be used for privacy or to conserve power. |
Adjusting the Display
The monitor has four function control buttons designed for comfortable viewing and listening.
Function Description
| Icon | Function Function Description | |
 | Brightness | The brightness of the display may be varied. |
 | Audio Volume | The volume of the speakers and headphone may be varied. |
Technical Information
Specifications
| LCD Panel ND1750 ND1950 | ||
| Size 17" SXGA 19" SXGA | ||
| Display Type Active matrix color TFT LCD Active matrix color TFT LCD | ||
| Resolution 1280 x 1024 1280 x 1024 | ||
| Display Dot 1280 x (RGB) x 1024 1280 x (RGB) x 1024 | ||
| Aspect Ratio 5:4 | 5:4 | |
| Display Area , mm (H x V) 337.92 mm (H) x 270.34 mm (V) 376.32 mm (H) x 301.6 mm (V) | ||
| Displayed Colors Up to16.2M with FRC or Dithering Up to 16.2M with FRC or Dithering | ||
| Brightness | 300 cd/m ^2 (typical) | 300 cd/m ^2 (typical |
| Contrast Ratio | 800:1 (typical) | 800:1 (typical) |
| Response Time | 5ms (typical) 5ms (typical) | |
| Color Temperature | 6500°K, Factory Calibrated | 6500°K, Factory Calibrated |
| Controls | |
| Power Switch (Momentary) | Power Mode control with LED indicator |
| Brightness | 2 buttons |
| Audio | 2 buttons |
| Audio | |
| Input | Microphone Level, Monophonic |
| Speaker Output | 0.5W + 0.5W |
| OSD | |
| Brightness | Digital |
| Volume | Digital |
Power Management
| Power Mode | Power Consumption* | Power LED Color |
| Run | 60 W maximum(DC output, 12V/5A)ND1750: 36 W, typicalND1950: 40 W, typical | Green |
| Standby | 12 W maximum10 W typical | Yellow |
| Off | 1 W maximum | Dark |
| External Connections | ||
| Power Input (DC input) DC Socket, 12V, 5A (Center Positive) | ||
| GigaBit Ethernet port | RJ45 | |
| USB ports 4 x USB connectors, T | ype A Receptacles | |
| Headphone 3.5mm Stereo Jack | ||
| Microphone 3.5mm Mono Jack, Pink | ||
| Headset RJ22 (4P4C, Reserved for Future VOIP Software Su pport) | ||
| Environment | ||
| Operating Condition: | Temperature | 5°C to 40°C/41°F to 104°F |
| Relative Humidity | 20% to 80% | |
| Storage Condition: | Temperature | -20°C to 60°C/-4°F to140°F |
| Relative Humidity | 5% to 85% | |
| Power Supply (AC Input) | ||
| Input Voltage | Single phase, 100 ~ 240VAC, 50 / 60 Hz | |
| Input Current 1.5 A maximum | ||
| Size and Weight ND1750 ND1950 | |
| Dimensions 367 (W) x 384 (H) x 199 (D) mm 413 (W) x 418 (H) x 222 (D) mm | |
| Net Weight 4.5 kg 4.6 kg | |
| Gross Weight 7.7 kg 8.0 kg | |
Supported Display Resolutions
If the selected timing is NOT included in table below, the Network Display will use the most suitable available timing.
| Mode | Resolution(Horizontal X Vertical) |
| SXGA | 1280 X 1024 |
| XGA | 1024 X 768 |
| SVGA | 800 X 600 |
| VGA | 640 X 480 |
Troubleshooting
This Network Display has been pre-adjusted using factory standards.
PROBLEM There is no image on Network Display
If there's no image on the Network Display, please perform the following steps:
- Verify that the power cord is connected to a proper source of power.
- Verify that the power cord is fully connected to the Power Adapter and that the Power Adapter cord is fully connected to the DC connector on the rear of the Display. The LED on the Power Adapter should be green.
- Verify that the Power Indicator on the Network Display is green.
- Turn off the Network Display and then turn it back on again.
PROBLEM The displayed image is dim.
If the displayed image on the Display appears too dim:
- Press the Brightness Control to increase the brightness.
PROBLEM The Network Display will not connect to your network.
If the Network Display will not connect to your network, please perform the following steps:
- Verify that the Ethernet connector is properly connected to your network and to the Display.
- Verify that your network is live and properly configured for use with the network display.
End User License Agreement ("License")
IMPORTANT – READ CAREFULLY.
THIS LICENSE IS A LEGAL DOCUMENT setting forth the terms under which Planar Systems, Inc. ("Licensor") and its licensors and suppliers (collectively referred to as "Third Party Suppliers") are willing to license to you software which is owned by Licensor and/or its Third Party Suppliers, who are intended third party beneficiaries under this License.
Acceptance. Licensor is willing to license to you the enclosed software, downloaded software, or software described in the manual or other document containing this License, whichever is applicable, ("Software"), together with any supplied documentation, only if you accept all of the terms contained in this License. Please read this Agreement carefully before unpacking, downloading, installing or using the Software or the Device (defined below). By downloading or installing the Software, or unpacking or using the Software or Device, you agree to be bound by the terms of this License. If you do not agree to these terms, Licensor and its Third Party Suppliers are unwilling to license the Software to you, and you should not and may not download or install the Software or unpack or use the Software or the Device. In such case, you should promptly contact Licensor for information on return of the unused product and all accompanying materials for a refund of your money. ANY USE OF THE SOFTWARE, INCLUDING BUT NOT LIMITED TO USE ON THE DEVICE, WILL CONSISTUTE YOUR ACCEPTANCE OF THIS LICENSE (OR RATIFICATION OF ANY PREVIOUS CONSENT).
Grant. Licensor grants to you a non-exclusive right, during the term of this License, to install and/or use the Software, in object code only, solely in conjunction with your Planar-manufactured hardware ("Device"). You have the right to use this Software by loading it onto a computer containing the capability of transferring the Software (in whole or in part) to the Device. You may use the Software in this fashion as many times as necessary, so long as such use is always in conjunction with the Device.
Copyright. The Software and all related documentation are protected under the laws and treaties of copyright and intellectual property. All title and copyrights in and to the Software (including but not limited to any images, photographs, animations, video, audio, music, text and "applets" incorporated into the Software) and any copies of the Software are owned and retained by Licensor and/or its Third Party Suppliers. You may copy and use the Software and related documentation only as expressly permitted in this License. You must reproduce and maintain all proprietary marks, legends, and copyright notices that appear in or on the Software and related materials, or any portion thereof, on any copies of the Software or related materials that you make or use. Third Party Suppliers named in such copyright notices shall each have the right to enforce provisions of this License or use. Third Party Suppliers named in such copyright notices shall each have the right to enforce provisions of this License.
Patents. The Software and/or Device are protected by international treaties and various patents, including the following U.S. patents: 6,836,885 and 5,918,039.
Restrictions. You may not use, copy, modify, translate or transfer the Software, or any modification thereof, in whole or in part, except as expressly provided for in this License. You may not sell, rent, lend or lease the
Software. You may not decompile, reverse engineer or otherwise decode or alter the Software, or attempt to do any of the same, except and only to the extent that applicable law notwithstanding this limitation expressly permits such activity.
Software Transfer. You may permanently transfer to another party ownership of the Device and equipment, including all of your rights under this License to use the Software, provided you retain no copies, you transfer the entire product (including the Device and Software, all component parts, the media and printed materials, any upgrades, these license terms, and, if applicable, the Certificate(s) of Authority), and the recipient accepts and agrees to the terms and conditions of this License. You may not otherwise sublicense, assign or transfer the Software or ownership of the Device and equipment. If the Software is an upgrade, any transfer must also include all previous versions of the Software.
Termination. This License will terminate automatically if you fail to comply with any of its terms or conditions, including any attempt to modify the Software. Upon termination for any reason, you agree to promptly destroy all copies of the Software and related material or return all such copies to Licensor.
Disclaimer of Warranty. The Software is provided "AS IS" with all faults and with no warranties of any kind, whether express, implied or statutory. LICENSOR SPECIFICALLY DISCLAIMS ALL WARRANTIES, REPRESENTATIONS, OR CONDITIONS, INCLUDING, BUT NOT LIMITED TO, ANY IMPLIED WARRANTY OR CONDITION OF MERCHANTABILITY, NONINFRINGEMENT, AND CORRESPONDENCE TO DESCRIPTION OR FITNESS FOR A PARTICULAR PURPOSE. LICENSOR DOES NOT WARRANT THAT THE FUNCTIONS CONTAINED IN THE SOFTWARE WILL MEET YOUR REQUIREMENTS OR THAT THE OPERATION WILL BE UNINTERRUPTED OR ERROR FREE. SOME JURISDICTIONS DO NOT ALLOW THE EXCLUSION OF IMPLIED WARRANTIES, SO THE ABOVE EXCLUSION MAY NOT APPLY TO YOU.
LIMITATION OF LIABILITY. IN NO EVENT SHALL LICENSOR OR ANY THIRD PARTY SUPPLIER BE LIABLE FOR ANY DIRECT, CONSEQUENTIAL, INCIDENTAL, INDIRECT, OR SPECIAL DAMAGES, INCLUDING WITHOUT LIMITATION COST OF COVER, LOST PROFITS, OR LOSSES RESULTING FROM BUSINESS INTERRUPTION OR LOSS OF DATA, REGARDLESS OF THE FORM OF ACTION OR LEGAL THEORY UNDER WHICH THE LIABILITY MAY BE ASSERTED, EVEN IF ADVISED OF THE POSSIBILITY OR LIKELIHOOD OF SUCH DAMAGES. SOME JURISDICTIONS DO NOT ALLOW THE LIMITATION OF LIABILITY FOR CONSEQUENTIAL OR INCIDENTAL DAMAGES, SO THE ABOVE LIMITATION MAY NOT APPLY TO YOU.
REMEDIES. NOTWITHSTANDING ANY DAMAGES THAT YOU MIGHT INCUR FOR ANY REASON WHATSOEVER (INCLUDING, WITHOUT LIMITATION, ALL DAMAGES REFERENCED ABOVE AND ALL DIRECT OR GENERAL DAMAGES), THE ENTIRE LIABILITY OF LICENSOR AND ANY THIRD PARTY SUPPLIERS UNDER ANY PROVISION
Planar Systems, Inc.
1195 NW Compton Drive
Beaverton, OR 97006-1992
www.planar.com
©2007 Planar Systems, Inc.
Planar is a registered trademark of Planar Systems, Inc. Other brands and names are the property of their respective owners. Technical information in this document is subject to change without notice.
HDPNRPJ700I
020-0689-00A
- Planar Systems, Inc
- Customer Service
- Internet Support
- Technical Support
- Contents
- Preface
- FCC Statement Warning
- Warning
- Canadian DOC Notice
- Important Safety Instructions
- Important Recycle Instruction:
- Installation
- Unpacking
- Register Your Planar Products Today
- Cables, Replacement Lamps and Accessories
- Desktop Installation
- Connecting the Network Display and Base
- Viewing Angle Adjustment
- Alternate Mounting Solutions
- Detaching Network Display from Its Stand
- Interface for Arm/ Wall Mount Applications
- Connecting the Display to Your Network
- Connecting User Devices
- Connecting the AC Power
- Setting Up the Network Display
- Display Controls
- User Controls
- Power Modes
- Adjusting the Display
- Technical Information
- Supported Display Resolutions
- Troubleshooting
- PROBLEM There is no image on Network Display
- PROBLEM The displayed image is dim.
- PROBLEM The Network Display will not connect to your network.
- End User License Agreement ("License")
Brand : Planar
Model : ND1950
Category : Desktop computer