
SuperFone Punk A45 - Smartphone Micromax - Free user manual and instructions
Find the device manual for free SuperFone Punk A45 Micromax in PDF.


| Product Type | Smartphone |
| Brand | Micromax |
| Model | SuperFone Punk A45 |
| Display Size | 3.5 inches |
| Display Resolution | 320 x 480 pixels |
| Processor | 1 GHz single-core |
| RAM | 256 MB |
| Storage | 512 MB internal, expandable via microSD |
| Camera | 3.2 MP rear |
| Battery | Li-Ion 1400 mAh, removable |
| Operating System | Android 2.3 Gingerbread |
| Dimensions | 116 x 62 x 12 mm |
| Weight | 110 g |
| Connectivity | GSM, Wi-Fi 802.11 b/g, Bluetooth 2.1, GPS |
| Power Supply | AC adapter 5V, 500 mA |
| Main Functions | Phone calls, SMS, music player, FM radio, camera, web browser |
| Maintenance & Cleaning | Wipe with soft dry cloth; avoid liquids |
| Safety Precautions | Do not expose to moisture or extreme temperatures |
| Spare Parts & Repairability | Battery and charger available; limited user serviceable parts |
| General Information | Released in 2011; user manual available in PDF |
Frequently Asked Questions - SuperFone Punk A45 Micromax
User questions about SuperFone Punk A45 Micromax
0 question about this device. Answer the ones you know or ask your own.
Ask a new question about this device
Download the instructions for your Smartphone in PDF format for free! Find your manual SuperFone Punk A45 - Micromax and take your electronic device back in hand. On this page are published all the documents necessary for the use of your device. SuperFone Punk A45 by Micromax.
USER MANUAL SuperFone Punk A45 Micromax
natural_image
Front view of a smartphone rear panel showing ports and buttons (no text or symbols visible)
natural_image
Black cylindrical object with a pointed tip, resembling a stylized pen or tool (no visible text or symbols)
natural_image
Front view of a black smartphone with no visible text, numbers, or symbols on the body
natural_image
Side view of a black cylindrical device with a flat top and side panel (no visible text or symbols)
natural_image
Black foldable smartphone with a camera lens and 'cromax' branding on the front panel (no additional text or symbols visible)A45 User Guide
1 Welcome
Congratulations on becoming the proud owner of the Micromax A 45 Android mobile phone. You have now joined the millions of satisfied Micromax customers spread across the Globe Your A45 device offers you these exciting features and much more:
■ Android2.36 (Gingerbread)
20 M Pcamera
■ 889 cm capacitive touch screen
■ External Memory (Supports up to 32 GB)
650 Mhz Processor
- Multimedia
■ Gravity sensor, Light sensor
- Bluetooth 3.0
■ Wi-Fi 802.11b/g/n
The colors and specifications shown/mentioned in the user manual may differ from the actual product. Images shown are for representation purpose only. Other product logos and company names mentioned herein may be trademarks or trade names of their respective owners.
User Guide
Table of Contents
1 Welcome 2
2 Phone Layout 6
2.1 Keya and Parts 6
2.2 Icons and Indicators....7
3 Getting Started 9
3.1 Insert SIM Card....9
3.2 Insert Memory card 10
3.3 Unlock the phone....11
3.4 Set Your Screen Lock....12
4 Placing and Receiving Calls 12
4.1 To place a call by Dialing 12
4.2 End a call....13
4.3 Options During a Call....13
4.4 Conference Call....13
4.5 Disable Phone Calls (Airplane mode)....15
4.6 Using the Touch screen 15
4.7 Using the Phone's Buttons 16
4.8 Open and Close the Launcher 17
4.9 Switch to Recently Used Application 18
5 The Home Screen 19
5.1 Customize Home Screen....20
5.1.1 Add te ms to the Home screen....20
5.2 Change Wallpaper 20
6 Working With Menus 21
6.1 Context Menus.... 21
6.2 Options menus.... 22
7 Aisha 23
User Guide
8 Connect to the Internet 23
8.1 Access Internet via Wi-Fi 24
9 Managing Notifications 25
9.1 Open the Notifications Panel.... 25
9.2 Respond to Notifications.... 26
9.3 Clear all Notifications 26
9.4 Close Notifications Panel....26
10 Call Logs 26
11 Messaging 27
11.1 Delete Message Threads.... 27
11.2Exchange Messages 28
11.3Create and Send Multimedia Message 28
11.4Forward a message.... 29
11.5Lock a Message....29
11.6. Using the Onscreen Keyboard.... 30
11.7 Enter Various Characters.... 31
12 Multimedia 32
12.1Camera 32
1.1.1 Take a Picture....32
1.1.2 Shoot Videos .... 3 3
1.1.3G aler y....33
1.1.4 Share an Album .... 34
12.2Music.... 35
1.1.5 Control Playback Volume....36
12.3FM Radio 36
12.4 37
12.5Record Sounds 37
13 Manage Accounts 38
User Guide
13.1 Why Use a Google Account.... 38
13.2 Manage Your Calendar 38
13.3Google Search 38
14 Connect to Networks and Devices 39
14.1Connect to Internet....39
14.2Connect to Wi-Fi Networks 39
14.3Pair With Bluetooth Devices 39
14.3.1 Con ned to Internet via your Phone. 40
14.4 Install Secure Certificate from SD Card.... 40
15 Third Party Applications 41
15.1 Google Latitude, Maps and Places.... 41
15.2Google talk....41
15.3Play store....41
15.4M-Store 42
16 Phone Settings 42
17 Health and Safety Information 44
18 Taking Care of Your Device 46
2 Phone Layout
2.1 Keya and Parts


1 Earp ie œ socket 7 Back
User Guide
2 USBCo mector 8 Search
3 Power key 9 Volume down
4 Micro phone 10 Volume up
5 Menu 11 Cameralens
6 Home 12 Speaker
2.2 Icons and Indicators
| Icons | Indicators | Icons | Indicators |
 | Signal strength indicator |  | Ala rm has been set |
 | New missed calls |  | Wi-Fi is activated |
 | USB is connected |  | Bluetooth this on |
 | The headphone is being used |  | Battery level |
User Guide

New message

Airplane mode is activated
3 Getting Started
31 Insert SIM Card
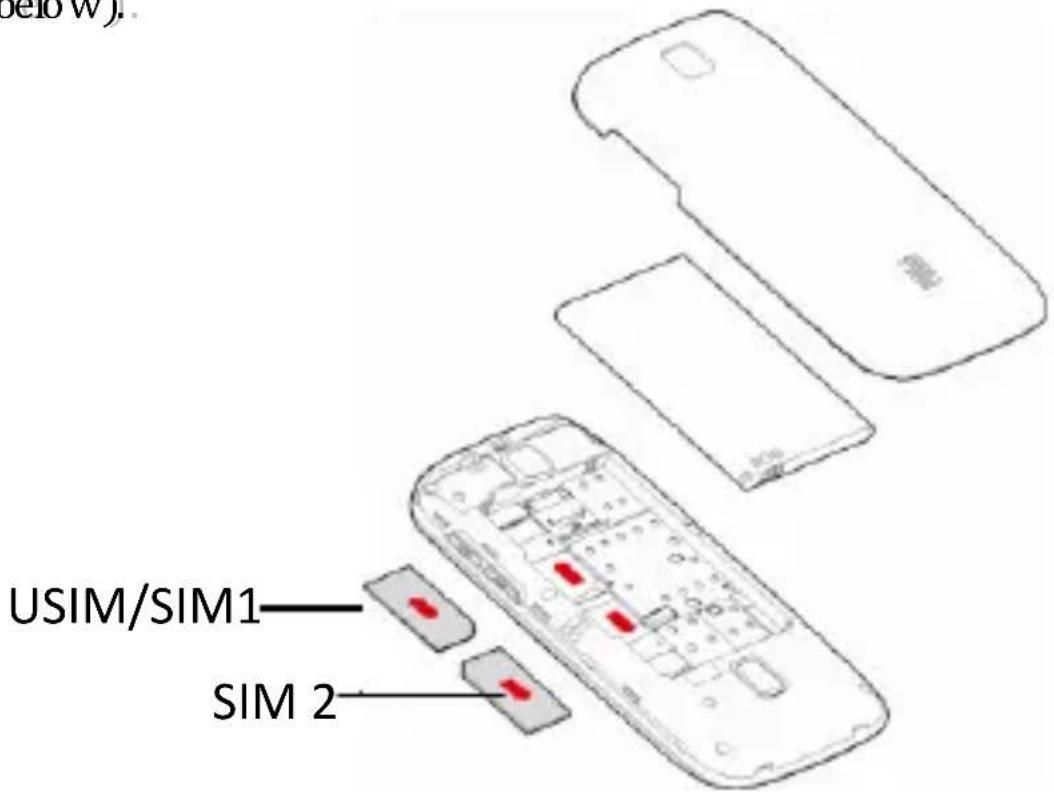
The A45 is a Dual SIM mobile phone allowing you to use the facility of two networks.
To insert SIM card(s):
- Switch off the mobile phone and remove the rear cover and battery.
- Insert the SIM card correctly in the card slot(s) (See figure below).
User Guide
- Finally insert the battery and replace the rear cover of the mobile phone.
3.2 InsertMemory card
- Power off the mobile phone, then remove the rear cover and battery.
- Insert the memory card into the sb t

User Guide
- Finally insert the battery and the rear cover of the mobile phone.
Use only compatible memory cards approved by Micromax with this device. In compatible memory cards may damage the device or corrupt he data stored in the card.
3.3 Unlock the phone
You may need to provide PIN, Password, or draw a pattern to unlock your phone. To unlock the screen
- Press the power key to wake up the phone.

- Drag the screen up to unbock.
To set the unknown method
Tap Settings> Security> Setup screen book to set your type of screen book.
3.4 Set Your Screen Lock
You can set your screen to as a security measure You may also be required to bck your screen by a policy set by an email or other account you add to your phone.
- On the main menu, touch Settings > Security.
- Touch Setup screen lock.
- Choose the type of looking as desired. You can set your screen location the basis of pattern, PIN, Password or none.
4 Placing and Receiving Calls
You can dial a phone number or touch a number in your contacts.
You can also place from the Calllog or contacts.
4.1 Top hœ acall byDiuding
-
Touch the phone icon on the Home screen or touch the Phone tab from Contacts or the Call log.
-
Tou d h the k e ys to enter th e phone number. To correct a
User Guide
w rong number, touch to erase the digits.
■ To dial an international number, touch and hold the 0 key to enter the Plus(+) symbol, and then enter the international country prefix, followed by the phone number:
■ Touch the icon to dial the number
- Press the VolumeUp/ Down button to adjust the call volume
4.2 End a call
Whiled uring ac al, touch the icon.
4.3 Options During a Call
When a call is in progress, you can put it on hold, initiate a phone conference, mute your microphone etc.
■ To place a call on hold touch the Hold icon
Take the call off hold by touching the Unhod icon.
■ Touch the Muteicon to mute your voice at the other end. Unmute the microphone by touching the Muteicon again.
■ Touch the speaker i on to turn on/off the speaker.
■ You can also view or hide the dialpad during a call.
4.4 Conference Call
If you accept a new call when you are already on a call, you can
User Guide
switch between the two callers or merge the two calls into a conference call
- Place a call to the first participant.
- When you are connected, touch the Add call icon, the first participant is put on hold and you are prompted to dial the second contact
-
Place the next call, using the phone tab, the Call log, or your contacts.
-
When you are connected, touch Merge calls. The participant is added to the conference call.

Touch to swap calls
Touch to merge the calls into a conference call
You can add as many callers as your carrier supports.
Recommendation: Contact your service provider to know whether they support conference calls and how many participants you can include.
4.5 Disable Phone Calls (Airplane mode)
Some b c at i ons may require you to turn off your mobile, Wi-Fi, and B lu et ooth wi re e ss conn e c t i o ns. You can turn off all these c conn e c t i o ns at o nce by p h a i n g your ph ore i n Airp h a ne mode.
- Press and hold the Power button.
- Drag notification pan el d o w n then touch the Airplane mode.
4.6 Using the Touch screen
You can use the touch screen in the following ways:
- Touch: Acts on items on the screen, such as application and settings icons to type letters and symbids using the onscreen keyboard to press onscreen buttons.
- Touch and hold: Touch and hold an item on the screen until an action occurs.
- Drag: Touch and hold an item and move your finger on the screen until you reach the target position.
- Swipe or slide: Quickly slide your finger across the surface of the screen, (without dragging an item). For example, slide the screen up or down to scroll alist.
Double-tap: Tap quickly twice on a webpage, map, or other screen to zoom. For example, double-tap subsection of a webpage in Browser to zoom that section to fit the width of the screen. You can also double-tap to control the Camera zoom, In Maps, and in other applications.
■ Pind: In some applications (Such as Maps, Browser, and
User Guide
Gallery) you can zoom in and out by placing two fingers on the screen at once and pinching them together (to zoom out) or spreading them apart (to zoom in).
- Rotate the screen: On most screens, the orientation of the screen changes as your rot at eit. You can turn this feature on and off.
4.7 Using the Phone's Buttons
The phone's buttons and soft button offers a lot of functions and shortcuts.
| Button | Press | Press and hold |
 | Home key: Opens the Home screen | Opens recently used applications. |
 | Menu key: Opens a context menu related with current screen or Application. | |
 | Opens Google search to search your phone and the web. In many applications, opens a Search box for searching within the application. | Opens Google search by voice. |
User Guide
 | Back key: Opens the previous screen you were working on. |
4.8 Open and Close the Launcher
Touch the Laum her Icon 📁 to open the main menu.
You can add an application icon to the Home screen by pressing and holding it until vibrates and enters Home screen and the release your finger.

Press Home icon or Back icon to closet the Launcher.
4.9 Switch to Recently Used Application
- Pressandholdt he

ic on for a few seconds.

Touch anicon to open a n application
- Touch an icon to open its application. Or press to return to the current application.
5 The Home Screen
When you sign in, the home screen opens.
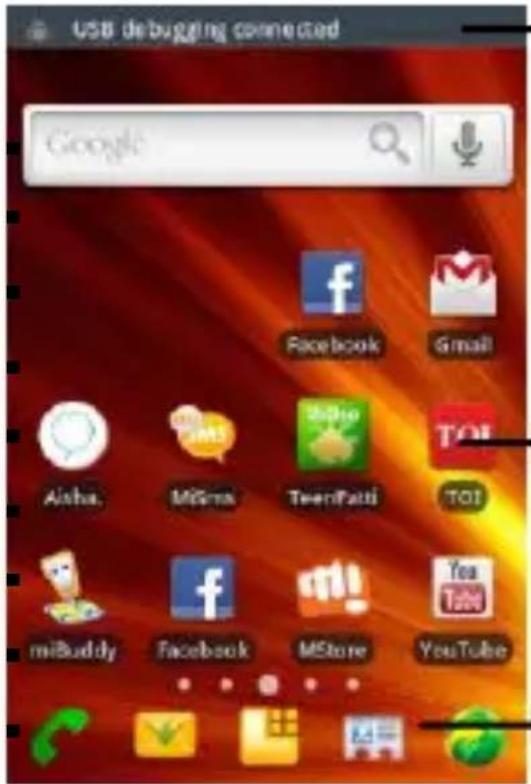
The status bar shows the time, signal strength battery status, and notification icons.
Tap items on the Home screen to open them. Touch and hold an empty spot to add a shortcut to an application, a widget and so on
Touch the menu icons to open the men is on the screen such as home screen, main menu, call logs and so on.
The main menu screen is your starting point to access all the features on your phone..
- At the top of the screen, the Status bar displays the time, status, and notifications.
- Touch the main menu icon at the bottom of the screen to view all installed applications.
5.1 Customize Home Screen
You can add applications, shortcuts, widgets, and other items to any part of the Home screen or change the wallpaper.
5.1.1 Add items to the Home screen
- Pres s to open the Home screen.
-
A menu for adding the following pops up.
-
Shortcuts: Add shortcuts to applications, a bookmarked webpage, a favorite contact, a destination in Maps, a music playlist, etc. The shortcuts available depend on the applications you have installed
Custom Shortcut: Let you define you own shortcut - Widgets: Add any application (widgets) to your Home screen, Including dock, music player, pictures and so on. You can also download widgets from Android Market.
- Folders: Add a folder where you can organize Home screen items, or folder that contain all your contacts, contacts with phone number, or starred contacts. Your folder's contents are kept up to date automatically.
■ Wallpapers: Choose different types of wallpaper per sas desired
5.2 Change Wallpaper
To add a wallpaper:
- Touch and hold anywhere on a Home screen that is not
occupied. A list of options appear.
- Touch a wall paper source:
■ Gallery. Choose from pictures that you have taken with Camera download to your device.
Live Wall papers Choose from a scrolling list of animated wallpapers.
- Wallpaper Gallery. Choose from mw a papers gallery available. You can download additional wallpapers from Android Market.
- Set your wall paper as desired.
6 Working With Menus
The phone provides you with Options menus and context menus.
6.1 Context Menus
- You can open context menu by touching 📄 on any screen.
■ Not a ll screens have context menus. If you touch 📷 on a screen that has no context menu, no thing happens.
User Guide

6.2 Options menus
Options men us contain tools that apply to specific items on the screen. You can open an option by touching and holding an item on the screen. Not all item shave options menus.
When you touch and hold some items on a screen, an Options menu opens.
 | Opens the dialer |
 | Opens messaging |
 | Opens the main menu |
User Guide
 | Opens the call b gs |
 | Opens the Go oge S e a rch |
7 Aisha
Your Superf one punk comes with Aisha, an interactive assistant which follows your voice commands and even talks to you. Use the interactive features of Aisha to get things done for you. For more information on how to use Aisha, please refer to the Flyer that comes with your phone's packaging.
Before you start using Aisha, you would need to do the following:
- Connect to the Internet (refer to section 8)
- Tapo nthe A is haicon and it will automatically in stall the required data on to your SD card. Proceed with the installation as suggested.
Now you are ready to use Aisha. Please refer to the Aisha Flyer that comes along with your A45 to explore the world of aisha.
8 Connect to the Internet
To configure your Internet
- Go to Settings> Wireless & Networks > Mobile Networks > access point names.
- Select the access point name or charge the access point name for your Internet connectivity as provided by the service provider of your SIM card.
By default, your network providers ends the access point name settings via SMS, or it comes with your SIM card. You may need to install these settings. After this, you can choose from the listed access point names. If the access point names are not listed by default, please contact your network provider for the same.
- After you have selected or configured the access point name, go to Settings > SIM Management > Data Connection and tap the desired data connection to enable Internet connection.
8.1 Access Internet via Wi-Fi
To browse the Internet via Wi-Fi:
-
Go to Menu > settings > wireless & networks and then enable Wi-Fi.
-
Next, go to Menu> settings> wireless & networks > Wi-Fi Settings and then select the WIFI connection listed under Wi-Fi networks.
9 Managing Notifications
Notification icons informs you of new messages and events,
When you receive a notification, its icon appears in the status bar, along with a summary that appears only briefly.
91 Open the Notifications Panel
Drag the status hardown from the top of the screen as shown below.

The Notifications panel displays your wireless provider and a list of your current notifications.
9.2 Respond to Notifications
- Open the notification panel and touch a notification to respond to it.
- What happens next depends on the notification. For example, for network connection notification, the list of configured networks opens for you to reconnect.
9.3 Clear all Notifications
■ Open the Notifications panel
- Touch the desire de vent at the panel. All event-based notifications are cleared; on going notifications remain in the list.
9.4 Close Notification sPanel
Drag the tab at the bottom of the Notifications panel to the top of the screen. Or just press the back button. The panel also closes when you touch a notification to respond to it.
10 Call Logs
The call bglists your call history. And also allows you redial, return call, or add a number to your Contacts.
- Tap the icon or tap and then Call logs to open the Callbgs.
User Guide
- Touch and hold an entry to open a menu with options for communicating with that contact.
- Touch and hold an entry in the bg and then touch Remove from call log to remove the entry from the bg
ing
You can use Messaging to exchange text messages and multimedia messages with your friends on their mobilephones.
Touch to compose a new text or multimedi a message.
Touch to open a messaging conversation
1 1.1 Delete MessageThreads
- Touch and hold the message.
- Touch Delete thread in the menu that opens.
You can also press Menu and touch Delete threads to delete a message threads from the window.
112 Exchange Messages
You can send text message of up to 160 characters to another mobile phone. If you exceed the limit, your message is delivered as a series of messages.
A Message becomes an MMS if you send it to an email address, add a subject or multimed a media file
113 Create and Send Multimedia Message
- On the Messaging screen touch compose new message.
- Entera mobile phone number or email address in the Tofield.
-
Touch the composition text box to start entering your message
-
Touch the □□ key below the IC Ds c een A menu opens:
■ Touch Add subject to add a subject.
- Touch Attach to attach pictures, videos, audio and so on through the options available.
■ Touch Di scard to exit this message.
■ Touch InsertSmiley to insertsmiley.
- Touch Insert Quick Text to inser treadymade texts.
■ Touch Insert contact to add another contact.
5. Touch Send icon to send the multi media message.
11.4 Forward a message
- Touch and hold a message in a message conversation window.

- Touch Forward in the menu that opens.
- Add a contact.
- Touch Send i oo n to send the m es ss age.
You can also Copy message text, Save message to SIM card, View message details and delete message
115 Locka Message
You can lock a message so t won't be deleted if you reach your storage limits.
- Touch and hold message in a messagewi ndow.
- Touch Lock message in the menu that opens. Unlock a
message by touching and holding it and then touch Unb d message.
116. Using the On screen Keyboard
Some applications display the keyboard by default. In other is, you touch a text field where you want to enter text, to open the keyboard.

■ Use the icon to erase characters.
■ After typing press icon to close the keyboard.
117 Enter Various Characters
■ Press the symbols key to switch to the numbers and symbols keyboard.
■ Press the ALT key on the symbols keyboard to view additional symbols; Press it again to switch back.
- Touch the text field or portion that contains text. A menu opens with options.

■ Touch "Cut", too cut the selected text.
■ Touch "Copy" to select the selected text
- Touch the text field where you want to paste the text. And paste the text that you copied from a not her application.
- Touch Paste in the menu that opens. The text is inserted at
the cursor position.
12 Multimedia
12.1 Camera
You camera's pictures and videos are stored in the SD card, so you must insert one to use the Camera. You can copy pictures and videos from the SD card to a PC and vice versa.

11.1 Take a Picture
Touch the Camera icon in the main menu.
User Guide
■ Adjust the exposure, and other settings if you wish.
Frame your subject on screen. You can zoom in or zoom out.
■ Touch the shutter icon on the screen.
1.1.2 Shoot Videos
Drag the control to the video position
■ Adjust the quality, effect, and others settings if you wish.
■ Paint the len s to t he scen e you want to capture
■ Touch the star tv i de o i con.
■ Touch the stop video icon to stops shooting.
11.3 Gallery
You can use the Gallery to view pictures and play videos and share files.
-
Touch the Gallery icon in the Launch e.
-
Open Gallery from the camera by pressing Gallery.

and tou chi ng
User Guide

-
Touch an album to open it and view its contents.
-
Peek into an album stack by touching it with two fingers and spreading them apart
-
Touch a picture or a video in an album to view it.
11.4 Share an Album
-
Open the main Galaxy window.
-
Press Menu twice.
-
Check or un check kth eal bums you want to share.
-
Touch Share at the bottom of the screen. In the menu that opens, touch the application to use to share the selected albums.
You can share viae mail,B let ooth,Gmail and messaging.
122 Music
You can easily transfer your favorite music from your PC to the SD card and experience a whole word of interesting and me obvious music.

User Guide
Touch to shuffle the current playlist
Drag the slider to godirectly to a section of a track Touch to open the current playlist

Touch to repeat the current playlist; touch again to repeat the current track.
Skip tracks, pause or r e sum e play back.
Enable SRS effect
1.15 Control Playback Volume
Pressthe phone's volume up/down keys on the rightside of the mobilephone. A panel opens to show the current media volume; the indicator moves as you adjust the volume.
123 FM Radio
You can listen to your favorite FM channels using the inbuilt FM receiver of your phone.
User Guide
Turn on the speaker
Touch to play or pause the IM Radio
Touch to search for the previous effective channel

AddTouch to view the channel list.
Touch to addto Favorite list
Touch to search for the next effective channel
125 Record Sounds
Sound Record is useful for recording quick thoughts. You can also record your voice and set t as a ringtone.
You need to have a micro SD card installed on your phon et ou se.
-
Tap to start recording a voice clip. "Recording" appears when it is recording a voice clip.
-
Tap 10 stop recording. It will appear "Save" and "Cancel", and you can tap 'Save', then "Save succeeded" which indicates finishing the recording. Tap Play icon can play the recording you have just recorded.
13 Manage Accounts
You can set up a corporate, Google account etc on your device. You can do this by tapping Settings>Acc ounts& sync>Add Account:
You may also be able to add other kinds of accounts, depending on your application.
13.1 Why Use a Google Account
Your Google Account lets you take full advantage of Google applications and services that you may want to use, such as Gmail Google Maps, Navigation, Android Market, YouTube Messaging, and many more.
13.2 Manage Your Calendar
The Calendar app lets you view and edit your schedules.
- Reador ed t event deta is. Touch an event to view its deta is.
■ Manage events and calendars. Touch icons across the top or Menu to search or create events, return to today, or adjust settings.
13.3 GoogleSearch
Goog le Search can help you find anything you need on the web.
Touch the g icon on the all apps screen to access google search
14 Connect to Networks and Devices
Your phone can connect to a variety of networks and devices, including Wi-Fi, GPRS, Bluetooth, devices, such as headsets. You can also transfer files to/from your PC through the data cable.
141 Connect to Internet
Refer to section 8.
142 Connect to Wi-Fi Networks
Refer to Section 8.1.
143 Pair With Bluetooth Devices
- Go to Settings > Wireless & networks > Bluetooth settings.
- If Bluetooth is off, check Bluetooth to turn it on. Your phone scans and display the Bluetooth devices in range.
- If the device you want to pair with is not in the list, make it disc overable.
- If your phone stops scanning before you make the other device discoverable, touch Scan for devices.
- Touch the ID of the other device in the list in Settings to pair them. If you are prompted to enter a password, try entering 00 00 or 123 4 (the most common password), if the pairing is successful, your phone connects to the device.
14.3.1 Connect to Internet via your Phone
You can browse the Internet on your PC using your mobile phone. To do this:
- Connect your mobile phone to your PC via the USB adaptor.
- Go to Menu> Settings> Wireless & Networks> Tethering & portable hotspot > and the ntouch USB Tethering.
In case of Linux, Windows 7 and Vista OS, the drivers get automatically installed.
However, in case of Windows XP, you need to manually install the drivers.
144 Install Secure Certificate from SDCa rd
If your VPN or Wi-Fi Network rely on secure certificates, you must obtain the certificates and store them in your phone's storage, before you can configure access to those VPN or Wi-Fi networks on your phone.
You may need to download the certificates from a website.
-
Copy the certificate from your computer to the root of the SD card
-
Touch >Settings>Security.
-
Touch Install from SD card under Credential Storage.
-
Touch the file name of the certificate to install Only the names of certificates that you have not already installed on your phone are displayed
- If prompted, enter the certificate's password and touch OK.
- Enter an a name for the certificate and touch OK.
15 Third Party Applications
15.1 Google Latitude, Maps and Places
Google Maps/Latitude/Placeslets you track your current location view real-time traffic situations, and receive detailed directions to your destination. It also provides a search to d where you can bcate places of interest or an address on a vector or aerial map, or view locations in street level.
You need an active mobile data or Wi-Fi connection to use Google Maps/Places/Latitude.
Note: Google application does not cover every country or city
152 Googletalk
Google talk is a chatting application which allows you to connect to your friends on Gmail. and let you conveniently communicate with them Please turn on WiFi or connect to GPRS.
153 Play store
You must add an account to the device to load Play store. In Google Play store, you can download all sorts of information or
materials.
15.4 M-Store
Menu > M- Store
You can access live.micromaxinfo.com and download wallpaper, music ringtones and so on for your phone:
You need Internet connection for this service. Please refer to section 8 on how to connect to the Internet
16 Phone Settings
You can go to Settings to configure how your phone bcks, sounds, communication, privacy, and operations in a variety of ways:
| SIM management | Set preferences on how you use SIMs inserted in your phone |
| Wireless & networks | Lets you configure and manage connections to networks and devices by Using Wi-Fi, Bluetooth, and mobile networks. |
| Callsettings | Lets you configure phone call settings, such as call forwarding, call waiting, and other special features offered by your carrier |
| Audio profiles | Lets you configure how and at what volume the phonerings, vibrates etc. |
User Guide
| Display | Lets you configure brightness and other screen settings. |
| Location | Lets you use your preferences for using and sharing your location when your search for information and use location-aware applications, such as Maps. |
| Security | Lets you set a whole range of security features of your phone. |
| Applications | Set preferences for the various application displayed on the phonemenus. |
| Accounts & sync | Lets you add, remove and manage your Google and others supported accounts |
| Privacy | Lets you manage your personal information. |
| Storage | Lets you see and manage available space on your phone and on your SD card |
| Language & keyboard | Lets you select the language for the text on your phone and for configuring the onscreen keyboard. |
| Voice input & output | Configure the voice input feature to enter text by speaking. |
User Guide
| Accessibility | Enable your installed accessibility applications and adjust related settings. |
| Date& Time | Let you choose preferences such as format and time zones |
| Schedule Power On/Off | Schedule automatic power ring on/off of the phone. |
| About phone | View information about your phone, such as system updates, status, and battery use. |
17 Health and Safety Information
Please read the following guidelines regarding the use of your phone. Not following them may be dangerous or illegal.
Certification Information (SAR)
- Your phone is designed not to exceed the limits of emission of radio waves recommended by international guidelines. These guidelines include safety margins designed to assure the protection of fall persons, regardless of age and health.
■ SAR (specific absorption rate) is the unit of measurement of body-absorbed RF quantity when the phone is in use. SAR value is ascertained according to the highest RF level generated during laboratory tests.
User Guide
- The true SAR level during phone usage will be far lower than this level.
- The SAR value of the phone may change depending on factors such as how close you are to a network base station, use of accessories and other enhancements.
The highest SAR value of the device is 1.003 W/kg (head) and 1017 W/kg (body) a veraged over 1 gm of human tissue. - The SAR value may differ depending on national reporting, testing requirements and the network band.
SAR R e omm end at i ons
- Please keep your calls short and use SMS wherever more convenient. This advice applies especially to children, adolescents and pregnant two men
■ Prefert to use your cell phone when the signal quality is good
■ People having active medical implants should preferably keep the cell phone at least 15cm away from the implant. - Mainta in a preferable distance of 15 mm from the device.
SafeDriving
- Do not use the phone while driving. When you have to use the phone, please use the personal hands-free kit.
■ Please do not put the phone onto any passenger seat or any place from which it may fall down in case of vehicular collision or emergency braking
User Guide
During Flight
■ Flight is influenced by interference caused by the phone. It is illegal to use a phone on the airplane. Please turn off your phone or switch to flight mode during a flight.
In Hospitals
- Your Phone's radio waves may interfere with the functioning medical devices. Consult a physician or the manufacturer of the medical device to determine whether they are adequately shielded from external Radio Frequency. Switch off your device when regulations instruct you to do so.
- Do not carry the wireless device in the breast pocket.
- Turn off the phone if there is any reason to suspect that interference is taking place.
Uns afe Areas
Please turn off your phone when you are close to a gas station or in the vicinity of any place where fuel and chemical preparations, or any other dangerous goods are stored.
18 Taking Care of Your Device
Your device is a product of superior design and craftsmanship and should be handled with care: The following suggestions will help you protect your phone:
- Keep the device dry. If your device gets wet, remove the battery
User Guide
without turning on the device, wipe it with a dry cloth and take it the service center.
- Do not store the device in high or cold temperature. High temperatures can shorten the life of electronic devices and damage batteries.
- Do not use or store the device in dusty, dirty areas. Its moving parts and electronic components can be damaged.
- Do not attempt to open the device other than as instructed in this guide. Repairing the phone by yourself other than our authorized service agents/centers goes against the warranty rules.
- Do not drop, knock or shake the device. Rough handling can break internal circuit boards and fine mechanics.
- Do not use harsh chemicals, deaning solvents, or strong detergents to clean the device. Only use a soft, clean, dry cloth to clean the surface of the device.
- Do not store your device near magnetic fields or allow your device to come in contact with magnetic fields for extended period of time.
Battery Recommendations :
- Please put the battery in a well-ventilated place out of direct sunlight. Charge the battery at room temperature range.
If the time span of the battery after charging becomes much shorter than usual, the battery life is at an end. Replace the battery with a new battery of these a make and specification.
User Guide
- Do not discard the battery with household trash. Please dispose of used battery according to your local environmental laws and guidelines.
- Use manufacturer approved batteries, chargers, accessories and supplies. Micromax will not be responsible for user's safety when using unapproved batteries or accessories.
Dischimers
Micromax will not bear any responsibility for any in compliance with the abovementioned guidelines or improper usage of the mobile phone.
- The content of this manual may vary from the actual content displayed in the mobile phone In such a case, the later shall govern.
Micromax keeps the right to make modifications to any of the content in this user guide without public announcement or priornotification.
Copyrights:
- All rights reserved Reproduction, transfer, distribution or storage of part or all of the contents in this document in any form without the prior written permission of Micromax is strictly prohibited
For Product Support:
■ Helpline number: 01144770044
■ Working Hours: Monday to Saturday 10:00 AM to 6:30 PM
User Guide
(Except National & Public holidays)
- Email Support: services uperfone@micromaxinfo.com.
■ For more information, please visit our website www.micromaxin.b.com.
- Welcome
- User Guide
- Table of Contents
- Welcome 2
- Phone Layout 6
- Getting Started 9
- Placing and Receiving Calls 12
- The Home Screen 19
- Working With Menus 21
- Aisha 23
- Connect to the Internet 23
- Managing Notifications 25
- Call Logs 26
- Messaging 27
- Multimedia 32
- Manage Accounts 38
- Connect to Networks and Devices 39
- Third Party Applications 41
- Phone Layout
- Keya and Parts
- Getting Started
- Insert SIM Card
- InsertMemory card
- Unlock the phone
- Set Your Screen Lock
- Placing and Receiving Calls
- Top hœ acall byDiuding
- End a call
- Options During a Call
- Conference Call
- Disable Phone Calls (Airplane mode)
- Using the Touch screen
- Using the Phone's Buttons
- Open and Close the Launcher
- Switch to Recently Used Application
- The Home Screen
- Customize Home Screen
- Add items to the Home screen
- Change Wallpaper
- Working With Menus
- Context Menus
- Options menus
- Aisha
- Connect to the Internet
- Access Internet via Wi-Fi
- Managing Notifications
- Open the Notifications Panel
- Respond to Notifications
- Clear all Notifications
- Close Notification sPanel
- Call Logs
- ing
- 1.1 Delete MessageThreads
- Exchange Messages
- Create and Send Multimedia Message
- Forward a message
- Locka Message
- Using the On screen Keyboard
- Enter Various Characters
- Multimedia
- Camera
- Take a Picture
- Shoot Videos
- Gallery
- Share an Album
- Music
- Control Playback Volume
- FM Radio
- Record Sounds
- Manage Accounts
- Why Use a Google Account
- Manage Your Calendar
- GoogleSearch
- Connect to Networks and Devices
- Connect to Internet
- Connect to Wi-Fi Networks
- Pair With Bluetooth Devices
- Connect to Internet via your Phone
- Install Secure Certificate from SDCa rd
- Third Party Applications
- Google Latitude, Maps and Places
- Googletalk
- Play store
- M-Store
- Phone Settings
- Health and Safety Information
- Certification Information (SAR)
- SAR R e omm end at i ons
- SafeDriving
- During Flight
- In Hospitals
- Uns afe Areas
- Taking Care of Your Device
- Battery Recommendations :
- Dischimers
- Copyrights:
- For Product Support:
Brand : Micromax
Model : SuperFone Punk A45
Category : Smartphone