EGH-E9502G(BK) - Frying Pan Elba - Free user manual and instructions
Find the device manual for free EGH-E9502G(BK) Elba in PDF.


| Product Type | Frying Pan |
| Brand | Elba |
| Model | EGH-E9502G(BK) |
| Color | Black (BK) |
| Material | Aluminum with non-stick coating |
| Handle Material | Bakelite or stainless steel (estimated) |
| Diameter | 28 cm (estimated) |
| Height | 5 cm (estimated) |
| Weight | 1.2 kg (estimated) |
| Compatible Hobs | All types including induction |
| Oven Safe | Up to 180°C (with handle) |
| Dishwasher Safe | No (hand wash recommended) |
| Non-stick Coating | PTFE-based (estimated) |
| Heat Source | Gas, electric, ceramic, induction |
| Care Instructions | Use wooden or silicone utensils; avoid metal |
| Cleaning | Hand wash with mild detergent |
| Safety Features | Cool-touch handle, stable base |
| Spare Parts Availability | Contact Elba customer service |
| Repairability | Handle replacement possible by professional |
| Warranty | Standard 1 year (estimated) |
| Usage | Indoor cooking, frying, sautéing |
Frequently Asked Questions - EGH-E9502G(BK) Elba
User questions about EGH-E9502G(BK) Elba
0 question about this device. Answer the ones you know or ask your own.
Ask a new question about this device
Download the instructions for your Frying Pan in PDF format for free! Find your manual EGH-E9502G(BK) - Elba and take your electronic device back in hand. On this page are published all the documents necessary for the use of your device. EGH-E9502G(BK) by Elba.
USER MANUAL EGH-E9502G(BK) Elba
natural_image
Exterior view of two gas stove flares with control knobs, one labeled 'ELBA' (no other text or symbols)ELBA
BUILT-IN HOB
MODEL: EGH-E9502G(BK)/EGH-E9503G(BK)
EGH-E9522G(GR)/EGH-E9523G(GR)
Owner's Manual
Please read this manual carefully before operating your set.
Retain it for future reference.
Record model number and serial number of the set.
See the label attached on the set and quote this information to your dealer when you require service.

For Your Safety
These instructions have been drawn up for your safety and that of others. You are therefore requested to read them carefully before installing and using the appliance. Keep this instruction manual for future reference as necessary. If the appliance is sold or moved, make sure that the manual is handed over to the new user.
INSTALLATION
Installation of the appliance and its connection to the gas supplies must only be carried out by qualified technician. It is important to check that the appliance is connected completely to the gas supplies before using.
- It is risky to modify or attempt to modify the characteristics of this product.
- After removing the appliance from the packaging, make sure that it is not damaged and in perfect condition. Otherwise, please contact your dealer before installing the appliance into operation.
- The manufacturer declines all responsibility in case of failure to comply with the accident prevention regulations.
- Make sure that air is able to circulate freely around the appliance. Installing the appliance into the built-in cabinet must provide sufficient moving air flow at the bottom of the appliance to avoid hazard.
- Make sure that the appliance is supplied with the type of gas indicated on the rating label.
- Use of a gas cooking appliance produces heat and moisture in the room in which it is installed. Ensure that the room is well ventilated by keeping the air intakes open or by installing an extractor hood with discharge pipe.
- If the appliance is used intensively for a long time the effectiveness of the ventilation will have to be increased, for example by opening a window or increasing the power of any electric extractor fan.
DURING USE
This product is designed to cook food for household and for non-professional purposes. It should not be used for any other purpose.
- After using the appliance, make sure that all controls are in "OFF" position.
- If you use an electrical socket close to this appliance, make sure that the cables of the appliances you are using are distance away from the cooking zones of this appliance.
CHILDREN'S SAFETY
- This appliance must only be used by adults. Make sure that children do not touch the controls or play with the appliance.
- The exposed parts of this appliance heat up during cooking and remain hot for some time even after it is switched off. Keep children well away until the appliance has cooled down.
CLEANING AND MAINTENANCE
- Keep the appliance thoroughly cleaned. Food residues may cause the risk of fire.
SERVICE AND PARTS
- In the instance of malfunctions, never attempt to repair the appliance yourself.
- Repairs by unauthorized technician may cause damage and accidents. Please refer to the contents of this manual. If you do not find the necessary information, contact the authorized service center.
- Servicing on this appliance must be carried out by an authorized technical service centre. Always request the use of original spare parts.
DESCRIPTION OF THE HOB
2
7
3
6
4
5
1
- Control Knobs
- Safety Valve (Thermocouple)
- Ignition
- Cast Iron Wok Stand
- SABAF Burner Base
- SABAF Burner Cap
- SABAF Burner Ring
INSTRUCTIONS FOR USE
The symbols on the control knobs corresponding to the following:
OFF No gas flow
Maximum gas flow
Minimum gas flow
To obtain a flame more easily, light the burner before placing a cooking utensil on the trivet.

To light a burner, push the knob of the burner fully down and turn it anticlockwise to the “maximum flow” setting symbol. After lighting the flame, keep the knob pressed for about 5 seconds. This is necessary to heat up the thermocouple and activate the safety valve, which would otherwise cut off the gas flow.

Always check that the flame is even and turn the control knob to adjust the flame as required.
In the instance of a power cut, replace a new battery at the bottom of the appliance. Otherwise, manually place a flame near the burner and proceed as already described.
If the flame does not light after a few attempts, check that the burner cap and burner base are correctly positioned.
To turn off the flame, turn the control knob clockwise to the "OFF" symbol.
Before removing pans from the burners, always lower or turn off the flame.
FOR CORRECT USE OF THE HOB
For lower gas consumption and better efficiency, use only flat-bottomed pans of dimensions suitable for the burners, as shown in the table at the bottom.
Also, as soon as a liquid comes to the boil take care to turn the flame down to a level that will just keep it boiling.
Burner Minimum pan diameter Maximum pan diameter
Large (Rapid) 180mm 220mm
Small (Auxiliary) 80mm 160mm

During cooking processes involving fats or oils, watch your foods carefully because these substances may catch fire if brought to high temperatures.
CLEANING AND MAINTENANCE
Before carrying out cleaning or maintenance, disconnect the appliance from the electrical mains and gas supplies then allow it to cool down.
GENERAL CLEANING
Wash cast iron with lukewarm water and detergent. Do not use abrasive cleaner which might damage them.
Wash the burner caps often with boiling water and detergent, taking care to remove all deposits after cooking.
The trivet can also be washed in a dishwasher.
For stubborn dirt, clean using non-abrasive detergents with lukewarm water. Do not use scouring pads, steel brush or acids for cleaning.
Clean the hob regularly with a soft cloth with lukewarm water and a little liquid detergent. Do not use the following products:
- bleaches;
- soaped scouring pads;
- steel brush scouring pads;
- stain removers for baths or sinks.
If the hob gets very dirty, use specific commercial cleansing products.
IGNITION PLUG
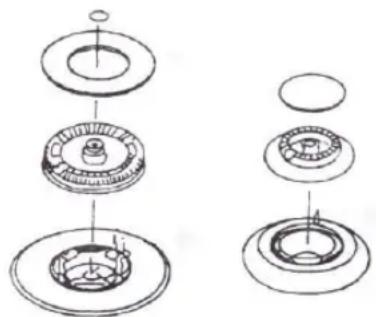
Automatic burner ignition is provided (when installed) by a ceramic plug and a metal electrode. Periodically clean these parts of the hob thoroughly. In addition, to avoid ignition difficulties, check that the cavities in the burner are not obstructed. To remove deposits from the burner cavities, remove the cap and separate the two parts (see diagram on the right). After cleaning, put the two parts back together and return them correctly to their position. After washing, replace the trivet, checking that they are correctly positioned.
natural_image
Exploded view diagram of a mechanical assembly showing internal components (no text or labels)INSTRUCTIONS FOR THE INSTALLATION TECHNICIAN

CAUTION: This appliance must only be installed and used in rooms with permanent ventilation to local standards.
Installation of the appliance and its connection to the gas supplies must only be carried out by qualified technician. Before any procedure, it is important to check that the appliance is DISCONNECTED from the gas supplies. The Manufacturer declines all responsibility for any damage arising from installation in breach of the regulations in force or from failure to comply with the accident prevention regulations.
INSTALLATION PREMISES
For proper operation of a gas appliance, the air necessary for the combustion of the gas must be able to flow into the room naturally. The air must flow into the room directly through openings in the outside walls. These openings must have an unobstructed cross-section not less than 2m^3/h for each kw of power (see total power in kw on the appliance rating label).
This opening must be constructed so that it will not be obstructed from inside or outside, or constructed close to the floor. The opening is recommended to be on the side opposite to that on which the flue gases are discharged. If it is not feasible to provide these openings in the room where the appliance is installed, the necessary air may be taken from an adjacent room, provided that:
- this room is not a bedroom or a hazardous environment;
- this room has ventilation;
- the ventilation between the room where the appliance is installed and the adjacent room has openings.

natural_image
Line drawing of a kitchen interior with a stove, oven, and tiled floor (no text or symbols)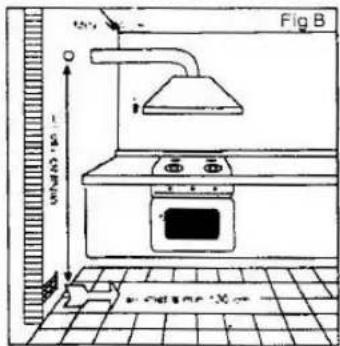
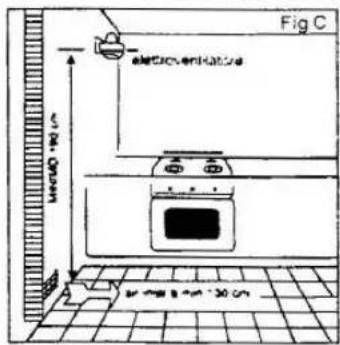
Discharge of flue gases
Gas cooking appliances must discharge their flue gases through hoods connected directly to flues or the outdoors. If it is not possible to install the hood (fig. B) an electric fan must be installed on the outside wall or the window of the room, provided it is possible for the ventilation opening to be increased in proportion to the delivery rate of the fan (fig. C).
For a kitchen, the delivery rate of this electric fan must guarantee an hourly air exchange of 3-5 times its volume. In both instances, the use of flues already used by other appliances to discharge the flue gases is forbidden.

When the installation is complete, always check that all the joints are absolutely tight using a soapy solution. Never use a flame to make this check.
MAIN SPECIFICATION
Gas Source : LPG
Rated Gas Pressure: 2,800 (Pa)
Burner Rating : 5.0kW (Left), 5.0kW (Right), 1.75kW (Middle)
Product Dimension (mm): 860 (W) x 500 (D) x 165 (H)
Built-in Dimension (mm): 750 (W) x 470 (D)
ELBA


- ELBA
- BUILT-IN HOB
- For Your Safety
- INSTALLATION
- DURING USE
- CHILDREN'S SAFETY
- CLEANING AND MAINTENANCE
- SERVICE AND PARTS
- DESCRIPTION OF THE HOB
- INSTRUCTIONS FOR USE
- FOR CORRECT USE OF THE HOB
- GENERAL CLEANING
- IGNITION PLUG
- INSTRUCTIONS FOR THE INSTALLATION TECHNICIAN
- INSTALLATION PREMISES
- Discharge of flue gases
- MAIN SPECIFICATION
Brand : Elba
Model : EGH-E9502G(BK)
Category : Frying Pan