
VT-FX602S - Video camera HITACHI - Free user manual and instructions
Find the device manual for free VT-FX602S HITACHI in PDF.


| Product Type | Video Camera (VHS-C) |
| Brand | Hitachi |
| Model | VT-FX602S |
| Dimensions (W x H x D) | approx. 130 x 90 x 180 mm |
| Weight | approx. 700 g (without battery) |
| Power Supply | 6V DC via rechargeable battery pack (NiCd) |
| Recording Medium | VHS-C cassette |
| Image Sensor | 1/4-inch CCD (approx. 0.5MP effective) |
| Optical Zoom | 12x |
| Digital Zoom | Up to 100x |
| Auto Focus | Yes (TTL contrast detection) |
| Viewfinder | 0.55-inch color LCD (approx. 113k pixels) |
| LCD Screen | None (only viewfinder) |
| Microphone | Built-in stereo |
| Date/Time Imprint | Yes |
| Remote Control | Optional (wired or infrared) |
| Care & Cleaning | Clean lens with soft cloth; store in dry place; avoid direct sunlight |
| Safety | Do not disassemble; use only manufacturer-specified batteries; avoid water exposure |
| Spare Parts & Repairability | Battery pack, charger, AC adapter, AV cables; consult authorized service centers |
| General Information | Analog VHS-C camcorder; compatible with VHS VCR via adapter; records in SP/LP modes |
Frequently Asked Questions - VT-FX602S HITACHI
User questions about VT-FX602S HITACHI
0 question about this device. Answer the ones you know or ask your own.
Ask a new question about this device
Download the instructions for your Video camera in PDF format for free! Find your manual VT-FX602S - HITACHI and take your electronic device back in hand. On this page are published all the documents necessary for the use of your device. VT-FX602S by HITACHI.
USER MANUAL VT-FX602S HITACHI
VT-FX602S Owner's Manual
Your Complete Guide to Videocassette Viewing and Recording
Using these quality features:
Hi-Fi System
☐ Rotary 4-head Record/Playback System
Bilingual on-screen menu display selectable in English or Spanish
Infrared remote control
Real time tape counter
☐ 181 channel capability PLL frequency synthesizer tuner with direct station call
☐ Auto power on and off system
□ Auto counter reset
☐ Auto rewind when the end of a tape is reached
Direct Button Operation
2 Step Picture Search Operation
Still
Digital Auto Tracking (DTR)
□ Auto Repeat
□ Rental Play Mode
☐ Three different tape speeds (SP/LP/SLP)
☐ IRT (Instant Recording Timer)
☐ 1 Year, 7 events (including Daily and Weekly Timer Recording)
□ Auto Return
Time Search / Blank Search / Index Search / Edit Search
Just-In-Time Recording
☐ Remaining Tape Running Time Display
Slow Motion
Jog and Shuttle
□ Auto Clock Setting
IMPORTANT SAFEGUARDS - 2 -
TABLE OF CONTENTS
IMPORTANT SAFEGUARDS .... 3
PRECAUTIONS 6
LOCATION 6
POWER SUPPLY 6
AVOID THE HAZARDS OF ELECTRICAL SHOCK AND FIRE....7
WARNING 7
FEATURES 8
VIDEO CASSETTE TAPE....9
OPERATING CONTROLS AND FUNCTIONS.... 11
PREPARATION FOR USE....13
CABLE CONNECTIONS 13
SETTING A VIDEO CHANNEL 14
CONNECTING TO INPUT JACKS 15
A/V TERMINALS 15
INSTALLING THE BATTERIES.... 16
MTS (Multi-Channel Television Sound) SYSTEM 16
CHECKING THE SELECTED MTS MODE 17
MTS RECORDING/MONITOR MODE 18
SELECTING THE MTS SYSTEM.... 18
PRESET FOR USE 21
AUTOMATIC CHANNEL PRESET (Without a Cable Box) 21
TO DELETE PRESET CHANNEL 24
CHANNEL PRESET AGAIN 26
DAYLIGHT-SAVING TIME 28
SETTING THE CLOCK (AUTO/MANUAL) 29
SELECTING THE LANGUAGE 36
ON SCREEN DISPLAY 37
PLAYBACK 38
NORMAL PLAYBACK 38
IRT (Instant Recording Timer) 50
TIMER RECORDING 51
IMPORTANT SAFEGUARDS - 3 -
| AUTOMATIC TIMER RECORDING | 51 |
| HINTS FOR TIMER RECORDING | 57 |
| AUTO RETURN | 57 |
| JUST-IN TIME RECORDING | 58 |
| SETTING THE REMAINING TIME | 59 |
| COPYING A VIDEO TAPE | 61 |
| CONTROLLING YOUR TV WITH THE VCR'S REMOTE | 62 |
| REMOTE CONTROL OF THE TV | 63 |
| REMOTE CONTROL OF THE CABLE CONVERTER | 64 |
| TROUBLESHOOTING GUIDE pg. 36 | 65 |
| MAINTENANCE | 66 |
| TECHNICAL SPECIFICATIONS | 67 |
| CABLE CHANNEL DESIGNATIONS | 67 |
| pg. 39 | 67 |
WARNING:
TO REDUCE THE RISK OF FIRE OR ELECTRIC SHOCK, DO NOT EXPOSE THIS APPLIANCE TO RAIN OR MOISTURE.

CAUTION:
TO REDUCE THE RISK OF ELECTRIC SHOCK, DO NOT REMOVE COVER (OR BACK) NO USER SERVICEABLE PARTS INSIDE. REFER SERVICING TO QUALIFIED SERVICE PERSONNEL.
The caution marking is located on the rear of the cabinet.

CONSTITUTING A RISK OF ELECTRIC SHOCK IS PRESENT WITHIN THIS UNIT.

THIS SYMBOL INDICATES THAT THERE ARE IMPORTANT OPERATING AND MAINTENANCE INSTRUCTIONS IN THE LITERATURE ACCOMPANYING THE APPLIANCE.
IMPORTANT SAFEGUARDS
-
Read instructions-All the safety and operating instructions should be read before the appliance is operated.
-
Retain Instructions-The safety and operating instructions should be retained for future reference.
- Heed Warnings-All warnings on the appliance and in the operating instructions should be adhered to.
- Follow Instructions-All operating and use instructions should be followed.
- Cleaning-Unplug this video product from the wall outlet before cleaning. Do not use liquid cleaners or aerosol cleaners. Use a damp cloth for cleaning.
EXCEPTION: A product that is meant for uninterrupted service and, that for some specific reason, such as the possibility of the loss of an authorization code for a CATV converter, is not intended to be unplugged by the user for cleaning or any other purpose, may exclude the reference to unplugging the appliance in the cleaning description otherwise required in item 5.
- Attachments-Do not use attachments not recommended by the video product manufacturer as they may cause hazards.
- Water and Moisture-Do not use this video product near water, for example, near a bath tub, wash bowl, kitchen sink, or laundry tub, in a wet basement, or near a swimming pool, and the like.
- Accessories-Do not place this video product on an unstable cart, stand, tripod, bracket, or table. The video product may fall, causing serious injury to a child or adult, and serious damage to the appliance. Use only with a cart, stand, tripod, bracket, or table recommended by the manufacturer, or sold with the video product. Any mounting of the appliance should follow the manufacturer's instructions and should use a mounting accessory recommended by the manufacturer. An appliance and cart combination should be moved with care. Quick stops, excessive force, and uneven surfaces may cause the appliance and cart combination to overturn.

-
Ventilation-Slots and openings in the cabinet are provided for ventilation and to ensure reliable operation of the video product and to protect it from overheating, and these opening must not be blocked or covered. The openings should never be blocked by placing the video product on a bed, sofa, rug, or other similar surface. This video product should not be placed in a built-in installation such as a bookcase or rack unless proper ventilation is provided or the manufacturer's instructions have been adhered to.
-
Power Sources-This video product should be operated only from the type of power source indicated on the marking Label. If you are not sure of the type of power supply to your home, consult your appliance dealer or local power company. For products intended to operate from battery power, or other sources, refer to the operating
instructions.
-
Grounding or Polarization-This video product is equipped with a polarized alternating-current line plug (a plug having one blade wider than the other). This plug will fit into the power outlet only one way. This is a safety feature. If you are unable to insert the plug fully into the outlet, try reversing the plug. If the plug should still fail to fit, contact your electrician to replace your obsolete outlet. Do not defeat the safety purpose of the polarized plug.
-
Power Cord Protection-Power supply cords should be routed so that they are not likely to be walked on or pinched by items placed upon or against them, paying particular attention to cords at plugs, convenience receptacles, and the point where they exit from the appliance.
-
Outdoor Antenna Grounding-If an outside antenna or cable system is connected to the video product, be sure the antenna or cable system is grounded so as to provide some protection against voltage surges and built-up static charges. Article 810 of the National Electrical Code, ANSI/NFPA No. 70, provides information with regard to proper grounding of the mast and supporting structure, grounding of the lead-in wire to an antenna discharge unit, size of grounding conductors, location of antenna-discharge unit, connection to grounding electrodes, and requirements for the grounding electrode. (Fig. A)
2. Antenna ground diagram.
-
Lightning-For added protection for this video product during a lightning storm, or when it is left unattended and unused for long periods of time, unplug it from the wall outlet and disconnect the antenna or cable system. This will prevent damage to the video product due to lightning and power-line surges.
-
Power Lines-An outside antenna system should not be located in the vicinity of overhead power lines or other electric light or power circuits, or where it can fall into such power lines or circuits. When installing an outside antenna system, extreme care should be taken to keep from touching such power lines or circuits as contact with them might be fatal.
-
Overloading-Do not overload wall outlets and extension cords as this can result in a risk of fire or electric shock. Never spill liquid of any kind on the video product.
-
Object and Liquid Entry-Never push objects of any kind into this video product through any openings as they may touch dangerous voltage points or short-out parts that could result in a fire or electric shock. Never spill liquid of any kind on the video product.
-
Servicing-Do not attempt to service this video product yourself as opening or removing covers may expose you to dangerous voltage or other hazards. Refer all servicing to qualified service personnel.
-
Damage Requiring Service-Unplug this video product from the wall outlet and refer servicing to qualified service personnel under the
following conditions:
a. When the power-supply cord or plug is damaged.
b. If liquid has been spilled, or objects have fallen into the video product.
c. If the video product has been exposed to rain or water.
d. If the video product does not operate normally by following the operating instructions. Adjust only those controls that are covered by the operating instructions as an improper adjustment of other controls may result in damage and will often require extensive work by a qualified technician to restore the video product to its normal operation.
e. If the video product has been dropped or damaged in any way.
f. When the video product exhibits a distinct change in performance—this indicates a need for service.
-
Replacement Parts-When replacement parts are required, be sure the service technician has used replacement parts specified by the manufacturer or have the same characteristics as the original part. Unauthorized substitutions may result in fire, electric shock or other hazards.
-
Safety Check-Upon completion of any service or repairs to this video product, ask the service technician to perform safety checks to determine that the video product is in proper operating condition.
-
Heat-This video product should be situated away from heat sources such as radiators, heat registers, stoves, or other products (including amplifiers) that produce heat.
PRECAUTIONS
LOCATION
For safe operation and satisfactory performance of your VCR, keep the following in mind when selecting a place for its installation:
- Shield it from direct sunlight and keep it away from sources of intense heat.
- Avoid dusty or humid places.
- Avoid places with insufficient ventilation for proper heat dissipation. Do not block the ventilation holes at the top and bottom of the VCR. Do not place the unit on a carpet because this will block the ventilation holes.
- Install unit in a horizontal position.
- Avoid locations subject to strong vibration.
- Do not place the VCR near strong magnetic fields.
- Do not move the unit from a cold to a hot place or vice versa.
- Do not place the VCR directly on top of the TV.
POWER SUPPLY
• AC 120V, 60Hz ONLY
AVOID THE HAZARDS OF ELECTRICAL SHOCK AND FIRE
- Do not handle the power cord with wet hands.
- Do not pull on the power cord when disconnecting it from AC wall outlet. Grasp it by the plug.
- If, by accident, water is spilled on your VCR, unplug the power cord immediately and take the unit to an Authorized Service Center for servicing.
- Do not put your fingers or objects into the VCR cassette holder.
- Do not place anything directly on top of the VCR.
WARNING
Moisture condensation may occur inside the unit when it is moved from a cold place to a warm place, or after heating a cold room or under conditions of high humidity. Do not use the VCR at least for 2 hours until its inside is dry.
FCC WARNING- This equipment may generate or use radio frequency energy. Changes or modifications to this equipment may cause harmful interference unless the modifications are expressly approved in the instruction manual. The user could lose the authority to operate this equipment if an unauthorized change or modification is made.
IMPORTANT COPYRIGHT INFORMATION
Unauthorized recording or use of broadcast television programming, video tape, film or other copyrighted material may violate applicable copyright laws. We assume no responsibility for the unauthorized duplication, use or other acts which infringe upon the rights of copyright owners.
WARNING: To prevent fire or electric shock, match wide blade of plug to wide slot, and fully insert plug.
The serial number of this product may be found on the back of the VCR. No others have the same serial number as yours. You should record the number and other vital information here and retain this book as a permanent record of your purchase to aid identification in case of theft.
| Date of Purchase | |
| Dealer Purchase from | |
| Dealer Address | |
| Dealer Phone No. |
FEATURES - 8 -
| Model No. | |
| Serial No. |
FEATURES
- Hi-Fi System- The Hi-Fi stereo recording system offers you super sound quality with a dynamic range of 80dB and frequency response from 20Hz to 20kHz and 0.005% wow and flutter.
- Rotary 4-head Record/Playback System- Rotary 4-heads to ensure excellent picture quality and special effects playback.
- Bilingual on-screen menu display selectable in English or Spanish
• Infrared remote control
- Real time tape counter- This shows the elapsed recording or playback time in hours, minutes, and seconds (not in the case of blank portion). The "-" indication will appear when the tape is rewound further than the tape counter position "0:00:00".
- 181 channel capability PLL frequency synthesizer tuner with direct station call- (A converter may be necessary to view scrambled cable channels.)
- Auto power on and off system- Automatically turns the VCR on as you insert the cassette, turns off after auto-rewind, and ejects when the beginning of the tape is reached.
• Auto counter reset- (when inserting a tape)
- Auto rewind when the end of a tape is reached- (not in the case of timer recording).
- Direct Button Operation- When a tape is in the VCR and the power is off, just press PLAY, REW or F.FWD button on the main unit and it will automatically turn on the VCR and playback, rewinding or fast-forwarding will start immediately (not in the case of timer recording).
- 2 Step Picture Search Operation- You can view a video program at a high speed or super high speed in either a forward or reverse direction in LP and SLP mode.
- Still- "Freeze" the picture at any time, for close viewing of a particular scene.
- Digital Auto Tracking (DTR)- Adjusts the tracking automatically for each tape you play.
- Auto Repeat- Allows you to repeat a tape indefinitely without pressing the PLAY button.
- Rental Play Mode- Improves playback picture quality of worn tapes, especially rental tapes.
• Three different tape speeds: SP/LP/SLP
- IRT (Instant Recording Timer)- Instant timed recording from 30 to 480 minutes possible at the push of REC/IRT button.
• 1 Year, 7 events (including Daily and Weekly Timer Recording)- The built-in timer allows you to record up to 7 programs at different times on different channels up to 1 year in advance. The daily timer allows
recordings to be made of daily broadcasts, and the weekly timer allows recording to be made once a week up to the end of the tape.
- Auto Return- After finished timer recording, the beginning of the recorded program(s) can be searched.
- Time Search- Lets you set the VCR to advance the tape by entering the desired playback time you want to skip.
- Blank Search- Lets you set the VCR to search for an unrecorded portion on the tape.
- Index Search- Lets you Index the start of a recording.
- Edit Search- Lets you set the VCR to edit an unwanted segment of a recording.
- Just-In-Time Recording- Measures the remaining tape and automatically adjusts the tape speed so that the automatic timer recording fits on a cassette.
- Remaining Tape Running Time Display- You can check the remaining running time of your tape.
- Slow Motion- You can view the video program at a slower than normal playback speed. Slow speed can be controlled by pressing F.FWD button (faster) or REW button (slower).
- Jog and Shuttle- You can adjust the playback speed using the Shuttle Ring (the outer ring) or advance the frame one by one using the Jog Dial (the inner ring).
- Auto Clock Setting- Allows you to use the clock function from the PBS broadcast.
VIDEO CASSETTE TAPE
This VCR will operate with any cassette that has the VHS mark. For best results, we recommend the use of high-quality tapes. Do not use poor quality or damaged tapes.
PRECAUTIONS
- Avoid moisture. Moisture condensation may occur on the tape if it is moved from a cold place to a warm place. Before using a tape with these conditions, to avoid a damage of the tape and your VCR, wait until the tape has warmed to room temperature and the moisture has evaporated.
- Avoid extreme heat, high humidity and magnetic fields.
- Do not tamper with the cassette mechanism.
- Do not touch the tape with your fingers.
THREE DIFFERENT TAPE SPEEDS
Before recording, select the tape speed from: SP mode (Standard Play), LP mode (Long Play) or SLP mode (Super Long Play).
The table below shows the maximum recording/playback time using T60, T120, or T160 tapes in each mode.
Tape Speed
Recording/Playback Time
Type of tape T60
T120
T160
SP mode 1 hour 2 hours 2-2/3 hours
LP mode 2 hours 4 hours 5-1/3 hours
SLP mode 3 hours 6 hours 8 hours
INSERTING A CASSETTE
Insert the cassette in the direction as shown. Push in gently, but continuously, on the center-back of the cassette until it is drawn into the VCR.
The VCR will automatically turn on.

REMOVING A CASSETTE
1) In the Stop mode, press STOP/EJECT button on the VCR. The cassette will eject.
2) Pull the cassette out of the cassette compartment.
3) Store the cassette in its case as shown.

natural_image
Diagram showing a mechanical component being cut into a housing, with no visible text or symbols.ERASE PREVENTION
You can prevent accidental erasing of recording by breaking off the tab on the back edge of the cassette.
If you decide to record on the tape again, cover the hole with plastic
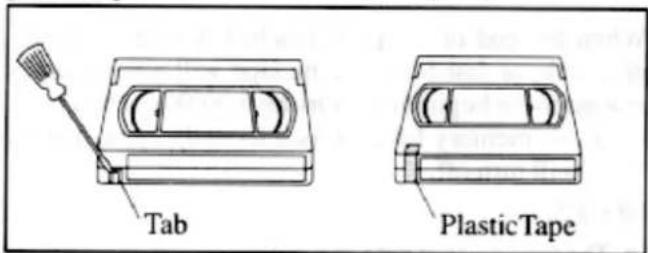
tape.
OPERATING CONTROLS AND FUNCTIONS
-FRONT VIEW-

-REMOTE CONTROL VIEW-
Remote Control Illustration
1. Cassette Compartment
-
REW button- Press to rewind the tape, or to view the picture rapidly in reverse during the playback mode. (Rewind Search)
-
PLAY button- Press to begin playback.
-
F.FWD button- Press to rapidly advance the tape, or view the picture rapidly in forward during playback. (Forward Search)
-
PAUSE button- Press to temporarily stop the tape during recording or to view a still picture during playback.
Frame Advance Function- Press to advance the picture by one frame during the still mode.
- STOP button- Press to stop the tape motion.
EJECT button- Press to remove a tape from the VCR. (only on the VCR)
- REC button(s)- Press to begin manual recording. When you operate by remote control, press both 2 buttons (1 is a safety button) together.
IRT button- Press to activate Instant Recording Timer. (only on the VCR)
- CHANNEL buttons- Press to select desired channels for viewing or recording.
SET function- Press to enter digits when setting program (for example: setting clock or timer program). Press to select setting modes from on screen menu.
Tracking function- Press to minimize video 'noise' (lines or dots on screen) during playback (only the VCR) or slow mode.
Press to stabilize the picture in the Still mode when the picture begins to vibrate vertically.
-
Digital display- Displays the clock, timer recording, counter and channel etc.
-
Remote sensor window- Receives the infrared signals from the remote control.
-
POWER button- Press to turn VCR on and off. Press to activate a timer recording.
-REAR VIEW-
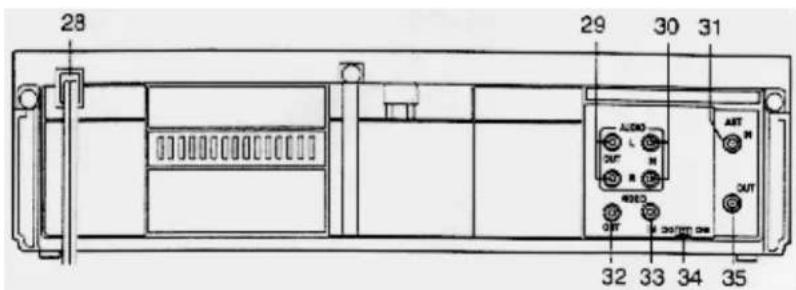
12. Search buttons
- BLANK SEARCH button- Press to use Blank Search mode.
- TIME SEARCH button- Press to use Time Search mode.
-
INDEX SEARCH- Press to use Index Search mode.
-
NUMBER buttons- Press to select desired channels for viewing or recording. To select channels from 1 to 9, first press "0" button then 1 to 9.
100/ENT button- When selecting cable channels which are more than 100, press this button first, then press the last two digits. (To select channel 125, first press "100/ENT" button then press "2" and "5").
-
MENU button- Press to display the main menu on the TV screen.
-
SELECT button- When setting program (for example: setting clock or timer program), press to determine your selection and proceed to a next step you want to input. Press to determine setting modes from on screen menu.
Status function- Press to display the remain, counter, or the current channel number and current time on the TV screen.
-
SLOW button- Press to reduce the playback speed. Slow speed can be controlled by pressing F.FWD button (faster) or REW button (slower).
-
JOG/SHUTTLE button- Press to use the Jog Dial or the Shuttle Ring. (See page 21.)
-
Jog/Shuttle indicator- Lights on when JOG/SHUTTLE button is pressed. (See page 21.)
-
Jog Dial- Turn to advance one frame in the forward or backward direction at the speed with which the dial is turned. (See page 21.)
-
Shuttle Ring- Turn to make rewind or fast forward speed faster in the forward or backward direction in the Play mode or Still mode. The further the Shuttle Ring is rotated, the faster the playback speed. (See page 21.)
21. Mode Select buttons
• CATV button- For details, see page 34.
• TV button- For details, see page 34.
• VCR button- For details, see page 34.
-
MUTE button- Press to mute the TV's sound. Press it again to resume the sound.
-
VOLUME button- Press to adjust the desired TV's volume level by using either or button.
-
VCR/TV button- Press to select VCR or TV mode.
VCR position: to view playback, to monitor video recordings or watch TV using the VCR tuner.
PREPARATION FOR USE - 13 -
TV position: to watch TV or to view on program while recording another.
- COUNTER MEMORY button- Press to set counter memory on and off.
- ADD/DELETE button- Press to add or delete channel numbers during channel preset. Press to cancel a setting of timer program. Press to correct digits when setting program (for example: setting clock or timer program).
COUNTER RESET button- Press to reset counter to 0:00:00.
- TAPE SPEED button- Press to set desired recording speed : SP/LP/SLP.
- Power cord- Connect to a standard AC outlet (120V/60Hz).
- AUDIO OUT jacks- Connect to the audio input jacks of your audio equipment or another VCR.
- AUDIO IN jacks- Connect to an audio output jacks of your audio equipment or another VCR.
- ANT. IN terminal- Connect to an antenna or CATV.
- VIDEO OUT jack- Connect to a video input jack of your video camera or another VCR.
- VIDEO IN jack- Connect to a video output jack of your video camera or another VCR.
- CH3/CH4 selector switch- Use to select a video output channel (3 or 4) for playback from the VCR.
- ANT. OUT terminal- Connect to an antenna input terminal of your TV.
PREPARATION FOR USE
CABLE CONNECTIONS
For some of the most common types of connections, see the following drawings. Use only one connection. For any further complex connections, please contact your local dealer or other qualified persons. (You may need additional accessories which are not supplied).
1 Disconnect the antenna or cable from your TV.
2 Connect the antenna or cable to the ANT.IN jack of your VCR.
PREPARATION FOR USE - 14 -

flowchart
graph TD
    A["VHF/UHF combination antenna"] --> B["OR"]
    C["UHF antenna"] --> D["OR"]
    E["Cable box or Cable company"] --> F["OR"]
    G["UHF/VHF combiner (not supplied)"] --> H["OR"]
    I["Indoor antenna"] --> J["OR"]
    K["Back of the VCR"] --> L["ANT IN OUT"]
    style A fill:#f9f,stroke:#333
    style C fill:#f9f,stroke:#333
    style E fill:#f9f,stroke:#333
    style G fill:#f9f,stroke:#333
    style I fill:#f9f,stroke:#333
    style K fill:#f9f,stroke:#333
    style L fill:#ccf,stroke:#333
3 Connect one end of the coaxial cable (supplied) to the ANT.OUT jack of your VCR.
4 Connect the other end of the coaxial cable (supplied) to the UHF/VHF antenna jacks.
![[Back of the VCR] ANT IN OUT CHD [1] CHM OR OR Coaxial cable (supplied) [Back of the UHF/VHF combination TV] UHF/VHF Coaxial cable (supplied) UHF/VHF separator (not supplied) VHF UHF [Back of the UHF/VHF separated TV]](/content/2026/05/1085390/images/198fc1c9bd48ca0eaaf0db761511b5e5a46c21d033ac562eb9d6bbea68e90f63.jpg)
SETTING A VIDEO CHANNEL
If your TV does not have A/V terminals;
When the VCR is in the Playback mode or when the VCR is in the VCR position, your TV will receive the signals from the VCR on either channel 3 or 4.
To use the VCR with your TV, set the selector switch to CH3 or CH4, whichever is not used or least used for normal broadcasts in your area.
Then set your TV to that same channel.

CONNECTING TO INPUT JACKS
When you copy a video tape, or watch a program recorded on an another source, use audio/video input jacks.
![[Another source] to an audio output jack Audio/Video adapter cord (not supplied) [Back of the VCR] AUDIO L OUT IN R VIDEO OUT IN To an video output jack](/content/2026/05/1085390/images/8233b838f3f4c9c9f11a4dc55968699d5871522477d6d4a347c78c897187320e.jpg)
- When you connect the monaural VCR etc to this VCR, connect the Audio output jack of the monaural VCR etc to the AUDIO IN L jack of this VCR. The audio signal will be recorded in both L and R channel equally.
INPUT SELECT
To use the external input jacks, select the AUX position. Press the CHANNEL or ▼ button or enter "00" with number button on the remote control so that "AUX" appears on the screen.
Note: "AUX" is found before the lowest memorized channel. (Example: CH2)
A/V TERMINALS
If your TV has A/V input jacks, you may connect your VCR's AUDIO/VIDEO OUTPUT jacks to the audio/video input jacks on back of your TV. Direct audio/video connections usually result in a better picture and sound quality for tape playback. Please see your TV's owner's manual for A/V input connections.
![[Back of the VCR] Audio/Video adapter cord (not supplied) AUDIO L OUT IN R VIDEO OUT IN IN AUDIO R VIDEO [A/V television]](/content/2026/05/1085390/images/02b1b5df5116a5429bce00fd75db6574371b232f4191c72b222198a368cfdd71.jpg)
INSTALLING THE BATTERIES
1) Press the tab to the direction of the arrow and open the cover.
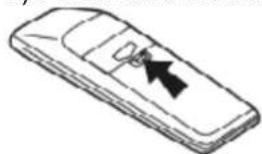
natural_image
Line drawing of a mobile phone with a black arrow pointing to the screen (no text or symbols)2) Insert 2 "AAA" batteries into the battery compartment in the direction as indicated by the polarity (+/-) markings.
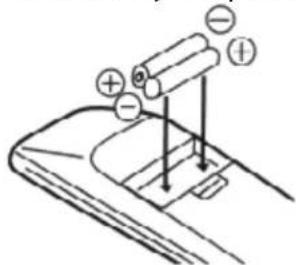
3) Replace the cover.

Note to CATV system installer:
This reminder is provided to call the CATV system installer's attention to Article 820-40 of the NEC that provides guidelines for proper grounding and, in particular, specifies that the cable ground shall be connected to the grounding system of the building as close to the poing of cable entry as practical.
MTS (Multi-Channel Television Sound) SYSTEM
You can record or listen to a program in MTS broadcast, by using a stereo amplifier and speakers.
Connect your VCR to your stereo source using the following diagram.
![[Back of the VCR] Audio/video adapter cord (not supplied) Audio OUT VCC OUT CHSCOM AN N OUT Coaxial cable (supplied) Monitor TV Antenna input jack LEFT R10x1 OUT AUDIO Stereo source](/content/2026/05/1085390/images/4da12dba5a6a70992ff3ba42b6d158e85eef3022f437770f5ecbec686413dcd3.jpg)
CHECKING THE SELECTED MTS MODE
When you receive a signal from a tape or VCR tuner channel you are watching, the status shown below will appear when you press the SELECT button on the remote control.
![STOP 12:00AM CH 32 STEREO SAP SP 0:00:00 HIFI 1] 2] 3] 4]](/content/2026/05/1085390/images/9786aecc12ce79b98d5905508debf3177ffd523cddde97a338372b3f5f6371b1.jpg)
| SAP | A Second Audio Program which means your program is received in a second language. |
| HIFI High | Fidelity which produces a clear sound from two sources. |
1] When a program broadcast in stereo can be received, STEREO appears on the TV screen.
2] When a program broadcast in second audio can be received, SAP appears on the TV screen.
3] When a program broadcast both in stereo and second audio can be received. STEREO and SAP appear on the TV screen.
NOTE: Although a program may be broadcast in both stereo and second audio, you cannot record in both stereo and second audio at the same time.
4] While VCR is set in HIFI stereo mode. HIFI appears on the TV screen. While VCR is set in monaural (MONO) mode, HIFI disappears from the TV screen.
NOTE: If you play non-HIFI tapes while the VCR is set in HIFI, HIFI will disappear from the TV screen and the VCR play automatically in monaural.
| Type of broadcast | Display on the TV screen | STEREO/SAP SELECTION | Hi-Fi audio track (2-channel) | Normal audio track | |
| L-channel | R-channel | ||||
| Regular (monaural audio) | -None- | -Invalid- | Mono | Mono | Mono |
| Stereo broadcast | STEREO | -Invalid- | L | R | L+R |
| Bilingual broadcast | SAP | TV STEREO* | Main audio program | Main audio program | Main audio program |
| SAP* | Sub audio program | Sub audio program | Sub audio program | ||
| Stereo & Bilingual broadcast | STEREO SAP | TV STEREO* | L | R | L+R |
| SAP* | Sub audio program | Sub audio program | Sub audio program | ||
MTS RECORDING/MONITOR MODE
* You must select the recording mode in TV STEREO or SAP when you record a broadcast. Refer to "TO SELECT STEREO OR SAP MODE" on the next page.
SELECTING THE MTS SYSTEM
NOTE: You must use the remote control for this procedure.
Make sure...
• VCR power must be turned on.
- Turn on the TV and set the TV channel to the same video output channel as located on the back of the VCR. (CH 3 or 4)
- Press VCR/TV button on the remote control so that "VCR" appears on the display.
TO SELECT HIFI MODE
1 Select the main menu
Press MENU button. The main menu appears on the TV screen.
MENU
TIMER PROGRAMMING
VCR SET UP
INITIALIZE
MTS (Multi-Channel Television Sound) SYSTEM - 19 -
2 Select "VCR SET UP"
Press CH/SET 📄 or ▼ button repeatedly to point to "VCR SET UP". Then, press SELECT button.
MENU
TIMER
PROGRAMMING
□ VCR SET UP INITIALIZE
3 Select "AUDIO OUT"
Press CH/SET or ▼ button repeatedly to point to "AUDIO OUT". Then, press SELECT button.
VCR SET UP
TAPE
SELECT
\~T130
REPEAT
PLAY
RENTAL
AUTO
RETURN
□ AUDIO OUT
TV
STEREO
[ON]
SAP
4 Select "HIFI"
Press CH/SET 📄 or ▼ button repeatedly to point to "HIFI".
AUDIO OUT
HIFI
[ON]
MONO
5 To return to TV mode
Press MENU button.
Notes:
- Normally, "HIFI" should be selected for playback with HIFI sound.
- When you play non-HIFI tapes, VCR play automatically in monaural.
- The VCR records automatically MTS broadcasts in HIFI stereo sound.
TO SELECT MONO MODE
You can change the selection to "MONO" if you want to listen to HIFI tapes in normal audio playback.
1) Press MENU button.
2) Press CH/SET 📋 or ▼ button repeatedly to point to "VCR SET UP". Then, press SELECT button.
3) Press CH/SET 📋 or ▼ button repeatedly to point to "AUDIO OUT". Then, press SELECT button.
4) Press CH/SET or button repeatedly to point to "MONO".
5) Press MENU button to return to original mode.
TO SELECT STEREO OR SAP MODE
1 Select the main menu
Press MENU button. The main menu appears on the TV screen.
MENU
☐ TIMER PROGRAMMING
VCR SET UP
INITIALIZE
2 Select "VCR SET UP"
Press CH/SET 📄 or ▼ button repeatedly to point to "VCR SET UP".
Then, press SELECT button.
MENU
TIMER
PROGRAMMING
□ VCR SET UP
INITIALIZE
Press CH/SET 📋 or ▼ button repeatedly to point to "TV STEREO" or "SAP.
Then, press SELECT button.
VCR SET UP
TAPE
SELECT
REPEAT
PLAY
RENTAL
AUTO
RETURN
AUDIO
OUT
TV STEREO [ON]
SAP
\~T130
4 To return to TV mode
Press MENU button.
Notes:
- You must select the recording mode in TV STEREO or SAP when you record broadcast.
Refer to "MTS RECORDING/MONITOR MODE" on previous page.
When you play the tape on the VCR later, it will be in stereo or second audio.
- If you select second audio when second audio is not available, the VCR will record normal audio.
PRESET FOR USE
Channel memory programming is NOT needed when connected to a cable box. You can program the tuner to scan only the channels you receive in your area. See page 38 for channel designations.
NOTE: You must use the remote control for this procedure.
AUTOMATIC CHANNEL PRESET (Without a Cable Box)
NOTES:
- Follow the steps below once. Repeat it only if there is a power failure or the VCR is unplugged for more than 30 seconds. (In these cases, the programmed channels are erased.)
- You must follow the steps below before attempting to play or record a video tape. If you want to play or record a video tape BEFORE programming the tuner, you must first press the POWER button to turn off the VCR. Then, press the POWER button again to turn it back on. To program the tuner again, see "CHANNEL PRESET AGAIN".
1 Plug in the VCR power cord
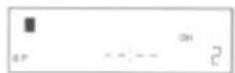
Plug the VCR power cord into a standard AC outlet. "--:" appears on the display.

- Whenever the AC plug is connected, the VCR search the local PBS station for auto clock setting. If the VCR find the local PBS station, current time appears on the display.
2 Select channel 3 or 4 on the TV
Turn on the TV and set the TV channel to the same video output channel as located on the back of the VCR. (CH3 or 4)
3 Turn on the VCR
Press the POWER button to turn on the VCR. "☐" appears on the display.
4 Select the VCR mode
Press VCR/TV button so that "VCR" appears on the display

5 Select "ENGLISH" or "ESPANOL"
Select "ENGLISH" or "ESPANOL=Spanish" using CH/SET or button.
Then, press SELECT or MENU button.
LANGUAGE
SELECT
☐ ENGLISH [ON] ESPAÑOL
6 Begin channel preset
Press SELECT button once. The tuner scans and memorizes all the active channels in your area. (TV mode: from CH2/ CATV mode: from CH1)
PRESET FOR USE - 23 -
TUNER SET UP
C H 0 2
- The VCR distinguishes between standard TV channels and cable channels.
7 After scanning
The tuner stops on the lowest memorized channel. The TV screen returns to TV mode.
C H 0 2
- If you subscribe to CABLE TV, "CATV" appears on the display.
- If "TUNER SET UP" appears on the TV screen again, check the cable connections. Then, press SELECT button once again. The VCR will begin preset again.
- If the VCR cannot find the local PBS station at step 1, after scanning channels, "AUTO CLOCK" flashes on the TV screen. And the VCR search the local PBS station for auto clock setting again. If current time does not appear, follow "SETTING THE CLOCK" (page 16).
Note: The VCR will search through all the available channels from the lowest channel. It must scan each channel for one minute to determine if that channel is transmitting the EDS signal. If the highest channel has EDS signal, it takes many times. To cancel this search, press MENU button. Then, follow "SETTING THE CLOCK" (page 16).
- If you use DAYLIGHT-SAVING TIME when current time appears, follow "DAYLIGHT-SAVING TIME" (page 16).
TO RECALL A DESIRED CHANNEL
You can select the desired channel by using CHANNEL (or CH/SET) or
PRESET FOR USE - 24 -
▼ button or directly pressing number buttons on the remote control.
Note for using number buttons:
- When selecting cable channels which are higher than 100, press 100/ENT button first, then press the last two digits. (To select channel 125, first press "100/ENT" button then press "2" and "5").
- You must precede single-digit channel numbers with a zero (02, 03, 04 and so on).
TO DELETE PRESET CHANNEL
The channels you no longer receive or seldom watch can be deleted from the memory. (Of course, you can add the deleted channel into the memory again.)
NOTE: You must use the remote control for this procedure.
Make sure...
• VCR power must be turned on.
- Turn on the TV and set the TV channel to the same video output channel as located on the back of the VCR. (CH 3 or 4)
- Press VCR/TV button on the remote control so that "VCR" appears on the display.
1 Select the main menu
Press MENU button. The main menu appears on the TV screen.
MENU
☐ TIMER PROGRAMMING
VCR SET UP INITIALIZE
2 Select "INITIALIZE"
Press CH/SET 📋 or ▼ button repeatedly to point to "INITIALIZE".
Then, press SELECT button.
MENU
TIMER
VCR SET UP
PROGRAMMING
PRESET FOR USE - 25 -
□ INITIALIZE
3 Select "CHANNEL SET UP"
Press CH/SET or button repeatedly to point to "CHANNEL SET UP".
Then, press SELECT button.
INITIALIZE
□ CHANNEL SET UP
SETTING CLOCK LANGUAGE SELECT D.S.T.
4 Select "ADD/DELETE CH"
Press CH/SET 📋 or ▼ button repeatedly to point to "ADD/DELETE CH". Press SELECT button.
CHANNEL SET UP
TV [ON] CATV
□ ADD/DELETE CH
5 Enter the desired channel number
Press the number buttons or CH/SET 🎨 or ▼ button repeatedly until your desired channel number appears. (Example: CH02)
ADD/DELETE CH
02 (TV)
6 Delete it from memory
Press ADD/DELETE button so that "DELETE" flashes on the TV screen.
ADD/DELETE CH
02 (TV)
-DELETED-
- To delete another channel, repeat steps [5] and [6].
- If you press ADD/DELETE button again, the channel is memorized again.
ADD/DELETE CH
02 (TV)
-MEMORIZED-
7 Exit the preset mode
Press MENU button to return to TV mode.
NOTE: To confirm that channel(s) has been deleted or added, press CH/SET or ▼button.
CHANNEL PRESET AGAIN
1 Select the main menu
Press MENU button. The main menu appears on the TV screen.
MENU
PRESET FOR USE - 27 -
☐ TIMER PROGRAMMING VCR SET UP INITIALIZE
2 Select "INITIALIZE"
Press CH/SET or ▼ button repeatedly to point to "INITIALIZE". Then, press SELECT button.
MENU
TIMER PROGRAMMING VCR SET UP ☐ INITIALIZE
3 Select "CHANNEL SET UP"
Press CH/SET or button repeatedly to point to "CHANNEL SET UP".
Then, press SELECT button.
INITIALIZE
☐ CHANNEL SET UP SETTING CLOCK LANGUAGE SELECT D.S.T.
4 Select "TV" or "CATV"
Press CH/SET or ▼ button repeatedly to point to "TV" or "CATV".
CHANNEL SET UP
TV [ON] CATV ADD/DELETE CH
5 Begin channel preset
Press SELECT button once. After scanning, the tuner stops on the lowest memorized channel.
Select this feature and the VCR's clock automatically will advance one hour in April, then reverse one hour in October. Follow the steps below when you want to use this feature even if you set the AUTO CLOCK to ON.
When Daylight-Saving Time is ON, the clock's time will change automatically as follows:
First Sunday of April : from 2:00AM to 3:00AM Last Sunday of October : from 2:00AM to 1:00AM
NOTES:
- When programmed timer recordings start between 2:00AM - 2:59AM on the First Sunday of April, the VCR will start recording at 3:00AM.
- When programmed timer recordings end between 2:00AM - 2:59AM on the First Sunday of April, the VCR will stop recording at 3:00AM.
Make sure ...
- You must use the remote control for the following procedure.
• VCR power must be turned on. - Turn on the TV and set the TV channel to the same video output channel as located on the back of the VCR. (CH 3 or 4)
- Press VCR/TV button on the remote control so that "VCR" appears on the display.
1 Select the main menu
Press MENU button.
2 Select "INITIALIZE"
Press CH/SET 📋 or ▼ button repeatedly to point to "INITIALIZE". Then, press SELECT button.
MENU
TIMER
VCR SET UP
□ INITIALIZE
PROGRAMMING
3 Select "D.S.T." (Daylight-Saving Time) to [ON]
Press CH/SET 📋 or ▼ button repeatedly to point to "D.S.T.".
Then, press SELECT button repeatedly until [ON] appears.
INITIALIZE
CHANNEL SET UP
SETTING
LANGUAGE
D.S.T.
CLOCK
SELECT
[ON]
4 To return to TV mode
Press MENU button.
Repeat steps [1] to [3]. Then, press SELECT button so that [ON] disappears from the menu. Press MENU button to return to TV mode.
SETTING THE CLOCK (AUTO/MANUAL)
Set the clock accurately for proper automatic timer recording.
- If the Public Broadcasting Station (PBS) is available in your area, follow "AUTO CLOCK SETTING".
- If it is not, follow "MANUAL CLOCK SETTING".
- Whenever the AC plug is connected, the VCR search the local PBS station for auto clock setting. You may not need to set the clock.
- If you use DAYLIGHT-SAVING TIME, follow "DAYLIGHT-SAVING TIME" on this page.
AUTO CLOCK SETTING
You can have the VCR set the clock automatically by using the Public Broadcasting Station (PBS) channel in your area. Once you have set the clock by using the following procedure, the VCR will automatically monitor the correct time and date being broadcast by the PBS station in your area, using a new service called Extended Data Service (EDS) whenever turning the VCR off, at 12:00AM and 12:00PM.
Make sure ...
- Confirm that the antenna connections are correct.
- The cable converter box must be turned on if your VCR is connected directly to it. (See NOTES)
- You must use the remote control for the following procedure.
• VCR power must be turned on. - Turn on the TV and set the TV channel to the same video output channel as located on the back of the VCR. (CH 3 or 4)
- Press VCR/TV button on the remote control so that "VCR" appears on the display.
NOTES:
- Auto clock setting only needs to be set once, but can be done again if the clock's time has become incorrect for some reason.
- If you will set Daylight-Saving Time Selection to ON or OFF, the time will be changed to corresponding with Daylight-Saving Time Selection when the VCR load the EDS signal. The VCR will load the EDS signal whenever turning the VCR off, at 12:00AM and 12:00PM
- If the VCR is connected directly to a cable converter box, the local PBS station must be selected on the cable box itself, and the VCR must be set to the output channel of the cable converter box (usually channel 3 or 4), to be able to set up and automatically correct the clock. The VCR cannot control the channels of the cable converter box.
1 Select the main menu
Press MENU button.
2 Select "INITIALIZE"
Press CH/SET 📋 or ▼ button repeatedly to point to "INITIALIZE".
Then, press SELECT button.
MENU
TIMER
PROGRAMMING
VCR SET UP
□ INITIALIZE
3 Select "SETTING CLOCK"
Press CH/SET 📋 or ▼ button repeatedly to point to "SETTING CLOCK".
Then, press SELECT button.
INITIALIZE
PRESET FOR USE - 31 -
CHANNEL SET UP
□ SETTING CLOCK
LANGUAGE
D.S.T.
SELECT
4 Select "AUTO CLOCK"
Press CH/SET or ▼ button repeatedly to point to "AUTO CLOCK".
Then, press SELECT button.
SETTING CLOCK
□ AUTO CLOCK
MANUAL
[ON]
5 Enter the channel number for the PBS station
First, press CH/SET or button repeatedly to point to "MANUAL".
Then, press SELECT button.
Next, press the number buttons or CH/SET 🎨 or ▼ button repeatedly until the channel number for your local PBS station appears.
- If you do not know the PBS channel number, leave it set to "AUTO". The VCR will search automatically all available channels for the local PBS station, and will select that channel.
SET AUTO CLOCK CHANNEL
AUTO [ON]
MANUAL
6 Exit the Auto Clock Setting
Press SELECT button, then press MENU button.
7 Turn off the VCR
Press POWER button to turn off the VCR for searching the local PBS station. The power must remain off during this search.
If you enter the channel number manually at step 5,
- It may take about a few minutes for this search to be completed.
If you choose AUTO at step 5,
- The VCR will search through all the available channels from the lowest channel. It must scan each channel for one minute to determine if that channel is transmitting the EDS signal. If the highest channel has EDS signal, it takes many times. You can start this channel search at night when the unit is not in use.
- If the time that is automatically set by this selected PBS station is incorrect, it may not be your local PBS station, but one from a different time zone. Or there is a possibility that no channel is broadcasting the EDS signal in your area, as shown by no time being set even after an overnight search. In these cases, you must manually enter the correct local PBS station, or set the clock manually, turning off the Auto Clock Setting feature.
MANUAL CLOCK SETTING
We suggest that you use a TV or radio station as your time source. In the example below, the clock is to be set to:
| DATE | 1st | March, | 1996 | |
| SETTING | TIME | 5:40PM |
NOTE: You must use the remote control for this procedure.
Make sure...
• VCR power must be turned on.
- Turn on the TV and set the TV channel to the same video output channel as located on the back of the VCR. (CH 3 or 4)
- Press VCR/TV button on the remote control so that "VCR" appears on the display.
1 Select the main menu
Press MENU button.
2 Select "INITIALIZE"
Press CH/SET 📋 or ▼ button repeatedly to point to "INITIALIZE". Then, press SELECT button.
MENU
TIMER
VCR SET UP
□ INITIALIZE
PROGRAMMING
3 Select "SETTING CLOCK"
Press CH/SET 📋 or ▼ button repeatedly to point to "SETTING CLOCK". Then, press SELECT button.
INITIALIZE
CHANNEL SET UP
□ SETTING CLOCK LANGUAGE SELECT D.S.T.
4 Select "MANUAL"
Press CH/SET or button repeatedly to point to "MANUAL". Then, press SELECT button.
SETTING CLOCK
AUTO
CLOCK
MANUAL
[ON]
Make sure...
- If you did not set your desired digit within 2 seconds after pressing CH/SET 📋 or ▼ button during steps [5] to [9], the input mode will forward to next step.
- When you press SELECT button after pressing CH/SET 📄 or ▼ button during steps [5] to [9], you may forward to next step.
- Press ADD/DELETE button to go back one step from current step during steps [6] to [10].
5 Select the month
Press CH/SET 📋 or ▼ button repeatedly until your desired month appears. (Example: March 03)
PRESET FOR USE - 34 -
SETTING CLOCK
MONTH DAY YEAR
03 / -- ----
HOUR MINUTE AM/PM
-- : -- --
6 Select the day
Press CH/SET or button repeatedly until your desired day appears.
(Example: 1st ☐01)
SETTING CLOCK
MONTH DAY YEAR
03 / 01 ----
HOUR MINUTE AM/PM
--- : ---
7 Select the year
Press CH/SET or button repeatedly until your desired year appears.
(Example: 1996)
SETTING CLOCK
MONTH DAY YEAR
03 / 01 FRI 1996
HOUR MINUTE AM/PM
--- : ---
8 Select the hour
Press CH/SET 📋 or ▼ button repeatedly until your desired hour appears.
(Example: 05)
SETTING CLOCK
MONTH DAY YEAR
03 / 01 FRI 1996
PRESET FOR USE - 35 -
HOUR MINUTE AM/PM
05 : -- --
9 Select the minute
Press CH/SET 🎨 or ▼ button repeatedly until your desired minute appears. (Example: 40)
SETTING CLOCK
MONTH DAY YEAR
03 / 01 FRI 1996
HOUR MINUTE AM/PM
05 : 40 --
10 Select "AM" or "PM"
Press CH/SET 📋 or ▼ button repeatedly to point to "AM" or "PM".
(Example: PM)
SETTING CLOCK
MONTH DAY YEAR
03 / 01 FRI 1996
HOUR MINUTE AM/PM
05 : 40 PM AM
PM
11 Start the clock
Press MENU or SELECT button.
Although seconds are not displayed, they begin counting from 00 when you press MENU or SELECT button. Use this feature to synchronize the clock with the correct time.
NOTE:
- When unplugging the AC-cord or if there is a power failure for more than 30 seconds, "--:" may flash on the display. If this happen, follow the "AUTOMATIC CHANNEL PRESET" and "SETTING THE CLOCK".
TO CHANGE CLOCK SETTING
If you want to change the clock,
PRESET FOR USE - 36 -
1) Press MENU button.
2) Press CH/SET 📋 or ▼ button repeatedly to point to "INITIALIZE". Then, press SELECT button.
3) Press CH/SET or button repeatedly to point to "SETTING CLOCK".
Then, press SELECT button.
4) Press CH/SET or button repeatedly to point to "MANUAL". Then, press SELECT button.
5) Select a digit you want to change using SELECT button or ADD/DELETE button.
6) Enter correct numbers using CH/SET or button.
7) Press MENU button to return to original mode.
SELECTING THE LANGUAGE
If you want to change the language on the TV screen, follow the steps below:
1 Select the main menu
Press MENU button.
2 Select "INITIALIZE"
Press CH/SET 📋 or ▼ button repeatedly to point to "INITIALIZE". Then, press SELECT button.
MENU
TIMER PROGRAMMING VCR SET UP ☐ INITIALIZE
3 Select "LANGUAGE SELECT"
Press CH/SET or button repeatedly to point to "LANGUAGE SELECT".
Then, press SELECT button.
INITIALIZE
CHANNEL SET UP SETTING CLOCK
☐ LANGUAGE SELECT D.S.T.
ON SCREEN DISPLAY - 37 -
4 Select "ENGLISH" or "ESPAÑOL"
Select "ENGLISH" or "ESPAÑOL=Spanish" using CH/SET 📄 or ▼ button.
LANGUAGE
SELECT
☐ ENGLISH [ON] ESPAÑOL
5 Exit the Language select
Press MENU button to return to TV mode.
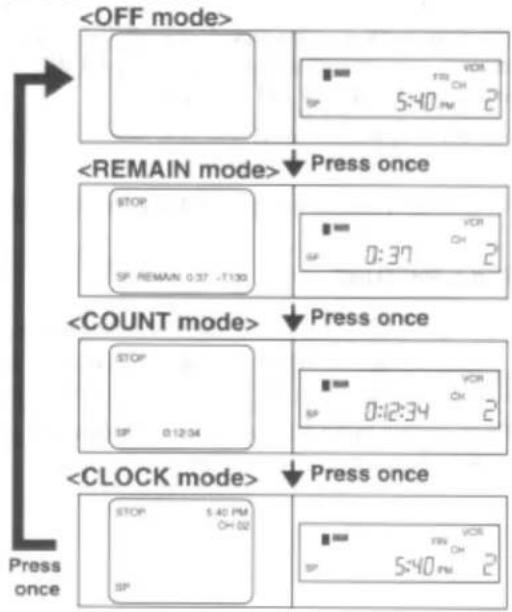
ON SCREEN DISPLAY
To check the Remain, Count, Clock and Channel number on the TV screen and display, press SELECT button.
Each time you press SELECT button, TV screen and display will change as the illustration:
PLAYBACK
NORMAL PLAYBACK
Make sure...
- Turn on the TV and set the TV channel to the same video output channel as located on the back of the VCR. (CH 3 or 4)
- Press VCR/TV button on the remote control so that "VCR" appears on the display.
1 Insert a prerecorded tape
Counter mode appears at counter 0:00:00 on the TV screen. If the erase-protection tab has been removed, the VCR will start playback automatically.
2 To begin playback
Press PLAY button.
If a tape is already in the VCR
2A) Using button on the VCR
Just press PLAY button on the VCR. Power will automatically turn on and playback will start. (Direct Button Operation)
2B) Using button on the remote control
Press POWER button to turn on, and then press PLAY button on the remote control.
3 To stop playback
Press STOP button.
PICTURE SEARCH
This feature is useful in finding or skipping over a particular scene on a tape. In this mode, the sound will be muted.
1) You may view a video tape at a high speed in either a forward or reverse direction by pressing F.FWD or REW button. (in the SP/LP/SLP modes)
2) Depress it again, the VCR will now search in super high speed. (in the LP / SLP modes)
3) For normal speed, simply press PLAY button.
STILL PICTURE
You can view a still picture on the screen during playback (the Still mode). Press PAUSE button during playback. " "appears on the display. Press PLAY button to return to playback.
NOTE: If it is left in the Still mode for more than five minutes, the VCR will
PLAYBACK - 39 -
automatically switch to the Stop mode.
VERTICAL HOLD CONTROL
When the picture begins to vibrate vertically, stabilize the picture by pressing CHANNEL (or CH/SET) or ▼ button in the Still mode.
NOTES:
- When the picture is distorted or rolling vertically, adjust the vertical hold control on your TV.
- Some latest TV's do not have a user adjustable vertical hold control.
TRACKING ADJUSTMENT
- Tracking adjustment will be set automatically (Digital TRacking function) when you start playback. "DTR" appears on the display.
- When playing pre-recorded tapes or tapes recorded on units other than your own, noise lines (black and white streaks) may appear on the playback picture. If this occurs, you can adjust the tracking control manually by pressing CHANNEL 🎨 or ▼ button on the VCR until the streaks disappear. To return to the DTR function, stop the tape once and start playback again.
- You can reduce the noise lines by pressing CHANNEL 🎨 or ▼ button in the slow mode, too. Slow tracking adjustment will not be set automatically.
Note: In Still mode, press SLOW button on the remote control and press CHANNEL or ▼ button until the streaks disappear. To return to Still mode, press PAUSE button again.
SLOW MOTION
Press SLOW button on the remote control to reduce the playback speed. The VCR mutes the sound during slow motion. You can control the speed by pressing F.FWD button (faster) or REW button (slower). Press PLAY button to return to normal playback.
NOTE: If it is left in the Still mode for more than five minutes, the VCR will automatically switch to the Stop mode.
AUTO REWIND
When the end of a tape is reached during recording, playback, or fast-forward, the tape will automatically rewind to the beginning. After that, the VCR will eject the tape and turn itself to off.
NOTES:
- The tape will not auto-rewind during timer recording or Instant Recording Timer.
PLAYBACK - 40 -
- When the Counter Memory is activated, the tape will rewind to the 0:00:00 and the VCR will be in the Stop mode.
JOG AND SHUTTLE FUNCTION
You can view the playback picture at a high speed or advance one frame using the Jog and Shuttle function.
1 Select Jog/Shuttle mode
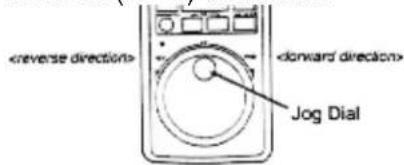
Press JOG/SHUTTLE button in the Play mode or Still mode. The Jog/Shuttle indicator lights on. The picture will freeze on the screen. No action for Jog/Shuttle in 30 seconds makes the Jog/Shuttle indicator light turn off.

2 To make the playback speed faster
Hold and turn the Shuttle Ring (the outer ring) in either direction. The further the ring is rotated, the faster the playback speed in the forward (FWD) or reverse (REV) direction. If you release the ring, the ring will return to the original position and the picture will be in the Still mode.

3 To advance the frame one by one
Turn the Jog Dial (the inner dial) in either direction. The faster the dial is rotated, the faster the frames advance one by one in the forward (FWD) or reverse (REV) direction.
4 To return to normal playback Press PLAY button.

NOTE: When noise lines appear on the still picture, change to slow mode and adjust tracking as described in Slow Tracking.
SPECIAL PLAY BACK
Make sure...
• VCR power must be turned on.
- Turn on the TV and set the TV channel to the same video output channel as located on the back of the VCR. (CH 3 or 4)
- Press VCR/TV button on the remote control so that "VCR" appears on the display.
- You must use the remote control for the following procedure.
AUTO REPEAT PLAYBACK
The VCR has the auto repeat function that allows you to repeat a tape indefinitely without touching the Play button.
- Insert a prerecorded tape.
1 Select the main menu
Press MENU button.
2 Select "VCR SET UP"
Press CH/SET 📄 or ▼ button repeatedly to point to "VCR SET UP". Then, press SELECT button.
MENU
TIMER
PROGRAMMING
□ VCR SET UP
INITIALIZE
3 Select "REPEAT PLAY"
Press CH/SET or button repeatedly to point to "REPEAT PLAY".
VCR SET UP
TAPE
SELECT
\~T130
REPEAT PLAY
RENTAL
AUTO
RETURN
Press SELECT button so that [ON] will appear next to "REPEAT PLAY" on the TV screen.
Repeat playback will start automatically.
NOTES:
- Once you select the repeat play mode, it stays in effect even after you turn off the VCR.
- When the Counter Memory is activated, the tape will rewind to 0:00:00 and the VCR will be in the Stop mode.
- If the Rental mode is set [ON], the "RENTAL PLAY" display has priority.
TO STOP PLAYBACK
Press STOP button.
TO EXIT THE AUTO REPEAT MODE
Repeat steps [1] to [3]. Then, press SELECT button. [ON] will then disappear from the menu. Press MENU button to return to TV mode.
RENTAL PLAY
This function enables you to improve the picture quality when playing back worn cassettes such as those rented from a video shop.
- Insert rental tape into VCR and begin playback.
1 Select the main menu
Press MENU button during the playback.
2 Select "VCR SET UP"
Press CH/SET 📋 or ▼ button repeatedly to point to "VCR SET UP".
Then, press SELECT button.
MENU
TIMER
PROGRAMMING
VCR SET UP
INITIALIZE
3 Select "RENTAL"
Press CH/SET or button repeatedly to point to "RENTAL".
Then, press SELECT button.
VCR SET UP
TAPE
REPEAT
SELECT
PLAY
\~T130
□ RENTAL
AUTO
AUDIO
TV
SAP
RETURN
OUT
STEREO
[ON]
4 Select "RENTAL" to [ON]
Press SELECT button so that "RENTAL ON" will appear on the TV screen.
NOTES:
- Once you select the rental play mode, it stays in effect even after you turn off the VCR.
- Selecting ON or OFF must be done in the play mode only.
TO STOP PLAYBACK
Press STOP button.
TO EXIT THE RENTAL PLAY MODE
Repeat steps [1] to [3]. Then, press SELECT button so that "RENTAL OFF" appears on the TV screen.
SEARCH
Make sure...
• VCR power must be turned on.
- Turn on the TV and set the TV channel to the same video output channel as located on the back of the VCR. (CH 3 or 4)
- Press VCR/TV button on the remote control so that "VCR" appears on the display.
- You must use the remote control for the following procedure.
- A video cassette must be inserted in the VCR for these functions to work.
This feature can be used to memorize a beginning point that you want to review. And you can search it easily by rewinding or fast forwarding.
- Insert a prerecorded tape.
- If the counter is not displayed, the Counter Memory will not be activated. Press SELECT button so that the counter appears on the TV screen.
1 Stop the tape at your desired point
Rewind or fast forward the tape to the beginning point at which you want to review.
2 Reset the counter to 0:00:00
Press COUNTER RESET button.
3 Select the Counter Memory mode
Press COUNTER MEMORY button so that "M" appears on the TV screen.
M 0:12:30
4 Begin recording or playback
Press REC or PLAY button.
Press STOP button when recording or playback is completed.
5 To activate the Counter Memory
Press REW (or F.FWD) button. The tape will automatically stop when the counter returns to 0:00:00 (approx.).
TO EXIT THE COUNTER MEMORY
When the counter appears on the TV screen, press COUNTER MEMORY button once and then the SELECT button twice so that the "M" and the counter disappears from the TV screen.
TIME SEARCH
The Time Search function makes it possible to quickly advance the tape to your desired position from any position by entering the exact amount of playback time of the part you want to skip.
Example: To watch a program after 2 hour 50 minutes from present
position to forward direction.
1 Select "TIME SEARCH" mode
Press TIME SEARCH button.
2 Enter your desired time
Press CH/SET or button repeatedly until your desired time appears.
(Example: "2:50" for 2 hours 50 minutes)
TIME SEARCH
2:50
3 Begin Time Search
Press REW or F.FWD button. The VCR begins rewinding or fast forwarding to the specified point.
The time counts down as the searching progresses.
4 After Time Search
When 0:00 is reached, the VCR will start playback automatically.
NOTES:
• Time Search can be set up to 9 hours 59 minutes (9:59).
- This function will not operate in recording mode.
- Procedures must be followed within 30 seconds, from steps [1] to [2]. Otherwise the Time Search mode will be cancelled.
- Press STOP button to exit the Time Search mode.
INDEX SEARCH
This feature provides a method of indexing the starting point so that it can be easily returned to in either fast forward or rewind mode.
- The index mark will be made automatically when the REC button is pressed. It will also be marked at the starting point of Timer recording and IRT.
- The index mark is not recorded if the PAUSE button is pressed and released during recording.
- The time gap between making the index marks on the tape should be greater than 1 minute for SP recording, 2 minutes for LP recording and 3 minutes for SLP recording.
Example: You are watching program number 4 and want to fast forward to program number 7. You must skip three programs.

1 Select "INDEX SEARCH" mode
Press INDEX SEARCH button.
2 Enter your desired number
Press CH/SET 📋 or ▼ button repeatedly until the number of programs that you want to skip appears. (Example: "03" for 3 programs)
INDEX SEARCH 03
3 Begin Index Search
Press REW or F.FWD button. The VCR begins rewinding or fast forwarding to the beginning of desired program.
Note: Every time an index signal is skipped, the number in the program indicator decreases by one.
4 After Index Search
When the preset program is reached, the VCR will start playback automatically.
NOTES:
- Index Search can be set up to 20.
- This function will not operate in recording mode.
- Procedures must be followed within 30 seconds, from steps [1] to [2]. Otherwise the Index Search mode will be cancelled.
- Press STOP button to exit the Index Search mode.
BLANK SEARCH
This function enables you to search for the unrecorded portion of the tape
in the forward direction.
- Tape must be fully rewound.
1 Select "BLANK SEARCH" mode
Press BLANK SEARCH button.
The VCR begins fast forwarding to the beginning of the blank part of the tape.
BLANK SEARCH

2 After Blank Search
The VCR will automatically stop.
RECORDING
Make sure...
• VCR power must be turned on.
- Turn on the TV and set the TV channel to the same video output channel as located on the back of the VCR. (CH 3 or 4)
- Press VCR/TV button on the remote control so that "VCR" appears on the display.
- Insert a cassette with its erase prevention tab in place. (If necessary, rewind or fast forward the tape to the point at which you want to begin recording.)
- You must select the recording mode in TV STEREO or SAP when you record a broadcast.
Refer to "TO SELECT STEREO OR SAP MODE" on page 13.
VIEWING AND RECORDING THE SAME PROGRAM
1 Select the channel to be recorded
Press number buttons on the remote control or the CHANNEL (or
CH/SET) ▶ or button.
C
H
3
2
RECORDING - 48 -
NOTE: When you record with a cable converter box, the VCR channel must be selected to 3 or 4 then the actual channel that you wish to record must be selected on the cable converter box.
2 Select the tape speed
Press TAPE SPEED button on the remote control to select the desired tape speed (SP/LP/SLP).
SP
3 Begin recording
Press REC button. The red " " appears on the display.
REC
SP
4 Stop recording
Press STOP button when recording is completed.
SKIPPING SOME MATERIALS DURING RECORDING
Press PAUSE button to temporarily stop recording.
RECORDING - 49 -

Press PAUSE or REC button to resume recording.
NOTE: To prevent tape damage, after five minutes, the VCR will automatically switch to the Stop mode. You may review the time remaining with "☐" marks on the TV screen. Each "☐" mark shows one minute.
EDIT SEARCH
To edit an unwanted segment from the already recorded portion of tape while VCR remains in record mode.
1) Press PAUSE button.
2) Press and hold REW button until you have reached the beginning of the unwanted segment. (If you rewind past the beginning of the unwanted segment, press and hold F.FWD button until you have reached it.)
NOTE: If you do not press PAUSE button again within five minutes, VCR will automatically switch to the Stop mode.
3) Press PAUSE or REC button to resume recording.
RECORDING ONE PROGRAM WHILE VIEWING ANOTHER
You can record one program while viewing another. To start recording, follow steps [1] to [3] under "VIEWING AND RECORDING THE SAME PROGRAM".
NOTE: When you record with a cable converter box, you cannot record one program while viewing another.
4 Select the TV mode
Press VCR/TV button on the remote control to select TV so that the "VCR" disappears from the display.

5 Select the channel on the TV
Set the TV to the channel you want to watch.
TO MONITOR THE PROGRESS OF YOUR RECORDING
1 Select the VCR mode
Press VCR/TV button on the remote control to select TV so that the "VCR" appears on the display

2 Select channel 3 or 4 on the TV
Turn on the TV and set the TV channel to the same video output channel as located on the back of the VCR. (CH3 or 4)
IRT (Instant Recording Timer)
This function enables you to set a recording length simply by pressing the REC/IRT button on the VCR.
NOTE: This function cannot be done by the remote control.
Make sure...
• VCR Power must be turned on.
- Turn on the TV and set the TV channel to the same video output channel as located on the back of the VCR. (CH3 or 4)
- Press VCR/TV button on the remote control so that "VCR" appears on the display.
- Insert a cassette tape with its erase prevention tab in place. (If necessary, rewind or fast forward the tape to the point at which you want to begin recording.)
| PUSH(ES) | DISPLAY | RECORDED LENGTH |
| 1 push | (normal recording) | |
| 2 pushes 0:30 30 minutes | ||
| 3 pushes 1:00 60 minutes | ||
| ☐ ☐ | ☐ | — |
| 17 pushes 8:00 480 minutes | ||
| 18 pushes | (normal recording) | |
1 Select the channel to be recorded
Press number buttons on the remote control or the CHANNEL (or
Press REC/IRT button on the VCR as many times as needed. The recording length will be determined by the number of times you press REC/IRT button.
Each additional push will increase the recording time by 30 minutes. It is set up to 8 hours.
OTR (1:30)
SP
NOTES:
- Recording starts immediately when the REC/IRT button is pressed, whether you are watching the same or a different channel.
- When REC/IRT button is pressed 18 times, the VCR returns to the normal recording mode.
- To stop the IRT operation, press STOP button on the VCR or on the remote control.
- The recording length time remaining is indicated on the display as the recording is started.
- Recording stops when 0:00 is reached.
- Please note that in the SLP mode maximum recording time, assuming the tape is started at the beginning, is 8 hours using T-160 (or 6 hours using T-120).
- The TV that is connected to your VCR may be turned on or off during IRT.
- If the tape runs out before the end time, the VCR will switch to the Stop mode immediately, eject the tape and the VCR power will be turned off.
TIMER RECORDING
You may set the VCR to start and end a recording while you are away.
You can set seven programs to record on specific days, daily or weekly within a 1 year period.
In the example below, the timer is being set to record:
DATE:
6th
May,
1996
TIMER RECORDING - 52 -
SETTING TIME: from 7:30PM to 8:30PM
CHANNEL:
CH16
TAPE
SPEED:
SP
PROGRAM NO: No. 1
NOTE: You must use the remote control for this procedure.
Make sure...
• VCR Power must be turned on.
- Turn on the TV and set the TV channel to the same video output channel as located on the back of the VCR. (CH3 or 4)
- Press VCR/TV button on the remote control so that "VCR" appears on the display.
- Clock must be set to the correct time and date before setting the timer.
- Insert a cassette tape with its erase prevention tab in place. (If necessary, rewind or fast forward the tape to the point at which you want to begin recording.)
Avoid overlap of programs...
There is a case that a program will not be performed.
When programs overlap:
- The program that the start time is set earliest has priority.
- When the earliest program has finished and the programs which should start still overlap, the recording will start in order of the program number.
- If you programmed as the illustration, the timer recording would be carried out as follows (shaded part is the carried period):
9:00 AM - 10:00 AM for PROGRAM 2
10:00 AM - for PROGRAM 1

bar
| Program | Timeframe | |---|---| | Program 1 | 10:00AM | | Program 2 | 10:00AM | | Program 3 | 11:00AM |1 Select the main menu
Press MENU button.
2 Select "TIMER PROGRAMMING"
Press CH/SET ▶ or ▼ button to point to "TIMER PROGRAMMING".
Then, press SELECT button.
MENU
☐ TIMER PROGRAMMING
VCR SET UP
INITIALIZE
3 Select your desired program number (1 \~ 7)
Program number which is not set up flashes.
Press CH/SET ▶ or ▼ button repeatedly until your desired program number appears. (Example: 1)
Then, press SELECT button.
| PROGRAM | NUMBER | 1 |
| DATE - / - | ||
| START TIME - : - - | ||
| END TIME - : - - | ||
| CHANNEL | - | - |
| REC SPEED -- |
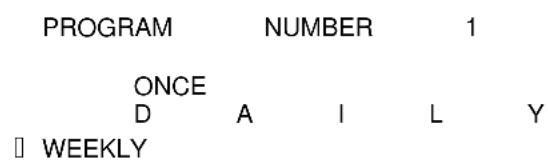
4 Select once, daily or weekly recording For once recording:
Press CH/SET ▶ or ▼ button repeatedly to point to "ONCE". Then, press SELECT button.

For daily recording: To record a TV program at the same time on the same channel every day. (Example: Monday through Sunday)
Press CH/SET ▶ or ▼ button repeatedly to point to "DAILY". Then, press SELECT button.

For weekly recording: To record a TV program at the same time on the same channel every week. (Example: every Monday on channel 7 at 5:00PM)
Press CH/SET ▶ or button repeatedly to point to "WEEKLY". Then, press SELECT button.
Make sure...
- If you did not set your desired digit within 2 seconds after pressing CH/SET ▶ or ▼ button during steps [5] to [8], the input mode will forward to next step.
- When you press SELECT button after pressing CH/SET ▶ or ▼ button during steps [5] to [8], you may forward to next step.
- Press ADD/DELETE button to go back one step from current step during steps [3] to [9].
5 Set the date when you want to start
First, press CH/SET ▶ or ▼ button repeatedly until your desired month appears. (Example: "05" for May)
Next, enter a date. (Example: "06" for the 6th)
ONE TIME PROGRAM
DATE 05/06 MON
START TIME - - : - -
END TIME - - : - - -
CHANNEL
REC SPEED --
6 Set the start time
First, press CH/SET ▶ button repeatedly until your desired hour appears. (Example: 07)
Next, enter a minute. (Example: 30)
Then, press CH/SET ▶ or ▼ button to point to AM or PM. (Example: PM)
ONE TIME PROGRAM
DATE 05/06 MON
START TIME 07:30 PM
END TIME --:-- --
CHANNEL
REC SPEED --
PM
A M
7 Set the end time
First, press CH/SET ▶ or button repeatedly until your desired hour appears. (Example: 08)
Next, enter a minute. (Example: 30)
Then, press CH/SET ▶ or ▼ button to point to AM or PM. (Example: PM)
ONE TIME PROGRAM
DATE 05/06 MON
START TIME 07:30 PM
END TIME 08:30 PM
CHANNEL
REC SPEED --
PM
A M
8 Set the channel number
Press CH/SET ▶ or button repeatedly until your desired channel number appears. (Example: 16)
ONE TIME PROGRAM
DATE 05/06 MON
START TIME 07:30 PM
END TIME 08:30 PM
CHANNEL 16
REC SPEED --
9 Set the tape speed
Press CH/SET ▶ or button repeatedly until your desired tape speed appears. (Example: SP)
ONE TIME PROGRAM
DATE 05/06 MON
START TIME 07:30 PM
END TIME 08:30 PM
CHANNEL 16
REC SPEED SP
□ SP LP SLP AUTO
- "AUTO" is available only with Program No. 1.
See "Just-In Time Recording" on page 31 for the use of "AUTO" setting.
10 Exit the program mode
Press MENU button. Program 1 is now completed.
To set another program, repeat steps [1] to [10].
11 Set the timer
Press POWER button. The "Indicator" appears on the display. The number of all programmed events are displayed with current time.

TO CORRECT AN AUTOMATIC TIMER PROGRAM
If you want to correct an automatic timer after you finished setting program,
1) Repeat steps [1] to [3] on previous page.
2) Select a digit you want to change using SELECT button or ADD/DELETE button.
3) Enter correct numbers using CH/SET ▶ or ▼ button.
4) Press MENU button to return to original mode.
5) Press POWER button to return to timer stand-by mode.
TO STOP AN AUTOMATIC TIMER PROGRAM WHICH HAS ALREADY STARTED
Press STOP/EJECT button on the VCR.
NOTE: STOP button on the remote control will not function in the Automatic Timer Recording mode.
TO CANCEL OR CHECK THE START/END TIME
1) Repeat steps [1] to [2] previous page.
2) Select a program number you want to check using CH/SET ▶ or ▼ button. The details of selected program appears on the TV screen. You may cancel the entire program by pressing ADD/DELETE button.
- If there is a power failure or the VCR is unplugged for more than 30 seconds, the clock setting and all timer settings are lost. When you select the clock manually, the clock setting may be lost.
- If the tape runs out before the end time, the VCR will switch to the Stop mode immediately, eject the tape and the VCR power will be turned off. The "☒" indicator will flash.
- If a tape is not inserted or the erase-protection tab is removed, the "☒" indicator flashes and automatic timer recording cannot occur. Insert a tape that allows recording.
- The TV that is connected to your VCR may be turned ON or OFF when the VCR is in the timer-record mode.
- When you record a cable channel program with cable converter box, first set the VCR's channel to 3 or 4 whichever is the output channel of your cable converter box. Then set your converter box to the channel you want to record and leave on while you are recording with power on.
AUTO RETURN
If you select auto return to [AUTO] from the menu, when all the timer recordings are completed, the VCR will return to the beginning of the recorded program(s).
NOTE: If there are any remaining programs including Daily & Weekly, this function does not be done.
1 Select the main menu
Press MENU button.
2 Select "VCR SET UP"
Press CH/SET ▶ or ▼ button repeatedly to point to "VCR SET UP". Then, press SELECT button.
3 Select "AUTO RETURN"
Press CH/SET ▶ or ▼ button repeatedly to point to "AUTO RETURN".
TIMER RECORDING - 58 -
| TAPE | SELECT | ~T130 |
| REPEAT | PLAY | |
| RENTAL |
| ☐ AUTO RETURN | ||
| AUDIO | OUT | |
| TV | STEREO | [ON] |
| SAP | ||
4 Select "AUTO RETURN" to [AUTO]
Press SELECT button so that [AUTO] will appear next to "AUTO RETURN".
VCR SET UP
| TAPE | SELECT | ~T130 |
| REPEAT | PLAY | |
| RENTAL |
| AUTO RETURN [AUTO] | |
| AUDIO | OUT |
| TV | STEREO |
| SAP | |
5 To return to TV mode
Press MENU button.
WATCH THE RECORDED PROGRAM
Press POWER button to turn on the VCR. Then, press PLAY button.
This function allows you to fully utilize the available tape length for timer recording. The VCR calculates the remaining tape amount and then adjusts the tape speed from SP to SLP as needed.
If it is suspected that the end of the tape will be reached before the reserved program ends (as long as SP mode is kept all the way), set recording mode to AUTO. This function is available only with Program No. 1 (Timer Recording).
The auto mode starts recording in SP mode. The internal circuit compares the rest of the program against the available tape length. If the internal circuit determines that the available tape is not long enough to record the program in the SP mode, the Recording mode is automatically changed to SLP mode. This will assure coverage of the desired program before the end of the tape is reached.
SETTING THE REMAINING TIME - 59 -
| Conventional Video Recording | Tape End | ||
| Recording in SP mode for 40 minutes | |||
| 20 minutes of the program is left unrecorded | |||
| Just-in Time Recording | |||
| Recording in SP mode for 30 minutes | Recording in SLP mode for 30 minutes | ||
| Recording mode automatically changes to SLP mode | |||
Notes:
- Set the tape remainder switch ("\~T60", "\~T130" or "T140\~") to the tape loaded. See "Setting the Remaining Time" on next page.
- Even if SLP mode is selected, just-in time recording cannot compensate for a tape length which may be too short.
- A momentary picture break up will occur at the point on the tape when the recording speed changes from SP to SLP.
- The displayed remaining tape running time may not always match the actual remaining time on the tape (usually longer than the actual time). It is recommended to set the end of the reserved recording time several minutes after the end of the TV program.
SETTING THE REMAINING TIME
You can set the remaining tape running time of your tape. Follow the steps below to correct the tape remaining indication.
Make sure...
• VCR power must be turned on.
- Turn on the TV and set the TV channel to the same video output channel as located on the back of the VCR. (CH3 or 4)
- Press VCR/TV button on the remote control so that "VCR" appears on the display.
- You must use the remote control for the following procedure.
- A video cassette must be inserted in the VCR for this function to work.
1 Select the main menu.
Press MENU button.
2 Select "VCR SET UP"
Press CH/SET ▶ or ▼ button repeatedly to point to "VCR SET UP". Then, press SELECT button.
SETTING THE REMAINING TIME - 60 -
TIMER
PROGRAMMING
□ VCR SET UP
INITIALIZE
3 Select "\~T60", "\~T130" or "T140\~"
Press SELECT button so that your desired time appears.
VCR SET UP
☐ TAPE SELECT \~T130
REPEAT PLAY
RENTAL
AUTO
RETURN
AUDIO
OUT
TV
STEREO
[ON]
SAP
| Selection | Your cassette tape length |
| ~T60 60 minutes or less | |
| ~T130 61 | ~ 130 minutes |
| T140~ 140 minutes or greater | |
For example, the popular T-120 cassette tape calls for the "\~T130" selection.
4 Exit the preset mode
Press MENU button to return to TV mode.
5 To check the remain time
Press SELECT button until REMAIN appears on TV screen.
PLAY
SP REMAIN - : - - \~T130
Note:
- In the Remain Time Mode calculating will start when the cassette tape is inserted and PLAY button is pressed.
While calculating, the TV screen shows as illustrated.
REMAINING TAPE RUNNING TIME DISPLAY
- Since the reel diameter and tape thickness are not common to all cassettes, the time count differs from cassette to cassette. Use the time display as an informative number only.
- During recording, the remaining tape running time is estimated based on the current recording mode (SP, LP, SLP).
- During playback the remaining tape running time is calculated based on the current playback mode.
- Remain time will not appear on TV screen while in the Fast forward or Rewind Mode.
- There will be a delay of up to 1 minute before the remain time appears on the TV display.
Note:
The use of the following tapes will result in difference between the displayed remaining time and actual time to the end of the tape:
- Tape housed in a VHS-C cassette adapter.
- Shorter tape length such as a 10-minute cassette.
- T-180 cassette. In this case the display may read 2 Hours, 40 Minutes at the starting point of the tape in SP mode.
Connect the editing (recording) VCR, source (playing) VCR and your TV using the following diagram.
EXAMPLE: The editing (recording) VCR is this unit. The source (playing) VCR is another VCR.
NOTE: When you connect the monaural VCR to this VCR, connect the Audio output jack of the monaural VCR to the AUDIO IN L jack of this VCR. The audio signal will be recorded both L and R channel equally.
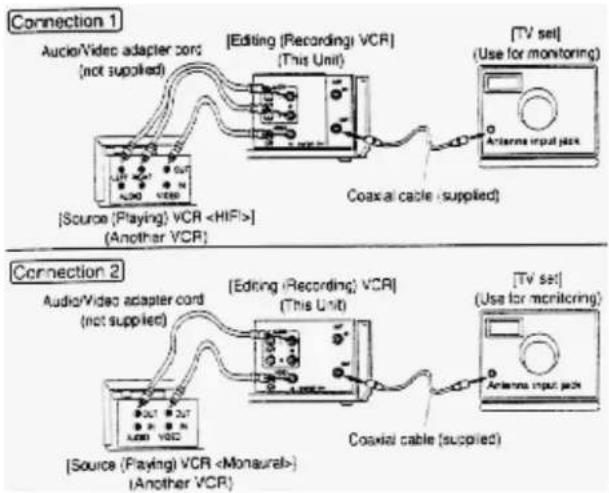
flowchart
graph TD
    subgraph Connection 1
        A["Audio/Video adapter cons (not supplied)"]
        B["Coaxial cable (supplied)"]
        C["TV set (Use for monitoring)"]
        D["Source (Playing) VCR <HIFI>"]
        E["Another VCR"]
    end

    subgraph Connection 2
        F["Audio/Video adapter cord (not supplied)"]
        G["Coaxial cable (supplied)"]
        H["TV set (Use for monitoring)"]
        I["Source (Playing) VCR <Monaural>"]
        J["Another VCR"]
    end
1) Insert a pre-recorded video cassette into the source (playing) VCR.
2) Insert a blank video cassette, or one you want to record over, into the editing (recording) VCR cassette compartment.
3) Press TAPE SPEED button on the remote control to select the desired recording speed (SLP, LP or SP) on the editing (recording) VCR.
4) Select AUX position on the editing (recording) VCR. See page 11, under "Input Select".
5) Press REC button on the editing (recording) VCR.
6) Begin playback of the tape in the source (playing) VCR.
NOTES:
- For best results during dubbing, use the VCR's front panel controls whenever possible. The remote control might affect the playback VCR's operation.
- Always use video-quality shielded cables with RCA-type connectors. Standard audio cables are not recommended.
- You can use a video disc player, satellite receiver, or other audio/video component with A/V outputs in place of the playback VCR.
TO MONITOR THE RECORDING
1) Turn on the TV, and set it to the same output channel as the editing VCR channel 3 or 4.
2) Press VCR/TV button on the remote control so that "VCR" appears on the display.
CONTROLLING YOUR TV WITH THE VCR'S REMOTE
This Hitachi remote control can be used with your TV as well as the VCR, as long as your TV comes with a remote control. This feature comes in handy--you won't have to juggle two remotes.
The remote control is compatible with the fifteen makers of TVs listed below--but don't be alarmed if yours is not on our list. You may still be able
to program the remote for your TV.
Every TV that comes with a remote control is set up to detect certain infrared signals. You need to program the VCR's remote control to send signals that your TV will recognize and respond to. Here's what to do:
Compatibility
- The remote control is designed to be operated with many televisions and cable converters, but will not work with every one made. If your TV or cable box does not respond the way it should when you program if as explained follows, this remote may be incapable of operating it.
- Once you have programmed the remote, you won't have to do it again until you change the batteries.
REMOTE CONTROL OF THE TV
PROGRAMMING THE REMOTE CONTROL OF THE TV
1 Turn on the TV
Turn on the TV (any channel is okay).
2 Program the remote control
Aim the VCR's remote control at your TV set. Hold down the TV button (not the VCR/TV button) while you press the number corresponding to your brand of television as shown in the chart.
For example; If you have an RCA television, press TV and 0 at the same time. If this button combination sends a signal that matches with your TV, the channel will change on the TV, and you'll know the remote is set to control the television.
NOTES:
- If that button combination does not change the TV channel, go through the whole list of button combinations one by one until you find one that does change your TV channel.
- Also, if your brand of TV is not listed in the chart, try all the number buttons. One of them may work for you.
- If the TV channel still doesn't change after going through all the button combinations listed, it is likely that you will not be able to program this remote control for your TV.
| TV Brands | Press TV and This Number |
| Hitachi | 1 |
| Zenith | 2 |
| Sony | 3 |
| Magnavox | 4 |
| Sanyo | 5 |
| Gold Star 1 | 6 |
| Toshiba 7 |
| Gold Star 2 8 |
| Panasonic 2 9 |
| RCA 0 |
| Panasonic 1 CH/SET (up arrow) |
| Mitsubishi CH/SET (down arrow) |
| JVC 100/ENT |
| Sharp 1 MEMORY |
| Sharp2 SELECT |
CONTROLLING THE TV
Once programmed, the VCR's remote control is ready to control the TV.
NOTE: Be aware that not all of your TV's functions may work even though the remote control is correctly programmed.
1 Select the TV function mode
First press TV button to change to the TV function mode, then press the button of the TV function that you want.
For example;
Press TV button and the CH/SET ( ), and the TV station will change to the next higher station.
2 Return to the VCR function mode
Press VCR button to operate your VCR with the remote again.
REMOTE CONTROL OF THE CABLE CONVERTER
If you have a cable converter, you will probably want to program your VCR's remote control so you can easily change channels. The process is the same as for programming the remote to operate your TV. For additional details, see the previous page.
PROGRAMMING THE REMOTE CONTROL OF THE CABLE CONVERTER
1 Program the remote control
Hold down the CATV button and press the number of your brand of cable box (shown in the chart).
NOTE: If that button combination does not work, or if your brand is not on the chart, just go through all the button combinations until you find the one that works best.
Cable Converters Press CATV and This Number
| Jerrold 1 1 | |
| Jerrold 2 2 | |
| Jerrold 3 3 | |
| Hamlin | 4 |
| Zenith | 5 |
| Scientific Atlanta 6 | |
| Pioneer | 7 |
| Philips | 8 |
TO OPERATE THE CABLE BOX ONCE THE REMOTE IS PROGRAMMED FOR IT.
1 Press CATV and then the button of the function you want.
2 Press VCR button to operate your VCR with the remote again.
TROUBLESHOOTING GUIDE pg. 36
If you have followed the instructions contained in this manual and have difficulty in operating your VCR, locate the SYMPTOM in the left column below. Check the corresponding POSSIBLE CAUSE and CORRECTIVE ACTION columns to remedy the problem.
| SYMPTOM POSSIBLE | CAUSE CORRECTIVE ACTION | |
| No power. • Power cord | is not connected.• The VCR power is turned off. | • Connect power cord to AC outlet.• Press POWER button to turn on the VCR. |
| Timer recording is not possible. | • The timer recording is set incorrectly.• The VCR power is turned on.• VCR clock is not set correctly. | • Set the timer recording correctly.• Press POWER button to turn off the VCR.• Set VCR clock correctly. |
| Recording mode cannot be engaged. | • The erase prevention tab on cassette is missing. | • Place a plastic tape over the hole. |
| No picture or poor picture on playback. | • The TV and/or VCR is in the TV mode.• The TV fine tuning is not set correctly. | • Set your TV to the the VCR mode and/or press VCR/TV button on the remote control so that "VCR" appears on the display.• Fine tune your TV. |
| Noise in picture on playback. | • Video heads are dirty. • Head cleaning is necessary, consult the nearest Authorized Service | |
| Center. | ||
| Playback picture is partially noisy. | ·The tracking control is not set correctly. | ·Adjust tracking control for a better picture. |
| On-the-air TV programs cannot be seen. | ·Connections are not correctly made.·The TV and/or VCR is in VCR mode. | ·Re-check the ANT.IN and ANT.OUT connections.·Set your TV to the TV mode and/or press VCR/TV button on the remote control so that "VCR" disappears from the display. |
| No operation by infrared Remote Control. | ·Weak batteries.·The TV or CATV button is pressed. | ·Check the batteries in the remote control.·Press VCR button on the remote control, then try again. |
| Operation buttons do not work after there is a power failure or you move your VCR. | ·Channel Memory Programming is required because programmed channels are erased. | ·See "NOTES" under "AUTOMATIC CHANNEL PRESET" on page 14. |
MAINTENANCE
SERVICING
Should your VCR become inoperative, do not try to correct the problem by yourself. There are no user-servicable parts inside. Turn off, unplug the power cord, and take the unit to Authorized Service Center for servicing.
CABINET CLEANING
- Wipe the front panel and other exterior surfaces of the VCR with a soft cloth immersed in lukewarm water and wrung dry.
- Never use a solvent or alcohol. Do not spray insecticide liquid near the VCR. Such chemicals may cause damage and discoloration to the exposed surfaces.
HEAD CLEANING
Playback picture may become blurred or interrupted while the TV program reception is clear. Dirt accumulated on the video heads after long periods of use, or the usage of rental or worn tapes can cause this problem. If a streaky or snowy picture appears during playback, the heads of your VCR may need to be cleaned.
- Please visit your local Audio/Video store and purchase a good quality VHS Video Head Cleaner.
- If a Video Head Cleaner does not solve the problem, consult the nearest Authorized Service Center. Professional video head cleaning requires highly technical attention.
TECHNICAL SPECIFICATIONS - 67 -
NOTES:
- Remember to read the instructions included with the head cleaner before use.
- Clean heads only when problems occur.
TECHNICAL SPECIFICATIONS
Format: VHS
Video Signal System: NTSC color EIA standard
Record/Playback System: Video: 4 heads
Audio: VHS
Hi-Fi
stereo
record/playbac
system
Tape Speed: 33.35mm/sec (SP), 16.67mm/sec (LP),
11.12mm/sec (SLP)
RF Input: UHF/VHF 75 ohm
Tuner: 181 channel tuning ability *(125 cable
channels)
Type:
Auto
programming
frequency
synthesis
Power Input:
AC120V
60Hz
Power Consumption: 20 W nominal
Cabinet Size: 14-1/4" (W) x 3-5/8" (H) x 10" (D)
36.0cm (W) x 9.2cm (H) x 25.2cm (D)
Weight: 7.5 lbs. (3.4 kg) (approx.)
Storage Temperature: -4^ to 131^
Operating Temperature: 41°F to 104°F
Accessories: 1 coaxial cable (Part No. 5857952),
1 remote control unit (Part No. TS13061), 2
AAA batteries
* Check your cable company's compatibility requirements.
- Design and specifications subject to change without notice.
CABLE CHANNEL DESIGNATIONS
(Cable Channel Chart)
pg. 39
MEMO
(blank page for consumer notes)
- VT-FX602S Owner's Manual
- Using these quality features:
- IMPORTANT SAFEGUARDS - 2 -
- TABLE OF CONTENTS
- IMPORTANT SAFEGUARDS - 3 -
- WARNING:
- CAUTION:
- The caution marking is located on the rear of the cabinet.
- IMPORTANT SAFEGUARDS
- Antenna ground diagram.
- PRECAUTIONS
- LOCATION
- POWER SUPPLY
- AVOID THE HAZARDS OF ELECTRICAL SHOCK AND FIRE
- WARNING
- IMPORTANT COPYRIGHT INFORMATION
- FEATURES - 8 -
- FEATURES
- VIDEO CASSETTE TAPE
- THREE DIFFERENT TAPE SPEEDS
- Tape Speed
- Recording/Playback Time
- INSERTING A CASSETTE
- REMOVING A CASSETTE
- ERASE PREVENTION
- OPERATING CONTROLS AND FUNCTIONS
- -REMOTE CONTROL VIEW-
- Cassette Compartment
- Search buttons
- Mode Select buttons
- PREPARATION FOR USE - 13 -
- PREPARATION FOR USE
- CABLE CONNECTIONS
- PREPARATION FOR USE - 14 -
- SETTING A VIDEO CHANNEL
- CONNECTING TO INPUT JACKS
- INPUT SELECT
- A/V TERMINALS
- INSTALLING THE BATTERIES
- Note to CATV system installer:
- MTS (Multi-Channel Television Sound) SYSTEM
- CHECKING THE SELECTED MTS MODE
- MTS RECORDING/MONITOR MODE
- SELECTING THE MTS SYSTEM
- Make sure...
- TO SELECT HIFI MODE
- Select the main menu
- Select "VCR SET UP"
- Select "AUDIO OUT"
- Select "HIFI"
- To return to TV mode
- Notes:
- TO SELECT MONO MODE
- TO SELECT STEREO OR SAP MODE
- To return to TV mode
- PRESET FOR USE
- AUTOMATIC CHANNEL PRESET (Without a Cable Box)
- Plug in the VCR power cord
- Select channel 3 or 4 on the TV
- Turn on the VCR
- Select the VCR mode
- Select "ENGLISH" or "ESPANOL"
- Begin channel preset
- PRESET FOR USE - 23 -
- After scanning
- TO RECALL A DESIRED CHANNEL
- PRESET FOR USE - 24 -
- Note for using number buttons:
- TO DELETE PRESET CHANNEL
- Select "INITIALIZE"
- PRESET FOR USE - 25 -
- Select "CHANNEL SET UP"
- Select "ADD/DELETE CH"
- Enter the desired channel number
- Delete it from memory
- -DELETED-
- -MEMORIZED-
- Exit the preset mode
- CHANNEL PRESET AGAIN
- PRESET FOR USE - 27 -
- Select "TV" or "CATV"
- Begin channel preset
- Make sure ...
- Select "D.S.T." (Daylight-Saving Time) to [ON]
- SETTING THE CLOCK (AUTO/MANUAL)
- AUTO CLOCK SETTING
- Select "SETTING CLOCK"
- PRESET FOR USE - 31 -
- CHANNEL SET UP
- Select "AUTO CLOCK"
- SETTING CLOCK
- Enter the channel number for the PBS station
- SET AUTO CLOCK CHANNEL
- Exit the Auto Clock Setting
- Turn off the VCR
- If you enter the channel number manually at step 5,
- If you choose AUTO at step 5,
- MANUAL CLOCK SETTING
- Select "MANUAL"
- Select the month
- PRESET FOR USE - 34 -
- Select the day
- Select the year
- Select the hour
- PRESET FOR USE - 35 -
- Select the minute
- Select "AM" or "PM"
- Start the clock
- NOTE:
- TO CHANGE CLOCK SETTING
- PRESET FOR USE - 36 -
- SELECTING THE LANGUAGE
- Select "LANGUAGE SELECT"
- ON SCREEN DISPLAY - 37 -
- Select "ENGLISH" or "ESPAÑOL"
- Exit the Language select
- ON SCREEN DISPLAY
- PLAYBACK
- NORMAL PLAYBACK
- Insert a prerecorded tape
- To begin playback
- 2A) Using button on the VCR
- 2B) Using button on the remote control
- To stop playback
- PICTURE SEARCH
- STILL PICTURE
- PLAYBACK - 39 -
- VERTICAL HOLD CONTROL
- TRACKING ADJUSTMENT
- SLOW MOTION
- AUTO REWIND
- PLAYBACK - 40 -
- JOG AND SHUTTLE FUNCTION
- Select Jog/Shuttle mode
- To make the playback speed faster
- To advance the frame one by one
- SPECIAL PLAY BACK
- AUTO REPEAT PLAYBACK
- Select "REPEAT PLAY"
- TO STOP PLAYBACK
- TO EXIT THE AUTO REPEAT MODE
- RENTAL PLAY
- Select "RENTAL"
- Select "RENTAL" to [ON]
- TO EXIT THE RENTAL PLAY MODE
- SEARCH
- Stop the tape at your desired point
- Reset the counter to 0:00:00
- Select the Counter Memory mode
- Begin recording or playback
- To activate the Counter Memory
- TO EXIT THE COUNTER MEMORY
- TIME SEARCH
- Select "TIME SEARCH" mode
- Enter your desired time
- Begin Time Search
- After Time Search
- INDEX SEARCH
- Select "INDEX SEARCH" mode
- Enter your desired number
- Begin Index Search
- After Index Search
- BLANK SEARCH
- Select "BLANK SEARCH" mode
- After Blank Search
- RECORDING
- VIEWING AND RECORDING THE SAME PROGRAM
- Select the channel to be recorded
- Select the tape speed
- Begin recording
- Stop recording
- SKIPPING SOME MATERIALS DURING RECORDING
- RECORDING - 49 -
- EDIT SEARCH
- RECORDING ONE PROGRAM WHILE VIEWING ANOTHER
- Select the TV mode
- Select the channel on the TV
- TO MONITOR THE PROGRESS OF YOUR RECORDING
- Select the VCR mode
- IRT (Instant Recording Timer)
- NOTE: This function cannot be done by the remote control.
- TIMER RECORDING
- TIMER RECORDING - 52 -
- NOTE: You must use the remote control for this procedure.
- Avoid overlap of programs...
- Select "TIMER PROGRAMMING"
- Select your desired program number (1 \~ 7)
- Select once, daily or weekly recording For once recording:
- Set the date when you want to start
- Set the start time
- Set the end time
- Set the channel number
- Set the tape speed
- Exit the program mode
- Set the timer
- TO CORRECT AN AUTOMATIC TIMER PROGRAM
- TO STOP AN AUTOMATIC TIMER PROGRAM WHICH HAS ALREADY STARTED
- AUTO RETURN
- TIMER RECORDING - 58 -
- Select "AUTO RETURN" to [AUTO]
- WATCH THE RECORDED PROGRAM
- SETTING THE REMAINING TIME - 59 -
- SETTING THE REMAINING TIME
- Select the main menu.
- SETTING THE REMAINING TIME - 60 -
- Select "\~T60", "\~T130" or "T140\~"
- Exit the preset mode
- To check the remain time
- REMAINING TAPE RUNNING TIME DISPLAY
- TO MONITOR THE RECORDING
- CONTROLLING YOUR TV WITH THE VCR'S REMOTE
- Compatibility
- REMOTE CONTROL OF THE TV
- PROGRAMMING THE REMOTE CONTROL OF THE TV
- Turn on the TV
- Program the remote control
- CONTROLLING THE TV
- Select the TV function mode
- Return to the VCR function mode
- REMOTE CONTROL OF THE CABLE CONVERTER
- PROGRAMMING THE REMOTE CONTROL OF THE CABLE CONVERTER
- Program the remote control
- TO OPERATE THE CABLE BOX ONCE THE REMOTE IS PROGRAMMED FOR IT.
- TROUBLESHOOTING GUIDE pg. 36
- MAINTENANCE
- SERVICING
- CABINET CLEANING
- HEAD CLEANING
- TECHNICAL SPECIFICATIONS - 67 -
- TECHNICAL SPECIFICATIONS
- CABLE CHANNEL DESIGNATIONS
Brand : HITACHI
Model : VT-FX602S
Category : Video camera