
ALS700 - Headphones Hamilton Buhl - Free user manual and instructions
Find the device manual for free ALS700 Hamilton Buhl in PDF.


| Product Type | Over-ear wired headphones |
| Connectivity | 3.5mm audio jack (gold-plated) |
| Cable Length | 6 ft (1.8 m) |
| Driver Size | 40 mm |
| Frequency Response | 20 Hz - 20 kHz |
| Impedance | 32 ohms |
| Sensitivity | 105 dB |
| Ear Cushion Material | Leatherette |
| Adjustable Headband | Yes, padded |
| Volume Control | In-line slider |
| Weight | 8 oz (227 g) |
| Color | Black |
| Power Source | Passive (no battery required) |
| Main Functions | Stereo audio playback, noise isolation |
| Intended Use | Classroom, computer, music listening |
| Care Instructions | Wipe with a damp cloth; avoid liquids in ear cups |
| Safety Warnings | Do not use while driving or operating machinery |
| Replaceable Parts | Ear pads (available from Hamilton Buhl) |
| Compatibility | Devices with 3.5mm jack (smartphones, tablets, PCs) |
| Warranty | Limited lifetime warranty |
| Included Accessories | Headphones, user manual |
Frequently Asked Questions - ALS700 Hamilton Buhl
User questions about ALS700 Hamilton Buhl
0 question about this device. Answer the ones you know or ask your own.
Ask a new question about this device
Download the instructions for your Headphones in PDF format for free! Find your manual ALS700 - Hamilton Buhl and take your electronic device back in hand. On this page are published all the documents necessary for the use of your device. ALS700 by Hamilton Buhl.
USER MANUAL ALS700 Hamilton Buhl
Never Ending Learning Innovation
Assistive Listening System
INSTRUCTION MANUAL
MODEL #: ALS700
PLEASE READ THIS INSTRUCTION MANUAL COMPLETELY BEFORE OPERATING THIS UNIT AND RETAIN THIS BOOKLET FOR FUTURE REFERENCE
HamiltonBuhl
80 Little Falls Road
Fairfield, NJ 07004
Phone: 800-631-0868
www.HamiltonBuhl.com
SAFE OPERATION
For safe operation please ensure to follow the instructions indicated below.
- Stop operation immediately if any liquid or solid object should fall into the cabinet.
- If the unit is not to be used for a long period of time, please ensure to disconnect all power sources. Remove all batteries from the receiver battery compartment, and unplug the transmitter AC/DC adapter from the wall outlet. Do not unplug the AC/DC by pulling the
• cord. - Place the transmitter only on a flat and even surface.
Place the unit in an area with proper ventilation. Do not cover the unit with a cloth or
- place on a carpeted surface.
- Do not use the unit in extremely hot, cold, dusty or humid environments
Placing the unit in a humid environment may cause condensation to form inside the unit. If this were to occur, remove all power sources and allow the unit to sit at room temperature for 1-2 hours prior to usage allowing the condensation to dissipate.
COMPLIANCE WITH FCC REGULATIONS
This device complies with Part 15 of the FCC Rules. Operation is subject to the following two conditions:
(1) This device may not cause harmful interference, and
(2) This device must accept any interference received, including interference that may cause undesired operation.
NOTE: This equipment has been tested and found to comply with the limits for a Class B digital device, pursuant to Part 15 of the FCC Rules. These limits are designed to provide reasonable protection against harmful interference in a residential installation. This equipment generates, uses and can radiate radio frequency energy and, if not installed and used in accordance with the instructions, may cause harmful interference to radio communications. However, there is no guarantee that interference will not occur in a particular installation. If this equipment does cause harmful interference to radio or television reception, which can be determined by turning the equipment off and on, the user is encouraged to try to correct the interference by one or more of the following measures:
- Reorient or relocate the receiving antenna.
- Increase the separation between the equipment and receiver.
- Connect the equipment into an outlet on a circuit different from that to which the receiver is connected.
- Consult the dealer or an experienced radio/TV technician for help.
PREPARATION FOR USE
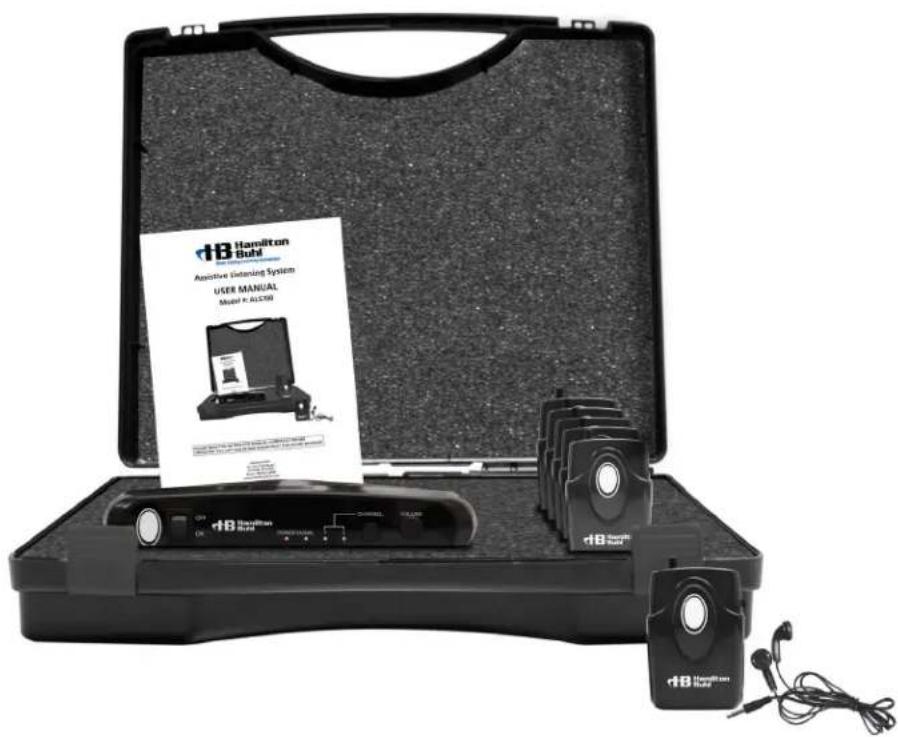
This system includes the following items:
• ALSM700 Dual Channel Transmitter x1
• ALSR700 Dual Channel Receivers x6
• ALSB700 Mono Earbuds x6
• Power Adapter x1
- Instruction Manual x1
- AAA Batteries x18
- Carrying Case x1
LOCATION OF CONTROLS
Rear Panel

natural_image
Black industrial device casing with circular vent and logo (no readable text or symbols beyond branding)- LINE IN JACK
- DC 5V JACK
- MICROPHONE INPUT
- ANTENNA
- POWER ON/OFF SWITCH
- POWER INDICATOR
- SIGNAL INDICATOR
- CH1 & CH2 INDICATOR
- CHANNEL SELECTION BUTTON
-
VOLUME CONTROL
-
CHANNEL SELECTION BUTTON
- PHONE JACK
- CH1 INDICATOR
- CH2 INDICATOR
- GAIN CONTROL KNOB
- POWER ON/OFF SWITCH
- BELT CLIP
- BATTERY COMPARTMENT
POWERING THE TRANSMITTER
NOTE: Only use the supplied power adapter.
- Insert the smaller end of the plug of the adapter to the back of the transmitter. Please ensure the power switch is on OFF prior to inserting the plug.
- Plug the large end of the adapter into an AC wall socket.
See diagram below for reference.

- Turn on the Power by pressing the POWER SWITCH. Once turned on, the power indicator will illuminate.
- The transmitter "signal" indicator will illuminate to confirm that the transmitter is broadcasting.
- Press the CHANNEL button on the front panel to select your desired channel.
SETTING UP THE TRANSMITTER
MICROPHONE INPUT the 1/4" MIC IN jack on the back of the transmitter is designed to accept either dynamic or electret microphones (microphone not included)
The 1/4" LINE IN jack enables you to connect directly to any audio source (Cable not included).
See below diagram for reference.


ALSR700 RECEIVER
FEATURES & CONTROLS
- Volume Control
- Channel Button
- CH1 & CH2 Indicators
- Power Switch
- Phone Jack
POWERING THE RECEIVER
Insert 3 x "AAA" size batteries into the battery compartment on the back of the receiver.
Please ensure to insert the batteries in the correct polarity. To preserve battery life, always turn ALSR700 receiver off when not in use. If the sound quality becomes weak or distorted, try relocating the transmitter or adjusting the antenna.
If the poor sound quality persists, then replace battery of the receiver. The life expectancy from a regular alkaline battery is up to 20 hours.
BATTERY WARNINGT
Be sure that the batteries are installed correctly. Inserting the batteries at the wrong polarity may damage the unit.
- Use only the size and type of batteries specified.
- Do not mix old and new batteries.
- Do not mix alkaline, standard (carbon-zinc) or rechargeable (nickel-cadmium) batteries.
- For better performance and longer operating time, we recommend the use of alkaline-type batteries.
- If the unit is not to be used for an extended period of time, remove the batteries. Old or leaking batteries can cause damage to the unit and may void the warranty.
- Do not try to recharge any non-rechargeable batteries not intended to be recharged; they can overheat and rupture. (Follow battery manufacturer's directions).
- Do not dispose of batteries in a fire, as the batteries may leak or explode.
Plug the ALSB700 mono earbuds into the phone jack on top of the receiver.
Turn on the receiver with the POWER SWITCH. The CH1 indicator will light up when receiving a signal from the ALSM700 transmitter CH1. If the receiver is not on the correct channel, the indicator will flash, when the receiver is on the correct channel indicator light will be solid. Press the channel button on the receiver to change to the correct channel.
Use the GAIN control to adjust the volume to your desired listening level. If there is no sound, please ensure the VOLUME on the transmitter is at a reasonable level.
OPTIMAL PERFORMANCET
For an optimal performance, please ensure the following:
1) The antenna is fully extended
2) There are no large structures/obstacles blocking the line of sight between the transmitter and the receiver.
3) The receivers have new batteries
4) The usage of the ALS700 is done in an environment of low interference (Areas with multiple FM transmissions can possibly increase interference)
SPECIFICATIONS
OVERALL ALS700 SYSTEM PERFORMANCE
Frequency Response ....100Hz – 8KHz
Signal to Noise Ratio 41dB
Total Harmonic Distortion ....../< 0.5%
RF Carrier Frequencies ....75.5MHz (Channel 1) — 75.9MHz (Channel 2)
Frequency Stability .... > 0.005%
Modulation ......FM +75KHz max.
Operating Range ......Up to150 feet line of sight
ALSM700 TRANSMITTER
Mic Input ...... Connector: 1/4" Phone jack Impedance: unbalanced
Line Input ...... Connector: 1/4" Phone jack Impedance: 100K unbalanced
Power Output ....13dBm
Controls ......Power On/Off, Volume Adjust, Channel Select
Indicators ......Power On LED, Signal LED, CH1 LED, CH2 LED.
Antenna .... Permanently mounted telescope
Power Requirement....5V DC, regulated @200mA, Adapter provided
Dimensions 9(L) x 6.07(W) x 1.97(H) Inches
Weight ....TBD
ALSM700 TRANSMITTER
Mic Input ...... Connector: 1/4" Phone jack Impedance: unbalanced
Line Input ...... Connector: 1/4" Phone jack Impedance: 100K unbalanced
Power Output ....13dBm
Controls ......Power On/Off, Volume Adjust, Channel Select
Indicators ......Power On LED, Signal LED, CH1 LED, CH2 LED.
Antenna ....Permanently mounted telescope
Power Requirement....5V DC, regulated @200mA, Adapter provided
Dimensions 9(L) x 6.07(W) x 1.97(H) Inches
Weight ....TBD
H3 Hamilton Buhl™ Never Ending Learning Innovation
Product Registration Instruction
Visit: www.HamiltonBuhl.com

natural_image
Silhouette of a person with long hair using a laptop, emitting arrows to the right (no text or symbols)- Click on Customer Support
- Click on Product Registration Form
- Please fill out all field marked with * to register your product
Our Mission:
Since our founding in 1993, HamiltonBuhl continues to evolve as a leader in technology products for education and industry. Our products are embraced by educators, corporate trainers, presenters, government agencies and hospitals for their daily presentation, from classrooms to the boardroom.
80 Little Falls Road, Fairfield, NJ 07004

- Assistive Listening System
- INSTRUCTION MANUAL
- MODEL #: ALS700
- SAFE OPERATION
- For safe operation please ensure to follow the instructions indicated below.
- COMPLIANCE WITH FCC REGULATIONS
- PREPARATION FOR USE
- LOCATION OF CONTROLS
- POWERING THE TRANSMITTER
- SETTING UP THE TRANSMITTER
- ALSR700 RECEIVER
- FEATURES & CONTROLS
- POWERING THE RECEIVER
- BATTERY WARNINGT
- OPTIMAL PERFORMANCET
- SPECIFICATIONS
- OVERALL ALS700 SYSTEM PERFORMANCE
- ALSM700 TRANSMITTER
- H3 Hamilton Buhl™ Never Ending Learning Innovation
- Product Registration Instruction
- Our Mission:
Brand : Hamilton Buhl
Model : ALS700
Category : Headphones