
HDPDP4200 - Television SANSUI - Free user manual and instructions
Find the device manual for free HDPDP4200 SANSUI in PDF.


| Product Type | Plasma Television |
| Brand | Sansui |
| Model | HDPDP4200 |
| Screen Size | 42 inches (diagonal) |
| Aspect Ratio | 16:9 |
| Resolution | 1366 x 768 pixels (HD Ready) |
| Contrast Ratio | 3000:1 (typical) |
| Brightness | 1000 cd/m² |
| Viewing Angle | 178° horizontal and vertical |
| Audio Output | 20W total (2 x 10W) |
| Connectivity | HDMI x2, Component x1, Composite x1, VGA x1, USB x1, RF x1 |
| Power Supply | AC 100-240V, 50/60Hz |
| Power Consumption (Max) | 350W |
| Standby Power | Less than 1W |
| Dimensions (W x H x D) with stand | 1040 x 720 x 310 mm |
| Weight with stand | 30.5 kg |
| VESA Mount Compatible | Yes, 400 x 200 mm |
| Remote Control Included | Yes |
| User Manual Included | Yes (digital download available) |
| Cleaning Instructions | Use a soft dry cloth. Do not use liquid cleaners or abrasive materials. |
| Safety Precautions | Place on stable surface, ensure proper ventilation, avoid exposing to rain or moisture. |
| Spare Parts Availability | Contact Sansui authorized service centers for spare parts. |
| Repairability Index | 7/10 (based on typical plasma TV design) |
Frequently Asked Questions - HDPDP4200 SANSUI
User questions about HDPDP4200 SANSUI
0 question about this device. Answer the ones you know or ask your own.
Ask a new question about this device
Download the instructions for your Television in PDF format for free! Find your manual HDPDP4200 - SANSUI and take your electronic device back in hand. On this page are published all the documents necessary for the use of your device. HDPDP4200 by SANSUI.
USER MANUAL HDPDP4200 SANSUI
42" WIDE PLASMA DISPLAY
HDPDP4200

natural_image
Illustration of a flat-screen TV with a remote control unit beside it (no text or symbols)ATTENTION
If you purchase a universal remote control from your local retailer, please contact the remote manufacturer for the required programming code.
IF CONTACT WITH CUSTOMER SERVICE IS REQUIRED PLEASE HAVE THE MODEL NUMBER READY PRIOR TO THE CALL CUSTOMER SERVICE - 1-800-289-0980
ORION WEBSITE
FOR INFORMATION ON OUR OTHER PRODUCTS, PLEASE VISIT OUR WEBSITE AT
www.orionsalesinc.com
Before operating the unit, please read this manual thoroughly.

CAUTION
RISK OF ELECTRIC SHOCK DO NOT OPEN

CAUTION: TO REDUCE THE RISK OF ELECTRIC SHOCK, DO NOT REMOVE COVER (OR BACK). NO USER-SERVICEABLE PARTS INSIDE. REFER SERVICING TO QUALIFIED SERVICE PERSONNEL.

The lightning flash with arrowhead symbol, within an equilateral triangle is intended to alert the user to the presence of uninsulated dangerous voltage within the product's enclosure that may be of sufficient magnitude to constitute a risk of electric shock.

The exclamation point within an equilateral triangle is intended to alert the user to the presence of important operating and maintenance (servicing) instructions in the literature accompanying the appliance.
WARNING: TO PREVENT FIRE OR SHOCK HAZARD, DO NOT EXPOSE THIS APPLIANCE TO RAIN OR MOISTURE.
FCC Declaration of Conformity Compliance Statement (Part 15):
The Sansui HDPDP4200, WIDE PLASMA DISPLAY complies with Part 15 of the FCC rules. Operation is subject to the following two conditions: (1) this device may not cause harmful interference, and (2) this device must accept any interference received, including interference that may cause undesired operation.
The party responsible for compliance to these rules is:
ORION SALES, INC
HIGHWAY 41 ORION PLACE, PRINCE, PRINCETON, INDIANA 47670
Ph: 1-800-289-0980
WARNING: This equipment has been tested and found to comply with the limits for a Class B digital device, pursuant to Part 15 of the FCC Rules. These limits are designed to provide reasonable protection against harmful interference in a residential installation. This equipment generates, uses and can radiate radio frequency energy and, if not installed and used in accordance with the instructions, may cause harmful interference to radio communications. However, there is no guarantee that interference will not occur in a particular installation. If this equipment does cause harmful interference to radio or television reception, which can be determined by turning the equipment off and on, the user is encouraged to try to correct the interference by one or more of the following measures:
- Reorient or relocate the receiving antenna.
- Increase the separation between the equipment and receiver.
- Connect the equipment into an outlet on a circuit different from that to which the receiver is connected.
- Consult the dealer or an experienced radio/TV technician for help.
CAUTION: Changes or modifications not expressly approved by the partly responsible for compliance with the FCC Rules could void the user's authority to operate this equipment.
Location of the required Marking
The rating sheet and the safety caution are on the rear of the unit.

natural_image
Line drawing of a monitor rear panel with control buttons and indicator lights (no text or symbols)1) Read these instructions.
2) Keep these instruction.
3) Heed all warnings.
4) Follow all instructions.
5) Do not use this apparatus near water.
6) Clean only with dry cloth.
7) Do not block any ventilation openings. Install in accordance with the manufacturer's instructions.
8) Do not install near any heat sources such as radiators, heat registers, stoves, or other apparatus (including amplifiers) that produce heat.
9) Do not defeat the safety purpose of the grounding-type plug. A grounding type plug has two blades and a third grounding prong. The third prong are provided for your safety. If the provided plug does not fit into your outlet, consult an electrician for replacement of the obsolete outlet.
10) Protect the power cord from being walked on or pinched particularly at plugs, convenience receptacles, and the point where they exit from the apparatus.
11) Only use attachments/accessories specified by the manufacturer.
12) Use only with the cart, stand, tripod, bracket, or table specified by the manufacturer, or sold with the apparatus. When a cart is used, use caution when moving the cart/apparatus combination to avoid injury from tip-over.
13) Unplug this apparatus during lightning storms or when unused for long periods of time.
14) Refer all servicing to qualified service personnel. Servicing is required when the apparatus has been damaged in any way, such as power-supply cord or plug is damaged, liquid has been spilled or objects have fallen into the apparatus, the apparatus has been exposed to rain or moisture, does not operate normally, or has been dropped.
PORTABLE CART WARNING (symbol provided by RETAC)

15) Apparatus shall not be exposed to dripping or splashing and that no objects filled with liquids, such a vases, shall be placed on the apparatus.
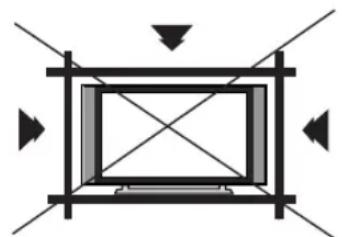
The unit emits heat when in operation. Do not place any covers or blankets on the unit, this may cause overheating. Do not block ventilation holes, or set up near radiators. Do not place in direct sunshine. When placing on a shelf leave 10 cm (4 inches) free space around the entire unit.
natural_image
Pure geometric diagram with intersecting lines and arrows, no text or symbols present
Notes when mounting the Plasma Display on a wall
- When installing the unit on a wall, allow at least 6 cm (2 1/2 inches) clearance between the rear of the Plasma Display and the wall. Clearance of less than 6 cm (2 1/2 inches) will obstruct the vents and may cause the interior of the unit to overheat, resulting in damage to the unit.
- If the unit is to be mounted on the wall, contact the retailer where you purchased the Plasma Display for advice, and have the equipment professionally installed. Incomplete or improper installation may cause injury to you and/or the Plasma Display.
- Bracket holes: To attach a wall mounting bracket (not supplied) here, remove the screws.

IMPORTANT NOTICE
Possible Adverse Effects on Plasma Screen: If a fixed (non-moving) pattern remains on the plasma screen for long periods of time, the image can become permanently engrained in the plasma display panel and cause subtle but permanent ghost images. This type of damage is NOT COVERED BY YOUR WARRANTY. Never leave your plasma display on for long periods of time while it is displaying the following formats or images:
- Fixed Images, such as stock tickers, video game patterns, TV station logos, and websites.
- Special Formats that do not use the entire screen. For example, viewing letterbox style (16:9) media on a normal (4:3) display (gray bars at top and bottom of screen); or viewing normal style (4:3) media on a widescreen (16:9) display (gray bars on left and right sides of screen).
To avoid the engraining, we recommend that you use the screen saver function. (see P.34)
The following symptoms are not signs of malfunction but technical limitation. Therefore we disclaim any responsibility for these symptoms.
- Plasma display panels are manufactured using an extremely high level of precision technology, however sometimes parts of the screen may be missing picture elements or have luminous spots. This is not a sign of a malfunction.
- Do not install the Plasma Display near electronic equipment that is susceptible to electromagnetic waves. Some equipment placed too near this unit may cause interference.
- Effect on infrared devices – There may be interference while using infrared devices such as infrared cordless headphones.
PREPARATIONS
IMPORTANT SAFETY INSTRUCTIONS 3
SAFETY PRECAUTIONS 4
IMPORTANT NOTICE 4
Contents 5
Features 6
Power source 6
Parts and functions 7
Remote control 8
Connections to other equipment 12
Setting the language 17
OPERATION
Display operation 18
Selecting the video input source 19
Labeling the video input source 19
Closed Caption.... 20
Setting the V-Chip 21
Setting the panel lock 24
Setting the picture size 25
Setting the picture scroll 27
Selecting the cinema mode 28
Adjusting the picture preference 29
Picture control adjustment.... 30
Selecting the color temperature 31
Resetting your picture adjustment.... 31
Sound control adjustment 32
Selecting the HDMI audio input source 32
Selecting the BBE 33
Resetting your audio adjustment.... 33
Screen Saver function 34
Picture control adjustment in the PC mode 35
Sound control adjustment in the PC mode.... 36
OTHERS
Troubleshooting 37
Specifications 38
LIMITED WARRANTY 39
- Picture Adjustments Using The Remote Control - The On-Screen display allows precise remote control adjustment of BRIGHTNESS, CONTRAST, COLOR, TINT and SHARPNESS.
- Programmable Display Sleep Timer - Operable from the remote control, the Plasma Display can be programmed up to 120 minutes to turn off automatically.
- V-Chip - The V-Chip function can read the rating of a broadcast program or movie content if the program is encoded with this information. V-chip will allow you to set a restriction level.
- BBE - BBE gives you vivid sound with incredible presence.
- S-Video/Component Video Jacks - A VCR, DVD player, satellite receiver or other audio/video component can be connected to this unit.
- Video Input Jacks - This unit is equipped 3 types of video input jacks. The component video in jacks and S-video in jack enable you to watch the DVD player or the video devices with high quality picture.
- On-Screen 3 Language Display - You can select one of 3 languages, English, Spanish or French for on-screen programming.
Power source
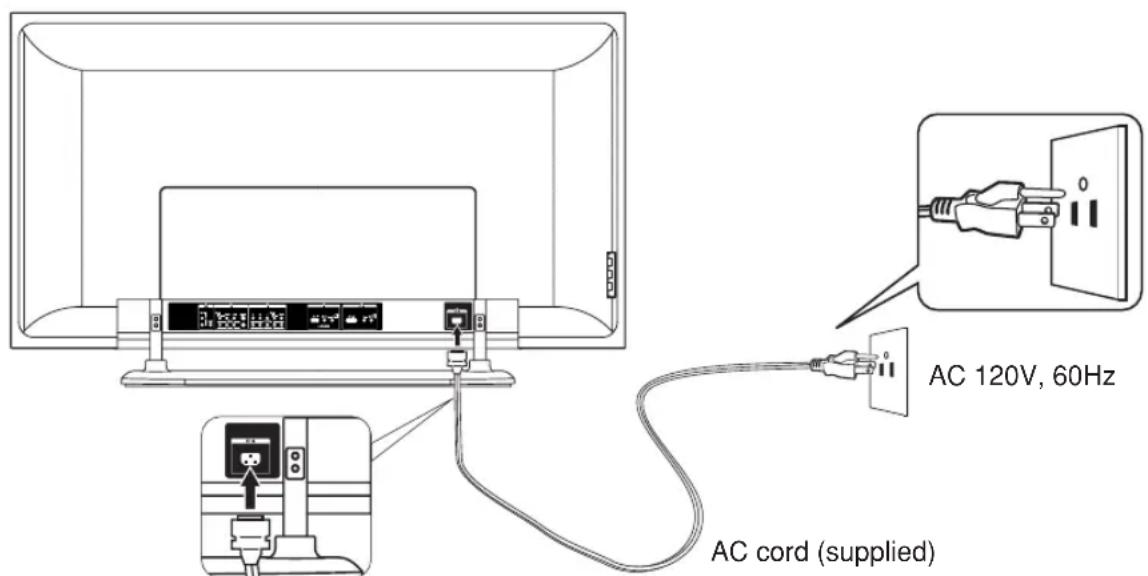
TO USE AC POWER
- Connect the AC cord plug into this unit's AC IN jack.
- Connect the AC cord into an AC outlet.
NOTES:
- Please make sure to insert the cord securely at both the Plasma Display and the wall outlet.
- The AC Cord has a grounding-type AC line plug. If the supplied AC cord does not match you AC outlet, contact a qualified electrician, do not defeat the purpose of a grounding plug.
WARNING:
- DO NOT CONNECT THIS UNIT TO THE POWER USING ANY DEVICE OTHER THAN THE SUPPLIED AC CORD. THIS COULD CAUSE FIRE, ELECTRICAL SHOCK, OR DAMAGE.
- DO NOT USE WITH A VOLTAGE OTHER THAN THE POWER VOLTAGE DISPLAYED. THIS COULD CAUSE FIRE, ELECTRICAL SHOCK, OR DAMAGE.
CAUTION:
- WHEN THIS UNIT IS NOT USED FOR A LONG TIME, (E.G., AWAY ON A TRIP) IN THE INTEREST OF SAFETY, BE SURE TO UNPLUG IT FROM THE AC OUTLET.
- DO NOT PLUG/UNPLUG THE PLUG WHEN YOUR HANDS ARE WET. THIS MAY CAUSE ELECTRICAL SHOCK.
- IF YOU NEED TO REPLACE THE SUPPLIED AC ADAPTER OR AC CORD, THE SPECIFIED ONE IS RECOMMENDED. CONTACT CUSTOMER SERVICE AT 1-800-289-0980.

* To display the menu screen.
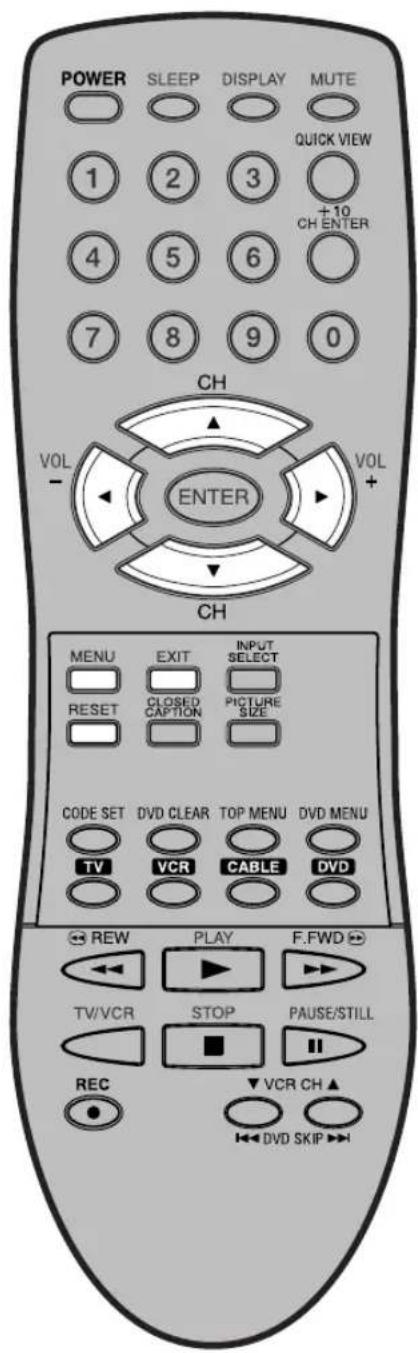
Press both VOLUME ▲/▼ buttons at the same time to display the menu screen.
CURSOR ▲/▼ buttons and VOLUME ▲/▼ buttons can be used to select the desired setting during the menu screen operations.


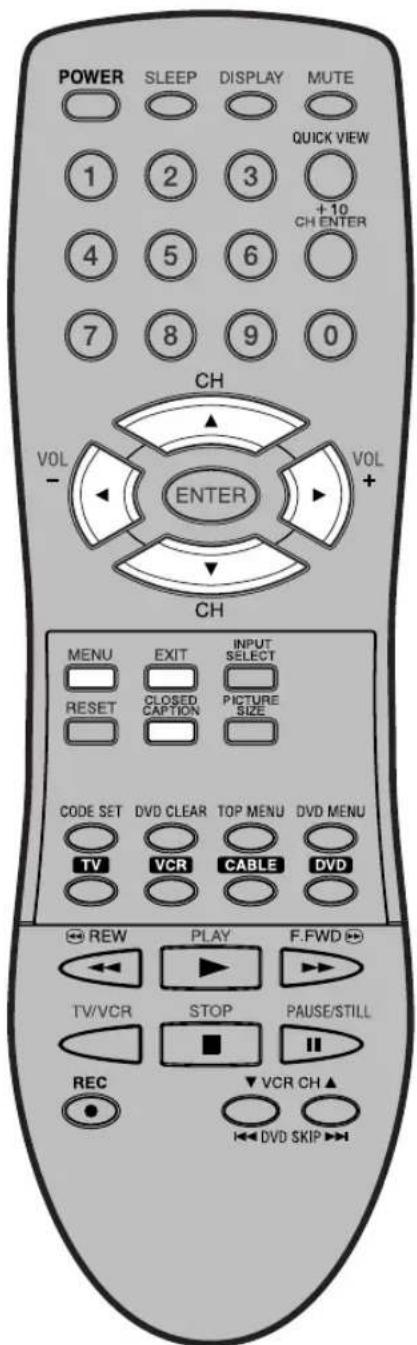
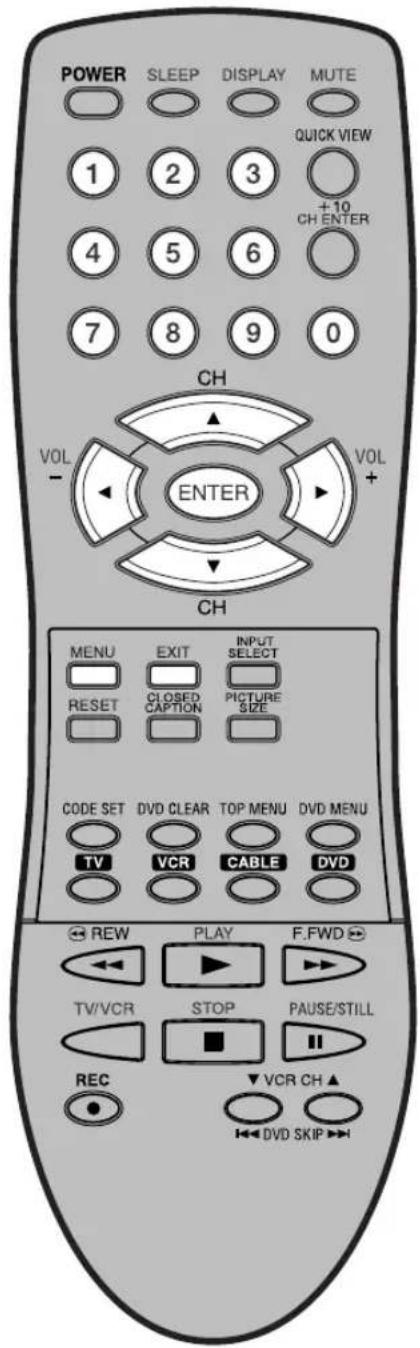
* You can use these buttons to operate your VCR, Cable/Satellite box or DVD after you have programmed the re-10 mote control for the code that operates your VCR, Cable/Satellite box or DVD (see page 10 and 11).
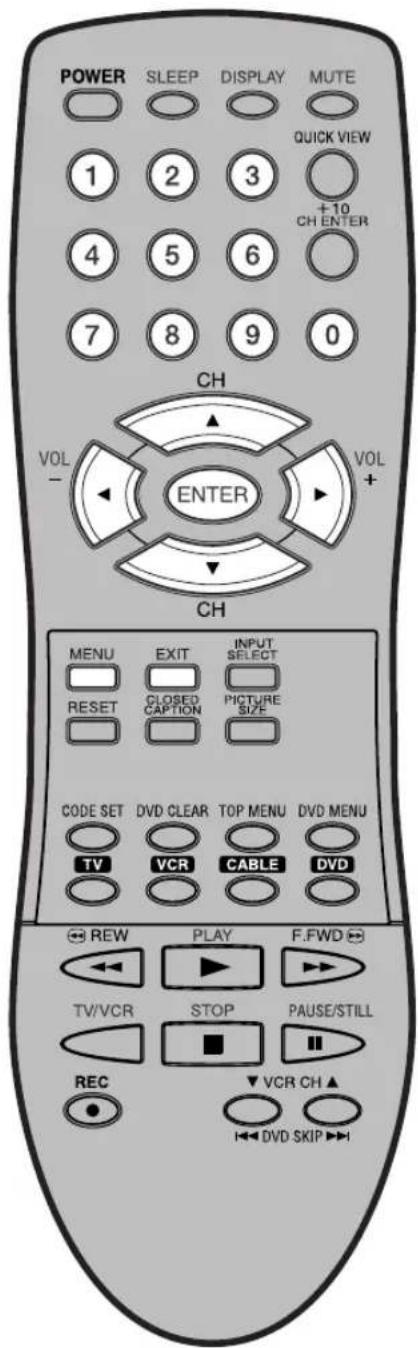
- PLASMA DISPLAY, VCR, CABLE, DVD POWER Button* - Used to turn the Plasma Display, VCR, Cable/Satellite box or DVD on or off after you select the operating mode on step 9.
- SLEEP Button - To set the Plasma Display to turn off after a preset amount of time, use the SLEEP button on the remote control.
- Direct Channel Selection Buttons (0-9)* - Allows direct access to any channel of the VCR, Cable/Satellite box or DVD.
- CH (CHANNEL)/CURSOR ▲ / ▼ Buttons* - Used to operate the menu functions of the Plasma Display, and to change the channels of a Cable/Satellite box.
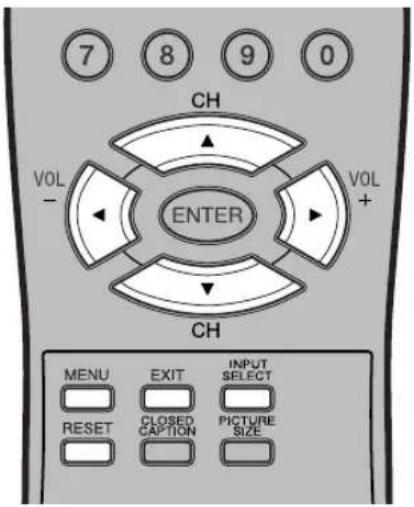
- MENU Button - Use to display the On-Screen menu function.
- RESET Button - Press to reset the On-Screen picture adjustments to their factory preset positions.
- CLOSED CAPTION Button - Press this button to switch between normal mode and the two Closed Caption modes (captions and 1/2 of full screen text). Closed Captioning will display text on screen for hearing impaired viewers.
- CODE SET Button - Used to register the 2-digit codes to operate your VCR or Cable/Satellite box. Press this button and the VCR button or the CABLE button simultaneously to start a registration (See page 10).
-
TV, VCR, CABLE, DVD Selector Buttons - Press to select the Plasma Display, VCR, Cable/Satellite box or DVD to be operated.
-
VCR Operation Buttons* - Press to operate your VCR if programmed properly using a code listed on page 10.
- DISPLAY Button - When you press this button, the input source will appear on the lower right corner of the screen. Press the button again to remove display from the screen.
- MUTE Button - To turn off the sound, press this button once. The Plasma Display will be silenced and the symbol "MUTE" will appear on the screen. The muting feature can be released by pressing the MUTE button again or one of the VOL (VOLUME) + or - buttons.
- QUICK VIEW Button - This button allows you to go back to the previous input source selected by just pressing the QUICK VIEW button. Press this button again to return to the channel you were watching.
- +10/CH ENTER Button* - Some connected equipment such as a Cable/Satellite box, VCR, or DVD may require this button to input selected channels.
- VOL (VOLUME) + / - Buttons - Press the ▶ button to increase, or the ◀ button to decrease the sound level.
- ENTER Button - Use to enter or select information for On-Screen operations.
- EXIT Button - Press to remove setup menu.
- INPUT SELECT Button - Press to display SOURCE SELECTION menu.
- PICTURE SIZE Button - Press to display PICTURE SIZE menu.
- DVD Operation Buttons* - Press to operate your DVD if programmed properly using a code listed on page 10.
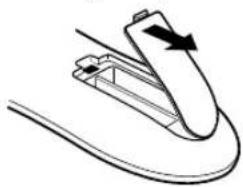
Before using the remote control, batteries must first be installed.
HOW TO INSTALL BATTERIES
- Open the battery compartment cover.
natural_image
Diagram of a cable connector with an arrow indicating rotation (no text or symbols)- Install two "AAA" batteries (supplied).

natural_image
Simple line drawing of a battery connected to a wire, no text or symbols present- Replace the battery compartment cover.
HOW TO USE THE REMOTE CONTROL
You may be able to use the remote control to operate your VCR and Cable/Satellite box along with the Plasma Display after the batteries are installed and you have registered the codes that operate your products. Some buttons are used exclusively for each product and some buttons are used in common with each product. To operate your products correctly using this universal remote control follow each step below.

Use two "AAA" size batteries. The batteries may last approximately one year depending on how much the remote control is used. For best performance, it is recommended that batteries should be replaced on a yearly basis, or when the remote operation becomes erratic. Do not mix old and new batteries or different types.
BATTERY PRECAUTIONS
These precautions should be followed when using batteries in this device:
- Use only the size and type of batteries specified.
- Be sure to follow the correct polarity when installing the batteries as indicated in the battery compartment. Reversed batteries may cause damage to the device.
- Do not mix different types of batteries together (e.g. Alkaline and Carbon-zinc) or old batteries with fresh ones.
- If the device is not to be used for a long period of time, remove the batteries to prevent damage or injury from possible battery leakage.
- Do not try to recharge batteries not intended to be recharged; they can overheat and rupture. (Follow battery manufacturer's directions.)
A. For PLASMA DISPLAY
1 Press the TV button first.
2 Aim remote at Plasma Display.
3 Press the POWER button.
4 Press other buttons to operate the features of your Plasma Display. You can use the VOL + and - buttons, the 0-9 buttons.
B. For VCR
1 Press the VCR button first.
2 Aim remote at VCR.
3 Press the POWER button to turn on VCR.
4 Press other buttons to operate the features of your VCR. You can use the VCR CH ▲ and ▼ buttons, the 0-9 buttons, the CH ENTER button.
C. For CABLE/SATELLITE box
1 Press the CABLE button first.
2 Aim remote at CABLE/SATELLITE box.
3 Press the POWER button to turn on your CABLE/SATELLITE box.
4 Press other buttons to operate the features of your CABLE/SATELLITE box. You can use the CH ▲ and ▼ buttons, the 0-9 buttons, the CH ENTER button.
D. For DVD
1 Press the DVD button first.
2 Aim remote at DVD.
3 Press the POWER button to turn on DVD.
4 Press other buttons to operate the features of your DVD. You can use the DVD SKIP ◀◀ and ▶▶️ buttons, the TOP MENU button, the DVD CLEAR button, the DVD MENU button, the 0-9 buttons, the CH ENTER button.
NOTES:
- Some buttons that have same functions are called different names according to the brand and model of the product. For example, RESET may be called "CANCEL".
- The buttons A, B, C and D are used exclusively for each product. You can use these buttons whenever you want.
TO REGISTER YOUR VCR, CABLE/SATELLITE BOX OR DVD WITH THE REMOTE CONTROL
1 Press CODE SET and VCR, CABLE or DVD you want to register at the same time.
2 Enter the 2-digit code listed below using the Direct Channel Selection buttons (0-9) within 10 seconds.
NOTES: • When shipped from the factory, the remote control is set to operate your Plasma Display.
- If you do not enter the code within 10 seconds from step 1 or enter the non-listed code below, this operation is canceled.
- When you install or replace batteries, you may need to register the codes again for the products you want to control.
REGISTRATION CODES BY PRODUCT AND BRAND NAME
| VCR | |||
| Admiral 08, 61 Multi Tech 39 | |||
| Adventura 31 NEC 02, 18 | |||
| Aiwa 31 Orion 33, 50 | |||
| Akai | 23, 38, 41 | Panasonic | 14, 51, 59 |
| Audio Dynamics 02, 18 Pentax 15 | |||
| Bell & Howell 06, 47 Philco 07, 14 | |||
| Broksonic 21, 26, 33, 50, 55 Philips | 07, 14, 27 | ||
| Canon | 14 Pioneer 10, 15 | ||
| Citizen | 09 Portland 46 | ||
| Craig | 12 Pro Scan 16, 60 | ||
| Curtis Mathes | 14, 59 Quasar 14, 59 | ||
| Daewoo | 44, 46, 48, 54 | RCA 15, 16, 20, 27, 40, 42, 60 | |
| Daytron | 36, 46 Realistic 06, 08, 12, 14, 31 | ||
| DBX | 02, 18 Samsung 20, 30 | ||
| Emerson | 03, 21 23, 26, 33, 35, 43, 50 | Sansui | 39 |
| Fisher | 11, 12, 13, 47 | Sanyo | 06, 12, 47 |
| Funai | 31 Scott 04, 05, 33, 43 | ||
| General Electric | 14, 16, 20 | Sears | 06, 09, 11, 12, 15 |
| Goldstar | 09 Sharp 08, 61 | ||
| Go Video | 56, 62, 63 | Shintom | 39 |
| Hitachi | 15, 57 Signature 2000 08, 14, 16, 19, 31, 49 | ||
| Instant Replay | 14, 27 Sony 17, 32, 37 | ||
| J.C. Penney | 14, 15, 18, 27 | Sylvania | 07, 14, 27 |
| JVC | 02, 25, 58 | Symphonic | 31 |
| Kenwood | 02 Tashiko 09 | ||
| Logik | 39 Tatung 02 | ||
| LXI | 09, 31 Teac 02, 31 | ||
| Magnavox 07, 14, 31 Teknika | 34 | ||
| Marantz | 07, 18 Toshiba 05, 15 | ||
| Marta 09 XR1000 | 39 | ||
| Memorex | 06, 12, 14, 31, 33 | Vector Research | 04, 18 |
| Mitsubishi | 04, 22, 52, 64 | Yamaha | 02, 18 |
| Montgomery Ward | 08, 14, 16, 19, 31, 49 | Zenith | 01, 24, 25, 29, 37 |
| CABLE/SATELLITE | |||
| Allegro | 58, 62 | RCA DSS | 73 |
| Allegro A/B Switch | 61 | Regency | 29 |
| Gemini | 05, 31, 38 | Samsung | 35 |
| General Electric | 67 | Scientific Atlanta | 16, 23, 36, 64 |
| General Instrument | 05, 06 | Sprucer | 13 |
| Hamlin | 02, 03, 45, 65, 66 | Standard Comp | 35 |
| Jerrold | 04, 07, 08, 09, 10, 18, 60, 63 | Texscan | 39, 56, 71 |
| Kale Vision | 35 | Tocom | 17, 18, 46 |
| Macom | 14, 21 | Unika | 48, 62 |
| Magnavox | 34 | United Satellite | 44 |
| NSC | 35, 39, 68, 69, 70 | Universal | 58, 62 |
| Oak | 11, 32, 42 | Vid Tech | 40 |
| Panasonic | 13, 20 | Video Way | 49 |
| Paragon | 33 | Viewstar | 54, 55, 72 |
| Philips | 47, 50, 52, 54, 55 | Zenith | 01, 53, 74 |
| Pioneer | 15, 43 | Zenith Satellite | 12, 28, 30, 51 |
| DVD | |||
| Aiwa 23 Raite 13 | |||
| Apex 20 RCA 01, 06 | |||
| Denon 00, 17 Saba 01 | |||
| Ferguson | 01 | Sampo | 14 |
| Funai 18, 32 Samsung 10 | |||
| Hitachi 11 Sharp 08 | |||
| JVC 09 Silvania 18, 32 | |||
| Kenwood 15, 29 SMC | 25 | ||
| Konka 19 Sony | 04, 26, 27, 28 | ||
| Mitsubishi | 05 Technics | 00 | |
| Nordmende | 01 Thomson | 01 | |
| Onkyo | 21 Toshiba | 03 | |
| Orion 33 Vialta | 31 | ||
| Oritron 24 Wave | 22 | ||
| Panasonic | 00 Yamaha | 00, 30 | |
| Philips 03, 16 Zenith | 07, 12 | ||
| Pioneer | 02 | ||
Connections to other equipment
The exact arrangement you use to interconnect various video and audio components to the Plasma Display is dependent on the model and features of each component. Check the Owner's Manual provided with each component for the location of video and audio inputs and outputs.
The connection diagrams below are offered as suggestions. You may need to modify them to accommodate your particular assortment of components. The diagrams are intended to show component video and audio interconnections only.
To connect the Plasma Display to a VCR

To connect the Plasma Display to a VCR with an S-Video cord
If you connect a VCR with a S-VIDEO cord to the S-VIDEO IN jack on the rear of the Plasma Display, you must also connect the audio cords to the AUDIO IN jacks on the rear of the Plasma Display. The S-VIDEO cord only carries the video signal. The audio signal is separate.

NOTE:
When the S-video cord and the video cord are connected to each jack at the same time, the S-video cord takes precedence over the video cord.
To connect the Plasma Display to a DVD player/Satellite receiver
If your DVD player or Satellite receiver has a S-Video out jack, connect cords as shown.
Rear lower of the Plasma Display

To connect the Plasma Display to a DVD player with component video
If your DVD player has component video out jacks, connect your Plasma Display to a DVD player using a component video cord. It can greatly enhance picture quality and performance.
Rear lower of the Plasma Display

NOTE:
Component Video input of this unit are for use of device which output 480i/1080i interlaced signals and 480p/720p progressive signals.
To connect the Plasma Display to a DTV receiver/set-top box
If you connect a DTV receiver/set-top box, connect your Plasma Display to a DTV receiver/set-top box using a component video cord.
Rear lower of the Plasma Display

Using an Audio Amplifier
To connect the Plasma Display to an Audio Amplifier, connect the unit to the amplifier using an Audio Cable (not supplied).

To connect the Plasma Display to a HDMI or a DVI device
The HDMI input receives digital audio and uncompressed video from a HDMI device or uncompressed digital video from a DVI device.
When you connect to a DVI device with a HDMI-to-DVI adapter cable, it transfers only the video signal. Separate analog audio cords are required.
Rear lower of the Plasma Display

flowchart
graph TD
    A["Input"] --> B["HDMI - to - DVI adapter cable (HDMI type A connector)"]
    B --> C["To DVI output"]
    B --> D["To HDMI out"]
    B --> E["Audio cord (not supplied)"]
    B --> F["HDMI cable (type A connector)"]
    F --> G["Output"]
    style A fill:#f9f,stroke:#333
    style B fill:#ccf,stroke:#333
    style C fill:#cfc,stroke:#333
    style D fill:#fcc,stroke:#333
    style E fill:#ffc,stroke:#333
    style F fill:#cff,stroke:#333
    style G fill:#ffc,stroke:#333
    note right of B: "HDMI type A connector (not supplied)"
    note right of C: "DVI device or HDMI device"
    note right of D: "Audio cord (not supplied)"
NOTE:
You must choose an appropriate setting for each connection (see page 32. "Selecting the HDMI audio input source").
To connect the Plasma Display to a PC (Personal Computer)
Before you connect this Plasma Display to your PC, change the adjustment of your PC's Resolution and Refresh rate (60 Hz).
Connect one end of a (male to male) VGA cable to the video card of the computer and the other end to the VGA connector PC MONITOR on the back of the Plasma Display. Attach the connectors firmly with the screws on the plug. In case of a Multimedia computer, connect the audio cables to the audio outputs of your
Multimedia computer and to the AUDIO L and R connectors of the PC AUDIO (L/R) IN jacks of the Plasma Display.
Press INPUT SELECT on the remote control to select PC mode.
Switch on the computer. The Plasma Display can operate as the computer monitor.

Monitor Display modes
MODE Resolution Refresh rate
VGA 640x480 60Hz
SVGA 800x600 56.3Hz
SVGA 800x600 60.3Hz
XGA 1024x768 60Hz
To return to normal mode
Press INPUT SELECT again.
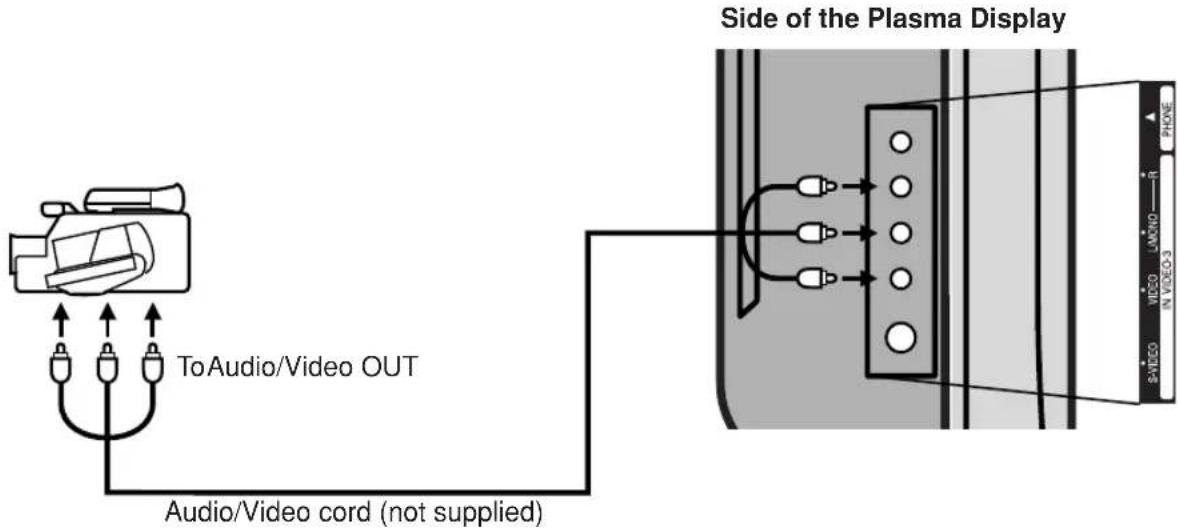
To connect the Plasma Display to a camcorder
Toplayback from a camcorder, connect the camcorder to the Plasma Display as shown.
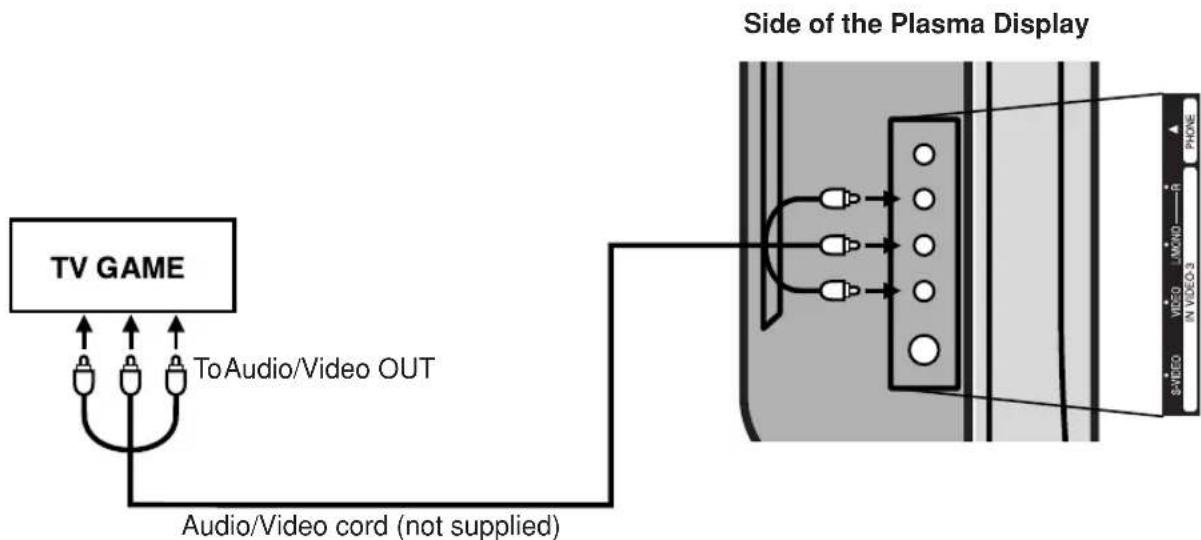
To connect the Plasma Display to a Game
The Plasma Display can also be used as a display device for many video games. However, due to the wide variety of signals generated by these devices and subsequent hook-up variations required, they have not all been included in the suggested connection diagrams. You'll need to consult each component's Owner's Manual for additional information.
You can choose from three different languages (English, French and Spanish) for the on-screen displays.

NOTE:
If no buttons are pressed for more than about 60 seconds, the MENU screen will return to normal operation automatically.
1 Press MENU. The menu screen will appear.
2 Press ◄or ▶ select SETUP menu.
3 Press ▲ or ▼ to select "LANGUAGE".
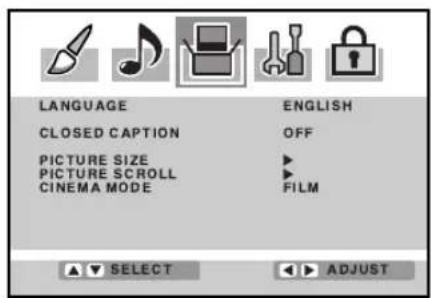

4 Press ◀ or ▶to select the desired addaggaee English (ENGLISH), French (FRANÇAIS) or Spanish (ESPAÑOL).
5 Press EXIT to return to the normal screen.

VOLUME
Adjust the volume level by pressing VOL + or - . The volume level will be indicated on the screen by white bars. As the volume level increases, so do the number of bars. If the volume decreases, the number of white bars also decreases.

bar
| Category | Value | |---|---| | VOLUME | 32 |DISPLAY
Press DISPLAY to display the current information on the screen.
• VIDEO mode selected
• V ideo label (if preset)
- Content rating
- Sleep time (if preset)
- Picture size
Press DISPLAY again to clear the call display.

QUICK VIEW
This button allows you to go back to the last input source selected by pressing QUICK VIEW. Press QUICK VIEW again to return to the last input source you were watching.
MUTE
Press MUTE to switch off the sound. The unit's sound will be silenced and "MUTE" will appear on the screen. The sound can be switched back on by pressing this button again or VOL + or -.

SLEEP
To set the unit to turn off after a preset amount of time, press SLEEP on the remote control. The clock will count up 10 minutes for each press of the SLEEP button (0h00m, 0h10m, ...1h50m, 2h00m). After the sleep time is programmed, the display will appear briefly every ten

minutes to remind you that the sleep timer is operating. To confirm the sleep timer setting, press SLEEP and the remaining time will be displayed for a few seconds. To cancel the sleep timer, press SLEEP repeatedly until the display turns to 0h00m.


Selecting the video input source
Press INPUT SELECT to view a signal from another device connected to your Plasma Display, such as a VCR or DVD player. You can select VIDEO1, VIDEO2, VIDEO3 (left side of the unit), COMPONENT1, COMPONENT2, HDMI, or PC depending on which input jacks you used to connect your devices.
![SOURCE SELECTION 0: VIDEO1 1: VIDEO2 2: VIDEO3 3: COMPONENT1 4: COMPONENT2 5: HDMI 6: PC ▲ ▼ [0-6] SELECT](/content/2026/05/1084559/images/1c94f47f4fcc6c3100eee0da62c3a1335970af6b196ae89c45268197b7719c60.jpg)
Pressing INPUT SELECT on the remote control displays the current signal source. To change the video input source, press INPUT SELECT again or 0-6.
Labeling the video input source
The video label feature allows you to label each input source for your unit.
1 Press MENU. Then press ▶ or ▶ to select OPTION menu. Press ▲ or ▼ to select "VIDEO LABEL".

2 Press ♦pr .The VIDEO LABEL menu will appear.

3 Press ▲ or ▼ to select the video source you want to label.
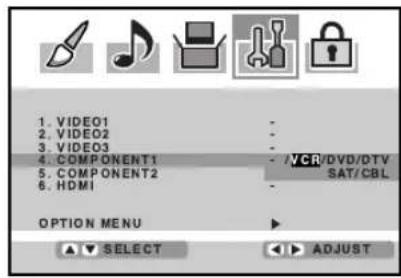
4 Press ◀ or ▶ to select the desired label for that input source. - : Uses the default label name VCR : V ideo cassette recorder DVD : DVD video DTV : Digital TV set-top box SAT : Satellite box CBL : Cable box HD : HDMI device (only HDMI)

5 Press EXIT to return to the normal screen.
WHAT IS CLOSED CAPTIONING?
This Plasma Display has the capability to decode and display Closed Captioned television programs. Closed Captioning will display text on the screen for hearing impaired viewers and may translate and display text in another language if broadcast.
Captions: This Closed Caption Mode will display text on the screen in English or another language if broadcast. Generally, Closed Captions in English are transmitted on C1 and Closed Captions in other languages are transmitted on C2.
Text: The Text Closed Caption Mode will usually fill 1/2 of the screen with a programming schedule or other information.
1 Select desired video source for the Plasma Display.
2 Press MENU, then press ◀ or ▶ to display the SETUP menu.
3 Press ▲ or ▼ to select "CLOSED CAPTION".

NOTE:
This screen can be displayed by pressing the CLOSED CAPTION button on the Remote control.
4 Press ◄ or ▶ select the desired Closed Caption mode.
NOTE:
To turn the Closed Caption feature off, select "OFF".
5 Press EXIT to return to the normal screen.
NOTES:
- If the program or video you selected is not closed-captioned, no captions will display on-screen.
- If text is not available in your viewing area, a black rectangle may appear on-screen. If this happens, set the Closed Caption feature to "OFF".
- When selecting Closed Captions, the captioning will be delayed approx. 10 seconds.
- If no caption signal is received, no captions will appear, but the plasma Display will remain in the Caption Mode.
- Misspellings or unusual characters may occasionally appear during Closed Captioning. This is normal with Closed Captioning, especially with live programs. This is because during live programs, captions are also entered live. These transmissions do not allow time for editing.
- When Captions are being displayed, on-screen displays, such as volume and mute may be seen but may interfere with Closed Captions.
- Some Cable TV systems and copy protection systems may interfere with the Closed Captioned signal.
An age limitation can be set to restrict children from viewing or hearing violent scenes or picture that you may choose to exclude. The restriction applies to "TV RATING" and "MOVIE RATING" if this data is transmitted. You may set this restriction separately. To use the V-Chip function, you must register a password.

To register a password
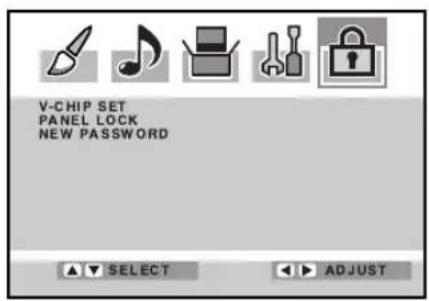
1 Press MENU. The menu screen will appear. Then press ▶ or ▶ to select LOCKS menu.
2 Press ▲ or ▼ to display the password entering mode.
3 Enter the password (4 digits) using number buttons (0-9), then press ENTER.
4 Enter the same password to confirm, then press ENTER. The password is now registered and the V-Chip menu will appear on the screen.
![NEW PASSWORD [0-9]:SELECT ENTER: SET EXIT: END](/content/2026/05/1084559/images/ebee29a93a894f927dec73afb68d4ddc6959693f6df6d8faac4ac1b606c433cf.jpg)
![NEW PASSWORD [0-9]:SELECT ENTER: SET EXIT: END](/content/2026/05/1084559/images/91297f1ee3ff4d9f845f1433a13290ba3abf7861af6cb478c38c4d90b45305b7.jpg)
“*appears instead of the number.
![CONFIRM PASSWORD [0-9]:SELECT ENTER: SET EXIT: END](/content/2026/05/1084559/images/16e6ad342fc1eefee97278f033dbb859afd262ed798ea3f7e9b062e1ba8a09fe.jpg)
NOTES:
- If you forget the password, contact Customer Service at 1-800-289-0980 for assistance. Your original remote control will be required.
• To avoid forgetting the password, write it down and keep in a safe place.

To use the Plasma Display after the V-Chip protection has been set.
When a program exceeding the selected V-Chip level is received a screen will appear blocking the channel display. To temporarily override the V-Chip press the MUTE button, enter your password and press ENTER. Changing the channel or turning the unit off will re-enable the V-Chip setting.
NOTE:
The V-Chip function is activated only on programs and input sources that have the rating signal.
To set the V-CHIP
1 Press MENU, then press ◀ or ▶ to select LOCKS menu.
2 Press ▲ or ▼ to display the password entering mode. Use number buttons (0-9) to enter your password, then press ENTER. The LOCKS menu appears.
3 Press ▲ or ▼ to select "TV RATING". Then press ◀ or ▶ display the desired rating.
OFF : TV RATING is not set
TV-Y : All children
TV-Y7 : 7 years old and above
TV-G : General audience
TV-PG : Parental guidance
TV-14 : 14 years old and above
TV-MA : 17 years old and above
- When you select TV-Y7, TV-PG, TV-14 or TV-MA, press DISPLAY to explain the rating. Press ▲ or ▼ to select the desired rating you want. Press ◀ or ▶ to select the setting "ON" or "OFF".
4 Press ▲ or ▼ to select "MOVIE RATING". Then press ◀ or ▶ to display the desired rating.
OFF : MOVIE RATING is not set
G : All ages
PG : Parental guidance
PG-13 : Parental guidance less than 13 years old
R : Under 17 years old Parental guidance suggested
NC17 : 17 years old and above
X : Adult only
![V.CHIP SET PANEL LOCK NEW PASSWORD SELECT ADJUST PASSWORD [0-9] SELECT ENTER SET EXIT: END V.CHIP V.CHIP TV RATING OFF MOVIE RATING TV-Y/TV-Y/TV-G TV-P/TV-Y/TV-MA OFF PANEL LOCK NEW PASSWORD OFF SELECT ADJUST](/content/2026/05/1084559/images/1ea376ab77def358bc58af5e21fdb51e60c56aeba3bde5a3e029f78c1ad72fe9.jpg)
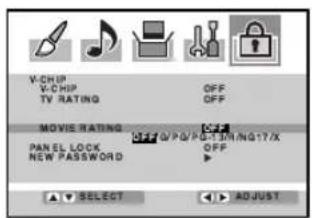
5 Press ▲ or ▼ to select "V-CHIP".
6 Press ▶ or ▶ selected "ON"N. Your settings are now set into memory.

7 Press EXIT to return to the normal screen.
To change the password
1 Press MENU, then press ◀ or ▶ to select LOCKS menu.

2 Press ▲ or ▼ to display the password entering mode. Use the number buttons (0-9) to enter your password, then press ENTER. The LOCKS menu appears.
![PASSWORD [0-9]:SELECT ENTER: SET EXIT: END](/content/2026/05/1084559/images/594b41a2cc6915768d23f414b3f2c2262682008324b31a4558405d0599b38e96.jpg)
3 Press ▲ or ▼ to select "NEW PASSWORD", then press ◀ or ▶
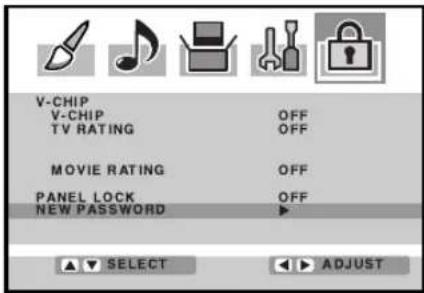
4 Enter a new password using the number buttons (0-9), then press ENTER.
![NEW PASSWORD [0-9]:SELECT ENTER: SET EXIT: END](/content/2026/05/1084559/images/a201b45c007c7683e01b209f3bc218bf6bf46699429b5e7aa4f291453890a664.jpg)
5 Enter the same password again to confirm, then press ENTER.
![CONFIRM PASSWORD [0-9]:SELECT ENTER: SET EXIT: END](/content/2026/05/1084559/images/93696cb8e7dcfedcfa5d55a8abcb5392a22a1f1652726569b7889586a99727ac.jpg)
6 Press EXIT to return to the normal screen.
Setting the panel lock
You can lock the front panel buttons to prevent your settings from being changed accidentally (by children, for example). When the panel lock is ON, all control buttons on the Plasma Display front panel (except POWER) do not operate.
To lock the front panel
1 Press MENU, then press ◄ or ▶ to select LOCKS menu.
![V-CHIP SET PANEL LOCK NEW PASSWORD SELECT ADJUST PASSWORD ***** [0-9]:SELECT ENTER: SET EXIT: END V-CHIP V-CHIP TV RATING OFF OFF MOVIE RATING OFF PANEL LOCK ON OFF NEW PASSWORD ▶ SELECT ADJUST](/content/2026/05/1084559/images/8ad826130c2bc0128ba5d18a800fd9e8071c7bdb06ad98b913097fa38ede28b6.jpg)
2 Press ▲ or ▼ to display the password entering mode. Use the number buttons (0-9) to enter your password, then press ENTER. The LOCKS menu appears.
3 Press ▲ or ▼ to select "PANEL LOCK" and press ◀ or ▶ to select "ON". If a button on the front panel is pressed, the message "NOT AVAILABLE" appears.
4 Press EXIT to return to the normal screen.
To unlock the front panel
Press and hold VOLUME ▼ on the front panel of Plasma Display for about 10 seconds until the message "PANEL LOCK:OFF" appears on the screen.
You also can unlock the front panel using the menus
1 Press MENU, then press or to select LOCKS menu.
![V-CHIP SET PANEL LOCK NEW PASSWORD SELECT ADJUST PASSWORD ****. [0-9]: SELECT ENTER: SET EXIT: END V-CHIP V-CHIP OFF TV-RATING OFF MOVIE RATING OFF PANEL LOCK ON/OFF NEW PASSWORD ▶ SELECT ADJUST](/content/2026/05/1084559/images/a644dacf9a563fb19de8acae07e46cb4d56f43e884b2cb78c8eabb595779613a.jpg)
2 Press ▲ or ▼ to display the password entering mode. Use the number buttons (0-9) to enter your password, then press ENTER. The LOCKS menu appears.
![PASSWORD [0-9]:SELECT ENTER: SET EXIT: END](/content/2026/05/1084559/images/303906b3931fc032b8d93652e56ae4af9e14c593ddbf64f605c0f3d94314ff82.jpg)
3 Press ▲ or ▼ to select "PANEL LOCK", then press ◀ or ▶ select "OFF".

4 Press EXIT to return to the normal screen.
You can view 480i and 480p format programs in a variety of picture sizes—NATURAL, CINEMA WIDE1, CINEMA WIDE2, CINEMA WIDE3, and FULL.

Selecting the picture size
1 Press MENU. Press ◀ or ▶ to select SETUP menu. Press ▲ or ▼ to select "PICTURE SIZE".

2 Press ▶ or ▶ The PICTURE SIZE menu will appear. Press ▲ / ▼ or a number buttons (0-4) to select the desired picture size, as described below and on the next page.
![PICTURE SIZE 0. NATURAL 1. CINEMA WIDE1 2. CINEMA WIDE2 3. CINEMA WIDE3 4. FULL ▲ ▼ [0-4] SELECT](/content/2026/05/1084559/images/af0daf4e89b84e869c996c0e145fb183799f0e8ca5e1f1fe4d37f832ff726d96.jpg)
3 Press EXIT to return to the normal screen.
NOTE:
You can also display the PICTURE SIZE menu by pressing the PICTURE SIZE button on the remote control.
NATURAL picture size
In many cases, this image will display the size of standard 4:3 with a gray side bar.

natural_image
Simple geometric diagram with a circle centered within a square, surrounded by four smaller circles (no text or symbols)Natural picture size example
CINEMA WIDE1 picture size (for 4:3 format programs)
To fill the screen, the right and left edges are extended more widely though the center of the picture remains near former ratio.
The top and bottom edges of the picture may be hidden.

natural_image
Diagram showing a square plate with a circular hole and an oval shape below it, both without any text or symbols.CINEMA WIDE1 picture size example
NOTE:
The PICTURE SIZE feature is not available for some program formats (such as 1080i or 720p).
Such formats will display in FULL.
CINEMA WIDE2 picture size (for letter box programs)
The entire picture is uniformly enlarged—it is stretched the same amount both wider and taller (retains its original proportion).
The top and bottom edges of the picture may be hidden. To view the hidden areas, it is possible to make the picture scroll (see the next page).

natural_image
Diagram showing a circular component being dropped into a rectangular block with five circular holes (no text or symbols)CINEMA WIDE2 picture size example
CINEMA WIDE3 picture size (for letter box programs with subtitles)
To fill the width of the screen, it is extended horizontally. However; it is only slightly extended at the top and the bottom.
The top and bottom edges of the picture may be hidden. To view the hidden areas (such as subtitles or captions), it is possible to make the picture scroll (see the next page).

CINEMA WIDE3 picture size example
FULL picture size (for 16:9 source programs)
FULL will display the picture at the maximum size.

natural_image
Diagram showing a circular component being dropped into a rectangular block with four circular holes (no text or symbols)FULL picture size example
You can scroll the picture in CINEMA WIDE2 and CINEMA WIDE3

NOTE:
The scroll amounts are as follows:
• 480i/480p signal source:
CINEMA WIDE1 : Not adjustable
CINEMA WIDE2 : -10 to +10
CINEMA WIDE3 : -10 to +10
1
Press MENU in CINEMA WIDE2 or CINEMA WIDE3 mode.
Then press ◀ or ▶ to select SETUP menu.
2
Press ▲ or ▼ to select "PICTURE SCROLL".
3
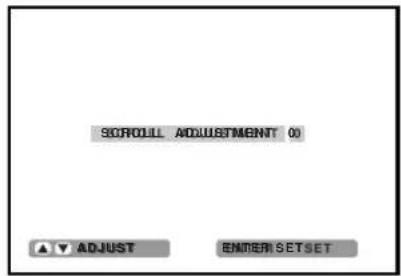
Press ◄ or ▶ display the SCROLL ADJUSTMENT mode.


4
Press ▲ or ▼ to adjust the vertical position of the picture.
Normal (center) position
To raise the picture, press ▲.
To lower the picture, press ▼.


5
Press EXIT to return to the normal screen.
Selecting the cinema mode
A smoother motion may be obtained by setting the CINEMA MODE to FILM when you view a DVD from the DVD player connected with the component input.

To set the CINEMA MODE to FILM
1 Press MENU, then press ◀ or ▶ to select SETUP menu.

2 Press ▲ or ▼ to select "CINEMA MODE", and then press ◄ or ▶ to select "FILM".
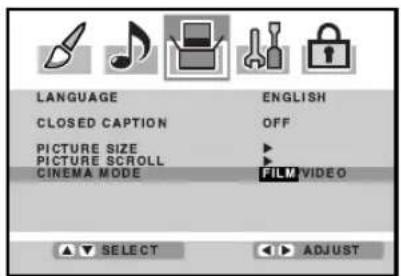
To set the CINEMA MODE to VIDEO :
Press ◀ or ▶ to select "VIDEO" in step 2 above.
Adjusting the picture preference
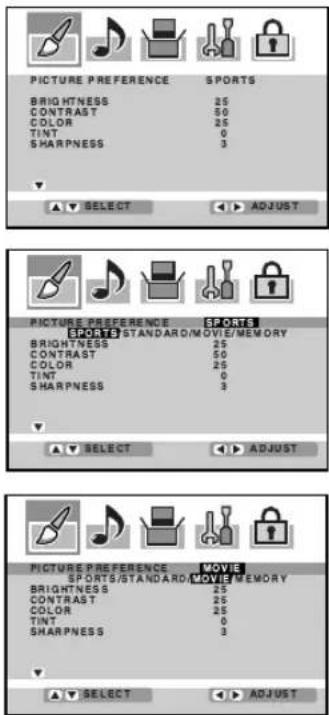
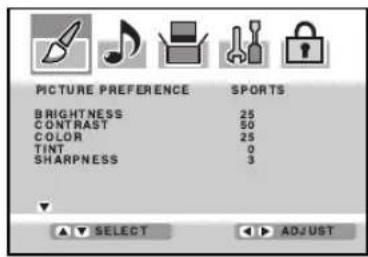
You can select four picture modes—SPORTS, STANDARD, MOVIE, and MEMORY—as described in the following table:

1 Press MENU, then press ◀ or ▶ to select PICTURE menu.
2 Press ▲ or ▼ to select "PICTURE PREFERENCE".
3 Press or ▶ select the item you want to adjust.
| Mode Picture Quality | |
| SPORTS Bright | and bright dynamic picture (factory-set) |
| STANDARD Standard picture quality (factory-set) | |
| MOVIE Movie-like picture setting (factory-set) | |
| MEMORY Your person prefer poets (set by you; see Picture Picture control adjustment" on page 30). | |
4 After your desired setting, press EXIT to return to the normal screen.
Picture control adjustment

NOTE:
The CONTRAST default setting is set to maximum at the factory.
1 Press MENU, then press ◀ or ▶ to select PICTURE menu.
2 Press ▲ or ▼ to select the item you want to adjust, then press ◀ or ▶
3 Press ▶or ▶adjust their setting.
- ▲▼ enables you to select items to adjust.
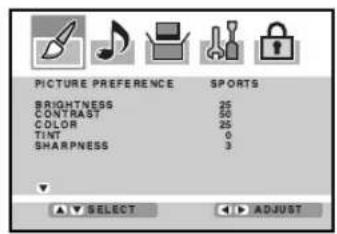
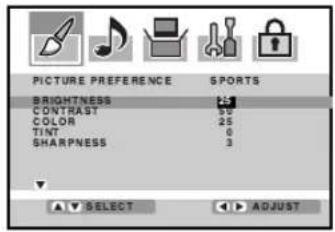
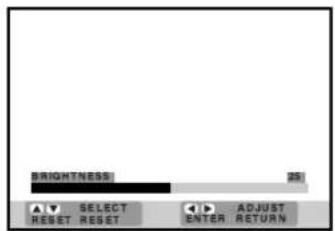
| ◀ | ▶ | |
| BRIGHTNESS | decrease brightness | increase brightness |
| CONTRAST | decrease contrast | increase contrast |
| COLOR | paler color | brilliant color |
| TINT | reddish color tint | greenish color tint |
| SHARPNESS | makes picture softer | makes picture clearer |
4 After your desired setting, press EXIT to return to normal screen.
NOTE:
When you press RESET in the PICTURE menu, the picture adjustments return to the factory preset levels.
Selecting the color temperature
Change the picture quality by selecting from three preset color temperatures—COOL, MEDIUM, and WARM:
1 Press MENU, then press ◀ or ▶ select PICTURE menu.
2 Press ▲ or ▼ to select "COLOR TEMPERATURE". Press ◀ or ▶ to select the mode you prefer.
| Mode Picture | Quality Quality |
| COOL | Blueish |
| MEDIUM | Neutral |
| WARM | Reddish |
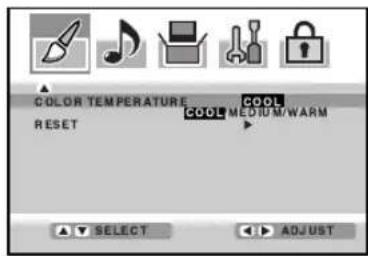
3 Press EXIT to return to the normal screen.
Resetting your picture adjustment
The RESET function returns your picture quality adjustments to the following factory settings:
MODE .... sports TINT .... center (0) BRIGHTNESS .... center (25) SHARPNESS .... center (3) CONTRAST .... max (50) COLOR TEMPERATURE . cool COLOR .... center (25)
1 Press MENU, then press ◀ or ▶ to select PICTURE menu.

2 Press ▲ or ▼ to select "RESET", then press ▶.

Sound control adjustment/Selecting the HDMI audio input source

Sound control adjustment
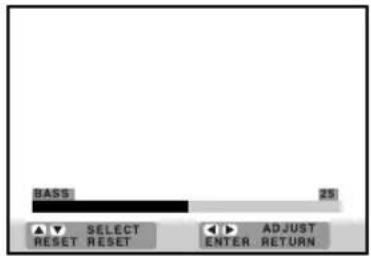
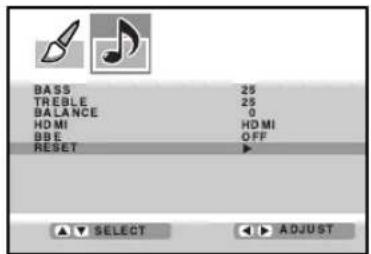
Sound controls are factory preset but you can adjust them individually as follows:
1 Press MENU, then press ◀ or ▶ to select AUDIO menu.

2 Press ▲ or ▼ to select the item you want to adjust, then press ◀ or ▶
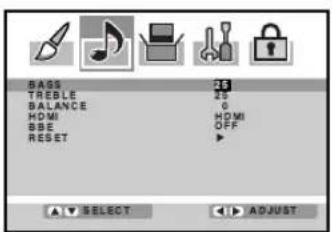
3 Press ◄ or ▶ adjust the setting. BASS:

Press ◄or ▶ adjustment bass sound.
TREBLE:
Press ◀ or ▶ to adjust the entire sound.
BALANCE:
Press ◀or ▶to obtain an equal sound level from both speakers.
4 After your desired setting, press EXIT to return to the normal screen.
Selecting the HDMI audio input source
When you use HDMI AUDIO IN jacks with HDMI or DVI device, you must select HDMI audio input source from "HDMI" or "DVI".
1 Press MENU. Then press ◀r ▶ to select AUDIO menu.

2 Press ▲ or ▼ to select "HDMI".
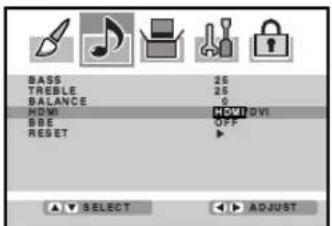
3 Press ◄ or ▶ select "HDMI" or "DVI".
HDMI: When you connect the HDMI device to the Plasma Display, select this setting.
DVI: When you connect the DVI device to the Plasma Display with analog audio cords, select this setting.
4 Press EXIT to return to the normal screen.

Licensed by BBE Sound, Inc. under USP5510752 and 5736897. BBE and BBE symbol are registered trademarks of BBE Sound, Inc.
NOTE:
When you press RESET in the AUDIO menu, the audio adjustment return to the factory preset levels.
Selecting the BBE
By correcting the phase delay and distortion naturally generated by speaker systems, the BBE sound feature ensures that the sound that reaches your ears is as natural as the original sound. Human voices are clearer and music is natural and well-defined.
1 Press MENU, then press ◀ or ▶ to select AUDIO menu.

2 Press ▲ or ▼ to select "BBE", then press ◀ or ▶ to select "ON".
3 Press EXIT to return to the normal screen.
To turn off the BBE sound feature:
Select "OFF" in step 2 above.
Resetting your audio adjustment
The RESET function returns the audio adjustment to the following factory settings:
2 Press ▲ or ▼ to select "RESET", then press ▶.
When a still picture is displayed for an extended period of time, a "ghost" image may permanently appear on the screen.

INVERSION/FULL WHITE
Assists in preventing retained images on the screen.
1 Press MENU, then press ◀ or ▶ to select OPTION menu. Press ▲ or ▼ to select "SCREEN SAVER", then press ◀ or ▶
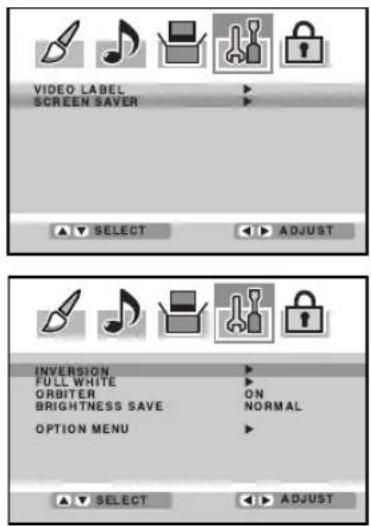
2 Press ▲ or ▼ to select the "INVERSION" or "FULL WHITE", then press ◀ or ▶
INVERSION
MENU disappears and the screen color will invert.
FULL WHITE
MENU disappears and the picture showing on screen will be replaced with white screen.
- The screen will return to normal when any button is pressed.
ORBITER
Moves the picture on the screen in small increments continuously to reduce the image retention of stationary images i.e. channel identification. logo etc.
1 Press MENU, then press ◀ or ▶ to select OPTION menu. Press ▲ or ▼ to select "SCREEN SAVER", then press ◀ or ▶

2 Press ▲ or ▼ to select the "ORBITER", then press ◀ or ▶
3 Press EXIT to return to the normal screen.
BRIGHTNESS SAVE
The brightness of the screen is adjustable.
1 Press MENU, then press ▶ or ▶ to select OPTION menu. Press ▲ or ▼ to select "SCREEN SAVER", then press ▶ or ▶
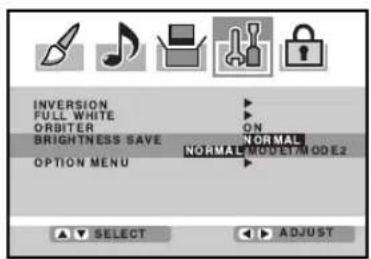
2 Press ▲ or ▼ to select the "BRIGHTNESS SAVE", then press ◄por.
NORMAL: The screen is normal brightness.
MODE1 : The screen will get dim.
MODE2 : The screen will get dimmer.
3 Press EXIT to return to the normal screen.
Description about the each setting option:
BRIGHTNESS: To adjust the brightness of PC Monitor-screen.
CONTRAST: To adjust the contrast of PC Monitor-screen.
HOR POSITION: To adjust the horizontal position of the image on the PC Monitor-screen.
VER POSITION: To adjusts the vertical position of the image on the PC Monitor-screen.
PHASE: This must be adjusted after the frequency of your PC has been set to 60hz to optimize picture quality. (page 15)
CLOCK: To minimize any vertical bars or stripes visible on the screen background.
AUTO ADJUST: When you select this and press ◀ or ▶ the HOR
POSITION and VER POSITION are adjusted automatically. At the same time, your adjusted level will be cancelled. If the result after the automatic adjustment is not satisfying, manual correction is possible.
RED/GREEN/BLUE: To adjust the color temperature of PC Monitor-screen.
NOTES:
- If you wish to change the on-screen language, follow the steps 1 - 5 on page 17.
- If no buttons are pressed for more than approx. 60 seconds, the PC Monitor Menu-screen will return to normal Monitor-screen automatically.
- The PC Monitor Menu settings are not effective for normal mode, or external input mode.
PC Monitor Menu
There are a number of picture and audio settings you can adjust to optimize the performance of the unit in PC mode.
Press INPUT SELECT repeatedly to select PC mode. Press MENU. The PC Monitor Menu will appear.


Example: Adjust the contrast.
1 Press MENU during PC mode, then press ◀ or ▶ to select PC PICTURE menu.
2 Press ▲r to select CONTRAST, then press or .◀ ▶
3 Press ◀r to ▶adjust the setting.
The adjustment screen will disappear approx. 60 seconds after completing an adjustment.
4 Press EXIT to return to the normal screen.
Resetting your picture adjustment in the PC mode
The RESET function returns your picture quality adjustment to the following factory settings:
BRIGHTNESS ...... center (25) RED ...... center (25)
1 Press MENU during PC mode, then press ◀ or ▶ to select PC PICTURE menu.
2 Press ▲r to select "RESET", then press.
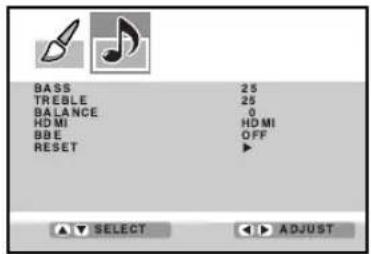
Sound control adjustment in the PC mode

1 Press MENU during PC mode, then press ◀ or ▶ to select PC AUDIO menu.
2 Press ▲ or ▼ to select the item you want to adjust, then press ◀ or ▶
3 Press ▶or ▶ adjust the setting.
BASS:
Press ◄ or ▶ adjust the bass sound.
TREBLE:
Press ◀ or ▶ to adjust the treble sound.
BALANCE:
Press ◀ or ▶ to obtain an equal sound level from both speakers.
BBE:
Press ◀ or ▶ to turn On or Off the BBE sound feature (see page 33 for more details).
4 After your desired setting, press EXIT to return to the normal screen.
Resetting your audio adjustment in the PC mode The RESET function returns the audio adjustment to the following factory settings:
BASS...... center (25)
TREBLE ...... center (25)
BALANCE ...... center (0)
1 Press MENU during PC mode, then press ◀ or ▶ to select PC AUDIO menu.
2 Press ▲ or ▼ to select "RESET", then press ▶.


Use the following check list for troubleshooting if you have problems with your Plasma Display. Consult your local dealer or service outlet if problems persist. Be sure all connections are properly made when using with other units.
| SYMPTOMS POSSIBLE SOLUTIONS | |
| Display does not operate. | Make sure the power cord is plugged in.Try another AC outlet.Power is off, check fuse or circuit breaker.Unplug unit for an hour, then plug it back in. |
| Poor sound or no sound. | Check sound adjustments (Volume and Mute).Check for sources of possible interference. |
| Poor picture or no picture. | Check for sources of possible interference.Check picture control adjustments. |
| Poor color or no color. | Check picture control adjustments.Check for sources of possible interference. |
| No Remote operation. | Batteries are weak, dead or inserted incorrectly.Remote is out of range, move closer to Plasma Display (within 15 feet).Make sure Remote is aimed at sensor.Confirm there are no obstructions between the Remote and the Plasma Display.Make sure the power cord is plugged in. |
| Power interrupted.Display shuts off. | |
| Closed - Caption is not activated. | Set closed caption decoder in the menu. |
| Display is not shown in your language. | Select proper language in the menu options. |

SANSUI®
TO ORDER ACCESSORY PARTS OR LITERATURE
PLEASE CALL:
1-888-369-0304
FOR CUSTOMER SERVICE,
ADDITIONAL SET-UP OR
Power consumption: Operation: 350 W
Stand by: 8.5 W
Weight: 88.0 lbs (40 kg)
Dimensions: Width: 47-5/8 inches (1,210 mm)
Height: 28-3/16 inches (716.5 mm)
Depth: 13-3/8 inches (340 mm)
Inputs: VIDEO: 1 V (p-p)/75 ohms
AUDIO: -8 dBm/50k ohms
S-VIDEO: Y: 1 V (p-p), 75 ohms
C: 0.286 V (p-p), 75 ohms
COMPONENT: Y: 1 V (p-p), 75 ohms
Suggested scan rates: 1080i, 480p, 480i, 720p
HDMI Audio: 2-channel PCM
32/44.1/48 kHz sampling frequency
16/20/24 bits per sample
PC Monitor input: Mini-Dsub 15pin x 1
PDP: 42.32 inches (1074.9 mm diagonal)
1024 x 768 pixel
Speaker: 2-3/16 inches (56 mm) x 5 inches (127 mm), 4 ohms x 2
Sound output power: 10 W + 10 W
ACCESSORY: Remote control
Batteries (UM-4) x 2
AC Cord
Design and specifications are subject to change without notice.
SANSUI®
LIMITED WARRANTY
42" WIDE PLASMA DISPLAY
ORION warrants this product to be free from manufacturing defects in material and workmanship under normal use and conditions for a period of 90 days from date of original purchase in the United States.
Should service be necessary under this warranty for any reason due to a manufacturing defect or malfunction during the first ninety (90) days from date of original purchase, ORION will provide in-home repair service by an ORION authorized Independent Service Center at no charge. Also, if an original part fails due to manufacturing defect in material and workmanship within one year from date of original purchase we will replace the defective part only (LABOR NOT INCLUDED AFTER THE INITIAL NINETY (90) DAY WARRANTY PERIOD) provided the defect or malfunction is verified along with dated proof of purchase.
There are ORION authorized Independent Service Centers located throughout the country. For the one nearest you, DIAL TOLL FREE: 1-800-289-0980 or visit our website at www.orionsalesinc.com. This product is eligible for in-home service for the first ninety (90) days from the original date of purchase, and thereafter for CARRY-IN service only. ORION will not be liable for damages incurred in shipment of the unit. If there are no ORION authorized Independent Service Centers in your area please call - 1-888-296-7466 for assistance.
Note: This warranty is void if the product is:
(a) Damaged through negligence, misuse, abuse, or accident.
(b) Used in a commercial application or rentals.
(c) Modified or repaired by anyone other than an Independent Service Center authorized by ORION to effect warranty repairs to the class of product or by the ORION Factory Service Center.
(d) Damaged because it is improperly connected to the equipment of other manufacturers.
This warranty does not cover:
(a) Damage to equipment not properly connected to the product.
(b) Costs incurred in the shipping of the product to an ORION authorized Independent Service Center or ORION Factory Service Center.
(c) Damage or improper operation of unit caused by customer abuse, misuse, negligence, or failure to follow operating instructions provided with the product.
(d) Ordinary adjustments to the product which can be performed by customer as outlined in the owner's manual.
(e) Signal reception problems caused by external antenna or cable systems.
THIS WARRANTY IS NON TRANSFERABLE AND APPLIES ONLY TO THE ORIGINAL PURCHASER AND DOES NOT EXTEND TO SUBSEQUENT OWNERS OF THE PRODUCT. ANY APPLICABLE IMPLIED WARRANTIES, INCLUDING THE WARRANTY OF MERCHANTABILITY, ARE LIMITED IN DURATION TO A PERIOD OF THE EXPRESS WARRANTY AS PROVIDED HEREIN BEGINNING WITH THE DATE OF ORIGINAL PURCHASE AT RETAIL AND NO WARRANTIES, WHETHER EXPRESS OR IMPLIED SHALL APPLY TO THIS PRODUCT THEREAFTER. ORION MAKES NO WARRANTY AS TO THE FITNESS OF THE PRODUCT FOR ANY PARTICULAR PURPOSE AND USE.
UNDER NO CIRCUMSTANCES SHALL ORION BE LIABLE FOR ANY LOSS, DIRECT, INDIRECT, INCIDENTAL, SPECIAL, OR CONSEQUENTIAL DAMAGE ARISING OUT OF OR IN CONNECTION WITH THE USE OF THIS PRODUCT.
THIS WARRANTY IS VALID ONLY IN THE UNITED STATES OF AMERICA. THIS WARRANTY GIVES YOU SPECIFIC LEGAL RIGHTS, HOWEVER, YOU MAY HAVE OTHER RIGHTS WHICH MAY VARY FROM STATE TO STATE. SOME STATES DO NOT ALLOW LIMITATION ON IMPLIED WARRANTIES OR EXCLUSION OF CONSEQUENTIAL DAMAGE, THEREFORE THESE RESTRICTIONS MAY NOT APPLY TO YOU.
- 42" WIDE PLASMA DISPLAY
- HDPDP4200
- ATTENTION
- CAUTION
- WARNING: TO PREVENT FIRE OR SHOCK HAZARD, DO NOT EXPOSE THIS APPLIANCE TO RAIN OR MOISTURE.
- FCC Declaration of Conformity Compliance Statement (Part 15):
- Location of the required Marking
- Notes when mounting the Plasma Display on a wall
- IMPORTANT NOTICE
- The following symptoms are not signs of malfunction but technical limitation. Therefore we disclaim any responsibility for these symptoms.
- PREPARATIONS
- OPERATION
- OTHERS
- Power source
- TO USE AC POWER
- NOTES:
- WARNING:
- CAUTION:
- HOW TO INSTALL BATTERIES
- HOW TO USE THE REMOTE CONTROL
- BATTERY PRECAUTIONS
- For PLASMA DISPLAY
- For VCR
- For CABLE/SATELLITE box
- For DVD
- TO REGISTER YOUR VCR, CABLE/SATELLITE BOX OR DVD WITH THE REMOTE CONTROL
- REGISTRATION CODES BY PRODUCT AND BRAND NAME
- Connections to other equipment
- To connect the Plasma Display to a VCR with an S-Video cord
- NOTE:
- To connect the Plasma Display to a DVD player/Satellite receiver
- To connect the Plasma Display to a DVD player with component video
- To connect the Plasma Display to a DTV receiver/set-top box
- Using an Audio Amplifier
- To connect the Plasma Display to a HDMI or a DVI device
- To connect the Plasma Display to a PC (Personal Computer)
- Monitor Display modes
- To connect the Plasma Display to a camcorder
- To connect the Plasma Display to a Game
- VOLUME
- DISPLAY
- QUICK VIEW
- MUTE
- SLEEP
- Selecting the video input source
- Labeling the video input source
- WHAT IS CLOSED CAPTIONING?
- To register a password
- To set the V-CHIP
- To change the password
- Setting the panel lock
- To lock the front panel
- To unlock the front panel
- You also can unlock the front panel using the menus
- Selecting the picture size
- NATURAL picture size
- CINEMA WIDE1 picture size (for 4:3 format programs)
- CINEMA WIDE2 picture size (for letter box programs)
- CINEMA WIDE3 picture size (for letter box programs with subtitles)
- FULL picture size (for 16:9 source programs)
- 1
- 2
- 3
- 4
- 5
- Selecting the cinema mode
- To set the CINEMA MODE to FILM
- Adjusting the picture preference
- Picture control adjustment
- Selecting the color temperature
- Resetting your picture adjustment
- Sound control adjustment/Selecting the HDMI audio input source
- Sound control adjustment
- TREBLE:
- BALANCE:
- Selecting the HDMI audio input source
- Selecting the BBE
- Resetting your audio adjustment
- INVERSION/FULL WHITE
- INVERSION
- FULL WHITE
- ORBITER
- BRIGHTNESS SAVE
- Description about the each setting option:
- PC Monitor Menu
- Resetting your picture adjustment in the PC mode
- Sound control adjustment in the PC mode
- BASS:
- BBE:
- SANSUI®
- LIMITED WARRANTY
- Note: This warranty is void if the product is:
- This warranty does not cover:
Brand : SANSUI
Model : HDPDP4200
Category : Television