
MMP401B - Browser HITACHI - Free user manual and instructions
Find the device manual for free MMP401B HITACHI in PDF.


| Product Type | GPS Navigator with Multimedia Player |
| Model | MMP-401B |
| Brand | Hitachi |
| Display Size | 4 inches TFT LCD |
| Display Resolution | 480 x 272 pixels (RGB) |
| Dimensions (W x H x D) | 115 x 75 x 28 mm |
| Weight | 215 g |
| Battery Type | Built-in rechargeable battery |
| Battery Charging Time | Approximately 2.5 hours |
| Battery Life (Navigation) | Approximately 2 hours |
| Power Supply | AC power adaptor or car power adaptor (12V) |
| GPS Frequency | 1575.42 MHz |
| GPS Satellite Channels | 20 |
| Refresh Rate | 1 Hz |
| Memory Card Support | SD or MMC memory card |
| Multimedia Playback | Audio, Video, Picture files |
| Connectivity | USB 2.0, Earphone jack, External GPS antenna jack |
| Mounting | Suction cup windscreen mount with bracket |
| Accessories Included | User manual (x2), AC adaptor, Car adaptor, USB cable, Earphones, Stylus, Suction cup mount, Bracket, Warranty card, CD-ROM, Velvet pouch |
| Touch Screen | Yes, stylus or finger operation |
| Cleaning Instructions | Unplug before cleaning; use damp cloth; no liquid or aerosol cleaners |
| Operating Temperature (Battery) | 5 °C to 35 °C |
Frequently Asked Questions - MMP401B HITACHI
User questions about MMP401B HITACHI
0 question about this device. Answer the ones you know or ask your own.
Ask a new question about this device
Download the instructions for your Browser in PDF format for free! Find your manual MMP401B - HITACHI and take your electronic device back in hand. On this page are published all the documents necessary for the use of your device. MMP401B by HITACHI.
USER MANUAL MMP401B HITACHI
Multi Player with GPS
Model Name
MMP-401B
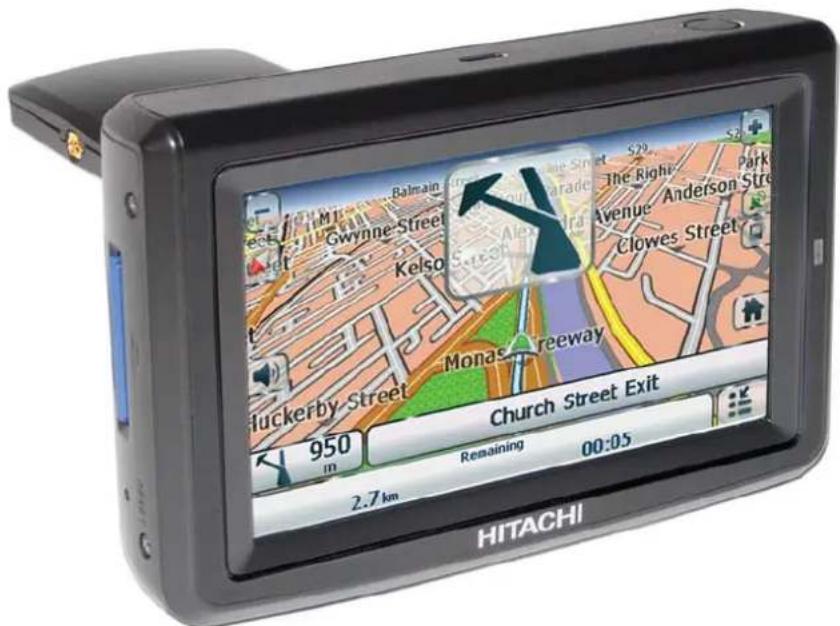
Thank you for purchasing this HITACHI product.
To obtain the best performance and safety, please read this manual carefully.
Please keep this manual for future reference.
SAFETY PRECAUTIONS
For your safety, please read the following precautions carefully before using this product. Improper use will cause serious personal injuries and/or damage to your property or this product.
The following symbols are used in this manual. Please fully understand the meaning of the symbols before reading the instructions in this section.
 WARNING WARNING | Never ignore the instruction. There are risks of serious injuries or possible death to the user. |
 CAUTION CAUTION | Do not ignore the instruction. There are possibilities of personal injuries and/or property damage. |

- It is your sole responsibility to place, secure and use the product in a manner that will not cause accidents, personal injury or property damage. Always observe safe driving practises.
- Mount the product in a position that is secure and does not obstruct the driver's view.
- Do not mount the product in a way that may interfere with the safe operation of the vehicle, the deployment of air bags or other safety equipment.
• Do not operate the product while driving. - Before using the product on the road, make yourself familiar with the product and its operation.
- Do not rely on the navigation system to search for medical emergency services, e.g. hospital. It is not guaranteed that the suggested route will take you to the nearest emergency services. In this case, use local information sources.
- Due to the constantly changing traffic routes, it is not guaranteed that the routes and maps are 100% accurate.
- The product is intended to be used as a travel aid and must not be used for any purpose requiring precise measurement of direction, distance, location or topography.
- Do not use the product for aircraft navigation.

CAUTION
- Do not handle the product while it is hot. Let the product cool, out of direct sunlight.
- Do not expose the product to direct sunlight for prolonged periods. Overheating may damage the product.
• To discourage theft, do not leave the product in an unattended vehicle.
Failure to adhere to these warnings and cautions may lead to death, serious injury or property damage. Hitachi disclaims all liability for installation or use of the product that causes to death, injury or property damage or that violates any law.
CONTENTS
SAFETY PRECAUTIONS 2
IMPORTANT SAFETY INSTRUCTIONS ..... 4
FUNCTIONAL OVERVIEW 6
Front View 6
Rear View 6
Top View 6
Bottom View 7
Side View 7
PREPARATION 8
Supplied Accessories 8
Using the AC Power Adaptor 8
Using the Car Power Adaptor 8
Using the Built-in Battery 8
Positioning the Player in a Vehicle 9
BASIC OPERATION 10
Getting Started 10
Navigation 10
Brightness Setting 10
Volume Setting 10
Entertainment 11
Entertainment Screen Buttons 12
TROUBLESHOOTING 13
SPECIFICATIONS 14
IMPORTANT SAFETY INSTRUCTIONS
-
Read Instructions - All the safety and operating instructions should be read before the product is operated.
-
Retain Instructions - The safety and operating instructions should be retained for future reference.
-
Heed Warnings - All warnings on the product and in the operating instructions should be adhered to.
-
Follow Instructions - All operating and use instructions should be followed.
-
Cleaning - Unplug the product from the wall outlet or car cigarette lighter socket before cleaning. Do not use liquid cleaners or aerosol cleaners. Use a damp cloth for cleaning.
-
Attachments - Only use attachments/accessories specified by the manufacturer.
-
Water and Moisture - Do not use the product near water, for example, near a bath tub, wash bowl, kitchen sink, or laundry tub, in a wet basement, or near a swimming pool, etc.
-
Accessories - Do not place the product on an unstable cart, stand, tripod, bracket, or table. The product may fall, causing serious injury to a child or adult, and serious damage to the product. Use only with a cart, stand, tripod, bracket, or table recommended by the manufacturer, or sold with the product. Any mounting of the product should follow the manufacturer's instructions and should use a mounting accessory recommended by the manufacturer. The product and cart combination should be moved with care. Quick stops, excessive force, and uneven surfaces may cause the product and cart combination to overturn.
-
Ventilation - Slots and openings in the cabinet are provided for ventilation and to ensure reliable operation of the product and to protect it from overheating, and these openings must not be blocked or covered. The openings should never be blocked by placing the product on a bed, sofa, rug, or other similar surface. The product should not be placed in a built-in installation such as a bookcase or rack unless proper ventilation is provided
or the manufacturer's instructions have been adhered to.
-
Power Sources - The product should be operated only from the type of power source indicated on the marking label. If you are not sure of the type of power supply to your home, consult your appliance dealer or local power company. For products intended to operate from battery power, or other sources, refer to the operating instructions.
-
Grounding or Polarization - The product may be equipped with a polarized alternating-current line plug (a plug having one blade wider than the other). This plug will fi t into the power outlet only one way. This is a safety feature. If you are unable to insert the plug fully into the outlet, try reversing the plug. If the plug should still fail to fi t, contact your electrician to replace your obsolete outlet. Do not defeat the safety purpose of the polarized plug.
-
Power Cord Protection - Power cords should be routed so that they are not likely to be walked on or pinched by items placed upon or against them, paying particular attention to cords at plugs, convenience receptacles, and the point where they exit from the appliance.
-
Lightning - For added protection for the product during a lightning storm, or when it is left unattended and unused for long periods of time, unplug it from the wall outlet or car cigarette lighting socket. This will prevent damage to the product due to lightning and power-line surges.
-
Power Lines - An outside antenna system should not be located in the vicinity of overhead power lines or other electric light or power circuits, or where it can fall into such power lines or circuits. When installing an outside antenna system, extreme care should be taken to keep from touching such power lines or circuits as contact with them might be fatal.
-
Overloading - Do not overload wall outlets and extension cords as this can result in a risk of fire or electric shock.
-
Object and Liquid Entry - Never push objects of any kind into the product through any openings as they may touch dangerous voltage points or short-out parts that could result in a fire or electric shock. Never spill liquid of any kind on the product.
- Servicing - Do not attempt to service the product yourself as opening or removing covers may expose you to dangerous voltage or other hazards. Refer all servicing to qualified service personnel.
- Damage Requiring Service - Unplug the product from the wall outlet or car cigarette lighter socket and refer servicing to qualified service personnel under the following conditions:
a. When the power cord or plug is damaged.
b. If liquid has been spilled, or objects have fallen into the product.
c. If the product has been exposed to rain or water.
d. If the product does not operate normally by following the operating instructions. Adjust only those controls that are covered by the operating instructions as an improper adjustment of other controls may result in damage and will often require extensive work by a service technician to restore the product to its normal operation.
e. If the product has been dropped or damaged in any way.
f. When the product exhibits a distinct change in performance, this indicates a need for service.
-
Replacement Parts - When replacement parts are required, be sure the service technician has used replacement parts specified by the manufacturer or have the same characteristics as the original part. Unauthorized substitutions may result in fire, electric shock or other hazards.
-
Safety Check - Upon completion of any service or repairs to the product, ask the service technician to perform safety checks to determine that the product is in proper operating condition.
- Heat - Do not install the product near any heat sources such as radiators, heat registers, stoves, or other products (including amplifiers) that produce heat.
- Installation Location - Avoid placing the product in areas of direct sunlight, heating radiators, closed automobiles, high temperature, high humidity, excessive dust, strong vibration, impact or strong magnetic fi elds, as the internal parts may be seriously damaged.
- Hazards of Electrical Shock and Fire - Do not touch the power cord with wet hands. Hold the plug when disconnecting the AC adaptor. Do not pull the power cord. Unplug the AC adaptor from the wall outlet or remove the battery pack when the product is not used for long periods of time.
- Hearing Safety - Listen at a moderate volume. Using headphones at high volume can impair your hearing.
- Traffi c Safety - Do not operate the product while driving or cycling as you may cause an accident.
NOTE
- When the product is in use for a long period of time, the surface will be heated. This is normal.
- Sometimes, the LCD screen may have some tiny red, blue, white or black spots. This is normal and does not affect the performance.
FUNCTIONAL OVERVIEW
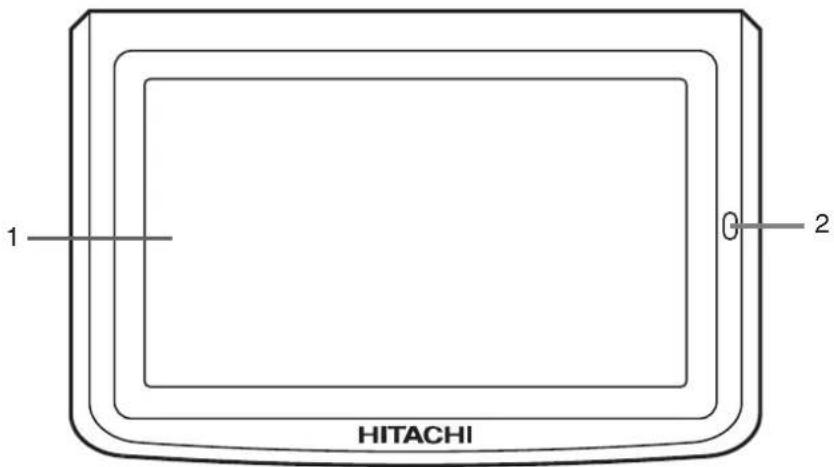
Front View
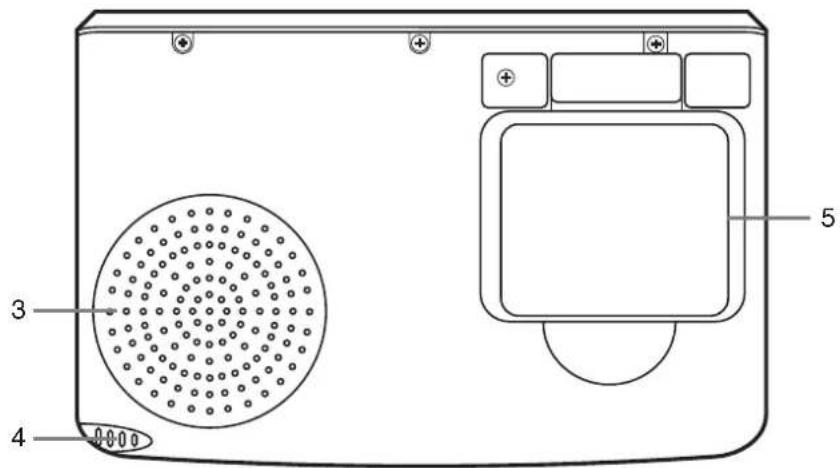
Rear View
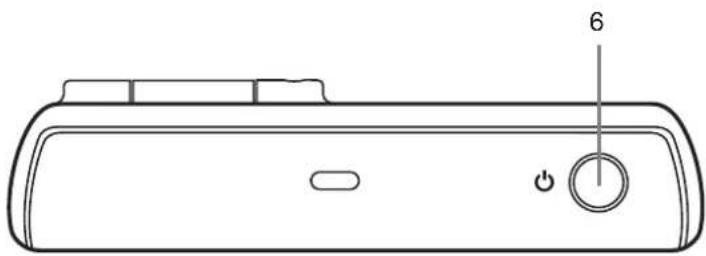
Top View
natural_image
Line drawing of a remote control device with labeled ports (no text or symbols beyond basic labels)Bottom View
natural_image
Line drawing of a remote control panel with labeled ports and an icon (no text or symbols beyond labels)Side View
- Touch Screen
- Charge Indicator
Indicates orange when the battery is charging.
- Speaker
- Stylus
Taps the touch screen to make selections and enter information.
- GPS Antenna
Receives signals from GPS satellites when lifted up to the horizontal position.
- Power Button
Turns the player on or off.
Returns to the Top Menu.
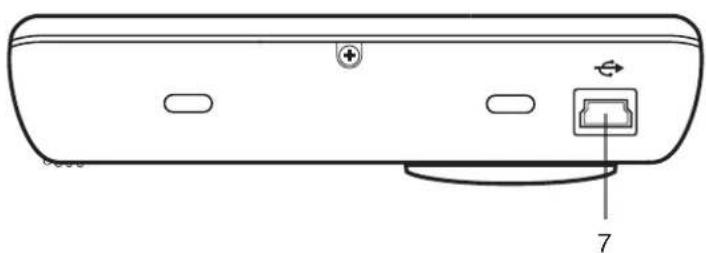
- USB Socket
Connection socket for USB cable to your computer.
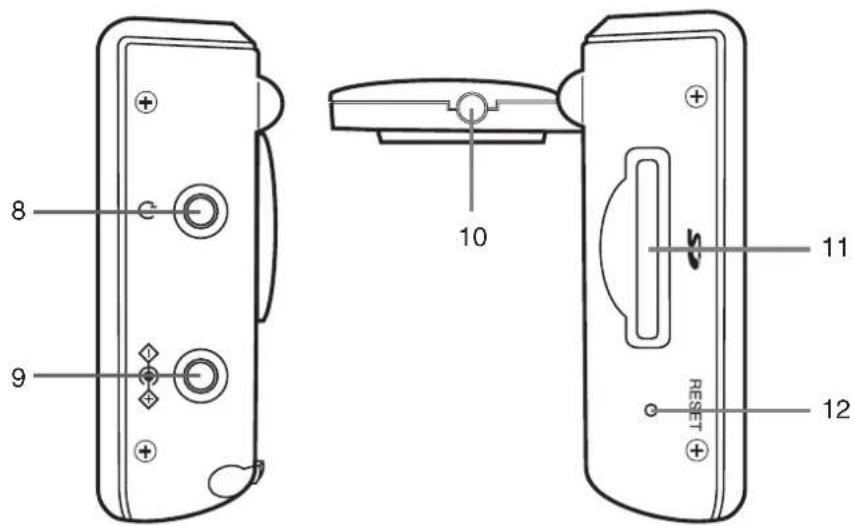
- Earphone Socket
Connection socket for earphones.
- Power Socket
Connection socket for AC power adaptor or car power adaptor.
- External Antenna Socket
Connection socket for external GPS antenna.
- Card Slot
Slot for SD or MMC memory card.
- Reset Button
Resets the player.
PREPARATION
Supplied Accessories
When you unpack the player, please check to ensure the following accessories are supplied before installation. In case of missing or damaged, please contact the dealer immediately.
- User manual (x2)
• AC power adaptor (x1)
• Car power adaptor (x1)
USB cable (x1) - Earphones (x1)
- Stylus (x1)
• Suction cup windscreen mount (x1) - Mounting bracket (x1)
- Warranty card (x1)
- CD-ROM (x1)
- Velvet pouch (x1)
Using the AC Power Adaptor
- Connect the AC power adaptor to the power socket on the player.
- Connect the plug of the AC power adaptor to the wall outlet.
Using the Car Power Adaptor
- Connect the car power adaptor to the power socket on the player.
- Connect the other end of the car power adaptor to the car cigarette lighter socket.
Using the Built-in Battery
To Charge the Battery
When the battery is charging, the Charge Indicator is orange. When the battery is fully charged, the Charge Indicator turns off.
- To charge the player using an electrical wall outlet, connect the AC power adaptor to the player and the wall outlet.
- To charge the player in a vehicle, connect the car power adaptor to the player and the car cigarette lighter socket.
NOTE
- Do not disconnect the AC power adaptor or car power adaptor during charging.
- The charging time of a battery is about 2.5 hours and it depends on the environmental conditions.
- The fully charged battery provides about 2 hours of navigation operation.
- It is normal for the battery to become warm during charging.
● The battery can be charged when the player is turned on. The charging time will be longer.
● Regular recharging a partially charged battery does not cause harm. - Do not use the battery under high temperature or near heat sources.
● The battery should be used at environmental temperature of 5^ C to 35^ C. - Do not dispose the battery in fire, water or heat it up.
- To prolong the battery life, if it is not used for a long period of time, it should be charged for about 30 minutes before turning on the player.
- To prolong the battery life, charge it under or close to indoor temperature.
Positioning the Player in a Vehicle
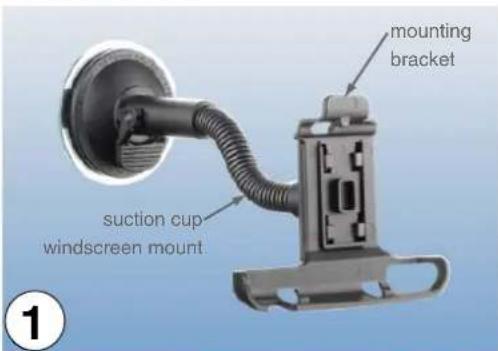
The player can be positioned on the inside of the vehicle windscreen using the supplied suction cup windscreen mount and mounting bracket.
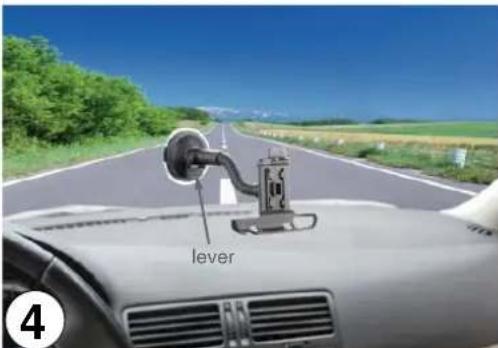
- Attach the mounting bracket onto the suction cup windscreen mount. Ensure the mounting bracket is secured onto the suction windscreen mount.
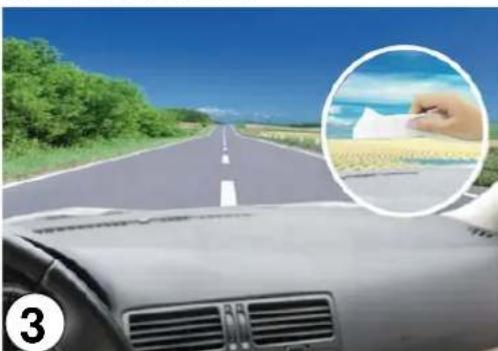
- Find a suitable position on your windscreen where the player will be visible to the driver.
- Wipe the windscreen area that the suction cup will be mounted to.
natural_image
Interior view of a car driving on a road with greenery and a hand holding a paper, showing a magnified inset of the road ahead (no text or symbols visible)- Press the suction cup firmly to the windscreen, then push the lever towards the windscreen.
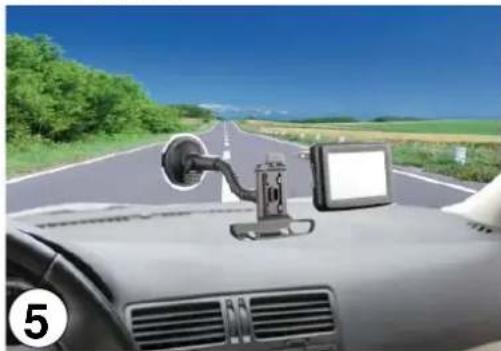
- Place the player onto the mounting bracket. Ensure the player is secured onto the mounting bracket.
natural_image
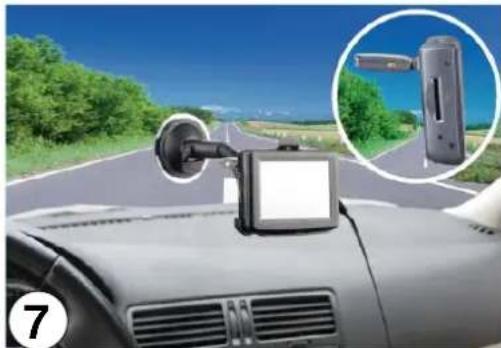
Interior view of a car with a mounted touchscreen device on the windshield, driving on a rural road under a clear blue sky (no visible text or symbols)- Bend the arm of the suction cup windscreen mount so that the player will be visible to the driver.
- Lift up the GPS antenna to the horizontal position and the player is ready to be used.
natural_image
Interior view of a car with a mounted touchscreen device on the windshield, showing a close-up of a rectangular device mounted on the road (no visible text or symbols)WARNING
- Mount the player in a position that is secure and does not obstruct the driver's view.
- Do not mount the player in a way that may interfere with the safe operation of the vehicle, the deployment of air bags or other safety equipment.
BASIC OPERATION
Getting Started
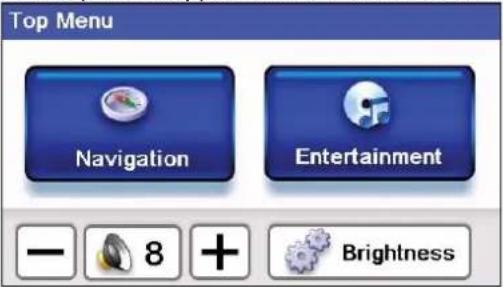
- Press the Power button for a while to turn on the player.
The Top Menu appears on the touch screen.
NOTE
- You can return to the Top Menu any time by pressing the Power button.
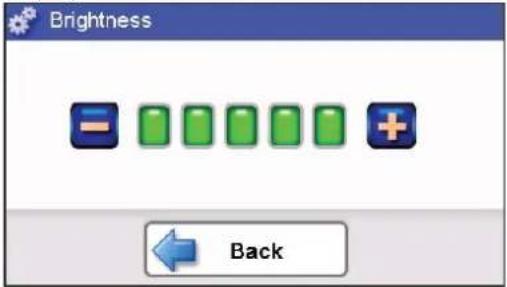
Brightness Setting
- Tap on the Top Menu to enter Brightness Setting.
The Brightness Setting screen will be displayed.
-
Tap or to adjust the brightness of the touch screen.
-
Tap Back to return to the Top Menu.
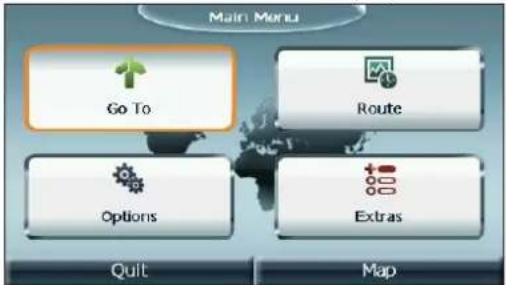
Navigation
- Tap on the Top Menu to enter navigation mode.
The Destinator Menu will be displayed.
NOTE
- Please refer to Hitachi Destinator User Manual for the navigation operation.
- Tap Quit to quit Destinator and return to the Top Menu.
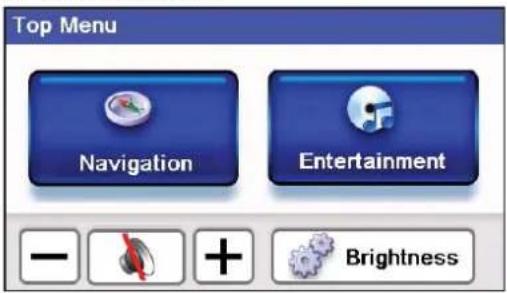
Volume Setting
- Tap of to adjust the volume.
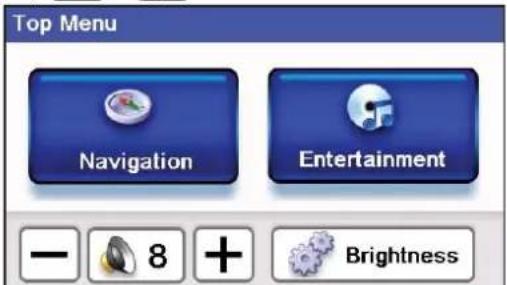
- Tap to mute the sound or tap to restore the sound.

Entertainment
You can play the audio, video or picture fi les stored in SD or MMC memory card.
-
Insert the SD or MMC memory card to the card slot.
-
Tap Entertainment on the Top Menu to enter media player mode.
The SDMMC DISK folder will be displayed.
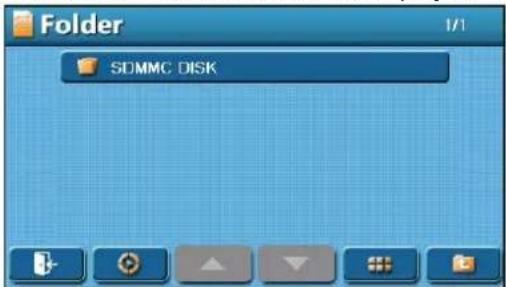
- Tap SDMMC DISK folder to open it.
The folder list will be displayed.
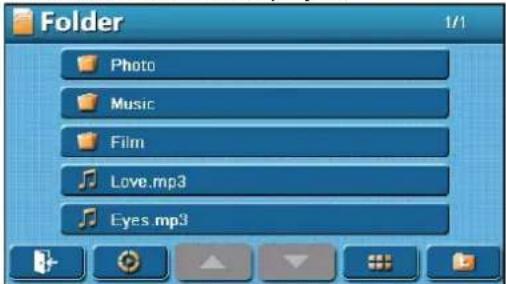
- Tap a folder to open it; or tap a file to play it.
To Play an Audio or Video File
- Tap the Music or Film folder to open it.
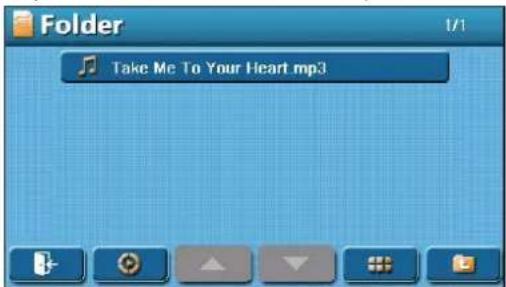
- Select and tap the fi le to play it.
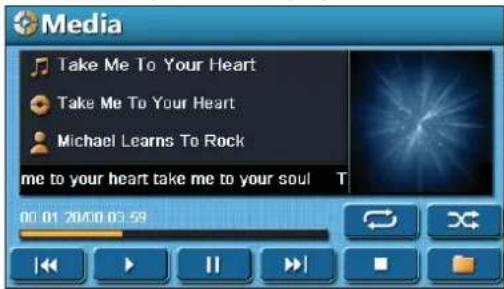
NOTE
● While a video is playing, tap the video to toggle between the two screen size display modes.
To Play a Picture File
- Tap the Picture folder to open it.
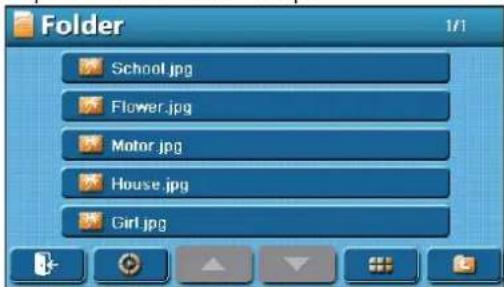
- Select and tap the fi le to play it.
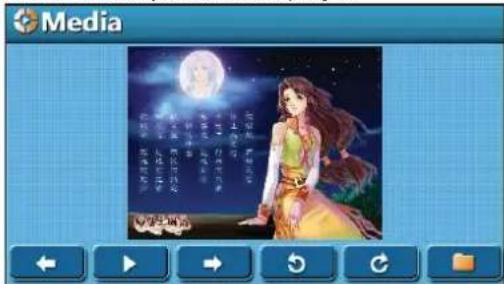
- While displaying a picture, tap the picture to toggle between the two screen size display modes.
Entertainment Screen Buttons
The following buttons appear on the Folder screens.
| Buttons Description | |
 | Tap to return to the Top Menu. |
 | Tap to display the entertainment interfere. |
 | Tap to scroll up the folder list or fi le list. |
 | Tap to scroll down the folder list or fi le list. |
 | Tap to show the fi le list in thumbnail mode. |
 | Tap to resume the fi le list. |
 | Tap to return to the folder list. |
The following buttons appear on the Picture Media screens.
| Buttons Description | |
 | Tap to play the previous picture. |
 | Tap to play the pictures continuously. |
 | Tap to play the next picture. |
 | Tap to rotate the current picture 90° anticlockwise. |
 | Tap to rotate the current picture 90° clockwise. |
 | Tap to return to the fi le list. |
The following buttons appear on the Audio and Video Media screens.
| Buttons Description | |
 | Tap to play a fi le or all fi les repeatedly. |
 | Tap to play the fi les in random order. |
 | Tap to play the previous fi le. |
 | Tap to resume the playback. |
 | Tap to pause the playback. |
 | Tap to play the next fi le. |
 | Tap to stop the playback. |
 | Tap to return to the fi le list. |
TROUBLESHOOTING
If you experience any of the following difficulties while using the player, use this troubleshooting guide to help you remedy the problem. Should any problem persist, consult your nearest service center.
| Symptom Possible Cause Remedy | ||
| The player does not start. The battery may be exhausted. Recharge the battery. | ||
| The player does not have sound. | The volume is set to minimum. Increase the volume level. | |
| The touch screen is too dark. The touch screen is not bright enough. | Increase the brightness level. | |
| The player does not receive GPS signals. | The GPS antenna is unable to receive signal. | Check the position of the player in the vehicle. The GPS antenna requires a clear view of sky to receive information from the GPS satellites.Ensure the GPS antenna is in the horizontal position. If the player is used in a vehicle with heated or heat-refl ecting windscreen, connect it with an external antenna in order to receive the GPS signals. |
| The player has lost GPS reception. | The player is experiencing poor GPS coverage. | The GPS signal is interrupted due to tunnels, tall buildings, snowing, etc. When the obstruction is cleared, the player should re-acquire satellite signals in a few seconds. |
SPECIFICATIONS
GPS Section
| Received Center Frequency | 1575.42 MHz |
| GPS Satellites | 20 |
| Refresh Frequency | 1/sec |
TFT LCD Monitor
| Size | 4 inch |
| Resolution (H x V) | 480 x 272 (RGB) |
Main Unit
| Dimensions | 115 x 75 x 28 mm |
| Weight | 215g |
Specification are subject to change without notice for improvement.



MEMO





HITACHI
Inspire the Next


- Multi Player with GPS
- Model Name
- MMP-401B
- SAFETY PRECAUTIONS
- CAUTION
- CONTENTS
- IMPORTANT SAFETY INSTRUCTIONS
- NOTE
- FUNCTIONAL OVERVIEW
- Bottom View
- Side View
- PREPARATION
- Supplied Accessories
- Using the AC Power Adaptor
- Using the Car Power Adaptor
- Using the Built-in Battery
- To Charge the Battery
- Positioning the Player in a Vehicle
- WARNING
- BASIC OPERATION
- Getting Started
- Brightness Setting
- Navigation
- Volume Setting
- Entertainment
- To Play an Audio or Video File
- To Play a Picture File
- Entertainment Screen Buttons
- TROUBLESHOOTING
- SPECIFICATIONS
- MEMO
- HITACHI
- Inspire the Next
Brand : HITACHI
Model : MMP401B
Category : Browser