
RJ05-SQ - Frying Pan Chefman - Free user manual and instructions
Find the device manual for free RJ05-SQ Chefman in PDF.


| Product Type | Frying Pan |
| Brand | Chefman |
| Model | RJ05-SQ |
| Material | Non-stick coating with aluminum core |
| Diameter | 10 inches (25.4 cm) |
| Handle Material | Stainless steel with silicone grip |
| Oven Safe Temperature | Up to 400°F (204°C) |
| Stovetop Compatibility | All stovetops including induction |
| Dishwasher Safe | Yes, recommended hand wash for longevity |
| Weight | Approximately 1.5 lbs (0.68 kg) |
| Dimensions (L x W x H) | 20 x 10.5 x 3 inches (50.8 x 26.7 x 7.6 cm) |
| Power Source | Stovetop (nonelectric) |
| Main Functions | Searing, sautéing, frying, braising |
| Cleaning and Maintenance | Hand wash with mild soap; avoid abrasive sponges |
| Safety Features | Cool-touch handle, tempered glass lid |
| Spare Parts and Repairability | Replacement lids available; non-stick coating wears over time |
| Warranty | 1-year limited warranty |
| Country of Origin | China |
Frequently Asked Questions - RJ05-SQ Chefman
User questions about RJ05-SQ Chefman
0 question about this device. Answer the ones you know or ask your own.
Ask a new question about this device
Download the instructions for your Frying Pan in PDF format for free! Find your manual RJ05-SQ - Chefman and take your electronic device back in hand. On this page are published all the documents necessary for the use of your device. RJ05-SQ by Chefman.
USER MANUAL RJ05-SQ Chefman
- Safety Instructions
- Features
- Operating Instructions
- Cooking Guide
• Cleaning and Maintenance - Terms and Conditions
• Warranty Registration
RJ05-SQ-BLACK
COOKING FORWARD™
Welcome!
Whether this is your first Chefman® appliance or you're already a part of our family, we're happy to be in the kitchen with you! With your new Electric Grill and Skillet, you can grill, braise, and steam quick, healthy meals all from one countertop-friendly appliance. The adjustable temperature-control dial makes it simple to precisely set the heat for everything from high-heat searing to slow braising and low-heat buffet service. The nonstick cooking insert is removable for simple, easy cleanup.
Before you get cooking, please take a few minutes to read our directions, safety instructions, and warranty information.
From our kitchen to yours,
The Chefman® Team

READ ALL INSTRUCTIONS BEFORE USE
For your safety and continued enjoyment of this product, always read the instruction manual before using.
CONTENTS
1 Safety Instructions
3 Features
4 Operating Instructions
7 Cooking Guide
8 Cleaning and Maintenance
9 Terms and Conditions
11 Warranty Registration
SAFETYINSTRUCTIONS
IMPORTANT SAFEGUARDS
This appliance is for HOUSEHOLD USE ONLY.
WARNING: When using electrical appliances, basic safety precautions should always be followed, including:
- Read all instructions.
- Do not touch hot surfaces. Use handles or knobs.
- To protect against electrical shock, do not immerse cord, plugs, or the unit body in water or other liquids.
- Close supervision is necessary when any appliance is used by or near children.
- Unplug from the outlet when not in use and before cleaning. Allow to cool before putting on or taking off parts, and before cleaning the appliance.
- Do not operate any appliance with a damaged cord or plug or after the appliance malfunctions or has been damaged in any manner. Contact Chefman® Customer Support for examination, repair, or adjustment.
- The use of accessory attachments not recommended by Chefman ® may cause injuries.
- Do not use outdoors.
- Do not let the cord hang over the edge of a table or counter, or touch hot surfaces.
- Do not place on or near a hot gas or electric burner, or in a heated oven.
- Extreme caution must be used when moving an appliance containing hot oil or other hot liquids.
SAFETYINSTRUCTIONS
IMPORTANT SAFEGUARDS
- Always attach the plug to the appliance first, then plug the cord in the wall outlet. To disconnect, turn any control to "off," then remove the plug from the wall outlet.
- Do not use the appliance for other than intended use.
California Proposition 65: (Applicable for California Residents only)

WARNING: Cancer and Reproductive Harm - www.P65Warnings.ca.gov.

Do not place appliance on stovetop or other heatable surface, even if stovetop is not on. Doing so is a fire hazard.
HOUSEHOLD USE ONLY
SAVE THESE INSTRUCTIONS
FEATURES

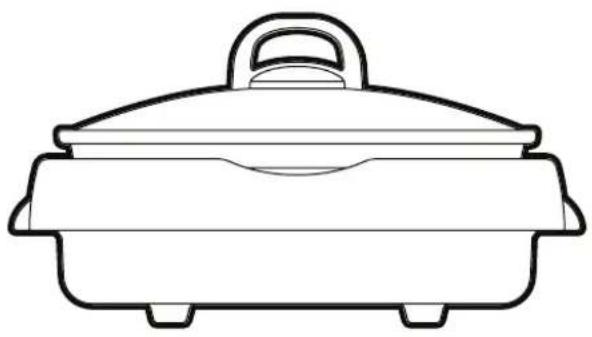
- Tempered Glass Lid
- Lid Handle
- Nonstick Cooking Insert
- Cool-Touch Base
- Electrical Port
- Temperature-Control Dial
- Removable Temperature-Control Unit
- Indicator Light
- Power Supply Cord
OPERATING INSTRUCTIONS
BEFORE FIRST USE
For best results, follow these steps before using your Electric Grill and Skillet for the first time.
- Check that all parts are accounted for before throwing away any packaging materials. Read and remove any stickers on the unit, except for the rating label on the bottom of the unit, which should remain on.
- Remove the cooking insert from the cool-touch base; this may require a good pull.
- Wash the cooking insert, base, and lid with warm, soapy water using a sponge. NOTE: Do not use abrasive cleaners or scouring pads. Never immerse the power cord in water or any liquid.
- Rinse thoroughly to remove all soap residue. WARNING: Do not reassemble and use without thoroughly drying the electrical port; if not completely dry, it can create an electrical shock hazard.
- Rub a little neutral oil, such as vegetable oil, on the interior of the cooking pan to condition the nonstick surface.
- Assemble the lid following the directions on p. 5.
OPERATING INSTRUCTIONS
TO ASSEMBLE THE LID
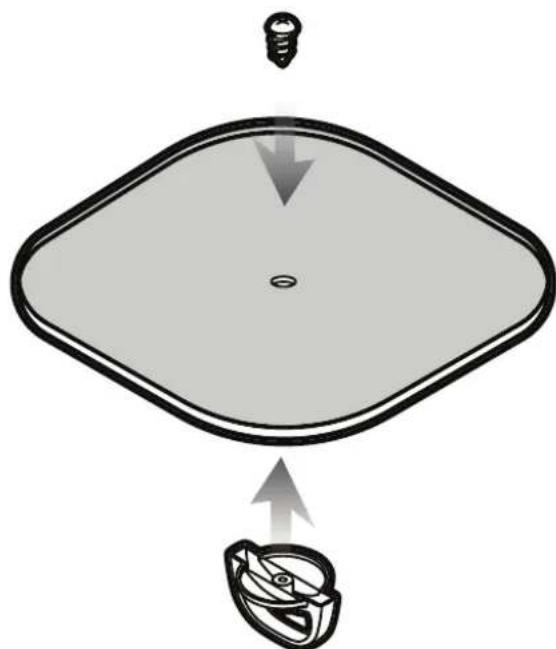
The lid needs to have its handle attached before first use.
- Locate the screw needed to attach the lid handle to the lid. It is screwed into the handle.
- Using a Phillips-head screwdriver, remove the screw from the handle.
- Place the handle over the hole on the top side of the lid so that it aligns with the hole.
- Place the screw on the underside of the lid so that it fits through the hole in the lid and into the lid handle.
- Using a Phillips-head screwdriver, tighten the screw until the handle is securely attached to the lid.
OPERATING INSTRUCTIONS
TO COOK IN THE GRILL AND SKILLET
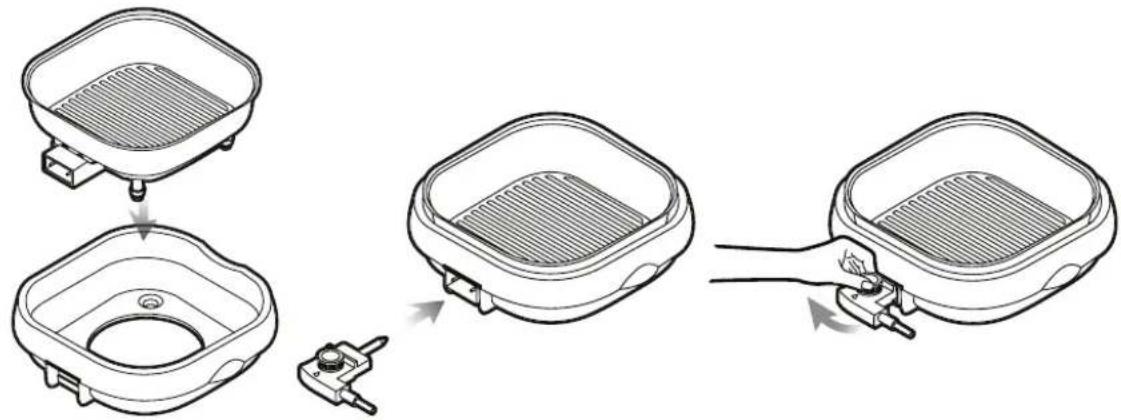
- Set the cool-touch base on a flat, sturdy surface near an outlet. Lower the cooking insert into the base, making sure that the electrical port is in the rectangular hole in the side of the base and that the legs align with the four circular holes at the bottom of the base. Snap the insert securely into the base.
- Plug the temperature-control unit into the port in the base.
- Ensure that the temperature-control dial is in the OFF position. Plug the power supply cord into an available power outlet.
- Turn the temperature-control dial to the desired temperature. (See Cooking Guide on p. 7.) The indicator light will turn on and then will turn off when the selected temperature has been reached.
- Add ingredients according to your recipe. During cooking, the indicator light will turn on and off, indicating the proper temperature is being maintained. NOTE: Use wooden, silicone, or heatproof plastic or nylon cooking utensils as metal can scratch the nonstick finish.
- When you have finished cooking, turn the temperature control dial to the OFF position, and unplug the power supply cord from the power outlet. Allow the unit to cool completely before cleaning.
COOKING GUIDE
There are many ways to cook in your Grill and Skillet, and you should always follow your recipes and check food for doneness according to current food-safety guidelines. However, here are a few basics:
To Grill/Sear: Set the temperature to 400° F or 450° F. Allow the pan to heat for a few minutes. If you're grilling a lean food, such as fish, brush the grill bars with a little cooking oil. Add food, and cook according to your recipe, turning once to give grill marks to both sides.
To Simmer/Braise: If indicated by your recipe, follow the grilling instructions above to first sear the food. Add liquid according to the recipe, then reduce the heat to 200° F or 250° F so that liquid is at a steady simmer. Cover with the lid and cook according to the recipe until done. If the temperature is set above 212° F when simmering, the indicator light will not turn off because the maximum temperature reached when cooking with liquid is the boiling point ( 212° F).
To Steam: Pour 1 cup of water (or more if needed) into the pan. Place food on a rack (not included) that will fit inside the skillet. Cover with the lid. Set the temperature to about 225° F. Cook according to the recipe, keeping the lid on, until done. Because the temperature is set above 212° F, the indicator light will not turn off; the maximum temperature reached when cooking with liquid is the boiling point ( 212° F).
To Pan Fry: Add a neutral-flavored oil (such as vegetable or canola) to the pan no higher than 11/2 inches below the top of the pan. Set the temperature to 350°F to 400°F . Heat the oil until the indicator light turns off. Add food to the pan, and cook according to the recipe, turning once, to brown both sides. Be careful not to crowd the pan, which can inhibit browning. Depending on how much you're cooking, you may need to add more oil between batches and give the pan a few minutes to heat to the right temperature before continuing. If food seems to be browning too quickly, adjust the heat down. When finished frying, turn the temperature-control dial OFF, and let the oil cool completely before cleaning the pan.
CLEANING AND MAINTENANCE
- Disconnect the plug from the wall outlet, then remove the temperature-control unit from the appliance.
- Always allow the unit to completely cool before cleaning.
- Pull the cooking insert out of the cool-touch base.
- Using a sponge, wash the insert, base, and lid with warm, soapy water. Do not use abrasive pads, which can scratch the nonstick finish of the insert. If scouring is necessary, use a nylon scrubbing pad with liquid detergent or a nonabrasive cleaner. Alternatively, the lid and insert may also be washed in the top rack of the dishwasher. However, washing the insert by hand will help preserve the life of the unit.
- Rinse thoroughly to remove soap residue.
- Dry thoroughly with a soft cloth before reassembling and storing. WARNING: Do not reassemble and use without thoroughly drying the electrical port; if not completely dry, it can create an electrical shock hazard.
- Store with the cord/temperature-control unit coiled loosely inside the cooking insert. NOTE: The temperature-control unit/cord/plug should not be immersed in water and is not dishwasher-safe.
TERMS AND CONDITIONS Limited Warranty
RJ Brands, LLC d/b/a Chefman® offers a limited 1-year Warranty (the “Warranty”) available on sales through authorized distributors and retailers only. Please note that this Warranty becomes valid from the date of initial retail purchase and that the Warranty is non-transferable and applies only to the original purchaser.
This Warranty is void without proof of purchase within the United States and Canada. Please be aware that this Warranty supersedes all other warranties and constitutes the entire agreement between the consumer and Chefman ® . Any changes to the Terms and Conditions of this Warranty must be in writing, signed by a representative of Chefman ® . No other party has the right or ability to alter or change the Terms and Conditions of this Warranty.
We may ask you to please submit, via email, photos and/or video of the issue you are experiencing. This is to help us better assess the matter and possibly offer a quick fix. Photos and/or video may also be required to determine warranty eligibility.
We encourage you to register your product. Registering can make the Warranty process easier and can keep you informed of any updates or recalls on your product. To register, follow the directions on the Chefman® Warranty Registration page in the Chefman® User Guide. Please retain your proof of purchase even after registering. In the event that you do not have proof of your purchase date, we may declare your Warranty void or we may, at our sole discretion, apply the date of manufacture as the purchase date for purposes of this Warranty.
TERMS AND CONDITIONS Limited Warranty
WHAT THE WARRANTY COVERS
- Manufacturer Defects – Chefman® products are warranted against defects in material and workmanship, under normal household use, for a period of 1 year from the date of purchase when used in accordance with the directions listed in the Chefman® User Guide. If your product does not work as it should, please contact Customer Support at support@chefman.com so that we may assist you.
THIS WARRANTY DOES NOT COVER
- Misuse – Damage that occurs from neglectful or improper use of products, including, but not limited to, damage that occurs as a result of usage with incompatible voltage, regardless of whether the product was used with a converter or adapter. See Safety Instructions in the Chefman® User Guide for information on proper use of product;
- Poor Maintenance – General lack of proper care. We encourage you to take care of your Chefman® products so that you may continue to enjoy them. Please see Cleaning and Maintenance directions in the Chefman® User Guide for information on proper maintenance;
- Commercial Use – Damage that occurs from commercial use;
- Normal Wear and Tear - Damage or degradation expected to occur due to normal use over time;
- Altered Products – Damage that occurs from alterations or modifications by any entity other than Chefman® such as the removal of the rating label affixed to the product;
- Catastrophic Events – Damage that occurs from fire, floods, or natural disasters; or
- Loss of Interest – Claims of loss of interest or enjoyment.
CHEFMAN® WARRANTY REGISTRATION
What do I need to register my product?
CHEFMAN.
Model/Modele: RJ25-C
Conveyor toaer
120v\~60hz 1800W
CONFORMS TO UL STD. 1026
CERTIFIED TO CSA STD.C22.2 No.64
CAUTION: DO NOT IMMERSE IN WATER
ATTENTION: NE PAS PLONGER DANS L'EAU
WARNING: TO PREVENT ELECTRIC SHOCK,
UNPLUG BEFORE CLEANING
•Proof of Purchase (online confirmation, receipt, gift receipt)
- Date Code
- Access Code
NOTE: Label depicted here is an example.
How do I register my product?
All you need to do is fill out a simple Chefman® registration form. You can easily access the form in one of the two ways listed below:
- Visit chefman.com/register.
- Scan the QR code to access the site:

CHEFMAN® WARRANTY REGISTRATION
For product information, visit chefman.com.
EXCEPT WHERE SUCH LIABILITY IS REQUIRED BY LAW, THIS WARRANTY DOES NOT COVER, AND CHEFMAN® SHALL NOT BE LIABLE FOR, INCIDENTAL, INDIRECT, SPECIAL, OR CONSEQUENTIAL DAMAGES, INCLUDING WITHOUT LIMITATION, DAMAGE TO, OR LOSS OF USE OF THE PRODUCT, OR LOST SALES OR PROFITS OR DELAY OR FAILURE TO PERFORM THIS WARRANTY OBLIGATION. THE REMEDIES PROVIDED HEREIN ARE THE EXCLUSIVE REMEDIES UNDER THIS WARRANTY, WHETHER BASED ON CONTRACT, TORT OR OTHERWISE.
Chefman ® is a registered trademark of RJ BRANDS, LLC. Cooking Forward ™ is a trademark of RJ Brands, LLC. Intertek ® is a registered trademark of Intertek Group, PLC.
CHEFMAN®
@mychefman


www.chefman.com
©CHEFMAN 2021
- COOKING FORWARD™
- WELCOME
- READ ALL INSTRUCTIONS BEFORE USE
- CONTENTS
- SAFETYINSTRUCTIONS
- IMPORTANT SAFEGUARDS
- HOUSEHOLD USE ONLY
- SAVE THESE INSTRUCTIONS
- FEATURES
- OPERATING INSTRUCTIONS
- BEFORE FIRST USE
- TO ASSEMBLE THE LID
- TO COOK IN THE GRILL AND SKILLET
- COOKING GUIDE
- CLEANING AND MAINTENANCE
- TERMS AND CONDITIONS LIMITED WARRANTY
- WHAT THE WARRANTY COVERS
- THIS WARRANTY DOES NOT COVER
- CHEFMAN® WARRANTY REGISTRATION
- CHEFMAN
- HOW DO I REGISTER MY PRODUCT
- CHEFMAN®
Brand : Chefman
Model : RJ05-SQ
Category : Frying Pan