
EVRX2006 - Audio/video converter EVOLUTION - Free user manual and instructions
Find the device manual for free EVRX2006 EVOLUTION in PDF.


| Product Type | HDMI over Cat5e/Cat6 POE Receiver |
| Brand | Evolution by Vanco |
| Model | EVRX2006 |
| Dimensions (W x H x D) | 2.7" x 0.7" x 3.25" (68.58 x 17.78 x 82.55 mm) |
| Weight | Not specified (approx. 0.2 lbs) |
| Power Supply | Power over Ethernet (PoE) – no external power supply required on receiver end |
| Video Resolution Support | 480i/p, 720p, 1080i, 1080p @60Hz; Deep Color, Full 3D |
| Transmission Range | Up to 50m (164ft) at 1080p full HD; up to 80m (262ft) at 720p/1080i |
| Video Bandwidth | Single-link 165MHz (4.95Gbps) |
| Audio Support | Surround sound up to 7.1 ch, DTS-HD, Dolby TrueHD, stereo digital audio |
| HDCP Compliance | HDCP 2.0 compliant |
| EDID Management | Automatic EDID and EQ management (plug and play) |
| IR Control | Bi-directional IR pass-through (20KHz–60KHz) with IR RX and TX included |
| Connectors | HDMI Type A 19-pin female (input/output), RJ-45 (UTP), 3.5mm IR ports |
| LED Indicators | Video lock (yellow), Power (green) |
| Operation Temperature | 32°F to 104°F (0°C to 40°C) |
| Cable Requirements | Single Cat5e or Cat6 (solid UTP/STP recommended, T568B termination) |
| Care Instructions | Clean with dry cloth; unplug before cleaning |
| Safety Warnings | Avoid water, moisture, heat sources; adequate ventilation; use surge protector |
| Package Contents | Receiver unit, IR TX, IR RX, product manual |
| Warranty | 2 years limited (Vanco) |
Frequently Asked Questions - EVRX2006 EVOLUTION
User questions about EVRX2006 EVOLUTION
0 question about this device. Answer the ones you know or ask your own.
Ask a new question about this device
Download the instructions for your Audio/video converter in PDF format for free! Find your manual EVRX2006 - EVOLUTION and take your electronic device back in hand. On this page are published all the documents necessary for the use of your device. EVRX2006 by EVOLUTION.
USER MANUAL EVRX2006 EVOLUTION
HDMI® POE Receiver over Single Cat5e/Cat6 Cable

DEAR CUSTOMER
Thank you for purchasing this product.
For optimum performance and safety, please read these instructions carefully before connecting, operating or adjusting this product. Please keep this manual for future reference.
This product is 100% inspected and tested in the United States to verify HDMI performance parameters.
WARNING
- Do not expose this unit to water, moisture, or excessive humidity.
- Do not install or place this unit in a built-in cabinet, or other confined space without adequate ventilation.
- To prevent risk of electrical shock or fire hazard, due to overheating do not obstruct unit's ventilation openings.
- Do not install near any source of heat, including other units that may produce heat.
-
Do not place unit near flames.
-
Only clean unit with a dry cloth.
- Unplug unit during lightening storms or when not used for an extended period of time. A surge protector is strongly recommended.
- Protect the power cord from being walked on or pinched, particularly at the plugs.
- Use unit only with accessories specified by the manufacturer.
- Refer all servicing to qualified personnel.
CAUTION
HDMI is a very complex technology requiring continuous authentication of the signal and the same video resolution and audio settings on all electronic equipment in the system. When there are multiple sources and displays, the video resolution and audio setting on all connected units must be adjusted to correspond with that of the display having the lowest video and audio capability.
INTRODUCTION
The Evolution by Vanco EVRX2006 HDMI Receiver over Single Cat5e/6 with Bi-directional IR, auto EDID/EQ, and PoE receives high definition video and audio signals, IR, and power at a distance of up to 164ft/50m over a single Cat5e/6 cable. Power over Ethernet (PoE) Technology transmits power over Cat5e/6, allowing the Receiver to be powered without the use of a power supply. No EDID or EQ adjustments are necessary as the unit automatically adjusts for compatibility and gain. This receiver also features a newly redesigned slim and compact chassis for easy and flexible installations. This product fully supports DTS-HD and Dolby TrueHD audio formats, and is HDCP compliant. In addition, bi-directional IR pass-through allows for source or display control. The EVRX2006 works with Evolution Series Splitters, Matrix Selector Switches and Extender Transmitters over Cat5e/Cat6 that have POE functionality
Ultra Slim HDMI® POE Receiver over Single Cat5e/Cat6 Cable
Part # EVRX2006
- To be utilized with Evolution by Vanco matrix units, splitters, and extender transmitters that send HDMI signals over a single Cat5e/6 cable and feature Power over Ethernet (PoE) Technology
- Allows HDMI audio/video signals to be transmitted using a single Cat5e or Cat6 Cable
- Features Power over Ethernet (PoE) Technology which transmits power over Cat5e/Cat6; No power supply needed on the receiver end
- Slim and compact design
- Wide band Bi-directional IR system allowing for control of source or display (IR accessories included)
- Wideband IR signal from 20KHz to 60KHz
- Transmission Range: Extends HDMI transmission up to 50m (164ft) from the HDMI source at Full HD 1080p 24-bit color and 3D
• Features Auto EDID and EQ Management - Works with HDMI and HDCP compliant devices
- HDCP 2.0 compliant
• Pure uncompressed 7.1ch digital audio
• Supports DTS-HD and Dolby TrueHD high bit rate audio - Dimensions: 2.7" (68.58mm) W x .7" (17.78mm) H x 3.25" (82.55mm) D
SPECIFICATIONS
HDMI Compliance....HDMI Deep Color, Full 3D
HDCP Compliance....Yes
Video Bandwidth.... Single-link 165MHz [4.95Gbps]
Video Support....480i/480p/720p/1080i/1080p @60
HDMI over UTP....Full HD [1080P]-50m [165ft]; HD [720p/1080i]-80m [262ft]
Audio Support....Surround Sound [up to 7.1 ch] or stereo digital audio
Input TMDS Signal.... 1.2 Volts [peak to peak]
Input DDC Signal....5 Volts [peak to peak, TTL]
ESD protection....(1) Human body model +/- 6kV (air-gap discharge) & (contact discharge) (2) Core chipset - +/-8KV
PCB stack-up....4 layer board (impedance control – differential 100, single 50)
IR pass-thru....Full-duplex bi-directional
HDMI source control....Controllable via IR pass-through from RX to TX and from TX to RX with IR extenders or via CEC integrated
HDMI connector....Type A 19 pin female
RJ-45 connector......WE/SS 8P8C
LED indicators......Video lock yellow, Power, green
3.5mm connector....(TX and RX) IR Receiver/ IR blaster
Operation temperature....32-104 degrees F
Storage temperature....-4 - 140 degrees F
Relative humidity....20-90% RH (no condensation)
PACKAGE CONTENTS
• HDMI® POE Receiver EVRX2006
- IR TX
- IR RX
- Product Manual
PANEL DESCRIPTIONS
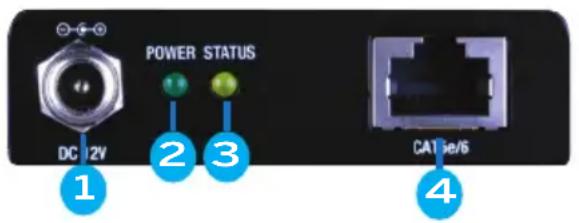

- DC 12V: Connect with power supply (Not necessary if used with compatible HDMI matrix or splitter with power.
- Power indicator light
- Status indicator light
- UTP IN: Connect to the matrix or splitter via CAT5e/ CAT6a cable.
- HDMI OUT: Connect with HDMI to display
- IR TX (see IR section for more information)
- IR RX (see IR section for more information)
CONNECTION DIAGRAM

HDMI over Cat5e/Cat6
CONNECT AND OPERATE
- Connect a source such as a Blu-Ray Player, game console, A/V Receiver, Cable or Satellite Receiver, etc. to the HDMI input on the compatible product.
- Connect a display such as an HDTV or HD Projector to the HDMI output on the Receiving unit.
- Connect a single Category 5e/6/7 up to 164ft/50m to the UTP output of the Transmitting unit, and the other end to the UTP input of the Receiving unit.
- Power on each device in the same sequence (receiver will already be powered when transmitting devise is plugged in and powered on)
At this point the display connected should display the connected source signal. If no signal is being displayed, connect a shorter Cat5e/6 cable (jumper or patch cable). If a display is having difficulty receiving a signal, access the display's menu and adjust the resolution (lowest to highest until signal is displayed). A 24 Hz or 30 Hz refresh rate may work better than 60 Hz or higher. Use the source remote at the receiver emitter to test IR functionality. If the IR remote function is not responding, check the emitters to ensure they are placed correctly and are plugged into the correct IR jacks on both the transmitting device and receiver.
EDID
The EVRX2006 is equipped with EDID management, however there is no need to adjust any dip switches or dials, the unit automatically reads the EDID from the display and save it internally. This feature was created for the installer in mind, for a plug and play installation!
IR
The bi-directional IR system allows you to control the source that is connected to the extender unit, from the display; or the display from the source, not simultaneously. There are two important things to note when setting up the IR system:
- The IR Receiver (IR RX) is always what you point your remote at to send an IR signal. This pigtail is placed at the display for controlling the source; or at the source for controlling the display.
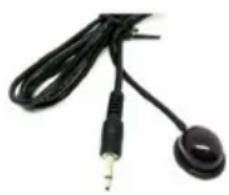
- The IR Blaster (IR TX) is what sends the IR signal to what you are intending to control, whether it's the source or the display. This pigtail is placed at the source; either pointed at the source, or placed on the front panel of the source, see below for placement tips. Or placed at the display to control the display from the source.
IR RECEIVER

natural_image
Two black cable connectors with connectors and a circular connector (no text or symbols visible)IR BLASTER
natural_image
Close-up of a black audio jack with a metallic connector and earband (no text or symbols visible)IR BLASTER (TX)
To control the source: Plug IR Blaster into IR TX port of transmitting unit (ex: EVSP1013) and place the transmitter in front of the IR eye of the source.
To control the display: Plug IR Blaster into IR TX port of the EVRX2006 and place the transmitter in front of the IR eye of the display.
Note: Placement of the IR Blaster is important and can result in the IR system not working if improperly placed.
First, locate the IR eye or window on the source
If placing the IR blaster right on the front panel of the source, do not stick right on top of the IR eye or IR window. The IR signal cannot travel through the double-sided tape on the Blaster. Instead place the blaster on either side, or on the top or bottom of the IR eye or window, with the tip of the blaster facing the IR eye or window. See below for illustration of where IR signal shoots from on IR Blaster:


IR RECEIVER (RX)
To control the source: Plug the IR Receiver into IR RX port of the EVRX2006 at or near the display.
To control the display: Plug IR Receiver into IR RX port of transmitting unit (ex: EVSP1013) and place receiver in position where it is able to receive remote signals.
NOTICE
- Vanco HDMI and Cat5e/6 cables are strongly recommended for use with this product to ensure best results.
- Incorrect placement of IR Transmitter and Receiver may result in the failure of the IR extenders. Please check carefully before plugging in the IR extender to the respective IR sockets. The transmission length is largely affected by the type of Cat5e/6 cables utilized, the type of HDMI sources, and the type of HDMI display. The testing result shows solid UTP cables (usually in the form of 300m [1,000ft] bulk cables) can transmit a lot longer signals than stranded UTP cables (usually in the form of fixed length patch cords). Shielded STP cables are better suited than unshielded UTP cables. A solid UTP Cat5e/6 cable shows longer transmission range than stranded STP Cat-6 cable. For long extension applications, use solid UTP/STP category cables.
- EIA/TIA-568-B termination (T568B) for Cat5e/6 cables is recommended for better performance.
- To reduce the interference among the unshielded twisted pairs of wires in Cat5e/6 cables, one can use shielded STP cables to improve EMI problems, which worsens in long cable transmission.
- The quality of Cat5e/6 cables can have a major effect on how long the transmission limit can achieve and quality of picture, the actual transmission range is subject to the Cat5e/6 cable utilized. For the best results, Cat6 is recommended.
- If your HDMI display has multiple HDMI inputs, it is found that the first HDMI input [HDMI input #1] generally can produce better transmission performance among all HDMI inputs.

Performance Guide for HDMI over Category Cable Transmission
| Performance rating | Type of category cable | |||
| Wiring | Shielding | CAT5 | CAT5e | CAT6 |
| Solid | Unshielded (UTP) | ★★★ | ★★★★ | ★★★★★ |
| Shielded (STP) | ★★★ | ★★★ | ★★★★ | |
| Stranded | Unshielded (UTP) | ★ | ★★ | ★★ |
| Shielded (STP) | ★ | ★ | ★★ | |
| Termination | Please use EIA/TIA-568-B termination (T568B) at any time | |||
TROUBLESHOOTING
- Best results are usually achieved when the source and display resolutions are the same. If resolutions differ, the extenders will try to adjust the signal to match the resolution of the HDTV with the lowest resolution. This will result in a picture with a lower resolution on the other HDTV sets.
- If you do not get audio and video, access the "setup" menu on the TV to adjust the audio and video settings. If the HDMI control circuit cannot establish a handshake, then there usually will be no audio or video in addition to a blue or black screen with a statement similar to "this protocol not supported" or "weak signal".
- If the above mentioned messages display, reset the receiver by disconnecting the power supply. You can also disconnect all of the HDMI and power cables, wait 15 minutes for any voltages to decay and then reconnect all of the cables.
- If you are still encountering issues, attempt the "hot-plug" concept. With all of the HDMI cables disconnected, turn on the source and plug in the HDMI cable into it's output, then power up the Vanco unit and plug the HDMI cable into it's input, finally turn on the display and plug the HDMI cable from the receiver into it. This activates all of the devices in corresponding order and results in a signal being plugged into a device that is on and will attempt to connect the signal.
- Most of the major source and display manufacturers employ a proprietary control channel to communicate between devices from the same manufacturer (CEC). Sometimes this can interfere with the HDMI control circuit or the authentication of the signal. Call the manufacturer if you experience this issue. Sometimes a player, an audio/video receiver, or a cable/satellite box may not have the latest software update, usually this can be downloaded from the manufacturer's website.
- If you have problems with the IR control circuit, make sure that the IR RX pigtail is plugged into extender receiver and pointed at the display, and the IR TX pigtail is attached to the extender sender and pointed at the source.
SAFETY AND NOTICE
The EVRX2006 has been tested for conformance to safety regulations and requirements, and has been certified for EVRX2006 should be used with care. Please read and follow the safety instructions to protect yourself from possible injury and to minimize the risk of damage to the unit.
- Follow all instructions and warnings marked on this unit.
- Do not attempt to service this unit yourself, except where explained in this manual.
- Provide proper ventilation and air circulation and do not use near water.
- Keep objects that might damage the device and assure that the placement of this unit is on a stable surface.
- Use only the power adapter and power cords and connection cables designed for this unit.
- Do not use liquid or aerosol cleaners to clean this unit.
• Always unplug the power to the device before cleaning.
LIMITED WARRANTY
With the exceptions noted in the next paragraph, Vanco warrants to the original purchaser that the equipment it manufactures or sells will be free from defects in materials and workmanship for a period of two years from the date of purchase. Should this product, in Vanco's opinion, prove defective within this warranty period, Vanco, at its option, will repair or replace this product without charge. Any defective parts replaced become the property of Vanco. This warranty does not apply to those products which have been damaged due to accident, unauthorized alterations, improper repair, modifications, inadequate maintenance and care, or use in any manner for which the product was not originally intended.
Items integrated into Vanco products that are made by other manufacturers, notably computer hard drives and liquid crystal display panels, are limited to the term of the warranty offered by the respective manufacturers. Such specific warranties are available upon request to Vanco. A surge protector, power conditioner unit, or an uninterruptible power supply must be installed in the electrical circuit to protect against power surges.
If repairs are needed during the warranty period the purchaser will be required to provide a sales receipt/sales invoice or other acceptable proof of purchase to the seller of this equipment. The seller will then contact Vanco regarding warranty repair or replacement.
TECHNICAL SUPPORT
In case of problems, please contact Vanco Technical Support by dialing 1-800-626-6445. You can also email technical support issues to techsupport@vanco1.com.
When calling, please have the Model Number, Serial Number (affixed to the bottom of the unit) and Invoice available for reference during the call.
Please read this Instruction Manual prior to calling or installing this unit, since it will familiarize you with the capabilities of this product and its proper installation.
All active electronic products are 100% inspected and tested to insure highest product quality and trouble-free installation and operation. The testing process utilizes the types of high-definition sources and displays typically installed for entertainment and home theater applications.
For additional information, such as helpful installation videos, etc. please visit www.vanco1.com
LIABILITY STATEMENT
Every effort has been made to ensure that this product is free of defects. The manufacturer of this product cannot be held liable for the use of this hardware or any direct or indirect consequential damages arising from its use. It is the responsibility of the user and installer of the hardware to check that it is suitable for their requirements and that it is installed correctly. All rights are reserved. No parts of this manual may be reproduced or transmitted by any form or means electronic or mechanical, including photocopying, recording or by any information storage or retrieval system without the written consent of the publisher.
Manufacturer reserves the right to revise any of its hardware and software following its policy to modify and/or improve its products where necessary or desirable. This statement does not affect the legal rights of the user in any way.

- DEAR CUSTOMER
- This product is 100% inspected and tested in the United States to verify HDMI performance parameters.
- WARNING
- CAUTION
- INTRODUCTION
- Ultra Slim HDMI® POE Receiver over Single Cat5e/Cat6 Cable
- Part # EVRX2006
- SPECIFICATIONS
- PACKAGE CONTENTS
- PANEL DESCRIPTIONS
- CONNECTION DIAGRAM
- CONNECT AND OPERATE
- EDID
- IR
- IR BLASTER (TX)
- IR RECEIVER (RX)
- NOTICE
- TROUBLESHOOTING
- SAFETY AND NOTICE
- LIMITED WARRANTY
- TECHNICAL SUPPORT
- LIABILITY STATEMENT
Brand : EVOLUTION
Model : EVRX2006
Category : Audio/video converter